
Create successful ePaper yourself
Turn your PDF publications into a flip-book with our unique Google optimized e-Paper software.
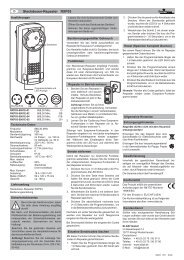
Holiday <strong>Timer</strong><br />
With the holiday timer, you have the possibility to activate<br />
the switching times programmed for Sundays at the push of<br />
a button.<br />
MO TU WE TH FR SA SO<br />
W<br />
AUTO<br />
W<br />
HOLI<br />
S/W DEL<br />
MO TU WE TH FR SA SU<br />
AUTO<br />
Holiday timer<br />
Lowering/Raising Shutters/Awnings<br />
with the Touch of a Button<br />
In all operating modes (see B1), you can raise and lower<br />
the shutters/awnings manually at the push of a button.<br />
If the shutter/awning raises/lowers time-controlled, you can<br />
stop this manually by briefly pressing the<br />
button.<br />
The current radio channel is permanently displayed with<br />
bar symbols in the top part of the display.<br />
After initially pressing the CH/CLOCK button, the current<br />
radio channel (CH) is displayed at first.<br />
HOLI<br />
S/W DEL<br />
B3<br />
If you activate the holiday timer before 18:00 hrs, it<br />
is automatically deactivated at midnight (24:00 hrs)<br />
on the same day.<br />
If you activate the holiday timer after 18:00, it is first<br />
automatically deactivated at midnight (24:00) the<br />
next day.<br />
In the operating mode »automatic operation with<br />
holiday timer«, the holiday timer is deactivated with<br />
a random difference of 15 minutes.<br />
MO TU WE TH FR SA SO<br />
W<br />
MANU<br />
W<br />
MANU MO TU WE TH FR SA SO<br />
W<br />
MANU MO TU WE TH FR SA SO<br />
W<br />
CH<br />
CLOCK<br />
MO TU WE TH FR SA SO<br />
W<br />
MANU<br />
Channel 1<br />
MANU MO TU WE TH FR SA SO<br />
W<br />
C<br />
<strong>Radio</strong> Channel Selection<br />
Channel 2<br />
MANU MO TU WE TH FR SA SO<br />
W<br />
MANU<br />
MO TU WE TH FR SA SO<br />
CH<br />
CLOCK<br />
after 3 seconds<br />
Within 3<br />
seconds<br />
Channel 3<br />
Channel 4<br />
Channels 1-4 (groups function)<br />
UP STOP DOWN<br />
(Raise) (Lower)<br />
Reset (Delete Data Completely)<br />
You have the possibility to delete all saved data completely<br />
and restore the default settings or re-program the radio<br />
timer:<br />
Besides the basic settings shown here, the two switching<br />
times stated in B2 are preset.<br />
� Repeat the steps for initial operation<br />
( see A1, A2, A4).<br />
Re-program the switching times for automatic operation<br />
(see B2) .<br />
Troubleshooting<br />
MO TU WE TH FR SA SO<br />
W<br />
MANU<br />
MO TU WE TH FR SA SO<br />
W<br />
MANU<br />
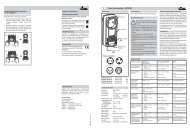
Changing the Battery<br />
ESC HOLI<br />
S/W DEL<br />
> 3 seconds<br />
� If the symbol blinks: Exchange the batteries.<br />
� If there is no visible display: check the battery<br />
polarity or exchange the battery.<br />
� If the control does not react to pressing buttons in<br />
manual operation: re-enter the radio channels of the<br />
radio timer in the radio controls.<br />
� If the control does not react to the programmed<br />
switching commands in automatic operation: check<br />
whether the radio timer is in the operating mode<br />
»automatic operation«. Check the programmed<br />
switching times. If necessary, re-enter the radio<br />
channels of the radio timer in the radio controls.<br />
+<br />
The battery capacity is shown in the display with the<br />
symbol . If the complete battery symbol blinks, you<br />
have to exchange the battery.<br />
� Press the radio timer together in the center on the top<br />
and the bottom and pull it out of the wall mount.<br />
� Exchange the battery. Only use batteries of the type<br />
CR2032. Observe the correct polarity!<br />
�<br />
Replace the timer in the wall mount. The stop latches<br />
have to snap into place.<br />
The clock has a power reserve of some minutes. If<br />
the radio timer is without voltage supply for a longer<br />
period, you have to reset the time (see A1).<br />
However, the programmed switching times (see B2) and<br />
saved propagating times (see A4) are maintained in case<br />
of a voltage cutout.<br />
Attention! Keep batteries out of the range of children!<br />
Technical Data<br />
Frequency:<br />
868,30 MHz<br />
Modulation:<br />
FSK<br />
Voltage supply:<br />
1x3V- battery,CR2032<br />
Power consumption:<br />
- Static current approx. 12 µA<br />
- Transmission current approx. 13 mA<br />
Operating temperature:<br />
0°C to 50°C<br />
Range:<br />
- with good free field conditions approx. 100 m<br />
- in buildings approx. 30 m<br />
Dimensions: approx. 80x80x16mm<br />
Weight: approx. 50 g<br />
Disposal Notices<br />
Dispose of the spent batteries in a designated container<br />
for spent batteries or via the specialized retail trade.<br />
Dispose of the packaging material in collection containers<br />
for paper, cardboard and plastics.<br />
Warranty<br />
Conformity<br />
Dispose of the obsolete device via a collection<br />
point for electronic scrap or your retailer.<br />
Obsolete appliances and batteries may not be<br />
disposed of in the household waste!<br />
Within the statutory warranty period, we remedy defects<br />
of the device due to material or production defects free of<br />
charge by means of repair or exchange.<br />
The warranty expires in case of external modifications/interference.<br />
The product fulfils the essential demands of the<br />
R&TTE directive<br />
1999/5/EG.<br />
For application in:<br />
EU/CH/FL/IS/N<br />
The Declaration of Conformity can be found on the Internet<br />
at: www.eldat.de.<br />
Customer Service<br />
Should defects/errors occur despite accurate handling, or<br />
if your device was damaged, please contact your retailer<br />
or the following address:<br />
<strong>ELDAT</strong> GmbH<br />
Im Gewerbepark 14<br />
15711 Zeesen<br />
Germany<br />
Phone: + 49 (0) 33 75 / 90 37-0<br />
Telefax: + 49 (0) 33 75 / 90 37-90<br />
Internet: www.eldat.de<br />
E-mail: info@eldat.de<br />
76180 0207 GB<br />
Safety Notices<br />
<strong>RTS06</strong>-5004E-01<br />
Please read these instructions carefully before<br />
commissioning the product!<br />
We shall not be liable for damage to objects or<br />
persons caused by non-compliance with these operating<br />
instructions and especially with the safety notices!<br />
Also observe the operating instructions of the devices to<br />
be controlled!<br />
The automatic control of systems or devices that need to<br />
be supervised is not permitted. Do not modify the radio<br />
timer yourself!<br />
Have radio timers that do not function checked by the<br />
manufacturer!<br />
Intended Use<br />
The radio timer <strong>RTS06</strong> was exclusively developed and<br />
manufactured for the time-controlled switching of devices<br />
with Easywave radio controls.<br />
The manufacturer shall not be liable for damage caused<br />
by improper or unauthorized use.<br />
Function<br />
<strong>RTS06</strong> <strong>Radio</strong> <strong>Timer</strong><br />
ESC<br />
General Notices<br />
MODE<br />
PROG<br />
ADJ<br />
HOLI<br />
S/W DEL<br />
CH<br />
OK CLOCK<br />
The radio timer works in the 868 MHz range, which is also<br />
used by other radio services. Therefore, other devices<br />
that work on the same or a neighboring frequency may<br />
impair the operation and the range of the timer.<br />
The received power of the radio controls to be activated<br />
may be influenced by several factors:<br />
�<br />
�<br />
�<br />
�<br />
GB<br />
Installation site<br />
Unscreened devices and systems<br />
Other transmitters in the frequency range<br />
Weather conditions and similar<br />
In case of interferences that cannot be remedied, contact<br />
an expert workshop or the manufacturer.<br />
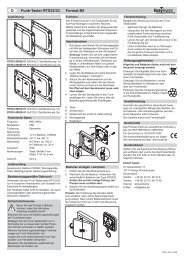
The radio timer <strong>RTS06</strong> is a wall-mounted batteryoperated<br />
radio timer (surface-mounted) for the timecontrolled<br />
switching of Easywave radio controls (function<br />
range: UP / STOP / DOWN), e.g. electric-drive shutters,<br />
awnings and illumination.<br />
The radio timer has four individually coded radio<br />
channels so that four different radio telegrams can be<br />
sent to control four devices or groups individually.<br />
Additionally, it is possible to transmit the four different<br />
radio telegrams together (with a delay of approx. 0.5<br />
seconds per channel) and therefore activate all four<br />
devices or groups simultaneously (group function).<br />
The following four operating modes are available:<br />
� Manual operation (factory setting)<br />
� Automatic operation<br />
� Automatic operation with temporary manual operation<br />
� Automatic operation with holiday timer<br />
The following functions can be programmed in the three<br />
automatic operating modes:<br />
� 24-h switching period (day function) or 1 week (week<br />
function),<br />
� individual switching times for each radio channel as well<br />
as for each weekday or different weekdays (Monday to<br />
Friday and Saturday/Sunday)<br />
� Raising and lowering shutters and awnings to<br />
intermediate positions.<br />
With a holiday setting, the switching times programmed for<br />
Sundays can be activated on holidays with only one push<br />
of a button.<br />
The clock can also be changed from wintertime to daylight<br />
saving time with one push of a button.<br />
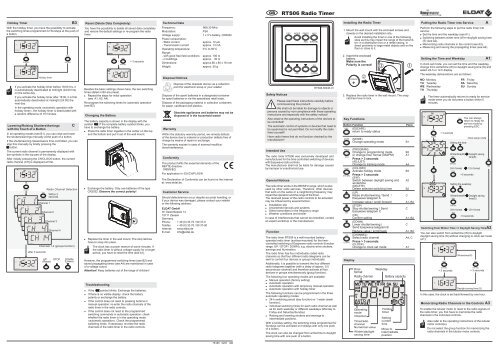
Installing the <strong>Radio</strong> <strong>Timer</strong><br />
1. Mount the wall mount with the enclosed screws and<br />
dowels on the desired installation site.<br />
Avoid installing the timer in one of the following<br />
sites as this may impair the range of the transmitter:<br />
in a distribution box or a metal casing, in<br />
direct proximity to large metal objects and on the<br />
floor or close to it.<br />
2. Insert the enclosed<br />
battery.<br />
Make sure the<br />
Polarity is correct!<br />
3.<br />
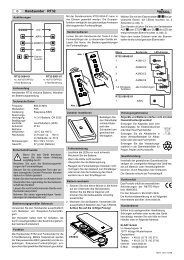
Key Functions<br />
Button Function<br />
Point<br />
ESC (ESCAPE)<br />
return to ready status<br />
MODE<br />
PROG<br />
ADJ<br />
HOLI<br />
S/W DEL<br />
OK<br />
CH<br />
CLOCK<br />
CR2032<br />
Display<br />
+<br />
Replace the radio timer in the wall mount. The snap<br />
catches have to lock.<br />
(MODE)<br />
Change operating mode<br />
B1<br />
(PROGRAM)<br />
Change to programming mode B2<br />
or change hour format (AM/PM) A1<br />
Press > 3 seconds:<br />
(ADJUST)<br />
Change to training mode<br />
A4<br />
(HOLIDAY)<br />
Activate holiday mode<br />
B3<br />
Press > 3 seconds:<br />
(S/W)<br />
Switch between daylight saving and A2<br />
wintertime<br />
(DELETE)<br />
Delete selected switching time<br />
B2<br />
(UP)<br />
Raise shutter/awning / Send / C<br />
Easywave telegram A<br />
Increase value / scroll forward<br />
A1, B2<br />
(STOP)<br />
Stop shutter/awning / Send<br />
C<br />
Easywave telegram C<br />
(OK)<br />
Confirm setting<br />
A1, B2<br />
(DOWN)<br />
Lower shutter/awning /<br />
C<br />
Send Easywave telegram B<br />
Reduce value / scroll back<br />
A1, B2<br />
(CHANNEL)<br />
Select radio channel<br />
A4, C<br />
Press > 3 seconds:<br />
(CLOCK)<br />
Change to clock set mode<br />
A1<br />
Hourformat<br />
<strong>Radio</strong> channel<br />
MO TU WE TH FR SA SU<br />
AM<br />
PM<br />
W<br />
S<br />
AUTO<br />
MANU<br />
Operating<br />
mode<br />
Direction<br />
Time/radio<br />
channel<br />
Numerical value<br />
Winter/daylight<br />
saving time<br />
Weekday<br />
Battery capacity<br />
Holiday<br />
timer<br />
Setting<br />
current<br />
time<br />
Move to<br />
intermediate<br />
position<br />
Putting the <strong>Radio</strong> <strong>Timer</strong> into Service<br />
Perform the following steps to put the radio timer into<br />
service:<br />
� Set the time and the weekday (see A1) ,<br />
� Switching between winter time (W)daylight saving time<br />
(S) (see A2) ,<br />
� Memorizing radio channels in the control (see A3) ,<br />
� Measuring and saving the propagating times (see A4) .<br />
Setting the Time and Weekday<br />
A1<br />
In clock set mode, you can set the time and the weekday,<br />
change from wintertime (W) to daylight saving time (S) and<br />
select 24-h or 12-h display.<br />
The weekday abbreviations are as follows:<br />
MO<br />
TU<br />
WE<br />
TH<br />
Monday<br />
Tuesday<br />
Wednesday<br />
Thursday<br />
FR<br />
SA<br />
SU<br />
Friday<br />
Saturday<br />
Sunday<br />
The timer automatically returns to ready for service<br />
mode when you do not press a button within 5<br />
minutes.<br />
MO TU WE TH FR SA SO<br />
W<br />
MANU<br />
MO TU WE TH FR SA SO<br />
W<br />
W<br />
CH<br />
CLOCK<br />
OK<br />
MO TU WE TH FR SA SO<br />
Switching from Winter Time Daylight Saving TimeA2<br />
You can also switch from wintertime (W) to daylight<br />
daylight saving time (S) without changing to clock set mode<br />
(A1):<br />
MO TU WE TH•FR<br />
SA SO<br />
W<br />
MANU<br />
MO TU WE TH FR SA SO<br />
S<br />
MANU<br />
>3seconds<br />
HOLI<br />
S/W DEL<br />
> 3 seconds<br />
Setting the time:<br />
Wintertime(W) Daylight saving<br />
HOLI<br />
time(S)<br />
S/W DEL<br />
24-h format 12-h format<br />
Prog<br />
Setting the weekday:<br />
Wintertime(W) Daylight saving<br />
HOLI<br />
time(S)<br />
S/W DEL<br />
24-h format 12-h format<br />
Prog<br />
You can always<br />
return to ready for<br />
service mode by<br />
pressing ESC.<br />
Wintertime(W)<br />
Clock setup mode<br />
HOLI<br />
S/W DEL<br />
> 3 seconds<br />
Daylight saving time (S)<br />
In this case, the clock is set back/forward by one hour.<br />
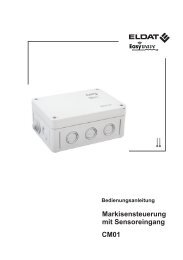
Memorizing <strong>Radio</strong> Channels in the Controls<br />
A3<br />
To enable the tubular motor to react to the radio signals of<br />
the radio timer, you first have to memorize the radio<br />
channels in the individual controls.<br />
Also refer to the operating instructions of the tubular<br />
motor control(s).<br />
Do not select the group function for memorizing the<br />
radio channels in the tubular motor controls.<br />
ESC<br />
>3 seconds<br />
>3 seconds<br />
A<br />
OK
Situation a): Memorizing the radio<br />
timer as the first transmitter in the<br />
tubular motor control<br />
1. Tubular motor: Activate the<br />
supply voltage<br />
The tubular motor rotates in both<br />
directions for 1 second each.<br />
1 second<br />
1 second<br />
2. New radio timer:<br />
Select the desired radio channel.<br />
MO TU WE TH FR SA SO<br />
W<br />
MANU<br />
W<br />
CH<br />
MO TU WE TH FR SA SO<br />
MO TU WE TH FR SA SO<br />
MANU MO TU WE TH FR SA SO<br />
W<br />
MANU MO TU WE TH FR SA SO<br />
W<br />
3. New radio timer:<br />
3.1 Rotation direction of the motor clockwise,<br />
when retracting the awning.<br />
or<br />
The tubular motor rotates in both<br />
directions for 1 second each.<br />
CH<br />
MANU MO TU WE TH FR SA SO<br />
ESC MODE PROG HOLI<br />
ADJ S/W DEL<br />
W<br />
Within 3<br />
seconds<br />
Channel 1<br />
Channel 2<br />
MANU MO TU WE TH FR SA SO<br />
CH<br />
OK CLOCK<br />
W<br />
MANU<br />
Channel 3<br />
Channel 4<br />
Channels 1-4<br />
(group function)<br />
3.2 Rotation direction of the motor counterclockwise,<br />
when retracting the awning.<br />
ESC MODE PROG HOLI<br />
ADJ S/W DEL<br />
CH<br />
OK CLOCK<br />
motor cable<br />
motor cable<br />
Situation b): Memorizing the radio<br />
timer when a manual transmitter is<br />
already memorized in the tubular<br />
motor control<br />
2. Already memorized manual transmitter:<br />
3. Already memorized manual transmitter:<br />
Situation c): Memorizing a manual<br />
transmitter if a radio timer is already<br />
memorized in the tubular motor control<br />
2. Already memorized radio timer:<br />
4. New radio timer:<br />
4. New manual transmitter:<br />
4. New radio timer:<br />
Situation d): Memorizing the radio<br />
timer if a radio timer is already<br />
memorized in the tubular motor control<br />
1. New <strong>Radio</strong> <strong>Timer</strong>:<br />
1. Already memorized radio timer: 1. New and already memorized radio timer:<br />
Select the desired radio channel.<br />
Select the desired radio channel.<br />
Select the desired radio channel.<br />
MO TU WE TH FR SA SO<br />
W<br />
MANU<br />
W<br />
CH<br />
MO TU WE TH FR SA SO<br />
MO TU WE TH FR SA SO<br />
MANU MO TU WE TH FR SA SO<br />
W<br />
MANU MO TU WE TH FR SA SO<br />
W<br />
5 seconds<br />
The tubular motor rotates in both<br />
directions for 1 second each.<br />
1 second<br />
The tubular motor rotates in both<br />
directions for 1 second each.<br />
1 second<br />
within<br />
5 seconds<br />
The tubular motor rotates in both<br />
directions for 1 second each.<br />
CH<br />
MANU MO TU WE TH FR SA SO<br />
CH<br />
W<br />
Within 3<br />
seconds<br />
Channel 1<br />
Channel 2<br />
MANU MO TU WE TH FR SA SO<br />
W<br />
MANU<br />
Channel 3<br />
Channel 4<br />
Channels 1-4<br />
(group function)<br />
then<br />
within<br />
5 Sekunden<br />
MO TU WE TH FR SA SO<br />
W<br />
MANU<br />
W<br />
CH<br />
MO TU WE TH FR SA SO<br />
MO TU WE TH FR SA SO<br />
MANU MO TU WE TH FR SA SO<br />
W<br />
MANU MO TU WE TH FR SA SO<br />
W<br />
5 seconds<br />
The tubular motor rotates in both<br />
directions for 1 second each.<br />
1 second<br />
1 second<br />
2. Already memorized radio timer:<br />
3. Already memorized radio timer:<br />
3. Already memorized radio timer:<br />
within<br />
5 seconds<br />
The tubular motor rotates in both<br />
directions for 1 second each.<br />
The tubular motor rotates in both<br />
directions for 1 second each.<br />
CH<br />
MANU MO TU WE TH FR SA SO<br />
W<br />
ESC MODE PROG HOLI<br />
Within 3<br />
seconds<br />
Channel 1<br />
Channel 2<br />
MANU MO TU WE TH FR SA SO<br />
ADJ S/W DEL<br />
CH<br />
OK<br />
CLOCK<br />
ESC MODE PROG HOLI<br />
ADJ S/W DEL<br />
CH<br />
_<br />
+ OK<br />
CLOCK<br />
W<br />
MANU<br />
Channel 3<br />
Channel 4<br />
Channels 1-4<br />
(group function)<br />
within<br />
5 Sekunden<br />
MO TU WE TH FR SA SO<br />
W<br />
MANU<br />
W<br />
CH<br />
MO TU WE TH FR SA SO<br />
MO TU WE TH FR SA SO<br />
MANU MO TU WE TH FR SA SO<br />
W<br />
MANU MO TU WE TH FR SA SO<br />
W<br />
5 seconds<br />
The tubular motor rotates in both<br />
directions for 1 second each.<br />
1 second<br />
within<br />
5 seconds<br />
The tubular motor rotates in both<br />
directions for 1 second each.<br />
The tubular motor rotates in both<br />
directions for 1 second each.<br />
CH<br />
MANU MO TU WE TH FR SA SO<br />
ESC MODE PROG HOLI<br />
OK<br />
W<br />
Within 3<br />
seconds<br />
Channel 1<br />
Channel 2<br />
MANU MO TU WE TH FR SA SO<br />
ADJ S/W DEL<br />
CH<br />
CLOCK<br />
CH<br />
_<br />
+ OK<br />
CLOCK<br />
W<br />
MANU<br />
then<br />
ESC MODE PROG HOLI<br />
ADJ S/W DEL<br />
then<br />
ESC MODE PROG HOLI<br />
ESC MODE PROG HOLI<br />
ADJ S/W DEL<br />
OK CLOCK<br />
OK<br />
CLOCK<br />
ADJ S/W DEL<br />
CH<br />
Channel 3<br />
Channel 4<br />
Channels 1-4<br />
(group function)<br />
within<br />
5 Sekunden<br />
1 second<br />
Measuring and Saving the Propagating Times<br />
For intermediate positioning in automatic mode, the radio<br />
timer has to measure and save the propagating time for<br />
raising and lowering the shutter/awning assigned to the<br />
radio channel once for each channel (»reference drive«).<br />
�<br />
�<br />
� Press the button until the shutter/awning has<br />
moved to the top end position without interruption,<br />
then let go of the button.<br />
The radio timer measures and saves the time<br />
required to raise the shutter/awning.<br />
�<br />
�<br />
MO TU WE TH FR SA SO<br />
W<br />
MANU<br />
PROG<br />
ADJ<br />
By pressing the shutter/awning to the top end<br />
position .<br />
When the shutter/awning is in the top end<br />
position:<br />
Press the button until the shutter/awning has<br />
moved to the bottom end position, then let go of<br />
the button.<br />
The radio timer measures and saves the time<br />
required to lower the shutter/awning.<br />
Repeat the two reference drives for the remaining radio<br />
channels / for additional shutters/ awnings.<br />
ESC Briefly press ESC to leave the reference drive<br />
fmode and return to ready for service mode.<br />
Raising/Lowering Shutters/Awnings<br />
Time-Controlled<br />
Changing the Operating Mode<br />
The radio timer has altogether four different operating<br />
modes:<br />
� Manual operation (factory setting): Shutters and<br />
awnings can only be raised and lowered manually,<br />
meaning by pushing a button. The programmed<br />
switching times are deactivated.<br />
� Automatic operation: Shutters and blinds can be raised<br />
and lowered either time-controlled or manually.<br />
� Automatic operation with temporary manual<br />
operation:<br />
After switching to this operating mode, the programmed<br />
switching times are deactivated until midnight (24 hrs).<br />
Afterwards, the radio timer switches independently to<br />
automatic mode. This serves to prevent the automatic<br />
lowering of a shutter on a summer evening on the<br />
terrace, for example.<br />
� Automatic operation with holiday mode:<br />
Shutters/awnings are raised or lowered according to a<br />
randomly generated time difference to the programmed<br />
times of the automatic operation mode (max. 15 min).<br />
This lets your house appear inhabited in your absence.<br />
With the MODE button, you can switch between the four<br />
operating modes:<br />
Manual<br />
operation<br />
> 3 seconds<br />
MO TU WE TH FR SA SO<br />
MO TU WE TH FR SA SO<br />
MO TU WE TH FR SA SO<br />
MANU<br />
Automatic<br />
operation<br />
MO TU WE TH FR SA SO<br />
W<br />
Automatic operation<br />
with temporary<br />
manual operation<br />
MO TU WE TH FR SA SO<br />
W<br />
AUTO<br />
CH<br />
CLOCK<br />
Channel 1<br />
MO TU WE TH FR SA SO<br />
Automatic operation<br />
with holiday timer<br />
W<br />
AUTO<br />
MANU<br />
Select<br />
channel<br />
Channel 2<br />
Channel 3<br />
Channel 4<br />
MO TU WE TH FR SA SO<br />
W<br />
AUTO<br />
Reference drive mode<br />
MODE<br />
MO TU WE TH FR SA SO<br />
MODE<br />
MODE<br />
B<br />
B1<br />
MODE<br />
Programming Switching Times<br />
The operating modes »automatic operation«, »automatic<br />
operation with temporary manual operation« and<br />
»automatic operation with holiday timer« enable the timecontrolled<br />
raising and lowering of shutters and awnings.<br />
In programming mode, you can<br />
� display the programmed switching times and,<br />
� program new switching times,<br />
� change programmed switching times,<br />
� delete programmed switching times.<br />
W<br />
AUTO<br />
Program new<br />
switching time<br />
MO TU WE TH FR SA SU<br />
AUTO<br />
PROG<br />
ADJ<br />
AUTO<br />
MO TU WE TH FR SA SU<br />
AUTO<br />
AUTO<br />
Change<br />
switching<br />
time<br />
ESC<br />
Free<br />
memory slots<br />
MO TU WE TH FR SA SU<br />
Next/previous<br />
switching time<br />
HOLI<br />
Delete<br />
switching<br />
time<br />
Change<br />
time<br />
You can return to ready for service mode at any time<br />
by pressing ESC<br />
MO TU WE TH FR SA SU<br />
Channel<br />
OK OK S/W DEL<br />
OK OK<br />
MO TU WE TH FR SA SU<br />
AUTO<br />
MO TU WE TH FR SA SU<br />
AUTO<br />
OK<br />
OK<br />
Select<br />
weekday(s)<br />
Select radio<br />
channel<br />
CH<br />
CLOCK<br />
> 3 Seconds<br />
AUTO<br />
OK<br />
B2<br />
The radio timer features two default switching times:<br />
� Raising the shutter/awning from Monday through<br />
Sunday at 7:00 hrs to the end position for radio channel<br />
1.<br />
� Lowering the shutter/awning Monday through Sunday at<br />
21:00 hrs to the end position for radio channel 1.<br />
You can program altogether 30 switching times. Once all<br />
memory slots are occupied, the display shows the message<br />
FULL:<br />
MO TU WE TH FR SA SO<br />
AUTO<br />
AUTO<br />
If move to intermediate position is programmed,<br />
the shutter/awning first moves to an end position<br />
and then to the desired intermediate position.<br />
With the weekdays,<br />
you have the following selection<br />
options:<br />
MO Monday<br />
TU Tuesday<br />
WE Wednesday<br />
TH Thursday<br />
FR Friday<br />
SA Saturday<br />
SU Sunday<br />
If the radio timer was set to 12-hr display (see A 1),<br />
the switching times are also displayed in 12-hr<br />
format (with AM/PM symbol).<br />
If no button is pressed for 5 minutes, the radio<br />
timer returns to ready for service mode.<br />
AUTO<br />
Lower<br />
No<br />
HOLI<br />
S/W DEL<br />
AUTO<br />
MO TU WE TH FR SA SU<br />
AUTO<br />
MO TU WE TH FR SA SU<br />
Lower Raise<br />
Simultaneously<br />
+<br />
Move to<br />
intermediate position<br />
MO TU WE TH FR SA SU<br />
AUTO<br />
Yes<br />
Display switching times<br />
Value for intermediate<br />
position<br />
(if programmed)<br />
Edit switching times<br />
Select value for intermediate position<br />
0% = bottom end position<br />
100% = top end position<br />
MO TU WE TH FR SA SU<br />
AUTO<br />
Raise<br />
MO TU WE TH FR SA SU<br />
Is " move to<br />
intermediate position"<br />
programmed?<br />
MO-FRMonday<br />
to Friday<br />
SA - SU Saturday and Sunday<br />
MO-SUdaily<br />
(daily function)<br />
MO TU WE TH FR SA SU<br />
AUTO