Lionel 600 N&W J 4-8-4 steam locomotive Owner's Manual
Lionel 600 N&W J 4-8-4 steam locomotive Owner's Manual
Lionel 600 N&W J 4-8-4 steam locomotive Owner's Manual

Create successful ePaper yourself
Turn your PDF publications into a flip-book with our unique Google optimized e-Paper software.
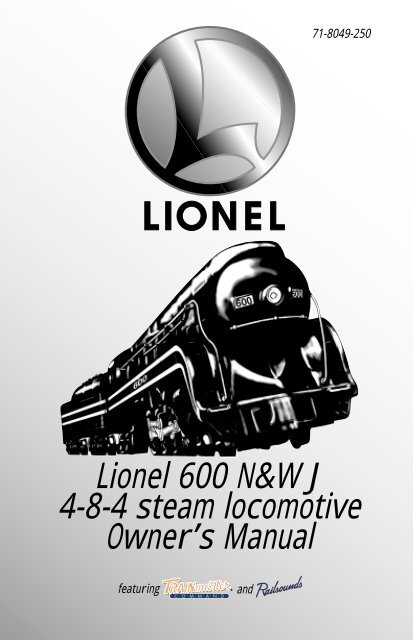
71-8049-250<br />
<strong>Lionel</strong> <strong>600</strong> N&W J<br />
4-8-4 <strong>steam</strong> <strong>locomotive</strong><br />
Owner’s <strong>Manual</strong><br />
featuring<br />
®<br />
and
Congratulations!<br />
You own one of the most sophisticated<br />
model trains ever built—the <strong>Lionel</strong><br />
TrainMaster ® Command-equipped J-class<br />
4-8-4 <strong>steam</strong> <strong>locomotive</strong>. From the crisp<br />
detail and weathered decoration outside<br />
to the advanced technology and brute<br />
power within the boiler, the <strong>Lionel</strong><br />
Class J 4-8-4 is ready for duty on your<br />
model railroad. Experience the superiority<br />
of today’s <strong>Lionel</strong>.<br />
• Powerful Pullmor ® motor<br />
• Liontech Command TM<br />
LCRU2 reverse unit for<br />
use with the <strong>Lionel</strong><br />
TrainMaster ® Command TM<br />
model railroad control<br />
system<br />
• Railsounds TM <strong>steam</strong> sound<br />
system—digital samples<br />
from a real Class J 4-8-4<br />
<strong>steam</strong> <strong>locomotive</strong><br />
• Smoke generator that<br />
produces clean, safe,<br />
and realistic smoke<br />
• Magne-Traction ®<br />
• Die-cast magnetic<br />
tender coupler<br />
• Brilliant headlight<br />
Table of contents<br />
Transformer operations<br />
Running your <strong>Lionel</strong> J with a <strong>Lionel</strong> transformer 3<br />
Locking your J into a single operational state 4<br />
Using your J’s magnetic tender coupler 4<br />
Your J’s RailSounds system—the basics 5<br />
Experiencing the range of your J’s Railsounds system 6<br />
Notes on Railsounds 6<br />
Installing the <strong>Lionel</strong> sound activation button 7<br />
TrainMaster Command operations<br />
Your J in the TrainMaster Command environment 8<br />
CAB-1 commands for your J 9<br />
Railsounds in the Command environment 9<br />
CAB-1 numeric keypad commands for your J 10<br />
Tuning your J’s performance 11<br />
Your J’s digital communication antenna 11<br />
Assigning your J a new ID# 12<br />
Maintaining and servicing your J<br />
Lubricating your J 13<br />
Adding fluid to your J’s smoke generator 14<br />
Replacing your J’s lamp 15<br />
<strong>Lionel</strong> Service 15<br />
2
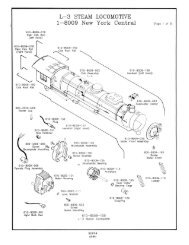
Transformer operations<br />
Running your <strong>Lionel</strong> J with a <strong>Lionel</strong> transformer<br />
1<br />
Place your J on <strong>Lionel</strong> or <strong>Lionel</strong>-compatible<br />
O gauge track.<br />
• Note the pull of Magne-Traction ® between your J and the steel<br />
track. Magnetized wheels and axles increase pulling power (more<br />
than 25 cars on straight and level track) and keep your J on track<br />
while passing swiftly through curves.<br />
• With track power OFF, connect the<br />
<strong>locomotive</strong> tether between the<br />
engine and tender. The six-pin tender<br />
plug connects with the six-pin receptacle<br />
on the <strong>locomotive</strong>. Feed any<br />
excess tether into the tender. Connect<br />
the drawbar between <strong>locomotive</strong><br />
and tender.<br />
2 Power up your J with your transformer.<br />
Note!<br />
• Your J is designed to operate on 5-15 volts alternating current.<br />
Virtually all <strong>Lionel</strong> and <strong>Lionel</strong>-compatible alternating-current<br />
transformers are suitable; we recommend the TrainMaster<br />
Command model railroad control system.<br />
• DO NOT POWER YOUR J WITH DIRECT CURRENT (DC). Damage to sensitive<br />
electronic components may occur.<br />
• When you first power up your track, the J will wait between 3 and<br />
8 seconds as it “listens” for digital language from the TrainMaster<br />
Command Base (available separately). When it’s determined that<br />
it’s on a conventional (nonCommand) railroad, the J’s headlight<br />
will illuminate and Railsounds will fire up. At this point, the J is in<br />
neutral. (This occurs when placing the J on your railroad for the<br />
first time. Thereafter, it starts in forward after every three-second<br />
power interrupt.)<br />
3 Move ‘em out!<br />
• Get your J moving. Press the DIR button on your CAB-1 remote or<br />
<strong>Lionel</strong> transformer. This sequences the Liontech Command reverse<br />
unit (LCRU2) to the next operating state.<br />
• Adjust track voltage until your J moves at your desired speed.<br />
3
Transformer operations<br />
Locking your J into a single operational state<br />
To select a single operational state for<br />
your <strong>Lionel</strong> <strong>600</strong> J (example: forward<br />
only), you can deactivate the LCRU2’s<br />
sequencing function with the reverse<br />
unit control switch, located underneath<br />
the cab of the J.<br />
Get your <strong>locomotive</strong> moving in the<br />
desired direction, then slow it down<br />
without stopping. Set the reverse unit<br />
control switch to PROGRAM/LOCK.<br />
The J is now “locked” into your chosen<br />
direction.<br />
When you no longer want singledirection<br />
operation, just slide the<br />
reverse unit control switch back to<br />
FORWARD/ RUN.<br />
PROGRAM/LOCK<br />
Use this setting to choose<br />
a single operational state like<br />
“forward.”<br />
FORWARD/RUN<br />
Use this setting for<br />
normal operations.<br />
Using your J’s magnetic tender coupler<br />
Your J is equipped with a magnetic<br />
die-cast knuckle coupler, a revolutionary<br />
design first introduced by<br />
<strong>Lionel</strong> in 1950.<br />
<strong>Lionel</strong> magnetic couplers react to the<br />
magnetic field generated by a <strong>Lionel</strong><br />
remote-control track section (available<br />
separately). Place the coupler’s “trigger<br />
disc” over the remote-control track’s coil<br />
and press uncouple on the controller. The<br />
magnetic field pulls the disc downward,<br />
and the coupler opens.<br />
4
Your J’s Railsounds system—the basics<br />
<strong>Lionel</strong> Railsounds is the most realistic<br />
model railroad sound system in the<br />
world. Your<br />
J features digital<br />
samples<br />
from a real-life<br />
Class J 4-8-4<br />
for the ultimate<br />
in realism.<br />
Begin by installing<br />
a 9-volt<br />
alkaline battery<br />
in the tender.<br />
This ensures<br />
full-feature<br />
operation of<br />
Railsounds.<br />
Remove the<br />
screw located<br />
at each end of<br />
the tender frame. Lift the rear of the tender<br />
shell first, then the remainder. Use care with<br />
the volume-control wires when setting the<br />
tender shell aside.<br />
Connect the 9-volt alkaline battery to<br />
the lead and insert it in the retaining clip.<br />
Do not touch the Railsounds component. It’s<br />
sensitive to the static electricity transferred<br />
by touch. When finished, replace the shell<br />
and reinstall the two end screws.<br />
Note!<br />
Although Railsounds is<br />
powered by track voltage,<br />
the battery is required for uninterrupted<br />
operation. Use<br />
only alkaline batteries.<br />
When you first apply track power, the<br />
J’s Railsounds system produces sounds<br />
of the <strong>locomotive</strong><br />
at rest. As<br />
the J moves,<br />
chuffing begins,<br />
increasing with<br />
the <strong>locomotive</strong>’s<br />
speed.<br />
To silence the<br />
<strong>steam</strong> chuffing<br />
(whistle/bell<br />
are unaffected),<br />
slide the Railsounds<br />
switch,<br />
located under<br />
the tender, to<br />
the OFF position<br />
before powering<br />
up the <strong>locomotive</strong>.<br />
The whistle is activated by<br />
using the lever or button on your transformer<br />
or CAB-1. The circular hatch on<br />
the tender serves as the volume control<br />
button to raise or lower the level of<br />
sound.<br />
Installing a 9-volt alkaline battery in your J’s tender.<br />
Remove the two end screws under the tender.<br />
Lift the REAR of the shell first, then the remainder.<br />
Note!<br />
Note!<br />
Discontinue <strong>locomotive</strong><br />
power for 10 seconds before<br />
changing the Railsounds<br />
ON/OFF switch position.<br />
If Railsounds “drops out” during<br />
track power interrupts<br />
(direction change), replace the<br />
battery.<br />
5
Transformer operations<br />
Experiencing the range of your J’s Railsounds system<br />
W<br />
ith Railsounds, you experience<br />
the sounds of real railroading like<br />
never before. Simply put, it’s the most<br />
sophisticated, authentic model railroad<br />
sound system in the world. And<br />
remember—inside your <strong>Lionel</strong> <strong>600</strong> J are<br />
the sounds of the only real-life J still in<br />
existence, the Norfolk Southern’s<br />
Norfolk & Western 611 J. No other electric<br />
train can offer you authentic J<br />
sounds. That’s the power of <strong>Lionel</strong>.<br />
• Variable chuff rate. Your J’s speed<br />
determines the <strong>steam</strong> chuff rate.<br />
• MultiWhistle TM . Different whistles<br />
every time—a Railsounds exclusive.<br />
• Authentic bell. Press BELL on your<br />
CAB-1 or transformer to begin the<br />
effect, again to discontinue. Even the<br />
final “hit” is muted like the real thing.<br />
• Reverse unit reset sound. Power<br />
down your track, wait for 3.5 seconds,<br />
and listen for the air-release sound—<br />
that’s the J telling you its Liontech<br />
Command reverse unit has just reset to<br />
forward operation.<br />
• Shutdown sequence. No other<br />
model railroad sound system shuts<br />
down like Railsounds. Turn off track<br />
power, and after the air-release reset<br />
sound, you have two seconds to restart<br />
your J. If you’re done with operations,<br />
Railsounds will commence with an<br />
authentic J shutdown sequence about<br />
two seconds after the air-release reset<br />
occurs.<br />
Notes on Railsounds<br />
• Use the tender-top “water hatch” volume<br />
control to adjust sound output.<br />
• Listen for incidental engine sounds<br />
during Railsounds operation. They’re<br />
automatic and, of course, authentic.<br />
• The 9-volt alkaline battery you installed<br />
ensures continuous J sounds, even during<br />
short track-power interrupts.<br />
• Longer track-power interruptions<br />
(including <strong>locomotive</strong> derailments)<br />
cause Railsounds to shut down after<br />
about 7 seconds.<br />
• For even more authentic Railsounds<br />
effects, operate your J in the<br />
TrainMaster Command environment.<br />
See page 9 for details.<br />
6
Installing the <strong>Lionel</strong> sound activation button<br />
To operate the bell and whistle sounds<br />
when operating your J with conventional<br />
transformers, you’ll need to install<br />
the <strong>Lionel</strong> no. 610-5906-001 sound activation<br />
button (available separately).<br />
Connect the button(s) as shown below.<br />
1 2<br />
BLACK WIRE<br />
TO YOUR TRANSFORMER<br />
RED WIRE<br />
ATTACH TO GROUND TERMINAL<br />
ATTACH TO POWER TERMINAL<br />
LIONEL<br />
SOUND<br />
ACTIVATION<br />
BUTTON<br />
<strong>Lionel</strong> no. 610-5906-001<br />
sound activation button<br />
for activating the bell<br />
For AC transformers with a horn/whistle button<br />
Red wire<br />
Red wire<br />
POWER<br />
SUPPLY<br />
ATTACH TO<br />
GROUND TERMINAL<br />
TO YOUR TRANSFORMER<br />
Black wire<br />
ATTACH TO<br />
POWER TERMINAL<br />
<strong>Lionel</strong> no. 610-5906-001<br />
sound activation<br />
button for<br />
whistle<br />
<strong>Lionel</strong> no. 610-5906-001<br />
sound activation button for bell<br />
For AC transformers lacking a horn/whistle button<br />
Note!<br />
The no. 610-5906-001 button works with any <strong>Lionel</strong> AC transformer<br />
except no. 6-4690 Type MW. Transformers made by other manufacturers<br />
may not be compatible with Railsounds.<br />
7
TrainMaster Command operations<br />
Your J in the TrainMaster Command environment<br />
<strong>Lionel</strong> TrainMaster Command is the<br />
fun and sophisticated model railroad<br />
control system from <strong>Lionel</strong>. Your J features<br />
the Liontech Command reverse<br />
unit, which acts as both a conventional<br />
reverse unit as well as the key to<br />
unlocking many extra features when<br />
you operate in Command mode.<br />
TrainMaster Command gives you the<br />
power to operate multiple Commandequipped<br />
<strong>locomotive</strong>s on the same track,<br />
at the same time. It’s the most fun you<br />
can have with electric trains, and it’s<br />
incredibly easy too! Just follow the<br />
directions below and you’ll be on your<br />
way.<br />
TO OPERATE IN COMMAND, YOU NEED A<br />
COMMAND BASE AND A CAB-1 REMOTE.<br />
Find them both at your authorized<br />
<strong>Lionel</strong> retailer.<br />
1<br />
Place your J on <strong>Lionel</strong> or <strong>Lionel</strong>-compatible<br />
O gauge track.<br />
• Make sure track power is OFF before placing it on track.<br />
• Make sure your <strong>Lionel</strong> Command Base is ON and its communications<br />
wire is connected to the COMMON post on your <strong>Lionel</strong><br />
transformer or the U on any of your installed PowerMasters.<br />
• Once positioned on the track, increase track voltage to FULL (on<br />
PowerMaster, slide the CMD/CONV switch to CMD).<br />
2 Address your J with CAB-1.<br />
• Press ENG and 1 on the numeric keypad of your CAB-1 remote.<br />
This command is sent by CAB-1 to the Command Base, which then<br />
translates your command into digital code. That code is sent<br />
around your railroad’s outside rails in the form of a digital “halo.”<br />
All Command-equipped <strong>Lionel</strong>s listen to this digital communication,<br />
but they do not respond until they hear their own ID number.<br />
• The digital language of TrainMaster Command—and not track<br />
power—controls the actions of Command-equipped <strong>Lionel</strong>s. Track<br />
power is simply like gasoline in the tank of your car—it gives you<br />
the power to go places, but it doesn’t tell you where to go or how<br />
fast to get there.<br />
• All Command-equipped <strong>Lionel</strong>s come factory-programmed with<br />
an ID# of “1.” To change your J’s ID#, see page 12.<br />
3 Move ‘em out!<br />
8<br />
• Throttle up or press any command button on CAB-1. Your J will<br />
respond to your every command. Read on. The fun is just beginning!
CAB-1 commands for your J<br />
J RAILSOUNDS EFFECTS<br />
IN BOLD ITALIC<br />
Coupler commands<br />
have no effect on<br />
your J’s magnetic tender<br />
coupler. COUPLER<br />
RELEASE SOUNDS.<br />
Press AUX2 to turn<br />
your J’s headlight on<br />
and off.<br />
Turn the THROTTLE<br />
to the right to accelerate,<br />
left to decelerate.<br />
SPEED-DEPENDENT VARIABLE<br />
STEAM CHUFFING. DYNACHUFF<br />
DYNAMIC CHUFFING EFFECT.<br />
Press HALT to shut<br />
down all PowerMaster<br />
electrical output on<br />
your railroad. Stops all<br />
Command-equipped<br />
<strong>Lionel</strong>s in operation.<br />
®<br />
SW ACC RTE TR ENG<br />
1 2 3 WSTL / HRN<br />
4 5 6<br />
BELL<br />
7 8 9<br />
0<br />
DIR<br />
AUX 1 COUPLER BOOST<br />
AUX 2 COUPLER BRAKE<br />
HALT<br />
Press WSTL/HRN<br />
to activate the J’s<br />
whistle, release to discontinue.<br />
MULTI-WHISTLE<br />
STEAM WHISTLE SOUND.<br />
Press BELL once to<br />
activate the bell,<br />
again to discontinue.<br />
TRADITIONAL BELL SOUND.<br />
Press DIR—the <strong>locomotive</strong><br />
decelerates to a<br />
complete stop; turn the<br />
throttle up, and the<br />
<strong>locomotive</strong> moves in<br />
the opposite direction.<br />
THERE IS NO NEUTRAL.<br />
STEAM AIR-RELEASE SOUND.<br />
Press and hold BOOST<br />
for extra power. Release<br />
BOOST and return to<br />
the <strong>locomotive</strong>’s previous<br />
speed. LABORED CHUFF<br />
Press and hold BRAKE<br />
to slow down or stop.<br />
Release BRAKE and<br />
return to the previous<br />
speed. SQUEALING BRAKE SOUNDS.<br />
Railsounds in the Command environment<br />
Y<br />
our J’s Railsounds system gives you<br />
even more in the TrainMaster<br />
Command environment.<br />
• DynaChuff TṂ Real <strong>steam</strong> <strong>locomotive</strong><br />
chuffing depends on the <strong>locomotive</strong>’s<br />
load. DynaChuff simulates both labored<br />
and relaxed chuffing sounds. Highball<br />
down the mainline and hear the labored<br />
chuffing of a <strong>locomotive</strong> battling inertia.<br />
Reduce your throttle setting, and chuffing<br />
relaxes to a more sedate sound, as<br />
though the load placed on the J has<br />
decreased. Experience DynaChuff on<br />
steep grades, at yard crawls, and at<br />
speed. Another Railsounds exclusive.<br />
• Bonus sounds like squealing brakes<br />
with the CAB-1 BRAKE command.<br />
• Incidental sounds you control with<br />
CAB-1 numeric keypad commands, like<br />
<strong>steam</strong> letoff and <strong>steam</strong> release effects.<br />
9
TrainMaster Command operations<br />
CAB-1 numeric keypad commands for your J<br />
W<br />
hen you press AUX1 on CAB-1,<br />
you turn the numeric keypad<br />
into 10 command buttons.<br />
The keypad “stays open”<br />
and gives you access to extra<br />
command features until you<br />
press any top-row button<br />
AUX1<br />
(SW, ACC, RTE, TR, or ENG). The<br />
CAB-1 keypad overlay included<br />
with your J is designed to<br />
help you learn the auxiliary<br />
features specific to this classic<br />
<strong>locomotive</strong>.<br />
J RAILSOUNDS EFFECTS IN BOLD ITALIC.<br />
0<br />
Stops and resets the J to<br />
FORWARD. WHISTLE BLOWS. HEADLIGHT<br />
FLICKERS.<br />
1Raises the volume of Railsounds.<br />
SOUND VOLUME INCREASES.<br />
2<br />
Reserved for future use.<br />
3<br />
Starts up Railsounds. STARTUP SEQUENCE<br />
COMMENCES. STEAM BLOWOFF SOUND.<br />
4<br />
Lowers the volume of Railsounds.<br />
SOUND VOLUME DECREASES.<br />
5<br />
Activates the Railsounds <strong>steam</strong><br />
shutdown sequence. Just like the<br />
real thing, your J must be idle for shutdown<br />
to occur. STEAM SHUTDOWN COMMENCES.<br />
Remember, the whistle and bell will<br />
not sound until you restart Railsounds.<br />
6<br />
STEAM RELEASE SOUND.<br />
7<br />
Reserved for future use.<br />
8<br />
Turns off the smoke generator.<br />
9<br />
Turns on the smoke generator.<br />
Press and hold 9 (10 seconds maximum)<br />
to initiate Smoke Boost —it<br />
superheats the smoke generator and<br />
enhances smoke output when you<br />
start running your J.<br />
Note!<br />
Always keep smoke fluid<br />
in your J’s smoke generator.<br />
Using Smoke Boost<br />
with depleted fluid can<br />
damage the generator’s<br />
element.<br />
10
Tuning your J’s performance<br />
MOMENTUM<br />
Simulate the labored performance of<br />
a <strong>locomotive</strong> pulling a heavy load with<br />
momentum. Press L, M, or H (located<br />
under CAB-1’s removable panel) for<br />
light, medium, or heavy momentum.<br />
The LCRU2 remembers the setting until<br />
you change it. For delayed response,<br />
use H. For quick response, choose L.<br />
BOOSTING AND BRAKING<br />
Use the BOOST and BRAKE command<br />
buttons for incremental control<br />
of speed and a superior method for handling<br />
grades, stops-and-starts, and<br />
more. Plus, using BRAKE in the<br />
Command environment gives you a<br />
bonus Railsounds effect—the ultrarealistic<br />
sound of squealing brakes.<br />
STALL<br />
Make your J feel more responsive<br />
by setting a “stall” voltage. Get<br />
your <strong>locomotive</strong> moving, then press<br />
SET; the J will stop. The headlight<br />
will flash, indicating it’s in the SET<br />
mode. Turn the throttle clockwise to<br />
get the engine moving, then decrease<br />
speed until the <strong>locomotive</strong> just stops.<br />
Then press SET again; the LCRU2<br />
remembers the stall setting until you<br />
change it. To clear stall, press SET<br />
twice, holding it for one second each<br />
time.<br />
HIGH VOLTAGE SETTING<br />
Press SET, headlight will flash.<br />
Get your <strong>locomotive</strong> moving to the<br />
maximum speed you want it to<br />
run, press BOOST. Use this to keep<br />
your <strong>locomotive</strong> from accidentally<br />
being derailed.<br />
SOUND QUALITY<br />
To achieve your preferred Railsounds<br />
master volume level, use the<br />
tender-top water-hatch volume control<br />
dial. Turn the dial left or right to<br />
adjust the volume to your liking.<br />
For quick remote-control of volume<br />
below the master setting—like muting—use<br />
the CAB-1 numeric keypad’s<br />
volume control. Pressing AUX1 and<br />
then 4 on the numeric keypad lowers<br />
overall Railsounds output.<br />
Your J’s digital communication antenna<br />
Your J <strong>locomotive</strong>’s cab (boiler shell) is<br />
more than a die-cast cab, it’s the<br />
LCRU2’s antenna for receiving<br />
Command Base digital communications.<br />
If your J is experiencing difficulty<br />
receiving base communications, check<br />
for foreign metal objects between the<br />
chassis and cab.<br />
11
TrainMaster Command operations<br />
Assigning your J a new ID#<br />
Example Assign a new ID#<br />
to your J<br />
Command Base ON<br />
Place the J on track<br />
PowerMasters set to CMD or<br />
traditional power supplies ON FULL<br />
Slide the J’s reverse unit control switch<br />
to PROGRAM/LOCK<br />
Turn track power on (PowerMasters):<br />
Press BOOST<br />
Program the J as Engine #6:<br />
ENG<br />
Press ENG<br />
6<br />
Press 6 (the ID#)<br />
SET<br />
Press SET<br />
Hear the whistle sound (or see the<br />
headlight flash if Railsounds is OFF)<br />
Slide the reverse unit control switch to<br />
FORWARD/RUN<br />
Your engine remembers its ID# forever;<br />
you can change it any time by repeating<br />
these steps<br />
A<br />
s your <strong>Lionel</strong> Command-equipped<br />
fleet grows, you’ll want to give<br />
your J a more individualized ID#.<br />
Choose from any between 1 and 99. To<br />
make things easy, use a portion of your<br />
J’s cab number, for example 6.<br />
Turn the Command Base ON and<br />
place the J on track. Slide the J’s reverse<br />
unit control switch to PROGRAM (see<br />
the illustration), then power up. Using<br />
CAB-1, press ENG, the engine ID#<br />
(example: 6), then press the SET button<br />
located under CAB-1’s removable<br />
panel. Hear the whistle blow (or see the<br />
headlight flash if Railsounds is off);<br />
that’s the LCRU2 confirming the new<br />
ID#. Slide the LCRU2 switch to<br />
FORWARD/RUN. Your J is ready to<br />
run with its all-new ID#.<br />
PROGRAM/LOCK<br />
FORWARD/RUN<br />
Slide the J’s reverse unit control switch<br />
to PROGRAM/ LOCK. When you’ve<br />
finished ID# programming, slide the<br />
switch to FORWARD/RUN.<br />
12
Maintaining and servicing your J<br />
Lubricating your J<br />
Help your <strong>Lionel</strong> J lead a long and<br />
productive life on your railroad by<br />
maintaining it properly.<br />
We recommend you purchase a<br />
<strong>Lionel</strong> Lubrication and Maintenance<br />
Kit (no. 6-62927), available from your<br />
<strong>Lionel</strong> dealer. Two basic rules to keep in<br />
mind: never over-lubricate (a small<br />
amount will do), and avoid getting<br />
grease or oil on the J’s wheels, contact<br />
rollers, or your track.<br />
You’ll know your J requires lubrication<br />
when visual inspection reveals<br />
dryness on the parts indicated in the<br />
illustration. Remove accumulated dirt<br />
and dust before lubricating, and always<br />
lubricate any <strong>locomotive</strong> emerging<br />
from prolonged storage. Also, lightly<br />
lubricate the J’s side rods after each 10<br />
hours of operation.<br />
Lubricate with<br />
<strong>Lionel</strong> oil<br />
sparingly<br />
Lubricate with<br />
<strong>Lionel</strong> oil<br />
sparingly<br />
Lubricate axle ends<br />
with <strong>Lionel</strong> oil<br />
sparingly<br />
Lubricate <strong>Lionel</strong> grease<br />
sparingly<br />
Lubricate with <strong>Lionel</strong> grease<br />
sparingly<br />
After 80 hours of operating time or<br />
after extended periods of storage,<br />
apply one drop of oil to the small hole<br />
in the die-cast motor casting, just below<br />
the field winding. After extended running,<br />
the brushes may require replacement.<br />
Sluggish or intermittent operation<br />
are signs that brush replacement is<br />
due. When removing the cab, take note<br />
of the location of the plastic insulating<br />
washer and sleeve. These must be<br />
replaced in the proper location.<br />
One drop of oil<br />
Sleeve<br />
Washer<br />
13
Maintaining and servicing your J<br />
Adding fluid to your J’s smoke generator<br />
Your J is equipped with a smoke generator<br />
that produces safe, clean<br />
white smoke during operation.<br />
The smoke generator requires the<br />
periodic addition of <strong>Lionel</strong> smoke fluid<br />
in order to function. Pierce the tube end<br />
with a pin, then add four to eight drops<br />
of fluid directly into the J’s stack.<br />
Smoke production will commence<br />
momentarily, faster if you run your J at<br />
speed. When smoke production wanes,<br />
add more fluid (four to eight drops).<br />
An idle J will not smoke; press AUX1<br />
and 9 (press for a maximum of 10 seconds)<br />
to engage the smoke generator at<br />
idle/in neutral. Always keep a small<br />
amount of smoke fluid in the<br />
J’s smoke generator; the generator’s element<br />
can become damaged if operated<br />
without fluid. Smoke production is<br />
greater at higher voltages and when the<br />
J is pulling a heavy load or long consist.<br />
14
Replacing your J’s lamp<br />
Your J is illuminated by a lamp located<br />
directly behind the boilerface.<br />
During the course of normal operation,<br />
the lamp may<br />
require<br />
replacement.<br />
Carefully<br />
pull open the<br />
boilerface<br />
using the slot<br />
at either side<br />
of the boiler<br />
cap. Remove<br />
the connector<br />
from the<br />
light in the<br />
boiler front.<br />
Pull the bulb out of the lens and replace it<br />
with <strong>Lionel</strong> part no. 610-8049-300, available<br />
from your Authorized <strong>Lionel</strong> Service<br />
Center or<br />
L i o n e l<br />
Service.<br />
<strong>Lionel</strong> part no. 610-8049-300 Place the<br />
bulb assembly<br />
back into<br />
its retaining<br />
bracket and<br />
close the<br />
boilerface;<br />
you’ll hear a<br />
Replacing an expired lamp inside the boilerface. When<br />
done, close the boilerface; listen for the sound of a SNAP.<br />
SNAP when<br />
it’s properly<br />
closed.<br />
<strong>Lionel</strong> Service<br />
This product is built with pride by<br />
<strong>Lionel</strong> and carries a warranty to<br />
support continued reliable operation.<br />
If service is required, bring it and its<br />
warranty card to your local<br />
Authorized <strong>Lionel</strong> Service Center. To<br />
find the nearest dealer or Service<br />
Center, simply call 1-800-4-LIONEL.<br />
If you prefer a <strong>Lionel</strong> factory repair,<br />
call 810-949-4100, fax 810-949-5429, or<br />
write <strong>Lionel</strong> Service, P.O. Box 748,<br />
New Baltimore, MI 48047-0748. State<br />
the problem and the product’s purchase<br />
date. We’ll send a return authorization<br />
letter to assure proper handling<br />
while at <strong>Lionel</strong>. You may choose<br />
to have your product repaired by<br />
<strong>Lionel</strong> Service after its warranty has<br />
expired. A reasonable service fee will<br />
be charged.<br />
CAUTION: Make sure your product<br />
is properly packed to prevent shipping<br />
damage. The shipment must be prepaid,<br />
and we recommend it be insured.<br />
Please follow these instructions carefully.<br />
This warranty gives you specific<br />
legal rights. You may have other rights<br />
that vary from state to state.<br />
15
CHESTERFIELD MI 48051-2493<br />
UNITED STATES OF AMERICA<br />
LIONEL IS AN<br />
OFFICIAL SPONSOR<br />
LITTLE LEAGUE BASEBALL<br />
© 1996 LIONEL LLC