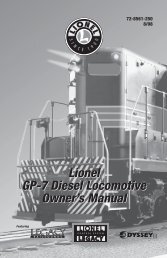
NO. 2332 GG-1 LOCOMOTIVE - Lionel
NO. 2332 GG-1 LOCOMOTIVE - Lionel
NO. 2332 GG-1 LOCOMOTIVE - Lionel

Create successful ePaper yourself
Turn your PDF publications into a flip-book with our unique Google optimized e-Paper software.
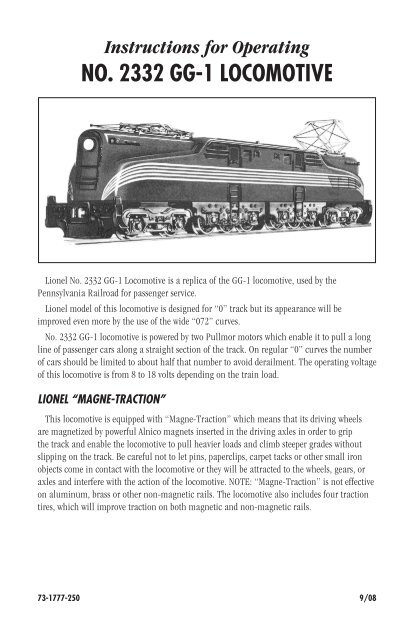
Instructions for Operating<br />
<strong>NO</strong>. <strong>2332</strong> <strong>GG</strong>-1 <strong>LOCOMOTIVE</strong><br />
<strong>Lionel</strong> No. <strong>2332</strong> <strong>GG</strong>-1 Locomotive is a replica of the <strong>GG</strong>-1 locomotive, used by the<br />
Pennsylvania Railroad for passenger service.<br />
<strong>Lionel</strong> model of this locomotive is designed for “0” track but its appearance will be<br />
improved even more by the use of the wide “072” curves.<br />
No. <strong>2332</strong> <strong>GG</strong>-1 locomotive is powered by two Pullmor motors which enable it to pull a long<br />
line of passenger cars along a straight section of the track. On regular “0” curves the number<br />
of cars should be limited to about half that number to avoid derailment. The operating voltage<br />
of this locomotive is from 8 to 18 volts depending on the train load.<br />
LIONEL “MAGNE-TRACTION”<br />
This locomotive is equipped with “Magne-Traction” which means that its driving wheels<br />
are magnetized by powerful Alnico magnets inserted in the driving axles in order to grip<br />
the track and enable the locomotive to pull heavier loads and climb steeper grades without<br />
slipping on the track. Be careful not to let pins, paperclips, carpet tacks or other small iron<br />
objects come in contact with the locomotive or they will be attracted to the wheels, gears, or<br />
axles and interfere with the action of the locomotive. <strong>NO</strong>TE: “Magne-Traction” is not effective<br />
on aluminum, brass or other non-magnetic rails. The locomotive also includes four traction<br />
tires, which will improve traction on both magnetic and non-magnetic rails.<br />
73-1777-250 9/08
#2124W LIONEL <strong>GG</strong>-1 PASSENGER SET INCLUDES:<br />
<strong>GG</strong>-1 locomotive and three Pullman passenger cars.<br />
<strong>LOCOMOTIVE</strong> FEATURES:<br />
• Electronic E-Unit with Direction Lock<br />
• Transformer controller forward, neutral and reverse operation<br />
• Electronic horn and bell with volume control<br />
• Dual operating couplers<br />
• Dual powerful Pullmor motors<br />
• Operating pantographs which raise and lower manually<br />
• Magne-Traction track gripping system<br />
• Traction tires<br />
• Operating directional headlights<br />
• Illuminated marker lights<br />
• Minimum Curve: 0-31<br />
PULLMAN CAR FEATURES:<br />
• Die-cast metal six-wheel trucks with operating couplers<br />
• Illuminated interior<br />
• Die-cast metal ends<br />
• Metal frame<br />
The following <strong>Lionel</strong> marks may be used throughout this instruction manual and are protected under law. All<br />
rights reserved.<br />
<strong>Lionel</strong> ® , TrainMaster ® , Odyssey ® , RailSounds ® , CrewTalk , TowerCom , DynaChuff , StationSounds ,<br />
Pullmor ® , ElectroCoupler , Magne-Traction ® , CAB-1 ® Remote Controller, PowerMaster ® , <strong>Lionel</strong> ZW ® , ZW ® ,<br />
PowerHouse ® , TMCC ® , <strong>Lionel</strong>ville, Lockon ® , Wireless Tether , LionMaster ® , FatBoy , American Flyer ® ,<br />
TrainSounds , PowerMax , LEGACY , PowerMax Plus, Odyssey II , LEGACY RailSounds <br />
The name FasTrack ® is used with permission from Pitsco, Inc.<br />
2
Transformer operations<br />
RUNNING YOUR <strong>LOCOMOTIVE</strong> WITH A LIONEL TRANSFORMER<br />
Caution!<br />
1<br />
2<br />
Do not power your locomotive with direct current (DC).<br />
Damage to sensitive electronic components may occur.<br />
PLACE YOUR TRAIN SET ON LIONEL OR LIONEL-COMPATIBLE O<br />
GAUGE TRACK.<br />
THROTTLE UP YOUR <strong>LOCOMOTIVE</strong> WITH YOUR<br />
TRANSFORMER.<br />
Your locomotive is designed to operate on 8-18 volts<br />
alternating current. Virtually all <strong>Lionel</strong> and <strong>Lionel</strong>-compatible<br />
alternating current transformers are suitable.<br />
Throttle up your locomotive and it will begin to move in the forward<br />
direction. Adjust track voltage until your locomotive moves at your desired<br />
speed. To increase speed, increase track voltage. To decrease speed, decrease<br />
voltage.<br />
Pressing the DIRECTION button on your transformer will sequence the<br />
Electronic E-unit to the next operating state in the repeating sequence of:<br />
forward, neutral, reverse, neutral, and so on.<br />
To stop the locomotive, cycle the Electronic E-unit to neutral or turn-off<br />
track power.<br />
3
Transformer operations<br />
LOCKING YOUR <strong>LOCOMOTIVE</strong> INTO FORWARD DIRECTION ONLY OPERATION<br />
When the Electronic E-unit Direction Lock switch is in the RUN position, your locomotive<br />
sequences through a repeating pattern of operations: forward, neutral, reverse, neutral, and so<br />
on.<br />
To lock your locomotive into forward direction only operation, you can deactivate the<br />
Electronic E-unit’s sequencing function. Follow the steps below and refer to figure 1 for the<br />
location of the Electronic E-unit Direction Lock switch.<br />
Note!<br />
Always turn off track power before removing the locomotive from the track.<br />
1. Turn off track power, wait three seconds, and remove the locomotive from the track. Now<br />
slide the Electronic E-unit Direction Lock switch to the LOCK position. Your locomotive is<br />
now locked into forward direction only operation.<br />
2. Place your locomotive back on the track. Power up the track and press the direction button<br />
on your transformer to confirm that the locomotive is now locked into forward direction<br />
only operation.<br />
To restore the forward-neutral-reverse sequence, turn off power and remove your locomotive<br />
from the track. Slide the Electronic E-unit Direction Lock switch back to the RUN position.<br />
Place the locomotive back on the track and restore track power.<br />
Electronic E-unit<br />
Direction Lock switch<br />
LOCK<br />
RUN<br />
Volume Control Knob<br />
FRONT of <strong>GG</strong>1<br />
Horn/Bell switch<br />
<strong>NO</strong> SND<br />
SND<br />
Figure 1. Switch locations<br />
4
Transformer operations<br />
USING YOUR <strong>LOCOMOTIVE</strong>’S MAGNETIC COUPLERS<br />
Your <strong>Lionel</strong> locomotive is equipped with operating magnetic knuckle couplers, a<br />
revolutionary design first introduced by <strong>Lionel</strong> in 1945.<br />
<strong>Lionel</strong> magnetic couplers react to the magnetic field generated by a <strong>Lionel</strong> Remote-Control<br />
Track section (available separately, 6-65149 or 6-12746 for O-27 gauge; 6-65530 for O gauge;<br />
or 6-12020 and 6-12054 for FasTrack layouts).<br />
Place your locomotive’s coupler trigger disc over the central coil of a Remote-Control<br />
Track section and press UNCOUPLE on the controller. The magnetic field pulls the disc<br />
downward, and the knuckle opens.<br />
One operating technique favored by <strong>Lionel</strong> railroaders is the “moving uncouple.” Press<br />
the UNCOUPLE button as the locomotive passes over a Remote-Control Track section. The<br />
magnetic field will open the coupler; the consist remains behind as the locomotive moves<br />
on. But be careful—the speed of a newly uncoupled and moving locomotive can increase<br />
dramatically.<br />
Remote-Control<br />
Track Section<br />
Figure 2. Magnetic coupler operation<br />
5
Transformer operations<br />
SOUNDING YOUR <strong>LOCOMOTIVE</strong>’S ELECTRONIC HORN AND BELL<br />
Use the HORN and BELL buttons on your transformer to activate the locomotives horn and<br />
bell sounds.<br />
If your transformer lacks HORN and BELL buttons, you will need to install <strong>Lionel</strong><br />
no. 610-5906-001 Sound Activation Buttons (available separately) to activate the locomotive’s<br />
horn and bell sounds.<br />
Connect the buttons as shown below. Be sure that all track power passes through the Sound<br />
Activation Button(s).<br />
FOR AC TRANSFORMERS LACKING A BELL BUTTON<br />
Black wire<br />
1 2<br />
Existing wire<br />
Red wire<br />
Common/Ground/U<br />
POWER<br />
SUPPLY<br />
Power/A<br />
<strong>Lionel</strong> no. 610-5906-001<br />
Sound Activation Button for<br />
activating the bell<br />
FOR AC TRANSFORMERS LACKING BELL AND HORN/WHISTLE BUTTONS<br />
Red wire<br />
Wire nut<br />
Existing wire<br />
Red wire<br />
Common/Ground/U<br />
POWER<br />
SUPPLY<br />
<strong>Lionel</strong> no. 610-5906-001<br />
Sound Activation Button for<br />
activating the<br />
horn<br />
Black wire<br />
Power/A<br />
Black wire<br />
<strong>Lionel</strong> no. 610-5906-001<br />
Sound Activation Button for<br />
activating the bell<br />
To adjust the volume of the horn and bell sounds, use the volume control knob located on<br />
the underside of the locomotive. See Figure 1 on page 4 for the location of the Volume Control<br />
Knob.<br />
To deactivate the electronic horn and bell sounds, slide the HORN/BELL switch to the <strong>NO</strong><br />
SND position. See Figure 1 on page 4 for the location of the HORN/BELL switch.<br />
6
Operating and servicing your set<br />
SERVICE INFORMATION<br />
The life and performance of the locomotive depends to a considerable extent upon proper<br />
care and lubrication of the motor and other moving parts. Since your locomotive might have<br />
been stored on the dealer’s shelves for some time, be sure to lubricate it according to the<br />
lubrication chart in Figure 4 on page 8 before running it for the first time. Put a small dab of<br />
<strong>Lionel</strong> Lubricant at all points marked “L”. Using the point of a pin or a thin wire, put a drop<br />
of <strong>Lionel</strong> Oil at points marked “O”. Lubricate carefully but never to excess. A small amount of<br />
oil or lubricant, properly applied, goes a long way. Be careful not to get any oil or lubricant on<br />
the running surfaces of the wheels or on the rails, or your locomotive will lose traction and do<br />
not lubricate locomotive rollers.<br />
The motors of this locomotive require occasional lubrication with a few drops of light<br />
machine oil. See Figure 5 on page 9. To get at the motors the locomotive body must first be<br />
removed by removing the screws in the ends of the locomotive. See Figure 4 on page 8.<br />
A complete Lubrication and Maintenance Kit No. 927 (6-62927) which contains all the<br />
material and equipment necessary to keep your outfit in top notch condition may be obtained<br />
from your authorized <strong>Lionel</strong> dealer or service station.<br />
This locomotive has front and rear headlights which are illuminated by 14 volt, bayonetbase<br />
lamps (No. 600-0363-300), available at your authorized <strong>Lionel</strong> dealer or service station.<br />
To replace your lamps, see the instructions on page 9.<br />
7
Operating and servicing your set<br />
LUBRICATING YOUR <strong>LOCOMOTIVE</strong><br />
Help your <strong>Lionel</strong> locomotive lead a long and productive life on your railroad by maintaining it<br />
properly. To keep your locomotive lubricated, we recommend that you purchase a <strong>Lionel</strong> Lubrication<br />
and Maintenance Kit (6-62927), available from your authorized <strong>Lionel</strong> dealer or service station.<br />
When you find that the lubrication points illustrated in Figure 4 appear dry, lubricate your<br />
locomotive after you have removed any accumulated dirt and dust. There are two basic rules to keep<br />
in mind when you are lubricating your locomotive: use only a small amount of lubrication and avoid<br />
getting grease or oil on your locomotive’s wheels, roller pick-ups, or the track.<br />
FRONT<br />
Body screws<br />
Body screws<br />
O<br />
Lubricate with <strong>Lionel</strong> oil sparingly<br />
L<br />
Lubricate with <strong>Lionel</strong> grease<br />
sparingly<br />
L<br />
Lubricate with <strong>Lionel</strong> grease<br />
sparingly<br />
O<br />
Lubricate with <strong>Lionel</strong> oil sparingly<br />
Body screws<br />
O<br />
Lubricate with <strong>Lionel</strong> oil<br />
sparingly<br />
REAR<br />
Figure 4. Underside details and lubrication points<br />
8
Operating and servicing your set<br />
LUBRICATING YOUR <strong>LOCOMOTIVE</strong>’S PULLMOR MOTOR ARMATURES<br />
Your locomotive will require occasional lubrication of its Pullmor motor armatures. If you<br />
hear excess noise during operation, or if the locomotive slows down intermittently, you may<br />
need to oil the top armature bearings.<br />
1. Remove the locomotive’s six body screws. See Figure 4 on page 8 for the screw locations.<br />
Carefully lift the shell away from the frame.<br />
2. Apply a small amount of <strong>Lionel</strong> oil (two drops) to the oil wick at the top of each motor.<br />
See Figure 5.<br />
Oil wick – Oil here<br />
3. Replace the body,<br />
securing it with the six<br />
body screws.<br />
Note!<br />
To prevent damage<br />
to the locomotive<br />
body, do not<br />
overtighten the<br />
body screws.<br />
LIONEL LIONEL<br />
Figure 5. Pullmor motor lubrication<br />
Place a small amount of oil<br />
(2-3 drops maximum) in the<br />
hole marked OIL.<br />
REPLACING YOUR <strong>LOCOMOTIVE</strong>’S LAMPS<br />
Your locomotive is illuminated by two 14-volt<br />
bayonnet base lamps. During the course of normal<br />
operations, they may require replacement.<br />
1. Remove the locomotive’s six body screws. See<br />
Figure 4 on page 8 for the screw locations.<br />
Carefully lift the shell away from the frame.<br />
2. Locate the assembly containing the expired lamp.<br />
To remove the lamp, gently push the lamp down<br />
and turn counter-clockwise to disengage the lamp<br />
from the socket.<br />
3. Replace it with <strong>Lionel</strong> part no. 600-0363-300,<br />
available from your authorized <strong>Lionel</strong> dealer or service station, or from <strong>Lionel</strong> Customer<br />
Service in Chesterfield, MI. See Instructions for Obtaining Service on page 12 for<br />
more information.<br />
4. Replace the body, securing it with the six body screws.<br />
Note!<br />
Figure 6. Lamp replacement<br />
<strong>Lionel</strong> part No. 600-0363-300<br />
REAR OF <strong>GG</strong>1<br />
To prevent damage to the locomotive body, do not overtighten the body screws.<br />
9
Operating and servicing your set<br />
REPLACING THE TRACTION TIRES<br />
Your locomotive is equipped with traction tires to increase the tractive effort of your<br />
locomotive and allow it to pull more cars at one time.<br />
During the course of normal operations, the traction tires may become worn out.<br />
Replacement traction tires are included with the locomotive. We recommend that you have<br />
the traction tires (630-8302-065) replaced by an authorized <strong>Lionel</strong> dealer or service station<br />
because the truck and side frames must be removed to access the wheels. See Instructions<br />
for Obtaining Service on page 12 for more information.<br />
INSTALLING THE PANTOGRAPHS ON YOUR <strong>GG</strong>1<br />
Although your locomotive is wired to operate on a three-rail track, it is equipped with<br />
operating pantographs which can be wired into the power circuit by any model railroader<br />
whose layout works with a catenary, or overhead power line.<br />
The pantographs are held in place with a spring catch and can be removed simply by<br />
pulling the base frame upward. This is a very important feature as it prevents damage to<br />
the pantograph in the event of a derailment or catching on a catenary. To replace, open the<br />
pantograph and snap into place by pushing in the center portion.<br />
Catenary Operation<br />
First remove the body from the frame of your <strong>GG</strong>1. See figuge 4 on page 8. For prototypical<br />
operation, (raised pantograph in the rear) it will be necessary to establish a wire from the rear<br />
pantograph pick-up to one of the collector leads (cut and splice).<br />
Install the eight insulation pieces (four for each pantograph).<br />
Simply snap them into the supports as shown here.<br />
Pantograph pick-ups<br />
located here inside body<br />
Figure 7. Installing the pantographs<br />
Note!<br />
Operation with raised pantographs will require increased overhead clearance.<br />
10
Operating and servicing your set<br />
REPLACING THE LAMPS IN YOUR PULLMAN PASSENGER CARS<br />
During the course of normal operations, the lamps inside your Pullman passenger cars may<br />
require replacement. Follow these steps and refer to Figure 7 as you replace the lamp.<br />
1. Twist the lamp base and socket assembly counter-clockwise and remove the assembly from<br />
the frame.<br />
3. Remove the lamp from the socket and replace it with lamp no. 600-0057-300 available<br />
from your authorized <strong>Lionel</strong> dealer or service station, or from <strong>Lionel</strong> Customer Service<br />
in Chesterfield, MI. See Instructions for Obtaining Service on page 12 for more<br />
information.<br />
4. Place the lamp base and socket assembly into the frame twisting it clockwise to secure it in<br />
place.<br />
LUBRICATING THE PULLMAN PASSENGER CAR TRUCKS<br />
Improperly lubricated trucks may increase the drag on your locomotive. Spin the wheels<br />
by hand. If they show any signs of drag or binding, remove the old lubricant and the<br />
accumulated dust and dirt with <strong>Lionel</strong> Cleaner and apply a drop of fresh oil at the ends of the<br />
axles. The lubrication points are designated as “O”. See Figure 7 below.<br />
Note!<br />
To keep your Pullman passenger cars trucks lubricated, we recommend that you<br />
purchase a <strong>Lionel</strong> Lubrication and Maintenance Kit (6-62927), available from your<br />
authorized <strong>Lionel</strong> dealer or service station.<br />
O<br />
Lubricate with<br />
<strong>Lionel</strong> Oil<br />
O<br />
Lubricate with<br />
<strong>Lionel</strong> Oil<br />
Lamp no. 600-0057-300<br />
Figure 7. Lubricating the passenger car trucks and replacing the lamp<br />
11
LIONEL LIMITED WARRANTY POLICY & SERVICE<br />
T<br />
his <strong>Lionel</strong> product, including all mechanical and electrical components, moving parts, motors and structural components,<br />
with the exception of LIGHT BULBS & LED’s are warranted to the original owner-purchaser for a period of one year<br />
from the original date of purchase against original defects in materials or workmanship when purchased through a<br />
<strong>Lionel</strong> Authorized Retailer*.<br />
This warranty does <strong>NO</strong>T cover the following: Normal wear and tear, Light bulbs or LED’s, Defects appearing in the course of<br />
commercial use, or Damage resulting from abuse/misuse of the product.<br />
Transfer of this product by the original owner-purchaser to another person voids this warranty in its entirety. Modification of<br />
this product in any way; visually mechanically or electronically, voids the warranty in its entirety.<br />
Any warranted product which is defective in original materials or workmanship and is delivered by the original ownerpurchaser<br />
(this warranty is non-transferrable) to <strong>Lionel</strong> LLC or any <strong>Lionel</strong> Authorized Service Station MUST be accompanied<br />
by the original receipt for purchase (or copy) from an <strong>Lionel</strong> Authorized Retailer*, will at the discretion of <strong>Lionel</strong> LLC,<br />
be repaired or replaced, without charge for parts or labor. In the event the defective product cannot be repaired, and a suitable<br />
replacement is not available, <strong>Lionel</strong> will offer to replace the product with a comparable model (determined by <strong>Lionel</strong><br />
LLC), if available. In the event a comparable model is not available the customer will be refunded the original purchase<br />
price (requires proof of purchase from the <strong>Lionel</strong> Authorized Retailer* it was originally purchased). Any products on<br />
which warranty service is sought must be sent freight or postage prepaid (<strong>Lionel</strong> will refuse any package when postage is due).<br />
Transportation and shipping charges are not covered as part of this warranty.<br />
<strong>NO</strong>TE: Products that require service that do not have a receipt from an LIONEL AUTHORIZED<br />
RETAILER* will be required to pay for all parts required to repair the product (labor will not incur<br />
a charge) providing the product is not older than 5 years from date of manufacture and is within 1<br />
year from date of purchase. A copy of the original sales receipt is required.<br />
In no event shall <strong>Lionel</strong> LLC be held liable for incidental or consequential damages.<br />
Some states do not allow the exclusion or limitation of incidental or consequential damages, so the above exclusion may not<br />
apply to you.<br />
This warranty gives you specific legal rights and you may have other rights which vary from state to state.<br />
Instructions for Obtaining Service<br />
If service for this <strong>Lionel</strong> LLC product is required; bring the item, along with your DATED sales receipt and completed warranty<br />
information (at the bottom of this page) to the nearest <strong>Lionel</strong> Authorized Service Station. Your nearest <strong>Lionel</strong> Service Station<br />
can be found by calling 1-800-4-LIONEL or by accessing the website at www.lionel.com.<br />
If you prefer to send your <strong>Lionel</strong> product directly to <strong>Lionel</strong>, for repair you must FIRST call 586-949-4100 extension 9105 or<br />
FAX <strong>Lionel</strong> at 586-949-5429 or write to Customer Service, 50625 Richard W. Blvd, Chesterfield, MI 48051-2493. Please have the<br />
6-digit <strong>Lionel</strong> product number, the date of original purchase, the dealer where the item was purchased and what seems to be<br />
the problem. You will receive a Verbal return authorization (RA) number to ensure your merchandise will be properly tracked<br />
and handled upon receipt at <strong>Lionel</strong> LLC.<br />
Once you have your Return Authorization (RA) number, make sure the item is packed in its original Styrofoam inner container<br />
which is placed inside the original outer display box (this will help prevent damage during shipping and handling).<br />
This shipment MUST be prepaid and we recommend that it be insured with the carrier of your choice.<br />
Please make sure you have followed all of the above instructions carefully before returning any merchandise for service. You<br />
may choose to have your product repaired by one of <strong>Lionel</strong> LLC’s Authorized Service Stations after its warranty has expired. A<br />
reasonable service fee should be expected once the product warranty has expired.<br />
Warranty Information<br />
Please complete the information below and keep it, along with your DATED ORIGINAL SALES RECEIPT. You MUST<br />
present this form AND your DATED SALES RECEIPT when requesting warranty service.<br />
*A complete listing of <strong>Lionel</strong> Authorized retailers can be found by calling 1-800-4-LIONEL or by visiting our website at<br />
www.lionel.com.<br />
Products that are more than 5 years old, from date of manufacture, are not applicable for warranty coverage, even<br />
if they have never been sold prior to this date. (Under no circumstance shall any components or labor be provided free<br />
of charge.)<br />
Name<br />
Address<br />
Place of Purchase <br />
Date of Purchase<br />
Product Number<br />
Product Description<br />
©2008 LIONEL L.L.C., CHESTERFIELD, MI 48051-2493<br />
UNITED STATES OF AMERICA<br />
PRINTED IN CHINA