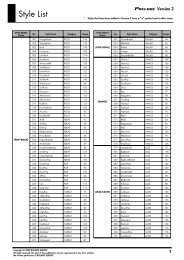
English version - Roland Keyboard Club
English version - Roland Keyboard Club
English version - Roland Keyboard Club

You also want an ePaper? Increase the reach of your titles
YUMPU automatically turns print PDFs into web optimized ePapers that Google loves.
Owner’s Manual<br />
r
WARNING – To reduce the risk of fire or electric shock, do not expose this device to rain or moisture.<br />
This product complies with the requirements of European Directive EMC 2004/108/EC.<br />
For EU Countries countries<br />
FEDERAL COMMUNICATIONS COMMISSION<br />
RADIO FREQUENCY INTERFERENCE STATEMENT<br />
For the the USA USA<br />
This equipment has been tested and found to comply with the limits for a Class B digital device, pursuant to Part 15 of the<br />
FCC Rules. These limits are designed to provide reasonable protection against harmful interference in a residential<br />
installation. This equipment generates, uses, and can radiate radio frequency energy and, if not installed and used in<br />
accordance with the instructions, may cause harmful interference to radio communications. However, there is no guarantee<br />
that interference will not occur in a particular installation. If this equipment does cause harmful interference to radio or<br />
television reception, which can be determined by turning the equipment off and on, the user is encouraged to try to correct the<br />
interference by one or more of the following measures:<br />
— Reorient or relocate the receiving antenna.<br />
— Increase the separation between the equipment and receiver.<br />
— Connect the equipment into an outlet on a circuit different from that to which the receiver is connected.<br />
— Consult the dealer or an experienced radio/TV technician for help.<br />
This device complies with Part 15 of the FCC Rules. Operation is subject to the following two conditions:<br />
(1) This device may not cause harmful interference, and<br />
(2) This device must accept any interference received, including interference that may cause undesired operation.<br />
Unauthorized changes or modification to this system can void the users authority to operate this equipment.<br />
This equipment requires shielded interface cables in order to meet FCC class B Limit.<br />
NOTICE<br />
This Class B digital apparatus meets all requirements of the Canadian Interference-Causing Equipment Regulations.<br />
For For Canada Canada<br />
AVIS<br />
WARNING<br />
For C.A. US US (Proposition 65) 65)<br />
This product contains chemicals known to cause cancer, birth defects and other reproductive harm, including lead.<br />
IMPORTANT: THE WIRES IN THIS MAINS LEAD ARE COLOURED IN ACCORDANCE WITH THE FOLLOWING CODE.<br />
BLUE:<br />
BROWN:<br />
NEUTRAL<br />
LIVE<br />
For For the the UKU.K.<br />
As the colours of the wires in the mains lead of this apparatus may not correspond with the coloured markings identifying<br />
the terminals in your plug, proceed as follows:<br />
The wire which is coloured BLUE must be connected to the terminal which is marked with the letter N or coloured BLACK.<br />
The wire which is coloured BROWN must be connected to the terminal which is marked with the letter L or coloured RED.<br />
Under no circumstances must either of the above wires be connected to the earth terminal of a three pin plug.<br />
DECLARATION OF CONFORMITY<br />
Compliance Information Statement<br />
For the USA<br />
USA<br />
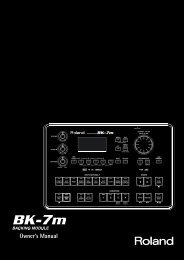
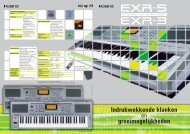
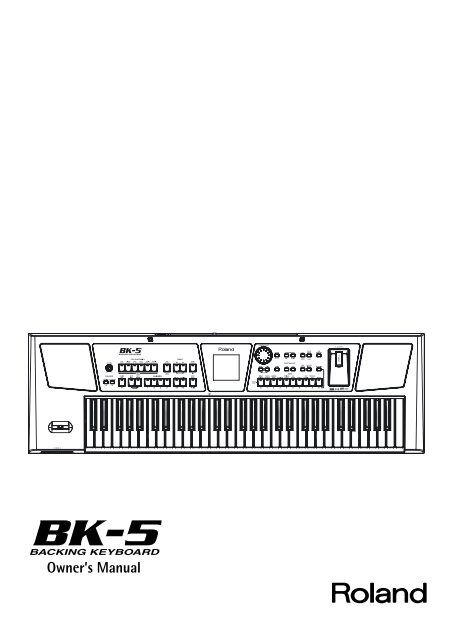
BK-5<br />
Backing <strong>Keyboard</strong>
Owner’s Manual<br />
Thank you and congratulations on your choice of the <strong>Roland</strong> BK-5 Backing <strong>Keyboard</strong>.<br />
To ensure that you obtain the maximum enjoyment and take full advantage of the BK-5’s functionality, please read this<br />
owner’s manual carefully.<br />
About this manual<br />
You should first read the chapter “Before you start using the BK-5” on p. 16. It explains how to connect the AC adaptor<br />
and turn on the power. This Owner’s Manual explains everything, from the BK-5’s basic operations to more advanced<br />
functions.<br />
Conventions in this manual<br />
In order to explain the operations as clearly as possible, this manual uses the following conventions:<br />
•Text enclosed in square brackets [ ] indicates the name of a button or knob. Example: the [MENU] button.<br />
• Paragraphs that begin with “NOTE” are cautionary statements that you must read.<br />
• Paragraphs that begin with “MEMO” contain useful information that may come in handy.<br />
•The numbers of pages that you can turn to for additional or related information are given like this: (p. **).<br />
The explanations in this manual include illustrations that depict what should typically be shown by the display. Note,<br />
however, that your unit may incorporate a newer, enhanced <strong>version</strong> of the system (e.g., include newer sounds), so what<br />
you actually see in the display may not always match what appears in the manual.<br />
ENGLISH ENGLISH ENGLISH ENGLISH<br />
Before using this instrument, carefully read “Using the unit safely” on p. 4 and “Important notes” on p. 6. Those sections provide<br />
information concerning the proper operation of the BK-5. Additionally, in order to feel assured that you have gained a good grasp<br />
of every feature provided by your new unit, the manual should be read in its entirety. The manual should be saved and kept on<br />
hand as a convenient reference.<br />
Copyright © 2011 ROLAND EUROPE. All rights reserved. No part of this publication may be reproduced in any form without the written permission of <strong>Roland</strong> Europe S.p.a.<br />
<strong>Roland</strong> and GS are either registered trademarks or trademarks of <strong>Roland</strong> Corporation in the United States and/or other countries.
Backing <strong>Keyboard</strong> BK-5<br />
Using the unit safely<br />
Used for instructions intended to alert<br />
the user to the risk of death or severe<br />
injury should the unit be used<br />
improperly.<br />
Used for instructions intended to alert<br />
the user to the risk of injury or material<br />
damage should the unit be used<br />
improperly.<br />
* Material damage refers to damage or<br />
other adverse effects caused with<br />
respect to the home and all its<br />
furnishings, as well to domestic<br />
animals or pets.<br />
The symbol alerts the user to important instructions<br />
or warnings.The specific meaning of the symbol is<br />
determined by the design contained within the<br />
triangle. In the case of the symbol at left, it is used for<br />
general cautions, warnings, or alerts to danger.<br />
The symbol alerts the user to items that must never<br />
be carried out (are forbidden). The specific thing that<br />
must not be done is indicated by the design contained<br />
within the circle. In the case of the symbol at left, it<br />
means that the unit must never be disassembled.<br />
The ● symbol alerts the user to things that must be<br />
carried out. The specific thing that must be done is<br />
indicated by the design contained within the circle. In<br />
the case of the symbol at left, it means that the powercord<br />
plug must be unplugged from the outlet.<br />
r<br />
4<br />
• Do not open (or modify in any way) the unit or its AC<br />
adaptor.<br />
.................................................................................................<br />
• Do not attempt to repair the unit, or replace parts within<br />
it (except when this manual provides specific instructions<br />
directing you to do so). Refer all servicing to your retailer,<br />
the nearest <strong>Roland</strong> Service Center, or an authorized <strong>Roland</strong> distributor,<br />
as listed on the “Information” page.<br />
.................................................................................................<br />
• Never install the unit in any of the following locations.<br />
• Subject to temperature extremes (e.g., direct sunlight<br />
in an enclosed vehicle, near a heating duct, on top of<br />
heat-generating equipment); or are<br />
• Damp (e.g., baths, washrooms, on wet floors); or are<br />
• Exposed to steam or smoke; or are<br />
• Subject to salt exposure; or are<br />
• Humid; or are<br />
• Exposed to rain; or are<br />
• Dusty or sandy; or are<br />
• Subject to high levels of vibration and shakiness.<br />
.................................................................................................<br />
• Make sure you always have the unit placed so it is level<br />
and sure to remain stable. Never place it on stands that<br />
could wobble, or on inclined surfaces.<br />
.................................................................................................<br />
• Be sure to use only the AC adaptor supplied with the<br />
unit. Also, make sure the line voltage at the installation<br />
matches the input voltage specified on the AC adaptor's<br />
body. Other AC adaptors may use a different polarity, or<br />
be designed for a different voltage, so their use could result in<br />
damage, malfunction, or electric shock.<br />
.................................................................................................<br />
• Use only the supplied power-supply cord. Also, the supplied<br />
power cord must not be used with any other device.<br />
.................................................................................................<br />
• Do not excessively twist or bend the power cord, nor<br />
place heavy objects on it. Doing so can damage the cord,<br />
producing severed elements and short circuits. Damaged<br />
cords are fire and shock hazards!<br />
.................................................................................................<br />
• This unit, in combination with an amplifier and headphones<br />
or speakers, may be capable of producing sound<br />
levels that could cause permanent hearing loss. Do not<br />
operate for a long period of time at a high volume level, or at a<br />
level that is uncomfortable. If you experience any hearing loss or<br />
ringing in the ears, you should immediately stop using the unit,<br />
and consult an audiologist.<br />
................................................................................................<br />
• Never allow foreign objects (e.g., flammable material,<br />
coins, pins) or liquids (e.g., water or juice) to enter this<br />
unit. Doing so may cause short circuits, faulty operation,<br />
or other malfunctions.<br />
................................................................................................<br />
• Immediately turn the power off, remove the AC adaptor<br />
from the outlet, and request servicing by your retailer,<br />
the nearest <strong>Roland</strong> Service Center, or an authorized<br />
<strong>Roland</strong> distributor, as listed on the “Information” page<br />
when:<br />
• The AC adaptor, the power-supply cord, or the plug has been<br />
damaged; or<br />
• If smoke or unusual odor occurs<br />
• Objects have fallen into, or liquid has been spilled onto the unit;<br />
or<br />
• The unit has been exposed to rain (or otherwise has become<br />
wet); or<br />
• The unit does not appear to operate normally or exhibits a<br />
marked change in performance.<br />
................................................................................................<br />
• In households with small children, an adult should provide<br />
supervision until the child is capable of following all<br />
the rules essential for the safe operation of the unit.<br />
................................................................................................<br />
• Protect the unit from strong impact.<br />
(Do not drop it!)<br />
................................................................................................
Backing <strong>Keyboard</strong> BK-5 r<br />
Using the unit safely<br />
• Do not force the unit's power-supply cord to share an<br />
outlet with an unreasonable number of other devices. Be<br />
especially careful when using extension cords—the total<br />
power used by all devices you have connected to the extension<br />
cord's outlet must never exceed the power rating (watts/amperes)<br />
for the extension cord. Excessive loads can cause the insulation on<br />
the cord to heat up and eventually melt through.<br />
.................................................................................................<br />
• Before using the unit in a foreign country, consult with<br />
your retailer, the nearest <strong>Roland</strong> Service Center, or an<br />
authorized <strong>Roland</strong> distributor, as listed on the “Information”<br />
page.<br />
.................................................................................................<br />
• Do NOT play a CD-ROM disc on a conventional audio CD<br />
player. The resulting sound may be of a level that could<br />
cause permanent hearing loss. Damage to speakers or<br />
other system components may result..<br />
• The unit and the AC adaptor should be located so their<br />
location or position does not interfere with their proper<br />
ventilation.<br />
.................................................................................................<br />
• Always grasp only the plug on the AC adaptor cord when<br />
plugging into, or unplugging from, an outlet or this unit.<br />
.................................................................................................<br />
• At regular intervals, you should unplug the AC adaptor<br />
and clean it by using a dry cloth to wipe all dust and<br />
other accumulations away from its prongs. Also, disconnect<br />
the power plug from the power outlet whenever the<br />
unit is to remain unused for an extended period of time.<br />
Any accumulation of dust between the power plug and the power<br />
outlet can result in poor insulation and lead to fire.<br />
.................................................................................................<br />
• Try to prevent cords and cables from becoming entangled.<br />
Also, all cords and cables should be placed so they<br />
are out of the reach of children.<br />
.................................................................................................<br />
• Never climb on top of, nor place heavy objects on the<br />
unit.<br />
.................................................................................................<br />
• Never handle the AC adaptor or its plugs with wet hands<br />
when plugging into, or unplugging from, an outlet or<br />
this unit.<br />
.................................................................................................<br />
• Before moving the unit, disconnect the AC adaptor and<br />
all cords coming from external devices.<br />
.................................................................................................<br />
• Before cleaning the unit, turn off the power and unplug<br />
the AC adaptor from the outlet (see p. 20).<br />
.................................................................................................<br />
• Whenever you suspect the possibility of lightning in your<br />
area, disconnect the AC adaptor from the outlet.<br />
.................................................................................................<br />
5
Backing <strong>Keyboard</strong> BK-5<br />
Important notes<br />
1. Important notes<br />
In addition to the items listed under “Using the unit safely” on p. 4, please read and observe the following:<br />
r<br />
Power supply<br />
• Do not connect this unit to same electrical outlet that is being<br />
used by an electrical appliance that is controlled by an inverter<br />
(such as a refrigerator, washing machine, microwave oven, or air<br />
conditioner), or that contains a motor. Depending on the way in<br />
which the electrical appliance is used, power supply noise may<br />
cause this unit to malfunction or may produce audible noise. If it is<br />
not practical to use a separate electrical outlet, connect a power<br />
supply noise filter between this unit and the electrical outlet.<br />
• The AC adaptor will begin to generate heat after long hours of<br />
consecutive use. This is normal, and is not a cause for concern.<br />
• Before connecting this unit to other devices, turn off the power to<br />
all units. This will help prevent malfunctions and/or damage to<br />
speakers or other devices.<br />
Placement<br />
• Using the BK-5 near power amplifiers (or other equipment containing<br />
large power transformers) may induce hum. To alleviate<br />
the problem, change the orientation of this instrument or move it<br />
further away from the source of interference.<br />
• This device may interfere with radio and television reception. Do<br />
not use it in the vicinity of such receivers.<br />
• Noise may be produced if wireless communications devices, such<br />
as cell phones, are operated in the vicinity of this unit. Such noise<br />
could occur when receiving or initiating a call, or while conversing.<br />
Should you experience such problems, you should relocate such<br />
wireless devices so they are at a greater distance from this unit, or<br />
switch them off.<br />
• Do not expose the unit to direct sunlight, place it near devices that<br />
radiate heat, leave it inside an enclosed vehicle, or otherwise subject<br />
it to temperature extremes. Excessive heat can deform or discolor<br />
the unit.<br />
• When moved from one location to another where the temperature<br />
and/or humidity is very different, water droplets (condensation)<br />
may form inside the BK-5. Damage or malfunction may result if<br />
you attempt to use the unit in this condition. Therefore, before<br />
using the unit, you must allow it to stand for several hours, until<br />
the condensation has completely evaporated.<br />
• Do not allow objects to remain on top of the keyboard. This can be<br />
the cause of malfunction, such as keys ceasing to produce sound.<br />
• Depending on the material and temperature of the surface on<br />
which you place the unit, its rubber feet may discolor or mar the<br />
surface.<br />
You can place a piece of felt or cloth under the rubber feet to prevent<br />
this from happening. If you do so, please make sure that the<br />
unit will not slip or move accidentally.<br />
• Do not put anything that contains water (e.g. flower vases) on the<br />
BK-5. Also, avoid the use of insecticides, perfumes, alcohol, nail<br />
polish, spray cans, etc., near the unit. Swiftly wipe away any liquid<br />
that spills on the unit using a dry, soft cloth.<br />
Maintenance<br />
• For everyday cleaning wipe the unit with a soft, dry cloth or one<br />
that has been slightly dampened with water. To remove stubborn<br />
dirt, use a cloth impregnated with a mild, nonabrasive detergent.<br />
Afterwards, be sure to wipe the unit thoroughly with a soft, dry<br />
cloth.<br />
• Never use benzene, thinner, alcohol or solvents of any kind, to<br />
avoid the possibility of discoloration and/or deformation.<br />
Additional precautions<br />
• Unfortunately, it may be impossible to restore the contents of data<br />
that was stored on a USB memory once it has been lost. <strong>Roland</strong><br />
Corporation assumes no liability concerning such loss of data.<br />
• Use a reasonable amount of care when using the BK-5’s buttons,<br />
other controls and jacks/connectors. Rough handling can lead to<br />
malfunctions.<br />
• Never strike or apply strong pressure to the display.<br />
• When connecting/disconnecting cables, grasp the connector<br />
itself—never pull on the cable. This way you will avoid causing<br />
shorts, or damage to the cable’s internal elements.<br />
• To avoid disturbing your neighbors, try to keep the BK-5’s volume<br />
at reasonable levels. You may prefer to use headphones, so you do<br />
not need to be concerned about those around you (especially late<br />
at night).<br />
• When you need to transport the unit, package it in the box<br />
(including padding) that it came in, if possible. Otherwise, you will<br />
need to use equivalent packaging materials.<br />
• Do not apply undue force to the music stand while it is in use.<br />
• Use only the specified expression pedal (<strong>Roland</strong> EV-series, sold<br />
separately) or pedal switch (<strong>Roland</strong> DP-series, BOSS FS-5U). By<br />
connecting any other expression pedal or footswitch, you risk<br />
causing malfunction and/or damage the unit.<br />
• Some connection cables contain resistors. Do not use cables that<br />
incorporate resistors for connecting to this unit. The use of such<br />
cables can cause the sound level to be extremely low, or impossible<br />
to hear. For information on cable specifications, contact the manufacturer<br />
of the cable.<br />
Storage devices that can be connected to the<br />
BK-5’s USB MEMORY port<br />
• The BK-5 allows you to connect commercially available USB Flash<br />
memory. You can purchase such devices at a computer store, a<br />
digital camera dealer, etc.<br />
• Though external hard disks with a capacity in excess of 2TB can be<br />
used, please bear in mind that the BK-5 can manage a maximum<br />
of 2TB. (FAT-32 formatted storage devices can be used right away.)<br />
• Use USB memory sold by <strong>Roland</strong> (M-UF-series). We cannot guarantee<br />
operation if any other USB memory is used.<br />
Before using external USB storage devices<br />
• Carefully insert the USB memory all the way in until it is firmly in<br />
place.<br />
• Never touch the terminals of USB memories. Also, avoid getting<br />
the terminals dirty.<br />
• USB memories are constructed using precision components; handle<br />
the storage devices carefully, paying particular note to the following.<br />
• To prevent damage from static electrical charges, discharge any<br />
static electricity that might be present in your body before handling<br />
a USB memory.<br />
• Do not touch the terminals with your fingers or any metal<br />
object.<br />
• Do not bend or drop a USB memory, or subject it to strong<br />
impact.<br />
• Do not leave a USB memory in direct sunlight or in locations<br />
such as a closed-up automobile.<br />
• Do not allow a USB memory to become wet.<br />
• Do not disassemble or modify your external USB memories.<br />
6
Backing <strong>Keyboard</strong> BK-5 r<br />
Important notes<br />
• When connecting a USB memory, position it horizontally with the<br />
BK-5’s USB MEMORY port and insert it without using excessive<br />
force. The USB MEMORY port may be damaged if you use excessive<br />
force when inserting a USB memory.<br />
• Do not insert anything other than a USB memory (e.g., wire, coins,<br />
other types of device) into the USB MEMORY port. Doing so will<br />
damage the BK-5’s USB MEMORY port.<br />
• Never connect your USB memory to the BK-5 via a USB hub.<br />
• Do not connect or disconnect a USB drive while it is being read<br />
from, or written to (i.e., while the USB flash access indicator<br />
blinks).<br />
Handling CDs<br />
• Avoid touching or scratching the shiny underside (encoded surface)<br />
of the disc. Damaged or dirty CD discs may not be read properly.<br />
Keep your discs clean using a commercially available CD<br />
cleaner.<br />
Liability and copyright<br />
• Recording, duplication, distribution, sale, lease, performance, or<br />
broadcast of copyrighted material (musical works, visual works,<br />
broadcasts, live performances, etc.) belonging to a third party in<br />
part or in whole without the permission of the copyright owner is<br />
forbidden by law.<br />
• Do not use this unit for purposes that could infringe on a copyright<br />
held by a third party. <strong>Roland</strong> assumes no responsibility whatsoever<br />
with regard to any infringements of third-party copyrights<br />
arising through your use of this unit.<br />
About audio files<br />
• Audio files in the following formats can be played back:<br />
• WAV format<br />
• 16-bit linear<br />
• Sampling rate of 44.1kHz<br />
• Stereo/mono<br />
• mp3 files:<br />
• MPEG-1 Audio Layer 3<br />
• Sampling frequency: 8/11.025/12/16/22.05/24/32/44.1/48kHz<br />
• Bit rate: 32/40/48/56/64/80/96/112/128/160/192/224/256/<br />
320kbps, VBR (variable bit rate)<br />
Supported Standard MIDI Files<br />
• Format 0/1<br />
• Company names and product names mentioned in this document are trademarks or registered trademarks of their respective owners.<br />
• MPEG Layer-3 audio compression technology is licensed from Fraunhofer IIS Corporation and THOMSON Multimedia Corporation.<br />
• Microsoft and Windows are registered trademarks of Microsoft Corporation.<br />
• Copyright © 2003 by Bitstream, Inc. All rights reserved. Bitstream Vera is a trademark of Bitstream, Inc.<br />
• MMP (Moore Microprocessor Portfolio) refers to a patent portfolio concerned with microprocessor architecture, which was developed by Technology<br />
Properties Limited (TPL). <strong>Roland</strong> has licensed this technology from the TPL group.<br />
7
Backing <strong>Keyboard</strong> BK-5<br />
Features<br />
2. Features<br />
The BK-5 is a professional keyboard designed to provide everything the entertaining artist and serious amateur musician<br />
needs on stage, in the studio, or at home.<br />
r<br />
8<br />
All-in-one arranger instrument<br />
The BK-5 is a superb instrument that uses <strong>Roland</strong>’s<br />
latest technology for professional-grade sounds and<br />
128 notes of polyphony.<br />
High-quality rhythms<br />
Your BK-5 comes loaded with over 300 stunning<br />
accompaniments (“rhythms”) that cover a variety of<br />
musical genres for various geographic areas (including<br />
Eastern Europe, Latin-America and Asia). Each<br />
rhythm comprises 4 intros, 4 main accompaniments,<br />
4 endings, 3 “Up” and 3 “Down” fill-ins.<br />
Four suitable settings for each rhythm<br />
(One Touch)<br />
For each rhythm, the <strong>Roland</strong> team has prepared four<br />
sets of suitable tones, effects and other settings that<br />
can be loaded for the realtime parts (One Touch<br />
function).<br />
USB-based Standard MIDI Files and rhythm<br />
player<br />
The BK-5 plays Standard MIDI Files and rhythms<br />
directly from a connected USB memory.<br />
USB-based audio player and audio recorder<br />
The BK-5 contains an audio player function that<br />
allows you to play back mp3 and WAV files directly<br />
from a connected USB memory.<br />
The BK-5 also allows you to record your performances.<br />
The resulting WAV files (audio) can be played<br />
back on the BK-5 itself.<br />
Three real-time parts<br />
The BK-5 comes with three MIDI parts (Upper 1,<br />
Upper 2, Lower) that can be played in real time.<br />
16 Song parts<br />
The BK-5 also provides 16 Song parts, which are used<br />
for Standard MIDI File playback but can also be controlled<br />
via MIDI (a computer connected to the MIDI<br />
IN socket or the COMPUTER USB port). This allows<br />
you to use the BK-5 as a 16-part multitimbral MIDI<br />
tone generator.<br />
Song and Rhythm Makeup Tools for Standard<br />
MIDI Files and rhythms<br />
These tools allow you to modify songs in no time<br />
without knowing the MIDI commands normally used<br />
to perform such changes.<br />
Performance List function<br />
This function allows you to save nearly all of the<br />
BK-5’s settings for each song and/or rhythm you will<br />
be using during your performances. The list that contains<br />
these settings can be saved to a USB memory<br />
and loaded from there whenever the need arises.<br />
Possibility to create new rhythms and to edit<br />
existing ones<br />
The Rhythm Composer function allows you to create<br />
new rhythms and to edit (i.e. change) existing ones,<br />
and then save them as “User Rhythms” to a USB<br />
memory.<br />
Multi-effects for rhythms or Standard MIDI files<br />
and real-time parts<br />
With a view to obtaining the highest possible sound<br />
quality, the BK-5 contains two dedicated multieffects<br />
processors (MFX A and B) for the Standard<br />
MIDI Files and rhythms you play back. In addition,<br />
there is one MFX processor for the real-time parts<br />
(Upper 1, Upper 2, Lower).<br />
Composite Video Out<br />
The BK-5’s VIDEO OUTPUT socket can be connected to<br />
an external screen, allowing your audience or fellow<br />
musicians to follow the lyrics and chord symbols<br />
(only SMF files) of the songs you perform.<br />
You can also view digital pictures in the .jpg format<br />
you took yourself.<br />
16 NTA parts (Note-to-Arranger)<br />
The BK-5 provides up to 16 MIDI parts dedicated to<br />
Arranger control via MIDI (“Note-to-Arranger”).
Backing <strong>Keyboard</strong> BK-5 r<br />
Contents<br />
1. Important notes . . . . . . . . . . . . . . . . . . . . . . . . . . . . . 6<br />
2. Features. . . . . . . . . . . . . . . . . . . . . . . . . . . . . . . . . . . . 8<br />
3. Panel description . . . . . . . . . . . . . . . . . . . . . . . . . . . 11<br />
Front panel. . . . . . . . . . . . . . . . . . . . . . . . . . . . . . . . . . . . 11<br />
Rear panel . . . . . . . . . . . . . . . . . . . . . . . . . . . . . . . . . . . . 14<br />
4. Shortcut list . . . . . . . . . . . . . . . . . . . . . . . . . . . . . . . 15<br />
5. Before you start using the BK-5 . . . . . . . . . . . . . . 16<br />
Connecting the AC adaptor . . . . . . . . . . . . . . . . . . . . . 16<br />
Connecting the BK-5 to an amplifier, mixer, etc. . . . 16<br />
Connecting a MIDI device. . . . . . . . . . . . . . . . . . . . . . . 17<br />
Connecting the BK-5 to your computer. . . . . . . . . . . 17<br />
If the computer doesn’t ‘see’ the BK-5 . . . . . . . . . . . . . . .17<br />
Connecting a television set. . . . . . . . . . . . . . . . . . . . . . 18<br />
Connecting an optional footswitch, hold pedal or<br />
expression pedal . . . . . . . . . . . . . . . . . . . . . . . . . . . . . . . 18<br />
Connecting a portable audio player . . . . . . . . . . . . . . 19<br />
Listening through headphones . . . . . . . . . . . . . . . . . . 19<br />
Installing the music rest . . . . . . . . . . . . . . . . . . . . . . . . 19<br />
Turning the power on/off . . . . . . . . . . . . . . . . . . . . . . . 20<br />
Turning the power on. . . . . . . . . . . . . . . . . . . . . . . . . . . . . .20<br />
Turning the power off . . . . . . . . . . . . . . . . . . . . . . . . . . . . .20<br />
Energy saving function . . . . . . . . . . . . . . . . . . . . . . . . . . . .20<br />
Demo of the BK-5 . . . . . . . . . . . . . . . . . . . . . . . . . . . . . 21<br />
6. Basic operation of the BK-5 . . . . . . . . . . . . . . . . . . 22<br />
About the display and cursor operation. . . . . . . . . . . 22<br />
Main page. . . . . . . . . . . . . . . . . . . . . . . . . . . . . . . . . . . . . . . .22<br />
Moving the cursor and setting parameter values . . . . . .22<br />
Moving between windows. . . . . . . . . . . . . . . . . . . . . . . . . .22<br />
7. Playing the BK-5’s real-time parts. . . . . . . . . . . . . 24<br />
Switching the UP2 and LWR parts on and off . . . . . 24<br />
Selecting Tones for the real-time parts . . . . . . . . . . . 24<br />
Using the [UP2] or [LWR] button to select Tones . . . . . .24<br />
Selecting a Tone on the main page . . . . . . . . . . . . . . . . . .24<br />
Using the ‘Numeric’ function to select Tones, Rhythms<br />
and Performances . . . . . . . . . . . . . . . . . . . . . . . . . . . . . . . . .25<br />
Checking a Tone’s or rhythm’s MIDI address . . . . . . . . . .26<br />
Using the ‘Help’ function . . . . . . . . . . . . . . . . . . . . . . . 26<br />
8. Rhythm functions . . . . . . . . . . . . . . . . . . . . . . . . . . 27<br />
Volume balance between the backing and the realtime<br />
parts. . . . . . . . . . . . . . . . . . . . . . . . . . . . . . . . . . . . . 27<br />
About the rhythms. . . . . . . . . . . . . . . . . . . . . . . . . . . . . 27<br />
Using rhythms. . . . . . . . . . . . . . . . . . . . . . . . . . . . . . . . . 27<br />
Selecting rhythms. . . . . . . . . . . . . . . . . . . . . . . . . . . . . . 29<br />
Playing back rhythms. . . . . . . . . . . . . . . . . . . . . . . . . . . 30<br />
Using the ‘One Touch’ function . . . . . . . . . . . . . . . . . . 31<br />
Programming your own ONE TOUCH settings (One Touch<br />
Edit) . . . . . . . . . . . . . . . . . . . . . . . . . . . . . . . . . . . . . . . . . . . . .32<br />
9. Using the BK-5 as a USB player . . . . . . . . . . . . . . . 34<br />
Getting ready to use the BK-5 as a USB player. . . . . 34<br />
File types the BK-5 can read and play back . . . . . . . . . . .34<br />
Selecting a song or rhythm on a USB memory. . . . . 34<br />
Playing back a song or rhythm from a USB memory35<br />
Renaming or deleting files/folders<br />
on a USB memory . . . . . . . . . . . . . . . . . . . . . . . . . . . . . 36<br />
Rename . . . . . . . . . . . . . . . . . . . . . . . . . . . . . . . . . . . . . . . . . 36<br />
Delete. . . . . . . . . . . . . . . . . . . . . . . . . . . . . . . . . . . . . . . . . . . 36<br />
Using the ‘Search’ function to locate songs, rhythms<br />
or pictures. . . . . . . . . . . . . . . . . . . . . . . . . . . . . . . . . . . . 37<br />
Activating the ‘Play All Songs’ parameter for the<br />
USB memory. . . . . . . . . . . . . . . . . . . . . . . . . . . . . . . . . . 38<br />
Deactivating the ‘Play All Songs’ function . . . . . . . . . . . 39<br />
Loop function (MARK A/B) . . . . . . . . . . . . . . . . . . . . . . 39<br />
Setting and using the loop positions . . . . . . . . . . . . . . . . 39<br />
10. Other important functions . . . . . . . . . . . . . . . . . . . 41<br />
Changing the key. . . . . . . . . . . . . . . . . . . . . . . . . . . . . . 41<br />
Changing the octave. . . . . . . . . . . . . . . . . . . . . . . . . . . 41<br />
Using ‘Track Mute’ and ‘Center Cancel’ . . . . . . . . . . . 42<br />
Selecting the track(s) to mute for rhythms<br />
or SMF songs . . . . . . . . . . . . . . . . . . . . . . . . . . . . . . . . . . . . 42<br />
Using the ‘Melody Intell(igence)’ function . . . . . . . . 43<br />
Using Split mode . . . . . . . . . . . . . . . . . . . . . . . . . . . . . . 43<br />
Setting the volume of the real-time parts . . . . . . . . 43<br />
11. Performance Lists . . . . . . . . . . . . . . . . . . . . . . . . . . 45<br />
Performance/Music Assistant/Factory Songs info . . 45<br />
Loading a Performance/‘Music Assistant’/‘Factory<br />
Songs’ List . . . . . . . . . . . . . . . . . . . . . . . . . . . . . . . . . . . . 45<br />
Recalling a Performance/‘Music Assistant’/<br />
‘Factory Songs’ memory . . . . . . . . . . . . . . . . . . . . . . . . 46<br />
Quickly locating Performance memories. . . . . . . . . . 46<br />
Saving your settings as a Performance . . . . . . . . . . . 46<br />
Other Performance List functions. . . . . . . . . . . . . . . . 47<br />
If you select ‘Rename’. . . . . . . . . . . . . . . . . . . . . . . . . . . . . 47<br />
If you select ‘Delete’ . . . . . . . . . . . . . . . . . . . . . . . . . . . . . . 48<br />
If you select ‘Make New List’ . . . . . . . . . . . . . . . . . . . . . . . 48<br />
Editing Performance memories. . . . . . . . . . . . . . . . . . 48<br />
Delete Performance. . . . . . . . . . . . . . . . . . . . . . . . . . . . . . . 49<br />
Saving the edited Performance List . . . . . . . . . . . . . . . . . 49<br />
12. Adding pictures to the music . . . . . . . . . . . . . . . . . 50<br />
Displaying photos automatically. . . . . . . . . . . . . . . . . 50<br />
Enjoying a VIMA TUNES slide show . . . . . . . . . . . . . . . . . 50<br />
Enjoying a slide show of your own pictures . . . . . . . . . . 50<br />
Using one of your own pictures as background. . . . 51<br />
13. Recording your performance as audio data . . . . . 52<br />
Recording . . . . . . . . . . . . . . . . . . . . . . . . . . . . . . . . . . . . 52<br />
Listening to your recording . . . . . . . . . . . . . . . . . . . . . . . . 53<br />
Saving your recording as an audio file . . . . . . . . . . . . . . 53<br />
14. Lock functions . . . . . . . . . . . . . . . . . . . . . . . . . . . . . 54<br />
Switching the locks on and off . . . . . . . . . . . . . . . . . . 54<br />
15. Menu options. . . . . . . . . . . . . . . . . . . . . . . . . . . . . . 55<br />
General procedure . . . . . . . . . . . . . . . . . . . . . . . . . . . . . 55<br />
Internal Lyrics . . . . . . . . . . . . . . . . . . . . . . . . . . . . . . . . . 55<br />
External Lyrics . . . . . . . . . . . . . . . . . . . . . . . . . . . . . . . . . . . 56<br />
9
Backing <strong>Keyboard</strong> BK-5<br />
r<br />
‘Performance Edit’ parameters. . . . . . . . . . . . . . . . . . . 56<br />
‘Tone Part View’ parameters . . . . . . . . . . . . . . . . . . . . . . . . 56<br />
‘Tone Part MFX’ parameters. . . . . . . . . . . . . . . . . . . . . . . . . 60<br />
‘Rhythm Parts’ parameters . . . . . . . . . . . . . . . . . . . . . . . . . 61<br />
Split . . . . . . . . . . . . . . . . . . . . . . . . . . . . . . . . . . . . . . . . . . . . . 61<br />
Key. . . . . . . . . . . . . . . . . . . . . . . . . . . . . . . . . . . . . . . . . . . . . . 62<br />
‘Arranger Setting’ parameters. . . . . . . . . . . . . . . . . . . . . . . 62<br />
‘Melody Intelligent’ parameters . . . . . . . . . . . . . . . . . . . . . 64<br />
Save As Default . . . . . . . . . . . . . . . . . . . . . . . . . . . . . . . . . . . 65<br />
‘Global’ parameters . . . . . . . . . . . . . . . . . . . . . . . . . . . . 65<br />
Save Global. . . . . . . . . . . . . . . . . . . . . . . . . . . . . . . . . . . . . . . 70<br />
One Touch Edit . . . . . . . . . . . . . . . . . . . . . . . . . . . . . . . . . . . 70<br />
Mastering Tools. . . . . . . . . . . . . . . . . . . . . . . . . . . . . . . . 71<br />
Compressor . . . . . . . . . . . . . . . . . . . . . . . . . . . . . . . . . . . . . . 71<br />
Equalizer . . . . . . . . . . . . . . . . . . . . . . . . . . . . . . . . . . . . . . . . . 72<br />
Makeup Tools (rhythms and SMF) . . . . . . . . . . . . . . . . 74<br />
Using the Makeup Tools. . . . . . . . . . . . . . . . . . . . . . . . . . . . 74<br />
Common. . . . . . . . . . . . . . . . . . . . . . . . . . . . . . . . . . . . . . . . . 74<br />
Instrument . . . . . . . . . . . . . . . . . . . . . . . . . . . . . . . . . . . . . . . 75<br />
Freeze Data. . . . . . . . . . . . . . . . . . . . . . . . . . . . . . . . . . . . . . . 79<br />
Saving your new rhythm or song (SMF) <strong>version</strong> . . . . . . . 80<br />
Rhythm Composer (programming your<br />
own rhythms) . . . . . . . . . . . . . . . . . . . . . . . . . . . . . . . . . 81<br />
Clearing the RAM memory (Initialize Rhythm) . . . . . . . . 81<br />
Getting ready for the first track . . . . . . . . . . . . . . . . . . . . . 82<br />
Recording a rhythm pattern . . . . . . . . . . . . . . . . . . . . . . . . 85<br />
Auditioning your rhythm and adding more tracks . . . . . 85<br />
Saving your rhythm . . . . . . . . . . . . . . . . . . . . . . . . . . . . . . . 85<br />
Recording other tracks and divisions . . . . . . . . . . . . . . . . 86<br />
Help function on the main Rhythm Composer page . . . 86<br />
Muting tracks while recording others . . . . . . . . . . . . . . . . 87<br />
Solo . . . . . . . . . . . . . . . . . . . . . . . . . . . . . . . . . . . . . . . . . . . . . 87<br />
Rhythm Track Edit functions. . . . . . . . . . . . . . . . . . . . . . . . 88<br />
Editing individual rhythm events (Micro Edit). . . . . . 99<br />
General procedure . . . . . . . . . . . . . . . . . . . . . . . . . . . . . . . . 99<br />
Editing events . . . . . . . . . . . . . . . . . . . . . . . . . . . . . . . . . . .100<br />
Other edit operations . . . . . . . . . . . . . . . . . . . . . . . . . . . . .101<br />
MIDI parameters. . . . . . . . . . . . . . . . . . . . . . . . . . . . . . 102<br />
Local . . . . . . . . . . . . . . . . . . . . . . . . . . . . . . . . . . . . . . . . . . .103<br />
Loading a MIDI Set . . . . . . . . . . . . . . . . . . . . . . . . . . . . . . .103<br />
Edit Rhythm Parts. . . . . . . . . . . . . . . . . . . . . . . . . . . . . . . .104<br />
Edit Tone Parts. . . . . . . . . . . . . . . . . . . . . . . . . . . . . . . . . . .105<br />
Edit Song Parts . . . . . . . . . . . . . . . . . . . . . . . . . . . . . . . . . .105<br />
Edit System . . . . . . . . . . . . . . . . . . . . . . . . . . . . . . . . . . . . .106<br />
Sync. . . . . . . . . . . . . . . . . . . . . . . . . . . . . . . . . . . . . . . . . . . .106<br />
Basic . . . . . . . . . . . . . . . . . . . . . . . . . . . . . . . . . . . . . . . . . . .107<br />
Rhythm . . . . . . . . . . . . . . . . . . . . . . . . . . . . . . . . . . . . . . . . .108<br />
NTA . . . . . . . . . . . . . . . . . . . . . . . . . . . . . . . . . . . . . . . . . . . .108<br />
Parameters . . . . . . . . . . . . . . . . . . . . . . . . . . . . . . . . . . . . . .109<br />
Visual Control TxCh. . . . . . . . . . . . . . . . . . . . . . . . . . . . . . .110<br />
Save MIDI Set. . . . . . . . . . . . . . . . . . . . . . . . . . . . . . . . . . . .110<br />
Factory Reset. . . . . . . . . . . . . . . . . . . . . . . . . . . . . . . . . 111<br />
Formatting a USB memory . . . . . . . . . . . . . . . . . . . . . 111<br />
16. Visual Control function . . . . . . . . . . . . . . . . . . . . 113<br />
Selecting clips and banks on an optional MIDI Visual<br />
Control/V-LINK device . . . . . . . . . . . . . . . . . . . . . . . . . 114<br />
17. Troubleshooting . . . . . . . . . . . . . . . . . . . . . . . . . . 115<br />
18. Rhythm list . . . . . . . . . . . . . . . . . . . . . . . . . . . . . . 117<br />
Rhythm division program change numbers . . . . . . . . . .118<br />
E-Series compatibility. . . . . . . . . . . . . . . . . . . . . . . . . . . . .118<br />
Recalling a Performance memory from the loaded<br />
Performance List via MIDI . . . . . . . . . . . . . . . . . . . . . . . . .118<br />
10<br />
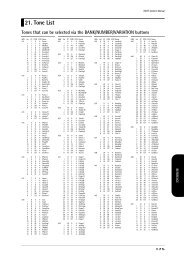
19. Tone List . . . . . . . . . . . . . . . . . . . . . . . . . . . . . . . . .119<br />
20. Drum Sets . . . . . . . . . . . . . . . . . . . . . . . . . . . . . . . .125<br />
21. Specifications . . . . . . . . . . . . . . . . . . . . . . . . . . . . .138<br />
Style Converter 4 system requirements. . . . . . . . . . 140<br />
22. MIDI Implementation Chart . . . . . . . . . . . . . . . . .141<br />
23. Chord Intelligence . . . . . . . . . . . . . . . . . . . . . . . . .142
Backing <strong>Keyboard</strong> BK-5 r<br />
Panel description<br />
3. Panel description<br />
Front panel<br />
C<br />
D E F G<br />
H<br />
I J K L M N O<br />
A<br />
B<br />
A Pitch Bend/Modulation lever<br />
You can raise or lower the pitch by moving this lever<br />
to the left or right. Push the lever away from yourself<br />
to apply modulation (normally vibrato) to the sound.<br />
B PHONES 1 & 2 sockets<br />
This is where you can connect one or two pairs of<br />
optional headphones (<strong>Roland</strong> RH-series). Doing so<br />
switches off the internal speakers.<br />
C VOLUME knob<br />
Use this knob to set the BK-5’s global output volume<br />
(all signals transmitted to the speakers and OUTPUT<br />
sockets). The setting of this knob also determines the<br />
volume in the headphones you may connect.<br />
D RHYTHM FAMILY buttons<br />
These buttons are used to select the family of the<br />
next rhythm you want to use. Pressing one of these<br />
buttons calls up a list of all rhythms contained in the<br />
selected family.<br />
Pressing and holding this button locks the currently<br />
selected rhythm (see p. 54).<br />
E TAP TEMPO button<br />
Pressing this button several times allows you to<br />
change the current rhythm’s or song’s tempo to the<br />
value calculated from the speed at which the button<br />
is pressed.<br />
Pressing and holding this button locks the current<br />
tempo setting (see p. 54).<br />
F TEMPO buttons<br />
These buttons can be used to decrease or increase the<br />
tempo of the currently selected rhythm or song.<br />
Pressing them together recalls the rhythm’s or song’s<br />
stored tempo value.<br />
NOTE<br />
You can also use the [TAP TEMPO] button E to set the<br />
desired tempo.<br />
G SYNC START button<br />
This button is used to activate or switch off the<br />
BK-5’s Sync Start or Sync Stop function. If it is on,<br />
rhythm playback can be started or stopped by simply<br />
playing a note or chord on the keyboard. See also<br />
page 27.<br />
While a song file is selected, this button stops playback.<br />
H BALANCE buttons<br />
These buttons allow you to set the balance between<br />
the rhythms and songs (BACKING) and the real-time<br />
parts (PART).<br />
11
Backing <strong>Keyboard</strong> BK-5<br />
Panel description<br />
I AUDIO REC button<br />
This button is used to start audio recording of your<br />
performance. This function records everything the<br />
BK-5 transmits to its OUTPUT sockets (audio signals<br />
you play back and audio <strong>version</strong>s of the MIDI parts<br />
you control). See page 52.<br />
This button is also used to select the Rhythm Composer<br />
function (see p. 81).<br />
J BASS INV button<br />
This button is used to switch the Bass In<strong>version</strong> function<br />
on and off (page 29).<br />
K AUTO FILL IN button<br />
This button is used to activate the Auto Fill-In function,<br />
which causes a transition to be played before<br />
selecting the new rhythm variation (which is selected<br />
with the VARIATION buttons).<br />
L VARIATION 1/2/3/4 buttons<br />
These buttons are used to select a rhythm “Variation”,<br />
i.e. a simpler or more complex arrangement of the<br />
selected rhythm.<br />
M INTRO button<br />
When you activate this button, rhythm playback<br />
starts with a musical introduction whose complexity<br />
depends on which VARIATION button currently lights<br />
(there are four different introductions per rhythm).<br />
After selecting a song file, this button allows you to<br />
rewind.<br />
NOTE<br />
You can also press this button during rhythm playback.<br />
N ENDING button<br />
When you activate this button, rhythm playback<br />
stops with a musical ending whose complexity<br />
depends on which VARIATION button currently lights<br />
(there are four different ending phrases per rhythm).<br />
After selecting a song file, this button allows you to<br />
fast-forward.<br />
O START/STOP button<br />
This button allows you to start and stop rhythm playback.<br />
If you select a song, it starts and temporarily<br />
stops (pause) song playback.<br />
Q<br />
R S T U V W<br />
X<br />
Y<br />
Z<br />
a b c d e<br />
P<br />
f<br />
r<br />
P Display<br />
This display shows information related to your operation.<br />
Q CURSOR/VALUE dial<br />
This dial can be used to move the cursor in the display,<br />
to select parameters and to set values.<br />
R ENTER/SELECT button<br />
Press this button to confirm your selection or deselection<br />
of the display item where the cursor is.<br />
S PERFORMANCE LIST button<br />
This button calls up the Performance List (page 45).<br />
T PERFORMANCE WRITE button<br />
The main function of this button is to save Performance<br />
settings. Depending on the selected display<br />
page, it can also be used to save rhythms and songs.<br />
U KEY button<br />
This button calls up the BK-5’s transposition function.<br />
Its settings can be applied to rhythms, Songs<br />
and the 3 real-time parts (UP1, UP2, LWR).<br />
12
Backing <strong>Keyboard</strong> BK-5 r<br />
Front panel<br />
If the button’s indicator doesn’t light, the rhythm,<br />
Songs and the 3 real-time parts use their normal<br />
pitch.<br />
Pressing and holding this button locks the key (see<br />
p. 54).<br />
V TRACK MUTE/CENTER CANCEL button<br />
This button lets you mute the accompaniment parts<br />
of the selected rhythm, so that only the bass and<br />
drum parts are played back. It also lets you mute the<br />
melody part of the selected MIDI File, or attenuate<br />
the vocal part at the center of an audio file (WAV or<br />
mp3), allowing you to sing or play that part yourself.<br />
Pressing and holding this button calls up a display<br />
page where you can select the Standard MIDI File or<br />
rhythm part(s) that you don’t want to hear.<br />
W USB MEMORY button<br />
Press this button to call up a list of the files stored on<br />
the USB memory connected to the BK-5‘s USB MEM-<br />
ORY port.<br />
X USB MEMORY port<br />
Connect an optional USB memory here.<br />
Note: <strong>Roland</strong> does not recommend using USB hubs, irrespective<br />
of whether they are active or passive. Please connect<br />
only one USB memory to this port.<br />
d MELODY INTELL button<br />
This buttons is used to add an automatic countermelody<br />
(second or third voice) to your solos or melodies.<br />
Pressing and holding it calls up a display page<br />
where you can view the “Melody Intelligent” parameter.<br />
e NUMERIC button<br />
Press this button if you want to use the TONE buttons<br />
f to enter numeric values (see p. 25).<br />
f TONE buttons (Tone selection)/[0]~[9] (numeric buttons)<br />
These buttons allow you to select Tones by category<br />
(page 24).<br />
You can also use them to input numeric values. To do<br />
so, first activate the NUMERIC button e.<br />
Pressing and holding any of these buttons locks the<br />
Tone (page 54).<br />
NOTE<br />
Use USB memory sold by <strong>Roland</strong>. We cannot guarantee<br />
operation if any another USB memory is used.<br />
Y MENU button<br />
This button allows you to open the BK-5’s menu page<br />
where you can view and select all available functions.<br />
Press it together with the [EXIT] button to listen to<br />
the BK-5’s demo songs.<br />
Z EXIT button<br />
This button is used to return to a higher menu level.<br />
Press and hold it to return to the BK-5’s main display<br />
page.<br />
a SPLIT button<br />
This button is used to activate Split mode. While its<br />
indicator lights, notes played to the left of the C4 on<br />
an keyboard trigger the LWR part. Notes to the right<br />
of the split point, on the other hand, trigger the UP1<br />
and UP2 parts. See “Using Split mode” on p. 43.<br />
b PART LWR and UP2 buttons<br />
These buttons are used to switch the real-time parts<br />
(Lower and Upper2) on and off.<br />
NOTE<br />
The Upper1 part (UP1) is always active and cannot be<br />
switched off.<br />
c ONE TOUCH button<br />
This button is used to enable the recall of One Touch<br />
memories. Pressing and holding it calls up a display<br />
page where you can edit and save One Touch memories.<br />
NOTE<br />
Use the TONE buttons [1]~[4] to select or deselect a One<br />
Touch memory (see p. 31).<br />
13
Backing <strong>Keyboard</strong> BK-5<br />
Panel description<br />
Rear panel<br />
A B C D E F G H I<br />
A USB COMPUTER port<br />
Use a USB cable to connect the BK-5 to your computer<br />
via this connector (page 17).<br />
B AUDIO INPUT (STEREO) mini jack<br />
This mini jack allows you to connect the audio outputs<br />
of an external signal source (CD/mp3 player,<br />
synthesizer, etc.).<br />
C AUDIO OUTPUT R & L/MONO sockets<br />
These sockets transmit all audio signals the BK-5<br />
generates as well as the signals you input to the<br />
BK-5.<br />
NOTE<br />
If you can/want to use only one channel on your external<br />
amplifier, connect the L/MONO socket to its input. For optimum<br />
sound quality, we recommend working in stereo,<br />
though.<br />
D VIDEO OUTPUT socket<br />
Connect this socket to the appropriate input of your<br />
TV or external display.<br />
NOTE<br />
The signal format (PAL or NTSC) and aspect ratio are selectable<br />
(page 67).<br />
E PEDAL HOLD socket<br />
An optional <strong>Roland</strong> DP-series or BOSS FS-5U footswitch<br />
connected to this socket can be used to hold<br />
the notes of the real-time parts. (The MELODY INTELL<br />
part can also be sustained in this way.) This function<br />
is also referred to as “sustain” or “damper”.<br />
F PEDAL SWITCH/EXPRESSION socket<br />
Connect a separately available pedal switch (<strong>Roland</strong><br />
DP-series), a separately available foot switch (BOSS<br />
FS-5U) or a separately available expression pedal<br />
(<strong>Roland</strong> EV-5) to this jack (page 18).<br />
G MIDI IN & OUT sockets<br />
You can connect MIDI devices to these sockets<br />
(page 17).<br />
H POWER switch<br />
Turns the power on/off (page 20).<br />
With the factory settings, the BK-5’s power will automatically<br />
be switched off 30 minutes after you stop<br />
playing or operating the BK-5.<br />
If the BK-5’s power has been turned off automatically,<br />
you can use the [POWER] switch to turn the<br />
BK-5 back on. If you don’t want the power to turn off<br />
automatically, set the “Auto Off” parameter to “OFF”<br />
(page 69).<br />
I DC IN socket<br />
Connect the supplied PSB-7U AC adapter here<br />
(page 16).<br />
r<br />
14
Backing <strong>Keyboard</strong> BK-5 r<br />
Shortcut list<br />
4. Shortcut list<br />
Pressing and holding the following buttons (or button combinations) allows you to directly jump to a related parameter<br />
page, which is faster than selecting the page in question via the BK-5’s menu. Some of these buttons activate a lock function<br />
(page 54).<br />
Press and hold<br />
RHYTHM FAMILY buttons<br />
Function<br />
Locks the rhythm to keep it from changing when you select another Performance<br />
memory.<br />
Locks the tempo setting to keep it from changing when you select<br />
another Performance memory.<br />
After activating record standby mode (the indicator flashes), pressing and<br />
holding this button will cancel that mode (use it if you don’t want to<br />
record after all).<br />
Locks the key setting to keep it from changing when you select another<br />
Performance memory.<br />
Opens the “Rhythm Track Mute” or “Song Track Mute” page.<br />
Opens the display page that shows which Tone is currently selected for<br />
the Lower part.<br />
Opens the display page that shows which Tone is currently selected for<br />
the Upper2 part.<br />
Simultaneously pressing the [LWR] and [UP2] buttons (without holding<br />
them) opens the display page where you can set the volume of the<br />
Upper1, Upper2 and Lower parts.<br />
Opens the “One Touch Edit” page.<br />
Opens the “Melody Intelligence” page.<br />
In some cases, this opens the “Help” page.<br />
TONE buttons<br />
Locks the Tone to keep it from changing when you select another Performance<br />
memory.<br />
Opens the “Split” page.<br />
Pressing and holding this button takes you back to the main page, no<br />
matter where you currently are.<br />
15
Backing <strong>Keyboard</strong> BK-5<br />
Before you start using the BK-5<br />
5. Before you start using the BK-5<br />
Connecting the AC adaptor<br />
1. Turn the [VOLUME] knob all the way to the<br />
left to minimize the volume.<br />
2. Connect the included power cord to the AC<br />
adapter.<br />
The indicator will light once you plug the AC adaptor<br />
into a wall outlet.<br />
Place the AC adapter so the side with the indicator<br />
(see illustration) faces upwards and the side with textual<br />
information faces downwards.<br />
NOTE<br />
Depending on your region, the included power cord may<br />
differ from the one shown above.<br />
3. Connect the AC adaptor to the BK-5’s DC IN<br />
jack.<br />
BK-5’s rear panel<br />
AC adapter<br />
Indicator<br />
Power cord<br />
to an AC outlet<br />
Connecting the BK-5 to an<br />
amplifier, mixer, etc.<br />
The BK-5 contains speakers and therefore doesn’t need<br />
to be connected to an external amplifier.<br />
You can, however, connect the BK-5’s OUTPUT sockets<br />
to an external amplifier (<strong>Roland</strong> KC-series) or the audio<br />
inputs of an external instrument (digital piano, etc.).<br />
NOTE<br />
To prevent malfunction and equipment failure, always turn<br />
down the volume and turn off all units before making any<br />
connections.<br />
1. Turn the [VOLUME] knob all the way to the<br />
left to minimize the volume.<br />
2. Switch off all devices.<br />
3. Connect the BK-5’s OUTPUT jacks to the<br />
inputs of your external device.<br />
Connecting the BK-5 to an amplifier<br />
4. Plug the power cord into a power outlet.<br />
The indicator will light once you plug the AC adaptor<br />
into a wall outlet<br />
OUTPUT R +<br />
L/MONO<br />
INPUT L + R<br />
r<br />
16<br />
NOTE<br />
Be sure to use only the AC adaptor supplied with the unit<br />
(PSB-7U). Also, make sure the line voltage at the installation<br />
matches the input voltage specified on the AC<br />
adapter’s body. Other AC adapters may use a different<br />
polarity, or be designed for a different voltage, so their use<br />
could result in damage, malfunction, or electric shock.<br />
NOTE<br />
If you won’t be using the BK-5 for an extended period of<br />
time, disconnect the power cord from the electrical outlet.<br />
For the connection to an amplifier, please choose<br />
unbalanced (mono) cables with 1/4” plugs at one end<br />
(for the BK-5). The connectors at the other end need<br />
to match the input sockets of the device to which<br />
you are connecting the BK-5.<br />
NOTE<br />
When connection cables with resistors are used, the volume<br />
level of equipment connected to the audio inputs may<br />
be low. If this happens, use connection cables that do not<br />
contain resistors.
Backing <strong>Keyboard</strong> BK-5 r<br />
Connecting a MIDI device<br />
Connecting a MIDI device<br />
The BK-5 can transmit and receive performance data<br />
when connected to an external MIDI device, which<br />
enables the two devices to control each other’s performance.<br />
For example, one device can play or switch<br />
sounds on the other device:<br />
MIDI stands for “Musical Instrument Digital Interface.” It<br />
is a universal standard for exchanging musical performance<br />
data among electronic musical instruments and<br />
computers.<br />
The BK-5’s MIDI connectors allow it to transmit performance<br />
data to, and receive such data from other<br />
devices. You can use the BK-5 in a wide range of ways<br />
by connecting external devices to these connectors.<br />
■ Connection example<br />
Before making connections with other devices, you<br />
must turn down the volume of all devices and turn<br />
off the power to avoid malfunctions or speaker damage.<br />
Connecting the BK-5 to your<br />
computer<br />
If you use a USB cable (commercially available) to connect<br />
the COMPUTER port located on the BK-5’s rear<br />
panel to the USB port of your computer, you’ll be able to<br />
do the following things.<br />
•Use the BK-5 as a sound module.<br />
•By transferring MIDI data between the BK-5 and your<br />
sequencer software, you’ll be able to enjoy a wide<br />
range of possibilities for music production and editing.<br />
1. Use a standard USB cable (A‰B-type connectors,<br />
commercially available) to connect<br />
the BK-5 to your computer as shown below.<br />
Playing the BK-5’s sounds from your MIDI sequencer<br />
USB cable<br />
Computer<br />
USB port<br />
BK-5<br />
Using the BK-5 to play your MIDI sound module<br />
MIDI sound module/<br />
sequencer<br />
NOTE<br />
Certain instruments, like an FR-3x V-Accordion, only have<br />
one MIDI socket whose function (IN or OUT) needs to be set<br />
with one of its MIDI parameters. To control the BK-5 from<br />
such an instrument, you need to set the latter to transmit<br />
MIDI messages (OUT).<br />
■ MIDI channels<br />
MIDI provides sixteen channels, numbered 1~16.<br />
Even if two MIDI devices are connected, you won’t be<br />
able to select or play sounds on the other device<br />
unless both devices are set to the same MIDI channel.<br />
The BK-5 is capable of receiving on all channels, 1~<br />
16.<br />
2. Refer to the <strong>Roland</strong> website for system<br />
requirements.<br />
<strong>Roland</strong> website: http://www.roland.com/<br />
As an alternative, you can connect the BK-5’s MIDI<br />
OUT and MIDI IN sockets to a MIDI interface and connect<br />
the latter to your computer.<br />
If the computer doesn’t ‘see’ the BK-5<br />
Normally, you don’t need to install a driver in order to<br />
connect the BK-5 to your computer. However, if some<br />
problem occurs, or if the performance is poor, using the<br />
<strong>Roland</strong> original driver may solve the problem.<br />
For details on downloading and installing the <strong>Roland</strong><br />
original driver, refer to the <strong>Roland</strong> website:<br />
http://www.roland.com/<br />
Specify the USB driver you want to use, and then install<br />
the driver. For details, refer to “USB Driver” on p. 69.<br />
■ Caution<br />
•To avoid the risk of malfunction and/or damage to<br />
external speakers, always turn the volume all the way<br />
down and switch off the power on all devices before<br />
you make any connections.<br />
• Only MIDI data can be transmitted and received via<br />
USB. Audio data for a song recorded on the BK-5<br />
cannot be transmitted or received.<br />
• Switch on the power to the BK-5 before you start up<br />
the MIDI application on your computer. Never turn<br />
the BK-5’s power on/off while your MIDI application<br />
is running.<br />
17
Backing <strong>Keyboard</strong> BK-5<br />
Before you start using the BK-5<br />
Connecting a television set<br />
BK-5 rear panel<br />
Video cable<br />
(Commercially available)<br />
Television<br />
Connecting an optional footswitch,<br />
hold pedal or expression pedal<br />
■ Footswitch or expression pedal, hold pedal<br />
The BK-5 provides a PEDAL SWITCH/EXPRESSION jack<br />
to which you can connect an optional footswitch<br />
(<strong>Roland</strong> DP-series or BOSS FS-5U) or an expression<br />
pedal (<strong>Roland</strong> EV-series).<br />
VIDEO OUTPUT<br />
NOTE<br />
Before you make connections to other devices, you must<br />
turn down the volume of all devices and turn off their<br />
power to prevent malfunctions or damage to your speakers.<br />
1. Switch off the BK-5 and the television set<br />
you’ll be connecting.<br />
2. Connect the BK-5 to your television set.<br />
Use a video cable (commercially available) to connect<br />
the BK-5’s VIDEO OUTPUT jack to the television set.<br />
3. Switch on the BK-5 (see p. 20).<br />
4. Switch on your television set.<br />
5. (As necessary) Specify the television output<br />
format (see p. 67).<br />
6. Specify the aspect ratio for your television<br />
set.<br />
The aspect ratio is the proportional relationship<br />
between the width and height of the screen. See<br />
page 67.<br />
Optional footswitch<br />
(<strong>Roland</strong> DP-series,<br />
BOSS FS-5U)<br />
Optional footswitch<br />
(<strong>Roland</strong> DP-series, BOSS<br />
FS-5U)<br />
—or—<br />
Optional expression pedal<br />
(<strong>Roland</strong> EV-series)<br />
If you connect a footswitch, you can select the function<br />
it should perform (page 69). By default, the footswitch<br />
will control the “Start/Stop” function.<br />
The BK-5 also provide a HOLD socket to which you<br />
can connect a damper pedal or footswitch (<strong>Roland</strong><br />
DP-series or BOSS FS-5U) that allows you to hold<br />
(sustain) the notes of the real-time parts you play.<br />
NOTE<br />
Use only the specified expression pedal (<strong>Roland</strong> EV-series,<br />
sold separately) or pedal switch (<strong>Roland</strong> DP-series, BOSS<br />
FS-5U). By connecting any other expression pedal or footswitch,<br />
you risk causing malfunction and/or damage the<br />
unit.<br />
r<br />
18
Backing <strong>Keyboard</strong> BK-5 r<br />
Connecting a portable audio player<br />
Connecting a portable audio player<br />
You can connect a portable audio player or any other<br />
line-level source to the AUDIO INPUT (STEREO) socket.<br />
The input level of the audio source you connect can be<br />
set with the “Audio In Level” parameter on the MENU‰<br />
Global‰ Utility page (page 68).<br />
•Use headphones fitted with a stereo 1/4” phone plug.<br />
Installing the music rest<br />
1. Install the music rest as shown in the illustration.<br />
AUDIO<br />
OUT<br />
You can also attenuate the vocal or solo part at the center<br />
of the stereo image of the audio signals being<br />
received. See “Audio In Center Canc” on p. 68.<br />
Listening through headphones<br />
You can use headphones to enjoy the BK-5 without disturbing<br />
those around you, such as at night.<br />
NOTE<br />
When moving the BK-5, be sure to remove the music rest<br />
as a safety precaution.<br />
NOTE<br />
Do not apply excessive force to the music rest.<br />
NOTE<br />
The music rest is not designed to accept the placement of<br />
laptops or other heavy objects.<br />
1. Plug the headphones into the PHONES 1 or<br />
2 socket located on the left side of the<br />
BK-5’s front panel.<br />
Doing so switches off the BK-5’s speakers.<br />
2. Use the BK-5’s [VOLUME] knob to adjust the<br />
headphone volume.<br />
■ Cautions when using headphones<br />
•To prevent damage to the cord’s internal conductors,<br />
avoid rough handling. When using headphones,<br />
mainly try to handle either the plug or the headset.<br />
• Your headphones may be damaged if the volume of a<br />
device is already turned up when you plug them in.<br />
Minimize the volume before you plug in the headphones.<br />
• Excessive input will not only damage your hearing,<br />
but may also strain the headphones. Please enjoy<br />
music at a reasonable volume.<br />
19
Backing <strong>Keyboard</strong> BK-5<br />
Before you start using the BK-5<br />
Turning the power on/off<br />
Once the connections have been completed, turn on the<br />
power to your various devices in the order specified. By<br />
turning on devices in the wrong order, you risk causing<br />
malfunction and/or damage to speakers and other<br />
devices.<br />
Turning the power on<br />
1. Turn the [VOLUME] knob all the way to the<br />
left to minimize the volume.<br />
4. Use the [VOLUME] knob to adjust the volume.<br />
Turning the power off<br />
1. Turn the [VOLUME] knob all the way to the<br />
left to minimize the volume.<br />
NOTE<br />
Never switch off the BK-5 while playback or recording is<br />
running or while data are being read from, or written to, an<br />
external USB memory.<br />
2. Switch off your external amplification system<br />
if you are using one.<br />
3. Press the BK-5’s [POWER] switch.<br />
The display will go dark and the power will turn off.<br />
NOTE<br />
Before turning the BK-5 on/off, always be sure to turn the<br />
volume down. Even with the volume turned down, you<br />
might hear some sound when switching the BK-5 on/off.<br />
However, this is normal and does not indicate a malfunction.<br />
2. Press the [POWER] switch to turn on the<br />
power.<br />
NOTE<br />
If you need to turn off the power completely, first turn off<br />
the [POWER] switch, then unplug the power cord from the<br />
power outlet. Refer to “Connecting the AC adaptor” on<br />
p. 16.<br />
Energy saving function<br />
NOTE<br />
The power will turn on, an opening message will<br />
appear in the BK-5’s screen, and then the main page<br />
will appear.<br />
After a brief interval, the BK-5 will be ready to produce<br />
sound.<br />
The BK-5 has an Auto Off function, which automatically<br />
switches off the power after a certain<br />
amount of time has passed without any buttons<br />
being operated.<br />
Shortly before the BK-5 shuts down automatically,<br />
the display starts counting down the seconds. If you<br />
want to keep using the BK-5 at this stage, press any<br />
button.<br />
You can also disable the “Auto Off” function. For<br />
more about the Auto Off function, refer to p. 69.<br />
When the BK-5 is turned off by the “Auto Off” function,<br />
the [POWER] button’s position doesn’t change,<br />
which means that you need to press it once, wait a<br />
few seconds, then press it again to switch the BK-5<br />
back on.<br />
r<br />
NOTE<br />
This unit is equipped with a protection circuit. A brief interval<br />
(a few seconds) after power up is required before the<br />
unit will operate normally.<br />
3. Switch on your amplification system or connect<br />
a pair of headphones (see p. 19).<br />
20
Backing <strong>Keyboard</strong> BK-5 r<br />
Demo of the BK-5<br />
Demo of the BK-5<br />
Your BK-5 contains a demo that introduces all of its<br />
highlights. It might be a good idea to try it out now. The<br />
demo is self-explanatory, so we’ll just show you how to<br />
start and stop it.<br />
NOTE<br />
You will need to connect an external display to take advantage<br />
of the BK-5’s demo function. See “Connecting a television set”<br />
on p. 18.<br />
1. Simultaneously press the [MENU] and [EXIT]<br />
buttons.<br />
The BK-5 plays back a song and the external display<br />
introduces the BK-5’s features.<br />
2. Press the [EXIT] button to leave the demo<br />
function.<br />
NOTE<br />
No data for the music that is played back will be output<br />
from MIDI OUT.<br />
NOTE<br />
All rights reserved. Unauthorized use of this material for<br />
purposes other than private, personal enjoyment is a violation<br />
of applicable laws.<br />
21
Backing <strong>Keyboard</strong> BK-5<br />
Basic operation of the BK-5<br />
6. Basic operation of the BK-5<br />
About the display and cursor<br />
operation<br />
This section introduces the information that appears on<br />
the main page in the BK-5’s display and how to navigate<br />
the menu.<br />
The setting field of the selected parameter is displayed<br />
in reverse.<br />
Main page<br />
Current measure or<br />
remaining time<br />
Time signature<br />
Tempo setting or time<br />
stretching<br />
Selected file type:<br />
Rhythm, .SMF,<br />
.WAV, .mp3<br />
Recording time<br />
Name of the last<br />
chord you played<br />
Real-time part field:<br />
UP1, UP2, LWR. The<br />
black field refers to<br />
the selected realtime<br />
part.<br />
Selected sounds<br />
Current “Key”<br />
setting<br />
Name of the<br />
selected rhythm<br />
(or loaded file)<br />
One Touch memory<br />
indication<br />
Lock status of<br />
these parameters<br />
Octave settings of<br />
the real-time<br />
parts.<br />
In our example, we want to assign a different Tone to<br />
the Upper1 (UP1) part.<br />
3. Rotate the [CURSOR÷VALUE] dial to change<br />
the value.<br />
4. Press the [ENTER/SELECT] button again to<br />
deselect the “UP1” field.<br />
The parameter’s setting field once again appears on a<br />
white background and the [CURSOR÷VALUE] dial can<br />
once again be used to select another parameter.<br />
Moving the cursor and setting parameter values<br />
The display cursor can only be moved to the fields that<br />
contain numeric values.<br />
1. Rotate the dial to move the cursor to the<br />
parameter whose value you want to change.<br />
Moving between windows<br />
Here is how to navigate the menu to select the setting<br />
you want to change.<br />
1. Press [MENU] button.<br />
The display changes to:<br />
2. Press the [ENTER/SELECT] button to confirm<br />
your selection.<br />
r<br />
22<br />
This page allows you to select the function group<br />
that contains the setting you want to change.<br />
NOTE<br />
In some cases, the [MENU] button may recall a special edit<br />
menu window instead of a main menu page.<br />
2. Rotate the [CURSOR÷VALUE] dial to select<br />
the entry of the desired function group.
Backing <strong>Keyboard</strong> BK-5 r<br />
Basic operation of the BK-5<br />
For this example, we will select “Global”.<br />
3. Press the [ENTER/SELECT] button to go to<br />
the “Global” function group.<br />
The display changes to:<br />
On this display page, “Display Contrast”, “Display<br />
Brightness” and “Tuning” can be changed directly.<br />
The remaining entries provide access to additional<br />
display pages.<br />
4. Try to select other “Menu” functions by proceeding<br />
as follows:<br />
(a) Press the [EXIT] button once to return to the “Menu”<br />
page.<br />
(b) Rotate the [CURSOR÷VALUE] dial to select an entry,<br />
then press the [ENTER/SELECT] button to go to the<br />
corresponding function group or setting.<br />
(c) Press and hold the [EXIT] button to return to the<br />
BK-5’s main page.<br />
The [EXIT] button stops flashing.<br />
23
Backing <strong>Keyboard</strong> BK-5<br />
Playing the BK-5’s real-time parts<br />
7. Playing the BK-5’s real-time parts<br />
Your BK-5 contains three real-time parts that can be controlled via MIDI: UP1, UP2 and LWR. Feel free to use only UP1 or<br />
to control all three simultaneously. You can assign the desired sounds (or “Tones”) to each of these parts. See page 119<br />
for a list of the available sounds.<br />
Switching the UP2 and LWR parts<br />
on and off<br />
The UP1 part is always active. The UP2 and LWR parts,<br />
however, can be switched on or off.<br />
1. Press the [UP2] or [LWR] button to switch<br />
the corresponding part (Upper2 or Lower)<br />
on (indicator lights) or off (indicator goes<br />
dark).<br />
2. If the Tone you need belongs to another<br />
family (see p. 119), press another Tone button.<br />
3. Rotate the [CURSOR÷VALUE] dial to select<br />
the desired Tone, then press the [ENTER/<br />
SELECT] button to confirm your selection.<br />
4. Press [EXIT] to leave the Tone selection<br />
page.<br />
If you switch on one of these parts, the cursor on the<br />
main page automatically jumps to the “UP2” or<br />
“LWR” field. If [UP2] and [LWR] are both switched off,<br />
the cursor jumps to the “UP1” field.<br />
Selecting Tones for the real-time<br />
parts<br />
On the BK-5, the sounds you can assign to the real-time<br />
parts are called “Tones”. The BK-5 allows you to assign<br />
any of the available Tones to any of the three real-time<br />
parts. Tone selection always applies to the part (UP1,<br />
UP2, or LWR) whose field is currently displayed in<br />
reverse.<br />
Tones can be selected in two ways:<br />
NOTE<br />
You can only listen to Tones for the Upper2 or Lower part if<br />
the [UP2] or [LWR] button lights.<br />
NOTE<br />
Tones can also be selected by simply pressing the<br />
[NUMERIC] key and entering their number.<br />
Selecting a Tone on the main page<br />
1. If the main page is not displayed, press and<br />
hold the [EXIT] button until it appears.<br />
The numbers and names of the Tones assigned to the<br />
three real-time parts are displayed in the lower half<br />
of the display:<br />
r<br />
Using the [UP2] or [LWR] button to select Tones<br />
1. Press and hold the [UP2] or [LWR] button.<br />
The display now shows a list of Tones where the currently<br />
selected sound is displayed in reverse:<br />
24<br />
The highlighted numeric field refers to the part<br />
whose Tone assignment can be changed. To select a<br />
different part, move the cursor to its numeric field<br />
and press the [ENTER/SELECT] button.<br />
2. Rotate the [CURSOR÷VALUE] dial to select<br />
the desired numeric field, then press the<br />
[ENTER/SELECT] button.
Backing <strong>Keyboard</strong> BK-5 r<br />
Selecting Tones for the real-time parts<br />
The numeric field is displayed in reverse.<br />
3. Rotate the dial to select the desired Tone.<br />
If necessary, use the TONE buttons to select a different<br />
family.<br />
The display now shows a page similar to the following:<br />
Using the ‘Numeric’ function to select Tones,<br />
Rhythms and Performances<br />
The “Numeric” function can be used to enter the number<br />
of the Tone, Rhythm or Performance memory you want<br />
to use, which is faster than scrolling with the<br />
[CURSOR÷VALUE] dial.<br />
This function is automatically activated when you call<br />
up a display or mode where using it makes sense. Below<br />
please find an example that shows you how to use the<br />
“Numeric” function for selecting Tones.<br />
NOTE<br />
For Tone selection, it would be a good idea to check on the<br />
main page which real-time part is currently selected to ensure<br />
that you don’t select a Tone for the wrong part.<br />
To select a different Tone for the Upper2 or Lower part, you<br />
can simply press and hold the [UP2] and [LWR] button while<br />
using the following procedure.<br />
In the following example, we will assign a different<br />
sound to the Upper1 part.<br />
You can also use the “Numeric” function (see below)<br />
to select the desired Tone. In that case, you need to<br />
confirm your selection by pressing the BK-5 button.<br />
Pressing the same TONE button several times allows<br />
you to select the first sound of the various categories<br />
within that family (“NaturalPiano”‰ “Vintage EP1”‰<br />
“Clav-1”…).<br />
4. Press [EXIT] to leave the Tone selection<br />
page.<br />
The display returns to the main page where the name<br />
of the newly selected Tone is shown.<br />
On the main page, you can also use the “Numeric”<br />
function to select Tones. The procedure is as follows:<br />
(a) Use the [CURSOR÷VALUE] dial to select the numeric<br />
field of the part you wish to assign a different Tone<br />
to.<br />
(b) Press the [NUMERIC] button (a pop-up window is displayed).<br />
(c) Use the [0]~[9] button to enter the number of the<br />
Tone you want to use.<br />
(d) Press the [ENTER/SELECT] button to confirm.<br />
1. Press the button of the Tone family that<br />
contains the Tone you want to select<br />
([PIANO/E.PIANO], for example).<br />
NOTE<br />
By pressing and holding one of these buttons, you activate<br />
the lock function for Tone selection, which means that<br />
Tones no longer change when you select Performance<br />
memories (page 54).<br />
The display changes to:<br />
NOTE<br />
You can also select the BK-5’s Tones via MIDI. Be aware,<br />
however, that if the BK-5 receives a sound select cluster<br />
(bank select + program change message) for which there is<br />
no Tone, the display shows “---” instead of a Tone name<br />
and the real-time part in question no longer sounds.<br />
25
Backing <strong>Keyboard</strong> BK-5<br />
Playing the BK-5’s real-time parts<br />
2. Press the [NUMERIC] button to open the<br />
following window:<br />
2. Press and hold the [NUMERIC] button to call<br />
up a pop-up window.<br />
The TONE buttons light.<br />
3. Press the TONE buttons that correspond to<br />
the figures you want to enter ([0]~[9]).<br />
For Tones, you can enter up to 4 digits. To select Tone<br />
6, for instance, simply pressing the [6] button is<br />
enough (the display will show “0006”).<br />
NOTE<br />
If you make a mistake, the quickest way to correct it is by<br />
pressing the [0] button four times (to enter “0000”) and<br />
then restarting.<br />
For Rhythms and Performance memories, up to 3<br />
digits can be entered.<br />
NOTE<br />
If you try to enter more digits than possible for the current<br />
item, a warning is displayed (“Tone doesn’t exist”).<br />
4. Press the [ENTER/SELECT] button to confirm<br />
your entry.<br />
The “Numeric” pop-up disappears and the display<br />
jumps to the Tone (and family) you selected.<br />
5. Press the [EXIT] button to return to the main<br />
page.<br />
(Tone selection window)<br />
(Rhythm selection window)<br />
3. Press the [EXIT] button (or press [NUMERIC]<br />
again) to return to the previous page.<br />
Using the ‘Help’ function<br />
Whenever the display shows a “? hold NUMERIC” message,<br />
the BK-5 can provide some explanations about the<br />
parameters currently shown in the display. To view this<br />
information, proceed as follows:<br />
1. Select a page where the above field is displayed,<br />
then press and hold the [NUMERIC]<br />
button.<br />
Checking a Tone’s or rhythm’s MIDI address<br />
Tones and rhythms can also be selected via MIDI. To this<br />
effect, they use an “internal” address, which is not usually<br />
displayed. For MIDI applications involving sequencers<br />
or external controllers, knowing the “official” address<br />
may come in handy. The BK-5 has a handy system that<br />
provides this information instantly—there is thus no<br />
need to look up the MIDI address in the tables at the end<br />
of this manual.<br />
1. Select the Tone or Rhythm whose MIDI<br />
address you need to know.<br />
A pop-up window similar to the following appears:<br />
r<br />
(Tone selection window)<br />
(Rhythm selection window)<br />
2. Press the [EXIT] button (or press [NUMERIC]<br />
again) to close the “Help” window.<br />
26
Backing <strong>Keyboard</strong> BK-5 r<br />
Rhythm functions<br />
8. Rhythm functions<br />
The BK-5 contains a function that plays back automatic accompaniments called “rhythms”. This section explains how to<br />
take advantage of the BK-5’s accompaniments.<br />
Volume balance between the<br />
backing and the real-time parts<br />
If the rhythm accompaniment is too loud or too soft<br />
with respect to the real-time parts you are using, you<br />
can change the balance with the [BACKING] and [KEY-<br />
BOARD] buttons:<br />
Using rhythms<br />
The “interactive” aspect about the rhythms is that you<br />
can change the key of the accompaniment simply by<br />
playing different notes or chords. Additionally, you can<br />
select different variations (more or less complex<br />
arrangements) for the active rhythm. The BK-5 provides<br />
several buttons for this.<br />
■ START/STOP<br />
When the [BACKING] or [KEYBOARD] button is pressed,<br />
the “BALANCE” pop-up window appears, showing the<br />
current setting:<br />
After about 3 seconds, the pop-up window disappears<br />
again.<br />
This button is used to start and stop rhythm playback.<br />
While a rhythm is running, the button’s indicator<br />
flashes red on the first beat of each bar, and green on<br />
the remaining beats.<br />
NOTE<br />
You can also start (and stop) rhythm playback simply by<br />
playing on the keyboard. See the next function. (The Start/<br />
Stop function can also be assigned to an optional footswitch.)<br />
■ SYNC START<br />
About the rhythms<br />
The BK-5 can generate interactive accompaniments<br />
based on the rhythm you select. Each rhythm is a typical<br />
accompaniment for a given musical genre. The BK-5<br />
comes with over 300 internal rhythms divided over 6<br />
families (see the RHYTHM FAMILY section on the front<br />
panel).<br />
The melodic accompaniment parts of the selected<br />
rhythms follow the chords you play on the keyboard.<br />
This button activates and switches off the “Sync<br />
Start” or “Sync Start/Stop” function. Pressing it several<br />
times allows you to select one of the following<br />
options:<br />
Function<br />
[SYNC START]<br />
indicator<br />
Explanation<br />
Sync Start Lights red Rhythm playback can be<br />
started by playing a note or<br />
chord. Press [START/STOP] to<br />
stop rhythm playback.<br />
27
Backing <strong>Keyboard</strong> BK-5<br />
Rhythm functions<br />
Function<br />
[SYNC START]<br />
indicator<br />
Explanation<br />
■ INTRO<br />
Sync Start/<br />
Stop<br />
Lights green<br />
Rhythm playback can be<br />
started by playing a note or<br />
chord. Playback will stop when<br />
you release all keys.<br />
— Dark Rhythm playback needs to be<br />
started and stopped using the<br />
[START/STOP] button (or the<br />
assigned optional footswitch).<br />
■ VARIATION [1], [2], [3], [4]<br />
Selects an introduction, which is usually used at the<br />
beginning of a song. You can, however, also select<br />
this pattern for other song sections. The behavior of<br />
the Intro pattern depends on when you press the<br />
[INTRO] button:<br />
[INTRO]<br />
Behavior<br />
Pressed before<br />
starting rhythm<br />
playback<br />
The indicator lights.<br />
When you start rhythm playback, the<br />
Arranger first plays a musical introduction.<br />
(This pattern is played back<br />
only once).<br />
These buttons are used to select the complexity<br />
(number of parts) of the rhythm’s arrangement:<br />
VARIATION<br />
Explanation<br />
[1] The simplest accompaniment pattern. A<br />
good choice for the first of the songs you<br />
play.<br />
[2] A slightly more complex pattern you may<br />
want to use for subsequent verses.<br />
[3] This pattern would be a good choice for<br />
the first chorus.<br />
[4] This is the most complex arrangement.<br />
Consider selecting it for the bridge or the<br />
final chorus sections of a song.<br />
Pressed during<br />
rhythm playback<br />
There are, in fact, four different INTRO patterns, that<br />
can be selected using the VARIATION [1], [2], [3] and<br />
[4] buttons. Again, the VARIATION buttons determine<br />
the complexity of the intro arrangement.<br />
■ ENDING<br />
The indicator flashes to signal that<br />
the INTRO pattern will begin on the<br />
next downbeat.<br />
When the intro is finished, the BK-5<br />
returns to the previously selected<br />
VARIATION pattern.<br />
Note that the VARIATION patterns are repeated<br />
(played back in a loop) until select a different pattern<br />
or stop rhythm playback.<br />
This button allows you to end your songs with a suitable<br />
closing section if you don’t want to simply stop<br />
playback. The behavior of the Ending pattern depends<br />
on when you press the [ENDING] button:<br />
r<br />
28<br />
[ENDING]<br />
Pressed before<br />
starting rhythm<br />
playback<br />
Behavior<br />
The indicator lights.<br />
When you start rhythm playback, the<br />
Arranger plays a musical ending. At<br />
the end of the phrase, playback stops.
Backing <strong>Keyboard</strong> BK-5 r<br />
Selecting rhythms<br />
[ENDING]<br />
Pressed during<br />
rhythm playback<br />
Behavior<br />
The indicator flashes to signal that<br />
the ENDING pattern will begin on the<br />
next downbeat.<br />
When the ending is finished, rhythm<br />
playback stops.<br />
Selecting rhythms<br />
1. Press a RHYTHM FAMILY button to select<br />
the rhythm family.<br />
There are four different ENDING patterns, that can be<br />
selected using the VARIATION [1], [2], [3] and [4] buttons.<br />
Again, the VARIATION buttons determine the<br />
complexity of the arrangement.<br />
■ BASS INV<br />
NOTE<br />
By pressing and holding one of these buttons, you activate<br />
the lock function for rhythm selection, which means that<br />
rhythms no longer change when you select Performance<br />
memories (see p. 54).<br />
The display shows a list of the rhythms that belong to<br />
this family. If the currently selected rhythms belongs<br />
to the family whose button you pressed, its name is<br />
displayed in reverse and the indicator of the button<br />
you pressed lights:<br />
This button is used to switch the “Bass In<strong>version</strong>”<br />
function on or off. While the button is dark, the<br />
rhythm’s bass part always plays the fundamental of<br />
your notes or chords. Example: if you play a chord<br />
consisting of the notes C, E and G (which is recognized<br />
as a C major chord), the bass part plays a C.<br />
If the [BASS INV] button lights, the rhythm’s bass<br />
part uses the lowest notes of the chords you play.<br />
Example: if you play a chord consisting of the notes<br />
E, G and C (still a C major chord), the bass part plays<br />
an E. This function therefore gives you more artistic<br />
licence.<br />
If you press a different RHYTHM FAMILY button, the<br />
display shows the beginning of the associated list<br />
(but the indicator of the associated family button<br />
doesn’t light):<br />
■ AUTO FILL IN<br />
2. Rotate the [CURSOR÷VALUE] dial to select<br />
the desired rhythm, then press [ENTER/<br />
SELECT] to confirm your selection.<br />
The indicator of the selected family button lights.<br />
When this button lights, the BK-5 plays a transition<br />
before switching to the newly selected VARIATION<br />
pattern. Example: if the VARIATION [1] pattern is running,<br />
pressing the [4] button will not switch to that<br />
pattern right away—the BK-5 first plays a fill-in to<br />
announce the new song section.<br />
NOTE<br />
The duration of the fill-ins (transitions) can be halved if you<br />
like. See “Fill In Half Bar” on p. 63. You can also speed up or<br />
slow down playback during a fill-in. See “Fill Ritardando”<br />
on p. 63.<br />
29
Backing <strong>Keyboard</strong> BK-5<br />
Rhythm functions<br />
NOTE<br />
The “Help” function is available in this environment (see<br />
p. 26). You can also press and hold [NUMERIC] to check the<br />
MIDI address of the selected rhythm (see p. 26).<br />
The main page displays the name of the last chord<br />
the BK-5 recognized:<br />
Playing back rhythms<br />
Let us now take a closer look at the interactive aspects<br />
of the BK-5’s rhythms and at how to use them.<br />
1. Switch on the BK-5 (see p. 20).<br />
2. Set the BK-5’s [VOLUME] knob to a reasonable<br />
level (about 1/4).<br />
8. Press the [START/STOP] button to start<br />
rhythm playback.<br />
3. Press the [SPLIT] button if you want to play<br />
in Split mode.<br />
4. Select the rhythm you want to use (see<br />
p. 29).<br />
5. Press the [INTRO] button (it lights) to start<br />
rhythm playback with an introduction.<br />
The [START/STOP] indicator lights and the BK-5 starts<br />
playing back the introductory phrase.<br />
9. Play different chords on the keyboard and<br />
listen to the effect this has on the rhythm.<br />
10. Switch on the [AUTO FILL IN] button (it<br />
lights).<br />
This means that when you select a different VARIA-<br />
TION pattern, the BK-5 will play a transition (fill-in)<br />
before switching to the new pattern.<br />
11. Press a VARIATION [1], [2], [3] or [4] button<br />
to select a more complex or a simpler<br />
accompaniment.<br />
r<br />
6. Press the VARIATION [1], [2], [3] or [4] button<br />
to select the complexity of the INTRO<br />
pattern.<br />
7. Play a chord on the keyboard.<br />
30<br />
• If you press it before the last beat of the current<br />
measure, the fill-in starts immediately and lasts until<br />
the end of the current measure, then the newly<br />
selected VARIATION pattern is played back.<br />
• If you press the desired VARIATION button on the last<br />
beat of a bar, the fill-in starts at the next downbeat<br />
and lasts an entire bar. Only then will the BK-5 switch<br />
to the newly selected VARIATION pattern.<br />
12. If necessary, you can change the rhythm’s<br />
tempo:
Backing <strong>Keyboard</strong> BK-5 r<br />
Using the ‘One Touch’ function<br />
•Press the TEMPO [√] or [®] button to decrease or<br />
increase the tempo.<br />
•Press the [TAP TEMPO] button at least three times at<br />
the desired tempo.<br />
Using the ‘One Touch’ function<br />
The ONE TOUCH memories help you select Tones for the<br />
real-time parts that match the atmosphere of the current<br />
rhythm. There are four such ONE TOUCH memories<br />
per rhythm.<br />
1. Select the desired rhythm.<br />
See page 29.<br />
2. Press the [EXIT] button to return to the main<br />
page.<br />
3. Switch on the [ONE TOUCH] button (its indicator<br />
lights).<br />
The BK-5 calculates the intervals between your<br />
presses and sets the corresponding tempo value.<br />
NOTE<br />
Simultaneously press the TEMPO [√] and [®] buttons<br />
(“STANDARD”) to return to the rhythm’s preset tempo.<br />
NOTE<br />
You can press and hold the [TAP TEMPO] button to lock the<br />
tempo setting (see p. 54).<br />
13. Press the [ENDING] button to end rhythm<br />
playback with a suitable closing section.<br />
You could also stop playback simply by pressing the<br />
[START/STOP] button or by releasing all keys on the<br />
keyboard (see “Sync Start/Stop” on p. 28).<br />
While rhythm or SMF song playback is stopped, the<br />
[TAP TEMPO] button flashes to indicate the selected<br />
tempo.<br />
If you haven’t selected any ONE TOUCH memory<br />
since switching on the BK-5, the indicators of TONE<br />
buttons [1], [2], [3] and [4] flash. Otherwise, the BK-5<br />
automatically recalls the last ONE TOUCH memory<br />
you selected.<br />
The main page displays “ONE TOUCH --” (or the number<br />
of the last ONE TOUCH memory).<br />
The indicators of TONE buttons [1]~[4] flash.<br />
4. Press the flashing TONE button assigned to<br />
the desired ONE TOUCH memory ([1]~[4]).<br />
The indicator of the button you press lights, while the<br />
indicators of the remaining three buttons still flash.<br />
5. Start playback of the rhythm.<br />
See page 30.<br />
6. Play a melody on the keyboard.<br />
7. Now press another TONE ([1]~[4]) button<br />
than the one that is currently active.<br />
8. Again play a melody on the keyboard.<br />
31
Backing <strong>Keyboard</strong> BK-5<br />
Rhythm functions<br />
The newly selected ONE TOUCH memory has recalled<br />
a different sound for the melody part. Note that the<br />
ONE TOUCH function also recalls other settings, like<br />
the tempo, INTRO/ENDING, etc.<br />
NOTE<br />
The BK-5 has a function that allows you to exclude certain<br />
settings when a new ONE TOUCH memory is selected. See<br />
“One Touch Hold” on p. 66.<br />
9. Press a different TONE [1]~[4] button to<br />
recall the associated ONE TOUCH memory.<br />
Tone selection for the real-time parts as well as other<br />
settings change in accordance with the newly<br />
selected ONE TOUCH memory.<br />
10. To switch off the ONE TOUCH function and<br />
return to the Tones that were selected<br />
before you activated the ONE TOUCH function,<br />
press the TONE [1]~[4] button whose<br />
indicator lights steadily.<br />
Its indicator flashes along with the other three TONE<br />
buttons.<br />
11. Press the [ONE TOUCH] button to leave ONE<br />
TOUCH memory selection mode.<br />
The TONE buttons stop flashing. (Only the indicator<br />
corresponding to the last Tone family you selected<br />
lights steadily.) You can now select different Tones<br />
for real-time parts without actually leaving the ONE<br />
TOUCH function (if it is still on).<br />
■ How can you tell whether the ONE TOUCH<br />
function is on or off?<br />
If the “ONE TOUCH” field on the main page is followed<br />
by a number (1~4), the ONE TOUCH function is<br />
currently on. If the “ONE TOUCH” field is followed by<br />
a dash (“–”), the ONE TOUCH function is off.<br />
After a few seconds, the display shows the contents<br />
of the USB memory. This page is of no importance<br />
here.<br />
2. Press and hold the [ONE TOUCH] button.<br />
The display changes to:<br />
This “One Touch Edit” page can also be selected via<br />
the BK-5’s menu.<br />
3. Use the [CURSOR÷VALUE] dial to select the<br />
ONE TOUCH memory you want to change,<br />
and confirm with the [ENTER/SELECT] button.<br />
The display changes to:<br />
(Here, ONE TOUCH memory 1 has been selected for<br />
editing.)<br />
r<br />
Programming your own ONE TOUCH settings<br />
(One Touch Edit)<br />
The BK-5 allows you to save your own ONE TOUCH settings,<br />
which may come in handy for CUSTOM rhythms<br />
for which there are no “presets”. The following operation<br />
saves the rhythm and its (new) ONE TOUCH settings<br />
to the “My Rhythms” folder on the USB memory connected<br />
to the USB MEMORY port.<br />
1. Connect an optional USB memory to the<br />
BK-5.<br />
32<br />
The ONE TOUCH function is off.<br />
The ONE TOUCH function is on (and<br />
memory 1 is selected).<br />
NOTE<br />
You can also select the desired ONE TOUCH memory by first<br />
pressing the [ONE TOUCH] button and then one of the<br />
flashing TONE buttons [1]~[4].
Backing <strong>Keyboard</strong> BK-5 r<br />
Using the ‘One Touch’ function<br />
4. Change the required settings.<br />
As soon as you change any setting, the display alerts<br />
you to the fact that the contents of the selected<br />
memory no longer corresponds to the current settings<br />
(“EDIT”):<br />
To overwrite the old rhythm file (replacing it with<br />
your new settings), use the [CURSOR÷VALUE] dial to<br />
select “Yes”, then press the [ENTER/SELECT] button.<br />
If you don’t want to overwrite the existing rhythm<br />
file, select “No” and press [ENTER/SELECT] to return to<br />
the “One Touch Edit” .<br />
8. Press the [EXIT] button to return to the main<br />
page.<br />
5. Use the [CURSOR÷VALUE] dial to select the<br />
memory where you want to save your new<br />
settings.<br />
6. Press the [WRITE] button (its indicator<br />
flashes).<br />
The display changes to:<br />
7. To save your ONE TOUCH changes, rotate<br />
the [CURSOR÷VALUE] dial to select “Yes” and<br />
press [ENTER/SELECT].<br />
The display shows the “Executing” message and then<br />
“Operation Complete”.<br />
Select “No” and press [ENTER/SELECT] if you don’t<br />
want to save your changes after all.<br />
NOTE<br />
The above message is only displayed the first time you<br />
press [WRITE] after editing a ONE TOUCH memory.<br />
■ If the “My Rhythms” folder on the USB memory<br />
already contains a rhythm file of the same<br />
name…<br />
In that case, the display shows the following message<br />
when you select “Yes” and press [ENTER/SELECT] (see<br />
above):<br />
33
Backing <strong>Keyboard</strong> BK-5<br />
Using the BK-5 as a USB player<br />
9. Using the BK-5 as a USB player<br />
This section explains how to playback MIDI (SMF) and audio songs stored on an optional USB memory. Note that it is also<br />
possible to select rhythms on that device and to use them in the same way as the internal rhythms. New song and rhythm<br />
files can be copied to the USB memory using your computer as you purchase them.<br />
Getting ready to use the BK-5 as a<br />
USB player<br />
1. On your computer, copy the new song and<br />
rhythm files to an optional USB memory<br />
(memory stick).<br />
NOTE<br />
Use USB memory sold by <strong>Roland</strong> (M-UF-series). We cannot<br />
guarantee operation if any other USB memory is used.<br />
2. Connect the USB memory to your BK-5.<br />
NOTE<br />
Carefully insert the optional USB memory all the way into<br />
the port until it is firmly in place.<br />
NOTE<br />
The BK-5 supports USB memories with a capacity of up to<br />
2TB.<br />
File types the BK-5 can read and play back<br />
Rhythms<br />
Standard MIDI<br />
Files (SMF)<br />
VIMA TUNES files<br />
(on CD-ROMs produced<br />
for the<br />
VIMA series)<br />
Audio files<br />
Extension<br />
.stl<br />
Format<br />
.mid 0 or 1<br />
.kar<br />
Connect an optional CD-ROM drive to<br />
the BK-5’s USB MEMORY port to be<br />
able to play back commercially available<br />
CD-ROMs made for VIMA-series<br />
instruments (“VIMA TUNES”). While a<br />
song plays, you can view a slide show<br />
suitable for the character of that song<br />
on an external display or television.<br />
.mp3<br />
mp3+CDG<br />
.wav<br />
• MPEG-1 Audio Layer 3<br />
• Sampling frequency:<br />
44.1kHz<br />
• Bit rate: 32/40/48/56/<br />
64/80/96/112/128/160/<br />
192/224/256/320kbps,<br />
VBR (variable bit rate)<br />
• 16-bit linear<br />
• Sampling frequency:<br />
44.1kHz<br />
• Stereo/mono<br />
Selecting a song or rhythm on a<br />
USB memory<br />
1. Connect an optional USB memory to the<br />
BK-5.<br />
After a few seconds, the display shows the contents<br />
of the USB memory.<br />
r<br />
34<br />
Press the [USB MEMOMRY] button if you inserted the<br />
USB memory at an earlier stage and now want to<br />
return to this display page.
Backing <strong>Keyboard</strong> BK-5 r<br />
Playing back a song or rhythm from a USB memory<br />
The icons to the left of the file names indicate the file<br />
type:<br />
Icon<br />
STL<br />
SMF<br />
Explanation<br />
Rhythm file<br />
SMF file<br />
The [®÷π] button’s indicator lights and song playback<br />
starts.<br />
3. If necessary, you can change the song’s<br />
playback tempo:<br />
•Press the TEMPO [√] or [®] button to decrease or<br />
increase the tempo.<br />
MP3<br />
WAV<br />
JPG<br />
Audio mp3 file<br />
Audio WAV file<br />
Picture file<br />
Folder<br />
2. Rotate the [CURSOR÷VALUE] dial to select<br />
the file you want to play back or display.<br />
3. Press the [ENTER/SELECT] button to load the<br />
file.<br />
The [USB MEMORY] button now lights to indicate<br />
that you selected a file on the USB memory.<br />
If the file you need is located inside a folder, you<br />
must first select that folder, press the [ENTER/SELECT]<br />
button to see its contents and then select the file. If<br />
you opened a folder by mistake, press the [EXIT] button<br />
to return to a higher level.<br />
NOTE<br />
If you set a tempo value close to the upper or lower limit<br />
for an mp3 or WAV file, playback may sound a little<br />
strange.<br />
•Press the [TAP TEMPO] button at least three times at<br />
the desired tempo. (This function is not available if<br />
you selected an audio file (WAV or mp3).)<br />
NOTE<br />
Press and hold the [EXIT] button to return to the main<br />
page.<br />
Playing back a song or rhythm from<br />
a USB memory<br />
If you selected a rhythm, see “Playing back rhythms” on<br />
p. 30, because operation is the same as for internal<br />
rhythms.<br />
In the following, we will therefore only show you how to<br />
play back song files located on a USB memory.<br />
NOTE<br />
The BK-5 has no internal memory where you could store SMF<br />
or audio files.<br />
1. Select a song (SMF or audio file) on the USB<br />
memory.<br />
See page 34.<br />
2. Press the [START/STOP] button to start playback.<br />
This button is also labeled [®÷π].<br />
The BK-5 calculates the intervals between your<br />
presses and sets the corresponding tempo value.<br />
NOTE<br />
Simultaneously press the TEMPO [√] and [®] buttons<br />
(“STANDARD”) to return to the rhythm’s preset tempo.<br />
4. Press the [®÷π] button again to pause song<br />
playback.<br />
The [®÷π] button goes dark.<br />
5. Press [®÷π] yet again to resume playback.<br />
6. Press the [SYNC START] button (ª) to stop<br />
playback<br />
You can use the following buttons to control song<br />
playback (see the gray legends):<br />
35
Backing <strong>Keyboard</strong> BK-5<br />
Using the BK-5 as a USB player<br />
Button<br />
[®÷π]<br />
Explanation<br />
Starts or pauses song playback.<br />
[ª] Stops song playback.<br />
[º] Rewinds the song.<br />
[‰] Fast-forwards the song.<br />
Renaming or deleting files/folders<br />
on a USB memory<br />
Rename<br />
Here is how to change the name of a file or folder on<br />
the connected USB memory.<br />
1. Connect an optional USB memory to the<br />
BK-5.<br />
After a few seconds, the display shows the contents<br />
of the USB memory.<br />
Press the [USB MEMORY] button if you inserted the<br />
USB memory at an earlier stage and now want to<br />
return to this display page.<br />
2. Rotate the [CURSOR÷VALUE] dial to select<br />
the file or folder you want to rename.<br />
3. Press the [MENU] button to jump to the<br />
“USB Memory Edit” page.<br />
To return to the BK-5’s menu, press and hold the<br />
[EXIT] button. While the contents of the connected<br />
USB memory is displayed, pressing [MENU] takes you<br />
to the “USB Memory Edit” page where you can select<br />
“Rename”, “Delete” or “Search”.<br />
NOTE<br />
If you press [MENU] while an empty folder is selected, the<br />
message “No item selected” is displayed to alert you to the<br />
fact that you cannot make any changes.<br />
4. Press the [ENTER/SELECT] button to call up<br />
the following display page:<br />
5. Rotate the [CURSOR÷VALUE] dial to select<br />
the desired character, then use the TONE<br />
buttons.<br />
You can press the [NUMERIC] button to switch<br />
between upper- and lower-case characters as well as<br />
numbers. The [LWR] button can be used to delete the<br />
selected character. The [UP2] button allows you to<br />
insert a character.<br />
6. Rotate the [CURSOR÷VALUE] dial to select<br />
the next character position you want to<br />
change, then use the TONE buttons again.<br />
7. Repeat steps (5) and (6) above to complete<br />
the name.<br />
8. Press the flashing [WRITE] button to confirm.<br />
The display changes to:<br />
Delete<br />
Files or folders on the connected USB memory that<br />
you no longer need can be deleted as follows.<br />
1. Connect an optional USB memory to the<br />
BK-5.<br />
After a few seconds, the display shows the contents<br />
of the USB memory.<br />
r<br />
36<br />
Press the [USB MEMORY] button if you inserted the<br />
USB memory at an earlier stage and now want to<br />
return to this display page.
Backing <strong>Keyboard</strong> BK-5 r<br />
Using the ‘Search’ function to locate songs, rhythms or pictures<br />
2. Rotate the [CURSOR÷VALUE] dial to select<br />
the file or folder you want to delete.<br />
3. Press the [MENU] button.<br />
NOTE<br />
If you press [MENU] while an empty folder is selected, the<br />
message “No item selected” is displayed to alert you to the<br />
fact that you cannot make any changes.<br />
4. Use the [CURSOR÷VALUE] dial to select<br />
“Delete”.<br />
Using the ‘Search’ function to<br />
locate songs, rhythms or pictures<br />
The BK-5 provides a “Search” function that allows you<br />
to search the connected USB storage device for the files<br />
you need. This function is available even while the BK-5<br />
is playing back a song or rhythm, allowing you to prepare<br />
the next song or picture without keeping your<br />
audience waiting.<br />
1. Connect an optional USB memory to the<br />
BK-5.<br />
After a few seconds, the display shows the contents<br />
of the connected USB storage device.<br />
5. Press the [ENTER/SELECT] button.<br />
The display changes to:<br />
2. If you know the folder where the file is<br />
located, select it by rotating the<br />
[CURSOR÷VALUE] dial and then pressing the<br />
[ENTER/SELECT] button.<br />
If you are not sure about the location, do not select a<br />
folder to avoid that the “Finder” function only looks<br />
in that folder.<br />
3. Press the [MENU] button.<br />
If you selected a folder in step (2) above, the display<br />
also contains a warning: “The folder may contain<br />
files. Do you want to delete it?”<br />
6. Rotate the [CURSOR÷VALUE] dial to select<br />
“YES” (delete) or “NO” (don’t delete).<br />
7. Press the [ENTER/SELECT] button to confirm<br />
your selection.<br />
The display changes to:<br />
NOTE<br />
If you press [MENU] while an empty folder is selected, the<br />
message “No item selected” is displayed to alert you to the<br />
fact that you cannot make any changes.<br />
4. Use the [CURSOR÷VALUE] dial to select<br />
“Search”.<br />
37
Backing <strong>Keyboard</strong> BK-5<br />
Using the BK-5 as a USB player<br />
5. Press the [ENTER/SELECT] button.<br />
The display changes to:<br />
The BK-5 searches the USB storage device for files<br />
whose names match the character string you entered<br />
and displays them. The title bar shows the path of the<br />
folder that contains the selected files.<br />
The first character position is already selected (“A”).<br />
6. Use the TONE buttons to select a different<br />
character.<br />
7. Rotate the [CURSOR÷VALUE] dial to select<br />
the next character position you want to<br />
change, then use the TONE buttons again.<br />
NOTE<br />
The “Search” function can find and display 100 files at a<br />
time.<br />
10. Rotate the [CURSOR÷VALUE] dial to select<br />
the song or rhythm you want to play back,<br />
then press the [ENTER/SELECT] button to<br />
confirm your selection.<br />
11. Press the [EXIT] button to close the list.<br />
12. Press the [START/STOP] button to start playback<br />
of the selected song or rhythm.<br />
r<br />
You can press the [NUMERIC] button to switch<br />
between upper- and lower-case characters as well as<br />
numbers. The [LWR] button can be used to delete the<br />
selected character. The [UP2] button allows you to<br />
insert a character.<br />
8. Repeat steps (6)~(7) to complete the character<br />
string you are looking for.<br />
9. Press the [ENTER/SELECT] button to start<br />
the search.<br />
38<br />
NOTE<br />
If you decide that you don’t want to use the “Search” function,<br />
press [EXIT] instead of [ENTER/SELECT].<br />
Activating the ‘Play All Songs’<br />
parameter for the USB memory<br />
The “Play All Songs” parameter allows you to play back<br />
all audio songs (WAV and mp3) or SMF songs on the<br />
connected USB memory.<br />
1. Connect an optional USB memory to the<br />
BK-5.<br />
After a few seconds, the display shows the contents<br />
of the USB memory.<br />
Press the [USB MEMORY] button if you inserted the<br />
USB memory at an earlier stage and now want to<br />
return to this display page.
Backing <strong>Keyboard</strong> BK-5 r<br />
Loop function (MARK A/B)<br />
2. Rotate the [CURSOR÷VALUE] dial to select<br />
the folder that contains the audio files you<br />
want to listen to.<br />
3. Press the [ENTER/SELECT] button to open<br />
the folder.<br />
4. Use the [CURSOR÷VALUE] dial to select the<br />
audio file where you want playback to start.<br />
5. Press [ENTER/SELECT] to confirm your selection.<br />
6. Press the [USB MEMORY] button to activate<br />
the playback function of the selected and all<br />
subsequent songs.<br />
NOTE<br />
.STL and .JPG files contained in the selected folder will be<br />
ignored when you start playback (see below).<br />
The icon in the lower left corner of the display page<br />
changes as follows:<br />
Deactivating the ‘Play All Songs’ function<br />
The “Play All Songs” function needs to be deactivated if<br />
you no longer need it. To do so, proceed as follows:<br />
1. If the display doesn’t currently show the<br />
contents of the connected USB memory,<br />
press the [USB MEMORY] button.<br />
2. Press the [USB MEMORY] button (again) to<br />
change the icon back to .<br />
Pressing the [®÷π] button now will only start playback<br />
of the selected song.<br />
Loop function (MARK A/B)<br />
The Loop function can be used to specify a passage,<br />
such as the chorus of a song, that will be repeated several<br />
times. This function is available for both audio and<br />
SMF songs. You can also use it to practise difficult song<br />
passages.<br />
Setting and using the loop positions<br />
1. Select the song you want to play back.<br />
2. Press the [START/STOP] button to start playback.<br />
7. Press the [®÷π] button to start playback of<br />
all audio songs.<br />
NOTE<br />
While playback of all songs is running, you can navigate<br />
the USB memory (to check its contents, for example). The<br />
“Play All Songs” function continues to play back the files of<br />
the folder you selected in step (2) above.<br />
If you select a different file while navigating (by pressing<br />
[ENTER/SELECT]), the “Play All Songs” function is switched<br />
off and the following message appears:<br />
3. When the BK-5 reaches the beginning of<br />
the passage you want to play back in a loop,<br />
press the VARIATION [3] button.<br />
The VARIATION [3] button flashes to indicate that the<br />
position has been set.<br />
8. Press the [π] button to stop sequential playback.<br />
39
Backing <strong>Keyboard</strong> BK-5<br />
Using the BK-5 as a USB player<br />
4. Wait until you reach the end of the passage<br />
to be played back in a loop, then press the<br />
VARIATION [4] button.<br />
The VARIATION [4] button lights, while VARIATION [3]<br />
keeps flashing. The loop’s start and end positions<br />
have been set and can be used.<br />
Here is what you have set so far (this is only an<br />
example):<br />
Flashes<br />
[3] [4]<br />
Lights<br />
5. Press the VARIATION [3] button (it lights) to<br />
activate the loop.<br />
The passage selected above is now played back over<br />
and over.<br />
[3]<br />
Lights<br />
: :<br />
6. Press the VARIATION [3] button again (it<br />
flashes) to deactivate loop playback.<br />
This does not delete the loop positions. The song is<br />
once again played back in the usual way (i.e. until the<br />
end).<br />
7. Press VARIATION [3] yet again (it lights) to<br />
return to the loop start position and activate<br />
the loop.<br />
NOTE<br />
The marker positions are deleted when you start playback<br />
of another song or switch off the BK-5.<br />
8. To delete the first and second marker positions,<br />
press the VARIATION [4] button.<br />
The VARIATION [3] and [4] buttons go dark and your<br />
loop setting is deleted.<br />
r<br />
40
Backing <strong>Keyboard</strong> BK-5 r<br />
Other important functions<br />
10. Other important functions<br />
This section presents other important functions you may need regularly.<br />
Changing the key<br />
This function allows you to transpose the BK-5’s pitch in<br />
semi-tone steps. Depending on the mode setting, this<br />
transposition applies to all sections or just a specific<br />
setting.<br />
NOTE<br />
If you choose to transpose the real-time parts, rhythm playback<br />
is also transposed.<br />
1. Press [KEY] button.<br />
Changing the octave<br />
This function allows you to transpose the real-time<br />
parts (UP1, UP2 and LWR) up or down in octave steps.<br />
1. If necessary, press the [EXIT] button to<br />
return to the main page.<br />
The display changes to:<br />
The display shows the current octave setting (“OCT”)<br />
for all 3 real-time parts.<br />
2. Use the [CURSOR÷VALUE] dial to select the<br />
“OCT” parameter of the real-time part<br />
whose setting you want to change.<br />
3. Press the [ENTER/SELECT] button.<br />
The selected “OCT” field is displayed in reverse.<br />
4. Rotate the [CURSOR÷VALUE] dial to select<br />
the desired setting.<br />
“Octave” setting<br />
–4~0~+4<br />
The current “KEY” setting (transposition interval) is<br />
displayed and already selected.<br />
NOTE<br />
Pressing and holding the [KEY] button locks the “Key” setting.<br />
2. Rotate the [CURSOR÷VALUE] dial to select<br />
the desired “Key” setting.<br />
5. Press the [ENTER/SELECT] button again.<br />
The “OCT” field is no longer selected and the<br />
[CURSOR÷VALUE] dial can be used to select other<br />
fields.<br />
NOTE<br />
You can also change the octave setting using [MENU] button‰<br />
“Performance Edit”‰ “Tone Part View”‰ “Octave<br />
Shift” (page 59).<br />
“Key” setting<br />
–6~0~+5 (semitone units)<br />
If the “Key” setting differs from “0”, the [KEY] indicator<br />
lights.<br />
After a few seconds, the “KEY” pop-up window disappears.<br />
Press the [EXIT] button to close it immediately.<br />
NOTE<br />
If you also need to change the “Mode” setting, see p. 62.<br />
41
Backing <strong>Keyboard</strong> BK-5<br />
Other important functions<br />
Using ‘Track Mute’ and ‘Center<br />
Cancel’<br />
You can use this function to mute tracks of rhythms or<br />
the melody part of the selected Standard MIDI File<br />
(SMF). After selecting a WAV or mp3 audio file, you can<br />
attenuate the vocal part at the center of the stereo<br />
image (“Center Cancel”). The Mute function’s behavior<br />
depends on the selected file type.<br />
1. Select a song (SMF or audio) or a rhythm.<br />
2. Press the [START/STOP] button to start playback.<br />
3. Press the [TRACK MUTE] (CENTER CANCEL)<br />
button (its indicator lights).<br />
1. Select a rhythm or an SMF song.<br />
2. Press and hold the [TRACK MUTE] (CENTER<br />
CANCEL) button.<br />
This function can also be selected using [MENU] button<br />
‰ “Global” ‰ “Rhythm/SMF Track Mute”.<br />
Depending on the file type, the display changes to…<br />
…or:<br />
r<br />
42<br />
The “Track Mute” or “Center Cancel” function will<br />
turn on. This depends on the file type you selected:<br />
File Type Function Explanation<br />
Rhythm Track Mute The specified rhythm<br />
track(s) is muted (Default:<br />
AC1~AC6).<br />
SMF Track Mute The specified Standard MIDI<br />
file track is muted (Default:<br />
channel 4).<br />
Audio<br />
(mp3,<br />
Wav)<br />
Center Cancel<br />
NOTE<br />
For some audio songs, the vocal sound may not be eliminated<br />
completely.<br />
4. Press the [TRACK MUTE] (CENTER CANCEL)<br />
button again to make its indicator go dark.<br />
This switches the “Track Mute” or “Center Cancel”<br />
function back off.<br />
Selecting the track(s) to mute for rhythms<br />
or SMF songs<br />
The following procedure allows you to specify the track<br />
of the selected Standard MIDI File that should be muted<br />
when you switch on the [TRACK MUTE] button.<br />
NOTE<br />
This function is not available for audio files.<br />
Sounds in the center (the<br />
melodic portion of the<br />
sound) will be minimized.<br />
When you start playback, you will notice that active<br />
parts are indicated by moving bar graphs that simulate<br />
level meters. The bar graphs of muted parts do<br />
not move.<br />
3. Rotate the [CURSOR÷VALUE] dial to move<br />
the cursor to the track you want to mute.<br />
4. Press the [ENTER/SELECT] button to highlight<br />
the corresponding parameter.<br />
5. Rotate the dial to change the setting and<br />
press [ENTER/SELECT] to confirm you setting.<br />
The possibilities are:<br />
Display indication<br />
<br />
M<br />
The associated track is played back.<br />
The associated track is no longer<br />
played back (muted).<br />
6. If you want to save your selection of the<br />
track(s) that should be muted for any<br />
rhythm or SMF file you play back, see “Save<br />
Global” on p. 70.<br />
7. If there is no need to save your settings,<br />
press and hold the [EXIT] button to return to<br />
the main page.
Backing <strong>Keyboard</strong> BK-5 r<br />
Using the ‘Melody Intell(igence)’ function<br />
Using the ‘Melody Intell(igence)’<br />
function<br />
The Arranger can add a counter-melody to the notes<br />
you play with the Upper1 part (UP1). Those automatic<br />
harmonies are based on the chords you play in the<br />
chord recognition area.<br />
The counter-melody is played by the MELODY INTELL<br />
part. There are 18 harmony types to choose from.<br />
1. Press the [MELODY INTELL] button (so that<br />
it lights).<br />
LWR part (if it is active). Note numbers above the<br />
split point can be used to play melodies using the<br />
UP1 and/or UP2 part.<br />
In Split mode, the “Type” parameter (see p. 62) is<br />
automatically set to “Intelligent”.<br />
NOTE<br />
See page 24 for how to select the real-time parts you want<br />
to use.<br />
NOTE<br />
You can activate a “Hold” function for the LWR part. See<br />
“Lower Hold” on p. 62.<br />
2. Press the [SPLIT] button again.<br />
The BK-5 leaves Split mode, the [SPLIT] indicator goes<br />
dark and chord recognition (see “Type” on p. 62) is set<br />
to “Pianist2”.<br />
This adds a harmony to the notes you play.<br />
2. Press the [MELODY INTELL] button again (its<br />
indicator goes dark) to switch off the<br />
counter-melody.<br />
Setting the volume of the real-time<br />
parts<br />
The BK-5 provides an easy way to change the volume<br />
balance of the Upper1, Upper2 and Lower parts.<br />
1. Simultaneously press the [LWR] and [UP2]<br />
buttons to call up the “Parts Volume” page.<br />
NOTE<br />
Press and hold the [MELODY INTELL] button to open the<br />
window where you can change the “Melody Intelligence”<br />
settings (see p. 64).<br />
Using Split mode<br />
In Split mode, the BK-5’s keyboard transmits notes<br />
played to the left of the split point to the Arranger parts.<br />
The notes to the right of the split point, however, are<br />
played back by the real-time parts..<br />
The “Volume” value of the last part you selected (on<br />
the main page) is already highlighted.<br />
NOTE<br />
In most cases, the default setting for the split point is note<br />
number 60 (C4). You can change the split point to a different<br />
note (see “Split Point” on p. 61).<br />
1. Press the [SPLIT] button (its indicator<br />
lights).<br />
The BK-5 is now in Split mode: note numbers below<br />
the split point (see “Split” on p. 56) are used to transpose<br />
rhythm playback in real-time and to play the<br />
2. Rotate the [CURSOR÷VALUE] dial to set the<br />
desired volume for that part (0~127).<br />
3. Press the [UP2] button to select the “UP2<br />
Volume” value.<br />
Pressing it again selects the “UP1 Volume” value.<br />
4. Repeat step (2) above.<br />
5. Press the [LWR] button to select the “LWR<br />
Volume” value.<br />
6. Repeat step (2) above.<br />
43
Backing <strong>Keyboard</strong> BK-5<br />
Other important functions<br />
NOTE<br />
You can also select the desired volume value by pressing<br />
the [ENTER/SELECT] button, rotating the [CURSOR÷VALUE]<br />
dial and pressing [ENTER/SELECT] again.<br />
7. Press the [EXIT] button to return to the main<br />
page.<br />
r<br />
44
Backing <strong>Keyboard</strong> BK-5 r<br />
Performance Lists<br />
11. Performance Lists<br />
Performance/Music Assistant/<br />
Factory Songs info<br />
The “Performance List” is a list of up to 999 Performance<br />
memories. Each Performance memory contains a reference<br />
to the desired rhythm or song and all settings you<br />
want to load along with that rhythm or song (see “‘Performance<br />
Edit’ parameters” on p. 56), including settings<br />
like INTRO/ENDING status, selected VARIATION, etc.<br />
The Performance memories you create are saved to the<br />
selected “Performance List”. This allows you to prepare<br />
one set of Performance memories for weddings, another<br />
for corporate events, a third for anniversaries, etc. Performance<br />
Lists always reside on a USB memory.<br />
It is perfectly possible to program several Performance<br />
memories for one song. Selecting a Performance memory<br />
is a lot faster than calling up one of the BK-5’s functions,<br />
modifying the settings, etc., while playing. You<br />
could program one Performance memory for the first<br />
part of a song, another for the bridge and a third one for<br />
the closing section. Doing so allows you to “play” with<br />
the effect settings of the various processors, for example.<br />
NOTE<br />
The BK-5 is supplied with one Performance List called “Music<br />
Assistant” and a second called “Factory Songs” that contains 5<br />
SMF files. These lists cannot be deleted or edited.<br />
Loading a Performance/‘Music<br />
Assistant’/‘Factory Songs’ List<br />
1. Switch on the BK-5.<br />
See page 20.<br />
2. Connect an optional USB memory to the<br />
BK-5.<br />
This step is unnecessary if you want to use the “Music<br />
Assistant” or “Factory Songs” list, because these lists<br />
reside in the BK-5’s internal memory.<br />
3. Press the PERFORMANCE [LIST] button.<br />
The display now shows all Performance Lists it found<br />
on the USB memory. (The internal “Music Assistant”<br />
and “Factory Songs” lists are always displayed in the<br />
top line.)<br />
NOTE<br />
If you already loaded a Performance List, the display immediately<br />
displays the Performance memories it contains. To<br />
load a different Performance List from the USB memory,<br />
press the PERFORMANCE [LIST] button again and proceed<br />
with step (4) below.<br />
The “LIST” icon at the bottom means that you can<br />
press the [LIST] button to alternate between the list<br />
of Performance List files (see the illustration above)<br />
and the contents of the currently selected list (see<br />
the illustration below).<br />
NOTE<br />
If the USB memory contains no Performance List files, or if<br />
the memory is not connected (properly), the BK-5 only displays<br />
the “Music Assistant” and “Factory Songs” list.<br />
4. Rotate the [CURSOR÷VALUE] dial to select<br />
the Performance List you want to use.<br />
5. Press the [ENTER/SELECT] button to confirm<br />
your selection.<br />
(In our example, we selected the “Music Assistant”<br />
list.) The display changes to:<br />
45
Backing <strong>Keyboard</strong> BK-5<br />
Performance Lists<br />
You can now select a Performance memory (see<br />
below).<br />
If you need to load another Performance List, press<br />
the PERFORMANCE [LIST] button again.<br />
Recalling a Performance/‘Music<br />
Assistant’/‘Factory Songs’ memory<br />
Here is how to select a Performance/ “Music Assistant”/<br />
“Factory Songs” memory from the last list you loaded<br />
(see p. 45).<br />
1. If the display doesn’t yet show a list of Performance/“Music<br />
Assistant”/“Factory Songs”<br />
memories, press the PERFORMANCE [LIST]<br />
button.<br />
In this example, we loaded the “Music Assistant” List.<br />
2. Rotate the [CURSOR÷VALUE] dial to select<br />
the memory whose settings you want to use,<br />
then press the [ENTER/SELECT] button to<br />
confirm your selection.<br />
During playback of that rhythm or song, you can<br />
already select a new Performance/“Music Assistant”/<br />
“Factory Songs” memory.<br />
3. If you need to return to the main page,<br />
press the [EXIT] button.<br />
To return to the page that lists the memories, press<br />
PERFORMANCE [LIST] again.<br />
Quickly locating Performance<br />
memories<br />
Performance memories can also be loaded using the<br />
BK-5’s “Numeric” function. See “Using the ‘Numeric’<br />
function to select Tones, Rhythms and Performances”<br />
on p. 25 for details.<br />
Saving your settings as a<br />
Performance<br />
1. Select a rhythm or song.<br />
2. Select all settings you would like to use for<br />
this rhythm or song.<br />
You can, for instance, assign the desired Tones to the<br />
real-time parts, switch on the [INTRO] button, modify<br />
the “Performance Edit” settings, etc.<br />
3. Press the [WRITE] button to jump to the<br />
“Write Performance” page.<br />
The [WRITE] indicator flashes and the display changes<br />
to:<br />
The PERFORMANCE [LIST] button lights to signal that<br />
the BK-5 is now using the settings of the selected<br />
Performance memory. The name of that memory is<br />
highlighted.<br />
r<br />
46<br />
The selected memory also refers to a rhythm or song,<br />
which can be started in the usual ways ([START/STOP]<br />
button, [SYNC START], etc.).<br />
By default, the BK-5 assigns the name of the selected<br />
rhythm, song or of the last Performance you loaded<br />
to the Performance settings you are about to save. If<br />
you agree with that name, proceed with step (7)<br />
below.<br />
4. Rotate the [CURSOR÷VALUE] dial to select<br />
the desired position.
Backing <strong>Keyboard</strong> BK-5 r<br />
Other Performance List functions<br />
5. Use the TONE buttons to enter the desired<br />
characters.<br />
4. Press the [MENU] button.<br />
6. Repeat steps (4) and (5) to enter the<br />
remaining characters.<br />
NOTE<br />
You can press the [NUMERIC] button to switch between<br />
upper- and lower-case characters as well as numbers. The<br />
[LWR] button can be used to delete the selected character.<br />
The [UP2] button allows you to insert a character.<br />
7. Press the [WRITE] button to save your settings,<br />
thereby creating a new Performance<br />
memory.<br />
This memory is added at the end of the currently<br />
selected Performance List (see “Loading a Performance/‘Music<br />
Assistant’/‘Factory Songs’ List” on<br />
p. 45).<br />
NOTE<br />
If you haven’t loaded any Performance List since switching<br />
on the BK-5, a new Performance List is created, and your<br />
Performance memory becomes its first entry.<br />
Other Performance List functions<br />
1. Connect a USB memory with at least one<br />
Performance List to the BK-5.<br />
The display now changes to a page with the following<br />
options:<br />
Function<br />
Rename*<br />
Delete*<br />
Make New<br />
Explanation<br />
Allows you to rename the selected Performance<br />
List.<br />
Deletes the selected Performance List.<br />
Allows you to create a new (empty) Performance<br />
List.<br />
[*] Not available if you selected the “Music Assistant” or “Factory<br />
Songs” list in step (3) above.<br />
5. Rotate the dial to select the desired option,<br />
then press the [ENTER/SELECT].<br />
If you select ‘Rename’<br />
The display changes to:<br />
2. Press the PERFORMANCE [LIST] button.<br />
The display now shows all Performance Lists on the<br />
connected USB memory.<br />
3. Rotate the dial to select the desired Performance<br />
List.<br />
This page allows you to change the name of the<br />
selected Performance List.<br />
1. Rotate the [CURSOR÷VALUE] dial to select<br />
the desired character position.<br />
You can press the [NUMERIC] button to switch<br />
between upper- and lower-case characters as well as<br />
numbers. The [LWR] button can be used to delete the<br />
selected character. The [UP2] button allows you to<br />
insert a character.<br />
2. Use the TONE buttons to enter the desired<br />
characters.<br />
47
Backing <strong>Keyboard</strong> BK-5<br />
Performance Lists<br />
3. Repeat steps (1) and (2) above to complete<br />
the name.<br />
4. Press the [WRITE] button to save the Performance<br />
List under the new name.<br />
The display briefly confirms the operation and the<br />
returns to the page with all Performance List files on<br />
your USB memory.<br />
If the USB memory already contains a file of the<br />
name you have entered, the display asks you whether<br />
it is OK to overwrite the other Performance List file.<br />
In that case, select “YES” to replace the other Performance<br />
List file with the one whose name you<br />
changed. (Select “NO” to return to the page where<br />
you can change the name.) Then, press the [ENTER/<br />
SELECT] button.<br />
If you select ‘Delete’<br />
The display changes to:<br />
This page allows you to delete the selected Performance<br />
List.<br />
1. Rotate the [CURSOR÷VALUE] dial to select<br />
“YES”, then press the [ENTER/SELECT] button<br />
to delete the Performance List.<br />
Select “NO” if you do not want to delete the Performance<br />
List after all.<br />
The display briefly confirms that the selected Performance<br />
List has been deleted and then returns to the<br />
page with all Performance List files on your USB<br />
memory.<br />
1. Rotate the [CURSOR÷VALUE] dial to select<br />
the desired character, then use the TONE<br />
buttons.<br />
You can press the [NUMERIC] button to switch<br />
between upper- and lower-case characters as well as<br />
numbers. The [LWR] button can be used to delete the<br />
selected character. The [UP2] button allows you to<br />
insert a character.<br />
2. Rotate the [CURSOR÷VALUE] dial to select<br />
the next character position you want to<br />
change, then use the TONE buttons again.<br />
3. Repeat steps (1) and (2) above to complete<br />
the name.<br />
4. Press the [WRITE] button to create the new<br />
Performance List, which is currently empty.<br />
If the USB memory already contains a file of the<br />
name you have entered, the display asks you whether<br />
it is OK to overwrite the other Performance List file.<br />
In that case, select “YES” to replace the other Performance<br />
List file with the one you want to create.<br />
(Select “NO” to return to the page where you can<br />
change the name.) Then, press the [ENTER/SELECT]<br />
button.<br />
The display returns to the page where the Performance<br />
Lists are displayed, and the newly created list<br />
is highlighted.<br />
NOTE<br />
The new Performance List file is saved to the “My Performances”<br />
folder on the USB memory. If this folder doesn’t<br />
yet exist, it will be created automatically.<br />
Editing Performance memories<br />
Whenever the display shows all Performance memories<br />
to which the selected List refers, you can press the<br />
[MENU] button to edit the memories. The “Edit” option<br />
allows you to do the following:<br />
If you select ‘Make New List’<br />
The display changes to:<br />
r<br />
48<br />
This page allows you to create a new Performance<br />
List whose name is selected automatically by the<br />
BK-5. If you are happy with that name, proceed with<br />
step (4) below. Otherwise…<br />
Operation<br />
Delete<br />
Performance<br />
Move Performance<br />
Save Performance<br />
List<br />
Explanation<br />
Deletes the selected Performance<br />
memory from the active list.<br />
Allows you to change the order in<br />
which the Performance memories<br />
appear in the selected Performance<br />
List.<br />
Allows you to save the edited list.
Backing <strong>Keyboard</strong> BK-5 r<br />
Editing Performance memories<br />
Delete Performance<br />
1. Select the Performance memory you want to<br />
remove from the list.<br />
2. Press the [MENU] button.<br />
If you did not save the Performance List, the BK-5<br />
now signals that you need to save it to preserve your<br />
changes.<br />
3. If necessary, rotate the [CURSOR÷VALUE]<br />
dial to select “Delete Performance”, then<br />
press the [ENTER/SELECT] button.<br />
The display changes to:<br />
9. Rotate the dial to select “YES” to save your<br />
changes to the USB memory (or “NO” if you<br />
wish to keep the previous <strong>version</strong>).<br />
10. Press the [ENTER/SELECT] button to confirm<br />
your selection.<br />
■ Move Performance<br />
1. Rotate the [CURSOR÷VALUE] dial to select<br />
the Performance memory you want to move<br />
to a different position inside the list.<br />
2. Press the [MENU] button.<br />
4. Rotate the dial to select “YES” to delete the<br />
Performance memory (or “NO” if you wish to<br />
keep it).<br />
5. Press the [ENTER/SELECT] button to confirm<br />
your selection.<br />
The display briefly confirms that the Performance<br />
memory has been deleted.<br />
If you like, you can now select another Performance<br />
memory you want to delete, press the [MENU] button<br />
to confirm and repeat from step (3).<br />
To save your edited Performance List, proceed with<br />
step (6). If you don’t want to save it, skip to step (8).<br />
3. Rotate the [CURSOR÷VALUE] dial to select<br />
“Move Performance”, then press the [ENTER/<br />
SELECT] button.<br />
The display changes to:<br />
Saving the edited Performance List<br />
6. Press the [MENU] button.<br />
7. Rotate the [CURSOR÷VALUE] dial to select<br />
“Save Performance List”, then press the<br />
[ENTER/SELECT] button.<br />
A message confirms that the data have been saved.<br />
8. Press the [EXIT] button.<br />
4. Rotate the dial to move the selected Performance<br />
memory to the desired position, then<br />
press the [ENTER/SELECT] button.<br />
You can now select another Performance memory<br />
you want to move, press the [MENU] button to confirm<br />
and repeat from step (3).<br />
See “Saving the edited Performance List” if you want<br />
to save the edited list.<br />
49
Backing <strong>Keyboard</strong> BK-5<br />
Adding pictures to the music<br />
12. Adding pictures to the music<br />
You can connect an external display or a television to the BK-5, and use it to watch a slide show, a notation, or video<br />
footage from another device connected to the BK-5.<br />
Displaying photos automatically<br />
The BK-5 can display photos in succession. You can<br />
have the photos switch automatically, somewhat like<br />
watching a movie. In addition, you can choose a picture,<br />
which will be used as background on an external screen.<br />
Enjoying a VIMA TUNES slide show<br />
You can watch a slide show while listening to a song on<br />
an optional “VIMA TUNES” CD-ROM (produced for the<br />
VIMA series).<br />
Songs on “VIMA TUNES” CD-ROMs provide slide show<br />
images suitable for each song, making it easy for you to<br />
enjoy a slide show without having to provide your own<br />
photos.<br />
1. Connect an external screen to the BK-5 (see<br />
p. 18).<br />
2. Connect an optional CD player to the BK-5’s<br />
USB MEMORY port.<br />
3. Insert the desired “VIMA TUNES” CD-ROM<br />
into the CD drive.<br />
NOTE<br />
“VIMA TUNES” songs are sold on CD-ROMs available from<br />
your <strong>Roland</strong> dealer.<br />
The BK-5 now displays a list of the songs on the<br />
CD-ROM. If you don’t see that list, press the<br />
[USB MEMORY] button.<br />
4. Select the song you want to play back by<br />
first rotating the [CURSOR÷VALUE] dial and<br />
then pressing the [ENTER/SELECT] button to<br />
confirm your selection.<br />
The [USB MEMORY] button’s indicator lights.<br />
5. Press the [START/STOP] (®÷π) button to play<br />
back the song.<br />
NOTE<br />
When you press the [SYNC START] (■) button to stop song<br />
playback, the slideshow also stops. When you load another<br />
“VIMA TUNES” song, the previous slideshow stops and the<br />
display shows the first picture for the new song.<br />
Enjoying a slide show of your own pictures<br />
You can watch a slide show while listening to a song on<br />
a USB storage device.<br />
NOTE<br />
The slide show only starts if the folder that contains the<br />
desired pictures has the same name as the song file you<br />
selected. Also, the folder must be located on the same level<br />
within the USB memory’s file hierarchy.<br />
1. Use a graphic program on your computer to<br />
prepare the pictures you want to use.<br />
Image data that can be displayed:<br />
Size Recommended: 512 x 384 or 1024 x 768<br />
pixels.<br />
(Images of 4096 x 3072 pixels or smaller<br />
and 4MB or less are supported).<br />
Note: If you use images that are larger<br />
than the recommended size, it may take<br />
longer to switch images.<br />
Format<br />
JPEG format (.JPG)<br />
2. Connect the USB memory to your computer<br />
and create a folder named “Amazing Grace”<br />
(for example) on the USB storage device.<br />
3. Copy the pictures you want to display for<br />
this song to the “Amazing Grace” folder.<br />
4. Copy the song “Amazing Grace” to the same<br />
level as the folder of the same name.<br />
Do not put the song file inside the folder.<br />
5. Disconnect the USB memory from your computer<br />
in accordance with the standard procedure<br />
for the operating system you are<br />
using.<br />
r<br />
50<br />
A slide show suitable for the character of the song<br />
will be shown on the external display or television set<br />
connected to the BK-5.
Backing <strong>Keyboard</strong> BK-5 r<br />
Using one of your own pictures as background<br />
6. Connect your USB memory to the BK-5’s<br />
USB MEMORY port.<br />
3. To revert to the colored background or logo,<br />
you must select it using the “Background<br />
Mode” parameter (see p. 68).<br />
If you once again select a .JPG picture (see above),<br />
the “Background Mode” parameter is again set to<br />
“User”.<br />
The BK-5 automatically shows the contents of the<br />
USB memory you inserted.<br />
7. Select the song you want to play back<br />
(“Amazing Grace” in our example) by first<br />
rotating the [CURSOR÷VALUE] dial and then<br />
pressing it to confirm your selection.<br />
8. Press the [®÷π] button to play back the song.<br />
The slide show of the pictures inside the “Amazing<br />
Grace” folder begins.<br />
■ ‘User’ background and slide shows<br />
Even after selecting a new background picture<br />
(“User”), you can still take advantage of the BK-5’s<br />
slide show functionality (see p. 50).<br />
If you select a song for which there is no picture<br />
folder on the same file level as the song file, however,<br />
your “User” background is displayed.<br />
■ Picture display and song lyrics<br />
If the first words (Lyrics data) of the last song you<br />
played back remain on the external screen while they<br />
are no longer needed, switch off the “External Lyrics”<br />
function (see p. 55) to make them disappear.<br />
NOTE<br />
The slide show stops when you pause or stop song playback,<br />
but the last picture is still displayed. You need to load<br />
a different song that has no associated slide show to cause<br />
the background or logo to be displayed (see “Using one of<br />
your own pictures as background”).<br />
Using one of your own pictures as<br />
background<br />
The BK-5 allows you to use one of your own pictures as<br />
screen background, allowing you to customize your performances.<br />
1. Connect the USB storage device that contains<br />
the picture you want to use to the<br />
BK-5’s USB MEMORY port.<br />
The display shows a list of the files on the USB storage<br />
device.<br />
2. Select the .JPG file you want to use.<br />
That picture now appears on the external screen (if<br />
connected).<br />
This picture will be considered your “User” setting<br />
and the “Background Mode” parameter (see p. 68)<br />
will be set to “USER”.<br />
51
Backing <strong>Keyboard</strong> BK-5<br />
Recording your performance as audio data<br />
13. Recording your performance as audio data<br />
Your BK-5 allows you to record everything it can transmit to its outputs, i.e. rhythm or song playback, your playing, your<br />
singing, and any audio signal transmitted to the BK-5. (The metronome signal is not recorded.)<br />
Feel free to connect the master outputs of an external<br />
mixing console to the BK-5’s AUDIO INPUT (STEREO)<br />
socket if you want to record your band or the signals of<br />
an accordion, additional synthesizers, pianos, drum<br />
machines, etc., as well.<br />
The resulting audio file is stored in the WAV format (not<br />
mp3), which allows you to burn your recordings onto a<br />
CD using your computer.<br />
NOTE<br />
You will need a USB memory to record your performance.<br />
Recording<br />
NOTE<br />
The following is based on the assumption that the “Rec Audio<br />
Sync” parameter (page 68) is active.<br />
1. Connect the USB memory to which you wish<br />
to save the audio data.<br />
NOTE<br />
Use USB memory sold by <strong>Roland</strong> (M-UF-series). We cannot<br />
guarantee operation if any other USB memory is used.<br />
2. Prepare everything you want to record:<br />
• Select the rhythm or song you want to use as accompaniment<br />
• Set the levels and effects, etc.<br />
3. Set the desired balance between the<br />
rhythm/song and the real-time parts using<br />
the BALANCE buttons.<br />
You may also want to set the “Audio In Level” parameter<br />
(page 68).<br />
4. Press the [AUDIO REC] button (its indicator<br />
flashes).<br />
5. Press the [START/STOP] button.<br />
The indicators of the [AUDIO REC] and [START/STOP]<br />
buttons light and the BK-5 starts playing back the<br />
selected rhythm or song and recording. Everything<br />
you play on the keyboard is recorded.<br />
6. At the end of the song, press the<br />
[AUDIO REC] or [START/STOP] button to stop<br />
recording.<br />
Rhythm or song playback and recording stop. The following<br />
message appears:<br />
You can now…<br />
(a) Save the song under a new name.<br />
‰ “Saving your recording as an audio file” on p. 53<br />
(b) Save the song under the name suggested by the BK-5<br />
(“My recording001”).<br />
‰Press the [WRITE] button. After a few seconds, the<br />
display will return to the main page. In this case, your<br />
audio file is saved in the “My Recordings” folder.<br />
(c) Decide to discard your recording, because you are<br />
unhappy with it.<br />
‰ Press the [EXIT] button. The display changes to:<br />
r<br />
52<br />
NOTE<br />
If you pressed the [AUDIO REC] button by accident, press<br />
and hold it until its indicator goes dark again.<br />
‰ Rotate the [CURSOR÷VALUE] dial to select “YES”,<br />
then press [ENTER/SELECT] to erase your recording.
Backing <strong>Keyboard</strong> BK-5 r<br />
Recording<br />
NOTE<br />
Selecting “NO” here takes you back to the state where you<br />
can choose between options (a) and (b).<br />
Listening to your recording<br />
If you selected (a) or (b) above, you can listen to your<br />
recorded performance:<br />
1. Press the [START/STOP] button to start playback<br />
of your recording.<br />
If your recording seems too loud or too soft, you may<br />
want to change the setting of the “Rec Audio Level”<br />
parameter ([MENU] button ‰ “Global“‰ “Utility”‰<br />
“Rec Audio Level” on p. 68).<br />
You can press the [NUMERIC] button to switch<br />
between upper- and lower-case characters as well as<br />
numbers. The [LWR] button can be used to delete the<br />
selected character. The [UP2] button allows you to<br />
insert a character.<br />
4. Repeat steps (2) and (3) to complete the<br />
name.<br />
5. Press the [WRITE] button (its indicator<br />
flashes) to save your recording under the<br />
new name and to return to the main page.<br />
If the USB memory already contains a file of that<br />
name, you will be asked whether you want to overwrite<br />
it:<br />
NOTE<br />
The BK-5 provides a second recording mode that allows<br />
you to start recording before the song you selected<br />
([MENU] button ‰ “Global“‰ “Utility”‰ “Rec Audio Sync”<br />
on p. 68).<br />
Saving your recording as an audio file<br />
When you stop recording (see above), the display shows<br />
the following message:<br />
NOTE<br />
The name suggestion displayed here depends on the first<br />
recording. It will, however, be followed by an incremental<br />
number.<br />
1. If you want to name your new song, proceed<br />
with step (2).<br />
If you are happy with the name suggested by the<br />
BK-5, simply press the [WRITE] button (see step (5)<br />
below).<br />
2. Use the TONE buttons to select a different<br />
character.<br />
3. Rotate the [CURSOR÷VALUE] dial to select<br />
the next character position you want to<br />
change, then use the TONE buttons again.<br />
In this case, select “YES” by first rotating the<br />
[CURSOR÷VALUE] dial and then pressing the [ENTER/<br />
SELECT] button to replace the old file with the new<br />
one (the old file will be lost).<br />
Otherwise, select “NO” and press [ENTER/SELECT] to<br />
return to the page where you can change the name,<br />
and enter a different name, then press the [WRITE]<br />
button.<br />
When you press the [WRITE] button, your audio file is<br />
saved to the “My Recordings” folder on the USB<br />
memory.<br />
53
Backing <strong>Keyboard</strong> BK-5<br />
Lock functions<br />
14. Lock functions<br />
The BK-5 allows you to lock (protect) several settings to ensure that they no longer change when you select a different<br />
Performance memory.<br />
The BK-5’s locks are data filters that allow you to use The lock status of the functions that provide this protection<br />
is also displayed on the main page:<br />
your Performance memories more efficiently, because<br />
you can ignore settings that may be fine for one song<br />
(the one you prepared the Performance memory for),<br />
but not for another.<br />
Here is an example: Suppose you select a Performance<br />
memory that assigns the “French Horns” sound to the<br />
Upper1 part, which you want to keep for the entire song<br />
(or set). In this case lock (i.e. protect) the Upper1 part<br />
after selecting this memory to ensure that subsequent<br />
Performance memories you recall modify all of the<br />
BK-5’s eligible settings—except the Upper1 part (which<br />
goes on using the “French Horns” sound).<br />
All settings that can be protected are indicated by<br />
means of the legend “Hold to LOCK”.<br />
NOTE<br />
The “Performance Hold” settings are linked to these buttons<br />
and therefore adopt the on/off status you select on the BK-5’s<br />
front panel.<br />
NOTE<br />
Unlike the other lock parameters, the protection of the tempo<br />
setting (see [MENU] button‰ “Performance Edit”‰ “Arranger<br />
Setting” ‰ “Tempo”, page 63) also applies to rhythm selection.<br />
Each rhythm has a preset tempo value that is recalled when<br />
you select it. While the tempo setting is locked, the tempo no<br />
longer changes when you select a different rhythm.<br />
Switching the locks on and off<br />
In the example shown here, you will learn how to<br />
exclude rhythm changes from Performance selections.<br />
The same procedure (albeit with different buttons) also<br />
applies to the tempo (press and hold [TAP TEMPO]) and<br />
“Key” (press and hold [KEY]) settings as well as to Tone<br />
selection (for each of the real-time parts individually).<br />
1. Connect the USB memory and load a Performance<br />
memory (page 45) or a rhythm<br />
(page 29).<br />
2. Press and hold one of the RHYTHM FAMILY<br />
buttons.<br />
NOTE<br />
The “Save Global” parameter (page 70) also saves the lock (and<br />
hence the “Performance Hold”) settings.<br />
Whenever you switch a lock function on or off, the display<br />
briefly informs you about this:<br />
A “Rhythm” pop-up window appears with a closed<br />
lock (see left). (If you repeat step (2), the pop-up window<br />
will display an open lock to inform you that the<br />
lock function has been cancelled.)<br />
3. Start playback of the selected rhythm.<br />
4. Select a different Performance memory.<br />
If the lock next to “RHYTHM” on the main page is<br />
closed, recalling another Performance does not<br />
change the rhythm.<br />
5. Again press and hold any RHYTHM FAMILY<br />
button to unlock the “RHYTHM” function.<br />
r<br />
54<br />
The Upper1 part no longer changes<br />
Tones.<br />
The Upper1 part will change Tones<br />
when you select a different Performance<br />
memory.
Backing <strong>Keyboard</strong> BK-5 r<br />
Menu options<br />
15. Menu options<br />
The BK-5’s [MENU] button provides access to the available parameters and functions.<br />
General procedure<br />
1. Press the [MENU] button (its indicator<br />
lights).<br />
The display changes to:<br />
2. Rotate the [CURSOR÷VALUE] dial to select<br />
the desired function group.<br />
Function group<br />
Mastering Tools<br />
Makeup Tools<br />
Rhythm<br />
Composer<br />
MIDI<br />
Factory Reset<br />
Format USB<br />
Device<br />
Explanation<br />
These functions allow you to set the<br />
global compressor and equalizer (see<br />
p. 71).<br />
These functions allow you to edit the<br />
selected rhythm or SMF song in an<br />
intuitive way, without caring too much<br />
about the underlying MIDI parameters.<br />
See page 74.<br />
This function group allows you to create<br />
new rhythms or to edit existing<br />
ones.<br />
This function group allows you to edit<br />
the BK-5’s MIDI parameters (see<br />
p. 102).<br />
This command allows you to load the<br />
BK-5’s factory settings (see p. 111).<br />
This command allows you to format an<br />
optional USB memory (see p. 111).<br />
3. Press the [ENTER/SELECT] button to go to<br />
the display page where you can edit the<br />
parameters of the selected group, or to execute<br />
the selected command.<br />
The following function groups are available:<br />
Function group<br />
Internal Lyrics<br />
External Lyrics<br />
Performance<br />
Edit<br />
Global<br />
Explanation<br />
Allows you to activate the display of<br />
lyrics data on the BK-5 itself. (Only for<br />
SMF and mp3 files for which there are<br />
lyrics data.)<br />
Allows you to cancel (“Off”) or activate<br />
(“On”) the display of song lyrics on an<br />
external screen.<br />
This function group allows you to<br />
select different Tones and effects settings<br />
for the keyboard parts, the<br />
selected rhythm, to set the Arranger’s<br />
behavior, the split point, etc. All settings<br />
of this group can be saved to a<br />
Performance memory. See “‘Performance<br />
Edit’ parameters” on p. 56.<br />
This function group contains parameters<br />
that apply to all sections of the<br />
BK-5 (see p. 65).<br />
Internal Lyrics<br />
The BK-5’s display can show the lyrics of Standard MIDI<br />
Files or mp3 songs you load. If such song files contain<br />
Lyrics data, the lyrics are always displayed on an external<br />
screen you connect to the BK-5 (see “Connecting a<br />
television set” on p. 18), unless you set the “External Lyrics”<br />
parameter to “Off” (see below).<br />
Sometimes, however, it may be wiser to orient the external<br />
screen in such a way that the audience can easily<br />
follow the lyrics, which may then mean that you no<br />
longer see what is displayed. If you need to see the lyrics,<br />
you can follow them on the BK-5’s internal display:<br />
1. Load a song with lyrics data (see p. 35).<br />
2. Select the “Internal Lyrics” command (see<br />
“General procedure”).<br />
3. Press the [ENTER/SELECT] button.<br />
One Touch Edit<br />
This functions allows you to edit the<br />
ONE TOUCH memories (and to save<br />
your changes).<br />
55
Backing <strong>Keyboard</strong> BK-5<br />
Menu options<br />
The internal display now shows the lyrics of the<br />
selected song (4 lines at a time) and the chords of the<br />
song (only for SMF files).<br />
Parameter/Group<br />
Save As Default<br />
Explanation<br />
This function allows you to save all “Performance<br />
Edit” settings as the new<br />
defaults that will be loaded each time<br />
you switch on the BK-5.<br />
‘Tone Part View’ parameters<br />
This function group can be selected using [MENU] button<br />
‰ “Performance Edit” ‰ “Tone Part View”.<br />
4. At the end of the song, press and hold the<br />
[EXIT] button to return to the main page.<br />
NOTE<br />
The internal display always shows four lines of lyrics and<br />
the chord symbols (this cannot be changed).<br />
r<br />
56<br />
External Lyrics<br />
This is, in fact, a switch that allows you to cancel (“Off”)<br />
or activate (“On”) the display of song lyrics on an external<br />
screen.<br />
‘Performance Edit’ parameters<br />
The following parameters can be set for each Performance<br />
memory:<br />
Parameter/Group<br />
Tone Part View<br />
Tone Part MFX<br />
Rhythm Parts<br />
Split<br />
Key<br />
Arranger Setting<br />
Explanation<br />
This is where you can edit settings<br />
related to Tones. See page 56.<br />
Contains the effects parameters for the<br />
keyboard parts (LWR, UP2, UP1). See<br />
page 60.<br />
This group contains all parameters of the<br />
rhythm parts. See page 61.<br />
This parameter allows you to change the<br />
split point, i.e. the separation between<br />
the lower and upper keyboard zones. See<br />
page 61.<br />
Allows you to transpose the BK-5 in<br />
semi-tone steps up or down. See<br />
page 41.<br />
This function group allows you to specify<br />
where and how the selected rhythm<br />
should scan the note messages generated<br />
by your playing for chord information.<br />
See page 62.<br />
Melody Intelligent Allows you to set the “Melody Intelligence”<br />
function. See page 64. This page<br />
can also be selected by pressing and<br />
holding the [MELODY INTELL] button.<br />
1. Use the [CURSOR÷VALUE] dial and [ENTER/<br />
SELECT] button to select the keyboard part<br />
you want to edit (LWR, UP2, UP1).<br />
The display shows the settings for the selected keyboard<br />
part.<br />
2. Use the dial to select and set the desired<br />
parameter(s).<br />
The following parameters are available:<br />
Tone<br />
Allows you to select a different Tone. See page 119<br />
for a list of available Tones and Drum Sets. While<br />
selecting a Tone, you can press a Tone selection button<br />
to select a different family.<br />
Parameter<br />
Tone<br />
Explanation<br />
The number of Tones depends on the<br />
selected family.<br />
Volume<br />
Adjusts the volume of the selected keyboard part.<br />
Selecting “0” means that the part is question is no<br />
longer audible.<br />
Parameter<br />
Setting<br />
Volume 0~127<br />
Reverb Send<br />
Use this parameter to set the reverb send level (i.e.<br />
the amount of effect that should be added).<br />
Parameter<br />
Setting<br />
Reverb Send 0~127<br />
Chorus Send<br />
Use this parameter to set the chorus send level (i.e.<br />
the amount of effect that should be added).<br />
Parameter<br />
Setting<br />
Chorus Send 0~127
Backing <strong>Keyboard</strong> BK-5 r<br />
‘Performance Edit’ parameters<br />
Panpot<br />
Use this parameter to change the stereo placement<br />
of the selected keyboard part. “L63” means “hard left”<br />
and “R63” represents “hard right”. Choose “0” if the<br />
sound should be at the center of the stereo image.<br />
Parameter<br />
Panpot<br />
Setting<br />
L63~0~R63<br />
Key Touch (velocity sensitivity)<br />
The BK-5’s keyboard is velocity sensitive, allowing<br />
you to control the timbre and volume of the keyboard<br />
parts by varying the strength with which you<br />
strike the keys.<br />
1. If you want to edit this setting, you have to<br />
press the [ENTER/SELECT] button to select<br />
the “Key Touch” page.<br />
2. Use the [CURSOR÷VALUE] dial to select and<br />
set the desired parameter, then press the<br />
[ENTER/SELECT] button and rotate the<br />
[CURSOR÷VALUE] dial.<br />
The following parameters are available:<br />
Parameter Setting range Explanation<br />
Curve<br />
High, Medium,<br />
Low, Fixed*<br />
“High”: Select this setting<br />
for maximum<br />
expressiveness. Even<br />
small variations of the<br />
force with which you<br />
strike a key produce<br />
audible changes. The<br />
trade-off is, however,<br />
that you have to strike<br />
the keys forcefully to<br />
reach the maximum<br />
volume.<br />
“Medium”: Medium<br />
velocity sensitivity.<br />
The keyboard<br />
responds to velocity<br />
changes, but the maximum<br />
volume can be<br />
obtained more easily<br />
than with “high”. (This<br />
is the default setting.)<br />
Parameter Setting range Explanation<br />
“Low”: Select this setting<br />
if you are used to<br />
playing on an electronic<br />
organ or if you<br />
do not want velocity<br />
changes to bring<br />
about major volume<br />
changes.<br />
“Fixed”: Select this<br />
setting if all notes you<br />
play on the keyboard<br />
should have the same<br />
velocity value. When<br />
you set this parameter,<br />
the “Fixed value”<br />
field can be edited<br />
Min Value 1~127 This parameter allows<br />
you to set the smallest<br />
velocity value with<br />
which you can trigger<br />
the selected part.<br />
Max Value 1~127 This parameter allows<br />
you to set the highest<br />
velocity value with<br />
which you can trigger<br />
the selected part.<br />
Fixed value* – 1~127 Allows you to set the<br />
value when “Curve” is<br />
set to “Fixed”.<br />
[*] This parameter can only be edited if the “Curve” parameter is<br />
set to “Fixed”.<br />
Eq Part Edit<br />
1. If you also want to edit the parameters of<br />
the equalizer, you have to rotate the<br />
[CURSOR÷VALUE] dial and press the [ENTER/<br />
SELECT] button to select the “Eq Edit Part”<br />
page.<br />
2. Use the [CURSOR÷VALUE] dial to select the<br />
desired parameter and press the [ENTER/<br />
SELECT] button.<br />
3. Rotate the [CURSOR÷VALUE] dial to set the<br />
desired value.<br />
57
Backing <strong>Keyboard</strong> BK-5<br />
Menu options<br />
r<br />
58<br />
The following parameters are available:<br />
Parameter Setting range Explanation<br />
Switch Off, On This parameter allows<br />
you to switch the<br />
equalizer on and off.<br />
High Freq<br />
1500Hz, 2000Hz,<br />
3000Hz, 4000Hz,<br />
6000Hz, 8000Hz,<br />
12000Hz<br />
Allows you to set the<br />
cutoff frequency of<br />
the high band (this is<br />
a shelving filter).<br />
High Gain –15~+15dB Use this parameter to<br />
set the level of the<br />
selected “High” frequency.<br />
Positive values<br />
boost (increase<br />
the volume of) that<br />
frequency band, negative<br />
values cut<br />
(attenuate) it.<br />
Mid Freq 200~8000Hz Allows you to set the<br />
cutoff frequency of<br />
the middle band (this<br />
is a peaking filter).<br />
Mid Gain –15~+15dB Use this parameter to<br />
set the level of the<br />
selected “Mid” frequency.<br />
Mid Q 0.5, 1.0, 2.0, 4.0,<br />
8.0<br />
Low Freq 90, 150, 180, 300,<br />
360, 600Hz<br />
Use this parameter to<br />
specify the width of<br />
the “Mid Frequency”<br />
band that you want to<br />
boost or cut. Smaller<br />
values mean that<br />
neighboring frequencies<br />
above/below that<br />
value are also<br />
affected.<br />
Allows you to set the<br />
cutoff frequency of<br />
the low band (this is a<br />
shelving filter).<br />
Low Gain –15~+15dB Use this parameter to<br />
set the level of the<br />
selected “Low” frequency.<br />
4. Press the [EXIT] button to leave the “Eq Part<br />
Edit” page.<br />
Mfx<br />
The BK-5 contains one multi-effects processor<br />
(“Mfx”) that can be used to process the desired keyboard<br />
part(s). Select “Off” for parts that don’t need to<br />
be processed by this Mfx.<br />
Parameter<br />
Mfx<br />
Setting<br />
Off, On<br />
Expression Pedal<br />
Select “Off” if you don’t need pedal expression for the<br />
selected part. This means that the keyboard part in<br />
question no longer responds to an expression pedal<br />
you may have connected to the SWITCH/EXPRESSION<br />
socket.<br />
Parameter<br />
Expression Pedal<br />
Pedal Exp Down/Up<br />
The expression pedal allows you to control the volume<br />
of all parts by foot.<br />
“Up” and “Down” refer to the volume that is used<br />
when the expression pedal is pressed (“Up”, highest<br />
volume) or in the upright position (“Down”, lowest<br />
volume).<br />
You do not need to specify “0” for the “Down” position.<br />
Selecting any other values will reduce the volume<br />
of the selected part up to the “Down” value.<br />
Likewise, you do not need to specify “127” as maximum<br />
value for “Up”.<br />
NOTE<br />
The expression pedal sends MIDI Expression commands<br />
(CC11).<br />
It is perfectly possible to set the “Down” value to<br />
“127” and the “Up” value to “0”, so that the selected<br />
part only sounds when the expression pedal is in the<br />
upright position. This can be used for some clever<br />
effects: instead of alternating between the Upper1<br />
and Upper2 parts by varying your velocity (which<br />
requires a considerable amount of “striking precision”,<br />
see “Min Value” and “Max Value” on p. 57), you<br />
could invert UP2’s response to the expression pedal,<br />
so that UP1 doesn’t sound when UP2 does, and vice<br />
versa.<br />
Parameter<br />
Setting<br />
Off, On<br />
Setting<br />
Pedal Exp Down/Up 0~127<br />
Hold Pedal<br />
This parameter allows you to specify whether and<br />
how a hold/damper pedal you connect to the PEDAL<br />
HOLD socket should respond to Hold messages<br />
(CC64).<br />
Parameter<br />
Hold Pedal<br />
Setting<br />
Auto, On, Off<br />
“Auto” means that the part in question only responds<br />
to Hold messages if it is assigned to the right half<br />
(Split) or the entire keyboard.<br />
“On” means that the part in question always responds<br />
to Hold messages, even if it is assigned to the left half<br />
of the keyboard.<br />
“Off”, finally, means that the part does not respond to<br />
Hold messages.
Backing <strong>Keyboard</strong> BK-5 r<br />
‘Performance Edit’ parameters<br />
Octave Shift<br />
Allows you to transpose the selected keyboard part in<br />
octave steps.<br />
Parameter<br />
Setting<br />
Octave Shift –4~0~+4<br />
Coarse Tune<br />
Changes the pitch of the selected keyboard part in<br />
semi-tone steps.<br />
Parameter<br />
Setting<br />
Coarse Tune –24~0~+24<br />
Fine Tune<br />
Changes the pitch of the selected part in steps of 1<br />
cent (1/100 semi-tone).<br />
Parameter<br />
Setting<br />
Fine Tune –100~0~+100<br />
Portamento Mode<br />
You can set the selected part to mono(phonic) mode.<br />
“Mono” means that you can only play one note at a<br />
time. You could select this mode to play a trumpet or<br />
woodwind part in a more natural way.<br />
“Poly”, on the other hand, means that you can play<br />
chords using the selected part.<br />
Parameter<br />
Portamento Mode<br />
Portamento Time<br />
“Portamento” means that the pitch doesn’t change in<br />
clearly defined steps: it produces glides from one<br />
note to the next. Use the this parameter to specify<br />
the speed at which those glides are carried out. The<br />
higher the value, the slower the transitions.<br />
Parameter<br />
Setting<br />
Poly, Mono<br />
Setting<br />
Bender Range<br />
This parameter sets the pitch interval, i.e. the value<br />
that will be used when the BENDER/MODULATION<br />
lever is pushed all the way to the left or right.<br />
Parameter<br />
Setting<br />
Bender Range 0~+24<br />
Modulation Assign<br />
This parameter allows you to specify for each keyboard<br />
part how it should respond to Modulation<br />
messages (CC01).<br />
Parameter<br />
Modulation Assign<br />
Auto: The keyboard part only responds to backward<br />
movements of the BENDER/MODULATION lever when<br />
no split setting causes it to be to the left of other<br />
keyboard parts. In other words: parts you can play<br />
with your left hand after selecting a split no longer<br />
respond to modulation messages. But they will while<br />
the keyboard is not split.<br />
On: The keyboard part always responds to backward<br />
movements of the BENDER/MODULATION lever.<br />
Off: The part in question does not respond to backward<br />
movements of the BENDER/MODULATION lever.<br />
Cut Off<br />
This filter parameter allows you to make the selected<br />
sound darker or brighter. Positive settings mean that<br />
more overtones will be allowed to pass, so that the<br />
sound becomes brighter. The further this value is set<br />
in the negative direction, the fewer overtones will be<br />
allowed to pass and the sound will become softer<br />
(darker).<br />
Setting<br />
Setting<br />
Auto, On, Off<br />
Characteristics of a low-pass filter<br />
Portamento Time 0~127<br />
Bender Assign<br />
This parameter allows you to specify for each keyboard<br />
part how it should respond to Pitch Bend messages.<br />
Parameter<br />
Bender Assign<br />
Setting<br />
Auto, On, Off<br />
Auto: The keyboard part only responds to left/right<br />
movements of the BENDER/MODULATION lever when<br />
no split setting causes it to be to the left of other<br />
keyboard parts. In other words: parts you can play<br />
with your left hand after selecting a split no longer<br />
respond to pitch bend messages. But they will while<br />
the keyboard is not split.<br />
On: The keyboard part always responds to left/right<br />
movements of the BENDER/MODULATION lever.<br />
Off: The part in question does not respond to left/<br />
right movements of the BENDER/MODULATION lever.<br />
NOTE<br />
For some sounds, positive (+) Cutoff settings will cause no<br />
noticeable change because the preprogrammed Cutoff<br />
parameter is already set to its maximum value.<br />
Parameter<br />
Setting<br />
Cut Off –64~+63<br />
Resonance<br />
When the Resonance value is increased, the overtones<br />
in the area of the cutoff frequency will be<br />
emphasized, creating a sound with a strong character.<br />
Parameter<br />
Cutoff frequency<br />
Setting<br />
Resonance –64~+63<br />
Frequency<br />
59
Backing <strong>Keyboard</strong> BK-5<br />
Menu options<br />
r<br />
60<br />
NOTE<br />
For some sounds, negative (–) “Resonance” settings may<br />
produce no noticeable change because the Resonance is<br />
already set to the minimum value.<br />
Attack (only for Tones)<br />
This parameter adjusts the onset of the sound. Negative<br />
values speed up the attack, so that the sound<br />
becomes more aggressive.<br />
Parameter<br />
Setting<br />
Attack –64~+63<br />
Decay<br />
This parameter adjusts the time over which the<br />
sound’s volume and cutoff frequency fall from the<br />
highest point of the attack down to the sustain level.<br />
Parameter<br />
Setting<br />
Decay –64~+63<br />
NOTE<br />
Percussive sounds usually have a sustain level of “0”. Piano<br />
and guitar sounds are in this category. Holding the keys for<br />
a long time will have little effect on the duration of the<br />
notes you are playing, even if you select a high value here.<br />
Release<br />
This parameter adjusts the time over which the sound<br />
will decay after the note is released until it is no<br />
longer heard. The cutoff frequency will also fall<br />
according to this setting.<br />
Parameter<br />
Setting<br />
Release –64~+63<br />
Vibrato Rate<br />
This parameter adjusts the speed of the pitch modulation.<br />
Positive (+) settings make the preset pitch<br />
modulation faster and negative (–) settings make it<br />
slower.<br />
Parameter<br />
Setting<br />
Vibrato Rate –64~+63<br />
Vibrato Depth<br />
This parameter adjusts the intensity of the pitch<br />
modulation. Positive (+) settings mean that the<br />
“wobble” becomes more prominent, while negative<br />
(–) settings make it shallower.<br />
Parameter<br />
Setting<br />
Vibrato Depth –64~+63<br />
Vibrato Delay<br />
This parameter adjusts the time required for the<br />
vibrato effect to begin. Positive (+) settings increase<br />
the time before vibrato will begin and negative settings<br />
shorten the time.<br />
Parameter<br />
Setting<br />
Vibrato Delay –64~+63<br />
C1<br />
The function of this parameter depends on the sound<br />
you assigned to the selected part. It may influence<br />
the filter and resonance setting, switch between the<br />
organ samples with the fast and slow Rotary modulation,<br />
etc.<br />
Parameter<br />
Setting<br />
C1 0~127<br />
‘Tone Part MFX’ parameters<br />
This function group can be selected using [MENU] button<br />
‰ “Performance Edit” ‰ “Tone Part MFX”. Your BK-5<br />
contains a multi-effects processor that can be used for<br />
processing any keyboard part you like. See “Mfx” on<br />
p. 58. (There are also 3 Mfx processors for the rhythm/<br />
song parts).<br />
Mfx Switch<br />
Select “Off” if you don’t need the Mfx processor.<br />
Parameter<br />
Mfx Switch<br />
Setting<br />
Mfx Type<br />
The BK-5 provides 84 different multi-effect types,<br />
some of which are combinations of two effects for<br />
added flexibility. This parameter allows you to select<br />
the desired type. The available types are:<br />
1. Thru<br />
2. Stereo EQ<br />
3. Overdrive<br />
4. Distortion<br />
5. Phaser<br />
6. Spectrum<br />
7. Enhancer<br />
8. Auto Wah<br />
9. Rotary<br />
10. Compressor<br />
11. Limiter<br />
12. Hexa-Chorus<br />
13. Trem Chorus<br />
14. Space-D<br />
15. St. Chorus<br />
16. St. Flanger<br />
17. Step Flanger<br />
18. St. Delay<br />
19. Mod. Delay<br />
20. 3 Tap Delay<br />
21. 4 Tap Delay<br />
22. Time Delay<br />
23. 2 Pitch Shifter<br />
24. FBK Pitch<br />
25. Reverb<br />
26. Gate Reverb<br />
27. OD‰ Chorus<br />
28. OD‰ Flanger<br />
Off, On<br />
29. OD‰ Delay<br />
30. DST‰ Chorus<br />
31. DST‰ Flanger<br />
32. DST‰ Delay<br />
33. EH‰ Chorus<br />
34. EH‰ Flanger<br />
35. EH‰ Delay<br />
36. Chorus‰ DLY<br />
37. Flanger‰ DLY<br />
38. CHO‰ Flanger<br />
39. CHO/DLY<br />
40. Flanger/DLY<br />
41. CHO/Flanger<br />
42. Isolator<br />
43. Low Boost<br />
44. Super Filter<br />
45. Step Filter<br />
46. Humanizer<br />
47. Speaker Sim<br />
48. Step Phaser<br />
49. MLT Phaser<br />
50. Inf Phaser<br />
51. Ring Modul<br />
52. Step Ring<br />
53. Tremolo<br />
54. Auto Pan<br />
55. Step Pan<br />
56. Slicer<br />
57. VK Rotary<br />
58. 3D Chorus<br />
59. 3D Flanger<br />
60. 3D Step Flgr<br />
61. Band Chorus<br />
62. Band Flanger<br />
63. Band Step Flg<br />
64. VS Overdrive<br />
65. VS Distortion<br />
66. GT Amp Simul<br />
67. Gate<br />
68. Long Delay<br />
69. Serial Delay<br />
70. MLT Tap DLY<br />
71. Reverse DLY<br />
72. Shuffle DLY<br />
73. 3D Delay<br />
74. Long Time DLY<br />
75. Tape Echo<br />
76. LoFi Noise<br />
77. LoFi Comp<br />
78. LoFi Radio<br />
79. Telephone<br />
80. Phonograph<br />
81. Step Pitch<br />
82. Sympa Reso<br />
83. Vib-Od-Rotary<br />
84. Center Canc<br />
NOTE<br />
Some of the names shown above may be abbreviated in the<br />
display.
Backing <strong>Keyboard</strong> BK-5 r<br />
‘Performance Edit’ parameters<br />
Mfx Edit<br />
If you also want to edit the parameters of the<br />
selected effect type, press the [ENTER/SELECT] button<br />
to jump to the “Mfx Edit” page. You can then use the<br />
[CURSOR÷VALUE] dial to edit the available parameters.<br />
The first two parameters for each Mfx type are “Chorus<br />
Send” (0~127) and “Reverb Send” (0~127). They<br />
allow you to specify whether—and to what<br />
extent—the Mfx signal should be processed by the<br />
Chorus and/or Reverb effect.<br />
‘Rhythm Parts’ parameters<br />
This function group can be selected using [MENU] button<br />
‰ “Performance Edit” ‰ “Rhythm Parts”.<br />
Volume<br />
Adjusts the volume of the selected rhythm part.<br />
Selecting “0” means that the part is question is no<br />
longer audible.<br />
Parameter<br />
Setting<br />
Volume 0~127<br />
Exp. Pedal<br />
Select “Off” if you don’t need pedal expression for the<br />
selected part. This means that the rhythm part in<br />
question no longer responds to an expression pedal<br />
you may have connected to the SWITCH/EXPRESSION<br />
socket.<br />
Parameter<br />
Exp. Pedal<br />
Setting<br />
Off, On<br />
Exp. Pedal All Parts On<br />
If you are not sure which rhythm parts still receive<br />
expression messages, and if you want all to receive<br />
them, you can select this field and press the [ENTER/<br />
SELECT] button.<br />
The parameters of this function group apply to the eight<br />
Arranger parts (i.e. the parts used to play back the<br />
selected rhythm).<br />
1. Use the [CURSOR÷VALUE] dial and the<br />
[ENTER/SELECT] button to select the rhythm<br />
part you want to edit (ADrum, ABass, Acc1,<br />
Acc2, Acc3, Acc4, Acc4, Acc5, Acc6).<br />
The display shows the settings for the selected part.<br />
2. Use the [CURSOR÷VALUE] dial to select the<br />
desired parameter(s), then press the [ENTER/<br />
SELECT] button.<br />
3. Rotate the [CURSOR÷VALUE] dial to set the<br />
value.<br />
The following parameters are available:<br />
Mute<br />
Allows you to mute the selected part, so that it is no<br />
longer audible.<br />
Parameter<br />
Mute<br />
Setting<br />
Off, On<br />
Solo<br />
Allows you to solo the selected part, which means<br />
that all other rhythm parts are switched off.<br />
Parameter<br />
Explanation<br />
Exp. Pedal All Parts Off<br />
If you are not sure which rhythm parts still receive<br />
expression messages, and if no rhythm part should<br />
receive them, you can select this field and press the<br />
[ENTER/SELECT] button.<br />
Split<br />
This page allows you to set two keyboard-related<br />
parameters. It can be selected using [MENU] button ‰<br />
“Performance Edit” ‰ “Split”.<br />
NOTE<br />
This page can also be selected by pressing and holding the<br />
[SPLIT] button.<br />
Split Point<br />
The “Split Point” parameter allows you to set the split<br />
point.<br />
Parameter<br />
Split Point<br />
Setting<br />
C#2~B6<br />
Solo<br />
Off, On<br />
NOTE<br />
After pressing the [ENTER/SELECT] button, you can set the<br />
split point either by rotating the [CURSOR÷VALUE] dial or<br />
by simply pressing the corresponding key on the keyboard.<br />
61
Backing <strong>Keyboard</strong> BK-5<br />
Menu options<br />
Lower Hold<br />
This parameter allows you to set the Hold function<br />
for the LWR part.<br />
Parameter<br />
Setting<br />
‘Arranger Setting’ parameters<br />
This function group can be selected using [MENU] button<br />
‰ “Performance Edit” ‰ “Arranger Setting”.<br />
Lower Hold<br />
Off, On<br />
r<br />
62<br />
If you set this parameter to “On”, the notes of the<br />
LWR part go on sounding until you play other notes<br />
in the left keyboard area. (This function is only available<br />
while the [SPLIT] button lights.)<br />
If you select “Off”, the LWR part stops sounding as<br />
soon as you release all keys in the left area.<br />
Key<br />
This function allows you to transpose the BK-5’s pitch in<br />
semi-tone steps. Depending on the mode setting, this<br />
transposition applies to all sections or just a specific section.<br />
It can be selected using [MENU] button ‰ “Performance<br />
Edit” ‰ “Key” or by pressing the [KEY] button. See<br />
“Changing the key” on p. 41.<br />
NOTE<br />
Pressing and holding the [KEY] button locks this parameter<br />
and keeps it from changing when you select Performance<br />
memories.<br />
Key<br />
Allows you to set the desired transposition interval.<br />
Each value represents a semi-tone step. Select “0” if<br />
no transposition is required.<br />
Parameter<br />
Setting<br />
Key –6~+5<br />
Mode<br />
Allows you to specify which sections should be transposed<br />
by the “Key” parameter.<br />
Parameter<br />
Mode<br />
Setting<br />
Song, <strong>Keyboard</strong>, Song+<strong>Keyboard</strong><br />
Song: Only song playback is transposed.<br />
<strong>Keyboard</strong>: Only the notes you play on the keyboard<br />
are transposed. (This also affects the chord information<br />
transmitted to the Arranger.)<br />
Song+<strong>Keyboard</strong>: Both song playback and the keyboard<br />
parts are transposed. Rhythm playback is also<br />
transposed.<br />
The parameters of this function group apply to the<br />
Arranger as a whole and allow you to fine-tune its<br />
behavior.<br />
Arranger<br />
Select “Off” if you only need the drum part of the<br />
selected rhythm and no melodic accompaniment<br />
parts (ABass, ACC1~6).<br />
Parameter<br />
Arranger<br />
Zone<br />
When you press the [SPLIT] button, the selected<br />
rhythm pattern is controlled by the chords you play<br />
in the left half of the keyboard.<br />
You can also tell the Arranger to scan another part of<br />
the keyboard for usable chords. Though “Left” is<br />
probably the most popular setting, you could select<br />
“Right” to have the Arranger scan the right half of<br />
the keyboard.<br />
Switch off the [SPLIT] button if the Arranger should<br />
scan the entire keyboard (“Whole”).<br />
The range of the left and right keyboard areas<br />
depends on the “Split Point” setting (page 61).<br />
Parameter<br />
Zone<br />
Setting<br />
Off, On<br />
Setting<br />
Type<br />
Another important choice is how you want to transmit<br />
note information to the Arranger.<br />
Parameter<br />
Type<br />
Off, Left, Right, Whole<br />
Setting<br />
Standard, Pianist1, Pianist2, Intelligent,<br />
Easy<br />
NOTE<br />
If the “Arr Type” parameter (page 66) is set to “On”, this<br />
“Type” setting has no effect.<br />
Standard: This is the normal chord recognition<br />
mode.<br />
Pianist1: In this mode, the BK-5 only recognizes<br />
chords that consist of at least three notes. Playing<br />
only two notes will not cause the rhythm’s key to<br />
change.
Backing <strong>Keyboard</strong> BK-5 r<br />
‘Performance Edit’ parameters<br />
Pianist2: Same as “Pianist1” while the Hold pedal is<br />
not pressed. If you press the Hold pedal, the BK-5<br />
even recognizes “chords” when you press only one<br />
note. If the hold pedal is still pressed, chord recognition<br />
continues up to a maximum of 5 played keys.<br />
Intelligent: Select this option when you want the<br />
chord recognition function to supply the missing<br />
notes of the chords you play.<br />
Easy: This is another “intelligent” chord fingering system.<br />
It works as follows:<br />
Major chords<br />
Minor chords<br />
Seventh chords<br />
Minor seventh<br />
chords<br />
Arranger Hold<br />
This function sustains the notes you play in the chord<br />
recognition area (“Zone”). Select “Off” if you want the<br />
accompaniment to stop as soon as the keys in that<br />
zone are released. This parameter is switched “On” by<br />
default.<br />
Parameter<br />
Arranger Hold<br />
Press the key that corresponds to the<br />
chord’s fundamental.<br />
Tempo<br />
Each rhythm has a preset tempo that is recalled<br />
when a rhythm is selected. This parameter allows you<br />
to specify if and when the BK-5 should ignore the<br />
preset tempo and go on using the tempo of the previously<br />
selected rhythm.<br />
Parameter<br />
Fundamental + any black key to the<br />
left of the fundamental.<br />
Fundamental + any white key to the<br />
left of the fundamental.<br />
Fundamental + any black key to the<br />
left + any white key to the left.<br />
Setting<br />
Off, On<br />
Setting<br />
NOTE<br />
The setting of this parameter is neither saved to the Performance<br />
memories, nor to the Global area (see “Save Global”<br />
on p. 70). The “Lock” setting can also be activated by pressing<br />
and holding the [TAP TEMPO] button.<br />
Fill In Half Bar<br />
When this parameter is “On”, the length of the Fill-<br />
Ins, which are played when the [AUTO FILL IN] button<br />
lights, is halved.<br />
Parameter<br />
Fill In Half Bar<br />
Certain pop songs in 4/4 contain bars that only last<br />
two beats. The usual place for such a bar is between<br />
the first and the second verse. Another favorite position<br />
for “halved” bars is at the end of a chorus or the<br />
bridge. Your BK-5 allows you to faithfully reproduce<br />
these “anomalies” using this function. This does not<br />
change rhythm playback right away. Only when a fillin<br />
or another VARIATION pattern starts will the “Fillin<br />
Half Bar” function be activated and play half the<br />
number of beats of the accompaniment pattern you<br />
selected.<br />
Fill Ritardando<br />
The FILL RIT function is suitable for ballads. It causes<br />
the next Fill-In to slow down (“ritardando”). See<br />
“Tempo Change Fill Rit” below for how to set how<br />
strongly the tempo should be decreased.<br />
Parameter<br />
Fill Ritardando<br />
Setting<br />
Off, On<br />
Setting<br />
Off, On<br />
As the name implies, it is only available while the<br />
[AUTO FILL-IN] button lights.<br />
Tempo<br />
Preset, Auto, Lock<br />
Here is what these three options mean:<br />
Setting<br />
Preset<br />
Auto<br />
Lock<br />
Selecting a new rhythm<br />
Playback is stopped Playback is running<br />
The rhythm's preset tempo is loaded.<br />
The BK-5 loads the<br />
preset tempo of the<br />
new rhythm<br />
The BK-5 doesn’t<br />
load the preset<br />
tempo of the new<br />
rhythm. It is played<br />
at the current<br />
tempo.<br />
The BK-5 doesn’t load<br />
the preset tempo of<br />
the new rhythm. The<br />
new rhythm is played<br />
at the current tempo.<br />
(a) Set “Fill Ritardando” to “On”.<br />
(b) Start Arranger playback.<br />
(c) Press a VARIATION [1]~[4] button.<br />
The BK-5 plays a Fill-In. The tempo slows down while<br />
the fill is being played. At the end of the fill, the<br />
rhythm returns to the previously set tempo (this is<br />
called “a tempo”).<br />
(d) Press and hold the [EXIT] button to return to the<br />
main page.<br />
63
Backing <strong>Keyboard</strong> BK-5<br />
Menu options<br />
Tempo Change Accel/Ritard, CPT, Fill Rit<br />
The “Termpo Change Acceler/Ritard” parameter<br />
allows you to speed up or slow down the rhythm<br />
tempo by the amount you set here. To use these<br />
functions, you must assign them to an optional footswitch<br />
(see p. 70).<br />
There are three Ritardando functions: one for all<br />
rhythm patterns, one for Ending patterns and one for<br />
fill-ins (see “Fill Ritardando” above). They all use the<br />
“Tempo Change” settings on the following page.<br />
‘Melody Intelligent’ parameters<br />
This function group can be selected using [MENU] button<br />
‰ “Performance Edit” ‰ “Melody Intelligent” or by<br />
pressing and holding the [MELODY INTELL] button.<br />
The following parameters are available:<br />
r<br />
64<br />
Parameter<br />
Setting<br />
Tempo Change Accel/Ritard 5%~92%<br />
Tempo Change CPT 0~3825<br />
Tempo Change Fill Rit 5%~92%<br />
Tempo Change Accel/Ritard: Allows you to set the<br />
degree (ratio) by which the tempo changes when the<br />
“Acceler” or “Ritard” function is triggered. Example: if<br />
the tempo is currently q= 100, the value “20%”<br />
means that the tempo drops to q= 80 or rises to q=<br />
120.<br />
Tempo Change CPT: Use this parameter to specify<br />
how long a ritardando/accelerando should take. In<br />
most cases, 480 CPT (i.e. one measure) is probably the<br />
most musical choice.<br />
Tempo Change Fill Rit: This parameter allows you to<br />
specify to what extent fill-in playback should be<br />
slowed down when the “Fill Ritardando” function is<br />
on.<br />
■ Using the Ritardando/Accelerando functions<br />
For general applications (any rhythm division) proceed<br />
as follows:<br />
•Assign the “Arr Rit” or “Arr Acc” function to an<br />
optional footswitch (see p. 70).<br />
•Press the [START/STOP] button to start rhythm playback.<br />
•Press the assigned footswitch.<br />
Switch<br />
Select “On” if you want to add a MELODY INTELL part.<br />
This part is triggered by the chord recognition of the<br />
BK-5’s Arranger and plays automatic harmonies that<br />
are added to the melody that you are playing using<br />
the UP1 part. You can choose from among 18 harmony<br />
types (see below).<br />
Parameter<br />
Switch<br />
NOTE<br />
This “Switch” parameter can also be assigned to an optional<br />
footswitch (see p. 69).<br />
Type<br />
Allows you to select one of the 18 harmony types:<br />
Parameter<br />
Type<br />
Setting<br />
Setting<br />
Off, On<br />
2nd Tone<br />
Depending on the selected “Type” setting, a second<br />
harmony is added to the “Melody Intelligent” part. If<br />
you like, you can select the desired Tone for the second<br />
harmony voice using this parameter.<br />
Parameter<br />
2nd<br />
1:Duet, 2:Organ 3:Combo, 4:Strings,<br />
5:Choir, 6:Block, 7:Big Band, 8:Country,<br />
9:Traditional, 10:Brodway, 11:Gospel,<br />
12:Romance, 13:Latin, 14:Country Guitar,<br />
15:Country Ballad, 16:Waltz Organ,<br />
17:Octave Type1, 18:Octave Type2<br />
Setting<br />
The Tone of the selected family.<br />
Intell Threshold<br />
This value represents the lowest velocity value<br />
(between “0” and “127”) of the UP1 part that triggers<br />
the “Melody Intelligent” part. If you don’t need this<br />
switching function, select “0”.<br />
Parameter<br />
Setting<br />
Intell Threshold 0~127
Backing <strong>Keyboard</strong> BK-5 r<br />
‘Global’ parameters<br />
Level<br />
Allows you to set the level of the “Melody Intelligent”<br />
part to ensure that the harmonies blend in with the<br />
rest.<br />
Parameter<br />
Setting<br />
Level 0~127<br />
Expression Pedal<br />
This parameter allows you to specify whether or not<br />
the “Melody Intelligent” part should respond to<br />
movements of the optional expression pedal you<br />
connected, and change its volume accordingly.<br />
Parameter<br />
Setting<br />
‘Global’ parameters<br />
The settings of the “Global” parameters can be saved to<br />
the BK-5’s global memory. If you don’t save them, your<br />
changes are lost when you switch off the BK-5.<br />
See “Save Global” on p. 70 for how to save these settings.<br />
Expression Pedal<br />
Off, On<br />
Hold Pedal<br />
This parameter allows you to specify whether or not<br />
the “Melody Intelligent” part’s notes can be held with<br />
the footswitch connected to the PEDAL HOLD socket.<br />
Parameter<br />
Hold Pedal<br />
See page 43.<br />
Setting<br />
Auto, On, Off<br />
Save As Default<br />
This function allows you to save the current “Performance<br />
Edit” settings as default settings. These settings<br />
are loaded each time you switch on the BK-5.<br />
Display Contrast<br />
This parameter can be selected using [MENU] button<br />
‰ “Global” ‰ “Display Contrast”.<br />
It is used to change the contrast of the BK-5’s display<br />
in case you find it difficult to read.<br />
Parameter<br />
Setting<br />
Display Contrast 1~10<br />
Display Brightness<br />
This parameter can be selected using [MENU] button<br />
‰ “Global” ‰ “Display Brightness”.<br />
It is used to change the brightness of the BK-5’s display<br />
in case you find it difficult to read.<br />
Parameter<br />
Setting<br />
Display Brightness 0~10<br />
Tuning<br />
This parameter can be selected using [MENU] button<br />
‰ “Global” ‰ “Tuning”.<br />
1. Rotate the [CURSOR÷VALUE] dial to select<br />
“YES”, then press the [ENTER/SELECT] button<br />
to define the current settings as the<br />
default state.<br />
The display shows a confirmation message.<br />
If you don’t want to define the current settings as<br />
the default state, rotate the [CURSOR÷VALUE] dial to<br />
select “NO”, then press the [ENTER/SELECT] button.<br />
The BK-5 then returns to the “Performance Edit”<br />
page.<br />
This parameter allows you to tune your BK-5 to<br />
acoustic instruments that cannot be tuned. The<br />
default is 440.0Hz.<br />
Parameter<br />
Setting<br />
Tuning<br />
415.3~466.2Hz<br />
Rhythm/SMF TrackMute<br />
See “Using ‘Track Mute’ and ‘Center Cancel’” on p. 42.<br />
65
Backing <strong>Keyboard</strong> BK-5<br />
Menu options<br />
Scale Tune Switch<br />
This parameter can be selected using [MENU] button<br />
‰ “Global” ‰ “Scale Tune Switch”.<br />
One Touch Hold<br />
This parameter can be selected using [MENU] button<br />
‰ “Global” ‰ “One Touch Hold”.<br />
Parameter Value Explanation<br />
Upper Off, On Select “On” if the “Scale<br />
Tune” settings (see below)<br />
should apply to the<br />
Upper1, Upper2 and Melody<br />
Intell parts.<br />
Lower Off, On Select “On” if the “Scale<br />
Tune” settings (see below)<br />
should apply to the Lower<br />
part.<br />
Rhythm Off, On Select “On” if the “Scale<br />
Tune” settings (see below)<br />
should apply to the<br />
rhythm parts.<br />
Scale Tune<br />
This parameter can be selected using [MENU] button<br />
‰ “Global” ‰ “Scale Tune”.<br />
The parameters on this page allow you to filter certain<br />
“One Touch” settings. Select “On” for the settings<br />
you do not want to load along with the remaining<br />
One Touch settings when you press a ONE TOUCH<br />
button.<br />
Parameter<br />
Tempo<br />
Tone Part<br />
Intro/Ending<br />
Variation<br />
Expression Pedal<br />
Setting<br />
Off, On<br />
Off, On<br />
Off, On<br />
Off, On<br />
Off, On<br />
Performance Hold<br />
This page can be selected using [MENU] button ‰<br />
“Global” ‰ “Performance Hold”.<br />
This parameter allows you to change the tuning of all<br />
notes of one octave, which may come in handy to<br />
create oriental tunings.<br />
Parameter Value Explanation<br />
The parameters on this page allow you to filter certain<br />
Performance settings. Select “On” for the settings<br />
you do not want to load along with the remaining<br />
settings when you select a Performance memory.<br />
Parameter<br />
Setting<br />
r<br />
C~B<br />
(each note can<br />
be set individually)<br />
-64~0~+63 Changes the pitch of<br />
the notes C~B in steps<br />
of 1 cent. The value<br />
that you specify is<br />
applied to all notes of<br />
the same name. If you<br />
change the tuning of<br />
the “C”, that value is<br />
added to, or subtracted<br />
from, all Cs (C1, C2, C3,<br />
etc.). (“–50” means that<br />
the note in question is<br />
tuned a quarter tone<br />
down.)<br />
Rhythm*<br />
Tempo*<br />
Expression Pedal<br />
Tone*<br />
Tone Part<br />
Split<br />
Lower Octave<br />
Arr Type<br />
Key*<br />
Bass In<strong>version</strong><br />
Off, On<br />
Off, On<br />
Off, On<br />
Off, On<br />
Off, On<br />
Off, On<br />
Off, On<br />
Off, On<br />
Off, On<br />
Off, On<br />
66
Backing <strong>Keyboard</strong> BK-5 r<br />
‘Global’ parameters<br />
[*] These parameters can also be switched by pressing and holding<br />
the assigned buttons on the front panel. (See the “Hold to<br />
LOCK” legends.)<br />
Metronome<br />
These parameters can be selected using [MENU] button‰<br />
“Global” ‰ “Metronome”.<br />
Parameter Setting Explanation<br />
Count In Off, 1bar, 2bar This parameter allows<br />
you to switch the<br />
Count-In function on<br />
(“1bar” or “2bar”) or<br />
off. When on, the metronome<br />
will count in<br />
the specified number<br />
of measures (bars)<br />
before the rhythm or<br />
SMF song starts playing.<br />
(This setting is not<br />
available for audio<br />
songs.)<br />
[*] This setting is not memorized when you use “Save Global”.<br />
The BK-5 is equipped with a metronome that can be<br />
used in various situations.<br />
NOTE<br />
While rhythm or SMF song playback is stopped, the<br />
[TAP TEMPO] button flashes in red to indicate the selected<br />
tempo.<br />
(a) Rotate the [CURSOR÷VALUE] dial to select the<br />
“Metronome” field.<br />
(b) Press the [ENTER/SELECT] button to highlight the<br />
setting.<br />
(c) Rotate the dial to select “On”.<br />
The metronome starts counting.<br />
NOTE<br />
The metronome is not available while an audio song file<br />
(mp3 or WAV) is selected.<br />
The metronome parameters you can set are:<br />
Parameter Setting Explanation<br />
Metronome* Off, On Select “On” to activate<br />
the metronome.<br />
Volume 0~127 Sets the metronome’s<br />
level.<br />
Time Signature 1~32/16, 8,<br />
4, 2<br />
Mode<br />
Always, Play,<br />
Rec<br />
Specifies the metronome’s<br />
time signature.<br />
Always: The metronome<br />
even counts<br />
when playback is<br />
stopped.<br />
Play: The metronome<br />
only sounds while the<br />
rhythm or song is playing.<br />
Rec: The metronome<br />
only sounds during<br />
rhythm recording<br />
(using the “Rhythm<br />
Composer”).<br />
Video Settings<br />
These parameters can be selected using [MENU] button‰<br />
“Global” ‰ “Video Settings”.<br />
The following table shows the Video Setting parameters.<br />
Parameter Setting Explanation<br />
Video Mode PAL, NTSC Select the setting that<br />
corresponds to the format<br />
used by the connected<br />
screen.<br />
Aspect Ratio Full, Center Specify the appropriate<br />
aspect ratio for the<br />
screen you are using.<br />
NOTE<br />
If you work with a TV set, do not forget to select the correct<br />
channel (“AV” or something to that effect, see the manual<br />
that came with your set).<br />
Lyrics Settings<br />
This page can be selected using [MENU] button ‰<br />
“Global” ‰ “Lyrics Settings”.<br />
67
Backing <strong>Keyboard</strong> BK-5<br />
Menu options<br />
r<br />
68<br />
The following table shows the “Lyrics Settings”<br />
parameters.<br />
Parameter Setting Explanation<br />
Background<br />
Mode<br />
Background<br />
Color<br />
Color, Logo,<br />
User<br />
Color: The background<br />
is empty but<br />
uses the selected color<br />
(see below).<br />
Logo: The BK-5’s logo<br />
is shown as background.<br />
User: The BK-5 uses<br />
the selected .JPG picture<br />
as background.<br />
See xx.<br />
1~8 Choose the background<br />
color.<br />
Highlight Color 1~8 Choose the highlight<br />
color.<br />
Row Displaying 2, 4 Allows you to specify<br />
the number of lines to<br />
be used for displaying<br />
lyrics.<br />
Chord View Off, On Select “On” if the BK-5<br />
should display chord<br />
symbols along with the<br />
lyrics.<br />
Utility<br />
The “Utility” parameters are found on the display<br />
page that can be selected using [MENU] button‰<br />
“Global” ‰ “Utility”.<br />
The following table shows the utility parameters.<br />
Parameter Setting Explanation<br />
SMF Quick Start Off, 2nd Bar,<br />
1st Note<br />
Off: Playback starts at<br />
the very beginning of<br />
the song file (which<br />
may contain a few<br />
silent bars).<br />
2nd Bar: Causes playback<br />
to start from<br />
measure 2 of the<br />
selected Standard MIDI<br />
File.<br />
1st Note: This is basically<br />
the same as the<br />
above, except that<br />
playback starts on the<br />
first note of the<br />
selected song.<br />
Parameter Setting Explanation<br />
Perform Next<br />
Song<br />
UP1 EQ/MFX<br />
Link<br />
Off, On<br />
Off, On<br />
Rec Audio Level –24, –18, –12,<br />
–6, +0 dB<br />
At the end of the current<br />
song, the next<br />
song in the Performance<br />
List starts automatically.<br />
If the<br />
Performance List step<br />
refers to a rhythm, the<br />
rhythm in question is<br />
loaded, but you will<br />
need to start manually<br />
by pressing the [START/<br />
STOP] button.<br />
If you select “on”, the<br />
BK-5 selects suitable<br />
MFX and equalizer settings<br />
for each Tone<br />
you assign to the<br />
Upper1 part.<br />
Allows you to set the<br />
recording level for<br />
your own performances<br />
(see p. 52). The<br />
setting of the [VOL-<br />
UME] knob does not<br />
affect the recording<br />
level. (Default setting:<br />
+0dB)<br />
Rec Audio Sync Off, On Off: Choose this setting<br />
when you want to<br />
start recording before<br />
starting rhythm or<br />
song playback.<br />
On: Choose this setting<br />
when you want to<br />
be able to start recording<br />
simultaneously<br />
with rhythm/song<br />
playback. When you<br />
choose this setting,<br />
pressing the [AUDIO<br />
REC] button will stop<br />
both playback and the<br />
recorder.<br />
Audio In Level 0~127 Allows you to set the<br />
input level of the signals<br />
received via the<br />
INPUT (STEREO) socket.<br />
See also page 19.<br />
Audio In Center<br />
Canc<br />
Off, On<br />
Select “On” if the “Center<br />
Cancel” function<br />
(see p. 42) should also<br />
affect the signals<br />
received via the AUDIO<br />
INPUT sockets.
Backing <strong>Keyboard</strong> BK-5 r<br />
‘Global’ parameters<br />
Parameter Setting Explanation<br />
USB Driver<br />
Recall MIDI Set<br />
Auto Off*<br />
Visual Ctrl<br />
Mode<br />
Generic,<br />
Original<br />
Off, Key/<br />
Rhythm, PK<br />
Series, Song,<br />
User1, User2,<br />
User3, User4,<br />
User5, User6,<br />
User7, User8<br />
Off,<br />
10 (5)<br />
30 (15)<br />
240 (30)<br />
MVC, V-LINK<br />
Generic: Choose this if<br />
you want to use the<br />
standard USB driver<br />
that was included with<br />
your computer. Normally,<br />
you should use<br />
this mode.<br />
Original: Choose this<br />
if you want to use a<br />
USB driver downloaded<br />
from the<br />
<strong>Roland</strong> website<br />
(www.roland.com).<br />
This parameter selects<br />
the MIDI Set whose<br />
settings are loaded<br />
when the BK-5 is<br />
switched on. Select<br />
“Off” if no MIDI Set<br />
should be recalled<br />
when the BK-5 is<br />
switched on.<br />
This parameter allows<br />
you to cause the BK-5<br />
to switch itself off<br />
after the selected<br />
number of minutes if<br />
you are not using it.<br />
The default setting is<br />
“30”. Select “Off” if you<br />
prefer not to use this<br />
function.<br />
The values in parentheses<br />
indicate when<br />
the pop-up countdown<br />
appears.<br />
This parameter allows<br />
you to select the visual<br />
control mode. The<br />
option to select<br />
depends on the messages<br />
supported by the<br />
external device: MIDI<br />
Visual Control (MVC) or<br />
V-LINK.<br />
Version Info n.nn Shows the <strong>version</strong><br />
number of the BK-5’s<br />
operating system.<br />
[*] When the BK-5 has been switched off by this function, you<br />
need to press the [POWER] button, wait a few seconds, then<br />
press the button again to switch the BK-5 back on. (Do not<br />
switch it on too quickly.)<br />
Pedal Switch<br />
The “Pedal Switch” setting is found on the display<br />
page that can be selected using [MENU] button‰<br />
“Global” ‰ “Pedal Switch”.<br />
If you do not change the factory setting, the footswitch<br />
is assigned to the “Start/Stop” function.<br />
The following table shows the functions you can<br />
assign to the footswitch.<br />
Function<br />
Start/Stop<br />
Intro<br />
Ending<br />
Variation1<br />
Variation2<br />
Variation3<br />
Variation4<br />
Bass In<strong>version</strong><br />
Arranger Hold<br />
Arranger Chord<br />
Off<br />
Half Bar On Fill In<br />
Break Mute<br />
Reset/Start<br />
Explanation<br />
Starts and stops rhythm or song<br />
playback. Same function as the<br />
[START/STOP] button.<br />
Same functions as the [INTRO],<br />
[ENDING], [VARIATION1],<br />
[VARIATION2], [VARIATION3],<br />
[VARIATION4], [BASS INV] buttons.<br />
See “Using rhythms” on p. 27.<br />
Allows you to switch the Arranger<br />
Hold function on and off. See<br />
page 63.<br />
Allows you to switch the Arranger’s<br />
chord recognition off, in which case<br />
only the drum/percussion part is<br />
played.<br />
Allows you to switch the “Fill In Half<br />
Bar” function on and off. See<br />
page 63.<br />
When you press the footswitch,<br />
rhythm playback is muted for the<br />
remainder of the current measure.<br />
This function allows you to have the<br />
BK-5 start on the first beat of the<br />
currently selected rhythm pattern<br />
when you press the assigned footswitch.<br />
Use it when you are accompanying<br />
a singer or soloist whose<br />
timing is a little shaky and suddenly<br />
notice that the playback lags one or<br />
two beats behind the singer/soloist.<br />
Split<br />
You can alternate between “Intelligent”<br />
and “Pianist2” modes. When<br />
the former is selected, the chord recognition<br />
area (see “Zone” on p. 62) is<br />
automatically set to “Left”. When<br />
you switch to “Pianist1”, the chord<br />
recognition area is automatically set<br />
to “Whole”.<br />
69
Backing <strong>Keyboard</strong> BK-5<br />
Menu options<br />
Function<br />
Scale Upper<br />
Scale Lower<br />
Up2<br />
Perf. Next<br />
Perf. Prev<br />
Portamento<br />
Hold<br />
Soft<br />
Sostenuto<br />
Lower Hold<br />
Track Mute<br />
AudioXfade<br />
Fade Out<br />
Melody Intelligent<br />
MFX On/Off<br />
Arranger Rit<br />
Explanation<br />
Allows you to assign the selected<br />
Scale Tune (see p. 66) setting to the<br />
two Upper parts.<br />
Allows you to assign the selected<br />
Scale Tune (see p. 66) setting to the<br />
two Upper parts.<br />
Allows you to switch the Upper2<br />
part on and off.<br />
Allows you to select the next or previous<br />
Performance.<br />
Pressing the footswitch activates the<br />
“Portamento Time” setting. When<br />
the footswitch is released, the “Portamento<br />
Time” setting is not used. To<br />
hear this effect, you need to set a<br />
“Portamento Time” value (see p. 59).<br />
The assigned footswitch can be used<br />
as a Soft, Sostenuto or Sustain (Hold<br />
pedal).<br />
The footswitch is assigned to the<br />
“Lower Hold” function (see p. 62).<br />
Same function as the [TRACK MUTE]<br />
button.<br />
The footswitch can be used to activate<br />
a crossfade between two files.<br />
To make this work, select a different<br />
song while the current song is being<br />
played back and press the footswitch.<br />
The BK-5 creates a brief<br />
blend between the current and the<br />
next song. (This function is only<br />
available between two audio songs.)<br />
This function gradually decreases<br />
the volume until it reaches zero. At<br />
that time, song or rhythm playback<br />
stops automatically.<br />
Allows you to control the “Switch”<br />
parameter of the “Melody Intelligent”<br />
function (see p. 64).<br />
Allows you to switch the MFX for the<br />
keyboard parts on and off.<br />
Allows you to activate the Arranger’s<br />
“Tempo Change Ritard” function<br />
(page 64).<br />
•“Rename” function (see p. 47).<br />
Parameter<br />
Language<br />
Setting<br />
Latin, Cyrillic, East Europe<br />
Save Global<br />
This function allows you to save all “Global” parameter<br />
settings to ensure that they are loaded automatically<br />
each time you switch the BK-5 on.<br />
You can select this function using [MENU] button ‰<br />
“Global” ‰ “Save Global”.<br />
1. Rotate the [CURSOR÷VALUE] dial to select<br />
“YES”, then press the [ENTER/SELECT] button<br />
to define the current settings as the<br />
default state.<br />
The display shows a confirmation message.<br />
If you don’t want to define the current “Global” settings<br />
as the default state, rotate the [CURSOR÷VALUE]<br />
dial to select “NO”, then press the [ENTER/SELECT]<br />
button. The BK-5 then returns to the “Performance<br />
Edit” page.<br />
NOTE<br />
The metronome status (On/Off, see page 67) is not saved to<br />
the Global area.<br />
One Touch Edit<br />
See “Using the ‘One Touch’ function” on p. 31.<br />
r<br />
70<br />
Arranger Acc<br />
Allows you to activate the Arranger’s<br />
“Tempo Change Accel” function<br />
(page 64).<br />
Language<br />
This parameter allows you to choose the character<br />
set to be used for the following:<br />
•Lyrics display (for files that contain lyrics)<br />
•“Search” functions (see p. 37)
Backing <strong>Keyboard</strong> BK-5 r<br />
Mastering Tools<br />
Mastering Tools<br />
The BK-5 contains an effects processor that applies to<br />
all real-time, rhythm and SMF song parts.<br />
This processor is called “Mastering Tools”, because it<br />
allows you to perfect the signal mix to adapt it to the<br />
sound system you are using.<br />
The parameters discussed here can be selected using<br />
[MENU] button ‰ “Mastering Tools”.<br />
5. If none of the preset memories contains the<br />
settings you need, press the [ENTER/SELECT]<br />
button to select and set the following<br />
parameters:<br />
Parameter Setting Explanation<br />
Level 0~127 Use this parameter to set<br />
the compressor’s input level.<br />
The higher the value, the<br />
stronger the three frequency<br />
bands are compressed.<br />
The value you set here is<br />
added to the “Level” settings<br />
of the three bands. Do not<br />
set this parameter to “0” if<br />
the compressor is switched<br />
on, because doing so means<br />
that the keyboard parts, the<br />
SMF song or Rhythm parts<br />
are no longer audible.<br />
Compressor<br />
This multi-band compressor/limiter allows you to process<br />
three frequency ranges separately. A compressor<br />
reduces high levels (peaks) and boosts low levels,<br />
smoothing out fluctuations in volume.<br />
To edit the Compressor parameters, use [MENU] button<br />
‰ “Mastering Tools” ‰ “Compressor”.<br />
Gain –12~0~<br />
12dB<br />
Use this parameter to correct<br />
the level at the compressor’s<br />
outputs. If the<br />
settings of the remaining<br />
parameters lead to a significantly<br />
lower level, select a<br />
positive value. If your settings<br />
lead to a significantly<br />
higher level, select a negative<br />
value. “0” means that<br />
the level is neither boosted<br />
nor attenuated.<br />
High/Mid/Low: Because “Attack”, “Release”, “Threshold”,<br />
“Ratio” and “Level” are the same for each band, we will<br />
only discuss them once. As you see, each of the three frequency<br />
ranges has its own set of parameters that allow<br />
you to specify their behavior.<br />
1. Select a keyboard part, an SMF song or a<br />
rhythm and start playback.<br />
2. Set the “Switch” parameter to “On” to activate<br />
the compressor.<br />
The compressor is now active. (Select “Off” to switch<br />
the compressor back off.)<br />
3. Use the [CURSOR÷VALUE] dial to select the<br />
“Preset” parameter, then press the [ENTER/<br />
SELECT] button.<br />
4. Rotate the [CURSOR÷VALUE] dial to select<br />
one of the available presets.<br />
The available presets are:<br />
1. Hard Comp<br />
2. Soft Comp<br />
3. Low Boost<br />
4. Mid Boost<br />
5. High Boost<br />
6. Standard<br />
7. User<br />
Attack 0~100ms Use this parameter to specify<br />
how fast the compressor<br />
of the band in question<br />
should start processing the<br />
signal once the level of that<br />
band exceeds the “Threshold”<br />
level. Choose a smaller<br />
value if you prefer a compression<br />
similar to that of<br />
FM radio stations. Higher<br />
values may yield a “snappier”<br />
or “funkier” sound.<br />
Release 50~<br />
5000ms<br />
This parameter allows you to<br />
specify how fast the compressor<br />
of the corresponding<br />
band should stop working<br />
when the signal level drops<br />
below the “Threshold” value.<br />
71
Backing <strong>Keyboard</strong> BK-5<br />
Menu options<br />
Parameter Setting Explanation<br />
Threshold –36~0dB This parameter allows you to<br />
set the level the frequency<br />
band (“High”, “Mid” or<br />
“Low”) must reach to trigger<br />
its compressor. The lower<br />
the value, the more noticeable<br />
the compression will be.<br />
Ratio 1:1.0~<br />
1:INF<br />
Level –24~<br />
+24dB<br />
Split High 2000~<br />
12000Hz<br />
Split Low<br />
80~800Hz<br />
Use this parameter to specify<br />
how strongly the level<br />
should be reduced when the<br />
band’s level exceeds the<br />
“Threshold” level. “1:2.0”, for<br />
example, means that level<br />
values above the “Threshold”<br />
level are halved. “1:INF” is<br />
useful if you set “Threshold”<br />
to “0dB” or thereabout. This<br />
produces a limiter effect,<br />
which means that no signal<br />
level will ever exceed the<br />
“Threshold” value. This may<br />
help you protect the speakers<br />
of the PA system etc.<br />
This parameter allows you to<br />
establish the desired mix<br />
among the three compressor<br />
bands. Choose a negative<br />
value to decrease the level,<br />
or a positive one to increase<br />
it. Choose “0” for a band<br />
whose level is OK as is.<br />
These two parameters specify<br />
the frequency where two<br />
bands are separated. The<br />
compressor has three bands,<br />
and so there are two crossover<br />
frequencies you can<br />
set: “High” between the<br />
“Mid” and “High” ranges;<br />
and “Low” between the<br />
“Mid” and “Low” ranges.<br />
Write User<br />
This function allows you to save the settings you<br />
made on the “Compressor” page.<br />
1. Press the [WRITE] button.<br />
The display shows a confirmation message.<br />
If you don’t want to define the current settings as<br />
the default state, rotate the [CURSOR÷VALUE] dial to<br />
select “NO”, then press the [ENTER/SELECT] button.<br />
The BK-5 then returns to the “Compressor” page.<br />
NOTE<br />
There is only one “User” memory for your own settings. By<br />
saving new settings, you therefore overwrite the previous<br />
ones.<br />
NOTE<br />
When you switch on the BK-5, it automatically loads the<br />
“User” settings.<br />
Equalizer<br />
To edit the Equalizer parameters, use [MENU] button ‰<br />
“Mastering Tools” ‰ “Equalizer”.<br />
The equalizer has the same function as the TREBLE, MID<br />
and BASS knobs on a mixer: it allows you to color the<br />
sound, or to apply tonal corrections.<br />
1. Select a keyboard part, an SMF song or a<br />
rhythm and start playback.<br />
2. Set the “Switch” parameter to “On” to activate<br />
the equalizer.<br />
The equalizer is now active and will affect the keyboard<br />
parts and SMF song or rhythm playback.<br />
(Select “Off” to switch the equalizer back off.)<br />
3. Use the [CURSOR÷VALUE] dial to select the<br />
“Preset” parameter, then press the [ENTER/<br />
SELECT] button.<br />
4. Rotate the [CURSOR÷VALUE] dial to select<br />
one of the available presets.<br />
The available presets are:<br />
1. Flat<br />
2. Rock<br />
3. Pop<br />
4. Jazz<br />
5. Classic<br />
6. Standard<br />
7. User<br />
r<br />
2. Rotate the [CURSOR÷VALUE] dial to select<br />
“YES”, then press the [ENTER/SELECT] button<br />
to save the current settings.<br />
72
Backing <strong>Keyboard</strong> BK-5 r<br />
Mastering Tools<br />
5. If none of the preset memories contains the<br />
settings you need, you can change the following<br />
parameters by first pressing the<br />
[ENTER/SELECT] button and then using the<br />
[CURSOR÷VALUE] dial.<br />
Parameter Setting range Explanation<br />
Level 0~127 Use this parameter to set<br />
the equalizer’s input<br />
level. This may be necessary<br />
when the level of<br />
the input signals is so<br />
high that the sound distorts.<br />
NOTE<br />
Do not set this parameter<br />
to “0” if the equalizer<br />
is switched on,<br />
because doing so<br />
means that the keyboard<br />
parts, SMF song/<br />
rhythm is/are no<br />
longer audible.<br />
Gain –9~0~9dB Use this parameter to<br />
correct the level at the<br />
equalizer’s outputs. If<br />
the settings of the<br />
remaining parameters<br />
lead to a significantly<br />
lower level, select a positive<br />
value. If your settings<br />
lead to a<br />
significantly higher level,<br />
select a negative value.<br />
“0” means that the level<br />
is neither boosted nor<br />
attenuated.<br />
High<br />
Frequency<br />
2000~<br />
12000Hz<br />
Allows you to set the<br />
cutoff frequency of the<br />
high band (this is a<br />
shelving filter).<br />
High Gain –15~15dB Use this parameter to set<br />
the level of the selected<br />
“High” frequency. Positive<br />
values boost<br />
(increase the volume of)<br />
that frequency band,<br />
negative values cut<br />
(attenuate) it.<br />
Mid Frequency<br />
200~8000Hz<br />
Allows you to set the<br />
cutoff frequency of the<br />
middle band (this is a<br />
peaking filter).<br />
Parameter Setting range Explanation<br />
Mid Q 0.5, 1, 2, 4, 8 Use this parameter to<br />
specify the width of the<br />
“Mid Frequency” band<br />
that you want to boost<br />
or cut. Smaller values<br />
mean that neighboring<br />
frequencies above/below<br />
that value are also<br />
affected.<br />
Mid Gain –15~15dB Use this parameter to set<br />
the level of the selected<br />
“Mid” frequency.<br />
Low Frequency<br />
50, 80, 100,<br />
150, 200, 250,<br />
300, 400Hz<br />
Allows you to set the<br />
cutoff frequency of the<br />
low band (this is a shelving<br />
filter).<br />
Low Gain –15~15dB Use this parameter to set<br />
the level of the selected<br />
“Low” frequency.<br />
Write User<br />
This function allows you to save the settings you<br />
made on the “Equalizer” page.<br />
1. Press the [WRITE] button.<br />
2. Rotate the [CURSOR÷VALUE] dial to select<br />
“YES”, then press the [ENTER/SELECT] button<br />
to save the current settings.<br />
The display shows a confirmation message.<br />
If you don’t want to define the current settings as<br />
the default state, rotate the [CURSOR÷VALUE] dial to<br />
select “NO”, then press the [ENTER/SELECT] button.<br />
The BK-5 then returns to the “Equalizer” page.<br />
NOTE<br />
There is only one “User” memory for your own settings. By<br />
saving new settings, you therefore overwrite the previous<br />
ones.<br />
NOTE<br />
When you switch on the BK-5, it automatically loads the<br />
“User” settings.<br />
73
Backing <strong>Keyboard</strong> BK-5<br />
Menu options<br />
Makeup Tools (rhythms and SMF)<br />
These functions allow you to actually edit the selected<br />
rhythm or SMF song (Standard MIDI File) without paying<br />
too much attention to the underlying parameters.<br />
NOTE<br />
The “Rhythm Makeup Tools” and “SMF Makeup Tools” functions<br />
cannot be used to edit Standard MIDI Files that use the<br />
XG format.<br />
Using the Makeup Tools<br />
1. Select the rhythm or SMF song you wish to<br />
modify on the connected USB memory (see<br />
p. 34).<br />
You can also select an internal rhythm.<br />
2. Press the [START/STOP] button to start playback<br />
of the song or rhythm.<br />
This allows you to listen to the song or rhythm before<br />
you start editing it. Press the [START/STOP] button<br />
again to halt playback.<br />
NOTE<br />
If you selected a rhythm or SMF song on the connected<br />
USB memory, press and hold the [EXIT] button to return to<br />
the main page.<br />
3. Press the [MENU] button.<br />
4. Rotate the [CURSOR÷VALUE] dial to select<br />
“Makeup Tools”, then press the [ENTER/<br />
SELECT] button.<br />
If you selected a rhythm in step (1), the display<br />
changes to:<br />
This menu allows you to select the following entries:<br />
Menu Option<br />
Common<br />
Instrument<br />
Freeze Data<br />
Save<br />
Explanation<br />
Select this entry to change common<br />
parameters that affect the rhythm or song<br />
as a whole, like the reverb or chorus<br />
effect, the tempo, etc.<br />
Select this entry to change the instruments<br />
used in the rhythm or song and<br />
their parameters. See page 75.<br />
Select this entry to “burn” your new settings<br />
into the file. Doing so will allow you<br />
to use your new <strong>version</strong> with any<br />
sequencer (software) or compatible<br />
<strong>Roland</strong> arranger instrument. See page 79.<br />
Select this entry to save your song or<br />
rhythm with the “Makeup Tools” settings<br />
you have made. See page 80.<br />
Common<br />
To edit the Common parameters, use [MENU] button ‰<br />
“Makeup Tools” ‰ “Common”.<br />
The “Common” parameters on this page apply to the<br />
entire song or rhythm.<br />
1. Rotate the [CURSOR÷VALUE] dial to select<br />
the desired “Common” parameter, then<br />
press the [ENTER/SELECT] button.<br />
If you selected an SMF song in step (1), the display<br />
changes to:<br />
r<br />
74<br />
The following parameters are available:<br />
Reverb Type: This parameter allows you to specify<br />
what kind of reverb effect you need. The available<br />
reverb types are:<br />
Setting<br />
Original<br />
Room1,<br />
Room2,<br />
Room3<br />
Meaning<br />
This setting means that the song uses its own<br />
(programmed) reverb settings.<br />
These types simulate the reverb characteristics<br />
of a room. The higher the number (1, 2 or<br />
3), the bigger the “room” becomes.
Backing <strong>Keyboard</strong> BK-5 r<br />
Makeup Tools (rhythms and SMF)<br />
Setting<br />
Hall1,<br />
Hall2<br />
Plate<br />
Delay<br />
These types simulate the reverb of a small (1)<br />
or large (2) concert hall and thus sound much<br />
“bigger” than the Room types above.<br />
This algorithm simulates the acoustics of a<br />
concert hall.<br />
A delay effect (no reverb). Works a lot like an<br />
echo effect and thus repeats the sounds.<br />
Pan Delay This is a stereo <strong>version</strong> of the above delay<br />
effect. It creates repetitions that alternate<br />
between the left and right channels.<br />
Chorus Type: Chorus broadens the spatial image of<br />
the sound and creates a stereo impression. You can<br />
choose from 8 types of chorus.<br />
Setting<br />
Meaning<br />
Meaning<br />
See “Saving your new rhythm or song (SMF) <strong>version</strong>”<br />
on p. 80.<br />
NOTE<br />
The changes you make using the procedure described<br />
above can be “burned” into the rhythm/song file using the<br />
“Freeze Data” command (see p. 79). Doing so will allow you<br />
to hear those changes on any sequencer (software) you<br />
use. Changes you don’t “freeze” are nevertheless stored<br />
when you save the edited rhythm/song file—but only the<br />
BK-5 can read them.<br />
Instrument<br />
To edit the Instrument parameters, use [MENU] button<br />
‰ “Makeup Tools” ‰ “Instrument”.<br />
Original<br />
Chorus<br />
1~4<br />
Fbk Chorus<br />
Flanger<br />
ShortDly<br />
ShortDlyFb<br />
The song uses its own (programmed)<br />
chorus settings.<br />
These are conventional chorus effects<br />
that add spaciousness and depth to the<br />
sound.<br />
This is a chorus with a flanger-like effect<br />
and a soft sound.<br />
This is an effect that sounds somewhat<br />
like a jet airplane taking off and landing.<br />
This is a full-fledged delay effect that<br />
can be used instead of a chorus or<br />
flanger. As you will see, there are a lot of<br />
parameters you can program.<br />
This is a short delay with many repeats.<br />
The display now shows all instruments used by the<br />
selected rhythm or SMF song.<br />
1. Rotate the [CURSOR÷VALUE] to select the<br />
instrument you want to change, then press<br />
the [ENTER/SELECT] button.<br />
Reverb Level & Chorus Level: These parameters<br />
allow you to modify the output level of the Reverb<br />
(or Chorus) processor.<br />
Rhythm Volume/Song Volume: This parameter<br />
allows you to set the overall volume of the selected<br />
rhythm or song if you think it is too loud/soft.<br />
Rhythm Tempo/Song Tempo: Allows you to change<br />
the rhythm’s or song’s tempo (q= 20~250).<br />
Key: This parameter allows you to transpose all song<br />
parts (except the drums) up to 12 semitones (1<br />
octave) up or down. This value is written to the song<br />
data and used every time you play back this song.<br />
NOTE<br />
This parameter is not available for rhythms.<br />
Undo Changes: Select this entry to cancel all<br />
“Rhythm/SMF Makeup Tools” settings you have made<br />
and to revert to the previously saved <strong>version</strong>.<br />
2. If you are satisfied with your changes and<br />
wish to preserve them, save your rhythm/<br />
song to the USB memory.<br />
The display changes to:<br />
The [MENU] button’s indicator flashes.<br />
2. Press the [MENU] button to jump to the<br />
location where the instrument is used.<br />
Playback starts automatically from that point.<br />
3. Rotate the [CURSOR÷VALUE] dial to select<br />
the parameter you wish to edit, then press<br />
the [ENTER/SELECT] button.<br />
75
Backing <strong>Keyboard</strong> BK-5<br />
Menu options<br />
r<br />
76<br />
NOTE<br />
If you select a Drum Set in step (1) above, the parameter<br />
list looks slightly different than for instruments that do not<br />
use a Drum Set. “Drum Sets” are special “Tones” that assign<br />
different sounds to most keys/note numbers, allowing you<br />
(and the BK-5) to play realistic drum and percussion parts.<br />
In the following, “(T)” refers to parameters that are only<br />
available for regular instruments (also called “Tones”),<br />
while “(D)” refers to parameters that are only available for<br />
Drum Sets.<br />
The following parameters are available:<br />
Tone (T), Drum (D)<br />
Allows you to select a different Tone within the<br />
active Tone family. See page 119 for a list of available<br />
Tones and Drum Sets.<br />
While selecting a Tone, you can press a TONE button<br />
to select a different family.<br />
Parameter<br />
Tone (T)<br />
Drum (D)<br />
Mute (T)/Drum Mute (D)<br />
Switches the selected instrument off. The corresponding<br />
part is no longer played back. (This setting<br />
only applies to the selected instrument and thus not<br />
necessarily to the entire track.)<br />
NOTE<br />
In the case of the drums, you can mute two instrument<br />
groups (“Drum Mute” and “Perc Mute”, see below) separately.<br />
Parameter<br />
Mute (T)<br />
Drum Mute (D)<br />
Solo<br />
Switches off all instruments except the selected<br />
instrument.<br />
Parameter<br />
Solo<br />
Perc Mute (D)<br />
Suppresses (or adds) the percussion sounds used by<br />
the drum part.<br />
Parameter<br />
Perc Mute<br />
Explanation<br />
Volume<br />
Adjusts the volume of the selected instrument. Negative<br />
values decrease the current volume, positive values<br />
increase it. (This is a relative setting that is added<br />
to, or subtracted from, the original setting.)<br />
Parameter<br />
The number of Tones depends on the<br />
selected family.<br />
Setting<br />
Off, On<br />
Value<br />
Off, On<br />
Setting<br />
Setting<br />
Off, On<br />
Volume -127~0~+127<br />
Reverb<br />
Use this parameter to set the reverb send level. Negative<br />
values decrease the current reverb send level,<br />
positive values increase it. (This is a relative setting<br />
that is added to, or subtracted from, the original setting.)<br />
Parameter<br />
Setting<br />
Reverb -127~0~+127<br />
Chorus<br />
Use this parameter to set the chorus send level. Negative<br />
values decrease the current chorus send level,<br />
positive values increase it. (This is a relative setting<br />
that is added to, or subtracted from, the original setting.)<br />
Parameter<br />
Setting<br />
Chorus -127~0~+127<br />
Panpot<br />
Use this parameter to change the stereo placement<br />
of the selected instrument. “0” means “no change”,<br />
negative (–) values shift the instrument towards the<br />
left and positive (+) values shift it towards the right.<br />
Parameter<br />
Setting<br />
Panpot -127~0~+127<br />
NOTE<br />
In the case of Drum Sets, this setting applies to all drum/<br />
percussion instruments. There is also a parameter that can<br />
be set for specific drum instruments. See page 79.<br />
Octave (T)<br />
Use this parameter to transpose the selected instrument<br />
up or down by up to 4 octaves.<br />
Parameter<br />
Setting<br />
Octave -4~0~+4<br />
Velocity<br />
This parameter allows you to modify the velocity<br />
range of the instrument in question. “0” means that<br />
the recorded velocity values are left untouched, negative<br />
values reduce all velocity values by the same<br />
amount (leaving differences between notes intact),<br />
while positive settings increase all velocity values.<br />
Parameter<br />
Setting<br />
Velocity -127~+127<br />
Cut Off<br />
This filter parameter allows you to make the selected<br />
sound darker or brighter. Positive settings mean that<br />
more overtones are allowed to pass, so that the<br />
sound becomes brighter. The further this value is set
Backing <strong>Keyboard</strong> BK-5 r<br />
Makeup Tools (rhythms and SMF)<br />
in the negative direction, the fewer overtones will be<br />
allowed to pass and the sound will become softer<br />
(darker).<br />
Setting<br />
Parameter<br />
Setting<br />
Cut Off -127~+127<br />
NOTE<br />
For some sounds, positive (+) “Cut Off” settings will cause<br />
no noticeable change because the preprogrammed “Cut<br />
Off” parameter is already set to its maximum value.<br />
Resonance<br />
This is a parameter one invariably associates with a<br />
synthesizer. When the “Resonance” value is increased,<br />
the overtones in the area of the cutoff frequency will<br />
be emphasized, creating a sound with a strong character.<br />
Parameter<br />
Setting<br />
Resonance -127~+127<br />
NOTE<br />
For some sounds, negative (–) “Resonance” settings may<br />
produce no noticeable change because the resonance is<br />
already set to the minimum value.<br />
The following parameters allow you to set the<br />
sound’s “envelope”. The envelope parameters affect<br />
both the volume (TVA) and the filter (TVF). The cutoff<br />
frequency will rise as the envelope rises and fall as<br />
the envelope falls.<br />
Attack (T)<br />
This parameter adjusts the onset of the sound. Negative<br />
values speed up the attack, so that the sound<br />
becomes more aggressive.<br />
Parameter<br />
Setting<br />
Attack -127~+127<br />
Decay (T)<br />
This parameter adjusts the time over which the<br />
sound’s volume and cutoff frequency fall from the<br />
highest point of the attack down to the sustain level.<br />
Parameter<br />
Setting<br />
Decay -127~+127<br />
Characteristics of a low-pass filter<br />
Cutoff frequency<br />
Frequency<br />
NOTE<br />
Percussive sounds usually have a sustain level of “0”. Piano<br />
and guitar sounds are in this category. Holding the keys for<br />
a long time will have little effect on the duration of the<br />
notes you are playing, even if you select a high value here.<br />
Release (T)<br />
This parameter adjusts the time over which the sound<br />
will decay after the note is released until it is no<br />
longer heard. The cutoff frequency will also fall<br />
according to this setting.<br />
Parameter<br />
Setting<br />
Release -127~+127<br />
NOTE<br />
Some sounds already contain natural (sampled) vibrato<br />
whose depth or speed cannot be changed.<br />
Use the following three parameters if you think the<br />
instrument in question has too much (or could use a<br />
little more) vibrato.<br />
Vibrato Rate (T)<br />
This parameter adjusts the speed of the pitch modulation.<br />
Positive (+) settings make the preset pitch<br />
modulation faster, and negative (–) settings make it<br />
slower.<br />
Parameter<br />
Setting<br />
Vibrato Rate -127~+127<br />
Vibrato Depth (T)<br />
This parameter adjusts the intensity of the pitch<br />
modulation. Positive (+) settings mean that the<br />
“wobble” becomes more prominent, while negative<br />
(–) settings make it shallower.<br />
Parameter<br />
Setting<br />
Vibrato Depth -127~+127<br />
Vibrato Delay (T)<br />
This parameter adjusts the time required for the<br />
vibrato effect to begin. Positive (+) settings increase<br />
the time before vibrato will begin and negative settings<br />
(–) shorten the time.<br />
Parameter<br />
Setting<br />
Vibrato Delay -127~+127<br />
Mfx<br />
The BK-5 contains 2 multi-effects processors (“Mfx”),<br />
one reverb processor and one chorus processor that<br />
can be used to process rhythms or Standard MIDI<br />
Files.<br />
Select “Off” for instruments that don’t need to be<br />
processed by any Mfx.<br />
Parameter<br />
Mfx<br />
Setting<br />
Off, A, B<br />
NOTE<br />
If you select “A” or “B”, additional parameters can be edited<br />
(see below).<br />
77
Backing <strong>Keyboard</strong> BK-5<br />
Menu options<br />
Mfx Type<br />
Allows you to select the desired Mfx type, i.e. the kind<br />
of effect you need. Each Mfx (“A” and “B”) can be<br />
assigned to as many instruments as you like. Be<br />
aware, however, that selecting a different type will<br />
affect all instruments that use this Mfx processor. See<br />
page 60 for a list of the available Mfx types.<br />
NOTE<br />
Each Mfx can be assigned to as many instruments as you<br />
like. Be aware, however, that selecting a different type will<br />
affect all instruments that use this Mfx processor.<br />
NOTE<br />
While the “Mfx” parameter is set to “Off”, you cannot select<br />
a different type. In that case, the display will show the<br />
message “---”.<br />
Mfx Edit<br />
If you also want to edit the parameters of the<br />
selected effect type, press the [ENTER/SELECT] button<br />
to jump to the “Mfx Edit” page. You can then edit the<br />
available parameters.<br />
Equalizer<br />
Activate this setting if you want to change the timbre<br />
of the selected instrument.<br />
Parameter<br />
Equalizer<br />
Setting<br />
Off, On<br />
Edit EQ<br />
To edit the equalizer parameters, press the [ENTER/<br />
SELECT] button to jump to the “Edit EQ” page. You<br />
can then edit the available parameters:<br />
Parameter Setting Explanation<br />
Mid Q 0.5, 1, 2, 4, 8 Use this parameter to<br />
specify the width of<br />
the “Mid Freq” band<br />
that you want to boost<br />
or cut. Smaller values<br />
mean that neighboring<br />
frequencies above/<br />
below that value are<br />
also affected.<br />
Mid Gain –15~1+5 dB Use this parameter to<br />
set the level of the<br />
selected “Mid Freq”.<br />
Positive values boost<br />
(increase the volume<br />
of) that frequency,<br />
negative values cut<br />
(attenuate) it.<br />
Low Freq<br />
Drum Instrument (D)<br />
90 Hz, 150 Hz,<br />
180 Hz, 300<br />
Hz, 360 Hz,<br />
600 Hz<br />
Allows you to set the<br />
cutoff frequency of<br />
the low band (this is a<br />
shelving filter).<br />
Low Gain –15~+15 dB Use this parameter to<br />
set the level of the<br />
selected “Low” frequency.<br />
Parameter Setting Explanation<br />
r<br />
78<br />
Equalizer Off, On Activate this setting if<br />
you want to change<br />
the timbre of the<br />
selected instrument.<br />
This parameter duplicates<br />
the “Equalizer”<br />
above and was added<br />
for your convenience.<br />
High Freq 1500 Hz, 2000<br />
Hz, 3000 Hz,<br />
4000 Hz, 6000<br />
Hz, 8000 Hz,<br />
12000 Hz<br />
Allows you to set the<br />
cutoff frequency of<br />
the high band (this is a<br />
shelving filter).<br />
High Gain –15~+15 dB Use this parameter to<br />
set the level of the<br />
selected “High” frequency.<br />
Positive values<br />
boost (increase the<br />
volume of) that frequency,<br />
negative values<br />
cut (attenuate) it.<br />
Mid Freq 200~8000 Hz Allows you to set the<br />
cutoff frequency of<br />
the middle band (this is<br />
a peaking filter).<br />
If you want to edit the settings for specific instruments<br />
of the selected Drum Set, press the [ENTER/<br />
SELECT] button to jump to the “Drum Instrument”<br />
page.<br />
All instruments of the Drum Set being used are displayed.<br />
Use the [CURSOR÷VALUE] dial to select the<br />
instrument you want to change, then press the<br />
[ENTER/SELECT] button.<br />
You can then use the [CURSOR÷VALUE] dial and the<br />
[ENTER/SELECT] button to edit the available parameters.<br />
Parameter Setting Explanation<br />
Instr.<br />
All Drum Set<br />
Instruments<br />
Parameters for the selected instrument<br />
Select the drum instrument<br />
you want to edit.<br />
Mute Off, On Suppress (or add) the<br />
selected instrument.
Backing <strong>Keyboard</strong> BK-5 r<br />
Makeup Tools (rhythms and SMF)<br />
Parameter Setting Explanation<br />
Solo Off, On Switch off all instruments<br />
except the<br />
selected instrument.<br />
Volume -127~+127 Use this parameter to<br />
set the volume of the<br />
selected drum instrument.<br />
Reverb -127~+127 Use this parameter to<br />
set the reverb send<br />
level of the selected<br />
drum instrument. The<br />
effect itself can be<br />
changed on the “Common”<br />
page.<br />
Chorus -127~+127 Use this parameter to<br />
set the chorus send<br />
level of the selected<br />
drum instrument. The<br />
effect itself can be<br />
changed on the “Common”<br />
page.<br />
Panpot -127~+127 Use this parameter to<br />
set the stereo placement<br />
of the selected<br />
drum instrument. “0”<br />
means “no change”,<br />
negative values shift<br />
the instrument<br />
towards the left and<br />
positive values shift it<br />
towards the right.<br />
Velocity -127~+127 This parameter allows<br />
you to modify the<br />
velocity range of the<br />
drum instrument in<br />
question. “0” means<br />
that the recorded values<br />
are left untouched,<br />
a negative setting<br />
reduces all velocity<br />
values by the same<br />
amount (leaving variations<br />
intact). A positive<br />
setting shifts all<br />
velocity values in a<br />
positive direction.<br />
Pitch -127~+127 Use this parameter to<br />
tune the selected drum<br />
instrument higher or<br />
lower. “0” means that<br />
the pitch is left<br />
unchanged.<br />
Parameter Setting Explanation<br />
Instr. Equalizer<br />
Edit EQ<br />
Undo Changes<br />
Global, Instr,<br />
Off<br />
(Press the<br />
[ENTER/<br />
SELECT] button)<br />
(Press the<br />
[ENTER/<br />
SELECT] button)<br />
Global: The drum<br />
instrument uses the<br />
equalizer settings of<br />
the Drum Set it<br />
belongs to.<br />
Instr: The drum instrument<br />
uses its own<br />
equalizer settings (see<br />
below).<br />
Off: The drum instrument<br />
is not equalized.<br />
Provides access to the<br />
EQ parameters of the<br />
currently selected<br />
drum instrument (if<br />
“Instr. Equalizer” is set<br />
to “Int”). See “Edit EQ”<br />
on p. 78 for a description<br />
of the available<br />
parameters.<br />
This function allows<br />
you to cancel the<br />
“Drum Instrument (D)”<br />
settings of the currently<br />
selected instrument<br />
and to revert to<br />
the previously saved<br />
<strong>version</strong>.<br />
4. If you are satisfied with your changes and<br />
wish to preserve them, save your rhythm/<br />
song to the USB memory.<br />
See “Saving your new rhythm or song (SMF) <strong>version</strong>”<br />
on p. 80.<br />
NOTE<br />
The changes you make using the procedure described<br />
above can be “burned” into the rhythm/song file using the<br />
“Freeze Data” command (see p. 79). Doing so will allow you<br />
to hear those changes on any sequencer (software) you<br />
use. Changes you don’t “freeze” are nevertheless stored<br />
when you save the edited rhythm/song file—but only the<br />
BK-5 can read them.<br />
Freeze Data<br />
To commit your settings, use [MENU] button ‰ “Makeup<br />
Tools” ‰ “Freeze Data”.<br />
Before saving your “made-up” song to a USB memory,<br />
you can (but you don’t have to) “commit” your changes,<br />
thereby turning them into “regular” rhythm or song<br />
data.<br />
This may come in handy if you also want to play back<br />
your new rhythm/song <strong>version</strong> on another arranger<br />
instrument, sequencer or your computer. This operation<br />
is unnecessary for files you only want to use with the<br />
BK-5 or one of the models mentioned above.<br />
79
Backing <strong>Keyboard</strong> BK-5<br />
Menu options<br />
Saving your new rhythm or song (SMF) <strong>version</strong><br />
1. If you are happy with your changes and wish<br />
to preserve them, select the “Save” parameter<br />
and press the [ENTER/SELECT] button.<br />
NOTE<br />
Even rhythms or songs for which you did not perform the<br />
“Freeze Data” command need to be saved using this procedure<br />
if you want to keep the changes.<br />
2. Use the [CURSOR÷VALUE] dial and the<br />
[ENTER/SELECT] button to select a different<br />
location if you do not want to overwrite the<br />
original <strong>version</strong>.<br />
3. Press the [WRITE] button (it flashes).<br />
If the USB memory already contains a rhythm or<br />
song file of that name, you will be asked whether you<br />
want to overwrite it:<br />
In this case, select “YES” using the [CURSOR÷VALUE]<br />
dial and press [ENTER/SELECT] to replace the old file<br />
with the new one (the old file will be lost).<br />
Otherwise, select “NO” and press the [ENTER/SELECT]<br />
button to return to the “Save” page and enter a different<br />
name.<br />
The BK-5 automatically adopts the name of the<br />
selected rhythm or song. If you want to save the new<br />
<strong>version</strong> under that name (and overwrite the previous<br />
<strong>version</strong>), skip to step (7) below.<br />
4. Use the TONE buttons to select a different<br />
character.<br />
5. Rotate the [CURSOR÷VALUE] dial to select<br />
the next character position you want to<br />
change.<br />
6. Repeat steps (4) and (5) to complete the<br />
name.<br />
7. Press the [WRITE] button to confirm your<br />
desire to save the rhythm or song.<br />
r<br />
80
Backing <strong>Keyboard</strong> BK-5 r<br />
Rhythm Composer (programming your own rhythms)<br />
Rhythm Composer (programming<br />
Menu<br />
your own rhythms)<br />
The BK-5 allows you to program your own rhythms.<br />
Before explaining the details, there are a few concepts<br />
you need to familiarize yourself with.<br />
What are rhythms?<br />
■ Patterns (Divisions)<br />
Rhythms are short sequences, or patterns (of four or<br />
eight measures) you can select in real-time. Patternbased<br />
accompaniments usually consist of the following<br />
elements:<br />
•The basic groove, i.e. the rhythm that is the backbone<br />
of the song.<br />
• Several alternatives for the basic groove that keep<br />
the accompaniment interesting and suggest some<br />
kind of “evolution” or “variation”.<br />
• Fill-Ins to announce the beginning of new parts.<br />
• An introduction and a closing section (ending).<br />
Programming four to eight patterns for a threeminute<br />
song is usually enough. Just use them in the<br />
right order to make them suitable for your song.<br />
The BK-5 allows you to program 54 different patterns<br />
per rhythm, some of which can be selected via dedicated<br />
buttons (VARIATION [1]~[4], etc.). Some Patterns<br />
are selected on the basis of the chords you play<br />
in the chord recognition area of the keyboard (major,<br />
minor, seventh).<br />
■ Tracks<br />
Unlike a drum machine, a BK-5 rhythm not only contains<br />
the rhythm part (drums & percussion) but also a<br />
melodic accompaniment, such as piano, guitar, bass<br />
and strings lines. That is why the rhythms work with<br />
tracks – eight to be precise.<br />
NOTE<br />
If necessary, you can even record a second drum track.<br />
The reason why the AccDrums part is assigned to the<br />
first track and the ABass part to the second is that<br />
most programmers and recording artists start by laying<br />
down the rhythm section of a song.<br />
There are exceptions to this rule, however, so feel free<br />
to start with any other part if that is easier for the<br />
rhythm you are programming.<br />
NOTE<br />
Though there are six (melodic) ACC tracks, most rhythms<br />
only contain two or three melodic accompaniment lines. In<br />
most cases, less means more, i.e. do not program six<br />
melodic accompaniments just because the BK-5 provides<br />
that facility. If you listen very carefully to a CD, you will<br />
discover that it is not the number of instruments you use<br />
that makes a song sound “big” but rather the right notes at<br />
the right time.<br />
■ Looped vs. one-shot patterns<br />
The BK-5 uses two kinds of patterns: looped divisions<br />
and one-shot divisions.<br />
Looped divisions: Looped divisions are accompaniments<br />
that are repeated until you select another division<br />
or press [START/STOP] to stop Arranger playback.<br />
The BK-5 provides four programmable looped divisions<br />
(VARIATION [1]~[4]).<br />
Looped divisions do not select other divisions when<br />
they are finished (because they never end): they keep<br />
playing until you select another division by hand (or<br />
by foot).<br />
One-shot divisions: One-shot patterns (or “Divisions”)<br />
are only played once and then select a looped<br />
division or stop the Arranger. The BK-5 uses the following<br />
one-shot divisions: INTRO [1]~[4], FILL UP [1]~<br />
[3], FILL DOWN [1]~[3] and ENDING [1]~[4].<br />
The division type also determines how the respective<br />
tracks are played back. Any track of a looped pattern<br />
that is shorter than another track is repeated until<br />
the longest track is finished. Then, a new cycle begins.<br />
Here’s how you can take advantage of that: if the<br />
drums play the same notes during four measures,<br />
while the rhythm guitar or piano needs four measures<br />
to complete a cycle, recording only one drum<br />
measure is enough, because it is automatically<br />
repeated until the longest track is finished.<br />
■ Several drum tracks are possible<br />
The Rhythm Composer allows you to assign a Drum<br />
Set to any “Accomp” track, thereby turning it into an<br />
additional drum track.<br />
Clearing the RAM memory (Initialize Rhythm)<br />
The first thing we need to do is clear the BK-5’s rhythm<br />
RAM memory, because it is not empty when you select<br />
the Rhythm Composer.<br />
1. Press the [MENU] button, select “Rhythm<br />
Composer”, then press the [ENTER/SELECT]<br />
button.<br />
The display changes to:<br />
2. Press the [MENU] button (its indicator<br />
flashes).<br />
81
Backing <strong>Keyboard</strong> BK-5<br />
Menu options<br />
The display changes to:<br />
Parameter Setting Explanation<br />
Expression 0~127 Temporary volume<br />
changes (CC11).<br />
Reverb 0~127 Reverb Send (CC91),<br />
i.e. how strongly the<br />
selected track should<br />
be processed by the<br />
reverb effect.<br />
3. “Initialize Rhythm” is already selected, so<br />
press the [ENTER/SELECT] button.<br />
The display changes to:<br />
Chorus 0~127 Chorus Send (CC93),<br />
i.e. how strongly the<br />
selected track should<br />
be processed by the<br />
chorus effect.<br />
Panpot 0~127 The track’s stereo<br />
placement (00[L]~64~<br />
127[R]).<br />
5. Press the [WRITE] button (its indicator<br />
flashes) to confirm your settings.<br />
The settings shown on this display page are suggested<br />
as defaults for every new rhythm you program.<br />
Feel free to change them depending on the<br />
kind of accompaniment you want to prepare:<br />
4. Use the [CURSOR÷VALUE] dial and [ENTER/<br />
SELECT] button to edit the available parameters.<br />
Parameter Setting Explanation<br />
The display changes to:<br />
Rec Track<br />
ADrum, ABass,<br />
Acc1, Acc2,<br />
Acc3, Acc4,<br />
Acc5, Acc6<br />
This parameter allows<br />
you to select the track<br />
whose settings you<br />
want to change.<br />
r<br />
82<br />
Inst<br />
(Tone assigned<br />
to the track)<br />
This is where you select<br />
a sound (or Drum Set)<br />
for the track marked<br />
for recording (“Rec<br />
Track”).<br />
Tempo 20~250 You can already set the<br />
tempo here or leave<br />
that for later.<br />
Time Signature 1/16, 1/4~4/<br />
4…<br />
This value needs to be<br />
set when you initialize<br />
the Rhythm RAM<br />
memory (i.e. now). All<br />
Divisions and Modes<br />
use this time signature.<br />
You could, however,<br />
edit the patterns<br />
at a later stage (see<br />
“Time Signature” on<br />
p. 98) and specify that<br />
VARIATION [1] should<br />
use “4/4”, MAIN [2] “6/<br />
8”, etc.<br />
6. Rotate the [CURSOR÷VALUE] dial to select<br />
“YES” and press the [ENTER/SELECT] button.<br />
The display returns to the “Rhythm Composer” page,<br />
which only contains the sound assignments you have<br />
just made.<br />
Select “NO” if you don’t want to initialize the rhythm<br />
memory area.<br />
Getting ready for the first track<br />
1. On the “Rhythm Composer” page, use the<br />
[CURSOR÷VALUE] dial and [ENTER/SELECT]<br />
button to select the “Division” parameter.<br />
2. Use the [CURSOR÷VALUE] dial to select the<br />
Division you want to record (“Intro”, “Main”,<br />
“Fill” or “Ending”).
Backing <strong>Keyboard</strong> BK-5 r<br />
Rhythm Composer (programming your own rhythms)<br />
3. Press the [AUDIO REC] button.<br />
Parameter Setting Explanation<br />
Octave –4~+4 This parameter allows<br />
you to transpose the<br />
keyboard in octave<br />
steps, which may be<br />
convenient for<br />
extremely high or low<br />
notes – or for using<br />
the special “noises” of<br />
certain sounds.<br />
The display changes to:<br />
4. If necessary, use the [CURSOR÷VALUE] dial<br />
and [ENTER/SELECT] button to edit the<br />
available parameters.<br />
Parameter Setting Explanation<br />
Rec Track*<br />
Inst<br />
ADrum, ABass,<br />
Acc1, Acc2,<br />
Acc3, Acc4,<br />
Acc5, Acc6<br />
(Tone assigned<br />
to the track)<br />
Key C, C#, D, Eb, E,<br />
F, F#, G, Ab, A,<br />
Bb, B<br />
This parameter allows<br />
you to select the track<br />
whose settings you<br />
want to record.<br />
This is where you select<br />
a sound (or Drum Set)<br />
for the track marked<br />
for recording (“Rec<br />
Track”).<br />
If you want to use the<br />
accompaniment in a<br />
musically meaningful<br />
way, you need to tell<br />
the BK-5 what key you<br />
are recording in. This is<br />
to ensure that the<br />
chords you play during<br />
everyday use of<br />
your rhythm with the<br />
BK-5’s Arranger lead to<br />
the correct real-time<br />
transpositions of the<br />
selected Division.<br />
The BK-5 allows you to<br />
record rhythms in any<br />
key. But do set the KEY<br />
parameter to the right<br />
value before recording.<br />
The key of AccDrums<br />
parts cannot be set<br />
(because that doesn’t<br />
make sense).<br />
Mode**<br />
Division*<br />
Major, Minor,<br />
7th, M=m,<br />
M=7, m=7,<br />
M=m=7<br />
Intro, Main,<br />
Fill, Ending<br />
This parameter allows<br />
you to specify whether<br />
you are about to<br />
record the accompaniment<br />
for major, minor<br />
or seventh chords. If<br />
you listen to the<br />
rhythm prepared by<br />
<strong>Roland</strong>, you will notice<br />
that there are slight<br />
differences in the<br />
looped patterns – and<br />
sometimes striking differences<br />
for Intros and<br />
Endings, with completely<br />
different<br />
phrases. Such variations<br />
can be prepared<br />
using the “Mode”<br />
parameter.<br />
Select the pattern you<br />
want to create. This<br />
parameter is linked to<br />
the division you select<br />
on the main “Rhythm<br />
Composer” page.<br />
Tempo 20~250 The tempo value you<br />
set here is recorded<br />
and regarded as preset<br />
tempo. You can<br />
change it at any stage<br />
in Rhythm Composer<br />
mode, so start by<br />
selecting a tempo that<br />
allows you to record<br />
the music the way you<br />
want it to sound.<br />
83
Backing <strong>Keyboard</strong> BK-5<br />
Menu options<br />
Parameter Setting Explanation<br />
Parameter Setting Explanation<br />
Input Quantize Off, 1/4, 1/8,<br />
1/8T, 1/16,<br />
1/16T, 1/32,<br />
1/32T,<br />
1/64<br />
Count In<br />
Off, 1Meas,<br />
2Meas, Wait<br />
Note<br />
This corrects minor<br />
timing problems. It<br />
shifts the notes whose<br />
timing is not exactly<br />
right to the nearest<br />
“correct” unit.<br />
Always select a resolution<br />
value that is fine<br />
enough to accept all<br />
note values you play. If<br />
the shortest notes of<br />
your accompaniment<br />
are 1/16th-note triplets,<br />
set the value to<br />
“1/16T”.<br />
The preset value, “1/<br />
16”, is OK for most situations.<br />
If you do not<br />
want to quantize your<br />
playing while recording,<br />
set this parameter<br />
to “Off”.<br />
You can also quantize<br />
the track after recording<br />
it (page 88).<br />
Specifies how long the<br />
count-in should be<br />
before recording starts.<br />
Off: No count-in.<br />
Recording starts as<br />
soon as you press the<br />
[START/STOP] button<br />
(while [AUDIO REC]<br />
flashes).<br />
1Meas: Recording<br />
starts after a 1-bar<br />
count-in.<br />
2Meas: Recording<br />
starts after a 2-bar<br />
count-in.<br />
Wait Note: Recording<br />
starts as soon as you<br />
play a note on the keyboard.<br />
(There will be no<br />
count-in.)<br />
Rec Mode Replace, Mix Replace: Everything<br />
you record replaces the<br />
data of the selected<br />
track. This mode is<br />
automatically selected<br />
when you activate the<br />
record function for a<br />
track that does not yet<br />
contain data. If you<br />
select a track that<br />
already contains data,<br />
this parameter is set to<br />
“Mix” but could be<br />
changed to “Replace” if<br />
you wanted to overwrite<br />
the previous <strong>version</strong>.<br />
Mix: The data you<br />
record are added to<br />
the existing data of the<br />
selected track.<br />
[*] The AccDrums track can only use Drum Sets (only the TONE<br />
[DRUMS] button is available for this track). On the other hand,<br />
you can use a second (or third) drum track by assigning the value<br />
111 to control change CC00 of the Acc1~Acc6 track(s). See “Editing<br />
individual rhythm events (Micro Edit)” on p. 99. You can,<br />
however, turn any Acc1~6 track into an additional drum track<br />
when you start recording.<br />
The AccBass track, however, can only be used for bass parts.<br />
[**] You can use one clone function that allows you to record one<br />
part and copy it to up to three Modes each. The “=” sign means<br />
that more than one pattern will be recorded.<br />
[***] Every rhythm pattern must have a set length. Setting the<br />
“Measure Length” value now will help you avoid a lot of confusion<br />
once you start recording.<br />
The Arranger tends to add blank bars at the end of a track, which<br />
is usually due to the fact that you stopped recording a little late<br />
(i.e. after the last bar you played). This means that you often<br />
“record” 5 measures instead of 4, for example:<br />
If you press [START/STOP] after bar 4…<br />
…your rhythm looks like this (5 bars):<br />
r<br />
Measure<br />
Length***<br />
Off, 1~136<br />
Specifies the number<br />
of bars the pattern<br />
should contain. The<br />
setting range is 1~136<br />
(or more, depending<br />
on the time signature)<br />
and “Off”. Select “Off”<br />
if you haven’t decided<br />
how long the pattern<br />
should be. In that case,<br />
the length is set when<br />
you stop recording.<br />
It is perfectly possible<br />
to specify a different<br />
length value for each<br />
track and Division.<br />
Furthermore, in Rhythm Composer mode, all patterns are looped<br />
and played back until you press the [START/STOP] button. A<br />
wrong number of measures (5 rather than 4, for example) is very<br />
likely to put you off, so do take the time to set the pattern length<br />
before you start recording.<br />
84
Backing <strong>Keyboard</strong> BK-5 r<br />
Rhythm Composer (programming your own rhythms)<br />
Recording a rhythm pattern<br />
1. Press the [START/STOP] button.<br />
Auditioning your rhythm and adding more tracks<br />
(1) Press the [START/STOP] button to listen to your<br />
track.<br />
The main Rhythm Composer page contains two<br />
parameters that allow you to select the pattern you<br />
want to audition. Here’s how to select it:<br />
Depending on the count-in setting, the metronome<br />
now counts down, after which recording starts.<br />
NOTE<br />
If you need a metronome during your performance, press<br />
the [TAP TEMPO] button while the main Rhythm Composer<br />
page is displayed. If you also need the metronome while<br />
listening to what you have recorded, select another metronome<br />
mode (see “Mode” on p. 67).<br />
NOTE<br />
You can also start recording using an optional footswitch<br />
connected to the SWITCH/EXPRESSION socket. See “Start/<br />
Stop” on p. 69.<br />
You could start by playing only the bass drum part. If<br />
you specified the track length before recording, the<br />
Rhythm Composer jumps back to the beginning of<br />
the pattern after the set number of measures. The<br />
second time around you could add the snare drum,<br />
the third time the HiHat, and so on.<br />
When recording another part (ABass~Acc6), do<br />
everything you would do during a live performance:<br />
add modulation, Pitch Bend and to use an optional<br />
hold pedal connected to the HOLD PEDAL jack.<br />
2. Press [START/STOP] again to stop recording.<br />
2. Use the [CURSOR÷VALUE] dial to select the<br />
“MODE” parameter, then press the [ENTER/<br />
SELECT] button.<br />
3. Rotate the [CURSOR÷VALUE] dial to select<br />
“Major”, “Minor” or “7th”.<br />
Only one mode can be selected for playback.<br />
4. Use the [CURSOR÷VALUE] dial and [ENTER/<br />
SELECT] button to select the “DIVISION”<br />
field.<br />
5. Rotate the [CURSOR÷VALUE] dial to select<br />
one of the Divisions (Intro 1~4, Main 1~4,<br />
Fill Dwn 1~3, Fill Up 1~3, End 1~4).<br />
Only one Division can be selected for playback.<br />
If you like your drum part, continue with “Saving<br />
your rhythm”. If not, record a new <strong>version</strong> (see “Getting<br />
ready for the first track” on p. 82). In that case,<br />
set the “Rec Mode” parameter according to what you<br />
want to do: “Replace”= replace the previous recording<br />
with new data; “Mix”= add notes you forgot to<br />
record the first time (see p. 84).<br />
Saving your rhythm<br />
Make it a habit to save your rhythms as frequently as<br />
possible. After all, if someone decided to switch off your<br />
BK-5 now, you would lose everything you have programmed<br />
so far.<br />
1. Go to the main Rhythm Composer page and<br />
press the [MENU] button (its indicator<br />
flashes).<br />
The display changes to:<br />
85
Backing <strong>Keyboard</strong> BK-5<br />
Menu options<br />
2. Rotate the [CURSOR÷VALUE] dial to select<br />
“Save” and press the [ENTER/SELECT] button.<br />
The display now shows the contents of the “My<br />
Rhythms” folder on the connected USB memory.<br />
Press the [EXIT] button if you want to select a different<br />
folder.<br />
NOTE<br />
Your own rhythms can only be saved to a USB memory. If<br />
you forgot to connect one, the display now shows the message<br />
“USB Device not inserted”.<br />
If you initialized the RAM memory before recording<br />
your first part, the BK-5 suggests the name<br />
“User_Rhythm”. Otherwise, it suggests the name of<br />
the rhythm you have been editing.<br />
3. Use the TONE buttons to select a different<br />
character.<br />
4. Rotate the [CURSOR÷VALUE] dial to select<br />
the next character position you want to<br />
change.<br />
You can also press the [LWR] button to delete the<br />
selected character, or the [UP2] button to insert a<br />
character.<br />
5. Repeat steps (3) and (4) to complete the<br />
name.<br />
6. Press the [WRITE] button to confirm your<br />
desire to save the rhythm.<br />
The display briefly confirms the operation and then<br />
returns to the main Rhythm Composer page.<br />
If the USB memory already contains a rhythm file of<br />
the specified name, you will be asked whether you<br />
want to overwrite it:<br />
Otherwise, select “NO” and press the [ENTER/SELECT]<br />
button to return to the “Save” page and enter a different<br />
name.<br />
Recording other tracks and divisions<br />
You can now record the second track – probably the<br />
bass. If you’d like to do the guided tour again, return to<br />
page 82. Do not forget to set the key for the bass part<br />
(see “Key” on p. 83).<br />
Once the first Division is finished, you can record other<br />
Divisions. Use the clone functions (“=”) to record several<br />
patterns in one go.<br />
Do not forget to record the Fills, Intros and Endings to<br />
complete your rhythms. There are two groups of three<br />
fills: “Up” 1~3 and “Dwn” 1~3. “Up” fills are used when<br />
you switch on the [AUTO FILL] button and then press a<br />
VARIATION button of a higher number (transition from<br />
[1] to [2], for example).<br />
“Dwn” fills are used when you switch on the [AUTO FILL]<br />
button and then press a VARIATION button of a lower<br />
number.<br />
Intros are usually used at the beginning of a song and<br />
End patterns provide professional closing sections.<br />
NOTE<br />
The ABass track is monophonic. You can only record singlenote<br />
patterns.<br />
Help function on the main Rhythm Composer<br />
page<br />
1. Press and hold the [NUMERIC] button.<br />
The display changes to:<br />
This page explains how to temporarily switch off<br />
(“Mute”) and isolate (“Solo”) specific tracks.<br />
2. Press the [EXIT] or [NUMERIC] button to<br />
return to the main Rhythm Composer page.<br />
r<br />
86<br />
In this case, select “YES” using the [CURSOR÷VALUE]<br />
dial and press [ENTER/SELECT] to replace the old file<br />
with the new one (the old file will be lost).
Backing <strong>Keyboard</strong> BK-5 r<br />
Rhythm Composer (programming your own rhythms)<br />
Muting tracks while recording others<br />
After programming a few tracks, you may find that certain<br />
parts tend to confuse you. That is why the BK-5<br />
allows you to mute tracks that you do not want to hear<br />
during recording.<br />
1. On the main Rhythm Composer page, use<br />
the [CURSOR÷VALUE] dial and [ENTER/<br />
SELECT] button to select the “TRACK”<br />
parameter.<br />
Solo<br />
If you need to listen to a track in isolation, press and<br />
hold the [TRACK MUTE] button and start playback.<br />
This mutes all other tracks, while the selected track is<br />
flagged with an “S”.<br />
Press the [TRACK MUTE] button again to switch off<br />
the function of the Solo function.<br />
The field below the “TRACK” parameter shows the<br />
name of the Tone or Drum Set assigned to the<br />
selected track (“TR-909” in our example).<br />
2. Press the [TRACK MUTE] button.<br />
An “M” appears next to the track you have just<br />
muted.<br />
NOTE<br />
If the track you solo was muted, it will be soloed like any<br />
other track. After switching off the Solo function, the track<br />
in question is once again muted.<br />
Playback in Arranger mode<br />
NOTE<br />
Save your rhythm before trying it out with the Arranger.<br />
If the rhythm stops unexpectedly during playback in<br />
Arranger mode, try different chords. Chances are that<br />
you only programmed the major pattern, so that the<br />
Arranger selects an empty pattern when you play a<br />
minor or seventh chord. Remember to set the Mode<br />
parameter to “M=m=7” until you have come to grips<br />
with the possibilities of the BK-5’s Arranger. That<br />
way, those three patterns will sound alike, but at<br />
least you are sure that the Arranger does not stop<br />
when you play a minor or seventh chord.<br />
3. Press the [TRACK MUTE] button again to<br />
switch off the mute function (the “M” disappears).<br />
NOTE<br />
This mute setting only applies to the Rhythm Composer<br />
page. During normal Arranger playback, all tracks that contain<br />
data are played back. Use the “Erase” function to<br />
remove parts that should not appear in your accompaniments<br />
(see p. 89).<br />
87
Backing <strong>Keyboard</strong> BK-5<br />
Menu options<br />
Rhythm Track Edit functions<br />
The “Track Edit” level of the Rhythm Composer provides<br />
12 functions: Quantize, Erase, Delete, Copy, Insert, Key,<br />
Change Velo, Change Gate Time, Global Change, Shift<br />
Clock, Track Length and Time Signat. There is also a<br />
“Micro Edit” environment that allows you to add, delete<br />
or change individual events. See page 99 for details.<br />
1. Return to the main Rhythm Composer page.<br />
2. Press the [MENU] button (its indicator<br />
flashes).<br />
The display changes to:<br />
certain notes in a given time range need to be quantized,<br />
you should narrow down the edit range using<br />
the “From”/“To” parameters.<br />
Parameter Setting Explanation<br />
Track<br />
ADrums~Acc6,<br />
ALL<br />
Allows you to select<br />
the track you wish to<br />
edit. You can also<br />
select “ALL” here, in<br />
which case the operation<br />
applies to all<br />
tracks.<br />
3. Use the [CURSOR÷VALUE] dial to select<br />
“Track Edit”, then press the [ENTER/SELECT]<br />
button.<br />
The display changes to:<br />
Mode<br />
Major, Minor,<br />
7th<br />
Division Intro 1~4,<br />
Main 1~4, Fill<br />
Dwn 1~3, Fill<br />
Up 1~3, End<br />
1~4<br />
Allows you to select<br />
the Mode to be edited.<br />
Use this parameter to<br />
select the Division you<br />
want to edit.<br />
From Bar<br />
1~[last measure<br />
of the<br />
track or pattern]<br />
Refers to the first measure<br />
to be edited. By<br />
default, the “From”<br />
value is set to the<br />
beginning of the<br />
selected track(s).<br />
r<br />
88<br />
You can use the [CURSOR÷VALUE] dial and [ENTER/<br />
SELECT] button to edit the available functions.<br />
■ Quantize<br />
Use this function if you chose not to quantize your<br />
music during recording and now realize that the timing<br />
is not quite what you expected it to be. If only<br />
From Beat<br />
1~[number of<br />
beats per bar]<br />
Specifies the beat position.<br />
The number of<br />
selectable beats<br />
depends on the<br />
selected time signature.<br />
From CPT 0~119 Refers to the starting<br />
CPT position. “CPT” is<br />
short for “Clock Pulse<br />
Time”, the smallest unit<br />
used by the BK-5.<br />
(There are 120 CPTs to<br />
every beat of a 4/4<br />
bar.) Change this setting<br />
only if your edit<br />
operation should start<br />
after the selected beat.<br />
To Bar<br />
1~[last measure<br />
of the<br />
track or pattern]<br />
This is where you specify<br />
the last measure to<br />
be edited. By default,<br />
the “To” position is set<br />
to the last event of the<br />
selected track (or the<br />
last event of the longest<br />
track when you<br />
select “All”).
Backing <strong>Keyboard</strong> BK-5 r<br />
Rhythm Composer (programming your own rhythms)<br />
Parameter Setting Explanation<br />
To Beat<br />
1~[number of<br />
beats per bar]<br />
Specifies the beat position.<br />
The number of<br />
selectable beats<br />
depends on the<br />
selected time signature.<br />
To CPT 0~119 Refers to the last clock<br />
that should be affected<br />
by the edit operation.<br />
Change this setting<br />
only if your edit operation<br />
should not end<br />
exactly on the selected<br />
beat.<br />
■ Erase<br />
“Erase” allows you to selectively delete data either<br />
within a specified range of measures, beats or clocks<br />
or from the entire track(s). When “Data Type” is set to<br />
“All”, “Erase” substitutes the required number of rests<br />
for the data you delete, so that you end up with the<br />
equivalent number of blank measures. If you also<br />
want to eliminate the measures themselves, use<br />
“Delete” (see below).<br />
Resolution<br />
1/4, 1/8, 1/8T,<br />
1/16, 1/16T, 1/<br />
32, 1/32T, 1/64<br />
This parameter sets the<br />
resolution of the<br />
Quantize function. Be<br />
sure to always select<br />
the value of the shortest<br />
note you recorded.<br />
Otherwise, your part<br />
no longer sounds the<br />
way you played it,<br />
because shorter notes<br />
are shifted to the<br />
wrong positions.<br />
Parameter Setting Explanation<br />
Track<br />
ADrums~Acc6,<br />
ALL<br />
Allows you to select<br />
the track you wish to<br />
edit. You can also<br />
select “ALL” here, in<br />
which case the operation<br />
applies to all<br />
tracks.<br />
Strength 0%~100% Use this parameter to<br />
specify how precise the<br />
timing correction<br />
should be. “0%” means<br />
that the selected “Resolution”<br />
value is not<br />
applied (“0% correction”),<br />
while “100%”<br />
means that all notes<br />
are shifted to the<br />
mathematically correct<br />
positions.<br />
From Note 0 C-~127 G9 This parameter allows<br />
you to set the note (or<br />
lower limit of the note<br />
range) to be modified<br />
within the specified<br />
“From/To” time range.<br />
To Note 0 C-~127 G9 This parameter allows<br />
you to set the upper<br />
limit of the note range<br />
to be modified within<br />
the specified “From/To”<br />
time range.<br />
Press the [WRITE] button (its indicator flashes) to<br />
confirm your settings and edit the data.<br />
Mode<br />
Major, Minor,<br />
7th<br />
Division Intro 1~4,<br />
Main 1~4, Fill<br />
Dwn 1~3, Fill<br />
Up 1~3, End<br />
1~4<br />
From Bar<br />
From Beat<br />
1~[last measure<br />
of the<br />
track or pattern]<br />
1~[number of<br />
beats per bar]<br />
Allows you to select<br />
the Mode to be edited.<br />
Use this parameter to<br />
select the Division you<br />
want to edit.<br />
Refers to the first measure<br />
to be edited. By<br />
default, the “From”<br />
value is set to the<br />
beginning of the<br />
selected track(s).<br />
Specifies the beat position.<br />
The number of<br />
selectable beats<br />
depends on the<br />
selected time signature.<br />
From CPT 0~119 Refers to the starting<br />
CPT position. “CPT” is<br />
short for “Clock Pulse<br />
Time”, the smallest unit<br />
used by the BK-5.<br />
(There are 120 CPTs to<br />
every beat of a 4/4<br />
bar.) Change this setting<br />
only if your edit<br />
operation should start<br />
after the selected beat.<br />
89
Backing <strong>Keyboard</strong> BK-5<br />
Menu options<br />
Parameter Setting Explanation<br />
Parameter Setting Explanation<br />
To Bar<br />
1~[last measure<br />
of the<br />
track or pattern]<br />
This is where you specify<br />
the last measure to<br />
be edited. By default,<br />
the “To” position is set<br />
to the last event of the<br />
selected track (or the<br />
last event of the longest<br />
track when you<br />
select “All”).<br />
From Note 0 C-~127 G9 This parameter is only<br />
displayed if “Data<br />
Type” (see above) is set<br />
to “Note”. It allows you<br />
to set the note (or<br />
lower limit of the note<br />
range) to be modified<br />
within the specified<br />
“From/To” time range.<br />
To Beat<br />
1~[number of<br />
beats per bar]<br />
Specifies the beat position.<br />
The number of<br />
selectable beats<br />
depends on the<br />
selected time signature.<br />
To Note 0 C-~127 G9 This parameter allows<br />
you to set the upper<br />
limit of the note range<br />
to be modified within<br />
the specified “From/To”<br />
time range.<br />
To CPT 0~119 Refers to the last clock<br />
that should be affected<br />
by the edit operation.<br />
Change this setting<br />
only if your edit operation<br />
should not end<br />
exactly on the selected<br />
beat.<br />
Data Type<br />
(select the data<br />
to be edited)<br />
ALL<br />
Note<br />
All parameters listed<br />
below.<br />
Only note messages.<br />
Press the [WRITE] button (its indicator flashes) to<br />
confirm your settings and edit the data.<br />
■ Delete<br />
Unlike the “Erase” function, “Delete” not only erases<br />
the data but also the measures, beats and/or CPT<br />
units, so that all data that lie behind the “To” position<br />
are shifted towards the beginning of the track(s). You<br />
cannot choose the data type to be erased.<br />
Modulation<br />
CC01 messages usually<br />
used for adding<br />
vibrato (i.e. use of the<br />
BENDER/MODULA-<br />
TION lever).<br />
PanPot<br />
Expression<br />
Reverb<br />
CC10 messages that<br />
specify the stereo position.<br />
CC11 messages that<br />
are used for temporary<br />
volume changes.<br />
Reverb Send messages<br />
(how strongly the part<br />
should be processed by<br />
the reverb effect).<br />
Parameter Setting Explanation<br />
Track<br />
Mode<br />
ADrums~Acc6,<br />
ALL<br />
Major, Minor,<br />
7th<br />
Allows you to select<br />
the track you wish to<br />
edit. Select “ALL” to<br />
edit all tracks.<br />
Allows you to select<br />
the Mode to be edited.<br />
r<br />
Chorus<br />
Program<br />
Change<br />
P.Bender:<br />
Chorus Send messages<br />
(how strongly the part<br />
should be processed by<br />
the chorus effect).<br />
Program change messages,<br />
used to select<br />
sounds or Drum Sets.<br />
Note: by deleting program<br />
change messages<br />
you also dispose of the<br />
related CC00 and CC32<br />
(bank select) messages.<br />
Pitch Bend data (i.e.<br />
use of the BENDER/<br />
MODULATION lever).<br />
Division Intro 1~4,<br />
Main 1~4, Fill<br />
Dwn 1~3, Fill<br />
Up 1~3, End<br />
1~4<br />
From Bar~<br />
To CPT<br />
See page 88.<br />
Use this parameter to<br />
select the Division you<br />
want to edit.<br />
Press the [WRITE] button (its indicator flashes) to<br />
confirm your settings and edit the data.<br />
90
Backing <strong>Keyboard</strong> BK-5 r<br />
Rhythm Composer (programming your own rhythms)<br />
■ Copy<br />
This function can be used to copy individual tracks,<br />
Modes and Divisions to replace existing parts while<br />
keeping the remaining parts of the rhythm already in<br />
the RAM memory.<br />
NOTE<br />
The “Copy” page now displays a “USB MEMORY” field to<br />
indicate that you can select a rhythm on the connected<br />
USB memory.<br />
1. Set “Location” to “Source”.<br />
The following parameters are displayed:<br />
3. Press the [ENTER/SELECT] button.<br />
Parameter Setting Explanation<br />
Location<br />
Source, Destination<br />
Allows you to select<br />
the rhythm whose<br />
tracks you wish to<br />
copy (“Source”) to<br />
another rhythm (“Destination”).<br />
Track<br />
Mode<br />
ADrums~Acc6,<br />
ALL<br />
Major, Minor,<br />
7th, ALL<br />
Division Intro 1~4,<br />
IntroALL,<br />
Main 1~4,<br />
MainALL,<br />
Fill Dwn 1~3,<br />
Fill DwnALL,<br />
Fill Up 1~3,<br />
Fill UpALL,<br />
End 1~4,<br />
EndALL<br />
From Bar~<br />
To CPT<br />
See page 88.<br />
Allows you to select<br />
the track you wish to<br />
copy. Select “ALL” to<br />
edit all tracks.<br />
Allows you to select<br />
the Mode to be copied.<br />
Use this parameter to<br />
select the Division you<br />
want to copy.<br />
2. Select a rhythm.<br />
Selecting a factory rhythm: Use the RHYTHM FAM-<br />
ILY buttons and the displayed parameters to select<br />
the desired rhythm. Skip to step (3) below.<br />
Selecting an ‘external’ rhythm: You can also work<br />
with a rhythm on a USB memory:<br />
(a) Press the [USB MEMORY] button to jump to the<br />
“USB Memory” page.<br />
(b) Select the rhythm that contains the track(s) you<br />
want to copy.<br />
NOTE<br />
When you import a rhythm, the “Location” parameter is set<br />
to “Destination”. To continue as explained below, you need<br />
to select the “Source” setting.<br />
4. Rotate the [CURSOR÷VALUE] dial to select<br />
the “Track” parameter, then press the<br />
[ENTER/SELECT] button.<br />
5. Rotate the [CURSOR÷VALUE] dial to select<br />
the track to be copied.<br />
You can also select “ALL” to copy all tracks of a given<br />
Mode/Division. In that case, “Destination–Track” (see<br />
below) is also set to “ALL”.<br />
6. Repeat this operation with the “Mode” and<br />
“Division” parameters to select the Mode<br />
(Major, Minor, 7th, ALL) and Division (Int 1~<br />
4, Int ALL, Main 1~4, Main ALL, FDw 1~3,<br />
FDw ALL, FUp 1~3, FUp ALL, End 1~4, End<br />
ALL).<br />
7. Press the [KEY] button to listen to the pattern<br />
you are about to copy.<br />
NOTE<br />
This audition function is not available when you select<br />
“ALL” for the “Mode” or “Division” field.<br />
91
Backing <strong>Keyboard</strong> BK-5<br />
Menu options<br />
8. Use the “From” and “To” parameters (3<br />
each) to specify the beginning and end of<br />
the excerpt you want to copy.<br />
By default, the “From” parameters are set to “Bar 1,<br />
Beat 1, CPT 0”, while the “To” values are set to include<br />
the entire track.<br />
9. Set “Location” to “Destination”.<br />
The following parameters are displayed:<br />
Parameter Setting Explanation<br />
Location<br />
Track<br />
Mode<br />
Source, Destination<br />
ADrums~Acc6,<br />
ALL<br />
Major, Minor,<br />
7th, ALL<br />
Division Intro 1~4,<br />
Main 1~4, Fill<br />
Dwn 1~3, Fill<br />
Up 1~3, End<br />
1~4<br />
Into Bar<br />
Into Beat<br />
Into CPT<br />
Allows you to select<br />
the rhythm whose<br />
tracks you wish to<br />
copy (“Source”) to<br />
another rhythm (“Destination”).<br />
Allows you to select<br />
the track you wish to<br />
edit. Select “ALL” only<br />
to replace all tracks.<br />
Allows you to select<br />
the Mode to be edited.<br />
Use this parameter to<br />
select the Division you<br />
want to edit.<br />
The” Into” position indicates where the<br />
beginning of the source excerpt will be<br />
after the copy operation. To copy the<br />
source data to the beginning of the<br />
destination track, select BAR= “1”,<br />
BEAT= “1” and CPT= “0”.<br />
10. Set “Copy Mode” to “Replace” or “Mix”.<br />
In either case, the length of the destination track may<br />
change to include all data of the source track.<br />
11. Use the [CURSOR÷VALUE] dial and [ENTER/<br />
SELECT] button to set “Track” to the track<br />
you wish to copy the data to.<br />
NOTE<br />
AccDrums data can also be copied to other tracks (preferably<br />
Acc1~Acc6). You can only copy ABass data to other<br />
ABass tracks. If you selected “ALL” for “Source – Track”, this<br />
“Track” parameter is also set to “ALL”.<br />
12. Repeat this operation with the “Mode”<br />
(Major, Minor, 7th, ALL) and “Division”<br />
parameters (Intro 1~4, Main 1~4, Fill Dwn<br />
1~3, Fill Up 1~3, End 1~4, ALL).<br />
NOTE<br />
If you selected “ALL” for “Source – Mode” or “Source – Division”,<br />
this “Mode” or “Division” parameter is also set to<br />
“ALL”.<br />
13. Use the [CURSOR÷VALUE] dial and [ENTER/<br />
SELECT] button to select “Copy Times” and<br />
specify the number of copies you need.<br />
Select “1” to copy the excerpt only once.<br />
14. Press the [KEY] button to audition the destination<br />
track.<br />
15. Use the [CURSOR÷VALUE] dial and [ENTER/<br />
SELECT] button to specify the target position<br />
using the three “Into” parameters.<br />
16. Press the [WRITE] button (its indicator<br />
flashes) to confirm your settings and edit<br />
the data.<br />
■ Insert<br />
“Insert” allows you to insert space and shift data that<br />
lie behind the “From” position further towards the<br />
end of the track (this is the exact opposite of<br />
“Delete”). The empty measures you create can be<br />
“filled” using the “Copy” function or by recording new<br />
phrases in that area.<br />
r<br />
92<br />
Copy Mode Replace The data in the<br />
selected range of the<br />
source track overwrite<br />
the destination track.<br />
Mix<br />
The data in the<br />
selected range of the<br />
source track are added<br />
to the data on the destination<br />
track.<br />
Copy Times 1~999 Allows you to to specify<br />
the number of copies<br />
to be made. Select<br />
“1” to copy the excerpt<br />
only once.
Backing <strong>Keyboard</strong> BK-5 r<br />
Rhythm Composer (programming your own rhythms)<br />
NOTE<br />
This function provides no “To” pointer. Instead, you need to<br />
specify the length of the insert using the “For” values.<br />
■ Key (transposition)<br />
This function allows you to transpose the notes of<br />
the selected track (non-note data obviously cannot<br />
be transposed).<br />
Parameter Setting Explanation<br />
Track<br />
Mode<br />
ADrums~Acc6,<br />
ALL<br />
Major, Minor,<br />
7th<br />
Division Intro 1~4,<br />
Main 1~4, Fill<br />
Dwn 1~3, Fill<br />
Up 1~3, End<br />
1~4<br />
From Bar~<br />
From CPT<br />
For Bar,<br />
For Beat,<br />
For CPT<br />
See page 88.<br />
Allows you to select<br />
the track you wish to<br />
edit. You can also<br />
select “ALL” here, in<br />
which case the operation<br />
applies to all<br />
tracks.<br />
Allows you to select<br />
the Mode to be edited.<br />
Use this parameter to<br />
select the Division you<br />
want to edit.<br />
Specifies how many bars, beats and<br />
CPTs are to be inserted.<br />
Press the [WRITE] button (its indicator flashes) to<br />
confirm your settings and edit the data.<br />
Parameter Setting Explanation<br />
Track<br />
Mode<br />
ADrums~Acc6,<br />
ALL<br />
Major, Minor,<br />
7th<br />
Division Intro 1~4,<br />
Main 1~4, Fill<br />
Dwn 1~3, Fill<br />
Up 1~3, End<br />
1~4<br />
From Bar~<br />
To CPT<br />
See page 88.<br />
Allows you to select<br />
the track you wish to<br />
edit. You can also<br />
select “ALL” here, in<br />
which case the operation<br />
applies to all<br />
tracks.<br />
Allows you to select<br />
the Mode to be edited.<br />
Use this parameter to<br />
select the Division you<br />
want to edit.<br />
Value –127~127) This is where you set<br />
the transposition<br />
interval in semi-tone<br />
steps. Select “2”, for<br />
example, to transpose<br />
a pattern in “C” to “D”.<br />
Be careful when applying<br />
“Key” to the<br />
AccDrums track. Transposing<br />
all notes of this<br />
track leads to dramatic<br />
changes.<br />
From Note 0 C-~127 G9 This parameter allows<br />
you to set the note (or<br />
lower limit of the note<br />
range) to be modified<br />
within the specified<br />
“From”/“To” time<br />
range.<br />
To Note 0 C-~127 G9 This parameter allows<br />
you to set the upper<br />
limit of the note range<br />
to be modified within<br />
the specified “From”/<br />
“To” time range.<br />
Press the [WRITE] button (its indicator flashes) to<br />
confirm your settings and edit the data.<br />
93
Backing <strong>Keyboard</strong> BK-5<br />
Menu options<br />
r<br />
94<br />
■ Change Velo<br />
The “Change Velo” function allows you to modify the<br />
dynamics (called “velocity”) of a track or excerpt. Only<br />
note events can be changed.<br />
Parameter Setting Explanation<br />
Track<br />
Mode<br />
ADrums~Acc6,<br />
ALL<br />
Major, Minor,<br />
7th<br />
Division Intro 1~4,<br />
Main 1~4, Fill<br />
Dwn 1~3, Fill<br />
Up 1~3, End<br />
1~4<br />
From Bar~<br />
To CPT<br />
See page 88.<br />
Allows you to select<br />
the track you wish to<br />
edit. You can also<br />
select “ALL” here, in<br />
which case the operation<br />
applies to all<br />
tracks.<br />
Allows you to select<br />
the Mode to be edited.<br />
Use this parameter to<br />
select the Division you<br />
want to edit.<br />
Bias* –99~99) Allows you to specify<br />
by how much the<br />
velocity values should<br />
change. Select a positive<br />
value to increase<br />
the velocity (the value<br />
is added to the velocity<br />
value of the affected<br />
notes) or a negative<br />
value to decrease the<br />
velocity values (that<br />
value is subtracted).<br />
Select “0” if you prefer<br />
to work with the<br />
“Magnify” parameter<br />
(see below).<br />
Parameter Setting Explanation<br />
Magnify** 0~200% This parameter works<br />
like a “Compander”<br />
effect (a dynamics processor<br />
that simultaneously<br />
acts as<br />
compressor and<br />
expander), although it<br />
processes MIDI data:<br />
by selecting a value<br />
above “100%” you<br />
increase the differences<br />
between high<br />
and low velocity values<br />
in the selected range.<br />
Values below “64” are<br />
lowered, while values<br />
above “64” are<br />
increased. The result is<br />
therefore that the difference<br />
between pianissimo<br />
and fortissimo<br />
becomes far more pronounced.<br />
From Note/<br />
To Note<br />
0 C-~127 G9 “From Note” refers to<br />
the lower limit of the<br />
note range you want<br />
to change. “To Note”<br />
represents the upper<br />
limit.<br />
[*] Even the highest positive or negative value doesn’t allow you<br />
to go beyond “1” or “127”. There is a reason why “0” is impossible:<br />
that value is used to indicate the end of a note (note-off).<br />
“127”, on the other hand, is the highest velocity value the MIDI<br />
standard can muster. Adding a high positive velocity value may<br />
thus lead to all notes being played at “127”.<br />
[**] “Magnify” values below “100%” have the opposite effect:<br />
they push all velocity towards the imaginary center of “64”, thus<br />
reducing differences in playing dynamics.<br />
Press the [WRITE] button (its indicator flashes) to<br />
confirm your settings and edit the data.<br />
■ Change Gate Time<br />
This function allows you to modify the duration of<br />
the notes in the selected time (“From”/“To”) and note<br />
(“From Note”/“To Note”) ranges. We recommend you<br />
only use this function to shorten notes that suddenly<br />
seem too long when you assign a different sound to<br />
the track in question. You cannot view the duration<br />
of the notes here, which makes editing the data “en<br />
bloc” a little bit hazardous. See “Editing individual<br />
rhythm events (Micro Edit)” on p. 99 for how to<br />
change the duration of individual notes.
Backing <strong>Keyboard</strong> BK-5 r<br />
Rhythm Composer (programming your own rhythms)<br />
After selecting a sound with a slow release (i.e. a<br />
sound that lingers on after all notes have been<br />
released), however, “Change Gate Time” will help you<br />
cut the notes down to size and thus avoid undesirable<br />
overlaps.<br />
Parameter Setting Explanation<br />
From Note/<br />
To Note<br />
0 C-~127 G9 “From Note” refers to<br />
the lower limit of the<br />
note range you want<br />
to change. “To Note”<br />
represents the upper<br />
limit.<br />
Press the [WRITE] button (its indicator flashes) to<br />
confirm your settings and edit the data.<br />
Parameter Setting Explanation<br />
Track<br />
ADrums~Acc6,<br />
ALL<br />
Allows you to select<br />
the track you wish to<br />
edit. You can also<br />
select “ALL” here, in<br />
which case the operation<br />
applies to all<br />
tracks.<br />
■ Global Change<br />
This function allows you to make quick changes to<br />
certain settings. The changes always apply to entire<br />
tracks (you cannot use “Global Change” for just a few<br />
measures). You can apply global changes to the four<br />
editable rhythms track parameters (“Express”,<br />
“Reverb”, “Panpot” and “Chorus”) when you notice<br />
that the effect is too prominent or not strong<br />
enough.<br />
You can also use it to “upgrade” older rhythms to<br />
ensure that they use the BK-5’s new sounds.<br />
Mode<br />
Major, Minor,<br />
7th<br />
Allows you to select<br />
the Mode to be edited.<br />
Division Intro 1~4,<br />
Main 1~4, Fill<br />
Dwn 1~3, Fill<br />
Up 1~3, End<br />
1~4<br />
Use this parameter to<br />
select the Division you<br />
want to edit.<br />
From Bar~<br />
To CPT<br />
See page 88.<br />
Bias –1920~1920 This parameter sets the<br />
amount by which the<br />
duration (or gate time)<br />
of the selected notes is<br />
to change. The shortest<br />
possible “Gate Time”<br />
value is “1” (used for all<br />
drum notes), so that<br />
selecting “–1000” for<br />
notes with a “Gate<br />
Time” value of “1” in<br />
the specified time<br />
range still leaves you<br />
with the same value.<br />
Magnify 0~200% Use this parameter<br />
rather than “Bias” to<br />
produce proportional<br />
changes to the<br />
affected “Gate Time”<br />
values. Values below<br />
“100%” decrease the<br />
duration, while anything<br />
above “100%”<br />
increases it. Select<br />
“100%” if you prefer to<br />
work with the “Bias”<br />
parameter (see above).<br />
Parameter Setting Explanation<br />
Track<br />
Mode<br />
ADrums~Acc6,<br />
ALL<br />
Major, Minor,<br />
7th, ALL<br />
Division Intro 1~4,<br />
IntroALL,<br />
Main 1~4,<br />
Fill Dwn 1~3,<br />
Fill Up 1~3,<br />
End 1~4, ALL<br />
Alteration<br />
Mode*<br />
Nearest,<br />
Degree, —<br />
Allows you to select<br />
the track you wish to<br />
edit. You can also<br />
select “ALL” here, in<br />
which case the operation<br />
applies to all<br />
tracks.<br />
Allows you to select<br />
the Mode to be edited.<br />
Use this parameter to<br />
select the Division you<br />
want to edit.<br />
This message type is<br />
only available for<br />
melodic rhythm tracks<br />
(i.e. not for ADrums or<br />
ABass tracks). Rhythm<br />
tracks you only just<br />
recorded do not contain<br />
it. See also “About<br />
‘Alteration Mode’ messages”<br />
on p. 100.<br />
95
Backing <strong>Keyboard</strong> BK-5<br />
Menu options<br />
r<br />
96<br />
Parameter Setting Explanation<br />
From/To…<br />
CC00,<br />
CC32,<br />
PC<br />
Inc/Dec…<br />
Expression,<br />
Reverb,<br />
Chorus,<br />
Panpot<br />
---, 0~127,<br />
ALL<br />
1~128<br />
Nearest**: Refers to a<br />
more musical system<br />
for real-time shifts of<br />
the recorded rhythm<br />
notes during Arranger<br />
playback.<br />
Degree: This setting<br />
refers to the “old” system<br />
for real-time con<strong>version</strong><br />
of track<br />
information during<br />
rhythm playback. See<br />
page 100.<br />
Select “---” if the<br />
selected pattern<br />
should ignore this setting.<br />
Enter the original data<br />
value (i.e. the value<br />
that is being used right<br />
now by the selected<br />
track(s)) for “From”. For<br />
“To”, specify the new<br />
value that should<br />
replace the “From”<br />
value. These are what<br />
we call “absolute”<br />
changes: you don’t add<br />
or subtract values, you<br />
replace them with<br />
other values. This system<br />
is only available<br />
for messages that<br />
allow you to select<br />
sounds or sound<br />
banks.***<br />
–127~127 These parameters<br />
allow you to add (+) or<br />
subtract (–) a given<br />
value to/from the current<br />
Expression, Pan,<br />
Reverb Send or Chorus<br />
Send values. This may<br />
come in handy if the<br />
real-time changes you<br />
recorded turn out to<br />
be too high or too low.<br />
[*] This parameter is not available for: ADrums and ABass tracks,<br />
Intro3 & 4 and End3 & 4 patterns.<br />
[**] The notes of the melodic rhythm tracks are compared against<br />
the chords played in the recognition area. If the next chord you<br />
play contains the note the selected part is already sounding<br />
(based on the previous chord), that note is maintained.<br />
If the new chord does not contain that note, the rhythm part in<br />
question uses the closest (“Nearest”) note. This produces a more<br />
musical behavior than any other system on the market.<br />
[***] CC00 messages are the so-called “MSB” bank select messages.<br />
They allows you to select the Capital Tone (select “0”) of a<br />
sound address. Select “---” if the current setting must not<br />
change. The CC32 control change is the so-called “LSB” bank select<br />
message. Use the PC parameter to change the address, a.k.a.<br />
program change number, of a sound (e.g. from “1” to “2”).<br />
Press the [WRITE] button (its indicator flashes) to<br />
confirm your settings and edit the data.<br />
■ Shift Clock<br />
“Shift Clock” allows you to shift the notes within the<br />
selected “From”/“To” range. It can be used for two<br />
things:<br />
•To correct “slow” notes due to a slow(er) attack.<br />
You may want to use “Shift Clock” after assigning a<br />
sound to a track that has a considerably slower<br />
attack than the sound you used for recording the<br />
part in question. This technique is frequently used in<br />
pop music to “time” 1/16-note string arpeggios<br />
played with a “slow” pad sound. Rather than have the<br />
notes begin at the mathematically correct time (e.g.<br />
2-1-0), you could shift them to the left (e.g. to 1-4-<br />
115), so that the peak volume of the attack is reached<br />
on the next beat:<br />
Original positions (slow attack, timing<br />
seems off)<br />
•To correct the timing of notes recorded via MIDI<br />
without quantizing them.<br />
You can use external sequences as raw material for<br />
your songs. Recording such excerpts via MIDI may<br />
cause a slight delay (e.g. 5 CPT). If that is not acceptable,<br />
use “Shift Clock” to “push” the recorded data to<br />
the left (select “–5”). That allows you to preserve any<br />
irregularities the original may contain because it was<br />
not quantized. After selecting a sound with a slow<br />
release (i.e. a sound that lingers on after all notes<br />
have been released), however, “Change Gate Time”<br />
will help you cut the notes down to size and thus<br />
avoid undesirable overlaps.<br />
Parameter Setting Explanation<br />
Track<br />
Mode<br />
ADrums~Acc6,<br />
ALL<br />
Major, Minor,<br />
7th<br />
Shift= –5<br />
(timing sounds OK)<br />
Allows you to select<br />
the track you wish to<br />
edit. You can also<br />
select “ALL” here, in<br />
which case the operation<br />
applies to all<br />
tracks.<br />
Allows you to select<br />
the Mode to be edited.
Backing <strong>Keyboard</strong> BK-5 r<br />
Rhythm Composer (programming your own rhythms)<br />
Parameter Setting Explanation<br />
Division Intro 1~4,<br />
Main 1~4, Fill<br />
Dwn 1~3, Fill<br />
Up 1~3, End<br />
1~4<br />
Use this parameter to<br />
select the Division you<br />
want to edit.<br />
NOTE<br />
There is no way to recall the previous <strong>version</strong>, so be sure to<br />
save your rhythm before continuing (see p. 85).<br />
From Bar~<br />
To CPT<br />
See page 88.<br />
Data Type See page 90.<br />
Value (CPT) –4800~4800 This parameter sets the<br />
amount by which the<br />
notes are shifted. The<br />
value refers to CPT<br />
units (one CPT= 1/120<br />
q). Notes on the first<br />
beat of the first bar<br />
cannot be shifted further<br />
to the left,<br />
because that would<br />
mean shifting them to<br />
the “0” measure, which<br />
doesn’t exist.<br />
From Note,<br />
To Note<br />
0 C-~127 G9 “From Note” allows<br />
you to set the note (or<br />
lower limit of the note<br />
range) to be modified<br />
within the specified<br />
“From”/“To” time<br />
range.<br />
“To Note” allows you to<br />
set the upper limit of<br />
the note range to be<br />
modified.<br />
Press the [WRITE] button (its indicator flashes) to<br />
confirm your settings and edit the data.<br />
■ Track Length<br />
This function allows you to modify the length (number<br />
of bars, beats and clocks) of a pattern after<br />
recording. Data that lie outside the range you<br />
decided to keep are discarded. Obviously, you only<br />
need to change the settings of the Mode whose<br />
length you want to modify.<br />
Parameter Setting Explanation<br />
Track<br />
ADrums~Acc6,<br />
ALL<br />
Division Intro 1~4,<br />
Main 1~4, Fill<br />
Dwn 1~3, Fill<br />
Up 1~3, End<br />
1~4<br />
Length Bar<br />
Length Beat<br />
Length CPT<br />
1~[number of<br />
beats per bar]<br />
Allows you to select<br />
the track you wish to<br />
edit. You can also<br />
select “ALL” here, in<br />
which case the operation<br />
applies to all<br />
tracks.<br />
Use this parameter to<br />
select the Division you<br />
want to edit.<br />
Use the<br />
[CURSOR÷VALUE] dial<br />
and the [ENTER/<br />
SELECT] button to set<br />
the length of the<br />
selected pattern(s) in<br />
steps of one bar. You<br />
can also make an existing<br />
track longer by<br />
specifying a “Bar”<br />
value that lies beyond<br />
the last notes.<br />
Specifies the beat position.<br />
The number of<br />
selectable beats<br />
depends on the<br />
selected time signature.<br />
This parameter allows<br />
you to “fine-tune” the<br />
length. In most cases,<br />
you will probably work<br />
with multiples of q<br />
notes (i.e. 120CPT)<br />
because 120CPT represent<br />
one beat of an X/4<br />
bar (1/4, 2/4, 3/4, 4/4,<br />
etc.).<br />
97
Backing <strong>Keyboard</strong> BK-5<br />
Menu options<br />
Parameter Setting Explanation<br />
Parameter Setting Explanation<br />
Mode<br />
Major, Minor,<br />
7th,<br />
Major+Minor,<br />
Major+7th,<br />
Major+Minor+<br />
7th,<br />
Minor+7th<br />
Choose the Modes to<br />
which the new length<br />
setting should apply.<br />
You can also switch on<br />
two or all three button<br />
icons. If you set “Track”<br />
to “ALL”, all three<br />
Modes are selected<br />
automatically (and<br />
that cannot be<br />
changed).<br />
Variation 1, 2, 3,<br />
4<br />
On, Off<br />
Use these parameters<br />
to select the pattern<br />
you want to change. If<br />
you set “Division” to<br />
“Fill Dwn” or “Fill Up”,<br />
there are only three<br />
button icons. You can<br />
switch on several or all<br />
button icons if you like.<br />
(But you cannot switch<br />
off all four or three.)<br />
Press the [WRITE] button (its indicator flashes) to<br />
confirm your settings and edit the data.<br />
Press the [WRITE] button (its indicator flashes) to<br />
confirm your settings and edit the data.<br />
■ Time Signature<br />
The “Time Signature” parameter allows you to check<br />
and set the time signature of the patterns. The major,<br />
minor and seventh Modes of a pattern must always<br />
use the same time signature, which is why you cannot<br />
edit them separately.<br />
Use this parameter to specify the time signature of<br />
the selected pattern (“Division”, see below). The<br />
MAIN, INTRO and ENDING instances comprise four<br />
variations, which is why there are four “Time Signatures”<br />
values you can select using the VARIATION<br />
[1]~[4] button icons. When you select “Fill Up” or “Fill<br />
Dwn” for “Division”, only three “Time Signature”<br />
instances can be edited.<br />
The most commonly used time signatures are: 2/4, 3/<br />
4, 4/4, 6/8 and 12/8. Other values (such as 7/4, 13/8,<br />
etc.) are also possible.<br />
NOTE<br />
When you change the time signature of an already<br />
recorded pattern, its notes and events are “reshuffled”, so<br />
that you may end up with incomplete measures. None of<br />
your data are deleted, however.<br />
r<br />
98<br />
Parameter Setting Explanation<br />
Division<br />
Intro, Main,<br />
FillDwn, FillUp,<br />
End, ALL<br />
Use this parameter to<br />
select the Division you<br />
want to edit.<br />
Time Signature 1/16~32/2 This parameter allows<br />
you to set the time signature.
Backing <strong>Keyboard</strong> BK-5 r<br />
Editing individual rhythm events (Micro Edit)<br />
Editing individual rhythm events<br />
(Micro Edit)<br />
Select this mode if you need to change just one aspect<br />
of an otherwise perfect rhythm.<br />
In this section, we will use the word “event” for any kind<br />
of message. An event is thus a command (or instruction)<br />
for the Arranger.<br />
You can only view and edit one track at a time. Therefore,<br />
be sure to check the “Track” setting before editing<br />
the events displayed on this page.<br />
1. Return to the main Rhythm Composer page.<br />
2. Use the “Track”, “Mode” and “Division”<br />
parameters to select the pattern you want<br />
to edit.<br />
3. Press the [MENU] button (its indicator<br />
flashes).<br />
The display changes to:<br />
4. Use the [CURSOR÷VALUE] dial to select<br />
“Micro Edit”, then press the [ENTER/SELECT]<br />
button.<br />
The display changes to:<br />
■ General notes about ‘Micro Edit’<br />
Position indications: Sequencers only register<br />
“events” whose positions and distances specify when<br />
the notes are to be sounded or when they should<br />
change (i.e. their “sequence”).<br />
Each event is executed at a given point in time, which<br />
is why they all have a position indication<br />
(“1-01-119”, for example). The first figure refers to<br />
the bar, the second to the beat within that bar and<br />
the third to the clock (CPT) between the current beat<br />
and the next. Each beat of a 4/4 bar comprises 120<br />
clocks.<br />
Monitoring note events: The Rhythm Composer can<br />
play back the note events you select. This may help<br />
you identify the occurrence you want to edit. When<br />
you move the cursor to a note event, it is played back.<br />
General procedure<br />
To change information already available on the selected<br />
track, proceed as follows:<br />
1. Use the [CURSOR÷VALUE] dial to select the<br />
list entry you want to edit.<br />
2. Press the [ENTER/SELECT] button to select<br />
the first value.<br />
In the following examples, we selected the CC00<br />
message (left) and the first parameter of a note event<br />
(right):<br />
You can use the [CURSOR÷VALUE] dial and [ENTER/<br />
SELECT] button to edit the available functions.<br />
NOTE<br />
This page doesn’t allow you to select a different rhythm<br />
pattern (“ADrum – Major – Intro1” in our example). Be sure<br />
to select the correct button before calling up the “Micro<br />
Edit” page (see step (2) above).<br />
3. Rotate the [CURSOR÷VALUE] dial to set the<br />
value.<br />
4. Press the [ENTER/SELECT] button to select<br />
the next value and edit it.<br />
5. When you’re done, press the [EXIT] button<br />
to return to the Rhythm Composer page,<br />
then save your rhythm (page 85).<br />
99
Backing <strong>Keyboard</strong> BK-5<br />
Menu options<br />
r<br />
■ Parameters you can change<br />
● Note velocity and gate time messages—These<br />
messages always come in pairs. The first value<br />
(“42:F#2”, for example) refers to the note itself and<br />
the second (“72”) to the velocity (playing dynamics).<br />
The “Micro Edit” page adds a third message to that<br />
pair. It describes the duration of the note in question.<br />
You may remember this value from the “Track Edit”<br />
environment, where it is called “Gate Time”.<br />
● CC—These messages usually add something to the<br />
notes being played, like modulation, a different volume,<br />
a new stereo position… The BK-5 recognizes<br />
(and allows you to edit) all control change numbers<br />
the Arranger uses (CC01, 10, 11, 91, 93) and displays<br />
their “official” name.<br />
100<br />
NOTE<br />
CC64 (Hold) events generated by a footswitch connected to<br />
the HOLD FOOTSWITCH socket are converted into the<br />
equivalent GATE TIME values at the time of recording. You<br />
may therefore have to change the duration of the notes<br />
themselves.<br />
● PC/Program Change—These messages are used to<br />
select sounds within the current bank. As there are<br />
only 128 possibilities, these messages are usually preceded<br />
by control changes CC00 and CC32. That’s why<br />
the BK-5 inserts all three when you use the “Create<br />
Event” function. To assign a Drum Set to an Acc1~6<br />
track, you must create a “CC00” event with the value<br />
“111”.<br />
NOTE<br />
The CC00 value of ADrums tracks cannot be edited.<br />
● Pitch Bend—These messages are used for temporary<br />
changes to the pitch of the notes being played at<br />
that time. Pitch Bend messages can be positive<br />
(higher) or negative (lower). Setting range: –128~<br />
128.<br />
● Alteration Mode—This event allows you to specify<br />
how the notes recorded for a rhythm track will be<br />
used during Arranger playback. See below for details.<br />
NOTE<br />
This parameter is not available for ADrums tracks or the<br />
Intro3,, Intro4, Ending3, Ending4 divisions.<br />
Editing events<br />
■Editing Pitch Bend messages<br />
Pitch Bend messages can be positive or negative (the<br />
range is –128~128). The value “0” means that the<br />
pitch of notes being played in that area is not altered.<br />
If a Pitch Bend occurrence is not reset to “0” at some<br />
stage, all notes will keep sounding flat when you no<br />
longer want them to.<br />
■Editing control changes<br />
These messages (CC) can be set to the desired value<br />
(0~127) when the corresponding effect is needed –<br />
but they also need to be reset to “0” to avoid<br />
unpleasant surprises.<br />
■About the ‘Note’ messages<br />
As stated above, note messages comprise a note<br />
number, a velocity value and a Gate Time value.<br />
The range for note numbers is “0 (C–)”~“127 (G9)”.<br />
Velocity messages can be set anywhere between “1”<br />
(extremely soft) and “127”. The value “0” cannot be<br />
entered, because it would effectively switch off the<br />
note.<br />
About ‘Alteration Mode’ messages<br />
This message type is only available for melodic<br />
rhythm tracks (i.e. not for ADrums or ABass tracks)<br />
and needs to be inserted by hand (using “Create<br />
Event”). Rhythm tracks you only just recorded do not<br />
contain it.<br />
It allows you to use a revolutionary system for adapting<br />
the recorded notes to a more natural behavior<br />
(also known as “voicing”). There are two options:<br />
● Degree—This setting refers to the “old” system for<br />
real-time con<strong>version</strong> of rhythm track information for<br />
Arranger playback. Based on the fundamentals of the<br />
chords you play during Arranger playback, it often<br />
leads to odd jumps of certain parts.<br />
● Nearest—Refers to a more musical system for<br />
real-time shifts of the recorded rhythm notes during<br />
Arranger playback. Let us first look at an illustration:<br />
Recorded strings track<br />
Chords played in the recognition area.<br />
Result with “Degree”<br />
Result with “Nearest”<br />
This new system is called “Adaptive Chord Voicing”.<br />
The notes of the melodic rhythm tracks are compared<br />
against the chords played in the recognition area. If<br />
the next chord you play contains the note the<br />
selected part is already sounding (based on the previous<br />
chord), that note is maintained.<br />
If the new chord does not contain that note, the<br />
rhythm part in question uses the closest (“Nearest”)<br />
note. In the example above, the “G” is closer to the<br />
“A” sounded by the strings part than the “C”. This<br />
produces a more musical behavior than any other<br />
system on the market.<br />
Both “Degree” and “Nearest” allow you to specify the<br />
note range (“Limit Low” and “Limit High”) the<br />
selected part may play. Notes that would fall outside<br />
that range during Arranger playback are automatically<br />
transposed to values inside the selected range.<br />
Rather than specifying two note values, you can also<br />
choose “Std”, which means that the BK-5 decides<br />
automatically when extremely high (or low) notes<br />
need to be shifted down (or up) by one or several<br />
octaves.
Backing <strong>Keyboard</strong> BK-5 r<br />
Editing individual rhythm events (Micro Edit)<br />
Other edit operations<br />
The “Micro Edit” page allows you to select several functions.<br />
■Create Event<br />
Select this function to add a new event to the<br />
selected track.<br />
You can select several consecutive events and edit<br />
them in one go: select the first event of a series, press<br />
and hold the [ENTER/SELECT] button and rotate the<br />
[CURSOR÷VALUE] dial.<br />
1. Select the event you want to edit.<br />
2. Press the [MENU] button (its indicator<br />
flashes).<br />
The display changes to:<br />
If the position for which you create a new event<br />
already contains other events, the new event is added<br />
at the end of that group.<br />
Parameter Setting Explanation<br />
Event<br />
Note, Control<br />
Change, Program<br />
Change,<br />
Pitch Bend,<br />
Alteration<br />
Mode<br />
Allows you to specify<br />
the event type you<br />
want to add.<br />
To Bar,<br />
To Beat,<br />
To CPT<br />
See page 88.<br />
Specifies the position<br />
where your new event<br />
will be inserted.<br />
The top line shows the event type that can be edited<br />
(“CC00 Bank MSB” in our example) and its location<br />
(“001:01:000”). You cannot change the event type on<br />
this page.<br />
If you selected several events (see above), the display<br />
looks as follows:<br />
3. Use the [CURSOR÷VALUE] dial to select the<br />
desired edit function, then press the<br />
[ENTER/SELECT] button.<br />
The selected event is inserted with a default value:<br />
Note: Note Number: 60 C4<br />
On Velocity: 100<br />
Gate Time: 60<br />
Program Change: CC00 Bank Select MSB, value “0”<br />
CC32 Bank Select LSB, value “4”<br />
Program Change Number “1”<br />
(The bank select messages are added<br />
automatically: you don’t have to<br />
worry about that.)<br />
Pitch Bend: “0”<br />
Alteration Mode: Nearest<br />
Limit Low: Std<br />
Limit High: Std<br />
Obviously, you will then need to change the default<br />
settings depending on the result you want to<br />
achieve.<br />
Press the [WRITE] button to confirm your settings<br />
and add the new event. The BK-5 returns to the<br />
“Micro Edit” page.<br />
■Erase Event<br />
This function allows you to remove one or several<br />
events without changing the positions of the<br />
remaining events.<br />
1. Use the [CURSOR÷VALUE] dial to select the<br />
event you want to delete.<br />
The selected event is displayed at the center of the<br />
display page.<br />
101
Backing <strong>Keyboard</strong> BK-5<br />
Menu options<br />
r<br />
NOTE<br />
To select several consecutive events, press the [ENTER/<br />
SELECT] button while rotating the [CURSOR÷VALUE] dial<br />
towards the left (upward direction) or the right (downward<br />
direction).<br />
2. Press the [ENTER/SELECT] button icon to<br />
remove the event you selected.<br />
The BK-5 returns to the “Micro Edit” page.<br />
■Move Event<br />
This function allows you to move one or several<br />
events.<br />
1. Select the event you want to move.<br />
2. Select the “Move Event” function.<br />
3. Set “To Bar”, “To Beat” and “To CPT”.<br />
102<br />
Parameter Setting Explanation<br />
To Bar,<br />
To Beat,<br />
To CPT<br />
See page 88.<br />
Specifies the position<br />
to which the first<br />
event (in chronological<br />
order) of the<br />
selected group should<br />
be shifted.<br />
NOTE<br />
If the position to which you move the selected event<br />
already contains other events, the moved event is added at<br />
the end of that group.<br />
NOTE<br />
Events located at “1-01-00” cannot be moved further to<br />
the left.<br />
4. Press the [WRITE] button to confirm your<br />
settings and move the event.<br />
The BK-5 returns to the “Micro Edit” page.<br />
■Copy Event<br />
This function allows you to copy one or several<br />
events. Use “Place Event” to insert a copy of those<br />
events at the desired position.<br />
1. Select the event you want to copy.<br />
To select several consecutive events, press and hold<br />
the [ENTER/SELECT] button while rotating the<br />
[CURSOR÷VALUE] dial towards the left (upward direction)<br />
or the right (downward direction).<br />
All events selected in this way appear on a gray background.<br />
2. Select the “Copy Event” function.<br />
3. Press the [ENTER/SELECT] button.<br />
Each new selection will replace the previous one.<br />
4. Use the“Place Event” function to specify<br />
where you want to insert the copied<br />
event(s).<br />
■Place Event<br />
This function is only available if the Rhythm Composer’s<br />
clipboard already contains events that you<br />
copied using “Copy Event”.<br />
1. Select the “Place Event” function.<br />
2. Set “To Bar”, “To Beat” and “To CPT”.<br />
Parameter Setting Explanation<br />
To Bar,<br />
To Beat,<br />
To CPT<br />
See page 88.<br />
Specifies the position<br />
where the first event<br />
you copied should be<br />
inserted.<br />
3. Press the [WRITE] button to confirm your<br />
settings and paste the new event(s).<br />
NOTE<br />
Events inserted with “Place Event” are added to any events<br />
that may already exist in that area. Existing events are not<br />
pushed towards the end of the track.<br />
MIDI parameters<br />
This section discusses the BK-5’s MIDI parameters and<br />
the associated memories called “MIDI Sets”.<br />
■ What’s MIDI<br />
“MIDI” stands for “Musical Instrument Digital Interface.”<br />
It is a universal standard that allows performance<br />
data to be exchanged among electronic musical<br />
instruments and computers. The BK-5 provides a<br />
MIDI IN and MIDI OUT socket so that performance<br />
data can be received from other MIDI instruments. It<br />
is also equipped with a COMPUTER port (USB) that<br />
can receive and transmit MIDI data from a computer.<br />
The MIDI parameters can be selected using [MENU]<br />
button ‰ “MIDI”.<br />
The BK-5’s MIDI environment contains the following<br />
options:<br />
MIDI parameter<br />
group<br />
Local<br />
MIDI Set<br />
Explanation<br />
This setting allows you to establish or<br />
remove the connection between the<br />
BK-5’s keyboard and the internal<br />
tone generator.<br />
Allows you to load a MIDI Set (“Key/<br />
Rhythm”, “PK Series”, “Song”,<br />
“User1”~“8”.
Backing <strong>Keyboard</strong> BK-5 r<br />
MIDI parameters<br />
MIDI parameter<br />
group<br />
Edit Rhythm Parts Here, you can edit all MIDI parameters<br />
of the rhythm parts (ADrum,<br />
ABass, Acc1~6). See page 104.<br />
Edit Tone Parts<br />
Edit Song Parts<br />
Edit System<br />
Local<br />
This setting allows you to establish or remove the connection<br />
between the BK-5’s keyboard and the internal<br />
tone generator.<br />
Parameter<br />
Explanation<br />
Here, you can edit all MIDI parameters<br />
related to the keyboard parts<br />
(UP1, UP2, LWR and Mel.Intell). See<br />
page 105.<br />
Here, you can edit all MIDI parameters<br />
of the Song parts. See page 105.<br />
This groups contains all MIDI parameters<br />
that apply to the BK-5 as a<br />
whole. See page 106.<br />
Setting<br />
Local On, Off (---)<br />
If you select “On” (default), playing on the BK-5’s keyboard<br />
or playing back a song/rhythm causes the corresponding<br />
notes to sound. If you select “Off”, the corresponding<br />
MIDI messages are no longer sent to the<br />
internal tone generator – but they are still transmitted<br />
to the MIDI OUT socket (or USB COMPUTER port) and<br />
hence to external MIDI instruments. When a parameter<br />
is modified inside a part, the display shows “---”.<br />
the MIDI transmit/receive channels of the real-time<br />
and rhythm parts and to switch off MIDI transmission/reception<br />
of the song parts.<br />
NOTE<br />
This parameter applies to both reception (RX) and transmission<br />
(TX). The BK-5 indeed allows you to set separate TX<br />
and RX channels for each part.<br />
■ PK Series<br />
This option prepares the BK-5 for MIDI control using<br />
a PK-series MIDI pedalboard. The most important settings<br />
are: “Part Switch” is set to “Int” and “Rhythm<br />
PcRx” is set to “On”.<br />
■ Song<br />
This option restores the factory settings for the<br />
BK-5’s SMF song parts and switches off the MIDI<br />
transmission and reception of the real-time and<br />
rhythm parts.<br />
■ User1~8<br />
The BK-5 also allows you to store and recall 8 different<br />
MIDI configurations.<br />
NOTE<br />
Loading a MIDI Set only changes the MIDI settings and has<br />
no effect on the remaining parameters.<br />
1. Rotate the [CURSOR÷VALUE] dial to select<br />
the “MIDI Set” field.<br />
Sound source<br />
Sound source<br />
MIDI OUT<br />
MIDI OUT<br />
LOCAL ON<br />
LOCAL OFF<br />
Loading a MIDI Set<br />
The MIDI Set environment contains two options with<br />
preset settings. All you need to do is select them to<br />
restore the default settings for the sections or aspects in<br />
question. In addition, there are 8 MIDI Set memories<br />
where you can save your own settings.<br />
Parameter<br />
+Rhythm<br />
+ SMF<br />
Setting<br />
+Rhythm<br />
+ SMF<br />
2. Press the [ENTER/SELECT] button to edit the<br />
“MIDI Set” field.<br />
The “MIDI Set” field is now displayed in reverse.<br />
3. Use the [CURSOR÷VALUE] dial to select the<br />
MIDI Set you want to load.<br />
The BK-5 loads the selected MIDI Set.<br />
Press the [ENTER/SELECT] button if you want to edit<br />
other parameters on this page.<br />
MIDI Set<br />
Key/Rhythm, PK Series, Song,<br />
User1~8<br />
■ Key/Rhythm<br />
This option recalls the factory MIDI settings for the<br />
keyboard parts (UP1, UP2, LWR, MELODY INT) and the<br />
rhythm parts (ADrum, ABass, Acc1~6). The most<br />
important (and practical) use for this field is resetting<br />
103
Backing <strong>Keyboard</strong> BK-5<br />
Menu options<br />
Edit Rhythm Parts<br />
The following parameters are located on the display<br />
page that can be selected using [MENU] button‰<br />
“MIDI” ‰ “Edit Rhythm Parts”.<br />
Filter Setting Explanation<br />
Pitch Bender Off, On Select “On” to transmit<br />
Pitch Bend messages.<br />
Modulation Off, On Select “On” to transmit<br />
Modulation messages<br />
(CC01).<br />
Volume Off, On Select “On” to transmit Volume<br />
messages (CC07).<br />
Panpot Off, On Select “On” to transmit<br />
Panpot messages (CC10).<br />
r<br />
1. Use the [CURSOR÷VALUE] dial to select the<br />
part you want to edit (ADrum, ABass, Acc1,<br />
Acc2, Acc3, Acc4, Acc5, Acc6).<br />
The display now shows the settings for the selected<br />
part.<br />
104<br />
Tx<br />
Select “On” if you want the selected part to transmit<br />
MIDI data.<br />
Parameter<br />
Tx<br />
Tx Ch<br />
Allows you to assign a MIDI transmit channel to the<br />
selected part.<br />
Parameter<br />
Setting<br />
Off, On<br />
Setting<br />
Tx Ch 1~16<br />
Tx Shift<br />
This parameter allows you to transpose the note<br />
messages before they are transmitted to an external<br />
MIDI instrument or computer. The maximum possible<br />
transposition is four octaves up (+48) or down (–48).<br />
Each step represents a semi-tone.<br />
Parameter<br />
Setting<br />
Tx Shift –48~0~+48<br />
Tx Local<br />
This is where you can disconnect the part from the<br />
internal sound source (“Off”) – or re-establish that<br />
connection (“On”).<br />
Parameter<br />
Tx Local<br />
Setting<br />
Off, On<br />
Tx Event<br />
The “TX Event” section provides a number of filters<br />
that allow you to specify whether the messages in<br />
question should be transmitted (On) or not (Off).<br />
Filter Setting Explanation<br />
Program<br />
Change<br />
Off, On<br />
Select “On” to transmit program<br />
change and bank<br />
select (CC00, CC32) messages.<br />
Expression Off, On Select “On” to transmit<br />
Expression messages<br />
(CC11).<br />
Reverb Off, On Select “On” to transmit<br />
Reverb messages (CC91).<br />
Chorus Off, On Select “On” to transmit<br />
Chorus messages (CC93).<br />
Select All Off, On Select “On” to transmit all<br />
MIDI message listed above.<br />
Rx<br />
Select “On” if you want the selected part to receive<br />
MIDI data.<br />
Parameter<br />
Rx<br />
Rx Ch<br />
Allows you to assign a MIDI receive channel to the<br />
selected part.<br />
Parameter<br />
Setting<br />
Off, On<br />
Setting<br />
Rx Ch 1~16<br />
Rx Shift<br />
This parameter allows you to transpose the note<br />
messages received from an external MIDI instrument<br />
or computer. The maximum possible transposition is<br />
four octaves up (+48) or down (–48). Each step represents<br />
a semi-tone.<br />
Parameter<br />
Setting<br />
Rx Shift –48~0~+48<br />
Rx Limit Low/Limit High<br />
“Limit Low” and “Limit High” allow you to set the<br />
note range to be received. If not all note messages<br />
received on a given MIDI channel should be played by<br />
the selected BK-5 part, narrow down the range.<br />
Parameter<br />
Rx Limit Low<br />
Rx Limit High<br />
Setting<br />
C–~G9<br />
C–~G9<br />
NOTE<br />
The “Limit Low” value cannot be higher than the “Limit<br />
High” value (and vice versa).
Backing <strong>Keyboard</strong> BK-5 r<br />
MIDI parameters<br />
Rx Event<br />
The “Rx Event” section provides a number of filters<br />
that allow you to specify whether the messages in<br />
question should be received (On) or not (Off).<br />
Filter Setting Explanation<br />
Edit Tone Parts<br />
The following parameters are located on the display<br />
page that can be selected using [MENU] button‰<br />
“MIDI” ‰ “Edit Tone Parts”.<br />
Program<br />
Change<br />
Off, On<br />
Select “On” to receive program<br />
change and bank<br />
select (CC00, CC32) messages.<br />
Pitch Bender Off, On Select “On” to receive Pitch<br />
Bend messages.<br />
Modulation Off, On Select “On” to receive Modulation<br />
messages (CC01).<br />
Volume Off, On Select “On” to receive Volume<br />
messages (CC07).<br />
Panpot Off, On Select “On” to receive Panpot<br />
messages (CC10).<br />
Expression Off, On Select “On” to receive<br />
Expression messages<br />
(CC11).<br />
Reverb Off, On Select “On” to receive<br />
Reverb messages (CC91).<br />
Chorus Off, On Select “On” to receive Chorus<br />
messages (CC93).<br />
Hold Off, On Select “On” to receive Hold<br />
messages (CC64).<br />
Sostenuto Off, On Select “On” to receive Sostenuto<br />
messages (CC66).<br />
Soft Off, On Select “On” to receive Soft<br />
messages (CC67).<br />
1. Use the [CURSOR÷VALUE] dial to select the<br />
part you want to edit (Upper1, Upper2,<br />
Lower, Mel.Intell).<br />
2. Press the [ENTER/SELECT] button.<br />
The display now shows the settings for the selected<br />
part.<br />
Tx, Tx Ch, Tx Shift, Tx Local, Tx Event<br />
For the explanation of these parameters please refer<br />
to page 104.<br />
Rx, Rx Ch, Rx Shift, Rx Limit Low/High, Rx Event<br />
For the explanation of these parameters please refer<br />
to page 104.<br />
Edit Song Parts<br />
The following parameters are located on the display<br />
page that can be selected using [MENU] button‰<br />
“MIDI” ‰ “Edit Song Parts”.<br />
Caf Off, On Select “On” to receive Caf-<br />
Channel aftertouch.<br />
RPN Off, On Select “On” to receive Registered<br />
parameter number<br />
messages (CC100/101).<br />
NRPN Off, On Select “On” to receive Nonregistered<br />
parameter number<br />
messages (CC98/99).<br />
System<br />
Exclusive<br />
Off, On<br />
Select “On” to receive System<br />
Exclusive messages.<br />
CC16 Off, On General purpose controller<br />
that allows you to influence<br />
the “C1” parameter (see<br />
p. 60). Select “On” to receive<br />
this message type.<br />
Select All Off, On Select “On” to receive all<br />
MIDI message listed above.<br />
1. Use the [CURSOR÷VALUE] dial to select the<br />
part you want to edit (Part 1~16).<br />
2. Press the [ENTER/SELECT] button.<br />
The display now shows the settings for the selected<br />
part.<br />
Tx, Tx Ch, Tx Shift, Tx Local, Tx Event<br />
For the explanation of these parameters please refer<br />
to page 104.<br />
Rx, Rx Ch, Rx Shift, Rx Limit Low/High, Rx Event<br />
For the explanation of these parameters please refer<br />
to page 104.<br />
105
Backing <strong>Keyboard</strong> BK-5<br />
Menu options<br />
Edit System<br />
The following parameters are located on the display<br />
page that can be selected using [MENU] button‰<br />
“MIDI” ‰ “Edit System”.<br />
Sync<br />
The following parameters are located on the display<br />
page that can be selected using [MENU] button‰<br />
“MIDI” ‰ “Edit System” ‰ “Sync”.<br />
r<br />
106<br />
The “Edit System” group contains the following<br />
parameters:<br />
Edit System<br />
Sync<br />
Basic<br />
Rhythm<br />
NTA<br />
Parameters<br />
Visual Control<br />
TxCh<br />
Explanation<br />
These parameters are used to synchronize<br />
external MIDI devices. See below.<br />
The parameters of this group affect the<br />
BK-5’s Basic channel. The Basic channel is<br />
used to receive and transmit Program<br />
Change and Bank Select messages for<br />
selecting Performances as well as for the<br />
reception and transmission of other kinds<br />
of messages that are not directly related<br />
to a specific MIDI channel. See page 107.<br />
The parameters of this group affect the<br />
BK-5’s Rhythm channel. The Rhythm<br />
channel is used for receiving program<br />
change and bank select messages that<br />
select rhythm and volume messages that<br />
change the rhythm’s volume. See<br />
page 108.<br />
These parameters allow you to assign MIDI<br />
channels to the BK-5’s NTA parts (Noteto-Arranger).<br />
Only notes received on one<br />
of these channels are considered chord<br />
information that can be used to transpose<br />
rhythm playback in real-time. See<br />
page 108.<br />
This group contains MIDI parameters that<br />
are not related to the previous groups. See<br />
page 109.<br />
Allows you to set the MIDI transmit channel<br />
for the Visual Control function. (The<br />
BK-5 does not receive Visual Control messages.)<br />
The “Sync” parameters allow you to specify whether<br />
or not the BK-5 should send MIDI real-time messages<br />
when you start rhythm or song playback. This allows<br />
you to synchronize external instruments or (software)<br />
sequencers with your BK-5.<br />
Rhythm Start/Stop Tx<br />
If you activate this option, the BK-5 sends start or<br />
stop messages when you start (or stop) rhythm playback.<br />
Parameter<br />
Rhythm Start/Stop Tx<br />
Rhythm Clock Tx<br />
If you activate this option the rhythm playback sends<br />
MIDI Clock messages.<br />
Parameter<br />
Rhythm Clock Tx<br />
Setting<br />
SMF Start/Stop Tx<br />
Similar to “Rhythm Start/Stop Tx” but for songs.<br />
Parameter<br />
SMF Start/Stop Tx<br />
Off, On<br />
Setting<br />
Off, On<br />
SMF Clock Tx<br />
Similar to “Rhythm Clock Tx” but for songs.<br />
Parameter<br />
SMF Clock Tx<br />
Setting<br />
Off, On<br />
Setting<br />
SMF Position Tx<br />
If you switch this parameter on, the song playback<br />
sends Song Position Pointer (SPP) messages that<br />
indicate the current playback position.<br />
Parameter<br />
SMF Position Tx<br />
Off, On<br />
Setting<br />
Off, On<br />
Sync Rx<br />
This parameter is used to specify whether rhythm<br />
and song playback should be synchronized by an<br />
external MIDI device.<br />
Parameter<br />
Sync Rx<br />
Setting<br />
Off, On
Backing <strong>Keyboard</strong> BK-5 r<br />
MIDI parameters<br />
Mode<br />
Parameter<br />
Mode<br />
Setting<br />
Internal, Auto, MIDI, Remote<br />
Internal: Song or rhythm playback uses BK-5 internal<br />
tempo.<br />
Auto: A good setting for remote control of song or<br />
rhythm playback (using a PK-series dynamic MIDI<br />
pedal board, for example). If the BK-5 receives a MIDI<br />
Start message (FA), it waits for Clock messages that<br />
specify the tempo. If those Clock messages are not<br />
received, the BK-5 starts playback using its internal<br />
tempo. If, however, Clock messages (F8) follow after<br />
the Start message, the BK-5 uses the external tempo.<br />
MIDI: Song or rhythm playback can be started or<br />
stopped with MIDI real-time messages (Start, Stop,<br />
Clock) received from an external clock source.<br />
Remote: Song or rhythm playback waits for a start<br />
message to start playback at its own tempo. When it<br />
receives a stop message, playback stops. External<br />
clock messages are ignored.<br />
Basic<br />
The following parameters are located on the display<br />
page that can be selected using [MENU] button‰<br />
“MIDI” ‰ “Edit System” ‰ “Basic”.<br />
Performance PC Tx<br />
This parameter is used to enable or disable the transmission<br />
of program change and bank select messages<br />
related to Performance selection.<br />
Parameter<br />
Performance PC Tx<br />
Part Switch Tx<br />
Whenever you mute or un-mute a part on the<br />
“Rhythm Parts” page, the BK-5 transmits an NRPN<br />
message that describes your action. Not sending this<br />
message may be useful to keep your external<br />
sequencer from recording it—or the receiving GS<br />
module from muting the part assigned to that MIDI<br />
channel.<br />
Parameter<br />
Part Switch Tx<br />
Rx<br />
Switches the reception of MIDI messages on the<br />
Basic channel on or off.<br />
Parameter<br />
Rx<br />
Rx Channel<br />
Use this parameter to assign a MIDI transmit channel<br />
to the “Basic” channel.<br />
Parameter<br />
Setting<br />
Off, On<br />
Setting<br />
Off, On<br />
Setting<br />
Off, On<br />
Setting<br />
Rx Channel 1~16<br />
Performance PC Rx<br />
This parameter is used to enable or disable the reception<br />
of program change and bank select messages<br />
related to Performance selection.<br />
The Basic channel is used to receive and transmit<br />
Program Change and Bank Select messages for<br />
selecting Performances, as well as for the reception<br />
and transmission of other kinds of messages that are<br />
not directly related to a specific MIDI channel.<br />
NOTE<br />
If you select another channel, messages intended for the<br />
Basic parameters might also cause other parameters to<br />
change when you don’t want them to.<br />
The following parameters are available here:<br />
Tx<br />
Switches the transmission of MIDI messages on the<br />
Basic channel on or off.<br />
Parameter<br />
Tx<br />
Setting<br />
Off, On<br />
Tx Channel<br />
The channel used to transmit MIDI messages.<br />
Parameter<br />
Setting<br />
Parameter<br />
Performance PC Rx<br />
Master Volume Rx<br />
Allows you to enable or disable the reception of Master<br />
Volume messages that would change the BK-5’s<br />
overall volume. This is an exclusive message common<br />
to all newer MIDI devices.<br />
Parameter<br />
Master Volume Rx<br />
Setting<br />
Off, On<br />
Part Switch Rx<br />
Whenever you mute or un-mute a part on the<br />
“Rhythm Parts” page, the BK-5 transmits an NRPN<br />
message that describes your action. You can keep the<br />
BK-5 from responding to such messages to avoid<br />
that external instruments mute its parts.<br />
Parameter<br />
Part Switch Rx<br />
Setting<br />
Off, On<br />
Setting<br />
Off, On<br />
Tx Channel 1~16<br />
107
Backing <strong>Keyboard</strong> BK-5<br />
Menu options<br />
Rhythm<br />
The following parameters are located on the display<br />
page that can be selected using [MENU] button‰<br />
“MIDI” ‰ “Edit System” ‰ “Rhythm”.<br />
Rhythm Volume Rx<br />
Allows you to enable or disable the reception of volume<br />
messages relating the rhythm.<br />
Parameter<br />
Rhythm Volume Rx<br />
Setting<br />
Off, On<br />
Rhythm Pc Rx<br />
This parameter allows you to enable or disable the<br />
reception of program change and bank select messages<br />
for rhythm selection.<br />
Parameter<br />
Rhythm Pc Rx<br />
Setting<br />
Off, On<br />
r<br />
108<br />
The Rhythm channel is used for receiving program<br />
change and bank select messages that select rhythms<br />
and volume messages that change the rhythm’s volume.<br />
The MIDI address of a rhythm consists of three elements:<br />
a CC00 number, a CC32 number and a program<br />
change number. The values assigned to CC00<br />
and CC32 define the rhythm (see “Rhythm list” on<br />
p. 117), whereas the program change number defines<br />
the Division (Intro, Ending, etc.). See “Rhythm division<br />
program change numbers” on p. 118.<br />
Sending only a program change number selects<br />
another Division of the currently active rhythm. Be<br />
aware, however, that only sending CC00 and CC32<br />
messages (without a program change) has no effect.<br />
NOTE<br />
When you select another rhythm on your BK-5, it transmits<br />
a CC00-CC32-PC cluster on the Rhythm channel, which<br />
you could record using an external sequencer.<br />
Tx<br />
Switches the transmission of MIDI messages on the<br />
Rhythm channel on or off.<br />
Parameter<br />
Tx<br />
Setting<br />
Off, On<br />
Tx Channel<br />
The channel used to transmit MIDI messages.<br />
Parameter<br />
Setting<br />
Tx Channel 1~16<br />
Rx<br />
Switches the reception of MIDI messages on the<br />
Rhythm channel on or off.<br />
Parameter<br />
Rx<br />
Setting<br />
Off, On<br />
Rx Channel<br />
Use this parameter to assign a MIDI receive channel<br />
to the Rhythm section.<br />
Parameter<br />
Setting<br />
Rx Channel 1~16<br />
NTA<br />
The following parameters are located on the display<br />
page that can be selected using [MENU] button‰<br />
“MIDI” ‰ “Edit System” ‰ “NTA”.<br />
NTA notes are only received (from an external MIDI<br />
instrument). What you play in the chord recognition<br />
area of the keyboard to feed the Arranger is automatically<br />
converted to the corresponding MIDI note<br />
numbers, so that all rhythm parts transmit their<br />
notes to external instruments. There is thus no need<br />
to transmit the note messages of what you play in<br />
the chord recognition area (NTA) separately.<br />
These parameters allow you to specify on which MIDI<br />
channels the BK-5 should receive chord information<br />
used to change the rhythm’s key in real-time.<br />
Channel<br />
Allows you to select the MIDI channel on which the<br />
BK-5 should receive NTA messages.<br />
Parameter<br />
Channel<br />
Setting<br />
Ch1~Ch16<br />
Rx<br />
This parameter allows you to specify whether (“On”)<br />
or not (“Off”) the selected MIDI channel should be<br />
used to receive chord information.<br />
Parameter<br />
Rx<br />
Setting<br />
Off, On
Backing <strong>Keyboard</strong> BK-5 r<br />
MIDI parameters<br />
Rx Octave<br />
Use this parameter to transpose the notes received<br />
on the selected MIDI channel (“Ch”) in steps of one<br />
octave.<br />
Parameter<br />
Setting<br />
Rx Octave –4~0~4<br />
Rx Global Limit Low/High<br />
These parameters allow you to set the note range to<br />
be received. If not all note messages of the selected<br />
MIDI channel should be received by the NTA “part”,<br />
set the range to the desired values.<br />
Parameter<br />
Rx Global Limit Low<br />
Rx Global Limit High<br />
NOTE<br />
The “Limit Low” value cannot be higher than the “Limit<br />
High” value (and vice versa).<br />
Parameters<br />
The following parameters are located on the display<br />
page that can be selected using [MENU] button‰<br />
“MIDI” ‰ “Edit System” ‰ “Parameters”.<br />
This page contains several parameters that are not<br />
related to one another (the other MIDI pages always<br />
concentrate on one aspect).<br />
Part Switch<br />
This parameter allows you to specify whether or not a<br />
muted part should go on sending MIDI messages:<br />
Parameter<br />
Part Switch<br />
Setting<br />
C–~G9<br />
C–~G9<br />
Setting<br />
Internal, Int+MIDI<br />
Internal: A muted part can no longer be played via<br />
the BK-5’s keyboard or Arranger/song player but continues<br />
to send MIDI messages. Selecting “Internal”<br />
and muting a part thus has the same effect as selecting<br />
“Local Off” (see p. 103).<br />
Int+MIDI: A muted part can no longer be played via<br />
the BK-5’s keyboard or Arranger/song player and no<br />
longer sends MIDI messages.<br />
Tx Velocity<br />
Your BK-5 is equipped with a velocity-sensitive keyboard<br />
and a tone generator capable of responding to<br />
velocity messages. Use this parameter to switch the<br />
transmission (TX) of velocity messages on or off.<br />
If you don’t select “On”, specify which velocity value<br />
to use instead of the continuous flux. The value you<br />
set will be used for all notes sent to MIDI OUT/USB<br />
COMPUTER.<br />
Parameter<br />
Setting<br />
Tx Velocity On, 1~127<br />
Tx SysEx<br />
Use this parameter to specify whether (“On”) or not<br />
(“Off”) the BK-5 should send SysEx messages. Such<br />
messages are not standardized, so that each manufacturer<br />
can use them ad lib for temporary (or permanent)<br />
changes to the way a part behaves. Effects<br />
parameters, for instance, can only be changed via<br />
SysEx messages.<br />
Such messages may slow down playback on external<br />
MIDI instruments or yield no effect at all, which is<br />
why you have the option to switch off their transmission<br />
in the first place.<br />
Parameter<br />
Tx SysEx<br />
Tx Data Change<br />
This parameter allows you to specify how the original<br />
program changes of the songs you play back are<br />
transmitted via MIDI. The BK-5 may change sound<br />
addresses (usually CC00 and CC32 values) so as to<br />
play back all songs with the best possible quality. If<br />
you switch this parameter on, such real-time transformations<br />
are also transmitted via MIDI. If you<br />
switch this parameter off, the original sound<br />
addresses are transmitted to the receiving device.<br />
(But the BK-5’s tone generator continues to<br />
“enhance” the songs you play back.)<br />
Parameter<br />
Tx Data Change<br />
Setting<br />
Off, On<br />
Octave Tx<br />
The “Octave Tx” parameter can be set to Absolute or<br />
Relative. You may have noticed that if you assign a<br />
bass sound to the UP1 or UP2 part in SPLIT mode, the<br />
notes are transposed to allow you to play meaningful<br />
bass lines using the UP1/2 part. “Relative” means that<br />
this internal (and automatic) transposition is translated<br />
into MIDI note numbers.<br />
In “Absolute” mode, however, the MIDI note numbers<br />
sent to other instruments will be the ones of the keys<br />
you actually press.<br />
Parameter<br />
Octave Tx<br />
Setting<br />
Off, On<br />
Setting<br />
Relative, Absolute<br />
Rx Velocity<br />
Your BK-5 is equipped with a velocity-sensitive keyboard<br />
and a tone generator capable of responding to<br />
velocity messages. This parameter allows you to<br />
switch the reception (RX) of velocity messages on or<br />
109
Backing <strong>Keyboard</strong> BK-5<br />
Menu options<br />
off. If you don’t need “On”, specify which velocity<br />
value to use instead of the continuous flux. This value<br />
will be used for all notes received via MIDI..<br />
The display changes to:<br />
Parameter<br />
Setting<br />
Rx Velocity On, 1~127<br />
Rx SySex<br />
Use this parameter to specify whether the BK-5<br />
should receive SysEx messages from other devices.<br />
Parameter<br />
Rx SySex<br />
Rx Transpose<br />
Use this parameter to specify whether or not the<br />
BK-5 should transpose the MIDI note messages it<br />
receives.<br />
Parameter<br />
Rx Transpose<br />
Soft Thru<br />
Select “On” if the BK-5 should transmit all MIDI messages<br />
it receives (using its MIDI OUT socket).<br />
Parameter<br />
Setting<br />
Off, On<br />
Setting<br />
Off, On<br />
Setting<br />
3. Rotate the [CURSOR÷VALUE] dial to select<br />
the MIDI Set where you want to save your<br />
settings (“User1”~ “User8”).<br />
4. Press the [ENTER/SELECT] button to confirm.<br />
A confirmation message informs you that the MIDI<br />
Set has been saved.<br />
If you change the MIDI settings after loading a “User”<br />
set, the BK-5 alerts you to the fact that you may<br />
need to save the MIDI Set again (provided, you want<br />
to keep your changes):<br />
Soft Thru<br />
Off, On<br />
Visual Control TxCh<br />
This parameter allows you to set the MIDI transmit<br />
channel for the Visual Control function. (The BK-5<br />
does not receive Visual Control messages.) By default,<br />
this channel is set to 16.<br />
Parameter<br />
Setting<br />
Visual Control TxCh 1~16<br />
Save MIDI Set<br />
This function allows you to save your changes to a<br />
“User” memory for quick recall.<br />
This function can be selected using the [WRITE] button<br />
while the “MIDI” page is displayed.<br />
r<br />
1. Edit the desired MIDI parameters (“Edit<br />
Rhythm Parts”, “Edit Song Parts”, “Edit Tone<br />
Parts”, “Edit System”).<br />
2. Press the [WRITE] button.<br />
110
Backing <strong>Keyboard</strong> BK-5 r<br />
Factory Reset<br />
Factory Reset<br />
The following function allows you to recall the BK-5’s<br />
original factory settings. This has no effect on the data<br />
stored on a USB memory.<br />
1. Press the [MENU] button.<br />
The display changes to:<br />
Formatting a USB memory<br />
This function allows you to format the connected USB<br />
memory.<br />
USB memories using the FAT-32 file system may not<br />
need to be formatted. We nevertheless recommend formatting<br />
all new USB storage devices with the BK-5.<br />
IMPORTANT NOTE: Formatting a USB memory means<br />
that all files (songs, rhythms, etc.) it contains are lost.<br />
Always check the contents of the memory before deciding<br />
to format it.<br />
1. Connect the a USB storage you want to format<br />
device to the USB MEMORY port on the<br />
BK-5’s front panel.<br />
2. Press the [MENU] button.<br />
2. Rotate the [CURSOR÷VALUE] dial to select<br />
the “Factory Reset” entry, then press the<br />
[ENTER/SELECT] button.<br />
3. Rotate the [CURSOR÷VALUE] dial to select<br />
the “Format USB Device” entry, then press<br />
the [ENTER/SELECT] button.<br />
3. Rotate the [CURSOR÷VALUE] dial to select<br />
“YES”, then press the [ENTER/SELECT] button<br />
to load the factory settings.<br />
Select “NO” to return to the previous display page<br />
without loading the factory settings.<br />
A confirmation message informs you that the BK-5<br />
has been initialized.<br />
4. Rotate the [CURSOR÷VALUE] dial to select<br />
“YES”, then press the [ENTER/SELECT] button<br />
to format the USB memory.<br />
A confirmation message informs you that the USB<br />
memory has been formatted.<br />
111
Backing <strong>Keyboard</strong> BK-5<br />
Menu options<br />
■ The following folders are created on the USB<br />
memory<br />
Name<br />
My Performances<br />
My Recordings<br />
My Songs<br />
My Rhythms<br />
Value<br />
This folder is used to save Performance<br />
Lists. (The contents of this<br />
folder cannot be viewed by pressing<br />
the [USB MEMORY] button. You need<br />
to press the PERFORMANCE [LIST]<br />
button gain access to the files it contains.<br />
The contents can be viewed on<br />
a computer, however.)<br />
This folder is used to store your audio<br />
recordings (see p. 52).<br />
This folder can be used to save SMF<br />
songs you edited with the “Makeup<br />
Tools” functions (see p. 74).<br />
This folder can be used to save<br />
rhythms you edited with the “Makeup<br />
Tools” or “Rhythm Composer” functions<br />
(see p. 74).<br />
NOTE<br />
We recommend copying the contents of your USB memory<br />
to your computer before formatting it.<br />
r<br />
112
Backing <strong>Keyboard</strong> BK-5 r<br />
Visual Control function<br />
16. Visual Control function<br />
The BK-5 has a powerful interface for realtime audio-and-video integration. “Visual Control” is a function that allows<br />
music and images to be performed together. When MIDI Visual Control- or V-LINK compatible devices are connected via<br />
MIDI, you’ll be able to easily enjoy a variety of visual effects that are linked to the expressive elements of your performance.<br />
For example, if you use the BK-5 with the EDIROL P-10,<br />
The following confirmation appears:<br />
you’ll be able to use the various controls on the BK-5’s<br />
keyboard to switch and control images on the EDIROL<br />
P-10.<br />
In order to enjoy the Visual Control function with the<br />
BK-5 and the EDIROL P-10, you’ll need to make connections<br />
using a MIDI cable (sold separately).<br />
MIDI OUT<br />
The display changes to:<br />
MIDI IN<br />
Image output<br />
Projector<br />
Edirol P-10 Visual<br />
Sampler<br />
NOTE<br />
To prevent malfunction and speaker damage, you must minimize<br />
the volume on all equipment and turn off their power<br />
before you make any connections.<br />
1. Connect the BK-5’s MIDI OUT socket to the<br />
MIDI IN socket of the optional MIDI Visual<br />
Control/V-LINK device.<br />
2. Press and hold the [BASS INV] button while<br />
pressing the [AUTO FILL IN] button.<br />
Repeat this step to switch the Visual Control function<br />
back off. The following message briefly confirms this<br />
operation:<br />
113
Backing <strong>Keyboard</strong> BK-5<br />
Visual Control function<br />
Selecting clips and banks on an<br />
optional MIDI Visual Control/<br />
V-LINK device<br />
1. Switch on the “Visual Control” function.<br />
2. Press a key in the highest octave (C#6~C7)<br />
to select the desired clips on the external<br />
MIDI Visual Control/V-LINK-compatible<br />
device.<br />
Clip selection via MIDI Visual<br />
Control/V-LINK<br />
Key MIDI Visual Control/V-LINK MIDI<br />
message<br />
C#6 Control the image bank<br />
(Bank Select)<br />
BF 00 00<br />
D6 Switch images (Clip 1) CF 00<br />
D#6 Control the image bank<br />
(Bank Select)<br />
BF 00 01<br />
E6 Switch images (Clip 2) CF 01<br />
F6 Switch images (Clip 3) CF 02<br />
F#6 Control the image bank<br />
(Bank Select)<br />
BF 00 02<br />
G6 Switch images (Clip 4) CF 03<br />
G#6 Control the image bank<br />
(Bank Select)<br />
BF 00 03<br />
A6 Switch images (Clip 5) CF 04<br />
A#6 Control the image bank<br />
(Bank Select)<br />
BF 00 04<br />
B6 Switch images (Clip 6) CF 05<br />
C7 Switch images (Clip 7) CF 06<br />
Using the black keys (Bank Select) and white keys<br />
(PC), 5 x 7= 35 clips can be selected.<br />
NOTE<br />
While the Visual Control function is active, the C#6~C7<br />
keys are temporarily unavailable for playing notes.<br />
r<br />
114
Backing <strong>Keyboard</strong> BK-5 r<br />
Troubleshooting<br />
17. Troubleshooting<br />
Symptom Action Page<br />
Power does not turn on.<br />
Is the included AC adaptor/power cord correctly connected to an<br />
AC outlet and to the BK-5?<br />
Do not use any AC adaptor or power cord other than the ones<br />
included. Doing so will cause malfunctions.<br />
16<br />
No sound from the BK-5. Did you switch the BK-5 on? 16<br />
The volume level of the instrument is too low<br />
when it is connected to an amplifier.<br />
Could the [VOLUME] knob be turned down? Select a higher setting.<br />
Can you hear sound through headphones?<br />
If you can hear sound through headphones, it may be that the<br />
connection cables are broken, or that your amp or speaker has<br />
malfunctioned. Check the cables and your equipment once again.<br />
Could the part volume settings have been minimized?<br />
Check the “Volume” setting of each part.<br />
Could a MIDI message received from an external MIDI device (volume<br />
message or exclusive message) have lowered the volume?<br />
Could you be using a connection cable that contains a resistor?<br />
Use a connection cable that doesn’t contain a resistor.<br />
—<br />
—<br />
56, 61<br />
—<br />
—<br />
The pitch of the selected rhythm/song is incorrect. Is the “Tuning” setting appropriate?<br />
Did you transpose the rhythm/song? Also check the “Rhythm<br />
Scale Tune” parameter.<br />
Can’t hear the vocal of an audio file (mp3 or WAV).<br />
Can’t hear the melody of SMF files.<br />
If the [TRACK MUTE] (CENTER CANCEL) button is lit, the vocal<br />
sound will be attenuated.<br />
If the [TRACK MUTE] button is lit, the melody of the MIDI files will<br />
be muted. Switch it off.<br />
65<br />
—<br />
42<br />
A “buzz” is heard from the external amplifier<br />
Is the external amplifier or other device used with the BK-5 connected<br />
to a different AC power outlet?<br />
Connect the amplifier or other device to the same AC outlet as the<br />
BK-5.<br />
—<br />
Can’t play an audio/mp3-format song Is the song in a format that the BK-5 is able to read? 34<br />
After connecting the BK-5’s USB COMPUTER port<br />
to your computer, the BK-5 doesn’t receive MIDI<br />
messages.<br />
Unable to read from/write to USB memory.<br />
The BK-5 may be receiving on a MIDI channel on which the MIDI<br />
controller doesn’t transmit. Correct the MIDI controller’s transmit<br />
channel.<br />
Are you using an (optional) <strong>Roland</strong> USB memory (M-UF series)?<br />
Reliable performance cannot be guaranteed if you use non-<br />
<strong>Roland</strong> USB memory products.<br />
Check the format of your USB memory. The BK-5 can use USB<br />
memory that has been formatted as FAT. If your USB memory was<br />
formatted using any other method, please re-format it using the<br />
BK-5.<br />
—<br />
—<br />
111<br />
Can’t save to USB memory. Could the USB memory be write protected? —<br />
Is there sufficient free space on the USB memory? —<br />
Audio recording won’t start or stops unexpectedly. Are you using an (optional) <strong>Roland</strong> USB memory (M-UF-series)?<br />
Reliable performance cannot be guaranteed if you use non-<br />
<strong>Roland</strong> USB memory products.<br />
—<br />
Is there sufficient free space on the USB memory? —<br />
115
Backing <strong>Keyboard</strong> BK-5<br />
Troubleshooting<br />
Symptom Action Page<br />
The external screen remains dark. Did you connect it to the VIDEO OUTPUT socket? 18<br />
Did you switch on your TV or external screen—and did you select<br />
the correct channel? See the TV’s or screen’s owners manual for<br />
how to select the channel that corresponds to the video input to<br />
which the BK-5 is connected.<br />
—<br />
Are you using a supported TV or monitor screen? —<br />
Thin horizontal lines flicker in the television<br />
screen.<br />
Can’t see the edge of the image on the television<br />
screen<br />
Lyric display is wrong.<br />
Insufficient volume from a device connected to<br />
the BK-5’s AUDIO INPUT (STEREO) socket.<br />
The songs won’t play.<br />
Thin horizontal lines may flicker on the television screen, but this<br />
is due to the television itself, and is not a malfunction of the BK-5.<br />
In some cases, the edge of the image may not be visible on the<br />
television screen, but this is due to the characteristics of the television<br />
and is not a malfunction on the BK-5.<br />
For some types of music files, the lyrics may sometimes be displayed<br />
incorrectly. Some words may be incorrectly shown outside<br />
the screen display area.<br />
Could you be using a connection cable that contains a built-in<br />
resistor? Use a connection cable that does not contain a resistor.<br />
Check the setting of the “Audio In Level” parameter and correct it,<br />
if necessary (page 68).<br />
The file type of the song is not one of the file types that the BK-5<br />
can play.<br />
—<br />
—<br />
—<br />
—<br />
—<br />
34<br />
It may be that the song data is damaged. —<br />
No Performance Lists are displayed. The USB memory doesn’t contain any Performance List files. —<br />
For some reason the USB memory is not recognized. —<br />
r<br />
116
Backing <strong>Keyboard</strong> BK-5 r<br />
Rhythm list<br />
18. Rhythm list<br />
No. Name<br />
CC00 CC32<br />
Pop Rock<br />
1 Flood Pop 6 1<br />
2 Frank's Way 6 117<br />
3 Easy Ballad 6 118<br />
4 Sky Beat 6 120<br />
5 Home Beat 6 121<br />
6 Slow Beat 6 122<br />
7 Fate Beat 6 80<br />
8 Romantic Beat 6 81<br />
9 Due Beat 6 124<br />
10 Acoustic Ballad 6 125<br />
11 Adult Contemp 6 126<br />
12 Gold Slow Beat 71 0<br />
13 Time Pop 71 2<br />
14 Gold Medium Beat 71 1<br />
15 Sunshine Pop 6 114<br />
16 Blue Pop 6 110<br />
17 Euro Ballad 6 80<br />
18 Killing Beat 6 3<br />
19 Jessie Beat 6 4<br />
20 Pink Beat 6 5<br />
21 Billy Beat 7 114<br />
22 Breakin'Beat 7 115<br />
23 Fancy Beat 7 116<br />
24 US Country Pop 7 117<br />
25 Gold Beat 7 118<br />
26 Radio Pop 7 101<br />
27 US Shuffle 4 22<br />
28 UK Shuffle 4 23<br />
29 Eric Beat 68 14<br />
30 Strummin' Pop 68 11<br />
31 Amazing Gospel 68 12<br />
32 Night Ballad 68 5<br />
33 6_8 Ballad 68 7<br />
34 6_8 Pop 68 9<br />
35 Love Sl Rock 5 57<br />
36 Unplugged Pop 68 2<br />
37 Unplugged Ballad 68 1<br />
38 Cool Live Band 68 8<br />
39 Acoustic Pop 68 6<br />
40 Rolling Rock 1 1<br />
41 Green Rock 1 83<br />
42 Spring Rock 1 80<br />
43 Broken Beat 1 81<br />
44 Straight Rock 1 82<br />
45 Joe's Rock 1 72<br />
46 Countdown Rock 1 69<br />
47 Cool Shuffle 1 76<br />
48 Breaky Rock 1 68<br />
49 JuliRock 1 73<br />
50 LoveRock 1 77<br />
51 Electro Rock 1 62<br />
52 MunichRock 1 74<br />
Disco Dance<br />
53 Peas Disco 66 1<br />
54 California Disco 66 2<br />
55 Edge Disco 66 3<br />
56 Saxo Disco 66 4<br />
57 Broken Dance 66 5<br />
58 Beat Generation 66 60<br />
59 Seventies 66 61<br />
60 Volare Gipsy 66 62<br />
61 Night'sDance 66 63<br />
62 Hung Disco 66 64<br />
63 Jamiro Dance 66 57<br />
64 Just Disco 66 58<br />
65 2000's Disco 66 59<br />
66 Slow Disco 66 56<br />
67 Gold Disco 66 65<br />
No. Name<br />
CC00 CC32<br />
68 Ladies Dance 66 28<br />
69 UK Dance 66 32<br />
70 Fire Beat 66 11<br />
71 Housing 66 27<br />
72 Survive Disco 66 21<br />
73 Dancin' 66 26<br />
74 Earth Boogie 66 34<br />
75 DJ Groove 66 33<br />
76 Hitmix 66 6<br />
77 House Maillorca 66 10<br />
78 <strong>Club</strong> House 66 9<br />
79 DJ Techno 66 7<br />
80 Hard Techno 66 8<br />
81 Barry Dance 66 13<br />
82 Poppin' Schlager 5 1<br />
83 Folk Schlager 5 2<br />
84 Disco Schlager 5 46<br />
85 Latin Schlager 5 47<br />
86 Happy Schlager 5 44<br />
87 Party Schlager 5 43<br />
88 Schlager Pop 5 42<br />
89 Phunk Beat 28 21<br />
90 Spear Beat 28 22<br />
91 Baby Beat 28 19<br />
92 Downtown Funk 28 17<br />
93 Wahoo Groove 28 18<br />
94 Rap Anthem 33 13<br />
95 Breath Rap 33 14<br />
96 Now Hip Hop 66 16<br />
Jazz Blues<br />
97 BlueEyesBand 12 41<br />
98 OrganSwingMedium 12 42<br />
99 OrganJazzFast 12 43<br />
100 Gold Swing 12 44<br />
101 Swingin' 12 45<br />
102 Cool Big Band 12 46<br />
103 Breezy Swing 14 25<br />
104 Biggest Band 14 24<br />
105 Midnight SlSwing 12 35<br />
106 Big Band Slow 14 18<br />
107 Big Band Medium 14 19<br />
108 Big Band Fast 14 20<br />
109 Swing Medium 12 31<br />
110 Swing Fast 12 32<br />
111 Jz Guitar Swing 12 37<br />
112 Pop Swing 12 38<br />
113 Slow Jz Waltz 17 28<br />
114 Cool Soul 44 30<br />
115 Soul 44 26<br />
116 Sweet Blues 44 1<br />
117 Cool Blues 44 2<br />
118 Over Rockin' 5 56<br />
119 UK Rock'N 5 51<br />
120 Baby Rock'N 10 39<br />
121 Go! Rock'N 5 36<br />
122 Blue Boogie 5 38<br />
123 Rock'N Slow 5 35<br />
Ball Room<br />
124 Gold Wien Waltz 17 55<br />
125 Gold Slow Waltz 17 56<br />
126 It Valzer 17 57<br />
127 Moon Waltz 17 58<br />
128 Alpenwalzer 17 49<br />
129 Polca Disco 19 33<br />
130 It Polca 19 34<br />
131 Paso Doble 40 4<br />
132 Gold Tango 26 17<br />
133 Cool Tango 26 15<br />
No. Name<br />
CC00 CC32<br />
134 It Tango 26 18<br />
135 Mazurca 1 17 40<br />
136 Tarantella Disco 53 7<br />
137 Gold Foxtrot 34 14<br />
138 Gold Jive 7 119<br />
139 Quick Step 69 2<br />
140 It Fox 50 88<br />
141 It Swing Fox 50 89<br />
142 Gold Rhumba 23 13<br />
143 It Beguine 39 27<br />
144 Romantic Beguine 39 26<br />
145 Beguine 39 16<br />
146 Gold Cha Cha 24 17<br />
147 It Mambo 38 14<br />
148 Meneaito 22 38<br />
149 Simple Cumbia 46 4<br />
150 It Hully Gully 22 50<br />
151 Go! Twist 10 30<br />
152 It Bachata 22 49<br />
153 Gold Samba 27 26<br />
154 Gold Bossa 22 47<br />
155 Gold Euro March 20 24<br />
Latin World1<br />
156 Carlos Beat 22 45<br />
157 Orchestr Cha Cha 24 16<br />
158 That's Mambo 38 13<br />
159 Bachata 22 40<br />
160 Go!Salsa 22 43<br />
161 Cuba Salsa 22 42<br />
162 Cool Merengue 22 41<br />
163 Fast Merengue 59 4<br />
164 Orchestral Samba 27 24<br />
165 Acoustic Samba 27 23<br />
166 Brazilian Samba 27 9<br />
167 Sambalegre 27 10<br />
168 Organ Samba 27 25<br />
169 Organ Bossa 22 46<br />
170 Orchestral Bossa 70 2<br />
171 Jazz Bossa 22 44<br />
172 <strong>Club</strong> Bossa 22 16<br />
173 Fast Bossa 22 18<br />
174 AfroPeruana 27 47 (Latin Am.)<br />
175 Andina 27 48 (Latin Am.)<br />
176 ChaChaCha 27 49 (Latin Am.)<br />
177 Chundo 27 50 (Latin Am.)<br />
178 Cumbia Neo 27 51 (Latin Am.)<br />
179 Cumbia Nortena 27 52 (Latin Am.)<br />
180 Cumbia Radio 27 53 (Latin Am.)<br />
181 Cumbia Sonidera 27 54 (Latin Am.)<br />
182 Cumbia Trad 27 55 (Latin Am.)<br />
183 Duranguense 27 56 (Latin Am.)<br />
184 Huaracha 27 57 (Latin Am.)<br />
185 Latin Capital 27 58 (Latin Am.)<br />
186 Latin <strong>Club</strong> 27 59 (Latin Am.)<br />
187 Latin Pop 27 60 (Latin Am.)<br />
188 Mariachi Fies 27 61 (Latin Am.)<br />
189 MariachiTrad 27 62 (Latin Am.)<br />
190 Merengue 27 63 (Latin Am.)<br />
191 Latin Ska 27 64 (Latin Am.)<br />
192 Son Cubano 27 65 (Latin Am.)<br />
193 Son Jarocho 27 66 (Latin Am.)<br />
194 Pop Reggae Br 27 40 (Brazil)<br />
195 Funk Carioca 27 36 (Brazil)<br />
196 MPB Funk 27 38 (Brazil)<br />
197 Sertanejo 27 44 (Brazil)<br />
198 Arrastape 27 27 (Brazil)<br />
199 Guarania 27 37 (Brazil)<br />
200 Pagode 27 39 (Brazil)<br />
201 Samba-Enredo 27 43 (Brazil)<br />
117
Backing <strong>Keyboard</strong> BK-5<br />
Rhythm list<br />
r<br />
No. Name<br />
CC00 CC32<br />
202 Samba 27 41 (Brazil)<br />
203 Chorinho 27 32 (Brazil)<br />
204 Samba-Duro 27 42 (Brazil)<br />
205 Brega 27 30 (Brazil)<br />
206 Arrocha 27 28 (Brazil)<br />
207 Bossa Nova 27 29 (Brazil)<br />
208 Forro 1 27 33 (Brazil)<br />
209 Forro 2 27 34 (Brazil)<br />
210 Forro 3 27 35 (Brazil)<br />
211 Xote 27 46 (Brazil)<br />
212 Vanerao 27 45 (Brazil)<br />
213 Chamame 27 31 (Brazil)<br />
Tradit World2<br />
214 Lazy Reggae 8 6<br />
215 Love Reggae 8 7<br />
216 Reggae 8 8<br />
217 Country Flyer 16 26<br />
218 Pop Gospel 44 33<br />
219 Gospel Shuffle 44 34<br />
220 Ska 67 4<br />
221 Irish 67 3<br />
222 Southern Twang 19 32<br />
223 SteamtrainCountr 16 25<br />
224 Posaunenpolka 19 31<br />
225 Posaunenwalzer 17 50<br />
226 Orchestr Sl Fox 50 84<br />
227 Pop Fox 50 86<br />
228 Fox Band 50 87<br />
229 Oldies 5 33<br />
230 Slow Country 16 20<br />
231 Country Ballad 16 19<br />
232 Country Rock 16 15<br />
233 Country Beat 16 16<br />
234 Country Fox 50 82<br />
235 Country Pop 50 85<br />
236 6_8 March 20 11<br />
237 US March 20 10<br />
238 Country Swing 16 18<br />
239 Orchestral Waltz 17 48<br />
240 HU Beat 16 53 (East Europe)<br />
241 HU Csardas 16 54 (East Europe)<br />
242 HU Disco 16 55 (East Europe)<br />
243 HU Discofox 16 56 (East Europe)<br />
244 HU Latin-pop1 16 57 (East Europe)<br />
245 HU Latin-pop2 16 58 (East Europe)<br />
246 HU Mulatos 16 59 (East Europe)<br />
247 HU Polka 16 60 (East Europe)<br />
248 HU Ragga 16 61 (East Europe)<br />
249 HU Rock & Roll 16 62 (East Europe)<br />
250 HU Roma kv 16 63 (East Europe)<br />
251 HU Twist 16 64 (East Europe)<br />
252 PL Brathanki 16 65 (East Europe)<br />
253 PL Dance Hit 16 66 (East Europe)<br />
254 PL Disco Polka 16 67 (East Europe)<br />
255 PL Dziew 6-8 16 68 (East Europe)<br />
256 PL GroovRock 16 69 (East Europe)<br />
257 PL Laendler 16 70 (East Europe)<br />
258 PL Polka 16 71 (East Europe)<br />
259 PL Swing 16 72 (East Europe)<br />
260 PL Tango 16 73 (East Europe)<br />
261 PL WiosnaDnc 16 74 (East Europe)<br />
262 SRB 7-8 16 75 (East Europe)<br />
263 SRB 9-8 16 76 (East Europe)<br />
264 SRB Dvojka 16 77 (East Europe)<br />
265 SRB Rumba 16 78 (East Europe)<br />
266 SRB Tamburasi 2-4 16 79 (East Europe)<br />
267 Deepchandi 16 33 (India)<br />
268 Filmy Masti 16 34 (India)<br />
269 Garba 16 35 (India)<br />
270 Goa Masti 16 36 (India)<br />
271 Gujrati Pop 16 37 (India)<br />
272 Kaharva 16 38 (India)<br />
273 Lavani Guddu 16 39 (India)<br />
274 Marathi 16 40 (India)<br />
118<br />
No. Name<br />
CC00 CC32<br />
275 Punjabi 16 41 (India)<br />
276 Roopak 16 42 (India)<br />
277 Sam e Gazal 16 43 (India)<br />
278 Sindhi Lada 16 44 (India)<br />
279 South Indian 16 45 (India)<br />
280 South Masti 16 46 (India)<br />
281 Melayu 16 93 (Indonesia)<br />
282 Pop Indonesia 16 94 (Indonesia)<br />
283 DangdutKoplo 16 47 (Indonesia)<br />
284 DangdutStd 16 48 (Indonesia)<br />
285 Kolintang 16 49 (Indonesia)<br />
286 PopKeroncong 16 50 (Indonesia)<br />
287 PopMinang 16 51 (Indonesia)<br />
288 PopSunda 16 52 (Indonesia)<br />
289 ThaiChaCha 16 89 (Thailand)<br />
290 I'SanChaCha 1 16 81 (Thailand)<br />
291 I'SanChaCha 2 16 82 (Thailand)<br />
292 ThaiOffBeat 16 90 (Thailand)<br />
293 Guaracha 16 80 (Thailand)<br />
294 Rumwong 16 84 (Thailand)<br />
295 I'SanRumwong 16 83 (Thailand)<br />
296 Serng 16 85 (Thailand)<br />
297 SlowRumwong 16 86 (Thailand)<br />
298 TaLoong 16 88 (Thailand)<br />
299 SongMai 16 87 (Thailand)<br />
300 Chinese Blue 16 28 (China)<br />
301 Chinese Bossa 16 29 (China)<br />
302 Chinese Jazz Pop 16 30 (China)<br />
303 Chinese Techno 16 31 (China)<br />
304 Chinese Teen Funk 16 32 (China)<br />
305 2RTechno 16 27 (China)<br />
Rhythm division program<br />
change numbers<br />
The following program change<br />
numbers allow you to select the<br />
desired rhythm division via MIDI.<br />
These messages need to be transmitted<br />
on the BK-5’s rhythm<br />
channel (see “Rhythm—Rx Channel”<br />
on p. 108).<br />
If you also need to select a different<br />
rhythm, be sure to insert the<br />
corrseponding CC00 and CC32<br />
bank select values (see “Rhythm<br />
list” on p. 117) before one of the<br />
program changes numbers shown<br />
below.<br />
Rhythm Divisions<br />
PC<br />
Intro1 67<br />
Intro2 68<br />
Intro3 65<br />
Intro4 66<br />
Main 1 01<br />
Main 2 02<br />
Main 3 09<br />
Main 4 10<br />
Fill Down1 89<br />
Fill Down2 100<br />
Fill Down3 90<br />
Fill Up1 97<br />
Fill Up2 99<br />
Fill Up3 98<br />
Ending1 75<br />
Ending2 76<br />
Ending3 73<br />
Ending4 74<br />
E-Series compatibility<br />
Rhythm Divisions<br />
PC<br />
Intro 83<br />
Fill in To Original 82<br />
Fill in To Variation 81<br />
Ending 84<br />
Break Mute 85<br />
Recalling a Performance<br />
memory from the loaded<br />
Performance List via MIDI<br />
The following bank select and program<br />
change messages allow you<br />
to select the desired Performance<br />
memory from the loaded Performance<br />
List. These MIDI messages<br />
must be received on the BK-5’s<br />
Basic channel.<br />
Basic structure<br />
CC00<br />
CC32<br />
PC<br />
122 (Fixed value)<br />
Here is how to calculate which<br />
values to assign to the CC00, CC32<br />
and PC messages:<br />
CC00<br />
CC32<br />
PC<br />
0~7 (Page value)<br />
1~128 (Value)<br />
122 (Fixed)<br />
(Performance memory<br />
number – 1) / 128<br />
For example, to recall Performance<br />
memory number 280, you will<br />
need to transmit:<br />
CC00 122<br />
Performance memory number<br />
– (CC32 x 128)<br />
CC32 (280 – 1) / 128= 2<br />
PC 280 – (2 x 128)= 24<br />
Note: Be aware that the BK-5<br />
transmits its Performance memory<br />
addresses based on the system<br />
shown above.
Backing <strong>Keyboard</strong> BK-5 r<br />
Tone List<br />
19. Tone List<br />
No. Name CC00 CC32 PC<br />
Piano - E.Piano<br />
0001 NaturalPiano 0 4 1<br />
0002 SuperiorPian 47 4 1<br />
0003 ClassicPiano 0 4 2<br />
0004 UprightPiano 1 4 1<br />
0005 Brite Piano 1 4 2<br />
0006 Mild Piano 2 4 1<br />
0007 MonoAcPiano 45 4 1<br />
0008 European Pf 16 4 1<br />
0009 Rock Piano 2 4 2<br />
0010 Piano+String 24 4 1<br />
0011 Piano+Choir 26 4 1<br />
0012 StackedPiano 47 4 3<br />
0013 RD Piano 1 0 4 3<br />
0014 RD Piano 1 w 8 4 3<br />
0015 Dance Piano 80 4 2<br />
0016 Honky-tonk 1 0 4 4<br />
0017 Honky-tonk 2 8 4 4<br />
0018 Vintage EP1 81 4 5<br />
0019 Vintage EP2 82 4 5<br />
0020 Stage 80 4 5<br />
0021 Pro Stage 47 4 5<br />
0022 Phase EP 44 4 5<br />
0023 Tremolo EP 46 4 5<br />
0024 Dist E.Piano 17 4 5<br />
0025 Cho. E.Piano 9 4 5<br />
0026 E.Piano 1 0 4 5<br />
0027 E.Piano 2 0 4 6<br />
0028 FM EPiano1 80 4 6<br />
0029 FM EPiano2 81 4 6<br />
0030 FM+SA EP 16 4 5<br />
0031 St.FM EP 16 4 6<br />
0032 Hard FM EP 24 4 6<br />
0033 EP Legend 10 4 6<br />
0034 EP Phase 32 4 6<br />
0035 St.Soft EP 8 4 5<br />
0036 MIDI EPiano1 1 4 3<br />
0037 MIDI EPiano2 2 4 3<br />
0038 Wurly 24 4 5<br />
0039 Clav. 1 1 4 8<br />
0040 Clav. 2 0 4 8<br />
0041 Phase Clav 17 4 8<br />
0042 JP8000 Clav. 38 4 8<br />
0043 Reso Clav. 16 4 8<br />
0044 Analog Clav. 32 4 8<br />
0045 Harpsichord1 2 4 7<br />
0046 Harpsichord2 24 4 7<br />
0047 Coupled Hps. 8 4 7<br />
0048 Harpsi.w 0 4 7<br />
0049 Vibraphone 0 4 12<br />
0050 Vibraphone w 8 4 12<br />
0051 Pop Vibe. 1 4 12<br />
0052 Marimba w 0 4 13<br />
0053 Xylophone w 0 4 14<br />
0054 Balafon 17 4 13<br />
0055 Balafon SRX 15 5 13<br />
0056 Glockenspiel 0 4 10<br />
0057 Celesta 0 4 9<br />
0058 Pop Celesta 1 4 9<br />
0059 Music Box 1 0 4 11<br />
0060 Music Box 2 1 4 11<br />
0061 Carillon 9 4 15<br />
0062 Tubular-bell 0 4 15<br />
0063 Church Bell 8 4 15<br />
Organ - Accord<br />
0064 B3 Sermon 12 4 17<br />
0065 Blues Perc 80 4 18<br />
0066 All Skate! 82 4 18<br />
0067 R&B B3 83 4 18<br />
0068 HeavyTraffic 81 4 19<br />
No. Name CC00 CC32 PC<br />
0069 Stevie's B3 82 4 17<br />
0070 Dyno Rotary 82 4 19<br />
0071 Hang Twice 85 4 18<br />
0072 Felix Ballad 84 4 18<br />
0073 XV Organ 80 4 19<br />
0074 B3 Has Come 88 4 18<br />
0075 Head Up B3 80 4 17<br />
0076 Br.Ballad B3 81 4 17<br />
0077 Organ 1 0 4 17<br />
0078 Organ 2 0 4 18<br />
0079 Organ 3 0 4 19<br />
0080 Ful Organ 1 2 4 17<br />
0081 Ful Organ 2 3 4 17<br />
0082 Ful Organ 3 4 4 17<br />
0083 Ful Organ 4 10 4 17<br />
0084 Church Org.1 0 4 20<br />
0085 Church Org.2 8 4 20<br />
0086 Church Org.3 16 4 20<br />
0087 Organ Flute 24 4 20<br />
0088 Theater Org. 33 4 20<br />
0089 Reed Organ 0 4 21<br />
0090 60's Organ 16 4 17<br />
0091 Org Jazz1 /9 83 4 19<br />
0092 Jazz Organ 1 1 4 18<br />
0093 Jazz Organ 2 3 4 18<br />
0094 Jazz Organ 3 4 4 18<br />
0095 Jazz Organ 4 5 4 18<br />
0096 JazzOrgan RD 81 4 18<br />
0097 Perc.Organ 1 32 4 18<br />
0098 Perc.Organ 2 33 4 18<br />
0099 Perc.Organ 3 34 4 18<br />
0100 Full Perc 87 4 18<br />
0101 Fire Perc 86 4 18<br />
0102 Rock Organ 17 4 19<br />
0103 Rotary Org.S 16 4 19<br />
0104 Rotary Org.F 24 4 19<br />
0105 Rotary Organ 8 4 19<br />
0106 L-Organ 47 4 19<br />
0107 Chorus Or 8 4 18<br />
0108 Mellow 1 83 4 17<br />
0109 Cheese Organ 24 4 17<br />
0110 Organ 101 1 4 17<br />
0111 JX8 Organ 30 4 17<br />
0112 D-50 Organ 25 4 17<br />
0113 VS Organ 28 4 17<br />
0114 Trem. Organ 8 4 17<br />
0115 E.Organ 16+2 2 4 18<br />
0116 Organ Bass 40 4 17<br />
0117 Puff Organ 16 4 21<br />
0118 Hybrid Organ 27 4 17<br />
0119 70's E.Organ 32 4 17<br />
0120 Farf Organ 19 4 17<br />
0121 Mellow Harm 0 4 23<br />
0122 Hand Harm. 51 4 23<br />
0123 B.Harp Basic 8 4 23<br />
0124 B.Harp Suppl 9 4 23<br />
0125 Acc. Master 69 4 22<br />
0126 Acc. Classic 68 4 22<br />
0127 Italian Folk 52 4 22<br />
0128 Fr. Musette 53 4 22<br />
0129 Steierische 54 4 22<br />
0130 Bandoneon 1 8 4 24<br />
0131 Bandoneon 2 0 4 24<br />
0132 Bandoneon 3 52 4 24<br />
0133 Soft Accord 25 4 22<br />
0134 Accordion Fr 64 4 22<br />
0135 Accordion It 8 4 22<br />
0136 OrganAcc 12 2 22<br />
0137 OboeAcc 13 2 22<br />
0138 ViolinAcc 14 2 22<br />
No. Name CC00 CC32 PC<br />
0139 It Musette 15 2 22<br />
0140 AccR16 16 2 22<br />
0141 AccR8 17 2 22<br />
0142 AccR8S 18 2 22<br />
0143 AccR4 19 2 22<br />
E.Guitar - Bass<br />
0144 Warm Drive 65 4 30<br />
0145 Clean Solid 69 4 28<br />
0146 Clean Elect. 64 4 28<br />
0147 Clean El Oct 65 4 28<br />
0148 Clean Gt. 0 4 28<br />
0149 Clean Mute 67 4 29<br />
0150 Dynamic Mute 66 4 28<br />
0151 Jazz Guitar1 62 4 27<br />
0152 Jazz Guitar2 80 4 27<br />
0153 Jazz Gt. 0 4 27<br />
0154 PedalSteel 8 4 27<br />
0155 Mellow Gt. 1 4 27<br />
0156 JC ChrusGt 9 4 28<br />
0157 JC CleanGt 4 4 28<br />
0158 Chorus Gt 8 4 28<br />
0159 Distortion 64 4 31<br />
0160 Distort Gt1 3 4 31<br />
0161 Distort Gt2 1 4 31<br />
0162 Distort Gt3 0 4 31<br />
0163 Dist. Mute 64 4 29<br />
0164 Muted Over 68 4 29<br />
0165 Muted Gt. 1 0 4 29<br />
0166 Muted Gt. 2 65 4 29<br />
0167 Muted Gt. 3 66 4 29<br />
0168 LP OverDrv 9 4 30<br />
0169 RockRhythm1 24 4 31<br />
0170 RockRhythm2 25 4 31<br />
0171 TC MutedGt 2 4 29<br />
0172 TC Clean 19 4 28<br />
0173 JGuitar Scat 81 4 27<br />
0174 Power Gt.1 16 4 31<br />
0175 Power Gt.2 65 4 31<br />
0176 Power Gt.3 66 4 31<br />
0177 Dist Rtm GTR 26 4 31<br />
0178 LP HalfDrv2 11 4 30<br />
0179 Mid Tone GTR 23 4 28<br />
0180 LP RearAtk 22 4 28<br />
0181 Clean Half 1 4 28<br />
0182 OpenHard 1 2 4 28<br />
0183 OpenHard 2 3 4 28<br />
0184 TC RearPk 17 4 28<br />
0185 TC Cln ff 18 4 28<br />
0186 AtkCleanGt 5 4 28<br />
0187 Funk Pop 8 4 29<br />
0188 LP Rear 21 4 28<br />
0189 Overdrv Gt 0 4 30<br />
0190 Overdrive1 1 4 30<br />
0191 Overdrive2 2 4 30<br />
0192 Overdrive3 64 4 30<br />
0193 More Drive 3 4 30<br />
0194 Dance Dst.Gt 11 4 85<br />
0195 Dist.Fast 4 4 31<br />
0196 Dazed Gtr 2 4 31<br />
0197 Attack Dist 5 4 31<br />
0198 LP Rear Pk 20 4 28<br />
0199 LP HalfDrv 10 4 30<br />
0200 LP Chorus 12 4 30<br />
0201 TCFrntPick 16 4 28<br />
0202 Funk Gt. 16 4 29<br />
0203 Gt.Feedback1 8 4 31<br />
0204 Gt.Feedback2 9 4 32<br />
0205 Gt.Harmonics 0 4 32<br />
0206 Gt.Cut Noise 1 4 121<br />
0207 Pick Scrape 6 4 121<br />
119
Backing <strong>Keyboard</strong> BK-5<br />
Tone List<br />
r<br />
No. Name CC00 CC32 PC<br />
0208 Ulti Ac Bass 0 4 33<br />
0209 XV Ac.Bass 9 4 33<br />
0210 AcBass 1 45 4 33<br />
0211 AcBass 2 46 4 33<br />
0212 AcBass 3 47 4 33<br />
0213 Rockabilly 1 4 33<br />
0214 XV Bass+Ride 16 4 33<br />
0215 AcousticBs 49 4 33<br />
0216 Wild Ac.Bs 8 4 33<br />
0217 TamBaStp 5 2 33<br />
0218 Guitaron 48 4 33<br />
0219 Chung Ruan 24 4 28<br />
0220 Fingered Bs. 0 4 34<br />
0221 AttackFinger 6 4 34<br />
0222 5String Bs 83 4 33<br />
0223 X 5String Bs2 83 2 33<br />
0224 Jazz Bass 1 2 4 34<br />
0225 Jazz Bass 2 3 4 34<br />
0226 Rock Bass 4 4 34<br />
0227 Heart Bass 5 4 34<br />
0228 Baby Bass 48 4 34<br />
0229 Double Pick 4 4 35<br />
0230 Picked Bass 0 4 35<br />
0231 Picked Bass2 1 4 35<br />
0232 Picked Bass3 2 4 35<br />
0233 Picked Bass4 3 4 35<br />
0234 Fretless Bs1 0 4 36<br />
0235 Fretless Bs2 1 4 36<br />
0236 Fretless Bs3 2 4 36<br />
0237 Fretless Bs4 3 4 36<br />
0238 Wood+FlessBs 8 4 36<br />
0239 Smooth Bass 19 4 40<br />
0240 Mr.Smooth 5 4 36<br />
0241 Mild Bass 37 4 40<br />
0242 Mute Bass 84 4 33<br />
0243 Muted PickBs 8 4 35<br />
0244 Nu Slap Bs 80 2 37<br />
0245 Finger Slap 1 4 34<br />
0246 Slap Pop 1 4 37<br />
0247 Slap Bass 1 0 4 38<br />
0248 Slap Bass 2 1 4 38<br />
0249 Beef FM Bass 8 4 40<br />
0250 WireStr Bass 11 4 40<br />
0251 X Wire Bass 10 4 40<br />
0252 Drum'n'Bass 82 4 39<br />
0253 RubberBass 1 13 4 40<br />
0254 RubberBass 2 16 4 40<br />
0255 Synth Bass 2 0 4 40<br />
0256 Reso Slap 8 4 37<br />
0257 Bass Invader 80 4 40<br />
0258 TB Saw Bass 81 4 39<br />
0259 MG Bass 4 4 40<br />
0260 Modular Bass 2 4 40<br />
0261 Seq Bass 1 3 4 40<br />
0262 SynthBass201 1 4 40<br />
0263 u/i/e/o V/Sw 84 4 40<br />
0264 VocoBass 83 4 40<br />
0265 Raver Bass 1 81 4 40<br />
0266 Raver Bass 2 82 4 40<br />
0267 MG Blip Bs 7 4 40<br />
0268 SH-101 Bass 80 2 39<br />
0269 SH101 Bass 1 17 4 40<br />
0270 SH101 Bass 2 18 4 40<br />
0271 SH101 Bass 3 20 4 40<br />
0272 SH101 Bass 4 47 4 40<br />
0273 JP-8 Bass 4 4 39<br />
0274 MG Oct Bass2 6 4 40<br />
0275 Bs+DistGT 40 119 34<br />
0276 RND Bass 26 4 40<br />
0277 Bubble Bass 28 4 40<br />
0278 Sync Bass 1 24 4 40<br />
0279 Spike Bass 21 4 40<br />
0280 Pulse Mix Bs 31 4 40<br />
0281 Seq Bass 2 33 4 40<br />
0282 3rd Bass 34 4 40<br />
120<br />
No. Name CC00 CC32 PC<br />
0283 MG Oct Bass1 35 4 40<br />
0284 MG LightBass 39 4 40<br />
0285 DistSynBass 40 4 40<br />
0286 DistEnvBass 38 4 40<br />
0287 LightSynBass 45 4 40<br />
0288 PopSynthBass 46 4 40<br />
0289 Sync Bass 2 30 4 40<br />
0290 TeeBee V/Sw 44 4 39<br />
0291 Odd Bass 15 4 40<br />
0292 303Sqr.Rev 43 4 39<br />
0293 Bassic Needs 83 4 39<br />
0294 SynthBass101 1 4 39<br />
0295 Synth Bass 1 0 4 39<br />
0296 JP-4 Bass 3 4 39<br />
0297 CS Bass 2 4 39<br />
0298 Tekno Bass 10 4 39<br />
0299 Echo SynBass 7 4 103<br />
0300 Reso SH Bass 16 4 39<br />
0301 Rubber303 Bs 14 4 39<br />
0302 TB303 Bass 9 4 39<br />
0303 TB303 DistBs 18 4 39<br />
0304 TB303 Sqr Bs 17 4 39<br />
0305 Clavi Bass 19 4 39<br />
0306 Jungle Bass 21 4 39<br />
0307 Square Bass 22 4 39<br />
0308 Arpeggio Bs 24 4 39<br />
0309 AtkSineBass 34 4 39<br />
0310 OB sine Bass 35 4 39<br />
0311 303SqDistBs 41 4 39<br />
0312 E.Bass Harm. 24 4 32<br />
0313 String Slap 2 4 121<br />
0314 Bass Slide1 5 4 121<br />
0315 Bass Slide 47 4 121<br />
0316 DoubleSlide 48 4 121<br />
A.Guitar<br />
0317 Nylon Gt.o 16 4 25<br />
0318 Nylon Gt.1 64 4 25<br />
0319 Nylon Gt.2 32 4 25<br />
0320 Nylon-str.Gt 0 4 25<br />
0321 Nylon Harp 2 4 100<br />
0322 Steel.Gt1 52 4 26<br />
0323 Steel.Gt2 64 4 26<br />
0324 Steel.Gt3 65 4 26<br />
0325 Steel.Gt5 70 4 26<br />
0326 Steel.Gt4 69 4 26<br />
0327 Steel.Gt6 32 4 26<br />
0328 Steel-str.Gt 0 4 26<br />
0329 Steel + Body 33 4 26<br />
0330 Ac.Guitar1 48 4 26<br />
0331 Ac.Guitar2 49 4 26<br />
0332 Ac.Guitar3 50 4 26<br />
0333 2_Guitars 66 4 26<br />
0334 12 Strings 8 4 26<br />
0335 Nylon+Steel1 9 4 26<br />
0336 Nylon+Steel2 67 4 26<br />
0337 Mandolin 24 4 26<br />
0338 Mandolin Tr. 26 4 26<br />
0339 MandolinTrem 18 4 26<br />
0340 Requint Gt.1 40 4 25<br />
0341 Requint Gt.2 52 4 25<br />
0342 Fl.Gtr 1 48 4 25<br />
0343 Fl.Gtr 2 49 4 25<br />
0344 Fl.GtrRoll 51 4 25<br />
0345 Nylon+Steel3 68 4 26<br />
0346 Ukulele 8 4 25<br />
0347 Velo Harmnix 24 4 25<br />
0348 Atk Steel Gt 10 4 26<br />
0349 TamCoStp 50 2 25<br />
0350 TamCoTrl 51 2 25<br />
0351 TamBPStp 52 2 25<br />
0352 TamBPTrl 53 2 25<br />
0353 TamPrTrl 54 2 25<br />
0354 TamORTrl 55 2 25<br />
0355 TamORBTr 56 2 25<br />
0356 Cavaquinho 0 5 25<br />
No. Name CC00 CC32 PC<br />
0357 Ac.Gtr.Hrm 51 4 26<br />
0358 Ac.Gt.Harmnx 16 4 32<br />
0359 Gt.FretNoise 0 4 121<br />
Strings - Vocal<br />
0360 St.Strings 1 16 4 49<br />
0361 St.Strings 2 17 4 49<br />
0362 St.Strings 3 18 4 49<br />
0363 Strings 11 5 49<br />
0364 Strings 1 0 4 49<br />
0365 String Ens 12 5 49<br />
0366 ChamberStr 2 4 49<br />
0367 Velo Strings 24 4 49<br />
0368 Mild Strings 7 4 49<br />
0369 Trem Str.St. 0 4 45<br />
0370 StringsSpic. 17 4 46<br />
0371 SuspenseStr 9 4 45<br />
0372 St.Slow Str1 10 4 50<br />
0373 St.Slow Str2 11 4 50<br />
0374 Slow Strings 10 5 49<br />
0375 SlowStrings1 0 4 50<br />
0376 SlowStrings2 1 4 50<br />
0377 SlowStrings3 2 4 50<br />
0378 Slow Tremolo 8 4 45<br />
0379 StraightStr. 10 4 52<br />
0380 Warm Strings 9 4 50<br />
0381 Legato Str. 8 4 50<br />
0382 Bright Str.1 1 4 49<br />
0383 Bright Str.2 4 4 49<br />
0384 Bright Str.3 5 4 49<br />
0385 Orchestra 1 9 4 49<br />
0386 Orchestra 2 8 4 49<br />
0387 Orchestra 3 20 4 49<br />
0388 FilteredOrch 3 4 52<br />
0389 Tremolo Orch 10 4 49<br />
0390 Film Octaves 7 5 49<br />
0391 Oct Strings1 32 4 49<br />
0392 Oct Strings2 33 4 49<br />
0393 Marcato 8 5 49<br />
0394 St.Pizzicato 3 4 46<br />
0395 Solo Pizz. 8 4 46<br />
0396 PizzicatoStr 0 4 46<br />
0397 Vcs&Cbs Pizz 1 4 46<br />
0398 X Violin 80 4 41<br />
0399 Folk Violin 16 2 41<br />
0400 FolkViolinVb 17 2 41<br />
0401 Violin Atk 1 4 41<br />
0402 ViolnSoloSRX 0 5 41<br />
0403 Slow Violin 8 4 41<br />
0404 Solo Spic. 16 4 46<br />
0405 Viola 0 4 42<br />
0406 Cello 0 4 43<br />
0407 Cello sect. 3 4 49<br />
0408 Cello Attack 1 4 43<br />
0409 Contrabass 0 4 44<br />
0410 ContraBsSect 34 4 49<br />
0411 Harp 0 4 47<br />
0412 Harp St. 2 4 47<br />
0413 Uillean Harp 8 4 47<br />
0414 Synth Harp 16 4 47<br />
0415 Harp&Strings 1 4 47<br />
0416 Timpani 0 4 48<br />
0417 Str.+Flute 13 4 49<br />
0418 Strings+Horn 12 4 49<br />
0419 S.Str+Choir 12 4 50<br />
0420 JP8 Strings1 81 4 51<br />
0421 JP8 Strings2 80 4 51<br />
0422 JP Strings 3 4 51<br />
0423 JP Strings 1 61 2 51<br />
0424 JP Saw Str. 4 4 52<br />
0425 Syn.Strings1 0 4 51<br />
0426 Syn.Strings2 0 4 52<br />
0427 Syn.Strings3 8 4 51<br />
0428 Syn.Strings4 9 4 51<br />
0429 Syn.Strings5 10 4 51<br />
0430 OB Strings 1 4 51
Backing <strong>Keyboard</strong> BK-5 r<br />
Tone List<br />
No. Name CC00 CC32 PC<br />
0431 Air Strings 8 4 52<br />
0432 JUNO Strings 2 4 52<br />
0433 60s Strings 40 4 49<br />
0434 High Strings 16 4 51<br />
0435 Tron Strings 24 4 51<br />
0436 Noiz Strings 25 4 51<br />
0437 DistStrings 6 4 52<br />
0438 Strings Hit 24 4 56<br />
0439 OrchestraHit 0 4 56<br />
0440 Double Hit 10 4 56<br />
0441 Choir Str. 11 4 49<br />
0442 Syn Vox Pad 0 4 55<br />
0443 Fem Mm Srt 82 4 54<br />
0444 Rich Choir 1 14 4 53<br />
0445 St.ChoirAahs 8 4 53<br />
0446 Jazz Scat 6 4 54<br />
0447 Choir Aahs 0 4 53<br />
0448 Melted Chr 33 4 53<br />
0449 ChorusLahs 24 4 53<br />
0450 ChorusAahs 32 4 53<br />
0451 Voice Oohs 48 4 54<br />
0452 Choir Hahs 16 4 53<br />
0453 St.BoysChoir 13 4 53<br />
0454 VoiceAah Mal 36 4 54<br />
0455 Humming 40 4 54<br />
0456 Silent Night 9 4 55<br />
0457 Melted Choir 9 4 53<br />
0458 JzVoiceBap 10 4 54<br />
0459 JzVoiceDow 11 4 54<br />
0460 Voice Dahs 8 4 54<br />
0461 JzVox Thum 12 4 54<br />
0462 JzVoiceDat 9 4 54<br />
0463 SynVox 1 4 55<br />
0464 JX8P Vox 18 4 55<br />
0465 Syn.Voice 1 8 4 55<br />
0466 Syn.Voice 2 10 4 55<br />
0467 VP330 Choir 16 4 55<br />
0468 LFO Vox 9 4 86<br />
0469 Solo Vox 0 4 86<br />
0470 Chorus Oohs2 3 4 54<br />
0471 Chorus Oohs1 0 4 54<br />
0472 VoiceLah Fem 16 4 54<br />
0473 ChorusLahFem 17 4 54<br />
0474 ChorusLuhFem 19 4 54<br />
0475 VoiceUuh Fem 23 4 54<br />
0476 Fem Lah&Lan 24 4 54<br />
Sax - Brass<br />
0477 Tenor Sax 0 4 67<br />
0478 Blowed Tenor 46 4 67<br />
0479 St.Tenor Sax 9 4 67<br />
0480 Latin Tenor 44 4 67<br />
0481 Super Tenor 47 4 67<br />
0482 TenorSaxFst 50 4 67<br />
0483 Tenor Sax 1 45 4 67<br />
0484 BreathyTn. 8 4 67<br />
0485 BlowAltoVib 50 4 66<br />
0486 Folk A.Sax 17 2 66<br />
0487 Folk A.SaxVb 18 2 66<br />
0488 FolkAlto 51 4 66<br />
0489 AltoSax Soft 46 4 66<br />
0490 AltoSax Exp. 8 4 66<br />
0491 Alto Sax 0 4 66<br />
0492 Baritone Sax 0 4 68<br />
0493 Bari & Tenor 8 4 68<br />
0494 Grow Sax 9 4 66<br />
0495 Soprano Exp. 8 4 65<br />
0496 Soprano Sax2 0 4 65<br />
0497 Sax Section 17 4 66<br />
0498 AltoSax + Tp 16 4 66<br />
0499 ORSaxVib 2 2 66<br />
0500 ORSaxTrl 3 2 66<br />
0501 Ac.Brass 80 4 62<br />
0502 Brass Sforz. 81 4 62<br />
0503 Brass sfz 1 10 4 62<br />
0504 Brass sfz 2 12 4 62<br />
No. Name CC00 CC32 PC<br />
0505 St. Brass ff 3 4 62<br />
0506 Africa Brass 80 4 64<br />
0507 St.Orch Brs1 36 4 62<br />
0508 Octave Brass 24 4 62<br />
0509 FatPop Brass 14 4 62<br />
0510 2Tps+Tb 43 4 62<br />
0511 2Tps+Tb+Sax 44 4 62<br />
0512 Fat + Reed 26 4 62<br />
0513 Warm Brass 2 4 64<br />
0514 Orch Brass 33 4 62<br />
0515 St.Orch Brs2 38 4 62<br />
0516 Brass + Reed 25 4 62<br />
0517 Brass 1 0 4 62<br />
0518 Brass 2 8 4 62<br />
0519 Brass 3 9 4 62<br />
0520 SC Brt Brass 1 5 62<br />
0521 Bones Sect. 2 4 62<br />
0522 Quad Brass1 4 4 62<br />
0523 Quad Brass2 5 4 62<br />
0524 Henry IV 47 4 64<br />
0525 Brass Fall 16 4 62<br />
0526 Switch Fall 0 5 62<br />
0527 Jump Brass 5 4 63<br />
0528 MG Brass fst 81 4 64<br />
0529 MKS Brass 4 4 63<br />
0530 JUNO Brass 1 4 63<br />
0531 Fat SynBrass 5 4 64<br />
0532 Poly Brass 80 4 63<br />
0533 PowerBrass 47 4 62<br />
0534 Synth Brass 0 4 63<br />
0535 Pro Brass 8 4 63<br />
0536 P5 Brass 0 4 64<br />
0537 Sync Brass 4 4 64<br />
0538 Oct SynBrass 16 4 63<br />
0539 SH-5 Brass 3 4 63<br />
0540 OB Brass 9 4 64<br />
0541 Velo Brass 1 16 4 64<br />
0542 DeepSynBrass 6 4 64<br />
0543 Tuba 1 0 4 59<br />
0544 Tuba 2 1 4 59<br />
0545 Tuba 3 47 4 59<br />
0546 Polka Tuba 46 4 59<br />
0547 Folk Tuba 45 4 59<br />
0548 Tuba + Horn 8 4 59<br />
0549 Euphonium 16 4 58<br />
0550 French Horns 0 4 61<br />
0551 Fr.Horn 1 4 61<br />
0552 Wide FreHrns 3 4 61<br />
0553 F.Hrn Slow 8 4 61<br />
0554 Horn + Orche 2 4 61<br />
0555 Trombone 1 0 4 58<br />
0556 Trombone 2 1 4 58<br />
0557 Bright Tb 4 4 58<br />
0558 V Twin bones 2 4 58<br />
0559 Bs.Trombone 8 4 58<br />
0560 Dual Horns 9 4 61<br />
0561 F.Horn Rip 24 4 61<br />
0562 SoaringHorns 46 4 64<br />
0563 Truba 8 2 58<br />
0564 TrubaStp 9 2 58<br />
0565 Trumpet 0 4 57<br />
0566 Trumpet2 48 4 57<br />
0567 Rom/Mar Tp 51 4 57<br />
0568 FolkTrumpVb 18 2 57<br />
0569 MariachiTp 50 4 57<br />
0570 Bright Tp. 24 4 57<br />
0571 Romantc Tp 49 4 57<br />
0572 Tp Mar/Shk 52 4 57<br />
0573 Trumpet & Nz 4 4 57<br />
0574 Warm Tp.1 25 4 57<br />
0575 Dark Trumpet 3 4 57<br />
0576 Tp Shake 53 4 57<br />
0577 Atk Trumpet 47 4 57<br />
0578 FolkTrumpet 1 4 57<br />
0579 Twin Tp. 27 4 57<br />
No. Name CC00 CC32 PC<br />
0580 Warm Tp.2 26 4 57<br />
0581 TrumpetFall2 17 4 62<br />
0582 Muted Tp 1 48 4 60<br />
0583 Muted Tp 2 49 4 60<br />
0584 MuteTrumpet1 0 4 60<br />
0585 MuteTrumpet2 2 4 60<br />
0586 MuteTrumpet3 3 4 60<br />
0587 Muted Horns 8 4 60<br />
0588 FlugelHorn 8 4 57<br />
0589 FluteVibAtk 52 4 74<br />
0590 FlTraverso 3 4 74<br />
0591 Flute Exp 2 4 74<br />
0592 Flute 1 0 4 74<br />
0593 Flute 2 1 4 74<br />
0594 Piccolo 1 0 4 73<br />
0595 JazzClariVib 50 4 72<br />
0596 FolkClarinet 51 4 72<br />
0597 FolkClarinVb 17 2 72<br />
0598 Folk Clarin 16 2 72<br />
0599 SoftClarinet 52 4 72<br />
0600 Clarinet 0 4 72<br />
0601 Bs Clarinet 8 4 72<br />
0602 Oboe 0 4 69<br />
0603 Oboe Exp. 8 4 69<br />
0604 <strong>English</strong> Horn 0 4 70<br />
0605 Bassoon 0 4 71<br />
0606 BottleBlow1 0 4 77<br />
0607 BottleBlow2 47 4 77<br />
0608 The Bottle 46 4 77<br />
0609 Pan Flute1 0 4 76<br />
0610 Pan Flute2 47 4 76<br />
0611 Whistle 1 0 4 79<br />
0612 Whistle 2 1 4 79<br />
0613 TinWhistle2 46 4 76<br />
0614 Multi Wind 16 4 72<br />
0615 Quad Wind 17 4 72<br />
0616 Recorder 0 4 75<br />
0617 Ocarina 0 4 80<br />
0618 Pipe & Reed 9 4 74<br />
Synth<br />
0619 Big Lead 4 4 82<br />
0620 OB Saw 26 4 82<br />
0621 LM Square 6 4 81<br />
0622 CC Solo 4 4 81<br />
0623 Twin Sine 11 4 81<br />
0624 Dual Sqr&Saw 23 4 81<br />
0625 Velo Lead 5 4 82<br />
0626 MG Square 1 4 81<br />
0627 Hollow Mini 2 4 81<br />
0628 Phenomena 80 4 87<br />
0629 Saw Wave 0 4 82<br />
0630 Unison Saws 46 4 91<br />
0631 Poly Saws 83 4 91<br />
0632 SuperSaws 47 4 91<br />
0633 Poly Key 82 4 91<br />
0634 80's PolySyn 1 4 91<br />
0635 Super Poly 4 4 91<br />
0636 Polysynth 1 0 4 91<br />
0637 Polysynth 2 2 4 91<br />
0638 OB Stab 2 4 101<br />
0639 Unison SawLd 7 4 84<br />
0640 MG SawLead 2 39 4 82<br />
0641 TB Lead 1 4 84<br />
0642 Fat GR Lead 3 4 85<br />
0643 D-50 Fantasy 43 4 89<br />
0644 Atmosphere 0 4 100<br />
0645 Ice Rain 0 4 97<br />
0646 Syn.Calliope 0 4 83<br />
0647 Big & Raw 1 4 88<br />
0648 P5 Sync Lead 16 4 85<br />
0649 Acid Guitar 10 4 85<br />
0650 D-50 Fat Saw 11 4 82<br />
0651 Euro-Dance 2 81 4 88<br />
0652 OB DoubleSaw 12 4 82<br />
0653 Rock Lead 18 4 85<br />
121
Backing <strong>Keyboard</strong> BK-5<br />
Tone List<br />
r<br />
No. Name CC00 CC32 PC<br />
0654 Techno Saw 47 4 82<br />
0655 JP DoubleSaw 13 4 82<br />
0656 JP SuperSaw 15 4 82<br />
0657 CS Saw 30 4 82<br />
0658 MG Saw Lead 31 4 82<br />
0659 Oct Saw Lead 35 4 82<br />
0660 Chiffer Lead 0 4 84<br />
0661 LM Pure Lead 8 4 83<br />
0662 JUNO Rave 3 4 88<br />
0663 LA Brass Ld 22 4 85<br />
0664 Big Fives 1 4 87<br />
0665 SequenceSaw3 46 4 82<br />
0666 Euro-Dance 1 80 4 88<br />
0667 Crispy Lead 84 4 88<br />
0668 LM Blow Lead 9 4 83<br />
0669 Xpressive 83 4 88<br />
0670 Raver Blade 82 4 88<br />
0671 Square Wave 0 4 81<br />
0672 Mellow FM 3 4 81<br />
0673 Shmoog 5 4 81<br />
0674 2600 Sine 8 4 81<br />
0675 KG Lead 10 4 81<br />
0676 OB Square 17 4 81<br />
0677 JP-8 Square 18 4 81<br />
0678 Dist Square 19 4 81<br />
0679 303SquarDst1 20 4 81<br />
0680 303SquarDst2 21 4 81<br />
0681 Pulse Lead 24 4 81<br />
0682 JP8 PulseLd1 26 4 81<br />
0683 JP8 PulseLd2 28 4 81<br />
0684 260RingLead 29 4 81<br />
0685 303DistLead 30 4 81<br />
0686 JP8000DistLd 31 4 81<br />
0687 HipHop Sq 33 4 81<br />
0688 Flux Pulse 35 4 81<br />
0689 Panning Lead 10 4 103<br />
0690 Pulse Saw 2 4 82<br />
0691 GR-300 Saw 6 4 82<br />
0692 LA Saw 7 4 82<br />
0693 Doctor Solo 8 4 82<br />
0694 Fat Saw Lead 9 4 82<br />
0695 FatSawLead 14 4 82<br />
0696 Waspy Synth 16 4 82<br />
0697 PM Lead 17 4 82<br />
0698 MG Saw 24 4 82<br />
0699 P5 Saw Lead 33 4 82<br />
0700 Natural Lead 36 4 82<br />
0701 Synchronized 38 4 82<br />
0702 SequenceSaw1 40 4 82<br />
0703 SequenceSaw2 41 4 82<br />
0704 Octave Stack 9 4 91<br />
0705 Reso Saw 42 4 82<br />
0706 Cheese Saw 43 4 82<br />
0707 FatSolo Lead 4 4 84<br />
0708 ForcefulLead 5 4 84<br />
0709 Oct.UnisonLd 6 4 84<br />
0710 Mad Lead 8 4 84<br />
0711 CrowdingLead 9 4 84<br />
0712 Space Org X 81 4 87<br />
0713 Double Sqr. 10 4 84<br />
0714 Chord maj7th 82 4 87<br />
0715 PureFlatLead 47 4 84<br />
0716 Short Chord 83 4 87<br />
0717 Charang 0 4 85<br />
0718 Wire Lead 1 4 85<br />
0719 FB.Charang 2 4 85<br />
0720 Mellow GR Ld 5 4 85<br />
0721 Fat SyncLead 17 4 85<br />
0722 5th DecaSync 19 4 85<br />
0723 Dirty Sync 20 4 85<br />
0724 DualSyncLead 21 4 85<br />
0725 5th Saw Wave 0 4 87<br />
0726 5th Lead 2 4 87<br />
0727 JP 5th Saw 5 4 87<br />
0728 JP8000 5thFB 6 4 87<br />
122<br />
No. Name CC00 CC32 PC<br />
0729 Bass & Lead 0 4 88<br />
0730 Fat & Perky 2 4 88<br />
0731 Delayed Lead 7 4 88<br />
0732 Pulse Wave 1 80 2 82<br />
0733 Pulse Wave 2 81 2 82<br />
0734 80'sTechLead 82 2 82<br />
0735 HollowReleas 4 4 100<br />
Pad - Ethnic<br />
0736 Warm Pad 0 4 90<br />
0737 LA Warm Pad 82 4 90<br />
0738 Attack! Pad 83 4 90<br />
0739 Human Pad 10 4 90<br />
0740 Thick Matrix 1 4 90<br />
0741 Sine Pad 5 4 90<br />
0742 JP Soft Pad 13 4 90<br />
0743 Stacked Pad 45 4 90<br />
0744 Warm JP STR 47 4 90<br />
0745 Warm Squ Pad 46 4 92<br />
0746 JP8 Hollow 44 4 92<br />
0747 Square Pad 45 4 92<br />
0748 Pad With 81 4 90<br />
0749 OB Soft Pad 6 4 90<br />
0750 Oct.PWM Pad 12 4 90<br />
0751 PWM Soft Pad 43 4 90<br />
0752 JP8 Sqr Pad 2 4 93<br />
0753 SoftBellPad 1 4 93<br />
0754 Warm Voices 82 4 95<br />
0755 Vox Pad 83 4 95<br />
0756 Octave Pad 8 4 90<br />
0757 Sync Brs.Pad 11 4 90<br />
0758 Silky Pad 2 11 4 104<br />
0759 Ambient Pad 6 4 100<br />
0760 Harpvox 3 4 100<br />
0761 Itopia 3 4 92<br />
0762 Holy Voices 12 4 92<br />
0763 Vox Sweep 2 4 95<br />
0764 SC Heaven 2 4 92<br />
0765 Tears Voices 12 4 95<br />
0766 Space Voice 0 4 92<br />
0767 Heaven II 1 4 92<br />
0768 EP Heaven 44 4 89<br />
0769 Bell Heaven 3 4 89<br />
0770 Water Space 4 4 92<br />
0771 Cosmic Voice 8 4 92<br />
0772 Vocorderman 11 4 92<br />
0773 Horror Pad 8 4 95<br />
0774 Breath&Rise 11 4 95<br />
0775 X-hale 81 4 95<br />
0776 Soundtrack 0 4 98<br />
0777 JP8Haunting 43 4 92<br />
0778 Metal Pad 0 4 94<br />
0779 Silky Pad 1 9 4 104<br />
0780 Echo Pan 1 2 4 103<br />
0781 Brightness 0 4 101<br />
0782 New Age Pad 2 4 89<br />
0783 LowBirds Pad 8 4 102<br />
0784 D-50 Retour 5 4 101<br />
0785 Fantasia 1 0 4 89<br />
0786 Fantasia 2 1 4 89<br />
0787 Fantasia 3 4 4 89<br />
0788 Fantasia 4 5 4 89<br />
0789 Music Bell 10 4 99<br />
0790 Big Panner 4 4 103<br />
0791 Reso Panner 5 4 103<br />
0792 Big Blue 29 4 102<br />
0793 Vibra Bells 8 4 99<br />
0794 Goblin 0 4 102<br />
0795 7th Atmos. 17 4 104<br />
0796 D-Mention 80 4 95<br />
0797 EP Pad 9 4 97<br />
0798 CP Pad 11 4 97<br />
0799 Panner Pad 2 4 94<br />
0800 Bowed Glass 0 4 93<br />
0801 Special Rave 4 4 94<br />
0802 Star Dust 3 4 104<br />
No. Name CC00 CC32 PC<br />
0803 Mystic Pad 6 4 104<br />
0804 Echo Drops 0 4 103<br />
0805 Rotary Strng 3 4 90<br />
0806 Stack Pad 9 4 90<br />
0807 Sweep Stack 13 4 96<br />
0808 Sweep Pipe 12 4 96<br />
0809 SawsSweep 47 4 96<br />
0810 Stray Pad 15 4 96<br />
0811 Anklung Pad 3 4 97<br />
0812 Tine Pad 1 4 94<br />
0813 Hols Strings 4 4 98<br />
0814 Clavi Pad 8 4 97<br />
0815 Galaxy Way 18 4 104<br />
0816 Rising OSC. 19 4 104<br />
0817 Noise Peaker 6 4 92<br />
0818 Etherality 5 4 104<br />
0819 Reso Stack 10 4 91<br />
0820 Techno Stack 11 4 91<br />
0821 TwinOct.Rave 13 4 91<br />
0822 Happy Synth 15 4 91<br />
0823 ForwardSweep 16 4 91<br />
0824 ReverseSweep 17 4 91<br />
0825 Warriors 4 4 96<br />
0826 Shwimmer 9 4 96<br />
0827 Celestial Pd 10 4 96<br />
0828 Minor Rave 24 4 91<br />
0829 Bamboo Hit 7 4 92<br />
0830 AuhAuh 10 4 92<br />
0831 Saw Impulse 5 4 97<br />
0832 Strange Str. 6 4 97<br />
0833 Crystal 0 4 99<br />
0834 Syn Mallet 1 4 99<br />
0835 Soft Crystal 2 4 99<br />
0836 Round Glock 3 4 99<br />
0837 Loud Glock 4 4 99<br />
0838 Digi Bells 9 4 99<br />
0839 Blow Bell 12 4 99<br />
0840 Choral Bells 16 4 99<br />
0841 Air Bells 17 4 99<br />
0842 Bell Harp 18 4 99<br />
0843 Gamelimba 19 4 99<br />
0844 Bottom Bell 23 4 99<br />
0845 Warm Atmos 1 4 100<br />
0846 Vaporish 80 4 91<br />
0847 Brass Star 3 4 101<br />
0848 Org Bell 8 4 101<br />
0849 Goblinson 1 4 102<br />
0850 50's Sci-Fi 2 4 102<br />
0851 Abduction 3 4 102<br />
0852 Auhbient 4 4 102<br />
0853 LFO Pad 5 4 102<br />
0854 LFO Sweep 44 4 90<br />
0855 Saw Strings 46 4 90<br />
0856 Ambient BPF 2 4 96<br />
0857 Random Str 6 4 102<br />
0858 UFO FX 14 4 102<br />
0859 FallinInsect 18 4 102<br />
0860 LFO Oct.Rave 19 4 102<br />
0861 Halo Pad 0 4 95<br />
0862 Sweep Pad 0 4 96<br />
0863 Oud 24 4 106<br />
0864 Oud+Strings 28 4 106<br />
0865 Ancestral 1 4 98<br />
0866 Converge 8 4 96<br />
0867 Prologue 1 2 4 98<br />
0868 Prologue 2 3 4 98<br />
0869 HistoryWave 5 4 98<br />
0870 Echo Pan 2 3 4 103<br />
0871 Pan Sequence 8 4 103<br />
0872 Star Theme 0 4 104<br />
0873 Echo Bell 1 4 103<br />
0874 Just Before 20 4 102<br />
0875 RandomEnding 22 4 102<br />
0876 Random Sine 23 4 102<br />
0877 Noise&SawHit 25 4 102
Backing <strong>Keyboard</strong> BK-5 r<br />
Tone List<br />
No. Name CC00 CC32 PC<br />
0878 DancingDrill 27 4 102<br />
0879 Dirty Stack 28 4 102<br />
0880 Static Hit 30 4 102<br />
0881 Acid Copter 32 4 102<br />
0882 260HarmPad 7 4 89<br />
0883 Tambra 10 4 97<br />
0884 Tamboura 16 4 105<br />
0885 Rabab 8 4 106<br />
0886 Gopichant 16 4 106<br />
0887 Shamisen 0 4 107<br />
0888 Kalimba 0 4 109<br />
0889 Sanza 8 4 109<br />
0890 Bagpipe 0 4 110<br />
0891 UillnPipe Or 11 4 110<br />
0892 Fiddle 0 4 111<br />
0893 Pungi 8 4 112<br />
0894 Banjo 0 4 106<br />
0895 Muted Banjo 1 4 106<br />
0896 Cimbalom_F 2 2 16<br />
0897 HDMallCimba 3 2 16<br />
0898 Zither 16 4 16<br />
0899 Santur 0 4 16<br />
0900 Cimbalom 8 4 16<br />
0901 Dulcimer 24 4 16<br />
0902 Purify 0 5 11<br />
0903 Tron Flute 51 4 74<br />
0904 ORClaVib 2 2 72<br />
0905 ORClaTrl 3 2 72<br />
0906 Frula 10 2 76<br />
0907 FrulaTrl 11 2 76<br />
0908 Fujara 12 2 76<br />
0909 Quena 9 2 76<br />
0910 NAY 8 4 73<br />
0911 Shakuhachi 0 4 78<br />
0912 Kawala 8 4 76<br />
0913 Di 16 4 73<br />
0914 TinWhistle1 24 4 76<br />
0915 TinWhtsle Nm 25 4 76<br />
0916 ShakuBamboo 47 4 78<br />
0917 Arghool 32 4 73<br />
0918 BaritoneShrt 10 4 68<br />
0919 BaritoneLong 12 4 68<br />
0920 Bangdi 15 5 72<br />
0921 Bandi Grwl 16 5 72<br />
0922 Bandi/Grwl 17 5 72<br />
0923 Bangdi /3 18 5 72<br />
0924 Esraj&Mizmar 19 5 72<br />
0925 Hulusi 20 5 72<br />
0926 Hulusi2 21 5 72<br />
0927 Hulusi2/3 1 22 5 72<br />
0928 Hls2 Sld Dw 23 5 72<br />
0929 Hls2 Sld Up 24 5 72<br />
0930 Hls2 VbMouth 25 5 72<br />
0931 Hls2/3 Mono 26 5 72<br />
0932 Hls2/Vb Mono 27 5 72<br />
0933 Hls2/VbMouth 28 5 72<br />
0934 Suona Grwl 30 5 72<br />
0935 Suona/Grwl 31 5 72<br />
0936 Qudi 0 5 78<br />
0937 Qudi /3 1 5 78<br />
0938 Qudi Orn 2 5 78<br />
0939 Qudi/Orn 3 5 78<br />
0940 Taj Mahal 4 5 78<br />
0941 Xun 5 5 78<br />
0942 Xun Orn 6 5 78<br />
0943 Xun/Orn 7 5 78<br />
0944 Xiao 8 5 78<br />
0945 Xiao Orn 9 5 78<br />
0946 Xiao/Orn 10 5 78<br />
0947 Zhongruan 1 5 25<br />
0948 Zhngruan Vib 2 5 25<br />
0949 Zhngruan/Vib 3 5 25<br />
0950 Zhngruan Trm 4 5 25<br />
0951 Zhngruan/Trm 5 5 25<br />
0952 Sacred Bells 1 5 11<br />
No. Name CC00 CC32 PC<br />
0953 BonangGamSRX 0 5 13<br />
0954 BelAngk SRX 1 5 13<br />
0955 BsKalimbaSRX 2 5 13<br />
0956 Kane / SRX 3 5 13<br />
0957 Reyong / SRX 4 5 13<br />
0958 VelAfro SRX2 5 5 13<br />
0959 Yang Qin 24 4 47<br />
0960 Yangqin 6 5 13<br />
0961 Yangqin /3 7 5 13<br />
0962 Yanqin Hrd 8 5 13<br />
0963 Yanqin Trm 9 5 13<br />
0964 Yanqin/Hrd 10 5 13<br />
0965 Yanqin/Trm 11 5 13<br />
0966 Erhu 1 5 41<br />
0967 Erhu Harm 2 5 41<br />
0968 Erhu/Harm 3 5 41<br />
0969 Erhu/Vib 4 5 41<br />
0970 SihuHorsScrm 9 5 49<br />
0971 Oygur 12 5 13<br />
0972 Log drum 98 119 13<br />
0973 Matoquin 13 5 49<br />
0974 Mizmar 24 4 112<br />
0975 Mizmar Solo 0 5 112<br />
0976 Uillean Pipe 9 4 110<br />
0977 Sitar 1 0 4 105<br />
0978 Sitar 2 1 4 105<br />
0979 Hichiriki 16 4 112<br />
0980 Pi Pa 32 4 106<br />
0981 Drone Sitar 7 5 105<br />
0982 Sitar/Drone 4 4 105<br />
0983 Sitar 3 5 4 105<br />
0984 Tsugaru 1 4 107<br />
0985 San Xian 9 4 106<br />
0986 Koto 0 4 108<br />
0987 Syn Shamisen 8 4 107<br />
0988 Gu Zheng 1 4 108<br />
0989 Taisho Koto 8 4 108<br />
0990 Kanoun 16 4 108<br />
0991 Bodhran 9 4 109<br />
0992 Bodhran Mute 10 4 109<br />
0993 Didgeridoo 8 4 110<br />
0994 Kanoon+Choir 19 4 108<br />
0995 Oct Harp 24 4 108<br />
0996 UillnPipe Nm 10 4 110<br />
0997 Er Hu 8 4 111<br />
0998 Gao Hu 9 4 111<br />
0999 Shanai 1 0 4 112<br />
1000 Shanai 2 1 4 112<br />
1001 Suona 1 32 4 112<br />
1002 Suona 2 33 4 112<br />
1003 Tinkle Bell 0 4 113<br />
1004 Gender 9 4 113<br />
1005 Pemade 15 4 113<br />
1006 Rababa 10 4 111<br />
1007 BOUZ_BAG_1 21 2 106<br />
1008 JV Bousouki 18 2 106<br />
1009 Gajde 11 2 110<br />
1010 Kajar 17 4 113<br />
1011 Kelontuk Sid 20 4 113<br />
1012 Atarigane 8 4 114<br />
1013 Guzheng 0 5 105<br />
1014 Guzhng Trm 1 5 105<br />
1015 Guzhng/Trm 2 5 105<br />
1016 St.GuZhngSRX 3 5 105<br />
1017 SitarGlisSRX 4 5 105<br />
1018 Shamisen SRX 5 5 105<br />
1019 Zheng Zither 6 5 105<br />
1020 Pipa 0 5 106<br />
1021 Pipa /4 1 5 106<br />
1022 Pipa Harm 2 5 106<br />
1023 Pipa Vib 3 5 106<br />
1024 Pipa Trem 4 5 106<br />
1025 Pipa/Harm 5 5 106<br />
1026 Pipa/Vib 6 5 106<br />
1027 Pipa/Trem 7 5 106<br />
No. Name CC00 CC32 PC<br />
1028 Rawap 8 5 106<br />
1029 Rawap Trem 9 5 106<br />
1030 Rawap/Trem 10 5 106<br />
1031 Gamelan Gong 98 119 113<br />
1032 RAMA Cymbal 100 119 113<br />
1033 Bonang 96 119 113<br />
Percuss - SFX<br />
1034 Steel Drums 0 4 115<br />
1035 Woodblock 0 4 116<br />
1036 Taiko 0 4 117<br />
1037 Sine Perc. 10 4 119<br />
1038 Fl.Key Click 1 4 122<br />
1039 Elec Perc 9 4 119<br />
1040 Jazz Tom 3 4 118<br />
1041 808 Tom 8 4 119<br />
1042 Melo. Tom 1 0 4 118<br />
1043 Real Tom 2 8 4 118<br />
1044 Jungle SD 18 4 118<br />
1045 Synth Drum 0 4 119<br />
1046 Concert BD 8 4 117<br />
1047 Castanets 8 4 116<br />
1048 Perc. Bang 11 4 126<br />
1049 Small Taiko 1 4 117<br />
1050 Tabla+ 0 5 115<br />
1051 Reverse Cym. 0 4 120<br />
1052 Cymbal Roll 47 4 113<br />
1053 Wind Chimes 5 4 125<br />
1054 Tambourine 16 4 114<br />
1055 Rev.Snare 8 4 120<br />
1056 Rev.ConBD 17 4 120<br />
1057 Rev.Kick 1 16 4 120<br />
1058 Rev.Tom 25 4 120<br />
1059 Agogo 0 4 114<br />
1060 MC-500 Beep 11 4 125<br />
1061 Finger Snaps 24 4 116<br />
1062 Angklung 16 4 116<br />
1063 Bebarongan 25 4 117<br />
1064 Dholak 27 4 117<br />
1065 Stack Hit 25 4 56<br />
1066 Industry Hit 26 4 56<br />
1067 Technorg Hit 22 4 56<br />
1068 Rave Hit 23 4 56<br />
1069 Bit Hit 20 4 56<br />
1070 Bam Hit 19 4 56<br />
1071 Philly Hit 9 4 56<br />
1072 Dist. Hit 18 4 56<br />
1073 Impact Hit 8 4 56<br />
1074 Euro Hit 3 4 56<br />
1075 Bass Hit 1 4 56<br />
1076 6th Hit 2 4 56<br />
1077 Techno Hit 17 4 56<br />
1078 Lo Fi Rave 16 4 56<br />
1079 Perc. Hit 11 4 56<br />
1080 Shock Wave 12 4 56<br />
1081 Clap Hit 27 4 56<br />
1082 Gun Shot 0 4 128<br />
1083 Machine Gun 1 4 128<br />
1084 Lasergun 2 4 128<br />
1085 Eruption 4 4 128<br />
1086 Big Shot 5 4 128<br />
1087 Explosion 3 4 128<br />
1088 Telephone 1 0 4 125<br />
1089 Telephone 2 1 4 125<br />
1090 Helicopter 0 4 126<br />
1091 Seashore 0 4 123<br />
1092 Horse-Gallop 2 4 124<br />
1093 Dog 1 4 124<br />
1094 Bird 1 0 4 124<br />
1095 Bird 2 3 4 124<br />
1096 Growl 1 5 4 124<br />
1097 Growl 2 6 4 124<br />
1098 Kitty 4 4 124<br />
1099 Fancy Animal 7 4 124<br />
1100 Breath Noise 0 4 122<br />
1101 Small <strong>Club</strong> 7 4 127<br />
123
Backing <strong>Keyboard</strong> BK-5<br />
Tone List<br />
r<br />
No. Name CC00 CC32 PC<br />
1102 Car-Engine 1 4 126<br />
1103 Seal 8 4 124<br />
1104 Rain 1 4 123<br />
1105 Thunder 2 4 123<br />
1106 Wind 1 3 4 123<br />
1107 Wind 2 6 4 123<br />
1108 Stream 4 4 123<br />
1109 Bubble 5 4 123<br />
1110 DoorCreaking 2 4 125<br />
1111 Siren 5 4 126<br />
1112 Train 6 4 126<br />
1113 Jetplane 7 4 126<br />
1114 Starship 8 4 126<br />
1115 Burst Noise 9 4 126<br />
1116 Car Engine 24 4 126<br />
1117 Car Horn 25 4 126<br />
1118 Car-Pass 3 4 126<br />
1119 Car-Stop 2 4 126<br />
1120 Car-Crash 4 4 126<br />
1121 Door 3 4 125<br />
1122 Cricket 7 4 123<br />
1123 White Noise 17 4 123<br />
1124 Winds Hit 47 4 123<br />
1125 Pink Noise 16 4 123<br />
1126 Scratch 1 4 4 125<br />
1127 TapeRewind 9 4 125<br />
1128 ShortCircuit 80 4 56<br />
1129 Trumpet Nz 9 4 122<br />
1130 Calculating 10 4 126<br />
1131 Scratch 2 7 4 125<br />
1132 ScratchKey 8 4 125<br />
1133 Phono Noise 10 4 125<br />
1134 HandClapMenu 40 4 116<br />
1135 909 HandClap 32 4 116<br />
1136 Applause 1 0 4 127<br />
1137 Applause 2 6 4 127<br />
1138 ApplauseWave 8 4 127<br />
1139 Voice ComeOn 23 4 127<br />
1140 Voice One 16 4 127<br />
1141 Voice Two 17 4 127<br />
1142 Voice Three 18 4 127<br />
1143 Voice Tah 19 4 127<br />
1144 Voice Aou 24 4 127<br />
1145 Voice Oou 25 4 127<br />
1146 Voice Hie 26 4 127<br />
1147 Voice Whey 20 4 127<br />
1148 Voice Kikit 22 4 127<br />
1149 Burner 12 4 126<br />
1150 Glass & Glam 13 4 126<br />
1151 Ice Ring 14 4 126<br />
1152 Crack Bottle 16 4 126<br />
1153 Pour Bottle 17 4 126<br />
1154 Open CD Tray 19 4 126<br />
1155 Audio Switch 20 4 126<br />
1156 Bounce 18 4 117<br />
1157 Key Typing 21 4 126<br />
1158 SL 1 22 4 126<br />
1159 SL 2 23 4 126<br />
1160 Boeeeen 26 4 126<br />
1161 R.Crossing 27 4 126<br />
1162 Compresser 28 4 126<br />
1163 Sword Boom! 29 4 126<br />
1164 Sword Cross 30 4 126<br />
1165 Stab! 1 31 4 126<br />
1166 Stab! 2 32 4 126<br />
1167 Laughing 1 4 127<br />
1168 BabyLaughing 9 4 127<br />
1169 Screaming 2 4 127<br />
1170 Punch 3 4 127<br />
1171 Heart Beat 4 4 127<br />
1172 Footsteps 5 4 127<br />
124
Backing <strong>Keyboard</strong> BK-5 r<br />
Drum Sets<br />
20. Drum Sets<br />
PC4 [CC32= 4]<br />
New Pop<br />
PC 18 [CC32= 4]<br />
New Rock<br />
PC 45 [CC32= 4]<br />
New BrushPop<br />
PC 8 [CC32= 4]<br />
New Folk<br />
PC 47 [CC32= 4]<br />
New Pop Perc<br />
PC 46 [CC32= 4]<br />
NewPBrshPerc<br />
PC 44 [CC32= 4]<br />
V-JazzBrush<br />
PC41 [CC32= 4]<br />
Brush<br />
PC 42 [CC32= 4]<br />
Brush 2<br />
0 C–1 HipHop Kick1 HipHop Kick1 HipHop Kick1 Brasil Tamburin CowBellSide Mambo_SW HipHop Kick1 Std.1 Kick1 Std.1 Kick1<br />
1 C#–1 Jazz Kick 1 Jazz Kick 1 Jazz Kick 1 Marches Tamburin SeaShells SeaShells Jazz Kick 1 Std.1 Kick2 Std.1 Kick2<br />
2 D–1 Mex Kick Mex Kick Mex Kick Tamorra 1 Equat-nutshells Equat-nutshells Mex Kick Std.2 Kick1 Std.2 Kick1<br />
3 D#–1 Rm Kick 1 Rm Kick 1 Rm Kick 1 Tamorra 2 Cascade_Ending Cascade_Ending Rm Kick 1 Std2 Kick2 Std2 Kick2<br />
4 E–1 Rm Kick 2 Rm Kick 2 Rm Kick 2 Tamorra 3 Chimes-Ending Chimes-Ending Rm Kick 2 Kick 1 Kick 1<br />
5 F–1 HipHop Kick2 HipHop Kick2 HipHop Kick2 Tamorra 4 Goathooves Goathooves HipHop Kick2 Kick 2 Kick 2<br />
6 F#–1 TechnoKick1 TechnoKick1 TechnoKick1 Tamorra 6 GoathoovesShot GoathoovesShot TechnoKick1 Jazz Kick 1 Jazz Kick 1<br />
7 G–1 BassDrumSet BassDrumSet BassDrumSet Tamorra 7 Bongo1_SW1 Bongo1_SW1 BassDrumSet Jazz Kick 2 Jazz Kick 2<br />
8 G#–1 HipHop Kick1 HipHop Kick1 HipHop Kick1 Tamorra 8 Bongo1_SW2 Bongo1_SW2 HipHop Kick1 Room Kick 1 Room Kick 1<br />
9 A–1 909Comp Kick 909Comp Kick 909Comp Kick Tamorra Ending Bongo1_SW3 Bongo1_SW3 909Comp Kick Room Kick 2 Room Kick 2<br />
10 Bb–1 St Kick 1 St Kick 1 St Kick 1 Pandeiro 1 Bongo2_SW1 Bongo2_SW1 St Kick 1 Power Kick1 Power Kick1<br />
11 B–1 JazzKick JazzKick JazzKick Pandeiro 2 Bongo2_SW2 Bongo2_SW2 JazzKick Power Kick2 Power Kick2<br />
12 C0 NewRockKik Rock Kick RockKik Pandeiro 3 Bongo2_3 Bongo2_3 NewRockKik Elec Kick 2 Elec Kick 2<br />
13 C#0 Cymbal Roll Cymbal Roll Cymbal Roll Pandeiro 4 Congas_SW1 Congas_SW1 Cymbal Roll Elec Kick 1 Elec Kick 1<br />
14 D0 Rock Stick 2 Rock Stick 2 Rock Stick 2 Pandeiro 5 Congas_SW2 Congas_SW2 Rock Stick 2 TR-808 Kick TR-808 Kick<br />
15 D#0 Rm Snare 1 Rm Snare 1 Rm Snare 1 Pandeiro 6 Congas_SW3 Congas_SW3 Rm Snare 1 TR-909 Kick TR-909 Kick<br />
16 E0 Rm Snare 2 Rm Snare 2 Rm Snare 2 BeguineLoop3 Congas_SW4 Congas_SW4 Rm Snare 2 Dance Kick 2 Dance Kick 2<br />
17 F0 St Snare1 St Snare1 St Snare1 BeguineLoop2 Tamorra 1 Tamorra 1 St Snare1 Voice One Voice One<br />
18 F#0 St Snare2 St Snare2 St Snare2 BeguineLoop1 Tamorra 2 Tamorra 2 St Snare2 Voice Two Voice Two<br />
19 G0 NewJzSn2 JazzSnare2 JazzSnare2 JazzSnare2 Tamorra 3 Tamorra 3 NewJzSn2 Voice Three Voice Three<br />
20 G#0 NewJzSn1 JazzSnare1 JazzSnare1 JazzzSnare1 Tamorra 4 Tamorra 4 NewJzSn1 --- Jazz Kick 1<br />
21 A0 R&B Snare R&B Snare R&B Snare R&B Snare Tamorra 6 Tamorra 6 R&B Snare --- Jazz Kick 2<br />
22 Bb0 RockSnare2_2 RockSnare2_2 RockSnare2 2 RockSnare2_2 Tamorra 7 Tamorra 7 PopSnare38 2 MC-500 Beep MC-500 Beep<br />
23 B0 RockSnare1_2 RockSnare1_2 RockSnare1 2 RockSnare1_2 Tamorra 8 Tamorra 8 PopSnare40 2 MC-500 Beep MC-500 Beep<br />
24 C1 PopSnare38 2 PopSnare38 2 PopSnare38 2 PopSnare38 2 Tamorra Ending Tamorra Ending PopSnare38 2 Concert Snr Concert Snr<br />
25 C#1 Snare Ghost1 Snare Ghost1 Snare Ghost1 Snare Ghost1 Pandeiro_SW1 Pandeiro_SW1 Snare Ghost1 Snare Roll Snare Roll<br />
26 D1 PopSnare38 2 PopSnare38 2 PopSnare38 2 PopSnare38 2 Pandeiro_SW2 Pandeiro_SW2 PopSnare38 2 Finger Snap Finger Snap<br />
27 D#1 FingerSnaps2 FingerSnaps2 FingerSnaps2 FingerSnaps2 Pandeiro_SW3 Pandeiro_SW3 FingerSnaps2 High-Q High-Q<br />
28 E1 909 HandClap 909 HandClap 909 HandClap RockSnare2_3 Pandeiro 5 Pandeiro 5 909 HandClap Slap Slap<br />
29 F1 808 Clap 808 Clap 808 Clap Roll Snare Brazilian_Tamburin Brazilian_Tamburin 808 Clap ScratchPush ScratchPush<br />
30 F#1 Hand clap2 Hand clap2 Hand clap2 Hand clap2 Chimes&Seeds_1 Chimes&Seeds_1 Hand clap2 ScratchPull ScratchPull<br />
31 G1 909 HandClap 909 HandClap 909 HandClap 909 HandClap Chimes&Seeds_2 Chimes&Seeds_2 909 HandClap Sticks Sticks<br />
32 G#1 Pedal Hi Hat Pedal Hi Hat Pedal Hi Hat Pedal Hi Hat PopHiHatFoot PopHiHatFoot Pedal HiHat1 SquareClick SquareClick<br />
33 A1 GospelHClp1 GospelHClp1 GospelHClp1 FolkSnareTango2 VibratoneSlow-Fast VibratoneSlow-Fast GospelHClp1 Mtrnm.Click Mtrnm.Click<br />
34 Bb1 Snare Roll 1 Snare Roll 1 Snare Roll 1 FolkSnareRoll AfricanCowBell AfricanCowBell Snare Roll 1 Mtrnm. Bell Mtrnm. Bell<br />
35 B1 Pop Kick 35 Pop Kick 35 Pop Kick 35 Pop Kick 35 Kick_Plastic Kick_Plastic JazzKick Jazz Kick 2 Br Kick 1<br />
36 C2 Pop Kick 36 Pop Kick 36 Pop Kick 36 Pop Kick 36 Kick_Plastic Kick_Plastic JazzKick Jazz Kick 1 Br Kick 2<br />
37 C#2 Pop Stick1 Pop Stick1 Pop Stick1 Pop Stick1 Snare Snare NewJzSW1 Side Stick Side Stick<br />
38 D2 PopSnare38 1 PopSnare38 1 PopSnare38 1 PopSnare38 1 Snare Snare NewJzSn1 Brush Swirl Br Snare1<br />
39 D#2 Snare Ghost1 Snare Ghost1 Snare Ghost1 Snare Ghost1 SnareFlam SnareFlam NewJzSW2 Brush Slap1 Br Snare2<br />
40 E2 PopSnare40 1 PopSnare40 1 PopSnare40 1 PopSnare40 1 Snare Snare NewJzSn2 Brush Swirl Brush Swirl<br />
41 F2 Flam Tom 41 Flam Tom 41 Flam Tom 41 Flam Tom 41 FloorTomFlam FloorTomFlam NewJzTomLoFl Lite Tom 4 Lite Tom 4<br />
42 F#2 Pop Hi Hat1 Pop Hi Hat1 Pop Hi Hat1 Pop Hi Hat1 Jazz Hat1 Jazz Hat1 JazzHiHat1 Brs HiHatCls Brs HiHatCls<br />
43 G2 Tom 43 Tom 43 Tom 43 Tom 43 FloorTom FloorTom NewJzTomLo Lite Tom 4 Lite Tom 4<br />
44 G#2 Pop Hi Hat2 Pop Hi Hat2 Pop Hi Hat2 Pop Hi Hat2 Jazz Hat2 Jazz Hat2 JazzHiHat2 Pedal HiHat Pedal HiHat<br />
45 A2 Flam Tom 45 Flam Tom 45 Flam Tom 45 Flam Tom 45 Tom2Flam Tom2Flam Jazz Tom MFl Lite Tom 4 Lite Tom 4<br />
46 Bb2 Pop Hi Hat3 Pop Hi Hat3 Pop Hi Hat3 Pop Hi Hat3 Jazz Hat3 Jazz Hat3 JazzHiHat3 Brs HiHatOpn Brs HiHatOpn<br />
47 B2 Tom 47 Tom 47 Tom 47 Tom 47 Tom2 Tom2 RockTomMid Lite Tom 4 Lite Tom 4<br />
48 C3 Flam Tom 50 Flam Tom 50 Flam Tom 50 Flam Tom 50 Tom1Flam Tom1Flam NewJzTomHiFl Lite Tom 4 Lite Tom 4<br />
49 C#3 Pop Cymbal2 Pop Cymbal2 Pop Cymbal2 Pop Cymbal2 JazzCrCym1 JazzCrCym1 CrachCymbal1 Brush Crash Brush Crash<br />
50 D3 Tom 50 Tom 50 Tom 50 Tom 50 PopBrushTom1 PopBrushTom1 NewJzTomHi Lite Tom 4 Lite Tom 4<br />
51 D#3 Pop Ride1 Pop Ride1 Pop Ride1 Pop Ride1 NewJzRide1 NewJzRide1 JazzRide1 Ride Cym IN Ride Cym IN<br />
52 E3 Pop Cymbal Pop Cymbal Pop Cymbal Pop Cymbal BrushCrash2 BrushCrash2 CrachCymbal2 ChinaCymbal ChinaCymbal<br />
53 F3 Pop Ride2 Pop Ride2 Pop Ride2 Pop Ride2 Jazz Ride2 Jazz Ride2 JazzRide2 Brush RideBL Brush RideBL<br />
54 F#3 Tambourine Tambourine Tambourine Tambourine CembaloFree CembaloFree Tambourine Tambourine Tambourine<br />
55 G3 Splash Cym. Splash Cym. Splash Cym. Splash Cym. BrushCrash1 BrushCrash1 Splash Cym. Splash Cym. Splash Cym.<br />
56 G#3 ChaChaCowb ChaChaCowb ChaChaCowb ChaChaCowb CowBell CowBell ChaChaCowb Cowbell Cowbell<br />
57 A3 CrashCymbal2 CrashCymbal2 CrashCymbal2 CrashCymbal2 JzCrashCym1 JzCrashCym1 CrachCymbal1 Crash Cymb2 Crash Cymb2<br />
58 Bb3 Vibraslap Vibraslap Vibraslap Vibraslap vibraslp vibraslp Vibraslap Vibraslap Vibraslap<br />
59 B3 RockRideCym1 RockRideCym1 RockRideCym1 RockRideCym1 RockRide1 RockRide1 RockRideCym1 Ride Cymbal Ride Cymbal<br />
60 C4 NewHiBongo HiBongo HiBongo HiBongo Bongo_SW Bongo_SW NewHiBongo Bongo High Bongo High<br />
61 C#4 NewLoBongo LoBongo LoBongo LoBongo Bongo1_4 Bongo1_4 NewLoBongo Bongo Low Bongo Low<br />
62 D4 NewCongaSlp CongaSlap Conga Slap CongaSlap Congas_SW Congas_SW NewCongaSlp Mute H.Conga Mute H.Conga<br />
63 D#4 NewCongaOp CongaOp Conga Op CongaOp Congas_7 Congas_7 NewCongaOp Conga Hi Opn Conga Hi Opn<br />
64 E4 NewLoConga LoConga Lo Conga LoConga Congas_8 Congas_8 NewLoConga Conga Lo Opn Conga Lo Opn<br />
65 F4 Timbal Hi Timbal Hi Timbal Hi Timbal Hi Timbal Hi Timbal Hi Timbal Hi High Timbale High Timbale<br />
66 F#4 Timbal Lo Timbal Lo Timbal Lo Timbal Lo Timbal Lo Timbal Lo Timbal Lo Low Timbale Low Timbale<br />
67 G4 Agogo Agogo Agogo Agogo Agogo Agogo Agogo Agogo Agogo<br />
68 G#4 Agogo Agogo Agogo Agogo Agogo Agogo Agogo Agogo Agogo<br />
69 A4 NewShaker2 Shaker2 Shaker2 Shaker2 Shaker2 Shaker2 NewShaker2 Cabasa Cabasa<br />
70 Bb4 NewShaker1 Shaker1 Shaker1 Shaker1 Shaker1 Shaker1 NewShaker1 Maracas Maracas<br />
71 B4 ShrtWhistle ShrtWhistle ShrtWhistle ShrtWhistle ShrtWhistle ShrtWhistle ShrtWhistle ShrtWhistle ShrtWhistle<br />
72 C5 LongWhistle LongWhistle LongWhistle LongWhistle LongWhistle LongWhistle LongWhistle LongWhistle LongWhistle<br />
73 C#5 Quide1 Quide1 Quide1 Quide1 Quide1 Quide1 NewQuide1 Short Guiro Short Guiro<br />
74 D5 Quide2 Quide2 Quide2 Quide2 Quide2 Quide2 NewQuide2 Long Guiro Long Guiro<br />
75 D#5 Claves Claves Claves Claves Claves Claves NewClaves Claves Claves<br />
76 E5 Woodblock Woodblock Woodblock Woodblock Woodblock1 Woodblock1 Woodblock Woodblock Woodblock<br />
77 F5 Woodblock Woodblock Woodblock Woodblock Woodblock2 Woodblock2 Woodblock Woodblock Woodblock<br />
78 F#5 Mute Cuica Mute Cuica Mute Cuica Mute Cuica Mute Cuica Mute Cuica Mute Cuica Mute Cuica Mute Cuica<br />
79 G5 Open Cuica Open Cuica Open Cuica Open Cuica Open Cuica Open Cuica Open Cuica Open Cuica Open Cuica<br />
80 G#5 MuteTriangl MuteTriangl MuteTriangl MuteTriangl MuteTriangl MuteTriangl MuteTriangl MuteTriangl MuteTriangl<br />
81 A5 OpenTriangl OpenTriangl OpenTriangl OpenTriangl OpenTriangl OpenTriangl OpenTriangl OpenTriangl OpenTriangl<br />
82 Bb5 Shaker Shaker Shaker Shaker Shaker Shaker Shaker Shaker Shaker<br />
83 B5 Jingle Bell Jingle Bell Jingle Bell Jingle Bell Jingle Bell Jingle Bell Jingle Bell Jingle Bell Jingle Bell<br />
125
Backing <strong>Keyboard</strong> BK-5<br />
Drum Sets<br />
PC4 [CC32= 4]<br />
New Pop<br />
PC 18 [CC32= 4]<br />
New Rock<br />
PC 45 [CC32= 4]<br />
New BrushPop<br />
PC 8 [CC32= 4]<br />
New Folk<br />
PC 47 [CC32= 4]<br />
New Pop Perc<br />
PC 46 [CC32= 4]<br />
NewPBrshPerc<br />
PC 44 [CC32= 4]<br />
V-JazzBrush<br />
PC41 [CC32= 4]<br />
Brush<br />
PC 42 [CC32= 4]<br />
Brush 2<br />
84 C6 Bell Tree Bell Tree Bell Tree Bell Tree Belltree Belltree Bell Tree Bell Tree Bell Tree<br />
85 C#6 Castanets Castanets Castanets Castanets Castanets Castanets Castanets Castanets Castanets<br />
86 D6 Mute Surdo Mute Surdo Mute Surdo Mute Surdo Surdo_mute Surdo_mute Mute Surdo Mute Surdo Mute Surdo<br />
87 D#6 Open Surdo Open Surdo Open Surdo Open Surdo Surdo_open Surdo_open Open Surdo Open Surdo Open Surdo<br />
88 E6 Cana Cana Cana Cana Cana Cana Cana Applause Applause<br />
89 F6 Timbal HiFlm Timbal HiFlm Timbal HiFlm Timbal HiFlm TimbalHiFlm TimbalHiFlm Timbal HiFlm --- ---<br />
90 F#6 Timbal LoFlm Timbal LoFlm Timbal LoFlm Timbal LoFlm TimbalLoFlm TimbalLoFlm Timbal LoFlm --- ---<br />
91 G6 NewTmblPHS Timbal PHS Timbal PHS Timbal PHS TimbalPHS TimbalPHS NewTmblPHS --- ---<br />
92 G#6 NewShekere1 Shekere1 Shekere1 Shekere1 Shekere1 Shekere1 NewShekere1 --- ---<br />
93 A6 NewShekere2 Shekere2 Shekere2 Shekere2 Shekere2 Shekere2 NewShekere2 --- ---<br />
94 Bb6 NHBngoMute Bongo Mute Bongo Mute Bongo Mute Bongo Mute Bongo Mute NHBngoMute --- ---<br />
95 B6 L BongoMute L BongoMute L BongoMute L BongoMute LBongoMute LBongoMute L BongoMute --- ---<br />
96 C7 CajonHi CajonHi CajonHi CajonHi CajonHi CajonHi CajonHi --- ---<br />
97 C#7 CajonHiFlm CajonHiFlm CajonHiFlm CajonHiFlm CajonHiFlm CajonHiFlm CajonHiFlm --- ---<br />
98 D7 Cajon Low Cajon Low Cajon Low Cajon Low CajonLo CajonLo Cajon Low --- Jazz Snare1<br />
99 D#7 CajonLoFlm CajonLoFlm CajonLoFlm CajonLoFlm CajonLoFlm CajonLoFlm CajonLoFlm --- Jazz Snare2<br />
100 E7 FlmncoHClap1 FlmncoHClap1 FlmncoHClap1 Flmnco Clap1 FlmncoHClp1 FlmncoHClp1 FlmncoHClap1 Brush Swirl Brush Swirl<br />
101 F7 FlmncoHClap1 FlmncoHClap1 FlmncoHClap1 Flmnco Clap1 FlmncoHClp1 FlmncoHClp1 FlmncoHClap1 Brush Tap Brush Tap<br />
102 F# BongoCowBell BongoCowBell BongoCowBell BongoCowBell BongoCowBell BongoCowBell BongoCowBell Brush Slap1 Brush Slap1<br />
103 G7 PopSnareFl RockSnareFl_H BrushSnare Shot PopSnareFl_L Crotals Crotals AfHey Brush Slap2 Brush Slap2<br />
104 G#7 MamboCowBell MamboCowBell MamboCowBell MamboCowBell MamboCowBell MamboCowBell MamboCowBell Brush Slap Brush Slap<br />
105 A7 PopSnareDrag Snare Ghost Phrase3 FolkSnrFlam2 CrashPhrase4 CrashPhrase4 MexFVox2 Brush Swirl Brush Swirl<br />
106 Bb7 HiHatPhrase3 HiHatPhrase3 Phrase1 FolkSnrShot1 CrashPhrase5 CrashPhrase5 AfFoots Brush Swirl Brush Swirl<br />
107 B7 CrashPhrase1 Crash2Phrase4 RidePhrase1 FolkSnrShot2 RidePhrase1 RidePhrase1 MexFVox1 Long Swirl Long Swirl<br />
108 C8 CrashPhrase2 Crash1Phrase3 RidePhrase2 SmallSnarPhr RidePhrase2 RidePhrase2 MexMVox1 Jazz Snare 1 Jazz Snare 1<br />
109 C#8 CrashPhrase3 Crash1Phrase4 RidePhrase4 FolkSnrFlam5 RidePhrase4 RidePhrase4 YodelFVox1 Jazz Snare 2 Jazz Snare 2<br />
110 D8 CrashPhrase4 CrashPhrase4 CrashPhrase4 FolkSnrFlam3 Egg_M3 Egg_M3 MexMVox2 Std.1 Snare1 Std.1 Snare1<br />
111 D#8 CrashPhrase5 CrashPhrase5 CrashPhrase5 FolkSdSnr1Sh Egg_MEndOff Egg_MEndOff YodelMVox1 Std.1 Snare2 Std.1 Snare2<br />
112 E8 Crash_Stop RidePhrase1 SnareBrushFlam FolkSdSnr2Sh Egg_M_SW1 Egg_M_SW1 MexMVox3 Std.2 Snare1 Std.2 Snare1<br />
113 F8 RidePhrase1 RidePhrase2 RidePhrase1 FkSdSnrPhr1 Egg_L4 Egg_L4 FlmncoFVox1 Std.2 Snare2 Std.2 Snare2<br />
114 F#8 RidePhrase2 RidePhrase3 RidePhrase2 FolkRimShtNS Egg_LEndOff Egg_LEndOff YodelFVox2 Tight Snare Tight Snare<br />
115 G8 RidePhrase3 RidePhrase4 RidePhrase3 FolkSplash1 Egg_L_SW1 Egg_L_SW1 FlmncoFVox2 StandrdSnar1 StandrdSnar1<br />
116 G#8 RidePhrase4 RidePhrase5 RidePhrase4 FolkSplash2 Egg_TuttiEndOff Egg_TuttiEndOff NewWhistle1 LD Snare M LD Snare M<br />
117 A8 RidePhrase5 BrushRidePhrase4 RidePhrase5 PopRide_Phr4 Egg_S4 Egg_S4 FlmncoFVox3 LD Snare C LD Snare C<br />
118 Bb8 RidePhrase1 Crash1Phrase1 Cascade_Ending PopRide_Phr5 Egg_SEndOff Egg_SEndOff NewWhistle2 Room Snare 1 Room Snare 1<br />
119 B8 RidePhrase2 --- --- --- Egg_S_SW1 Egg_S_SW1 FlmncoMVox1 Room Snare 2 Room Snare 2<br />
120 C9 RidePhrase4 --- --- --- Chimes Chimes FlmncoMVox2 Dance Snare1 Dance Snare1<br />
121 C#9 ChinaRoll ChinaStopped Crotals AAhhh DoorKeys DoorKeys BrazilVox1 Power Snare1 Power Snare1<br />
122 D9 ChinaStopped Crash1StopLong DoorKeys Uaahh Pinchimes Pinchimes FlmncoMVox3 Rev.Snare Rev.Snare<br />
123 D#9 Egg S4 Crash2StopLong Egg S4 Egg S4 Harmess-bell1 Harmess-bell1 BrazilVox2 Power Snare2 Power Snare2<br />
124 E9 Egg S1 ChinaRoll Egg S1 Egg S1 Harmess-bell2 Harmess-bell2 BrazilVox3 Elec Snare 1 Elec Snare 1<br />
125 F9 Egg AllEndOff Egg EndOff Egg EndOff Egg EndOff Harmess-bell3 Harmess-bell3 AfAahhh Dance Snare2 Dance Snare2<br />
126 F#9 Tambour Ending CembaloEnding CembaloEnding CembaloEnding CembaloEnding CembaloEnding Voice Snare Elec Snare 2 Elec Snare 2<br />
127 G9 Tambour Free CembaloFree CembaloFree CembaloFree CembaloFree CembaloFree Voice Snare Elec Snare 3 Elec Snare 3<br />
r<br />
126
Backing <strong>Keyboard</strong> BK-5<br />
Drum Sets<br />
PC 43 [CC32= 4]<br />
Brush 2 L/R<br />
PC 33 [CC32= 4]<br />
Jazz<br />
PC 34 [CC32= 4]<br />
Jazz L/R<br />
PC 1 [CC32= 4]<br />
Standard 1<br />
PC 2 [CC32= 4]<br />
Standard 2<br />
PC 3 [CC32= 4]<br />
Standard L/R<br />
PC 9 [CC32= 4]<br />
Room<br />
PC 13 [CC32= 4]<br />
Room L/R<br />
PC10 [CC32= 4]<br />
Hip Hop<br />
0 C–1 --- Std.1 Kick1 --- Std.1 Kick1 Std.1 Kick1 --- Std.1 Kick1 --- Elec Kick 2<br />
1 C#–1 --- Std.1 Kick2 --- Std.1 Kick2 Std.1 Kick2 --- Std.1 Kick2 --- Elec Kick 1<br />
2 D–1 --- Std.2 Kick1 --- Std.2 Kick1 Std.2 Kick1 --- Std.2 Kick1 --- CR78 Kick 1<br />
3 D#–1 --- Std2 Kick2 --- Std2 Kick2 Std2 Kick2 --- Std2 Kick2 --- CR78 Kick 2<br />
4 E–1 --- Kick 1 --- Kick 1 Kick 1 --- Kick 1 --- TR-606 Kick1<br />
5 F–1 --- Kick 2 --- Kick 2 Kick 2 --- Kick 2 --- TR-707 Kick1<br />
6 F#–1 --- Jazz Kick 1 --- Jazz Kick 1 Jazz Kick 1 --- Jazz Kick 1 --- 808 Kick<br />
7 G–1 --- Jazz Kick 2 --- Jazz Kick 2 Jazz Kick 2 --- Jazz Kick 2 --- TR-808 Kick<br />
8 G#–1 --- Room Kick 1 --- Room Kick 1 Room Kick 1 --- Room Kick 1 --- 808 BassDrum<br />
9 A–1 --- Room Kick 2 --- Room Kick 2 Room Kick 2 --- Room Kick 2 --- TR-909 Kick<br />
10 Bb–1 --- Power Kick1 --- Power Kick1 Power Kick1 --- Power Kick1 --- Dance Kick 2<br />
11 B–1 --- Power Kick2 --- Power Kick2 Power Kick2 --- Power Kick2 --- 909Comp Kick<br />
12 C0 --- Elec Kick 2 --- Elec Kick 2 Elec Kick 2 --- Elec Kick 2 --- TR-909 Kick2<br />
13 C#0 --- Elec Kick 1 --- Elec Kick 1 Elec Kick 1 --- Elec Kick 1 --- HipHop Kick2<br />
14 D0 --- TR-808 Kick --- TR-808 Kick TR-808 Kick --- TR-808 Kick --- BassDrumSet<br />
15 D#0 --- TR-909 Kick --- TR-909 Kick TR-909 Kick --- TR-909 Kick --- TechnoKick1<br />
16 E0 --- Dance Kick 2 --- Dance Kick 2 Dance Kick 2 --- Dance Kick 2 --- Bounce<br />
17 F0 Voice One Voice One Voice One Voice One Voice One Voice One Voice One Voice One Voice One<br />
18 F#0 Voice Two Voice Two Voice Two Voice Two Voice Two Voice Two Voice Two Voice Two Voice Two<br />
19 G0 Voice Three Voice Three Voice Three Voice Three Voice Three Voice Three Voice Three Voice Three Voice Three<br />
20 G#0 --- Br Kick 1 --- Rm Kick 1 --- --- St Kick 1 --- HipHop Kick1<br />
21 A0 --- Br Kick 2 --- Rm Kick 2 --- --- St Kick 2 --- Std2 Kick2<br />
22 Bb0 MC-500 Beep MC-500 Beep MC-500 Beep MC-500 Beep MC-500 Beep MC-500 Beep MC-500 Beep MC-500 Beep MC-500 Beep<br />
23 B0 MC-500 Beep MC-500 Beep MC-500 Beep MC-500 Beep MC-500 Beep MC-500 Beep MC-500 Beep MC-500 Beep MC-500 Beep<br />
24 C1 Concert Snr Concert Snr Concert Snr Concert Snr Concert Snr Concert Snr Concert Snr Concert Snr Concert Snr<br />
25 C#1 Snare Roll Snare Roll Snare Roll Snare Roll Snare Roll Snare Roll Snare Roll Snare Roll Snare Roll<br />
26 D1 Finger Snap Finger Snap Finger Snap FingerSnaps2 Finger Snap FingerSnaps2 Finger Snap Finger Snap FingerSnaps2<br />
27 D#1 High-Q High-Q High-Q High-Q High-Q High-Q High-Q High-Q High-Q<br />
28 E1 Slap Slap Slap Slap Slap Slap Slap Slap Slap<br />
29 F1 ScratchPush ScratchPush ScratchPush ScratchPush ScratchPush ScratchPush ScratchPush ScratchPush Scrtch Push2<br />
30 F#1 ScratchPull ScratchPull ScratchPull ScratchPull ScratchPull ScratchPull ScratchPull ScratchPull Scrtch Pull2<br />
31 G1 Sticks Sticks Sticks Sticks Sticks Sticks Sticks Sticks Sticks<br />
32 G#1 SquareClick SquareClick SquareClick SquareClick SquareClick SquareClick SquareClick SquareClick SquareClick<br />
33 A1 Mtrnm.Click Mtrnm.Click Mtrnm.Click Mtrnm.Click Mtrnm.Click Mtrnm.Click Mtrnm.Click Mtrnm.Click Mtrnm.Click<br />
34 Bb1 Mtrnm. Bell Mtrnm. Bell Mtrnm. Bell Mtrnm. Bell Mtrnm. Bell Mtrnm. Bell Mtrnm. Bell Mtrnm. Bell Mtrnm. Bell<br />
35 B1 Br Kick 1 Jazz Kick 1 Jazz Kick 1 St Kick 1 Std2 Kick2 St Kick 1 Rm Kick 1 Rm Kick 1 TR-909 Kick2<br />
36 C2 Br Kick 2 Jazz Kick 2 Jazz Kick 2 St Kick 2 Std.2 Kick1 St Kick 2 Rm Kick 2 Rm Kick 2 909Comp Kick<br />
37 C#2 Side Stick Side Stick Side Stick Side Stick Side Stick Side Stick Side Stick Side Stick 808 Rimshot<br />
38 D2 Br Snare1 Jazz Snare1 Jazz Snare1 St Snare2 Std.2 Snare1 St Snare2 Rm Snare 2 Rm Snare 2 Rap Snare<br />
39 D#2 Br Snare2 Hand clap2 Hand clap2 909 HandClap 808 Clap 909 HandClap 808 Clap 808 Clap 909 HandClap<br />
40 E2 Brush Swirl Jazz Snare2 Jazz Snare2 St Snare1 Std.2 Snare2 St Snare1 Rm Snare 1 Rm Snare 1 House Snare<br />
41 F2 Lite Tom 4 Real Tom 6 Real Tom 6 Real Tom 6 Real Tom 6 Real Tom 6 Room Tom 5 Room Tom 5 Brush Tom<br />
42 F#2 BrHiHatClosB JazzClosedHH JzHiHatClosB Close HiHat2 JazzClosedHH St HiHatClsB Closed HiHat Rm HiHatClsB Closed HiHat<br />
43 G2 Lite Tom 4 Real Tom 6 Real Tom 6 Real Tom 6 Real Tom 6 Real Tom 6 Room Tom 5 Room Tom 5 Brush Tom<br />
44 G#2 Pedal HiHat Pedal HiHat Pedal HiHat Pedal HiHat2 Pedal HiHat Pedal HiHat2 Pedal HiHat Pedal HiHat Pedal HiHat<br />
45 A2 Lite Tom 4 Real Tom 4 Real Tom 4 Real Tom 4 Real Tom 4 Real Tom 4 Room Tom 2 Room Tom 2 Brush Tom<br />
46 Bb2 BrHiHatOpenB JazzOpenHH JzHiHatOpenB Open HiHat2 JazzOpenHH St HiHatOpnB R8OpenHiHat2 Rm HiHatOpnB R8OpenHiHat2<br />
47 B2 Lite Tom 4 Real Tom 4 Real Tom 4 Real Tom 4 Real Tom 4 Real Tom 4 Room Tom 2 Room Tom 2 Brush Tom<br />
48 C3 Lite Tom 4 Real Tom 1 Real Tom 1 Real Tom 1 Real Tom 1 Real Tom 1 Room Tom 2 Room Tom 2 Brush Tom<br />
49 C#3 BrCrashCymbB Crash Cymb1 Crash Cymb 1 Crash Cymb1 Crash Cymb1 Crash Cymb 1 Crash Cymb1 Crash Cymb 1 909 Crash<br />
50 D3 Lite Tom 4 Real Tom 1 Real Tom 1 Real Tom 1 Real Tom 1 Real Tom 1 Room Tom 2 Room Tom 2 Brush Tom<br />
51 D#3 Br RideCymbB Ride Cym IN Ride Cymbal Ride Cymbal Ride Cymbal Ride Cymbal Ride Cymbal Ride Cymbal Ride Cymbal<br />
52 E3 ChinaCymbal ChinaCymbal ChinaCymbal ChinaCymbal ChinaCymbal ChinaCymbal ChinaCymbal ChinaCymbal ReverseCymbl<br />
53 F3 Br RideBellB Ride Bell Ridbl_c B Ride Bell Ride Bell Ridbl_c B Ride Bell Ridbl_c B Ride Bell<br />
54 F#3 Tambourine Tambourine Tambourine Tambourine Tambourine Tambourine Tambourine Tambourine Shake Tamb<br />
55 G3 Splash Cym. Splash Cym. Splash Cym. Splash Cym. Splash Cym. Splash Cym. Splash Cym. Splash Cym. Splash Cym.<br />
56 G#3 Cowbell Cowbell Cowbell Cowbell Cowbell Cowbell Cowbell Cowbell 808 Cowbell<br />
57 A3 Crash Cymb2 Crash Cymb2 Crash Cymb2 Crash Cymb2 Crash Cymb2 Crash Cymb2 Crash Cymb2 Crash Cymb2 Crash Cymb2<br />
58 Bb3 Vibraslap Vibraslap Vibraslap Vibraslap Vibraslap Vibraslap Vibraslap Vibraslap Vibraslap<br />
59 B3 Ride Cymbal Ride Cymbal Ride Cymbal Ride Cymbal Ride Cymbal Ride Cymbal Ride Cymbal Ride Cymbal Ride Cymbal<br />
60 C4 Bongo High Bongo High Bongo High Bongo High Bongo High Bongo High Bongo High Bongo High Bongo High<br />
61 C#4 Bongo Low Bongo Low Bongo Low Bongo Low Bongo Low Bongo Low Bongo Low Bongo Low Bongo Low<br />
62 D4 Mute H.Conga Mute H.Conga Mute H.Conga Mute H.Conga Mute H.Conga Mute H.Conga Mute H.Conga Mute H.Conga Mute H.Conga<br />
63 D#4 Conga Hi Opn Conga Hi Opn Conga Hi Opn Conga Hi Opn Conga Hi Opn Conga Hi Opn Conga Hi Opn Conga Hi Opn Conga Hi Opn<br />
64 E4 Conga Lo Opn Conga Lo Opn Conga Lo Opn Conga Lo Opn Conga Lo Opn Conga Lo Opn Conga Lo Opn Conga Lo Opn Conga Lo Opn<br />
65 F4 High Timbale High Timbale High Timbale High Timbale High Timbale High Timbale High Timbale High Timbale High Timbale<br />
66 F#4 Low Timbale Low Timbale Low Timbale Low Timbale Low Timbale Low Timbale Low Timbale Low Timbale Low Timbale<br />
67 G4 Agogo Agogo Agogo Agogo Agogo Agogo Agogo Agogo Agogo<br />
68 G#4 Agogo Agogo Agogo Agogo Agogo Agogo Agogo Agogo Agogo<br />
69 A4 Cabasa Cabasa Cabasa Cabasa Cabasa Cabasa Cabasa Cabasa Cabasa<br />
70 Bb4 Maracas Maracas Maracas Maracas Maracas Maracas Maracas Maracas 808 Maracas<br />
71 B4 ShrtWhistle ShrtWhistle ShrtWhistle ShrtWhistle ShrtWhistle ShrtWhistle ShrtWhistle ShrtWhistle ShrtWhistle<br />
72 C5 LongWhistle LongWhistle LongWhistle LongWhistle LongWhistle LongWhistle LongWhistle LongWhistle LongWhistle<br />
73 C#5 Short Guiro Short Guiro Short Guiro Short Guiro Short Guiro Short Guiro Short Guiro Short Guiro Short Guiro<br />
74 D5 Long Guiro Long Guiro Long Guiro Long Guiro Long Guiro Long Guiro Long Guiro Long Guiro CR78 Guiro<br />
75 D#5 Claves Claves Claves Claves Claves Claves Claves Claves 808 Clave<br />
76 E5 Woodblock Woodblock Woodblock Woodblock Woodblock Woodblock Woodblock Woodblock Woodblock<br />
77 F5 Woodblock Woodblock Woodblock Woodblock Woodblock Woodblock Woodblock Woodblock Woodblock<br />
78 F#5 Mute Cuica Mute Cuica Mute Cuica Mute Cuica Mute Cuica Mute Cuica Mute Cuica Mute Cuica Hoo<br />
79 G5 Open Cuica Open Cuica Open Cuica Open Cuica Open Cuica Open Cuica Open Cuica Open Cuica Hoo<br />
80 G#5 MuteTriangl MuteTriangl MuteTriangl MuteTriangl MuteTriangl MuteTriangl MuteTriangl MuteTriangl MuteTriangl<br />
81 A5 OpenTriangl OpenTriangl OpenTriangl OpenTriangl OpenTriangl OpenTriangl OpenTriangl OpenTriangl OpenTriangl<br />
82 Bb5 Shaker Shaker Shaker Shaker Shaker Shaker Shaker Shaker 626 Shaker<br />
83 B5 Jingle Bell Jingle Bell Jingle Bell Jingle Bell Jingle Bell Jingle Bell Jingle Bell Jingle Bell Jingle Bell
Backing <strong>Keyboard</strong> BK-5<br />
Drum Sets<br />
PC 43 [CC32= 4]<br />
Brush 2 L/R<br />
PC 33 [CC32= 4]<br />
Jazz<br />
PC 34 [CC32= 4]<br />
Jazz L/R<br />
PC 1 [CC32= 4]<br />
Standard 1<br />
PC 2 [CC32= 4]<br />
Standard 2<br />
PC 3 [CC32= 4]<br />
Standard L/R<br />
PC 9 [CC32= 4]<br />
Room<br />
PC 13 [CC32= 4]<br />
Room L/R<br />
PC10 [CC32= 4]<br />
Hip Hop<br />
84 C6 Bell Tree Bell Tree Bell Tree Bell Tree Bar Chimes Bell Tree Bell Tree Bell Tree Bell Tree<br />
85 C#6 Castanets Castanets Castanets Castanets Castanets Castanets Castanets Castanets Castanets<br />
86 D6 Mute Surdo Mute Surdo Mute Surdo Mute Surdo Mute Surdo Mute Surdo Mute Surdo Mute Surdo Mute Surdo<br />
87 D#6 Open Surdo Open Surdo Open Surdo Open Surdo Open Surdo Open Surdo Open Surdo Open Surdo Open Surdo<br />
88 E6 Applause Applause Applause Applause 2 Applause 2 Applause 2 Applause 2 Applause 2 Small <strong>Club</strong><br />
89 F6 --- --- --- --- --- --- --- --- Rap Snare<br />
90 F#6 --- --- --- --- --- --- --- --- Power Snare2<br />
91 G6 --- --- --- --- --- --- --- --- Noise Slap<br />
92 G#6 --- --- --- --- --- --- --- --- St Snare1<br />
93 A6 --- --- --- --- --- --- --- --- St Snare2<br />
94 Bb6 --- --- --- --- --- --- --- --- Rm Snare 1<br />
95 B6 Br Kick 1 --- Jazz Kick 1 Rm Snare 2 --- St Kick 1 St Snare2 Rm Kick 1 Rm Snare 2<br />
96 C7 Br Kick 2 --- Jazz Kick 2 Rm Snare 1 --- St Kick 2 St Snare1 Rm Kick 2 Dance Snare1<br />
97 C#7 Brush Crash --- Crash Cymb1 Std.1 Snare1 Std.1 Snare1 Crash Cymb1 Std.1 Snare1 Crash Cymb1 Techno Hit<br />
98 D7 Br Snare1 Br Snare1 Jazz Snare1 Std.1 Snare2 Std.1 Snare2 St Snare2 Std.1 Snare2 Rm Snare 2 Philly Hit<br />
99 D#7 Ride Cym IN Br Snare2 Ride Cym IN Std.2 Snare1 Std.2 Snare1 Ride Cymbal Std.2 Snare1 Ride Cymbal Shock Wave<br />
100 E7 Br Snare2 Brush Swirl Jazz Snare2 Std.2 Snare2 Std.2 Snare2 St Snare1 Std.2 Snare2 Rm Snare 1 Lo Fi Rave<br />
101 F7 Lite Tom 4 Brush Tap Real Tom 6 Tight Snare Tight Snare Real Tom 6 Tight Snare Room Tom 5 Bam Hit<br />
102 F# Brs HiHatCls Brush Slap1 JazzClosedHH StandrdSnar1 StandrdSnar1 Close HiHat2 StandrdSnar1 Closed HiHat Bim Hit<br />
103 G7 Lite Tom 4 Brush Slap2 Real Tom 4 LD Snare M LD Snare M Real Tom 4 LD Snare M Room Tom 2 TapeRewind<br />
104 G#7 Brush RideBL Brush Slap Ride Bell LD Snare C LD Snare C Ride Bell LD Snare C Ride Bell Phono Noise<br />
105 A7 Lite Tom 4 Brush Swirl Real Tom 1 Jazz Snare 1 Jazz Snare 1 Real Tom 1 Jazz Snare 1 Room Tom 2 Dance Snare1<br />
106 Bb7 Brs HiHatOpn Brush Swirl JazzOpenHH Jazz Snare 2 Jazz Snare 2 Open HiHat2 Jazz Snare 2 R8OpenHiHat2 Power Snare2<br />
107 B7 Br Kick1P Long Swirl Jazz Kick1 P Room Snare 1 Room Snare 1 St Kick1 P Room Snare 1 Rm Kick1 P Elec Snare 1<br />
108 C8 Br Kick2P Jazz Snare 1 Jazz Kick2 P Room Snare 2 Room Snare 2 St Kick2 P Room Snare 2 Rm Kick2 P Dance Snare2<br />
109 C#8 BrCrashCymbP Jazz Snare 2 JzCrashCym1P Dance Snare1 Dance Snare1 JzCrashCym1P Dance Snare1 JzCrashCym1P Elec Snare 2<br />
110 D8 Br Snare1P Std.1 Snare1 Jazz Snare1P Power Snare1 Power Snare1 St Snare2 P Power Snare1 Rm Snare2 P Elec. Snare<br />
111 D#8 BrRideCymbal Std.1 Snare2 Ride Cymbal Rev.Snare Rev.Snare Ride Cymbal Rev.Snare Ride Cymbal Elec Snare 3<br />
112 E8 Br Snare2P Std.2 Snare1 Jazz Snare2P Power Snare2 Power Snare2 St Snare1P Power Snare2 Rm Snare1 P 66 Snare 260<br />
113 F8 Lite4_t P Std.2 Snare2 Real Tom Elec Snare 1 Elec Snare 1 Real Tom Elec Snare 1 Room Tom 5 P TR-707 Snare<br />
114 F#8 BrHiHatClosP Tight Snare JzHiHatClosP Dance Snare2 Dance Snare2 St HiHatClsP Dance Snare2 Rm HiHatClsP 808 Snare 1<br />
115 G8 Lite4_t P StandrdSnar1 Real Tom Elec Snare 2 Elec Snare 2 Real Tom Elec Snare 2 Room Tom 2 P 808 Snare 2<br />
116 G#8 Br RideBell LD Snare M Ridbl_c P Elec. Snare Elec. Snare Ridbl_c P Elec. Snare Ridbl_c P TR-808Snare2<br />
117 A8 Lite4_t P LD Snare C Real Tom Elec Snare 3 Elec Snare 3 Real Tom Elec Snare 3 Room Tom 2 P 909 Snare 1<br />
118 Bb8 BrHiHatOpenP Room Snare 1 JzHiHatOpenP TR-707 Snare TR-707 Snare St HiHatOpnP TR-707 Snare Rm HiHatOpnP 909 Snare 2<br />
119 B8 --- Room Snare 2 --- 808 Snare 1 808 Snare 1 --- 808 Snare 1 --- 909 SD 1<br />
120 C9 --- Dance Snare1 --- 808 Snare 2 808 Snare 2 --- 808 Snare 2 --- TR-909Snare2<br />
121 C#9 --- Power Snare1 --- 909 Snare 1 909 Snare 1 --- 909 Snare 1 --- Rap Snare<br />
122 D9 --- Rev.Snare --- 909 Snare 2 909 Snare 2 --- 909 Snare 2 --- JungleSnare1<br />
123 D#9 --- Power Snare2 --- Rap Snare Rap Snare --- Rap Snare --- House Snare<br />
124 E9 --- Elec Snare 1 --- JungleSnare1 JungleSnare1 --- JungleSnare1 --- House Snare<br />
125 F9 --- Dance Snare2 --- House Snare House Snare --- House Snare --- House Snare<br />
126 F#9 --- Elec Snare 2 --- House Snare House Snare --- House Snare --- Voice Tah<br />
127 G9 --- Elec Snare 3 --- House Snare House Snare --- House Snare --- Noise Slap<br />
r<br />
128
Backing <strong>Keyboard</strong> BK-5 r<br />
Drum Sets<br />
PC 11 [CC32= 4]<br />
Jungle<br />
PC12 [CC32= 4]<br />
Techno<br />
PC14 [CC32= 4]<br />
House<br />
PC17 [CC32= 4]<br />
Power<br />
PC 25 [CC32= 4]<br />
Electronic<br />
PC 15 [CC32= 5]<br />
909 808 Kit<br />
PC29 [CC32= 4]<br />
TR-606<br />
PC30 [CC32= 4]<br />
TR-707<br />
PC 26 [CC32= 4]<br />
TR-808<br />
0 C–1 Elec Kick 2 Elec Kick 2 Elec Kick 2 Std.1 Kick1 Elec Kick 2 --- Elec Kick 2 Elec Kick 2 Elec Kick 2<br />
1 C#–1 Elec Kick 1 Elec Kick 1 Elec Kick 1 Std.1 Kick2 Elec Kick 1 --- Elec Kick 1 Elec Kick 1 Elec Kick 1<br />
2 D–1 CR78 Kick 1 CR78 Kick 1 CR78 Kick 1 Std.2 Kick1 CR78 Kick 1 --- CR78 Kick 1 CR78 Kick 1 CR78 Kick 1<br />
3 D#–1 CR78 Kick 2 CR78 Kick 2 CR78 Kick 2 Std2 Kick2 CR78 Kick 2 --- CR78 Kick 2 CR78 Kick 2 CR78 Kick 2<br />
4 E–1 TR-606 Kick1 TR-606 Kick1 TR-606 Kick1 Kick 1 TR-606 Kick1 --- TR-606 Kick1 TR-606 Kick1 TR-606 Kick1<br />
5 F–1 TR-707 Kick1 TR-707 Kick1 TR-707 Kick1 Kick 2 TR-707 Kick1 --- TR-707 Kick1 TR-707 Kick1 TR-707 Kick1<br />
6 F#–1 808 Kick 808 Kick 808 Kick Jazz Kick 1 808 Kick --- 808 Kick 808 Kick 808 Kick<br />
7 G–1 TR-808 Kick TR-808 Kick TR-808 Kick Jazz Kick 2 TR-808 Kick --- TR-808 Kick TR-808 Kick TR-808 Kick<br />
8 G#–1 808 BassDrum 808 BassDrum 808 BassDrum Room Kick 1 808 BassDrum --- 808 BassDrum 808 BassDrum 808 BassDrum<br />
9 A–1 TR-909 Kick TR-909 Kick TR-909 Kick Room Kick 2 TR-909 Kick --- TR-909 Kick TR-909 Kick TR-909 Kick<br />
10 Bb–1 Dance Kick 2 Dance Kick 2 Dance Kick 2 Power Kick1 Dance Kick 2 --- Dance Kick 2 Dance Kick 2 Dance Kick 2<br />
11 B–1 909Comp Kick 909Comp Kick 909Comp Kick Power Kick2 909Comp Kick --- 909Comp Kick 909Comp Kick 909Comp Kick<br />
12 C0 TR-909 Kick2 TR-909 Kick2 TR-909 Kick2 Elec Kick 2 TR-909 Kick2 --- TR-909 Kick2 TR-909 Kick2 TR-909 Kick2<br />
13 C#0 HipHop Kick2 HipHop Kick2 HipHop Kick2 Elec Kick 1 HipHop Kick2 --- HipHop Kick2 HipHop Kick2 HipHop Kick2<br />
14 D0 BassDrumSet BassDrumSet BassDrumSet TR-808 Kick BassDrumSet --- BassDrumSet BassDrumSet BassDrumSet<br />
15 D#0 TechnoKick1 TechnoKick1 TechnoKick1 TR-909 Kick TechnoKick1 --- TechnoKick1 TechnoKick1 TechnoKick1<br />
16 E0 Bounce Bounce Bounce Dance Kick 2 Bounce --- Bounce Bounce Bounce<br />
17 F0 Voice One Voice One Voice One Voice One Voice One --- Voice One Voice One Voice One<br />
18 F#0 Voice Two Voice Two Voice Two Voice Two Voice Two --- Voice Two Voice Two Voice Two<br />
19 G0 Voice Three Voice Three Voice Three Voice Three Voice Three --- Voice Three Voice Three Voice Three<br />
20 G#0 TR-909 Kick2 HipHop Kick2 TR-909 Kick2 --- --- --- --- --- ---<br />
21 A0 909Comp Kick TR-909 Kick2 TechnoKick2 --- --- --- --- --- ---<br />
22 Bb0 MC-500 Beep MC-500 Beep MC-500 Beep MC-500 Beep MC-500 Beep --- MC-500 Beep MC-500 Beep MC-500 Beep<br />
23 B0 MC-500 Beep MC-500 Beep MC-500 Beep MC-500 Beep MC-500 Beep --- MC-500 Beep MC-500 Beep MC-500 Beep<br />
24 C1 Concert Snr Concert Snr Concert Snr Concert Snr Concert Snr --- Concert Snr Concert Snr Concert Snr<br />
25 C#1 Snare Roll Snare Roll Snare Roll Snare Roll Snare Roll --- Snare Roll Snare Roll Snare Roll<br />
26 D1 FingerSnaps2 FingerSnaps2 FingerSnaps2 FingerSnaps2 Finger Snap --- FingerSnaps2 FingerSnaps2 FingerSnaps2<br />
27 D#1 High-Q High-Q High-Q High-Q High-Q --- High-Q High-Q High-Q<br />
28 E1 Slap Slap Slap Slap Slap TR909 Kick 2 Slap Slap Slap<br />
29 F1 Scrtch Push2 Scrtch Push2 Scrtch Push2 ScratchPush Scrtch Push2 TR909 Kick 4 Scrtch Push2 Scrtch Push2 Scrtch Push2<br />
30 F#1 Scrtch Pull2 Scrtch Pull2 Scrtch Pull2 ScratchPull Scrtch Pull2 Urbn Sn Roll Scrtch Pull2 Scrtch Pull2 Scrtch Pull2<br />
31 G1 Sticks Sticks Sticks Sticks Sticks TR909 Kick 5 Sticks Sticks Sticks<br />
32 G#1 SquareClick SquareClick SquareClick SquareClick SquareClick TR909 Snr 3 SquareClick SquareClick SquareClick<br />
33 A1 Mtrnm.Click Mtrnm.Click Mtrnm.Click Mtrnm.Click Mtrnm.Click TR909 Kick 3 Mtrnm.Click Mtrnm.Click Mtrnm.Click<br />
34 Bb1 Mtrnm. Bell Mtrnm. Bell Mtrnm. Bell Mtrnm. Bell Mtrnm. Bell TR909 PHH 2 Mtrnm. Bell Mtrnm. Bell Mtrnm. Bell<br />
35 B1 HipHop Kick1 TechnoKick1 HipHop Kick2 Power Kick2 Elec Kick 2 TR909 Kick 6 CR78 Kick 2 TR-707 Kick1 808 BassDrum<br />
36 C2 Std2 Kick2 TR-909 Kick2 TR-909 Kick2 Power Kick1 Elec Kick 1 TR909 Kick 1 TR-606 Kick1 TR-707 Kick1 TR-808 Kick<br />
37 C#2 Side Stick 808 Rimshot Side Stick Side Stick Side Stick TR909 Rim CR78 Rim TR-707 Rim 808 Rimshot<br />
38 D2 Dance Snare1 Dance Snare1 House Snare Dance Snare1 Elec. Snare TR909 Snr 1 66 Snare 160 TR-707 Snare 808 Snare 1<br />
39 D#2 HC2 Claps 2 707 Claps 909 HandClap 808 Clap 808 Clap TR909 Clap 1 707 Claps 707 Claps 808 Clap<br />
40 E2 House Snare 909 SD 1 Elec Snare 2 Power Snare1 Elec Snare 2 TR909 Snr 2 66 Snare 260 TR-707Snare2 TR-808Snare2<br />
41 F2 909 Tom 606 Dist.Tom 909 Tom Rock Tom 4 Synth Drum 2 TR909 Tom L 606 Tom TR-707 Tom 808 Tom 2<br />
42 F#2 606 HiHat Cl TR-707HiHatC TR-707HiHatC Close HiHat2 JazzClosedHH TR909 CHH 1 606 HiHat Cl TR-707HiHatC TR-808HiHatC<br />
43 G2 909 Tom 606 Dist.Tom 909 Tom Rock Tom 4 Synth Drum 2 TR909 Tom L 606 Tom TR-707 Tom 808 Tom 2<br />
44 G#2 JungleHiHat CR-78HiHatCl CR-78HiHatCl Pedal HiHat2 Pedal HiHat TR909 PHH 1 606 HiHat Cl TR-707HiHatC 808 HiHat Cl<br />
45 A2 909 Tom 606 Dist.Tom 909 Tom Rock Tom 4 Synth Drum 2 TR909 Tom M 606 Tom TR-707 Tom 808 Tom 2<br />
46 Bb2 606 HiHat Op 909HiHat Opn 909HiHat Opn Open HiHat2 JazzOpenHH TR909 OHH 2 606 HiHat Op TR-707HiHatO TR-808HiHatO<br />
47 B2 909 Tom 606 Dist.Tom 909 Tom Rock Tom 4 Synth Drum 2 TR909 Tom M 606 Tom TR-707 Tom 808 Tom 2<br />
48 C3 909 Tom 606 Dist.Tom 909 Tom Rock Tom 1 Synth Drum 2 TR909 Tom H 606 Tom TR-707 Tom 808 Tom 2<br />
49 C#3 Jngl Crash 909 Crash 909 Crash Crash Cymb1 Crash Cymb1 TR909 Crash 808 Crash 909 Crash 808 Crash<br />
50 D3 909 Tom 606 Dist.Tom 909 Tom Rock Tom 1 Synth Drum 2 TR909 Tom H 606 Tom TR-707 Tom 808 Tom 2<br />
51 D#3 Ride Cymbal Ride Cymbal 909Ride Cymb Ride Cymbal Ride Cymbal TR909 Ride 1 606 Ride Cym 909Ride Cymb 606 Ride Cym<br />
52 E3 ReverseCymbl ReverseCymbl ReverseCymbl ChinaCymbal ReverseCymbl TR909 Crash1 ChinaCymbal ChinaCymbal ChinaCymbal<br />
53 F3 Ride Bell Ride Bell Ride Bell Ride Bell Ride Bell TR909 Ride 2 Ride Bell Ride Bell Ride Bell<br />
54 F#3 Shake Tamb Shake Tamb Shake Tamb Tambourine Tambourine CR78 Tamb 1 CR78 Tambour Tambourine CR78 Tambour<br />
55 G3 Splash Cym. Splash Cym. Splash Cym. Splash Cym. Splash Cym. TR909 Crash2 Splash Cym. Splash Cym. Splash Cym.<br />
56 G#3 808 Cowbell 808 Cowbell 808 Cowbell Cowbell Cowbell JD Sm Metal CR78 Cow 808 Cowbell 808 Cowbell<br />
57 A3 Crash Cymb2 909 Crash 909 Crash Crash Cymb2 Crash Cymb2 TR909 Ride 3 909 Crash Crash Cymb2 909 Crash<br />
58 Bb3 Vibraslap Vibraslap Vibraslap Vibraslap Vibraslap Syn Swt Atk3 Vibraslap Vibraslap Vibraslap<br />
59 B3 --- Ride Cymbal Ride Cymbal Ride Cymbal Ride Cymbal TR808 Kick 1 Ride Cymbal Ride Cymbal Ride Cymbal<br />
60 C4 Bongo High CR78 HiBongo CR78 HiBongo Bongo High Bongo High TR808 Kick 2 CR78 HiBongo Bongo High CR78 HiBongo<br />
61 C#4 Bongo Low CR78 LoBongo CR78 LoBongo Bongo Low Bongo Low TR808 Rim CR78 LoBongo Bongo Low CR78 LoBongo<br />
62 D4 Mute H.Conga 808 Conga 808 Conga Mute H.Conga Mute H.Conga TR808 Snr 2 808 Conga Mute H.Conga 808 Conga<br />
63 D#4 Conga Hi Opn 808 Conga 808 Conga Conga Hi Opn Conga Hi Opn TR808 Clap 2 808 Conga Conga Hi Opn 808 Conga<br />
64 E4 Conga Lo Opn 808 Conga 808 Conga Conga Lo Opn Conga Lo Opn TR808 Snr 4 808 Conga Conga Lo Opn 808 Conga<br />
65 F4 High Timbale High Timbale High Timbale High Timbale High Timbale TR808 Tom L High Timbale High Timbale High Timbale<br />
66 F#4 Low Timbale Low Timbale Low Timbale Low Timbale Low Timbale TR808 CHH 1 Low Timbale Low Timbale Low Timbale<br />
67 G4 Agogo Agogo Agogo Agogo Agogo TR808 Tom L Agogo Agogo Agogo<br />
68 G#4 Agogo Agogo Agogo Agogo Agogo TR808 CHH 2 Agogo Agogo Agogo<br />
69 A4 Cabasa Cabasa Cabasa Cabasa Cabasa TR808 Tom M Cabasa Cabasa Cabasa<br />
70 Bb4 808 Maracas 808 Maracas 808 Maracas Maracas Maracas TR808 OHH 1 CR78 Maracas 808 Maracas 808 Maracas<br />
71 B4 ShrtWhistle ShrtWhistle ShrtWhistle ShrtWhistle ShrtWhistle TR808 Tom M ShrtWhistle ShrtWhistle ShrtWhistle<br />
72 C5 LongWhistle LongWhistle LongWhistle LongWhistle LongWhistle TR808 Tom H LongWhistle LongWhistle LongWhistle<br />
73 C#5 Short Guiro Short Guiro Short Guiro Short Guiro Short Guiro TR808Cowbell Short Guiro Short Guiro Short Guiro<br />
74 D5 CR78 Guiro CR78 Guiro CR78 Guiro Long Guiro Long Guiro TR808 Tom H CR78 Guiro Long Guiro CR78 Guiro<br />
75 D#5 808 Clave 808 Clave 808 Clave Claves Claves TR606 Cym CR78 Clv Claves 808 Clave<br />
76 E5 Woodblock Woodblock Woodblock Woodblock Woodblock TR606 OHH 1 Woodblock Woodblock Woodblock<br />
77 F5 Woodblock Woodblock Woodblock Woodblock Woodblock TR606 OHH 2 Woodblock Woodblock Woodblock<br />
78 F#5 Hoo Hoo Hoo Mute Cuica Mute Cuica CR78 Tamb 2 Hoo Hoo Hoo<br />
79 G5 Hoo Hoo Hoo Open Cuica Open Cuica CR78 OHH 1 Hoo Hoo Hoo<br />
80 G#5 MuteTriangl MuteTriangl MuteTriangl MuteTriangl MuteTriangl Cowbell Mute CR78 M.Beat MuteTriangl MuteTriangl<br />
81 A5 OpenTriangl OpenTriangl OpenTriangl OpenTriangl OpenTriangl CR78 OHH 2 CR78 M.Beat OpenTriangl OpenTriangl<br />
82 Bb5 626 Shaker 626 Shaker 626 Shaker Shaker Shaker Syn Swt Atk5 626 Shaker 626 Shaker 626 Shaker<br />
83 B5 Jingle Bell Jingle Bell Jingle Bell Jingle Bell Jingle Bell TR808 OHH 2 Jingle Bell Jingle Bell Jingle Bell<br />
129
Backing <strong>Keyboard</strong> BK-5<br />
Drum Sets<br />
PC 11 [CC32= 4]<br />
Jungle<br />
PC12 [CC32= 4]<br />
Techno<br />
PC14 [CC32= 4]<br />
House<br />
PC17 [CC32= 4]<br />
Power<br />
PC 25 [CC32= 4]<br />
Electronic<br />
PC 15 [CC32= 5]<br />
909 808 Kit<br />
PC29 [CC32= 4]<br />
TR-606<br />
PC30 [CC32= 4]<br />
TR-707<br />
PC 26 [CC32= 4]<br />
TR-808<br />
84 C6 Bell Tree Bell Tree Bell Tree Bell Tree Bell Tree 808 Maracas Bell Tree Bell Tree Bell Tree<br />
85 C#6 Castanets Castanets Castanets Castanets Castanets TR808 Claves Castanets Castanets Castanets<br />
86 D6 Mute Surdo Mute Surdo Mute Surdo Mute Surdo Mute Surdo Triangle Mt Mute Surdo Mute Surdo Mute Surdo<br />
87 D#6 Open Surdo Open Surdo Open Surdo Open Surdo Open Surdo Triangle Op Open Surdo Open Surdo Open Surdo<br />
88 E6 Small <strong>Club</strong> Applause 2 Applause 2 Applause 2 Small <strong>Club</strong> Narrow Hit 2 Small <strong>Club</strong> Small <strong>Club</strong> Small <strong>Club</strong><br />
89 F6 Kick Roll Dance Snare1 66 Snare 260 --- --- TR808 Cym1 --- --- ---<br />
90 F#6 Snare Roll Elec Snare 2 Dance Snare1 --- --- MG Zap 4 --- --- ---<br />
91 G6 66 Snare 260 Dance Snare1 909 SD 1 --- --- Scratch 1 --- --- ---<br />
92 G#6 Dance Snare1 House Snare Dance Snare1 --- --- MG Zap 1 --- --- ---<br />
93 A6 909 SD 1 Rap Snare Dance Snare1 --- --- TR606 Snr 2 --- --- ---<br />
94 Bb6 Elec Snare 2 House Snare Rap Snare --- --- Synth Saw --- --- ---<br />
95 B6 Dance Snare1 Dance Snare1 House Snare --- --- Digi Breath --- --- ---<br />
96 C7 Rap Snare Rap Snare House Snare --- --- TR808 Cym2 --- --- ---<br />
97 C#7 Techno Hit Techno Hit Techno Hit Std.1 Snare1 Techno Hit TR808 Conga1 Techno Hit Techno Hit Techno Hit<br />
98 D7 Philly Hit Philly Hit --- Std.1 Snare2 Philly Hit TR808 Conga2 Philly Hit Philly Hit Philly Hit<br />
99 D#7 Shock Wave Shock Wave Shock Wave Std.2 Snare1 Shock Wave Cajon 1 Shock Wave Shock Wave Shock Wave<br />
100 E7 Lo Fi Rave Lo Fi Rave Lo Fi Rave Std.2 Snare2 Lo Fi Rave Vint Snr 3 Lo Fi Rave Lo Fi Rave Lo Fi Rave<br />
101 F7 Bam Hit Bam Hit Bam Hit Tight Snare Bam Hit Door Creak Bam Hit Bam Hit Bam Hit<br />
102 F# Bim Hit Bim Hit Bim Hit StandrdSnar1 Bim Hit Vint.Phone Bim Hit Bim Hit Bim Hit<br />
103 G7 TapeRewind TapeRewind TapeRewind LD Snare M TapeRewind Door Creak TapeRewind TapeRewind TapeRewind<br />
104 G#7 Phono Noise Phono Noise Phono Noise LD Snare C --- --- Phono Noise Phono Noise Phono Noise<br />
105 A7 Dance Snare1 Dance Snare1 Dance Snare1 Jazz Snare 1 --- --- Dance Snare1 Dance Snare1 Dance Snare1<br />
106 Bb7 Power Snare2 Power Snare2 Power Snare2 Jazz Snare 2 Power Snare2 --- Power Snare2 Power Snare2 Power Snare2<br />
107 B7 Elec Snare 1 Elec Snare 1 Elec Snare 1 Room Snare 1 Elec Snare 1 --- Elec Snare 1 Elec Snare 1 Elec Snare 1<br />
108 C8 Dance Snare2 Dance Snare2 Dance Snare2 Room Snare 2 Dance Snare2 --- Dance Snare2 Dance Snare2 Dance Snare2<br />
109 C#8 Elec Snare 2 Elec Snare 2 Elec Snare 2 Dance Snare1 Elec Snare 2 --- Elec Snare 2 Elec Snare 2 Elec Snare 2<br />
110 D8 Elec. Snare Elec. Snare Elec. Snare Power Snare1 Elec. Snare --- Elec. Snare Elec. Snare Elec. Snare<br />
111 D#8 Elec Snare 3 Elec Snare 3 Elec Snare 3 Rev.Snare Elec Snare 3 --- Elec Snare 3 Elec Snare 3 Elec Snare 3<br />
112 E8 66 Snare 260 66 Snare 260 66 Snare 260 Power Snare2 66 Snare 260 --- 66 Snare 260 66 Snare 260 66 Snare 260<br />
113 F8 TR-707 Snare TR-707 Snare TR-707 Snare Elec Snare 1 TR-707 Snare --- TR-707 Snare TR-707 Snare TR-707 Snare<br />
114 F#8 808 Snare 1 808 Snare 1 808 Snare 1 Dance Snare2 808 Snare 1 --- 808 Snare 1 808 Snare 1 808 Snare 1<br />
115 G8 808 Snare 2 808 Snare 2 808 Snare 2 Elec Snare 2 808 Snare 2 --- 808 Snare 2 808 Snare 2 808 Snare 2<br />
116 G#8 TR-808Snare2 TR-808Snare2 TR-808Snare2 Elec. Snare TR-808Snare2 --- TR-808Snare2 TR-808Snare2 TR-808Snare2<br />
117 A8 909 Snare 1 909 Snare 1 909 Snare 1 Elec Snare 3 909 Snare 1 --- 909 Snare 1 909 Snare 1 909 Snare 1<br />
118 Bb8 909 Snare 2 909 Snare 2 909 Snare 2 TR-707 Snare 909 Snare 2 --- 909 Snare 2 909 Snare 2 909 Snare 2<br />
119 B8 909 SD 1 909 SD 1 909 SD 1 808 Snare 1 909 SD 1 --- 909 SD 1 909 SD 1 909 SD 1<br />
120 C9 TR-909Snare2 TR-909Snare2 TR-909Snare2 808 Snare 2 TR-909Snare2 --- TR-909Snare2 TR-909Snare2 TR-909Snare2<br />
121 C#9 Rap Snare Rap Snare Rap Snare 909 Snare 1 Rap Snare --- Rap Snare Rap Snare Rap Snare<br />
122 D9 JungleSnare1 JungleSnare1 JungleSnare1 909 Snare 2 JungleSnare1 --- JungleSnare1 JungleSnare1 JungleSnare1<br />
123 D#9 House Snare House Snare House Snare Rap Snare House Snare --- House Snare House Snare House Snare<br />
124 E9 House Snare House Snare House Snare JungleSnare1 House Snare --- House Snare House Snare House Snare<br />
125 F9 House Snare House Snare House Snare House Snare House Snare --- House Snare House Snare House Snare<br />
126 F#9 Voice Tah Voice Tah Voice Tah House Snare Voice Tah --- Voice Tah Voice Tah Voice Tah<br />
127 G9 Noise Slap Noise Slap Noise Slap House Snare Noise Slap --- Noise Slap Noise Slap Noise Slap<br />
r<br />
130
Backing <strong>Keyboard</strong> BK-5 r<br />
Drum Sets<br />
PC 31 [CC32= 4]<br />
TR-909<br />
PC 27 [CC32= 4]\<br />
Dance<br />
PC 28 [CC32= 4]<br />
CR-78<br />
PC 64 [CC32= 4]<br />
V-VoxDrum<br />
PC 49 [CC32= 4]<br />
Orchestra<br />
PC 50 [CC32= 4]<br />
Ethnic<br />
PC 32 [CC32= 4]<br />
Multi Drum<br />
PC 4 [CC32= 5]<br />
StandardKit1<br />
PC 5 [CC32= 5]<br />
StandardKit3<br />
0 C–1 Elec Kick 2 Elec Kick 2 Elec Kick 2 HipHop Kick1 Std.1 Kick1 --- Pop Cymbal2 --- ---<br />
1 C#–1 Elec Kick 1 Elec Kick 1 Elec Kick 1 Jazz Kick 1 Std.1 Kick2 --- Pop Ride1 --- ---<br />
2 D–1 CR78 Kick 1 CR78 Kick 1 CR78 Kick 1 Voice Kick Std.2 Kick1 --- R&B Snare --- ---<br />
3 D#–1 CR78 Kick 2 CR78 Kick 2 CR78 Kick 2 Rm Kick 1 Std2 Kick2 --- R&B Clap --- ---<br />
4 E–1 TR-606 Kick1 TR-606 Kick1 TR-606 Kick1 Rm Kick 2 Kick 1 --- Techno Snare --- ---<br />
5 F–1 TR-707 Kick1 TR-707 Kick1 TR-707 Kick1 HipHop Kick2 Kick 2 --- House Snare --- ---<br />
6 F#–1 808 Kick 808 Kick 808 Kick TechnoKick1 Jazz Kick 1 --- Jungle Snare --- ---<br />
7 G–1 TR-808 Kick TR-808 Kick TR-808 Kick BassDrumSet Jazz Kick 2 --- Ps Snare --- ---<br />
8 G#–1 808 BassDrum 808 BassDrum 808 BassDrum HipHop Kick1 Room Kick 1 --- 909 Snare --- ---<br />
9 A–1 TR-909 Kick TR-909 Kick TR-909 Kick 909Comp Kick Room Kick 2 --- 909Snare2 --- ---<br />
10 Bb–1 Dance Kick 2 Dance Kick 2 Dance Kick 2 St Kick 1 Power Kick1 --- 909 Kick 3 --- ---<br />
11 B–1 909Comp Kick 909Comp Kick 909Comp Kick JazzKick Power Kick2 --- House Kick --- ---<br />
12 C0 TR-909 Kick2 TR-909 Kick2 TR-909 Kick2 NewRockKik Elec Kick 2 --- TR-808 Kick --- ---<br />
13 C#0 HipHop Kick2 HipHop Kick2 HipHop Kick2 Cymbal Roll Elec Kick 1 --- 909 Kick --- ---<br />
14 D0 BassDrumSet BassDrumSet BassDrumSet Rock Stick 2 TR-808 Kick --- 909 Kick2 --- ---<br />
15 D#0 TechnoKick1 TechnoKick1 TechnoKick1 Rm Snare 1 TR-909 Kick --- TR-909 OHHsh --- ---<br />
16 E0 Bounce Bounce Bounce Rm Snare 2 Dance Kick 2 --- TR-909 OHH --- ---<br />
17 F0 Voice One Voice One Voice One St Snare1 Voice One --- Ah --- ---<br />
18 F#0 Voice Two Voice Two Voice Two St Snare2 Voice Two --- Ha --- ---<br />
19 G0 Voice Three Voice Three Voice Three NewJzSn2 Voice Three --- ShutHa --- ---<br />
20 G#0 --- HipHop Kick2 --- NewJzSn1 --- --- ShutHi --- ---<br />
21 A0 --- TR-909 Kick2 --- R&B Snare --- --- One --- ---<br />
22 Bb0 MC-500 Beep MC-500 Beep MC-500 Beep RockSnare2_2 MC-500 Beep --- Two --- ---<br />
23 B0 MC-500 Beep MC-500 Beep MC-500 Beep RockSnare1_2 MC-500 Beep --- Three --- ---<br />
24 C1 Concert Snr Concert Snr Concert Snr PopSnare38 2 Concert Snr --- Four --- ---<br />
25 C#1 Snare Roll Snare Roll Snare Roll Snare Ghost1 Snare Roll Finger Snap Snare Roll --- ---<br />
26 D1 FingerSnaps2 Finger Snap FingerSnaps2 PopSnare38 2 Finger Snap Tambourine FingerSnaps2 --- ---<br />
27 D#1 High-Q High-Q High-Q FingerSnaps2 JazzClosedHH Castanets High-Q --- ---<br />
28 E1 Slap Slap Slap 909 HandClap Pedal HiHat Crash Cymb1 Slap MaxLow Kick2 HipHop Kick2<br />
29 F1 Scrtch Push2 Scrtch Push2 Scrtch Push2 808 Clap JazzOpenHH Snare Roll Scrtch Push2 Rk CmpKick Syn Swt Atk1<br />
30 F#1 Scrtch Pull2 Scrtch Pull2 Scrtch Pull2 Hand clap2 Ride Cymbal Concert Snr Scrtch Pull2 Gospel Clap Lo-Bit Stk 1<br />
31 G1 Sticks Sticks Sticks 909 HandClap Sticks Concert Cym Sticks Sweep Bass TR707 Kick<br />
32 G#1 SquareClick SquareClick SquareClick Pedal Hi Hat SquareClick ConcertKick SquareClick Sft Snr Gst TR808 Snr 5<br />
33 A1 Mtrnm.Click Mtrnm.Click Mtrnm.Click GospelHClp1 Mtrnm.Click Jingle Bell Mtrnm.Click HipHop Kick2 Vint Kick 1<br />
34 Bb1 Mtrnm. Bell Mtrnm. Bell Mtrnm. Bell Voice Snare Mtrnm. Bell Bell Tree Mtrnm. Bell Reg.PHH Reg.PHH<br />
35 B1 TechnoKick2 TR-909 Kick2 CR78 Kick 2 Voice Kick Jazz Kick 1 Bar Chimes HipHop Kick Reg.Kick 1 Vint Kick 2<br />
36 C2 TR-909 Kick2 TechnoKick2 CR78 Kick 1 Voice Kick ConcertKick Wadaiko SimpleKick Reg.Kick 2 Old Kick 1<br />
37 C#2 TR-909 Rim Side Stick CR78 Rim Voice Stick Side Stick Wadaiko Rim Side Stick Reg.Stick Lo-Bit Stk 4<br />
38 D2 909 SD 1 Dance Snare1 CR78 Snare 1 Voice Snare Concert Snr Shimedaiko HipHop Snare Reg.Snr 2 Reg.Snr 1<br />
39 D#2 909 HandClap 909 HandClap 707 Claps Voice Stick Castanets Atarigane 707 Claps Reg.Snr Gst Amb Clap<br />
40 E2 TR-909Snare2 Power Snare1 CR78 Snare 2 Voice Snare Concert Snr Hyoushigi HipHopSnare2 Reg.Snr 1 TY Rim<br />
41 F2 909 Tom Synth Drum 2 78 TOM Voice Snare Timpani Ohkawa 85St Tom16 Reg.F.Tom Jazz Lo Tom1<br />
42 F#2 TR-707HiHatC CR-78HiHatCl CR-78HiHatCl Voice Hi Hat Timpani H kotsuzumi HipHopCHH Reg.CHH 1 Reg.CHH 1<br />
43 G2 909 Tom Synth Drum 2 78 TOM Voice Tom Timpani L Kotsuzumi 85St Tom16 Reg.L.Tom Jazz Lo Tom2<br />
44 G#2 TR-707HiHatC 808 HiHat Cl 606 HiHat Cl Voice Hi Hat Timpani Ban_Gu HipHopCHH Reg.CHH 2 Reg.CHH 2<br />
45 A2 909 Tom Synth Drum 2 78 TOM Voice Tom Timpani Big Gong 85St Tom12 Reg.M.Tom 1 Jazz Mid Tom<br />
46 Bb2 909HiHat Opn CR-78HiHatOp CR-78HiHatOp Voice Hi Hat Timpani Small Gong --- Reg.OHH Reg.OHH<br />
47 B2 909 Tom Synth Drum 2 78 TOM Voice Tom Timpani Bend Gong 85St Tom12 Reg.M.Tom 2 Jazz Mid Tom<br />
48 C3 909 Tom Synth Drum 2 78 TOM Voice Tom Timpani RAMA Cymbal 85St Tom10 Reg.H.Tom 1 Jazz Hi Tom<br />
49 C#3 909 Crash 808 Crash 808 Crash Voice Hi Hat Timpani RAMA Cymbal 85St CrsCym1 Crash Cym1 Crash Cym1<br />
50 D3 909 Tom Synth Drum 2 78 TOM Voice Tom Timpani Gamelan Gong 85St Tom10 Reg.H.Tom 2 Jazz Hi Tom<br />
51 D#3 909Ride Cymb 606 Ride Cym 606 Ride Cym Voice Ride Timpani Udo_Short 85St RdCym Rock Ride Rock Rd Edge<br />
52 E3 ChinaCymbal ReverseCymbl ChinaCymbal VoxCymbal1 Timpani Udo_Long ChinaCymbal China Cymbal China Cymbal<br />
53 F3 Ride Bell Ride Bell Ride Bell Voice Cymbal Timpani Udo_slap 85St RdBell Ride Edge Rock Rd Cup<br />
54 F#3 Tambourine Shake Tamb CR78 Tambour Voice Tambou Tambourine Bendir Tambourine Tamborine Tamborine<br />
55 G3 Splash Cym. Splash Cym. Splash Cym. Voice Cymbal Splash Cym. Req_Dum Splash Cym. Crash Cym2a Splash Cym<br />
56 G#3 808 Cowbell 808 Cowbell CR78 Cow Voice Perc Cowbell Req_tik Cowbell Cowbell Low Cowbell<br />
57 A3 Crash Cymb2 Crash Cymb2 909 Crash Voice Cymbal Con.Cymbal2 Tabla_Te Crash Cymb2 Crash Cym2b Rock Crash 2<br />
58 Bb3 Vibraslap Vibraslap Vibraslap Vibraslap Vibraslap Tabla_Na Vibraslap Cowbell Hi TR808 Cym<br />
59 B3 Ride Cymbal Ride Cymbal Ride Cymbal AfAahhh Concert Cym Tabla_Tun Ride Cymbal Ride Bell Jazz Ride<br />
60 C4 Bongo High Bongo High CR78 HiBongo NewHiBongo Bongo High Tabla_Ge Bongo High Conga Hi Mt Bongo Hi<br />
61 C#4 Bongo Low Bongo Low CR78 LoBongo NewLoBongo Bongo Low Tabla Ge Hi Bongo Low Conga Lo Mt Bongo Lo<br />
62 D4 Mute H.Conga Mute H.Conga 808 Conga NewCongaSlp Mute H.Conga Talking Drum Mute H.Conga Conga Lo Conga Hi Mt<br />
63 D#4 Conga Hi Opn Conga Hi Opn 808 Conga NewCongaOp Conga Hi Opn Bend tlk_drm Conga Hi Opn Conga Hi Op Conga Hi<br />
64 E4 Conga Lo Opn Conga Lo Opn 808 Conga NewLoConga Conga Lo Opn Caxixi Conga Lo Opn Conga Lo Op Conga Lo<br />
65 F4 High Timbale High Timbale High Timbale Timbal Hi High Timbale DJembe High Timbale Timbale Hi Timbale Hi<br />
66 F#4 Low Timbale Low Timbale Low Timbale Timbal Lo Low Timbale Djembe_rim Low Timbale Timbale Low Timbale Low<br />
67 G4 Agogo Agogo Agogo Agogo Agogo Low Timbale Agogo Agogo Bell H Cowbell Hi<br />
68 G#4 Agogo Agogo Agogo Agogo Agogo Timbl Paila Agogo Agogo Bell L Cowbell Low<br />
69 A4 Cabasa Cabasa Cabasa NewShaker2 Cabasa High Timbale Cabasa Cabasa Up Cabasa<br />
70 Bb4 808 Maracas Maracas CR78 Maracas NewShaker1 Maracas Cowbell Maracas Maracas Shaker<br />
71 B4 ShrtWhistle ShrtWhistle ShrtWhistle ShrtWhistle ShrtWhistle Bongo High ShrtWhistle Whistle Shrt Noise OHH 2<br />
72 C5 LongWhistle LongWhistle LongWhistle LongWhistle LongWhistle Bongo Low LongWhistle Whistle Long Scratch 5<br />
73 C#5 Short Guiro Short Guiro Short Guiro NewQuide1 Short Guiro Mute H.Conga Short Guiro Guiro Short Syn Low Atk2<br />
74 D5 CR78 Guiro Long Guiro CR78 Guiro NewQuide2 Long Guiro Conga Hi Opn Long Guiro Guiro Long MG Zap 3<br />
75 D#5 808 Clave Claves CR78 Clv NewClaves Claves Conga MtLow Claves Claves Syn Swt Atk1<br />
76 E5 Woodblock Woodblock Woodblock Woodblock Woodblock Conga Slap Woodblock Wood Block H Syn Swt Atk4<br />
77 F5 Woodblock Woodblock Woodblock Woodblock Woodblock Conga Lo Opn Woodblock Wood Block L Bongo Hi Slp<br />
78 F#5 Hoo Hoo Hoo Mute Cuica Mute Cuica Conga Slide Mute Cuica Cuica Mute Noise OHH<br />
79 G5 Hoo Hoo Hoo Open Cuica Open Cuica Mut Pandiero Open Cuica Cuica Open Noise CHH<br />
80 G#5 MuteTriangl MuteTriangl CR78 M.Beat MuteTriangl MuteTriangl Opn Pandiero MuteTriangl Triangle Mt Triangle 1<br />
81 A5 OpenTriangl OpenTriangl CR78 M.Beat OpenTriangl OpenTriangl Open Surdo OpenTriangl Triangle Op Triangle 2<br />
82 Bb5 626 Shaker 626 Shaker 626 Shaker Shaker Shaker Mute Surdo Shaker Cabasa Cut Cajon 1<br />
83 B5 Jingle Bell Jingle Bell Jingle Bell Jingle Bell Jingle Bell Tamborim Jingle Bell Castanet Cajon 3<br />
131
Backing <strong>Keyboard</strong> BK-5<br />
Drum Sets<br />
PC 31 [CC32= 4]<br />
TR-909<br />
PC 27 [CC32= 4]\<br />
Dance<br />
PC 28 [CC32= 4]<br />
CR-78<br />
PC 64 [CC32= 4]<br />
V-VoxDrum<br />
PC 49 [CC32= 4]<br />
Orchestra<br />
PC 50 [CC32= 4]<br />
Ethnic<br />
PC 32 [CC32= 4]<br />
Multi Drum<br />
PC 4 [CC32= 5]<br />
StandardKit1<br />
PC 5 [CC32= 5]<br />
StandardKit3<br />
84 C6 Bell Tree Bell Tree Bell Tree Bell Tree Bell Tree Agogo Bell Tree Bongo Hi Mt Wind Chime<br />
85 C#6 Castanets Castanets Castanets Castanets Castanets Agogo Castanets Bongo Hi Slp SprgDrm Hit<br />
86 D6 Mute Surdo Mute Surdo Mute Surdo Mute Surdo Mute Surdo Shaker Mute Surdo Bongo Lo Slp Crotale<br />
87 D#6 Open Surdo Open Surdo Open Surdo Open Surdo Open Surdo Low Whistle Open Surdo Bongo Hi Op R8 Click<br />
88 E6 Applause 2 Small <strong>Club</strong> Small <strong>Club</strong> Cana Applause Low Whistle ReverseCymbl Bongo Lo Op Metro Bell<br />
89 F6 --- 66 Snare 260 --- Timbal HiFlm --- Mute Cuica Hoo Cajon 1 DR202 Beep<br />
90 F#6 --- 909 SD 1 --- Timbal LoFlm --- Open Cuica Hoo Cajon 2 Reverse Cym<br />
91 G6 --- Elec Snare 2 --- NewTmblPHS --- MuteTriangl MuteTriangl Cajon 3 Xylo Seq.<br />
92 G#6 --- House Snare --- NewShekere1 --- OpenTriangl OpenTriangl Vint Snr 2 Vinyl Noise<br />
93 A6 --- Rap Snare --- NewShekere2 --- Short Guiro MuteTriangl Shaker 3 Mobile Phone<br />
94 Bb6 --- House Snare --- NHBngoMute --- Long Guiro OpenTriangl WD Rim Group Snap<br />
95 B6 --- Dance Snare1 --- L BongoMute --- Cabasa Up 808 Tom 2 Mix Kick 1 Laser<br />
96 C7 --- Rap Snare --- CajonHi --- Cabasa Down 808 Tom 2 Mix Kick 2 Siren<br />
97 C#7 Techno Hit Techno Hit Techno Hit CajonHiFlm Applause 2 Claves 808 Tom 2 Mix Kick 3 AnalogKick 3<br />
98 D7 Philly Hit Philly Hit Philly Hit Cajon Low Small <strong>Club</strong> Woodblock 808 Tom 2 Mix Kick 4 Old Kick 2<br />
99 D#7 Shock Wave Shock Wave Shock Wave CajonLoFlm Timpani Woodblock 808 Tom 2 Mix Kick 5 Reg.Kick<br />
100 E7 Lo Fi Rave Lo Fi Rave Lo Fi Rave FlmncoHClap1 Timpani --- 808 Tom 2 Mix Clap 1 TR909 Snr 4<br />
101 F7 Bam Hit Bam Hit Bam Hit FlmncoHClap1 Timpani --- 808 Cowbell Wind Chime TR808 Snr 2<br />
102 F# Bim Hit Bim Hit Bim Hit BongoCowBell Timpani --- 808 Conga Tibet Cymbal Short Snr1<br />
103 G7 TapeRewind TapeRewind TapeRewind AfHey Timpani --- 808 Conga Crotale Vint Snr 4<br />
104 G#7 Phono Noise Phono Noise Phono Noise MamboCowBell Timpani --- 808 Conga --- ---<br />
105 A7 Dance Snare1 Dance Snare1 Dance Snare1 MexFVox2 Timpani --- Synth Drum 2 --- ---<br />
106 Bb7 Power Snare2 Power Snare2 Power Snare2 AfFoots Timpani --- Synth Drum 2 --- ---<br />
107 B7 Elec Snare 1 Elec Snare 1 Elec Snare 1 MexFVox1 Timpani --- Synth Drum 2 --- ---<br />
108 C8 Dance Snare2 Dance Snare2 Dance Snare2 MexMVox1 Timpani --- Synth Drum 2 --- ---<br />
109 C#8 Elec Snare 2 Elec Snare 2 Elec Snare 2 YodelFVox1 Timpani --- Synth Drum 2 --- ---<br />
110 D8 Elec. Snare Elec. Snare Elec. Snare MexMVox2 Timpani --- Synth Drum 2 --- ---<br />
111 D#8 Elec Snare 3 Elec Snare 3 Elec Snare 3 YodelMVox1 Timpani --- R&B OHHsh --- ---<br />
112 E8 66 Snare 260 66 Snare 260 66 Snare 260 MexMVox3 Timpani --- R&B OHH --- ---<br />
113 F8 TR-707 Snare TR-707 Snare TR-707 Snare FlmncoFVox1 Timpani --- R&B CHH --- ---<br />
114 F#8 808 Snare 1 808 Snare 1 808 Snare 1 YodelFVox2 --- --- R&B OHH --- ---<br />
115 G8 808 Snare 2 808 Snare 2 808 Snare 2 FlmncoFVox2 --- --- TR-909 CHH --- ---<br />
116 G#8 TR-808Snare2 TR-808Snare2 TR-808Snare2 NewWhistle1 --- --- TR-909 OHH --- ---<br />
117 A8 909 Snare 1 909 Snare 1 909 Snare 1 FlmncoFVox3 --- --- 909 Crash --- ---<br />
118 Bb8 909 Snare 2 909 Snare 2 909 Snare 2 NewWhistle2 --- --- Pop Kick 36 --- ---<br />
119 B8 909 SD 1 909 SD 1 909 SD 1 FlmncoMVox1 --- --- IPopCStk37st --- ---<br />
120 C9 TR-909Snare2 TR-909Snare2 TR-909Snare2 FlmncoMVox2 --- --- IPopSn38st --- ---<br />
121 C#9 Rap Snare Rap Snare Rap Snare BrazilVox1 --- --- IPopSn40st --- ---<br />
122 D9 JungleSnare1 JungleSnare1 JungleSnare1 FlmncoMVox3 --- --- Pop Hi Hat1 --- ---<br />
123 D#9 House Snare House Snare House Snare BrazilVox2 --- --- Pop Hi Hat2 --- ---<br />
124 E9 House Snare House Snare House Snare BrazilVox3 --- --- Pop Hi Hat3 --- ---<br />
125 F9 House Snare House Snare House Snare AfAahhh --- --- Tom 43 --- ---<br />
126 F#9 Voice Tah Voice Tah Voice Tah Voice Snare --- --- Tom 47 --- ---<br />
127 G9 Noise Slap Noise Slap Noise Slap Voice Snare --- --- Tom 50 --- ---<br />
r<br />
132
Backing <strong>Keyboard</strong> BK-5 r<br />
Drum Sets<br />
PC 6 [CC32= 5]<br />
Kit-Euro:POP<br />
PC 1 [CC32= 5]<br />
WD Std Kit<br />
PC 2 [CC32= 5]<br />
LD Std Kit<br />
PC 3 [CC32= 5]<br />
TY Std Kit<br />
PC 7 [CC32= 5]<br />
LatinDrmKit<br />
PC 8 [CC32= 5]<br />
Latin Menu1<br />
PC 9 [CC32= 5]<br />
Latin Menu2<br />
PC 10 [CC32= 5]<br />
Latin Menu3<br />
PC 13 [CC32= 5]<br />
Asia Menu<br />
21 A0 --- --- --- --- TimbalesHand --- --- --- ---<br />
22 Bb0 --- --- --- --- Timbles HiMt --- --- --- ---<br />
23 B0 --- --- --- --- Timbles HiOp --- --- --- ---<br />
24 C1 --- --- --- --- Timbles LoMt --- --- --- ---<br />
25 C#1 --- --- --- --- Timbles LoOp --- --- --- ---<br />
26 D1 --- --- --- --- TmbSideStick --- --- --- ---<br />
27 D#1 --- --- --- --- TimblesPaila --- --- --- ---<br />
28 E1 TR707 Kick Dance Kick Dance Kick Dance Kick SectChd m9 --- --- --- ---<br />
29 F1 AnalogKick 1 Dry Kick 1 Dry Kick 1 Dry Kick 1 SectChd Mj9 --- --- --- ---<br />
30 F#1 Dirty Snr 6 Snr Roll Snr Roll Snr Roll TimbalesFil4 --- --- --- ---<br />
31 G1 FB Kick Power Kick Power Kick Power Kick TimbalesFil3 --- --- --- ---<br />
32 G#1 BrushRoll Amb.Snr 2 Amb.Snr 2 Amb.Snr2 p TimbalesFil2 --- --- --- ---<br />
33 A1 PlasticKick2 Reg.Kick 2 Reg.Kick 2 Power Kick TimbalesFil1 --- --- --- ---<br />
34 Bb1 Reg.CHH 2 Reg.PHH Reg.PHH Reg.PHH Dixie HH Hlf --- --- --- ---<br />
35 B1 Power Kick Reg.Kick 1 Reg.Kick 1 Reg.Kick Fat BD --- --- --- ---<br />
36 C2 TR909 Kick 6 WD Kick LD Kick TY Kick Room Kick 2 Agogo 2 Hi Cuica 3 Surdo Hard Hyoshigi<br />
37 C#2 R&B ShrtRim1 WD CStk LD CStk TY CStk Cross Stick2 Agogo 2 Lo Cuica Hi 1 Surdo Mute Hyoshigi 2<br />
38 D2 TR909 Snr 3 WD Snr LD Snr TY Snr Maple Lo Snr Agogo 3 Hi Cuica Hi 2 Surdo Mute2 Kane<br />
39 D#2 TR909 Clap 1 SF Snr Gst Reg.Snr Gst SF SnrGst Hand Clap 2 Agogo 3 Lo Cuica Lo 1 Surdo Open H Kane Side<br />
40 E2 TR909 Snr 4a WD Rim LD Rim TY Rim MapleSoft SN ApitoHiShort Cuica Lo 2 Surdo Open L Atarigane<br />
41 F2 Sharp L.Tom2 RR F.Tom RR F.Tom RR F.Tom Studio Tom 4 ApitoLoShort Ganza Hard Surdo Open1 Kwaengwari f<br />
42 F#2 TR909 CHH 1 Reg.CHH 1 Reg.CHH 1 Reg.CHH 1 Dixie HH Cls Berimbau Dn Ganza Soft Surdo Open2 Kwaengwari p<br />
43 G2 Sharp L.Tom1 TY L.Tom LD L.Tom TY L.Tom Studio Tom 3 Berimbau Mut Guiro Long Surdo Rim KwaengwariMt<br />
44 G#2 TR909 PHH 1 Reg.CHH 2 Reg.CHH 2 Reg.CHH 2 Dixie HH Pdl Berimbau Opn Guiro Long2 Surdo Rim 2 Mokugyo 1<br />
45 A2 Sharp M.Tom TY M.Tom LD M.Tom TY M.Tom Studio Tom 2 Berimbau Up Guiro Short Surdo Soft Mokugyo 2<br />
46 Bb2 TR909 OHH 2 Reg.OHH Reg.OHH Reg.OHH Dixie HH Opn Bongo 1 Hi Guiro Short2 Tamborim Mut Ohkawa<br />
47 B2 Sharp M.Tom TY M.Tom LD M.Tom TY M.Tom Studio Tom 2 Bongo 1 Lo Hand Clap 2 Tamborim Opn Ohkawa 2<br />
48 C3 Sharp H.Tom TY H.Tom LD H.Tom TY H.Tom Studio Tom 1 Bongo 2 Hi MamboBell Mt Tamborim Slp Shimedaiko 2<br />
49 C#3 TR909 Crash Crash Cym1a Crash Cym1a Crash Cym 2 Crash Cymbal Bongo 2 Lo MamboBell Op TamborimMute Sime Taiko<br />
50 D3 Sharp H.Tom TY H.Tom LD H.Tom TY H.Tom Studio Tom 1 Bongo Hi Hrd Maracas 2 TamborimOpen Taiko<br />
51 D#3 TR909 Ride Rock Ride 1 Rock Ride 1 Rock Ride 1 Rock RdCym1 Bongo HiOp f MaracasUpDwn TamborimRim Tsuzumi 2 Hi<br />
52 E3 China Cymbal China Cymbal China Cymbal China Cymbal Crash 1 Bongo Lo Hrd MtlGuiroLng TamborimRoll Tsuzumi 2 mf<br />
53 F3 Rock Rd Edge Splash Cym Splash Cym Splash Cym Bongo 1 Hi Bongo Lo Sft MtlGuiroSht Tambrin Hit Tsuzumi 2 p<br />
54 F#3 Tamborine 3 Tamborine 3 Tamborine 3 Tamborine2 Tambrin Hit Bongo LoOp f PandeiroCrsh TambrinShake Tsuzumi Hi<br />
55 G3 Crash Cym1 p Rock Crash 1 Rock Crash 1 Crash Cym1a Bongo 1 Lo Bongo LoOpmf PandeiroHit Timbale Hi Tsuzumi Lo<br />
56 G#3 Cowbell Cowbell3 Cowbell3 Cowbell3 Cowbell Op 1 Bongo LoSlap PandeiroL Hi Timbale Lo Wadaiko<br />
57 A3 Rock Crash 2 Crash Cym1b Crash Cym1 Crash Cym1b BongoHiSlap1 BongoBell Mt PandeiroL Lo Timbale Side Wadaiko Rim<br />
58 Bb3 Vibraslap Cowbell2 Lng Cowbell Cowbell2 Lng Cowbell 3 BongoBell Op PandeiroL Rm Timbales Rim Ho<br />
59 B3 TR606 Cym 2 Rock Ride 2 Rock Ride 2 Rock Ride 2 Bongo LoSlap BongoHiSlap1 PandeiroL Sp TimbalesFil1 Yoh<br />
60 C4 Bongo Lo Op Conga Hi Mt Conga 2H Mt Conga 2H Mt Conga Hi Mt BongoHiSlap2 PandeiroMute TimbalesFil2 iYooh<br />
61 C#4 Bongo Hi Op Conga Lo Mt Conga 2L Mt Conga 2L Mt Conga Lo Mt Cabasa Roll PandeiroOpen TimbalesFil3 Yyoo Dude<br />
62 D4 Conga Hi Mt Conga Hi Slp Conga 2H Slp Conga 2H Slp Conga Slap Caixa Mute PandeiroRim TimbalesFil4 Buk<br />
63 D#4 Conga Hi Op Conga Hi Op Conga 2H Op Conga 2H Op Conga Hi Op Caixa Mute2 PandeiroRoll TimbalesHand Buk Rim<br />
64 E4 Conga Lo Op Conga Lo Op Conga Lo Op Conga 2L Op CongaLoOp f Caixa Open1 PandeiroS Op Timbles HiMt Changgo<br />
65 F4 Conga Efx Timbale Hi Timbale 1 Timbare 4 Timbles HiMt Caixa Open2 PandeiroS Rm Timbles HiOp Asian Gong 1<br />
66 F#4 Shaker 3 Timbale Low Timbale 2 Timbare 3 Timbles LoOp Caixa Open3 PandeiroS Sp Timbles LoMt Asian Gong 2<br />
67 G4 Shaker 2 Mild Agogo H Agogo 2 Hi Agogo 2 Hi Agogo 2 Hi Caixa Rim Quide Long Timbles LoOp Gamelan Gong<br />
68 G#4 CR78 Beat Mild Agogo L Agogo 2 Low Agogo 2 Low Agogo 2 Lo Caixa Roll Quide Short TmbSideStick Asian Gong 3<br />
69 A4 Cabasa Cut 1 Cabasa Up Cabasa 2 Cabasa 2 Real Cabasa2 Caixa Roll2 Quijada SectChd 13th Asian Gong 4<br />
70 Bb4 Cabasa Cut 2 Maracas Shaker 2 Shaker 1 Maracas 2 Cajon Hi Rainstick SectChd m9 Asian Gong 6<br />
71 B4 Lo-Bit PHH Whistle Shrt Whistle Shrt Whistle Shrt ApitoHiShort Cajon Lo Real Cabasa1 SectChd Mj9 Asian Gong 7<br />
72 C5 Scratch 7 Whistle Long Whistle Whistle Long ApitoLoShort Cajon Rol Hi Real Cabasa2 Sabor! Ban Gu 1<br />
73 C#5 Syn Low Atk2 Guiro Short Guiro 2 Up Guiro 2 Up Guiro Short2 Cajon Rol Lo RecoRecoLng Arriba! Ban Gu 2<br />
74 D5 MG Zap 7 Guiro Long Guiro Long Guiro 2 Down Guiro Long2 Caxixi RecoRecoSht Ole! Ban Gu 3<br />
75 D#5 Syn Swt Atk1 Claves Claves 2 Claves 2 Claves Lo 2 Chekere 1 Repinique1 Uno! Ban Gu 4<br />
76 E5 Syn Swt Atk4 Wood Block H Wood Block2H Wood Block2H Berimbau Up Chekere 2 Repinique2 Dos! Gu Hi<br />
77 F5 Conga Thumb Wood Block L Wood Block2L Wood Block2L Berimbau Dn Chekere 3 RepiniqueHrd Tres! Gu Roll<br />
78 F#5 Triangle 1 Cuica Mute Cuica 2 Low Cuica 2 Low Cuica Hi 1 Clave! RepiniqueSft Quatro! HuYinLuoH Mt<br />
79 G5 Triangle 2 Cuica Open Cuica 2 Hi Cuica 2 Hi Cuica Lo 2 Claves Lo 2 Repique Open Grito-Hahaha HuYinLuoH Op<br />
80 G#5 Euro Hit 1 Triangle Mt Triangle Mt Triangle Mt Caixa Mute Conga Hi Mt Repique Rim Grito-Ahaha! HuYinLuoL Mt<br />
81 A5 Tao Hit Triangle Op Triangle Op Triangle Op Caixa Open2 Conga Hi Op Repique Roll Grito-Haahai HuYinLuoL Op<br />
82 Bb5 Narrow Hit 2 Cabasa Cut Cabasa2 Cut Cabasa2 Cut Caixa Rim Conga Link SambaBateria Grito-Rrrrr! Nao Bo<br />
83 B5 Euro Hit 2 DigiSpectrum DigiSpectrum DigiSpectrum Caixa Roll2 Conga Lo Mt SambaWhistle Tiquitito! Xiao Bo<br />
84 C6 Wind Chime Wind Chime Wind Chime Wind Chime Cajon Rol Hi Conga Roll Shaker 1 Grito-Oa Oa! Asian Gong 5<br />
85 C#6 Timpani Roll Wood Block M Wood Block2M Wood Block2M Cajon Rol Lo Conga Slap Shaker 2 Grito-Eh Eh! Shou Luo 1<br />
86 D6 Crotale Cajon 2 Cajon 2 Cajon 2 Surdo Mute2 Conga Thumb Shaker Long Ama ya ahi! Shou Luo 2<br />
87 D#6 R8 Click ConcertBD ConcertBD ConcertBD Surdo Open2 CongaLoOp f Shaker Short Fuego! Shu Ban 1<br />
88 E6 Metro Bell R&B Kick R&B Kick R&B Kick PandeiroL Hi CongaLoOp mf --- Hey Brazil Shu Ban 2<br />
89 F6 MC500 Beep 1 Dry Kick 2 Dry Kick 2 Dry Kick 2 PandeiroL Lo Cowbell 1 --- --- Shu Gu<br />
90 F#6 MC500 Beep 2 Old Kick Old Kick Old Kick PandeiroOpen Cowbell 2 --- --- Shu Gu Rim<br />
91 G6 Atmosphere Jazz Doos Jazz Doos Jazz Doos PandeiroMute Cowbell 3 --- --- Tang Gu Mt<br />
92 G#6 Agogo Noise Agogo Noise Agogo Noise Agogo Noise PandeiroL Rm Cowbell Mt 1 --- --- Tang Gu Op<br />
93 A6 Car Slip Rock OHH Rock OHH Rock OHH PandeiroL Sp Cowbell Mt 2 --- --- BaliCym Cls<br />
94 Bb6 Group Snap JD Anklungs JD Anklungs JD Anklungs Quijada Cowbell Op 1 --- --- BaliCym Opn<br />
95 B6 Laser Rock OHH Rock OHH Rock OHH Rainstick Cowbell Op 2 --- --- Ceng Ceng<br />
96 C7 ConcertBD Cajon 3 Cajon 3 Cajon 3 Metronome 2 --- --- --- Chenchen Cls<br />
97 C#7 AnalogKick 3 Cajon 1 Cajon 1 Cajon 1 R8 Click --- --- --- Chenchen Opn<br />
98 D7 Old Kick Mix Clap Mix Kick 4 TY Rim f Metronome 1 --- --- --- Kopyak Mt<br />
99 D#7 Reg.Kick Gospel Clap Gospel Clap Gospel Clap 180:LatinPt2 --- --- --- Kopyak Op<br />
100 E7 TR909 Snr 4b Bright Clap Bright Clap Bright Clap 160:CgMambo --- --- --- Finger Cym<br />
101 F7 TR808 Snr 2 Rock Rd Cup Rock Rd Cup Rock Rd Cup 132:TmblPtn1 --- --- --- Ramacymbal<br />
102 F# Vint Snr 4 Cowbell Cowbell Cowbell 132:AgogoPtn --- --- --- Jaw Harp Opn<br />
103 G7 Light Snr Crash Cym 2 Crash Cym 2 Crash Cym 2 104:Shakin' --- --- --- Jaw Harp Wow<br />
104 G#7 --- --- --- --- --- --- --- --- ---<br />
105 A7 --- --- --- --- --- --- --- --- ---<br />
106 Bb7 --- --- --- --- --- --- --- --- ---<br />
107 B7 --- --- --- --- --- --- --- --- ---<br />
108 C8 --- --- --- --- --- --- --- --- ---<br />
133
Backing <strong>Keyboard</strong> BK-5<br />
Drum Sets<br />
r<br />
134<br />
PC 14 [CC32= 5]<br />
India Menu<br />
PC 11 [CC32= 5]<br />
IndiaDrmKit<br />
PC 12 [CC32= 5]<br />
MidEastDrKit<br />
PC 101 [CC32= 4]<br />
IndoMix1<br />
PC 102 [CC32= 4]<br />
IndoMix2<br />
PC 103 [CC32= 4]<br />
IndoMix3<br />
PC 65 [CC32= 4]<br />
Or. R&B<br />
PC 66 [CC32= 4]<br />
Or. Techno<br />
PC 117 [CC32= 1]<br />
Oriental 1<br />
0 C–1 --- --- --- Elec Kick 2 HipHop Kick1 Pop Cymbal2 House Kick House Kick ---<br />
1 C#–1 --- --- --- Elec Kick 1 Jazz Kick 1 Pop Ride1 HipHop Kick HipHop Kick ---<br />
2 D–1 --- --- --- CR78 Kick 1 Mex Kick R&B Snare TR-808 Kick SimpleKick ---<br />
3 D#–1 --- --- --- CR78 Kick 2 Timpani R&B Clap 909 Kick2 909 Kick2 ---<br />
4 E–1 --- --- --- TR-606 Kick1 Timpani Techno Snare HipHopSnare2 HipHopSnare2 ---<br />
5 F–1 --- --- --- TR-707 Kick1 Timpani House Snare Techno Snare Techno Snare ---<br />
6 F#–1 --- --- --- 808 Kick Timpani Jungle Snare TR-808Snare2 R&B Snare ---<br />
7 G–1 --- --- --- TR-808 Kick Timpani Ps Snare R&B Clap R&B Clap ---<br />
8 G#–1 --- --- --- 808 BassDrum Timpani 909 Snare 707 Claps 707 Claps ---<br />
9 A–1 --- --- --- TR-909 Kick Timpani 909Snare2 Tambourine Tambourine ---<br />
10 Bb–1 --- --- --- Dance Kick 2 Timpani 909 Kick 3 R&B OHHsh TR-909 OHHsh ---<br />
11 B–1 --- --- --- 909Comp Kick Timpani House Kick R&B OHH TR-909 OHH ---<br />
12 C0 --- --- --- TR-909 Kick2 Timpani TR-808 Kick Wadaiko Wadaiko ---<br />
13 C#0 --- --- --- HipHop Kick2 Timpani 909 Kick Ohkawa Ohkawa ---<br />
14 D0 --- --- --- BassDrumSet Timpani 909 Kick2 Shimedaiko Shimedaiko ---<br />
15 D#0 --- --- --- TechnoKick1 Timpani TR-909 OHHsh H kotsuzumi H kotsuzumi ---<br />
16 E0 --- --- --- Dol4 Synth Drum 2 TR-909 OHH L Kotsuzumi L Kotsuzumi ---<br />
17 F0 --- --- --- Dance Snare1 Synth Drum 2 Ah Tabla_Ge Tabla_Ge ---<br />
18 F#0 --- --- --- GondangAlToba St Snare2 Ha Tabla_Na Tabla_Na ---<br />
19 G0 --- --- --- Elec Snare 1 Synth Drum 2 ShutHa Tabla_Te Tabla_Te ---<br />
20 G#0 --- --- --- Dance Snare2 NewJzSn1 ShutHi Tabla_Tun Tabla_Tun ---<br />
21 A0 --- --- --- Elec Snare 2 Synth Drum 2 One Udo_Long Udo_Long ---<br />
22 Bb0 --- --- --- MamboCowBell RockSnare2_2 Two Djembe_rim Djembe_rim ---<br />
23 B0 --- --- --- CowBell Synth Drum 2 Three 909 HandClap 909 HandClap ---<br />
24 C1 --- --- --- Claves Rm Kick 2 Four Tambourine Tambourine ---<br />
25 C#1 --- --- --- Woodblock1 Snare Ghost1 SnareFlam Pop Hi Hat1 Pop Hi Hat1 ---<br />
26 D1 --- --- --- Dol2 Rm Snare 2 FingerSnaps2 Pop Hi Hat2 Pop Hi Hat2 ---<br />
27 D#1 --- --- --- Dol3 FingerSnaps2 High-Q Pop Hi Hat3 Pop Hi Hat3 ---<br />
28 E1 --- --- --- GonTaput4 Rm Snare 1 Slap NewShaker2 NewShaker2 ---<br />
29 F1 --- --- --- GonTaput5 Room Tom 5 Scrtch Push2 NewShaker1 NewShaker1 ---<br />
30 F#1 --- --- --- GonTaput6 Room Tom 5 Scrtch Pull2 IPopSn40st IPopSn40st ---<br />
31 G1 --- --- --- Sticks Room Tom 2 Synth Drum 2 HipHop Snare HipHop Snare ---<br />
32 G#1 --- --- --- Congas_SW TR707 Hihat C Synth Drum 2 Jungle Snare Jungle Snare ---<br />
33 A1 --- --- --- Congas_SW2 Room Tom 2 Synth Drum 2 House Snare House Snare ---<br />
34 Bb1 --- Dixie HH Hlf Dixie HH Hlf Congas_SW4 ConcertKick Synth Drum 2 808 BassDrum TechnoKick2 ---<br />
35 B1 --- Fat BD Maple Kick 808 BassDrum HipHop Kick2 HipHop Kick 909 Kick 3 TR-909 Kick2 Bass Drum<br />
36 C2 Bebarongan 1 Room Kick 2 Warm Kick TR-808 Kick TR-909 Kick2 SimpleKick SimpleKick 909 Kick Bass Drum<br />
37 C#2 Bebarongan 2 Cross Stick2 Cross Stick2 808 Rimshot Side Stick Side Stick Side Stick TR-909 Rim Rim Shot<br />
38 D2 Bebarongan 3 Maple Lo Snr NaturlHardSN 808 Snare 1 House Snare St Snare2 R&B Snare 909 SD 1 Snare Drum<br />
39 D#2 Pelegongan 1 Claps Real Claps Real GdgTaputRim 909 HandClap 707 Claps HandClap1st HandClap1st Hand Clap 1<br />
40 E2 Pelegongan 2 MapleSoft SN NaturlRimSht TR-808Snare2 Elec Snare 2 St Snare1 Hand Clap 21 Hand Clap 21 Hand Clap 2<br />
41 F2 Pelegongan 3 Studio Tom 4 Studio Tom 4 808 Tom 2 808 Tom 2 85St Tom16 909Snare2 TR-909Snare2 Tom 1<br />
42 F#2 Wadon 1 Dixie HH Cls Dixie HH Cls TR-808HiHatC TR-808HiHatC HipHopCHH R&B CHH TR-707HiHatC Closed Hi-Hat<br />
43 G2 Wadon 2 Studio Tom 3 Studio Tom 3 808 Tom 2 808 Tom 2 85St Tom16 Pop Kick 36 Pop Kick 36 Tom 2<br />
44 G#2 Wadon 3 Dixie HH Pdl Dixie HH Pdl 808 HiHat Cl JazzClosedHH HipHopCHH R&B CHH TR-707HiHatC Closed Hi-Hat<br />
45 A2 Wadon 4 Studio Tom 2 Studio Tom 2 808 Tom 2 808 Tom 2 85St Tom12 IPopCStk37st 909 Tom Tom 3<br />
46 Bb2 Wadon 5 Dixie HH Opn Dixie HH Opn TR-808HiHatO JazzOpenHH HipHopOHH R&B OHH 909HiHat Opn Open Hi-Hat<br />
47 B2 Wadon 6 Studio Tom 2 Studio Tom 2 808 Tom 2 808 Tom 2 85St Tom12 Tom 43 909 Tom Tom 4<br />
48 C3 Wadon 7 Studio Tom 1 Studio Tom 1 808 Tom 2 808 Tom 2 85St Tom10 Tom 47 909 Tom Tom 5<br />
49 C#3 Dhol 1 Crash Cymbal Crash Cymbal 808 Crash 808 Crash 85St CrsCym1 Pop Cymbal2 909 Crash Crash Cymbal<br />
50 D3 Dhol 2 Studio Tom 1 Studio Tom 1 808 Tom 2 Bend tlk_drm 85St Tom10 Tom 50 909 Tom Tom 6<br />
51 D#3 Dhol 3 Rock RdCym1 Rock RdCym1 606 Ride Cym Tabla Ge Hi 85St RdCym Pop Ride1 909Ride Cymb Ride Cymbal<br />
52 E3 Dhol 4 Crash 1 Crash 1 ChinaCymbal Tabla_Tun ChinaCymbal Pop Cymbal ChinaCymbal Doholla1 Rim1<br />
53 F3 Dhol 5 Dhol 2 Rek Dom Ride Bell Tabla_Na 85St RdBell Dholla Dom Dholla Dom Doholla1 Dom<br />
54 F#3 Dholak 1 R8 Tamb R8 Tamb Tambourine Tambourine Tambourine Dholla Sak 1 Dholla Sak 1 Finger Doff A<br />
55 G3 Dholak 2 Dholak 1 Rek Open Splash Cym. Bongo2_SW2 Splash Cym. Dholla Sak 2 Dholla Sak 2 Doholla1 Rim2<br />
56 G#3 Dholak 3 VDrm Cowbell VDrm Cowbell 808 Cowbell 808 Cowbell Cowbell Dholla Sak 3 Dholla Sak 3 Cowbell<br />
57 A3 Dholak 4 Dholak 8 Rek Tek 909 Crash 909 Crash Crash Cymb2 Dholla Rim Dholla Rim Doholla 1 Sak<br />
58 Bb3 Dholak 5 VDrm Cowbell VDrm Cowbell Vibraslap Pop Kick 36 Vibraslap Dholla Raka Dholla Raka Dof 2 Dom<br />
59 B3 Dholak 6 Dholak 9 Rek Trill Ride Cymbal PopSnare38 1 Ride Cymbal Dholla Tak 1 Dholla Tak 1 Dof 1 Rim 1<br />
60 C4 Dholak 7 TablaBaya 1 Afro Feet 1 CR78 HiBongo Bongo High NewHighBongo Dholla Tak 2 Dholla Tak 2 Dof 1 Dom<br />
61 C#4 Dholak 8 TablaBayaSld Slit Drum CR78 LoBongo CR78 LoBongo NewLowBongo DofDom 1 DofDom 1 Dof 1 Sak 1<br />
62 D4 Dholak 9 TablaBaya 3 Afro Feet 2 808 Conga 808 Conga NewCongaSlap DofDom 2 DofDom 2 Dof 1 Rim 2<br />
63 D#4 Dholak Ga TablaBaya 6 Afro Clap 808 Conga NewCongaOp NewCongaOpen DofDom 3 DofDom 3 Dof 1 Sak 2<br />
64 E4 Dholak Na TablaBaya 5 Bendir 1 808 Conga NewLoConga NewLowConga DofTak 1 DofTak 1 Tabla 1 Tak 1<br />
65 F4 Dholak Ta TablaBaya Na Bendir 2 Timbal Hi High Timbale High Timbale DofTak 2 DofTak 2 Tabla 1 Tak 2<br />
66 F#4 Dholak Tun TablaBayaTin Dawul Timbal Lo Bongo_SW_P1 Low Timbale DofSak 1 DofSak 1 Tabla Roll<br />
67 G4 Madal Da TablaBayaTun Sagat Close Agogo Bongo_SW_P2 Agogo DofRim 1 DofRim 1 Tabla 1 Dom<br />
68 G#4 Madal Din TablaBaya 8 Sagat Open Agogo Bongo_SW_P3 Agogo DofSak 2 DofSak 2 Tabla FX<br />
69 A4 Madal Ta VDrmCabasaUp VDrmCabasaUp Cabasa Bongo_SW_P4 Cabasa DofRim 2 DofRim 2 Tabla 1 Tak 3<br />
70 Bb4 TablaBaya 1 VDrm Maracas VDrm Maracas 808 Maracas 808 Maracas Maracas DofSak 3 DofSak 3 Tabla 1 Sak<br />
71 B4 TablaBaya 2 VDrmCabasDwn VDrmCabasDwn GongToba1 Gamelan Gong Bongo1_SW1 DofFinger 1 DofFinger 1 Tabla 1 Rim<br />
72 C5 TablaBaya 3 Madal Da AfroDrum Flm GongToba2 LongWhistle Bongo1_SW3 DofFinger 2 DofFinger 2 Rek Trill<br />
73 C#5 TablaBaya 4 Madal Din AfroDrum Op1 Short Guiro Quide1 Short Guiro Tabla Raka 1 Tabla Raka 1 Rek 1 Sak<br />
74 D5 TablaBaya 5 Madal Ta AfroDrum Op2 CR78 Guiro Quide2 Long Guiro Tabla Tak 1 Tabla Tak 1 Rek 1 Tak 1<br />
75 D#5 TablaBaya 6 VDrm Claves AfroDrum Rat 808 Clave Claves Claves Tabla Tik 1 Tabla Tik 1 Rek 1 Rim<br />
76 E5 TablaBaya 7 VDrm Woodblk VDrm Woodblk Woodblock Woodblock Woodblock Tabla Dom Tabla Dom Rek 1 Dom<br />
77 F5 TablaBaya 8 VDrm Woodblk VDrm Woodblk Woodblock Bongo1_SW3 Woodblock Tabla Sak Tabla Sak Rek 1 Tak 2<br />
78 F#5 TablaBaya Ge FingerSnaps4 TalkingDr Dn --- Mute Cuica CR78 HiBongo Tabla Roll Tabla Roll Rek 1 Brass<br />
79 G5 TablaBaya Ka Udu Pot1 Acc TalkingDr Up --- Congas_8_P1 CR78 LoBongo Tabla Tak 2 Tabla Tak 2 Rek 1 Tak 3<br />
80 G#5 TablaBaya Na Udu Pot1 Hi Doholla Dom MuteTriangl CongaLoOpen_P1 MuteTriangl Tabla Raka 2 Tabla Raka 2 Rek 1 Roll<br />
81 A5 TablaBaya Te Udu Pot1 Lo Doholla Roll OpenTriangl CongaLoOpen_P2 OpenTriangl Tabla Rim 1 Tabla Rim 1 Rek 1 Khana Closed<br />
82 Bb5 TablaBaya Ti Udu Pot1 Slp Doholla Sak Castanets CongaLoOpen_P3 Shaker Tabla Toks Tabla Toks Tabl Noueri Rim<br />
83 B5 TablaBayaGin Udu Pot2 Lng Doholla Stop Mute Surdo CongaLoOpen_P4 CowBellSide Tabla Rim 2 Tabla Rim 2 Rek 1 Khana Open
Backing <strong>Keyboard</strong> BK-5 r<br />
Drum Sets<br />
PC 14 [CC32= 5]<br />
India Menu<br />
PC 11 [CC32= 5]<br />
IndiaDrmKit<br />
PC 12 [CC32= 5]<br />
MidEastDrKit<br />
PC 101 [CC32= 4]<br />
IndoMix1<br />
PC 102 [CC32= 4]<br />
IndoMix2<br />
PC 103 [CC32= 4]<br />
IndoMix3<br />
PC 65 [CC32= 4]<br />
Or. R&B<br />
PC 66 [CC32= 4]<br />
Or. Techno<br />
PC 117 [CC32= 1]<br />
Oriental 1<br />
84 C6 TablaBayaSld Udu Pot2 Mut Doholla Tak Open Surdo CongaLoOpen_P5 AfricanCowBell Tabla Tik 2 Tabla Tik 2 Sagat Mid<br />
85 C#6 TablaBayaTin Udu Pot2 Sht Doira Dun Small <strong>Club</strong> Castanets Castanets Rek Raka Rek Raka Tabl Noueri Dom 1<br />
86 D6 TablaBayaTun Udu Pot MENU Doira Tik CR78 Tambour Bongo High Mute Surdo Rek Dom Rek Dom Sagat High<br />
87 D#6 Udu Pot1 Acc 118:TablaByP Sarna Bell Side Stick Bongo Low Open Surdo Rek Trill Rek Trill Tabl Noueri Tak 1<br />
88 E6 Udu Pot1 Hi TablaBY 3 Sitar Gliss GospelHClp1 Mute H.Conga Udo_Long Rek Tak 1 Rek Tak 1 Sagat Sak<br />
89 F6 Udu Pot1 Lo Tablah 1 ZaghrutaStop TR-808Snare2 Conga Hi Opn 808 Tom 2 Rek Rim Rek Rim Hager<br />
90 F#6 Udu Pot1 Slp Tablah 2 Yoh Tribe 909 Snare 1 Conga MtLow 808 Tom 2 Rek Brass 1 Rek Brass 1 Zir<br />
91 G6 Udu Pot2 Lng Tablah 3 How Tribe 909 Snare 2 Conga Slap 808 Tom 2 Rek Tok Rek Tok Nakrazan A<br />
92 G#6 Udu Pot2 Mut Tablah 4 92:DholakPh 909 SD 1 NewShekere1 808 Tom 2 Rek Brass 2 Rek Brass 2 Zaghrouta 1 Loop<br />
93 A6 Udu Pot2 Sht TablaBY 1 120:Dhol Ph TR-909Snare2 NewShekere2 808 Tom 2 Rek Tak 2 Rek Tak 2 Nakrazan B<br />
94 Bb6 --- TablaBY 2 African Ens Rap Snare NHBngoMute 808 Tom 2 Rek Sak Rek Sak Zaghrouta 2 End<br />
95 B6 --- Tablah Bend Morocco Ens JungleSnare1 L BongoMute 808 Cowbell Rek Tik Rek Tik Zaghrouta 2 Loop<br />
96 C7 --- Metronome 2 Metronome 2 House Snare CajonHi 808 Conga Mazhar Dom Mazhar Dom Zaghrouta 2 End<br />
97 C#7 --- R8 Click R8 Click House Snare CajonHiFlm 808 Conga Mazhar Tak Mazhar Tak ---<br />
98 D7 --- Metronome 1 Metronome 1 House Snare Cajon Low 808 Conga Mazhar Sak Mazhar Sak ---<br />
99 D#7 --- --- --- Congas_SW CajonLoFlm Bend Gong Mazhar Brass Mazhar Brass ---<br />
100 E7 --- --- --- Congas_SW2 FlmncoHClap1 FlmncoHClp1 Sagat Mid Sagat Mid ---<br />
101 F7 --- --- --- Congas_SW4 FlmncoHClap1 FlmncoHClp1 Sagat Hi Sagat Hi ---<br />
102 F# --- --- --- MamboCowBell BongoCowBell BongoCowBell Sagat Closed Sagat Closed ---<br />
103 G7 --- --- --- Tabla Dhut PopSnareFl Bend tlk_drm Sagat Sak Sagat Sak ---<br />
104 G#7 --- --- --- BongoCowBell MamboCowBell MamboCowBell Dofs Tak Dofs Tak ---<br />
105 A7 --- --- --- Tabla_Ge PopSnareDrag Tabla_Ge Dofs Dom Dofs Dom ---<br />
106 Bb7 --- --- --- Tabla Ge Hi HiHatPhrase3 Tabla Ge Hi Dofs Sak Dofs Sak ---<br />
107 B7 --- --- --- Talking Drum CrashPhrase1 Talking Drum Dofs Rim 1 Dofs Rim 1 ---<br />
108 C8 --- --- --- Bend tlk_drm CrashPhrase2 Bend tlk_drm Dofs Rim 2 Dofs Rim 2 ---<br />
109 C#8 --- --- --- Udo_Short CrashPhrase3 Udo_Short Dofs Dom st. Dofs Dom st. ---<br />
110 D8 --- --- --- Udo_Long CrashPhrase4 Udo_Long TablaNurDom TablaNurDom ---<br />
111 D#8 --- --- --- Udo_slap CrashPhrase5 Udo_slap Dofs Sak st. Dofs Sak st. ---<br />
112 E8 --- --- --- Tabla_Te Crash_Stop Tabla_Te TablaNurRim TablaNurRim ---<br />
113 F8 --- --- --- Tabla_Na RidePhrase1 Tabla_Na TablaNurTak TablaNurTak ---<br />
114 F#8 --- --- --- Tabla_Tun RidePhrase2 Tabla_Tun TablaNurSak TablaNurSak ---<br />
115 G8 --- --- --- Ohkawa RidePhrase3 Ohkawa BassSlideFX BassSlideFX ---<br />
116 G#8 --- --- --- H kotsuzumi Scrtch Push2 H kotsuzumi BassSlapFX BassSlapFX ---<br />
117 A8 --- --- --- L Kotsuzumi Scrtch Pull2 L Kotsuzumi ZaghroutaSm2 ZaghroutaSm2 ---<br />
118 Bb8 --- --- --- Tabla Tong Small <strong>Club</strong> Open Surdo Zir 1 Zir 1 ---<br />
119 B8 --- --- --- Tabla Tak Explosion Mute Surdo ZaghroutaEd2 ZaghroutaEd2 ---<br />
120 C9 --- --- --- Tabla Tung Wind Conga Lo Opn NewHiBongo NewHiBongo ---<br />
121 C#9 --- --- --- Tabla_Tang Thunder Tabla_Tun NewLoBongo NewLoBongo ---<br />
122 D9 --- --- --- Tabla_Dung Helicopter Tabla_Tun NewCongaSlp NewCongaSlp ---<br />
123 D#9 --- --- --- Harmess-bell1 Applause Harmess-bell1 NewCongaOp NewCongaOp ---<br />
124 E9 --- --- --- Harmess-bell2 Screaming Harmess-bell2 NewLoConga NewLoConga ---<br />
125 F9 --- --- --- Harmess-bell3 Laughing Harmess-bell3 Timbal Hi Timbal Hi ---<br />
126 F#9 --- --- --- CembaloEnding GtFretNoise CembaloEnding Timbal Lo Timbal Lo ---<br />
127 G9 --- --- --- CembaloFree Wind Chimes CembaloFree Hager 1 Hager 1 ---<br />
135
Backing <strong>Keyboard</strong> BK-5<br />
Drum Sets<br />
r<br />
PC 117 [CC32= 2]<br />
Oriental 2<br />
PC 117 [CC32= 3]<br />
Oriental 3<br />
PC 117 [CC32= 4]<br />
Oriental4<br />
PC 118 [CC32= 4]<br />
Greek 1<br />
PC 119 [CC32= 4]<br />
Greek 2<br />
PC 57 [CC32= 4]<br />
SFX<br />
0 C–1 --- --- --- HipHop BD2 Timpani ---<br />
1 C#–1 --- --- --- Rek 2 Rim 2 Timpani ---<br />
2 D–1 --- --- --- Rek Dom 1 Snare Roll ---<br />
3 D#–1 --- --- --- Rek 2 Tak 1 Concert Snr ---<br />
4 E–1 --- --- --- Rek 2 Tak 2C Concert BD ---<br />
5 F–1 --- --- --- Rek 2 Sak 1 Jingle Bell ---<br />
6 F#–1 --- --- --- Tabla_Ge Bell Tree ---<br />
7 G–1 --- --- --- Tabla_Na Bar Chimes ---<br />
8 G#–1 --- --- --- Tabla_Te Wadaiko ---<br />
9 A–1 --- --- --- Tabla_Tun Small Gong ---<br />
10 Bb–1 --- --- --- Djembe_rim Gamelan Gong ---<br />
11 B–1 --- --- --- IPopKik35 Udo_Long ---<br />
12 C0 --- Wadaiko --- IPopKik36 82JzBsDrum2 ---<br />
13 C#0 --- Ohkawa --- IPopCStk37st Side Stick ---<br />
14 D0 --- Shimedaiko --- IPopSn38_1 82JzSnare1 ---<br />
15 D#0 --- H kotsuzumi --- IPopGstS39_1 Hand clap2 ---<br />
16 E0 --- L Kotsuzumi --- IPopSn40st 82JzSnare2 ---<br />
17 F0 --- Tabla_Ge --- PopFlrTmFl Real Tom 6 ---<br />
18 F#0 --- Tabla_Na --- IPopHat1_42 82JzClsHatB ---<br />
19 G0 --- Tabla_Te --- IPopTomL43 Real Tom 6 ---<br />
20 G#0 --- Tabla_Tun --- IPopHat2_44 Pedal HiHat ---<br />
21 A0 --- Udo_Long --- RockTom2Fl Real Tom 4 MC-500 Beep<br />
22 Bb0 --- Djembe_rim --- IPopHat3_46 82JzOpenHatB MC-500 Beep<br />
23 B0 --- 909 HandClap --- IPopTomM47 Real Tom 4 ytwn3.xtp<br />
24 C1 --- Tambourine --- RockTom1Fl --- ytwn2.xtp<br />
25 C#1 --- ChaChaCowb --- IPopCyml2_52 Crash1c B Guitar Slap<br />
26 D1 --- Agogo --- IPopTomH50 Real Tom 4 Chord Stroke<br />
27 D#1 --- Agogo --- IPopRd1_51 Ride_i B Chord Stroke<br />
28 E1 --- NewShaker2 --- IPopCym1_49 ChinaCymbal Biwa 3<br />
29 F1 --- NewShaker1 --- PopRideBl Ridbl_c B Phono Noise<br />
30 F#1 --- PopSnare40 1 --- Tambourine Tambourine TapeRewind<br />
31 G1 --- Elec Snare 2 --- Splash Cym. Splash Cym. Scrtch Push2<br />
32 G#1 --- 909 Snare 2 --- ChaChaCBell Cowbell Scrtch Pull2<br />
33 A1 --- 909 Snare 1 --- NewRkCrCym2 Crash Cym.2 GtCutNoise2<br />
34 Bb1 --- Elec Kick 2 --- 626 Shaker Vibraslap GtCutNoise2<br />
35 B1 Bass Drum TR-909 Kick2 TR-707 Kick1 NewRkRdCym1 RideCym Edge Dist.CutNoiz<br />
36 C2 Bass Drum Std.2 Kick1 TR-707 Kick1 TR-909 BD2 TR-909 BD2 Dist.CutNoiz<br />
37 C#2 Rim Shot Pop Stick1 TR-707 Rim Side Stick 808 Rimshot Bass Slide<br />
38 D2 Snare Drum PopSnare38 1 TR-707 Snare House SD Rap Snare Pick Scrape<br />
39 D#2 Hand Clap 1 HandClap1st Hand Clap 2 909 HandClap HandClap High-Q<br />
40 E2 Hand Clap 2 Hand Clap 21 TR-707 Snare Elec Snare 2 House SD Slap<br />
41 F2 Tom 1 TR-707 Snare Tom Real Tom 6 RkFlrTomFl ScratchPush<br />
42 F#2 Closed Hi-Hat JazzClosedHH TR-707HiHatC TR-707 HH-c Room Chh ScratchPull<br />
43 G2 Tom 2 Real Tom 6 Tom Real Tom 6 RkFloorTom Sticks<br />
44 G#2 Closed Hi-Hat Pedal HiHat TR-707HiHatC CR-78 chh Pedal HiHat SquareClick<br />
45 A2 Tom 3 Real Tom 4 Tom Real Tom 4 RockTom2Fl Mtrnm.Click<br />
46 Bb2 Open Hi-Hat JazzOpenHH TR-707HiHatO 909 OH R8 Ohh2 Mtrnm. Bell<br />
47 B2 Tom 4 Real Tom 4 Tom Real Tom 4 RockTom2 GtFretNoise<br />
48 C3 Tom 5 Tom 43 Tom --- RockTom1Fl GtCutNoise<br />
49 C#3 Crash Cymbal Crash Cymb1 TR-707 Crash --- 909 Crash GtCutNoise<br />
50 D3 Tom 6 Tom 47 Tom Real Tom 1 RockTom1 String Slap<br />
51 D#3 Ride Cymbal RockRideCym1 Ride Cymbal ReverseCymbl Ride Cymbal Fl.KeyClick<br />
52 E3 Doholla 2 Rim 1 Pop Ride2 Dholla2 Dom2 Dholla2 Dom2 ReverseCymbl Laughing<br />
53 F3 Doholla 2 Dom Dholla Dom Dholla 2 Sak Dholla 2 Sak Dholla Dom Screaming<br />
54 F#3 Hager Dholla Sak 1 Tambourine 808clave Dholla Sak 1 Punch<br />
55 G3 Doholla 2 Rim 2 Dholla Sak 2 Dholla2 Rim1 Dholla2 Rim1 Dholla Sak 2 Heart Beat<br />
56 G#3 Cowbell Dholla Sak 3 Cowbell Rek 2 Roll Dholla Sak 3 Footsteps<br />
57 A3 Doholla 2 Sak Dholla Rim Dholla2 RimC Dholla2 RimC Dholla Rim Footsteps<br />
58 Bb3 Zir Dholla Raka Cabasa Rek 2 Sak 1 Dholla Raka Applause<br />
59 B3 Dof 2 Rim 1 Dholla Tak 1 Doff 2 Dom 2 Doff 2 Dom 2 Dholla Tak 1 Creaking<br />
60 C4 Dof 2 Dom Dholla Tak 2 Doff2 Sak 1B Doff2 Sak 1B Dholla Tak 2 Door<br />
61 C#4 Dof 2 Sak 1 DofDom 1 Low Bongo Tabla Raka 1 DofDom 1 Scratch<br />
62 D4 Dof 2 Rim 2 DofDom 2 Doff 2 Sak 2 Tabla Tak 1 DofDom 2 Wind Chimes<br />
63 D#4 Dof 2 Sak 2 DofDom 3 High Bongo Tabla Tik 1 DofDom 3 Car-Engine<br />
64 E4 Tabla 2 Tak 1 DofTak 1 Doff 2 Rim 3 Tabla Dom DofTak 1 Car-Stop<br />
65 F4 Tabla 2 Tak 2 DofTak 2 Tabla1 Dom 2 Tabla Sak DofTak 2 Car-Pass<br />
66 F#4 Tabla Roll DofSak 1 Tabla Roll Tabla Roll DofSak 1 Car-Crash<br />
67 G4 Tabla 2 Dom DofRim 1 Tabla 2 Sak Tabla Tak 2 DofRim 1 Siren<br />
68 G#4 Tabla FX DofSak 2 Tabla Fx Tabla Raka 2 DofSak 2 Train<br />
69 A4 Tabla 2 Tak 3 DofRim 2 Tabla2 Tak1D Tabla Rim 1 DofRim 2 Jetplane<br />
70 Bb4 Tabla 2 Sak DofSak 3 Tabla 2 Tik Tabla Toks DofSak 3 Helicopter<br />
71 B4 Tabla 2 Rim DofFinger 1 Tabla2 Rim 2 Tabla Rim 2 DofFinger 1 Starship<br />
72 C5 Rek Trill DofFinger 2 Rek 2 Dom 1B Tabla Tik 2 DofFinger 2 Gun Shot<br />
73 C#5 Rek 2 Sak Tabla Raka 1 Rek 2 Rim 2 Rek Raka NewClaves Machine Gun<br />
74 D5 Rek 2 Dom Closed Tabla Tak 1 Rek Dom 1 Rek Dom NewShaker2 Lasergun<br />
75 D#5 Rek 2 Rim Tabla Tik 1 Rek 2 Tak 1 Rek Trill NewShaker1 Explosion<br />
76 E5 Rek 2 Dom Open Tabla Dom Rek 2 Tak 2C Rek Tak 1 Tabla1 Tak 1 Dog<br />
77 F5 Rek 2 Tak 1 Tabla Sak Rek 2 Sak 1 Rek Rim Tabla1 Dom 1 HorseGallop<br />
78 F#5 Rek 2 Khana Open Tabla Roll Hager 2 Rek Brass 1 Tabla Roll Bird<br />
79 G5 Rek 2 Tak 2 Tabla Tak 2 Rek2Khan Cl2 Rek Tok Tabla1 Tak 2 Rain<br />
80 G#5 Rek 2 Roll Tabla Raka 2 Zir 2 Rek Brass 2 Tabla Fx Thunder<br />
81 A5 Rek 2 Khana Closed Tabla Rim 1 Rek2Khan Op2 Rek Tak 2 Tabla1 Tak 3 Wind<br />
82 Bb5 Tabl Noueri Rim Tabla Toks Rek 2 Roll Rek Sak Tabla 1 Sak Seashore<br />
83 B5 Rek 2 Tak 3 Tabla Rim 2 Rek 2 Sak 1 Rek Tik Tabla 1 Rim Stream<br />
136
Backing <strong>Keyboard</strong> BK-5 r<br />
Drum Sets<br />
PC 117 [CC32= 2]<br />
Oriental 2<br />
PC 117 [CC32= 3]<br />
Oriental 3<br />
PC 117 [CC32= 4]<br />
Oriental4<br />
PC 118 [CC32= 4]<br />
Greek 1<br />
PC 119 [CC32= 4]<br />
Greek 2<br />
PC 57 [CC32= 4]<br />
SFX<br />
84 C6 Sagat Mid Tabla Tik 2 Sagat Mid Mazhar Dom Rek Trill Bubble<br />
85 C#6 Tabl Noueri Dom 2 Rek Raka Sagat Hi Mazhar Tak Rek 1 Sak Kitty<br />
86 D6 Sagat High Rek Dom Sagat Sak Mazhar Sak L Rek Tak 1 Bird 2<br />
87 D#6 Tabl Noueri Tak 2 Rek Trill Jingle Bell L Mazhar Brass Rek 1 Rim Growl<br />
88 E6 Sagat Sak Rek Tak 1 ZaghroutaSm3 Sagat Mid L Rek Dom Applause 2<br />
89 F6 Bongos Dom Rek Rim ZaghroutaEd3 Sagat Hi L Rek Tak 2 Telephone 1<br />
90 F#6 Nakrazan A Rek Brass 1 TablaNurDom3 Sagat Closed Rek 1 Brass Telephone 2<br />
91 G6 Bongos Tak Rek Tok Nakrazhan 1 Sagat Sak L Rek Tak 3 Small <strong>Club</strong><br />
92 G#6 Zaghrouta 1 Loop Rek Brass 2 TablaNurRim2 Dofs Tak Rek 1 Roll Small <strong>Club</strong> 2<br />
93 A6 Bongos Rim Rek Tak 2 Nakrazhan 2 Dofs Dom Rek 1 Khan A ApplauseWave<br />
94 Bb6 Zaghrouta 1 End Rek Sak TablaNurTak3 Dofs Sak TablaNurRim1 Eruption<br />
95 B6 Zaghrouta 2 Loop Rek Tik TR-707 Kick1 Dofs Rim 1 Rek 1 Khan B Big Shot<br />
96 C7 Zaghrouta 2 End Mazhar Dom Hand Clap 1 Dofs Rim 2 Sagat Mid Perc. Bang<br />
97 C#7 --- Mazhar Tak --- Dofs Dom st. TablaNurDom1 ---<br />
98 D7 --- Mazhar Sak --- TablaNurDom Sagat Hi ---<br />
99 D#7 --- Mazhar Brass --- Dofs Sak st. TablaNurTak1 ---<br />
100 E7 --- Sagat Mid --- TablaNurRim Sagat Sak ---<br />
101 F7 --- Sagat Hi --- TablaNurTak Hager 1 ---<br />
102 F# --- Sagat Closed --- TablaNurSak Zir 1 ---<br />
103 G7 --- Sagat Sak --- DoubleSlide Nakrazhan 1 ---<br />
104 G#7 --- Dofs Tak --- Bass Slide1 ZaghroutaSm1 ---<br />
105 A7 --- Dofs Dom --- ZaghroutaSm2 Nakrazhan 2 ---<br />
106 Bb7 --- Dofs Sak --- Zir 1 ZaghroutaEd1 ---<br />
107 B7 --- Dofs Rim 1 --- ZaghroutaEd2 ZaghroutaSm2 ---<br />
108 C8 --- Dofs Rim 2 --- NewHiBongo ZaghroutaEd2 ---<br />
109 C#8 --- Dofs Dom st. --- NewLoBongo TR-707 BD ---<br />
110 D8 --- TablaNurDom --- NewCongaSlp TR-909 BD2 ---<br />
111 D#8 --- Dofs Sak st. --- NewCongaOp Mix Kick ---<br />
112 E8 --- TablaNurRim --- NewLoConga 82RmBsDrum1 ---<br />
113 F8 --- TablaNurTak --- NewTmblHi 82StSnare1 ---<br />
114 F#8 --- TablaNurSak --- NewTmblLo 82JzSnare1 ---<br />
115 G8 --- BassSlideFX --- Hager 1 House SD ---<br />
116 G#8 --- BassSlapFX --- --- Rev.Snare ---<br />
117 A8 --- ZaghroutaSm2 --- --- --- ---<br />
118 Bb8 --- Zir 1 --- Jingle Bell --- ---<br />
119 B8 --- ZaghroutaEd2 --- Bell Tree --- ---<br />
120 C9 --- NewHiBongo --- Bongo High --- ---<br />
121 C#9 --- NewLoBongo --- Bongo Lo --- ---<br />
122 D9 --- NewCongaSlp --- Mute H.Conga --- ---<br />
123 D#9 --- NewCongaOp --- Conga Hi Opn --- ---<br />
124 E9 --- NewLoConga --- Conga Lo Opn --- ---<br />
125 F9 --- Timbal Hi --- High Timbale --- ---<br />
126 F#9 --- Timbal Lo --- Low Timbale --- ---<br />
127 G9 --- Hager 1 --- Agogo --- ---<br />
137
Backing <strong>Keyboard</strong> BK-5<br />
Specifications<br />
21. Specifications<br />
Display type<br />
Display<br />
Graphic LCD, 160 x 160 dots, backlit<br />
<strong>Keyboard</strong><br />
<strong>Keyboard</strong><br />
61 velocity sensitive keys<br />
Sound Source<br />
Max. Polyphony<br />
Sounds<br />
Multitimbral parts<br />
Master Tuning<br />
Key Control (Transpose)<br />
Tempo change<br />
Part mute functions<br />
128 voices (GM2/GS/XG Lite compatible)<br />
1,172 tones<br />
60 Drum Sets<br />
3 keyboard parts (UP1, UP2, LWR) + 16 song parts<br />
415.3~466.2 Hz<br />
–6~+5 in semitones (for audio/MIDI data)<br />
20~250 BPM for SMF and rhythms<br />
75~125% for mp3 and WAV files<br />
TRACK MUTE: Rhythms, SMF<br />
CENTER CANCEL: mp3, WAV, AUDIO INPUT signals<br />
Effects<br />
keyboard parts (UP1, UP2, LWR)<br />
Rhythms/SMF section<br />
Reverb: 8 types (selectable via Makeup Tools)<br />
Chorus: 8 types (selectable via Makeup Tools)<br />
MFX: 84 types for keyboard parts (selectable via Tone Part MFX)<br />
A & B for rhythm and SMF section (selectable via Makeup Tools)<br />
Parametric EQ: 6 presets + 1 User memory<br />
Multi-band compressor: 6 presets + 1 User memory<br />
Rhythm section<br />
Rhythms<br />
Rhythm Composer<br />
One Touch memories<br />
Rhythm Makeup Tools<br />
305 in 6 “Rhythm” families (localized rhythms for specific areas are included in the<br />
WORLD 1 and WORLD 2 families)<br />
Internal Rhythm Composer, SMF-to-Rhythm Converter provided as PC application (Windows)<br />
on the bundled CD-ROM<br />
4 programmable registrations per rhythm<br />
Instrument-oriented editing<br />
Songs<br />
Real-time player<br />
Song chord extractor<br />
SMF Makeup Tools<br />
SMF (Format 0/1), KAR, mp3, WAV, mp3+CDG<br />
Automatic chord detection for SMF files<br />
Instrument-oriented editing<br />
r<br />
138<br />
Performance Memories<br />
Performance Lists<br />
Performance memories per List Max. 999<br />
Search function<br />
Demo<br />
Demo<br />
Unlimited number (storage on USB memory)<br />
Over 500 “Music Assistant” memories (internal memory)<br />
5 “Factory Song” memories (internal memory)<br />
Quick location of SMF, audio and JPG files on the connected USB memory<br />
Yes
Backing <strong>Keyboard</strong> BK-5 r<br />
Specifications<br />
Recording<br />
Media<br />
Save format<br />
USB Flash memory<br />
Audio files: WAV (44.1 kHz, 16-bit linear)<br />
Video<br />
Lyrics<br />
Slide shows<br />
SMF, mp3/WAV, mp3+CDG<br />
Picture folder linked to songs (recommended resolution: 512 x 384 or 1024 x 768 pixels)<br />
Panel controls<br />
Knob<br />
Rotary encoder<br />
VOLUME<br />
Data dial<br />
Connectors<br />
PHONES jack x2<br />
AUDIO INPUT jack<br />
AUDIO OUTPUT jacks (L/Mono, R/Mono)<br />
USB ports<br />
MIDI connectors<br />
VIDEO OUTPUT jack<br />
Foot pedal jacks<br />
Stereo 1/4” phone type<br />
Stereo miniature phone type<br />
1/4” phone type<br />
USB COMPUTER connector (Type A, reception and transmission of MIDI data)<br />
USB MEMORY (Type B, data storage devices)<br />
MIDI IN, MIDI OUT (Visual Control function)<br />
RCA-type (CVBS, PAL or NTSC – selectable)<br />
HOLD, SWITCH/EXPRESSION (programmable)<br />
General specifications<br />
Speakers<br />
Rated power output<br />
Power supply<br />
Power consumption<br />
Auto Off function<br />
Dimensions<br />
2x 10 cm<br />
2x 12 W RMW<br />
AC adaptor (PSB-7U adaptor)<br />
1100mA<br />
Off, 10min, 30min, 240min<br />
Without music rest:<br />
1044 (W) x 317 (D) x 129 (H) mm<br />
41-1/8 (W) x 12-1/2 (D) x 5-1/8 (H) inches<br />
Including music rest:<br />
1044 (W) x 317 (D) x 301 (H) mm<br />
41-1/8 (W) x 12-1/2 (D) x 11-7/8 (H) inches<br />
Weight<br />
7.5 kg (excluding AC adaptor and music rest)<br />
16 lbs 9 oz (excluding AC adaptor and music rest)<br />
Supplied Accessories<br />
Owner’s Manual, PSB-7U AC adaptor, Power cord (for connecting the AC adaptor), Music<br />
rest, CD-ROM (Style Converter 4.0, USB driver)<br />
Options<br />
USB<br />
Pedals<br />
USB flash memory (M-UF-series)<br />
DP-series/BOSS FS-5U foot switch<br />
<strong>Roland</strong> EV-series expression pedal<br />
Note: In the interest of product improvement, the specifications and/or appearance of this unit are subject to change without prior notice.<br />
139
Backing <strong>Keyboard</strong> BK-5<br />
Specifications<br />
Style Converter 4 system requirements<br />
Operating system<br />
Microsoft® Windows® XP<br />
Microsoft® Windows® Vista®<br />
* This does not work with the 64-bit edition of Windows Vista®<br />
Microsoft® Windows® 7<br />
CPU/clock<br />
RAM<br />
Hard disk<br />
Pentium® Celeron® processor<br />
1 GHz or higher<br />
512 MB or more<br />
2 MB or more<br />
Display/colors 800 x 600 or higher /<br />
65,536 colors (16-bit High Color) or more<br />
Others<br />
CD-ROM drive<br />
r<br />
140
Backing <strong>Keyboard</strong> BK-5 r<br />
MIDI Implementation Chart<br />
22. MIDI Implementation Chart<br />
[Backing <strong>Keyboard</strong>] Date: November 2011<br />
Model: BK-5 Version: 1.00<br />
Basic<br />
Channel<br />
Mode<br />
Note<br />
Number<br />
Velocity<br />
After<br />
Touch<br />
Function... Transmitted Recognized Remarks<br />
Default<br />
Changed<br />
Default<br />
Message<br />
Altered<br />
True Voice<br />
Note ON<br />
Note OFF<br />
Key’s<br />
Ch’s<br />
1~16<br />
1~16, Off<br />
Mode 3<br />
Mode 3, 4 (M=1)<br />
*****<br />
0~127<br />
*****<br />
O<br />
X<br />
O<br />
O<br />
1~16<br />
1~16, Off<br />
Mode 3<br />
Mode 3, 4 (M=1) *2<br />
0~127<br />
0~127<br />
O<br />
X<br />
O *1<br />
O *1<br />
Pitch Bend O *1 O *1<br />
Control<br />
Change<br />
Program<br />
Change True #<br />
0,32<br />
1<br />
5<br />
6, 38<br />
7<br />
10<br />
11<br />
16<br />
64<br />
65<br />
66<br />
67<br />
69<br />
71<br />
72<br />
73<br />
74<br />
75<br />
76<br />
77<br />
78<br />
84<br />
91<br />
93<br />
98, 99<br />
100, 101<br />
O *1<br />
O *1<br />
O<br />
O<br />
O *1<br />
O *1<br />
O *1<br />
O *1<br />
O<br />
O<br />
O *1<br />
O *1<br />
O<br />
O<br />
O<br />
O<br />
O<br />
O<br />
O<br />
O<br />
O<br />
O<br />
O *1<br />
O *1<br />
O *1<br />
O *1<br />
O *1<br />
*****<br />
O *1<br />
O *1<br />
O<br />
O *1<br />
O *1<br />
O *1<br />
O *1<br />
O<br />
O *1<br />
O *1<br />
O *1<br />
O *1<br />
O<br />
O<br />
O<br />
O<br />
O<br />
O<br />
O<br />
O<br />
O<br />
O<br />
O (Reverb) *1<br />
O (Chorus) *1<br />
O *1<br />
O *1<br />
O *1<br />
0~127<br />
System Exclusive O *1 O *1<br />
System<br />
Common<br />
System<br />
Real Time<br />
Aux<br />
Messages<br />
Notes<br />
Song Position Pointer<br />
Song Sel<br />
Tune<br />
Clock<br />
Commands<br />
All Sounds Off<br />
Reset All Controllers<br />
Local On/Off<br />
All Notes Off<br />
Active Sensing<br />
Reset<br />
Mode 1: OMNI ON, POLY<br />
Mode 3: OMNI OFF, POLY<br />
O *1<br />
X<br />
X<br />
O *1<br />
O *1<br />
X<br />
X<br />
O *1<br />
X<br />
O<br />
X<br />
O<br />
X<br />
X<br />
O<br />
O<br />
*1 O X is selectable<br />
*2 Recognized as M= 1 even if M≠ 1<br />
Mode 2: OMNI ON, MONO<br />
Mode 4: OMNI OFF, MONO<br />
O (120, 126, 127)<br />
O (121)<br />
O (Song parts)<br />
O (123-125)<br />
O<br />
X<br />
Bank Select<br />
Modulation<br />
Portamento Time<br />
Data Entry<br />
Volume<br />
Panpot<br />
Expression<br />
C1<br />
Hold 1<br />
Portamento<br />
Sostenuto<br />
Soft<br />
Hold 2<br />
Resonance<br />
Realease Time<br />
Attack Time<br />
Cutoff<br />
Decay Time<br />
Vibrato Rate<br />
Vibrato Depth<br />
Vibrato Delay<br />
Portamento Control<br />
Effect 1 Depth<br />
Effect 3 Depth<br />
NRPN LSB, MSB<br />
RPN LSB, MSB<br />
Program Number 1~128<br />
O: Yes<br />
X: No<br />
141
Backing <strong>Keyboard</strong> BK-5<br />
Chord Intelligence<br />
23. Chord Intelligence<br />
C C# D E E F<br />
CM7 C#M7 DM7 E M7 EM7 FM7<br />
C7 C#7 D7 E 7 E7 F7<br />
Cm C#m Dm E m Em Fm<br />
Cm7 C#m7 Dm7 E m7 Em7 Fm7<br />
CmM7 C#mM7 DmM7 E mM7 EmM7 FmM7<br />
Cdim C#dim Ddim E dim Edim Fdim<br />
Cm7 ( 5 )<br />
C#m7 ( 5 )<br />
Dm7 ( 5 ) E m7 ( 5 ) Em7 ( 5 )<br />
Fm7 ( 5 )<br />
Caug C#aug Daug E aug Eaug Faug<br />
Csus4 C#sus4 Dsus4 E sus4 Esus4 Fsus4<br />
r<br />
C7sus4 C#7sus4 D7sus4 E 7sus4 E7sus4 F7sus4<br />
C7/13 C#7/13 D7/13 E 7/13 E7/13 F7/13<br />
142
Backing <strong>Keyboard</strong> BK-5 r<br />
Chord Intelligence<br />
F# G A A B B<br />
F#M7 GM7 A M7 AM7 B M7 BM7<br />
F#7 G7 A 7 A7 B 7 B7<br />
F#m Gm A m Am B m Bm<br />
F#m7 Gm7 A m7 Am7 B m7 Bm7<br />
F#mM7 GmM7 A mM7 AmM7 B mM7 BmM7<br />
F#dim Gdim A dim Adim B dim Bdim<br />
F#m7 ( 5 )<br />
Gm7 ( 5 ) A m7 ( 5 ) Am7 ( 5 ) B m7 ( 5 ) Bm7 ( 5 )<br />
F#aug Gaug A aug Aaug B aug Baug<br />
F#sus4 Gsus4 A sus4 Asus4 B sus4 Bsus4<br />
F#7sus4 G7sus4 A 7sus4 A7sus4 B 7sus4 B7sus4<br />
F#7/13 G7/13 A 7/13 A7/13 B 7/13 B7/13<br />
143
Backing <strong>Keyboard</strong> BK-5<br />
Index<br />
Index<br />
r<br />
Numerics<br />
1st note . . . . . . . . . . . . . . . . . . . 68<br />
2nd bar. . . . . . . . . . . . . . . . . . . . 68<br />
2nd Tone . . . . . . . . . . . . . . . . . . 64<br />
7th . . . . . . . . . . . . . . . . . . . . . . . 85<br />
A<br />
Absolute. . . . . . . . . . . . . . . . . . 109<br />
ACC . . . . . . . . . . . . . . . . . . . . . . 64<br />
Accompaniment . . . . . . . . . . . . 27<br />
ACV . . . . . . . . . . . . . . . . . . . . . 100<br />
Adaptive Chord Voicing. . . . . . 100<br />
Alteration<br />
Mode . . . . . . . . . . . . . . . . 100<br />
Always . . . . . . . . . . . . . . . . . . . . 67<br />
Arranger. . . . . . . . . . . . . . . . 27, 62<br />
Chord Off . . . . . . . . . . . . . . 69<br />
Hold . . . . . . . . . . . . . . . 63, 69<br />
Aspect Ratio. . . . . . . . . . . . . . . . 67<br />
Assign. . . . . . . . . . . . . . . . . . . . . 59<br />
Attack. . . . . . . . . . . . . . . 60, 71, 77<br />
Audio<br />
Input. . . . . . . . . . . . . . . . . . 19<br />
Level . . . . . . . . . . . . . . . . . . 68<br />
Player . . . . . . . . . . . . . . . . . 19<br />
REC. . . . . . . . . . . . . . . . . . . 52<br />
Recording. . . . . . . . . . . . . . 52<br />
Sync . . . . . . . . . . . . . . . . . . 68<br />
Audio In<br />
Center Canc . . . . . . . . . . . . 68<br />
Level . . . . . . . . . . . . . . . . . . 68<br />
AudioXfade . . . . . . . . . . . . . . . . 70<br />
Auto<br />
Fill In. . . . . . . . . . . . . . . . . . 29<br />
Off . . . . . . . . . . . . . . . . . . . 69<br />
B<br />
Background . . . . . . . . . . . . . . . . 51<br />
Color. . . . . . . . . . . . . . . . . . 68<br />
Mode . . . . . . . . . . . . . . . . . 68<br />
BACKING . . . . . . . . . . . . . . . . . . 27<br />
BALANCE . . . . . . . . . . . . . . . . . . 27<br />
Balance . . . . . . . . . . . . . . . . . . . 27<br />
Basic. . . . . . . . . . . . . . . . . . . . . 107<br />
Bender Assign . . . . . . . . . . . . . . 59<br />
Bender Range . . . . . . . . . . . . . . 59<br />
BIAS . . . . . . . . . . . . . . . . . . . . . . 94<br />
Blocking settings . . . . . . . . . . . . 54<br />
Boost . . . . . . . . . . . . . . . . . . . . . 71<br />
BPM . . . . . . . . . . . . . . . . . . . 31, 35<br />
Break Mute . . . . . . . . . . . . . . . . 69<br />
Brightness . . . . . . . . . . . . . . . . . 65<br />
144<br />
C<br />
C1 . . . . . . . . . . . . . . . . . . . . . . . . 60<br />
CC00 . . . . . . . . . . . . . . . . . . . . . . 26<br />
CC32 . . . . . . . . . . . . . . . . . . . . . . 26<br />
Center. . . . . . . . . . . . . . . . . . . . . 67<br />
Cancel . . . . . . . . . . . . . . 42, 68<br />
Change<br />
Gate Time . . . . . . . . . . . . . . 94<br />
Velo. . . . . . . . . . . . . . . . . . . 94<br />
Character set . . . . . . . . . . . . . . . 70<br />
Chord recognition . . . . . . . . . . . 62<br />
Chord View. . . . . . . . . . . . . . . . . 68<br />
Chorus . . . . . . . . . . . . . .56, 76, 82<br />
Level . . . . . . . . . . . . . . . . . . 75<br />
Send . . . . . . . . . . . . . . . . . . 61<br />
Type. . . . . . . . . . . . . . . . . . . 75<br />
Classic. . . . . . . . . . . . . . . . . . . . . 72<br />
Clock. . . . . . . . . . . . . . . . . . . . . 106<br />
Coarse Tune . . . . . . . . . . . . . . . . 59<br />
Common. . . . . . . . . . . . . . . . . . . 74<br />
Compressor . . . . . . . . . . . . . . . . 71<br />
Computer . . . . . . . . . . . . . . . . . . 17<br />
Connecting<br />
MIDI . . . . . . . . . . . . . . . . . . 17<br />
Contrast . . . . . . . . . . . . . . . . . . . 65<br />
Control Pedal . . . . . . . . . . . . . . . 18<br />
Copy . . . . . . . . . . . . . . . . . . . . . . 91<br />
Event. . . . . . . . . . . . . . . . . 102<br />
Mode. . . . . . . . . . . . . . . . . . 92<br />
Count In . . . . . . . . . . . . . . . . . . . 67<br />
CPT . . . . . . . . . . . . . . . . . . . . . . . 97<br />
Create<br />
Event. . . . . . . . . . . . . . . . . 101<br />
Cut Off . . . . . . . . . . . . . . . . . 59, 76<br />
D<br />
Data<br />
Type. . . . . . . . . . . . . . . . . . . 90<br />
Data Change. . . . . . . . . . . . . . . 109<br />
Decay . . . . . . . . . . . . . . . . . . 60, 77<br />
Default . . . . . . . . . . . . . . . . . . . . 65<br />
Degree . . . . . . . . . . . . . . . . 96, 100<br />
Delay. . . . . . . . . . . . . . . . . . . . . . 75<br />
Vibrato . . . . . . . . . . . . . . . . 60<br />
Delete<br />
Performance. . . . . . . . . . . . 48<br />
Performance List . . . . . . . . 48<br />
Rhythm Composer . . . . . . . 90<br />
Demo . . . . . . . . . . . . . . . . . . . . . 21<br />
Depth . . . . . . . . . . . . . . . . . . . . . 60<br />
Display . . . . . . . . . . . . . . . . . . . . 22<br />
Brightness. . . . . . . . . . . . . . 65<br />
Contrast . . . . . . . . . . . . . . . 65<br />
Division. . . . . . . . . . . . . . . . . . . . 83<br />
Driver . . . . . . . . . . . . . . . . . . . . . 17<br />
Drum<br />
Mute . . . . . . . . . . . . . . . . . . 76<br />
Drum Instrument . . . . . . . . . . . . 78<br />
Drum Set. . . . . . . . . . . . . . . . . .125<br />
Dynamics . . . . . . . . . . . . . . . . . . 57<br />
E<br />
Easy . . . . . . . . . . . . . . . . . . . . . . . 63<br />
Edit . . . . . . . . . . . . . . . . . . . . . . . 48<br />
EQ . . . . . . . . . . . . . . . . .78, 79<br />
Rhythm Parts . . . . . . . . . .104<br />
Song Parts. . . . . . . . . . . . .105<br />
System. . . . . . . . . . . . . . . .106<br />
Tone Parts . . . . . . . . . . . . .105<br />
Effect<br />
MFX . . . . . . . . . . . . . . . .61, 78<br />
EQ Part Edit. . . . . . . . . . . . . . . . . 57<br />
Equalizer . . . . . . . . . . . . . . . . . . . 78<br />
Erase<br />
Event . . . . . . . . . . . . . . . . .101<br />
Rhythm Composer . . . . . . . 89<br />
Event . . . . . . . . . . . . . . . . . . . . .101<br />
Exit Confirm . . . . . . . . . . . . . . . . 52<br />
Exp Pedal. . . . . . . . . . . . . . . . . . . 61<br />
Exp. Pedal All Parts . . . . . . . . . . . 61<br />
Export<br />
One Touch . . . . . . . . . . . . . . 33<br />
Expression . . . . . . . . . . . . . . . . . . 82<br />
Expression Pedal . . . . . . . . . . . . . 58<br />
External Lyrics. . . . . . . . . . . .55, 56<br />
F<br />
Factory Reset . . . . . . . . . . . . . .111<br />
Factory Song. . . . . . . . . . . . . . . . 45<br />
Fade Out . . . . . . . . . . . . . . . . . . . 70<br />
Fbk Chorus . . . . . . . . . . . . . . . . . 75<br />
FDw . . . . . . . . . . . . . . . . . . . . . . . 91<br />
Fill<br />
Dwn. . . . . . . . . . . . . . . . . . . 85<br />
Fill In Half Bar . . . . . . . . . . . . . . . 63<br />
Fill Ritardando . . . . . . . . . . . . . . 63<br />
Finder . . . . . . . . . . . . . . . . . . . . . 37<br />
Fine Tune. . . . . . . . . . . . . . . . . . . 59<br />
Flanger . . . . . . . . . . . . . . . . . . . . 75<br />
Flat . . . . . . . . . . . . . . . . . . . . . . . 72<br />
Footswitch . . . . . . . . . . . . . . . . . 18<br />
For . . . . . . . . . . . . . . . . . . . . . . . . 93<br />
Format USB Device. . . . . . . . . .111<br />
Freeze Data . . . . . . . . . . . . . . . . . 79<br />
Full. . . . . . . . . . . . . . . . . . . . . . . . 67<br />
FUp . . . . . . . . . . . . . . . . . . . . . . . 91
Backing <strong>Keyboard</strong> BK-5 r<br />
G<br />
Gain . . . . . . . . . . . . . . . . . . . 71, 73<br />
Generic . . . . . . . . . . . . . . . . . . . .69<br />
Get It . . . . . . . . . . . . . . . . . . . . . .91<br />
Global . . . . . . . . . . . . . . . . . . . . .65<br />
Change. . . . . . . . . . . . . . . . .95<br />
H<br />
Half Bar on Fill In . . . . . . . . . . . .69<br />
Hall . . . . . . . . . . . . . . . . . . . . . . .75<br />
Hard Comp . . . . . . . . . . . . . . . . .71<br />
Headphones . . . . . . . . . . . . . . . .19<br />
Help . . . . . . . . . . . . . . . . . . . . . . .26<br />
High. . . . . . . . . . . . . . . . . . . . . . .71<br />
Boost . . . . . . . . . . . . . . . . . .71<br />
Highlight Color . . . . . . . . . . . . . .68<br />
Hold. . . . . . . . . . . . . . . . . . 70, 100<br />
Lower . . . . . . . . . . . . . . . . . .62<br />
One Touch . . . . . . . . . . . . . .66<br />
Pedal . . . . . . . . . . . . . . . . . .58<br />
Performance . . . . . . . . . . . .66<br />
Hold Pedal . . . . . . . . . . . . . . . . . .65<br />
I<br />
Initialize<br />
Factory settings. . . . . . . . .111<br />
Rhythm . . . . . . . . . . . . . . . .81<br />
Storage device. . . . . . . . . .111<br />
Insert<br />
Rhythm tracks . . . . . . . . . . .92<br />
Inst. . . . . . . . . . . . . . . . . . . . 82, 83<br />
Instr Equalizer . . . . . . . . . . . . . . .79<br />
Instrument . . . . . . . . . . . . . . . . .75<br />
Int+Mid . . . . . . . . . . . . . . . . . . .109<br />
Intell Threshold . . . . . . . . . . . . . .64<br />
Intelligent . . . . . . . . . . . . . . . . . .63<br />
Internal . . . . . . . . . . . . . . . . . . .109<br />
Internal Lyrics . . . . . . . . . . . . . . .55<br />
Into . . . . . . . . . . . . . . . . . . . . . . .92<br />
J<br />
Jazz . . . . . . . . . . . . . . . . . . . . . . .72<br />
JPEG. . . . . . . . . . . . . . . . . . . . . . .50<br />
JPG. . . . . . . . . . . . . . . . . . . . . . . .50<br />
K<br />
Key. . . . . . . . . . 41, 62, 75, 83, 110<br />
/Rhythm. . . . . . . . . . . . . . .103<br />
Rhythm Composer . . . . . . .93<br />
Key Touch . . . . . . . . . . . . . . . . . .57<br />
KEYBOARD. . . . . . . . . . . . . . . . . .27<br />
<strong>Keyboard</strong> part . . . . . . . . 24, 56, 61<br />
L<br />
Language. . . . . . . . . . . . . . . . . . .70<br />
Length . . . . . . . . . . . . . . . . . . . . .97<br />
Level . . . . . . . . . . . . . . . . 68, 71, 72<br />
Melody Intelligence . . . . . . 65<br />
Limit<br />
High . . . . . . . . . . . . . . . . . 104<br />
Low. . . . . . . . . . . . . . . . . . 104<br />
Limiter . . . . . . . . . . . . . . . . . . . . 72<br />
List . . . . . . . . . . . . . . . . . . . . . . . 45<br />
Loading factory settings . . . . . 111<br />
Local. . . . . . . . . . . . . . . . . . . . . 103<br />
Lock . . . . . . . . . . . . . . . . . . . 54, 63<br />
Loop . . . . . . . . . . . . . . . . . . . . . . 39<br />
Low. . . . . . . . . . . . . . . . . . . . . . . 71<br />
Boost . . . . . . . . . . . . . . . . . 71<br />
Lower . . . . . . . . . . . . . . . . . . . . . 24<br />
Hold . . . . . . . . . . . . . . . . . . 62<br />
LWR . . . . . . . . . . . . . . . . . . . . . . 24<br />
Lyrics . . . . . . . . . . . . . . . . . . . . . 55<br />
Lyrics Settings . . . . . . . . . . . . . . 67<br />
M<br />
Mac . . . . . . . . . . . . . . . . . . . . . . 17<br />
Magnify . . . . . . . . . . . . . . . . . . . 94<br />
Main. . . . . . . . . . . . . . . . . . . . . . 91<br />
Main page . . . . . . . . . . . . . . . . . 22<br />
Major . . . . . . . . . . . . . . . . . . . . . 85<br />
Make New List . . . . . . . . . . . . . . 48<br />
Makeup Tools. . . . . . . . . . . . . . . 74<br />
Manual Bass. . . . . . . . . . . . . . . . 24<br />
Mark A/B . . . . . . . . . . . . . . . . . . 39<br />
Master Tune. . . . . . . . . . . . . . . . 65<br />
Master Volume Rx . . . . . . . . . . 107<br />
Mastering Tools . . . . . . . . . . . . . 71<br />
MBS . . . . . . . . . . . . . . . . . . . . . . 24<br />
Melody Intell . . . . . . . . . . . . . . . 43<br />
Melody Intelligence. . . . . . . . . . 43<br />
Melody Intelligent . . . . . . . . . . . 70<br />
Metronome . . . . . . . . . . . . . . . . 67<br />
MFX . . . . . . . . . . . . . . . . . . . 58, 77<br />
Edit . . . . . . . . . . . . . . . . 61, 78<br />
Micro Edit . . . . . . . . . . . . . . . . . 99<br />
Mid. . . . . . . . . . . . . . . . . . . . . . . 71<br />
Mid Boost. . . . . . . . . . . . . . . . . . 71<br />
MIDI . . . . . . . . . . . . . . . . . . . 17, 81<br />
Basic Channel. . . . . . . . . . 107<br />
Local control . . . . . . . . . . 104<br />
Parameters. . . . . . . . . . . . 109<br />
Set (saving) . . . . . . . . . . . 110<br />
SPP . . . . . . . . . . . . . . . . . . 106<br />
Synchronization. . . . . . . . 106<br />
USB. . . . . . . . . . . . . . . . . . . 17<br />
Visual Control. . . . . . . . . . 113<br />
MIDI Channels . . . . . . . . . . . . . . 17<br />
Minor . . . . . . . . . . . . . . . . . . . . . 85<br />
Minus One . . . . . . . . . . . . . . . . . 42<br />
Mix<br />
Record . . . . . . . . . . . . . . . . 84<br />
Rhythm Copy . . . . . . . . . . . 92<br />
Mode . . . . . . . . . . . . . . . . . . . . 107<br />
Modulation Assign. . . . . . . . . . . 59<br />
Mono . . . . . . . . . . . . . . . . . . . . . 59<br />
Move. . . . . . . . . . . . . . . . . . . . . . 49<br />
Performance. . . . . . . . . . . . 48<br />
Move Event. . . . . . . . . . . . . . . . 102<br />
mp3 . . . . . . . . . . . . . . . . . . . . . . 19<br />
Music Assistant . . . . . . . . . . . . . 45<br />
Mute . . . . . . . . . . . . . . . . . . . 61, 76<br />
Rhythm tracks . . . . . . . . . . 87<br />
My<br />
Performances . . . . . . . . . . 112<br />
Recordings . . . . . . . . . 53, 112<br />
Rhythms . . . . . . . . . . . . . . 112<br />
Songs . . . . . . . . . . . . . . . . 112<br />
N<br />
Nearest . . . . . . . . . . . . . . . . 96, 100<br />
Note-to-Arranger. . . . . . . . . . . 108<br />
NTA . . . . . . . . . . . . . . . . . . . . . . 108<br />
NTSC . . . . . . . . . . . . . . . . . . . . . . 67<br />
Numeric . . . . . . . . . . . . . . . . . . . 25<br />
O<br />
Octave. . . . . . . . . . . . . . . . . . 76, 83<br />
Shift . . . . . . . . . . . . . . . . . . 59<br />
Tx. . . . . . . . . . . . . . . . . . . . 109<br />
One Touch . . . . . . . . . . . . . . . . . 31<br />
Edit . . . . . . . . . . . . . . . . . . . 70<br />
Export . . . . . . . . . . . . . . . . . 33<br />
Hold . . . . . . . . . . . . . . . . . . 66<br />
Original. . . . . . . . . . . . . .69, 74, 75<br />
P<br />
P-10 . . . . . . . . . . . . . . . . . . . . . 113<br />
PAL . . . . . . . . . . . . . . . . . . . . . . . 67<br />
Pan Delay . . . . . . . . . . . . . . . . . . 75<br />
Panpot . . . . . . . . . . . . . .57, 76, 82<br />
Parameters . . . . . . . . . . . . . . . . 109<br />
Part<br />
Switch. . . . . . . . . . . . . . . . 109<br />
Part Switch Rx . . . . . . . . . . . . . 107<br />
Part Switch Tx . . . . . . . . . . . . . 107<br />
Parts Volume . . . . . . . . . . . . . . . 43<br />
Patterns . . . . . . . . . . . . . . . . . . . 81<br />
PC . . . . . . . . . . . . . . . . . . . . . 17, 26<br />
Pedal. . . . . . . . . . . . . . . . . . . . . . 18<br />
Expression. . . . . . . . . . . . . . 58<br />
Switch. . . . . . . . . . . . . . . . . 69<br />
Pedal Exp Down/Up . . . . . . . . . . 58<br />
Perc Mute. . . . . . . . . . . . . . . . . . 76<br />
Perf. Next . . . . . . . . . . . . . . . . . . 70<br />
Perform Next Song . . . . . . . . . . 68<br />
Performance. . . . . . . . . . . . . . . . 45<br />
Edit . . . . . . . . . . . . . . . . . . . 56<br />
Hold . . . . . . . . . . . . . . . . . . 66<br />
List . . . . . . . . . . . . . . . . . . . 45<br />
PC Rx. . . . . . . . . . . . . . . . . 107<br />
PC Tx . . . . . . . . . . . . . . . . . 107<br />
Photos<br />
Background . . . . . . . . . . . . 51<br />
Pianist1/2 . . . . . . . . . . . . . . . . . . 62<br />
145
Backing <strong>Keyboard</strong> BK-5<br />
Index<br />
r<br />
Pictures<br />
Background . . . . . . . . . . . . 51<br />
Pitch. . . . . . . . . . . . . . . . . . . . . . 79<br />
Pitch Bend . . . . . . . . . . . . . . . . . 59<br />
Place Event . . . . . . . . . . . . . . . 102<br />
Plate. . . . . . . . . . . . . . . . . . . . . . 75<br />
Play . . . . . . . . . . . . . . . . . . . . . . 67<br />
Play All Songs . . . . . . . . . . . . . . 38<br />
Poly . . . . . . . . . . . . . . . . . . . . . . 59<br />
Pop. . . . . . . . . . . . . . . . . . . . . . . 72<br />
Portamento . . . . . . . . . . . . . . . . 70<br />
Mode . . . . . . . . . . . . . . . . . 59<br />
Time . . . . . . . . . . . . . . . . . . 59<br />
Position Pointer. . . . . . . . . . . . 106<br />
POWER. . . . . . . . . . . . . . . . . . . . 20<br />
Preset<br />
Compressor . . . . . . . . . . . . 71<br />
Equalizer. . . . . . . . . . . . . . . 72<br />
Protecting settings . . . . . . . . . . 54<br />
Q<br />
Quantize<br />
Rhythm Composer. . . . . . . 88<br />
Quick Start. . . . . . . . . . . . . . . . . 68<br />
R<br />
Range. . . . . . . . . . . . . . . . . . . . . 59<br />
Rate<br />
Vibrato . . . . . . . . . . . . . . . . 60<br />
Ratio. . . . . . . . . . . . . . . . . . . . . . 72<br />
REC. . . . . . . . . . . . . . . . . . . . 52, 67<br />
Audio Level. . . . . . . . . . . . . 68<br />
Audio Sync. . . . . . . . . . . . . 68<br />
Rec Mode. . . . . . . . . . . . . . . . . . 84<br />
Rec Track . . . . . . . . . . . . . . . 82, 83<br />
Record<br />
Mix . . . . . . . . . . . . . . . . . . . 84<br />
Replace. . . . . . . . . . . . . . . . 84<br />
Recording. . . . . . . . . . . . . . . . . . 52<br />
Relative . . . . . . . . . . . . . . . . . . 109<br />
Release. . . . . . . . . . . . . . 60, 71, 77<br />
Rename . . . . . . . . . . . . . . . . 36, 47<br />
Replace<br />
Record . . . . . . . . . . . . . . . . 84<br />
User rhythm. . . . . . . . . . . . 92<br />
Reset/Start. . . . . . . . . . . . . . . . . 69<br />
RESOLUTION . . . . . . . . . . . . . . . 89<br />
Resonance . . . . . . . . . . . . . . 59, 77<br />
Reverb . . . . . . . . . . . . . . 56, 76, 82<br />
Level . . . . . . . . . . . . . . . . . . 75<br />
Send . . . . . . . . . . . . . . . . . . 61<br />
Type . . . . . . . . . . . . . . . . . . 74<br />
146<br />
Rhythm. . . . . . . . . . . . . . . . . . . . 27<br />
Clock Tx. . . . . . . . . . . . . . . 106<br />
Discard recording . . . . . . . . 85<br />
MIDI . . . . . . . . . . . . . . . . . 108<br />
MIDI address. . . . . . . . 26, 108<br />
Pc Rx. . . . . . . . . . . . . . . . . 108<br />
Save . . . . . . . . . . . . . . . . . . 85<br />
Start/Stop Tx. . . . . . . . . . . 106<br />
Track Edit . . . . . . . . . . . . . . 88<br />
Volume Rx . . . . . . . . . . . . 108<br />
Rhythm/SMF TrackMute . . . . . . 65<br />
Rit . . . . . . . . . . . . . . . . . . . . . 63, 64<br />
Tempo . . . . . . . . . . . . . . . . . 64<br />
Ritardando . . . . . . . . . . . . . . . . . 63<br />
Rock . . . . . . . . . . . . . . . . . . . . . . 72<br />
Room . . . . . . . . . . . . . . . . . . . . . 74<br />
Row Displaying . . . . . . . . . . . . . 68<br />
Rx . . . . . . . . . . . . . . . . . . .104, 107<br />
Ch . . . . . . . . . . . . . . . . . . . 104<br />
Event. . . . . . . . . . . . . . . . . 105<br />
Global Limit Low/High . . . 109<br />
Shift . . . . . . . . . . . . . . . . . 104<br />
Sysex. . . . . . . . . . . . . . . . . 110<br />
Transpose . . . . . . . . . . . . . 110<br />
Velocity. . . . . . . . . . . . . . . 109<br />
S<br />
Save . . . . . . . . . . . . . . . . . . . . . . 86<br />
As Default. . . . . . . . . . . . . . 65<br />
Global . . . . . . . . . . . . . . . . . 70<br />
MIDI Set . . . . . . . . . . . . . . 110<br />
Rhythm. . . . . . . . . . . . . . . . 85<br />
Saving. . . . . . . . . . . . . . . . . . . . . 46<br />
Scale Tune . . . . . . . . . . . . . . . . . 66<br />
Search. . . . . . . . . . . . . . . . . . . . . 37<br />
Second Tone. . . . . . . . . . . . . . . . 64<br />
Shift<br />
Clock . . . . . . . . . . . . . . . . . . 96<br />
Short<br />
Dly. . . . . . . . . . . . . . . . . . . . 75<br />
Dly FB . . . . . . . . . . . . . . . . . 75<br />
SMF<br />
Clock Tx. . . . . . . . . . . . . . . 106<br />
Position Tx . . . . . . . . . . . . 106<br />
Quick Start . . . . . . . . . . . . . 68<br />
Start/Stop Tx. . . . . . . . . . . 106<br />
Soft. . . . . . . . . . . . . . . . . . . . . . . 70<br />
Comp . . . . . . . . . . . . . . . . . 71<br />
Thru. . . . . . . . . . . . . . . . . . 110<br />
Solo. . . . . . . . . . . . . . . . .61, 76, 87<br />
Song<br />
Parts (MIDI). . . . . . . . . . . . 103<br />
Playback . . . . . . . . . . . . . . . 34<br />
Position Pointer . . . . . . . . 106<br />
Searching . . . . . . . . . . . . . . 37<br />
Sostenuto . . . . . . . . . . . . . . . . . . 70<br />
Specifications. . . . . . . . . . . . . . 138<br />
Split. . . . . . . . . . . . . . . . . . . . . . . 43<br />
High. . . . . . . . . . . . . . . . . . . 72<br />
Low . . . . . . . . . . . . . . . . . . . 72<br />
Point . . . . . . . . . . . . . . . . . . 61<br />
Standard . . . . . . . . . 31, 35, 71, 72<br />
Std. . . . . . . . . . . . . . . . . . . . . . .100<br />
Storing . . . . . . . . . . . . . . . . . . . . 46<br />
Storing, see Save<br />
STRENGTH. . . . . . . . . . . . . . . . . . 89<br />
Style, see Rhythm<br />
Switch<br />
Compressor . . . . . . . . . . . . . 71<br />
Equalizer . . . . . . . . . . . . . . . 72<br />
Melody Intelligence . . . . . . 64<br />
Sync. . . . . . . . . . . . . . . . . . . . . .106<br />
Rx . . . . . . . . . . . . . . . . . . .106<br />
Synchronization<br />
Audio. . . . . . . . . . . . . . . . . . 68<br />
SysEx . . . . . . . . . . . . . . . . . . . . .109<br />
T<br />
Tap Tempo. . . . . . . . . . . . . . .31, 35<br />
Tempo . . . . . . . . . . . . . . 31, 35, 82<br />
Arranger mode . . . . . . . . . . 63<br />
Makeup Tools . . . . . . . . . . . 75<br />
Rit . . . . . . . . . . . . . . . . . . . . 64<br />
Threshold . . . . . . . . . . . . . . . . . . 72<br />
Time<br />
Signature. . . . . . . . . . . . . . . 98<br />
Time Signature . . . . . . . . . . . . . . 82<br />
Time signature . . . . . . . . . . . . . . 67<br />
Tone. . . . . . . . . . . . . . . . . . . .56, 76<br />
MIDI address . . . . . . . . . . . . 26<br />
Part Effects . . . . . . . . . . . . . 60<br />
Part View. . . . . . . . . . . . . . . 56<br />
Track . . . . . . . . . . . . . . . . . . . . . . 81<br />
Edit . . . . . . . . . . . . . . . . . . . 88<br />
Length . . . . . . . . . . . . . . . . . 97<br />
Track Mute . . . . . . . . . . . . . . . . . 42<br />
Transpose . . . . . . . . . . . . . . . . .110<br />
Makeup Tools . . . . . . . . . . . 75<br />
Transposition . . . . . . . . . . . .41, 62<br />
Troubleshooting . . . . . . . . . . . .115<br />
Tune . . . . . . . . . . . . . . . . . . . . . . 59<br />
Tuning . . . . . . . . . . . . . . . . . . . . . 65<br />
Tx. . . . . . . . . . . . . . . . . . . 104, 107<br />
Ch . . . . . . . . . . . . . . . . . . .104<br />
Data Change . . . . . . . . . . .109<br />
Local . . . . . . . . . . . . . . . . .104<br />
Shift. . . . . . . . . . . . . . . . . .104<br />
SysEx . . . . . . . . . . . . . . . . .109<br />
Velocity . . . . . . . . . . . . . . .109<br />
Type. . . . . . . . . . . . . . . . . . . . . . . 62<br />
U<br />
Undo Changes . . . . . . . . . . .75, 79<br />
UP1, UP2. . . . . . . . . . . . . . . . . . . 24<br />
Upper . . . . . . . . . . . . . . . . . . . . . 24
Backing <strong>Keyboard</strong> BK-5 r<br />
USB . . . . . . . . . . . . . . . . . . 17, 111<br />
Driver . . . . . . . . . . . . . . 17, 69<br />
MIDI . . . . . . . . . . . . . . . . . . .17<br />
User . . . . . . . . . . . . 51, 71, 72, 110<br />
Utility. . . . . . . . . . . . . . . . . . 68, 70<br />
V<br />
Value . . . . . . . . . . . . . . . . . . . . . .93<br />
Velocity . . . . . . . . . . . . . . . 79, 109<br />
Rhythms . . . . . . . . . . . . . . .94<br />
Velocity sensitivity . . . . . . . . . . .57<br />
Version Info. . . . . . . . . . . . . . . . .69<br />
Vibrato. . . . . . . . . . . . . . . . . . . . .77<br />
Delay . . . . . . . . . . . . . . . . . .60<br />
Depth. . . . . . . . . . . . . . . . . .60<br />
Rate . . . . . . . . . . . . . . . . . . .60<br />
Video . . . . . . . . . . . . . . . . . . . . .113<br />
Mode . . . . . . . . . . . . . . . . . .67<br />
Settings . . . . . . . . . . . . . . . .67<br />
VIMA TUNES . . . . . . . . . . . . . . . .50<br />
Visual Control<br />
TxCh . . . . . . . . . . . . . . . . . .110<br />
Visual Ctrl Mode . . . . . . . . . . . . .69<br />
V-Link, Visual Control . . . . . . . .113<br />
Volume . . . . . . . . . . . . . . . . . . . .43<br />
Instrument. . . . . . . 56, 61, 76<br />
Makeup Tools. . . . . . . . . . . .75<br />
Metronome . . . . . . . . . . . . .67<br />
W<br />
Wait Note . . . . . . . . . . . . . . . . . .84<br />
WAV. . . . . . . . . . . . . . . . . . . 19, 52<br />
Whole . . . . . . . . . . . . . . . . . . . . .69<br />
Words . . . . . . . . . . . . . . . . . . . . .55<br />
Write . . . . . . . . . . . . . . . . . . . . . .46<br />
Rhythm . . . . . . . . . . . . . . . .80<br />
Song. . . . . . . . . . . . . . . . . . .80<br />
User . . . . . . . . . . . . . . . 72, 73<br />
Z<br />
Zone. . . . . . . . . . . . . . . . . . . . . . .62<br />
147
Backing <strong>Keyboard</strong> BK-5<br />
Index<br />
r<br />
148
Backing <strong>Keyboard</strong> BK-5 r<br />
Information<br />
When you need repair service, call your nearest <strong>Roland</strong> Service Center or authorized <strong>Roland</strong> distributor in your<br />
country as shown below.<br />
149
Backing <strong>Keyboard</strong> BK-5<br />
MEMO<br />
r<br />
150
For EU countries Countries<br />
For For China China China
602.00.0527.01 RES 873-11 BK-5 – OM/E