Instruction Sheet - Vance & Hines
Instruction Sheet - Vance & Hines
Instruction Sheet - Vance & Hines

You also want an ePaper? Increase the reach of your titles
YUMPU automatically turns print PDFs into web optimized ePapers that Google loves.
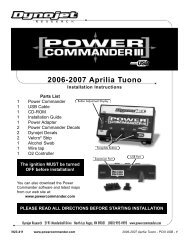
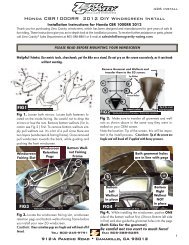
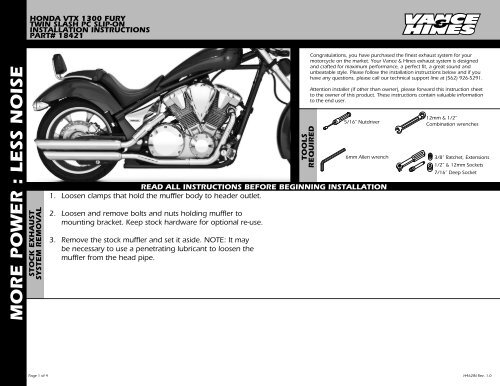
HONDA VTX 1300 FURY<br />
TWIN SLASH PC SLIP-ON<br />
INSTALLATION INSTRUCTIONS<br />
PART# 18421<br />
MORE POWER : LESS NOISE<br />
STOCK EXHAUST<br />
SYSTEM REMOVAL<br />
TOOLS<br />
REQUIRED<br />
READ ALL INSTRUCTIONS BEFORE BEGINNING INSTALLATION<br />
1. Loosen clamps that hold the muffler body to header outlet.<br />
2. Loosen and remove bolts and nuts holding muffler to<br />
mounting bracket. Keep stock hardware for optional re-use.<br />
3. Remove the stock muffler and set it aside. NOTE: It may<br />
be necessary to use a penetrating lubricant to loosen the<br />
muffler from the head pipe.<br />
Congratulations, you have purchased the finest exhaust system for your<br />
motorcycle on the market. Your <strong>Vance</strong> & <strong>Hines</strong> exhaust system is designed<br />
and crafted for maximum performance, a perfect fit, a great sound and<br />
unbeatable style. Please follow the installation instructions below and if you<br />
have any questions, please call our technical support line at (562) 926-5291.<br />
Attention installer (if other than owner), please forward this instruction sheet<br />
to the owner of this product. These instructions contain valuable information<br />
to the end user.<br />
5/16” Nutdriver<br />
6mm Allen wrench<br />
12mm & 1/2”<br />
Combination wrenches<br />
3/8” Ratchet, Extensions<br />
1/2” & 12mm Sockets<br />
7/16” Deep Socket<br />
Page 1 of 4<br />
H462IN Rev. 1.0
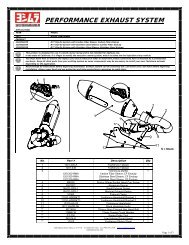
FIGURE1 FIGURE 2 FIGURE 3 FIGURE 4<br />
MORE POWER : LESS NOISE<br />
VANCE & HINES EXHAUST<br />
SYSTEM INSTALLATION<br />
Install bracket#620-P<br />
FUELPAK<br />
Place washers between mount<br />
bar and bracket<br />
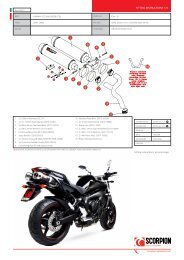
1. Install mounting bracket 620-P (supplied) to motorcycle<br />
mount bar (Figure 1) by using two M8x50mm socket head<br />
bolts (supplied), two M8 lock nuts (supplied) and the two<br />
stock washers. Note: Place stock washers between mount<br />
bar and muffler body mounting bracket (Figure 2). (Re-use<br />
of stock bolts and nuts is optional)<br />
2. Remove the muffler assemblies and heat shields from their<br />
protective packaging. Place each heat shield on a nonabrasive<br />
surface such as a towel, blanket or carpet.<br />
3. Install T-bolt clamps (supplied) over the front (notched end)<br />
of the mufflers (figure 4), small clamp on top tube, large<br />
clamp on lower tube. NOTE: The tightening bolts should be<br />
accessible from the bottom.<br />
4. Carefully lay the muffler assembly into the heat shield and<br />
loosely install the hose clamps (supplied) by feeding the<br />
tail end of the clamp into the heat shield clips (Figure 3).<br />
Note the direction of the clamp screw heads, they must be<br />
accessible for adjustment when system is installed (Figure<br />
4).<br />
5. Adjust the heat shield so that the muffler body protrudes<br />
beyond the heat shield by .25 inches, and the muffler body<br />
and heat shield edges are parallel. Tighten band clamps.<br />
6. Slide mufflers onto the head pipes.<br />
7. Slide nut plates (supplied) into muffler body brackets with<br />
the flat side towards the bike.<br />
8. Using 5/6” x 5/8” hex head bolts (supplied), attach the<br />
mufflers to the bracket.<br />
9. Tighten all hardware.<br />
10. After installation and before starting motorcycle, completely<br />
clean pipes and mufflers with soapy water and a clean, soft<br />
cloth. NOTE: Any residue, oil, or fingerprints will stain the<br />
finish when the metal heats up.<br />
11. Be sure to tighten all hardware before starting your<br />
motorcycle.<br />
EXHAUST CARE - HELPFUL HINTS TO AVOID DISCOLORATION OF EXHAUST SYSTEM<br />
1. When installing a new set of chrome pipes, make sure your hands are clean and free of oil.<br />
After installation, thoroughly clean pipes with a soft cloth and cleaning solvent that will leave<br />
no residue (chrome wax / polish, glass cleaner, alcohol, ammonia, etc...) before starting the<br />
motorcycle.<br />
2. Avoid long periods of idling as this can cause discoloration.<br />
3. Intake leaks can cause the engine to run lean and overheat, this could lead to discoloration.<br />
4. Make sure there are no exhaust leaks at the junction of the exhaust pipes and cylinder head.<br />
We recommend replacing gaskets if they are worn.<br />
VANCE & HINES OPTIONAL ACCESSORIES<br />
FUEL MANAGEMENT:<br />
Take the guess work out of fuel injection with Fuelpak Fuel<br />
Management. Contact your local dealer or call (562) 921-0071<br />
to order. Visit fuelpakfi.com for more information.<br />
Fuelpak is intended for racing or off-highway use only, and is<br />
not legal for sale or use in California on pollution-controlled<br />
vehicles.<br />
Install hose clamp<br />
Hose clamps and T-bolts<br />
head direction<br />
PLEASE NOTE: Every effort is made for <strong>Vance</strong> & <strong>Hines</strong> Exhaust Systems to provide improved cornering clearance. However, due to design and space limitations on some motorcycle models, ground and<br />
cornering clearance may not be improved and in some cases may be reduced. Be sure to follow proper installation instructions.<br />
Page 2 of 4<br />
H462IN Rev. 1.0
HONDA VTX1300 FURY<br />
TWIN SLASH PC SLIP-ON<br />
INSTALLATION INSTRUCTIONS<br />
PART# 18421<br />
PACKING LIST<br />
MORE POWER : LESS NOISE<br />
ALL PARTS SHOWN ARE ACTUAL SIZE<br />
Nut plate x2<br />
M8x50mm Socked head bolt x2<br />
#52 T-bolt clamp x1<br />
M8 metal lock nut x2<br />
5/16”x5/8” Flange Hd. Bolt x4<br />
#55 T-bolt clamp x1<br />
#36 Hose clamp x4<br />
PARTS NOT SHOWN:<br />
620-P Bracket 1x<br />
H650RC Muffler 1x<br />
H655HC Bottom heat shield 1x<br />
H656HC Top heat shield 1x<br />
A423R Baffle 1x<br />
WARRANTY<br />
<strong>Vance</strong> & <strong>Hines</strong> exhaust systems are warranted against defects in material and workmanship for a period of 90 days from the date of purchase from an authorized dealer. This warranty does not cover<br />
discoloration of chrome finishes. This warranty is limited to the repair or replacement of a product proven to be defective from normal use. <strong>Vance</strong> & <strong>Hines</strong> exhaust systems are designed to fit and<br />
operate on OEM motor and chassis. This warranty does not cover any product subject to abuse, misuse, improper installation or modification.<br />
Page 3 of 4<br />
H462IN Rev. 1.0
FUEL MANAGEMENT<br />
GET THE MOST OUT OF YOUR RIDING EXPERIENCE...<br />
AN AFTERMARKET EXHAUST SYSTEM IS ONLY YOUR FIRST STEP, NOW YOU NEED FUEL MANAGEMENT.<br />
NOW YOU NEED FUELPAK.<br />
MORE POWER : LESS NOISE<br />
Your fuel injected Harley-Davidson® is equipped with an ECU (electronic<br />
control unit) that’s programmed to deliver fuel to the motor based on an<br />
air/fuel ratio for a stock air filter and stock exhaust system. When you install<br />
a performance exhaust system, your airflow changes, so you need a<br />
fuel management system that adjusts your air/fuel ratio to match<br />
the changes. That fuel management system is Fuelpak. Fuelpak<br />
adds and takes away fuel, allowing for a more precise range of<br />
refinement in your air/fuel ratio. Get the perfect fuel management<br />
combination with your <strong>Vance</strong> & <strong>Hines</strong> exhaust system, get Fuelpak.<br />
For more information visit the tuning center at fuelpakfi.com<br />
NOTICE: Fuelpak is intended for racing or off-highway use only, and is not legal<br />
for sale or use in California on pollution-controlled vehicles.<br />
Page 4 of 4<br />
13861 ROSECRANS AVENUE / SANTA FE SPRINGS, CA 90670<br />
SALES: (562) 921-7461 / TECHNICAL: (562) 926-5291 / FAX: (562) 802-0110<br />
VANCEANDHINES.COM<br />
H462IN Rev. 1.0