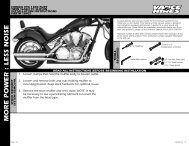
KAWASAKI VULCAN 1600 Classic BIG SHOTS ... - Vance & Hines
KAWASAKI VULCAN 1600 Classic BIG SHOTS ... - Vance & Hines
KAWASAKI VULCAN 1600 Classic BIG SHOTS ... - Vance & Hines

Create successful ePaper yourself
Turn your PDF publications into a flip-book with our unique Google optimized e-Paper software.
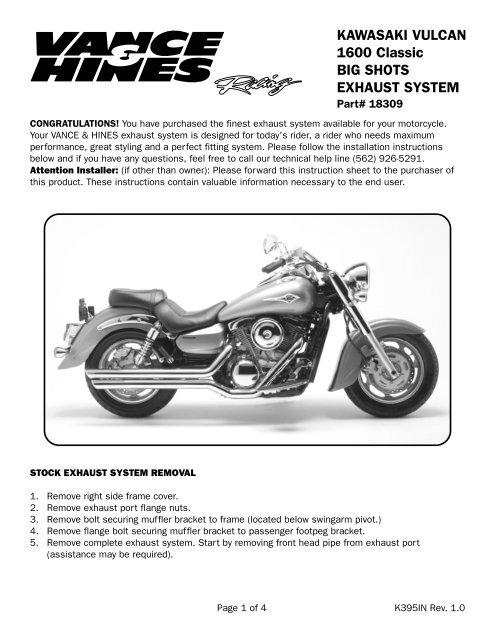
<strong>KAWASAKI</strong> <strong>VULCAN</strong><br />
<strong>1600</strong> <strong>Classic</strong><br />
<strong>BIG</strong> <strong>SHOTS</strong><br />
EXHAUST SYSTEM<br />
Part# 18309<br />
CONGRATULATIONS! You have purchased the finest exhaust system available for your motorcycle.<br />
Your VANCE & HINES exhaust system is designed for today's rider, a rider who needs maximum<br />
performance, great styling and a perfect fitting system. Please follow the installation instructions<br />
below and if you have any questions, feel free to call our technical help line (562) 926-5291.<br />
Attention Installer: (if other than owner): Please forward this instruction sheet to the purchaser of<br />
this product. These instructions contain valuable information necessary to the end user.<br />
STOCK EXHAUST SYSTEM REMOVAL<br />
1. Remove right side frame cover.<br />
2. Remove exhaust port flange nuts.<br />
3. Remove bolt securing muffler bracket to frame (located below swingarm pivot.)<br />
4. Remove flange bolt securing muffler bracket to passenger footpeg bracket.<br />
5. Remove complete exhaust system. Start by removing front head pipe from exhaust port<br />
(assistance may be required).<br />
Page 1 of 4 K395IN Rev. 1.0
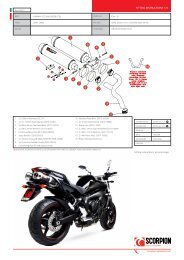
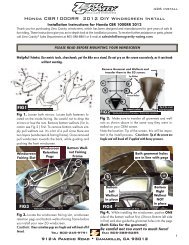
VANCE & HINES EXHAUST SYSTEM INSTALLATION<br />
1. Check condition of stock exhaust gaskets. Replace if<br />
damaged or worn.<br />
2. Using stock mounting bolt, install, but do not tighten,<br />
supplied mounting bracket (stamped 347-P) in the<br />
original mounting bracket location behind passenger<br />
footpeg. (Figure 1). Note: Make sure bracket is mounted<br />
in the right direction.<br />
installing mount<br />
bracket 347-P<br />
Figure 1<br />
3. Place heat shields on a non-abrasive surface such as a<br />
blanket or carpet. Using a felt tip marker, mark the<br />
outside surface of front and rear heat shields with the<br />
location of the mounting clips welded inside(Figure 2).<br />
Mark<br />
outside<br />
surface<br />
Figure 2<br />
Feed clamp<br />
through clips<br />
4. Install each heat shield over its respective head pipe<br />
(Figure 3).<br />
install heatshields.<br />
Figure 3<br />
Page 2 of 4 K395IN Rev. 1.0
5. Loosely install each hose clamp by feeding tail end of<br />
clamp into heat shield clip (Figure 2). Take note of<br />
clamp screw head direction (Figure 4). Screw head<br />
should be accessible when system is installed on<br />
motorcycle for adjustment purposes. Use #20 hose<br />
clamps for head pipe areas and #28 hose clamps for<br />
muffler areas.<br />
6. Using stock flange nuts, carefully install system into<br />
exhaust ports starting with the rear port first.<br />
(Assistance may be required). Note: Do not tighten yet.<br />
7. Slide dog bone shaped nut plate (supplied) inside each<br />
bracket welded to backside of mufflers (Figure 5).<br />
8. Attach mufflers to mounting bracket 347-P using 5/16”<br />
flange bolts (supplied) engaging dog bone nut plate.<br />
Note: Do not tighten yet.<br />
9. Tighten exhaust port flange nuts securing head pipes to<br />
cylinder heads.<br />
10. Tighten 5/16” flange bolts securing mufflers to<br />
mounting bracket.<br />
Arrows indicate direction of clamp<br />
heads.<br />
Figure 4<br />
install dogbone nutplates.<br />
Figure 5<br />
11. Align tip ends so that slash cuts are even. (Figure 6)<br />
12. Tighten all hose clamps securing heat shields.<br />
13. Reinstall right side cover.<br />
14. Remove oil and finger prints from chrome using a soft<br />
cloth and non abrasive cleaner before starting engine.<br />
Important: All hardware must be properly<br />
tightened before starting motorcycle.<br />
note alignment<br />
of tips.<br />
Figure 6<br />
RE-JETTING INSTRUCTIONS<br />
Re-jetting the carburetors will result in realizing the "full" potential of this performance exhaust system.<br />
<strong>Vance</strong> & <strong>Hines</strong> offers jet kits for most applications. For fuel injected models, we recommend the use of<br />
an adjustable fuel management system.<br />
PLEASE NOTE: Every effort is made for <strong>Vance</strong> & <strong>Hines</strong> Exhaust Systems to provide improved<br />
cornering clearance. However, due to design and space limitations on some motorcycle models,<br />
(center stand, oil filter, oil pan etc.) ground and cornering clearance may not be improved and in some<br />
cases may be reduced. Be sure to follow proper installation instructions.<br />
Page 3 of 4 K395IN Rev. 1.0
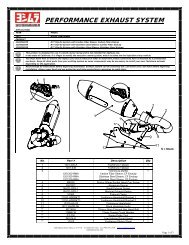
PACKING LIST (All parts actual size)<br />
#28 Hose clamp<br />
x 4<br />
#20 hose clamp<br />
x 5<br />
Nutplate x 2 5/16” x 5/8”<br />
Flange bolt x 4<br />
HELPFUL HINTS TO AVOID DISCOLORATION OF EXHAUST PIPES<br />
1. Follow owner’s manual instructions regarding use of the choke (starter enricher). If left on longer<br />
than recommended, discoloration may be accelerated.<br />
2. Avoid long periods of idling.<br />
3. Intake leaks can cause engine to run lean and overheat, thus turning the pipes blue.<br />
4. Make sure there are no exhaust leaks at the junction of the exhaust pipe and cylinder head.<br />
5. When installing a new set of chrome pipes, make sure your hands are clean and free of oil. After<br />
installation, thoroughly clean pipes with a cleaning solvent that will leave no residue (glass<br />
cleaner, alcohol, ammonia, etc.) before starting the motorcycle.<br />
WARNING!<br />
VANCE & HINES DOES NOT WARRANTY ANY CHROME<br />
PRODUCTS AGAINST DISCOLORATION.<br />
For information about other <strong>Vance</strong> and <strong>Hines</strong> products visit our web site at www.vanceandhines.com<br />
Page 4 of 4 K395IN Rev. 1.0