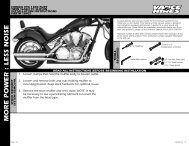
Harley-Davidson® Softail 1984-99 - Mustang Seats
Harley-Davidson® Softail 1984-99 - Mustang Seats
Harley-Davidson® Softail 1984-99 - Mustang Seats

You also want an ePaper? Increase the reach of your titles
YUMPU automatically turns print PDFs into web optimized ePapers that Google loves.
<strong>Harley</strong>Davidson® <strong>Softail</strong> <strong>1984</strong><strong>99</strong><br />
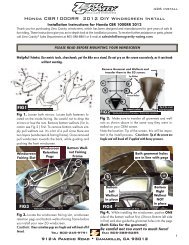
Mounting Suggestions<br />
<strong>Harley</strong>-Davidson® <strong>Softail</strong> <strong>1984</strong>-<strong>99</strong><br />
One-Piece Seat<br />
Mounting Suggestions<br />
<strong>Harley</strong>-Davidson® <strong>Softail</strong> <strong>1984</strong>-<strong>99</strong><br />
Two-Piece Seat<br />
Mounting Suggestions<br />
<strong>Harley</strong>-Davidson® <strong>Softail</strong> <strong>1984</strong>-<strong>99</strong><br />
Solo Seat<br />
Mounting Suggestions<br />
<strong>Harley</strong>-Davidson® <strong>Softail</strong> <strong>1984</strong>-<strong>99</strong><br />
Passenger Seat
Mounting Suggestions<br />
<strong>Harley</strong>-Davidson® <strong>Softail</strong> <strong>1984</strong>-<strong>99</strong><br />
One-Piece Seat<br />
Baseplate Features:<br />
<strong>Seats</strong> are built on 16 gauge formed steel baseplates. The baseplates<br />
have rubber supports at contact points. Rear seat features carpet to<br />
protect the fender.<br />
NOTE: <strong>Mustang</strong> <strong>Softail</strong> seats will fit all <strong>Softail</strong> models except<br />
1<strong>99</strong>9earlier FLSTS Heritage Springers.<br />
Removal of Stock Seat<br />
1. Remove one side mounting bolt on each side of driver’s seat.<br />
2. Remove rear fender screw.<br />
3. Remove seat from bike by sliding it back and up.<br />
Mounting of <strong>Mustang</strong> Solo Seat<br />
1. Clip welded nose tab into frame mount behind gas tank.<br />
2. Secure rear of seat with rear fender screw.<br />
Enjoy the comfort of your<br />
new <strong>Mustang</strong> seat!<br />
These steps are guidelines to help you install your new <strong>Mustang</strong> Product. If you need further<br />
assistance, please call us at 800‐243‐1392 or 860‐582‐9633, Monday through Friday 9:00 – 5:30<br />
Eastern or send an e‐mail to questions@mustangseats.com or visit our website at<br />
www.mustangseats.com.<br />
For care and maintenance of our seats, please go to our website under “Support”.<br />
Refers to part numbers 75596, 76372, 75157, 75629, 75444, 75110, 75112, 75631, 75303, 75503, 75735,<br />
75502<br />
back
Mounting Suggestions<br />
<strong>Harley</strong>-Davidson® <strong>Softail</strong> <strong>1984</strong>-<strong>99</strong><br />
Two-Piece Seat<br />
Baseplate Features:<br />
<strong>Seats</strong> are built on 16 gauge formed steel baseplates. The baseplates<br />
have rubber supports at contact points. Rear seat features carpet to<br />
protect the fender.<br />
NOTE: <strong>Mustang</strong> <strong>Softail</strong> seats will fit all <strong>Softail</strong> models except<br />
1<strong>99</strong>9earlier FLSTS Heritage Springers.<br />
Removal of Stock Seat<br />
1. Remove the side mounting bolt on each side of driver’s seat.<br />
2. Remove rear fender screw.<br />
3. Remove seat from bike by sliding it up and back.<br />
Mounting of <strong>Mustang</strong> Seat<br />
1. Remove two 1/4‐20 screws in the rear of the <strong>Mustang</strong> solo baseplate.<br />
2. Align passenger seat front chrome tabs with threaded holes in back of solo baseplate.<br />
3. Secure passenger seat and solo together with screws from step 1. Seat becomes a one‐piece<br />
unit.<br />
4. Clip welded nose tab of solo into the frame mount behind the gas tank and secure passenger<br />
seat tab with stock screw in rear fender.<br />
5. Align the solo side brackets and attach with large Allen screws. NOTE: The solo side brackets<br />
can be removed (and not used) when mounting the solo and passenger seat combination.<br />
NOTE: Nylon washer should be under the rear bracket only on ‘95 and earlier models.<br />
<strong>Mustang</strong> passenger seat can only be mounted to a <strong>Mustang</strong> solo seat.<br />
These steps are guidelines to help you install your new <strong>Mustang</strong> Product. If you need further<br />
assistance, please call us at 800‐243‐1392 or 860‐582‐9633, Monday through Friday 9:00 – 5:30<br />
Eastern or send an e‐mail to questions@mustangseats.com or visit our website at<br />
www.mustangseats.com.<br />
For care and maintenance of our seats, please go to our website under “Support”.<br />
Refers to part numbers 75122, 75123, 75141, 75142, 75490, 75492, 75506, 75509, 75512, 75513, 75514,<br />
75750, 75751, 75757, 75764, 79104, 79114, 79124, 79134 ,79228, 79229, 79248, 79249<br />
back
Mounting Suggestions<br />
<strong>Harley</strong>-Davidson® <strong>Softail</strong> <strong>1984</strong>-<strong>99</strong><br />
Solo Seat<br />
Baseplate Features:<br />
<strong>Seats</strong> are built on 16 gauge formed steel baseplates. The baseplates<br />
have rubber supports at contact points. Rear seat features carpet to<br />
protect the fender.<br />
NOTE: <strong>Mustang</strong> <strong>Softail</strong> seats will fit all <strong>Softail</strong> models except<br />
1<strong>99</strong>9earlier FLSTS Heritage Springers.<br />
Removal of Stock Seat<br />
1. Remove two side mount bolts, one on each side of driver’s seat.<br />
2. Remove rear fender screw.<br />
3. Remove seat from bike by sliding it back and up.<br />
Mounting of <strong>Mustang</strong> Solo Seat<br />
1. Clip nose tab into frame mount behind gas tank.<br />
2. Align side brackets with threaded holes in frame.<br />
3. Install and tighten two 1/2‐13 side mount bolts.<br />
Enjoy the comfort of your<br />
new <strong>Mustang</strong> seat!<br />
These steps are guidelines to help you install your new <strong>Mustang</strong> Product. If you need further<br />
assistance, please call us at 800‐243‐1392 or 860‐582‐9633, Monday through Friday 9:00 – 5:30<br />
Eastern or send an e‐mail to questions@mustangseats.com or visit our website at<br />
www.mustangseats.com.<br />
For care and maintenance of our seats, please go to our website under “Support”.<br />
Refers to part numbers 75512, 75490, 75750, 79124, 75757, 79104, 75506, 79248, 79228, 75141, 75122<br />
back
Mounting Suggestions<br />
<strong>Harley</strong>-Davidson® <strong>Softail</strong> <strong>1984</strong>-<strong>99</strong><br />
Passenger Seat<br />
Baseplate Features:<br />
<strong>Seats</strong> are built on 16 gauge formed steel baseplates. The baseplates<br />
have rubber supports at contact points. Rear seat features carpet to<br />
protect the fender.<br />
NOTE: <strong>Mustang</strong> <strong>Softail</strong> seats will fit all <strong>Softail</strong> models except<br />
1<strong>99</strong>9earlier FLSTS Heritage Springers.<br />
Mounting of <strong>Mustang</strong> Passenger Seat<br />
1. Remove <strong>Mustang</strong> solo seat from bike.<br />
2. Remove two 1/4‐20 screws located at back of <strong>Mustang</strong> solo seat baseplate.<br />
3. Align passenger seat front chrome tabs with threaded holes in back of solo baseplate.<br />
4. Secure rear seat and solo together with screws from step 2. Seat becomes a 1‐piece unit.<br />
5. Align chrome rear tab with threaded fender hole and secure with stock screw.<br />
6. Install and tighten side mount bolts.<br />
NOTE: <strong>Mustang</strong> passenger seat can only be mounted to a <strong>Mustang</strong> solo seat.<br />
Enjoy the comfort of your<br />
new <strong>Mustang</strong> seat!<br />
These steps are guidelines to help you install your new <strong>Mustang</strong> Product. If you need further<br />
assistance, please call us at 800‐243‐1392 or 860‐582‐9633, Monday through Friday 9:00 – 5:30<br />
Eastern or send an e‐mail to questions@mustangseats.com or visit our website at<br />
www.mustangseats.com.<br />
For care and maintenance of our seats, please go to our website under “Support”.<br />
Refers to part numbers 75513, 75514, 75492, 75751, 75513, 79134, 79114, 75764, 75509, 79249, 75142,<br />
79229, 75123<br />
back