Tripod - Big Dog Treestands
Tripod - Big Dog Treestands
Tripod - Big Dog Treestands

You also want an ePaper? Increase the reach of your titles
YUMPU automatically turns print PDFs into web optimized ePapers that Google loves.
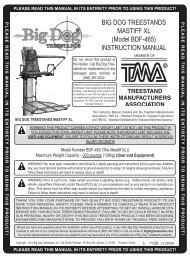
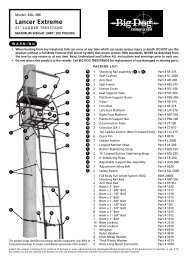
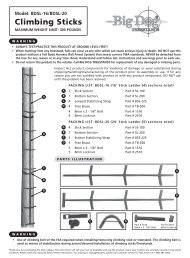
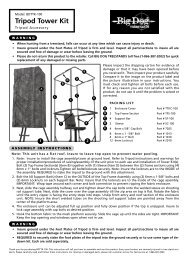
Model: BDT-300<br />
<strong>Tripod</strong><br />
16’ TRIPOD<br />
MAXIMUM WEIGHT LIMIT —300 POUNDS<br />
WARNING<br />
• When hunting from a treestand, falls can occur at any time which can cause injury or death.<br />
• Please do not return this product to the retailer. Call BIG DOG TREESTANDS toll free (1-866-387-2002) for quick<br />
replacement of any damaged or missing parts.<br />
B<br />
A<br />
PACKING LIST:<br />
Platform Carton (Box 1 of 2)<br />
C<br />
A<br />
E<br />
I<br />
K<br />
D<br />
G<br />
H<br />
L<br />
F<br />
B<br />
J<br />
C<br />
A<br />
B<br />
C<br />
D<br />
E<br />
F<br />
G<br />
2 Padded Shooting Rail Part # FSR-300<br />
2 Sleeve Part # SSR-300<br />
(for shooting rail connection)<br />
4 Rail Support Tube Part # SRS-200<br />
1 Foam Cushion Part # TFC-200<br />
1 Back Seat Part # TBS-300<br />
1 Seat Base Part # TSB-300<br />
1 Swivel Base Part # TSB-300<br />
H<br />
1 Seat Pedestal Part # SP-300<br />
O<br />
O<br />
M<br />
I<br />
J<br />
4 Cross Brace Part # CB-200<br />
1 Front Foot Platform Part # FFP-300<br />
K<br />
1 Rear Platform Part # RP-300<br />
P<br />
S<br />
R<br />
Q<br />
Q<br />
R<br />
P<br />
S<br />
N<br />
L<br />
M<br />
1 Subframe Part # TS-300<br />
12 8mm x 2 - 1/8" Bolt Part # 1516<br />
15 8mm x 2" Bolt Part # 1515<br />
6 8mm x 1- 5/8" Bolt Part # 1513<br />
26 8mm x 1- 3/8" Bolt Part # 1512<br />
8 6mm x 1 - 1/8" Bolt Part # 1011<br />
4 6mm x 5/8" Bolt Part # 1009<br />
59 8mm Locknut Part # 2510<br />
12 6mm Locknut Part # 2010<br />
2 8mm Nylon Washer Part # 4010<br />
Leg Carton (Box 2 of 2)<br />
1 Top Step Leg Part # TSL-300<br />
N<br />
1 Bottom Step Leg Part # BSL-300<br />
O<br />
2 Top Leg Part # TL-300<br />
P<br />
2 Bottom Leg Part # BL-300<br />
Q<br />
6 Upper Cross Support Tube Part # UCS-300<br />
R<br />
6 Lower Cross Support Tube Part # LCS-300<br />
S<br />
6 Leg Link Brace Part # LLB-200<br />
WARNING<br />
• Inspect ALL parts prior to leaving the ground.<br />
• Always test/practice at ground level w/tripod until comfortable with use of products.<br />
• Proper location/tightening of components is critical. Insure all components are properly tightened/secured and free of<br />
damage/wear prior to each use.<br />
Please inspect the shipping carton for evidence of damage or that it may have been opened before you received it. Then inspect your product carefully.<br />
Compare it to the image on the product label and the picture illustration in your instructions. You must check and tighten all bolts before each use. If for<br />
any reason you are not satisfied with the product, do not use it until the problem is solved or corrected.
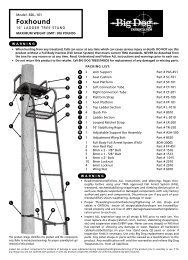
ASSEMBLY INSTRUCTIONS<br />
Note: TOOLS REQUIRED: (2) 13mm Wrenches, (2) 10mm Wrenches<br />
111 PLATFORM ASSEMBLY: Lay the Front Foot Platform (Item J) and the Rear Foot Platform (Item K) face down onto the mesh. Mate the flat<br />
ends of the platform(s) together. Next, lay the Subframe (Item L) onto both platforms and align the holes in the Subframe and the Front<br />
& Rear Platform. Fasten together using (4) 8mm x 2” bolts and (4) 8mm locknuts. Note: Insure the bolt heads are to the top or mesh side<br />
of the foot platforms. The Subframe is positioned between BOTH platforms. NOTE: DO NOT tighten any bolts/locknuts until the platform<br />
assembly is complete. (Fig. 1 &2)<br />
222 Rotate the platform so the mesh is facing upward. Next, attach the Rail Support Tubes (Item C) to the outside of the Foot Platform<br />
Assembly (Item(s) J,K) and secure with (1) 8mm x 2” bolt and (1) 8mm locknut. Repeat for all (4) Support Tubes. Note: The short welded<br />
tube on the Support tube should be at the top and pointed AWAY from the center of the platform. Next, attach the Cross Brace(s) (Item<br />
I) to the OUTSIDE of the Foot Platform Assembly using (1) 8mm x 1-3/8” bolt and (1) 8mm locknut and attach the opposite end to the<br />
INSIDE of the Rail Support Tubes using (1) 8mm x 1-3/8” Bolts and (1) 8mm locknuts for each Support tube. (Fig. 3 & 7)<br />
333 Assemble both ends of the Shooting Rail(s) (Item A) together with (1) Sleeve (Item B) between each Shooting Rail end and bolt together<br />
using (2) 6mm x 1-1/8” bolts and (2) 6mm locknuts. Next, align holes in assemblied Shooting Rail Assembly with hole(s) in the Rail Support<br />
Tubes (Item C) and secure using (4) 8mm x 2” bolts and (4) 8mm locknuts. Note: Keep the locknuts to the outside of the Rail Support<br />
Tube(s) to avoid catching your clothing. (Fig. 11 and also see packing illustration)<br />
444 [Seat Sub-Assembly] Assemble the Seat Base (Item F) to the Seat Back (Item E) using (2) 8mm x 1-3/8” bolts and (2) 8mm locknuts with<br />
(2) 8mm nylon washer between both components. Next, assemble the Swivel Base (Item G) to the Seat Base using (4) 6mm x 1-1/8” bolts<br />
and (4) 6mm locknuts. NOTE: Insure that the large locknut on the Swivel Plate is facing UPWARD or below the seat cushion. Now, attach<br />
the Seat Assembly w/Swivel Plate to the Seat Pedestal (Item H) over the hole end of the Seat Pedestal using (4) 6mm x 5/8” bolts and (4)<br />
6mm locknuts. Note: INSURE THE LOCKNUT ON THE SWIVEL PLATE IS SECURELY TIGHTENED. CHECK FREQUENTLY. This bolt will keep the<br />
sections from coming apart. Next, bolt the Seat Pedestal Assy. the the platform (in the center of platform) using (4) 8mm x 1-3/8” bolts<br />
and (4) 8mm locknuts. NOTE: The Seat Pedestal base is attached to both sections of the platform. (Fig. 4/5/6/11)<br />
555 LEG ASSEMBLY: [Front Leg Assembly] Identify Top Step Leg (Item M) with a welded U-Plate on one end and Bottom Step Leg (Item N) with<br />
a welded foot plate at one end. Insure both sections are orientated correctly and secure both sections together with (2) Leg Link Brace(s)<br />
(Item S)(angled plates) to the outside of the joint and align holes. Fasten the Leg joint together using (4) 8mm x 2-1/8” bolt(s) and (4)<br />
8mm locknuts. [Back Leg(s) Assembly] Identify the Top Leg (Item O) with welded U-Plate and Bottom Leg (Item P) with a welded foot<br />
plate and insure proper orientation of the foot plate in relation to the welded U-Plate on Leg Section. Note: Insure the Leg Sections are<br />
secured together correctly so that, when attached to foot platform, the foot plates will face AWAY from the platform area. Secure back<br />
Leg Sections together using (2) Leg Link Brace(s) and fasten together using (4) 8mm x 2-1/8” bolts and (4) 8mm locknuts. (Fig. 10)<br />
666 [**This step requires at least 3 people and the use of a table/bench**] [Attaching Legs to Platform Assembly] Lay the Platform/Cage<br />
assembly on its side on a table or bench so that the single/front leg mounting tube location is sideways or parallel with the table/bench.<br />
The table/bench is required to assemble the leg sections onto the platform with the least amount of difficulty. With (2) or more people,<br />
insert the U-Plate end of the Front Leg Assembly over the mounting tube and align the holes and insert (1) 8mm x 2” bolt through the<br />
U-Plate and through the mounting tube in the foot platform and secure with (1) 8mm locknut. NOTE: Insure to have someone hold<br />
and support the leg while suspended. Next, attach the Rear Leg sections to the rear mounting tubes in the foot platform. Insert the<br />
u-plates and align the holes in both the U-Plate and mounting tube and secure with (1) 8mm x 2” bolt and (1) 8mm locknut on each rear<br />
Leg Section. NOTE: Insure ALL the foot pads on ALL leg assemblies are pointed outward. Insure to hold/support all the legs assemblies<br />
reducing the stress on the connection joints. (Fig. 7 & 8)<br />
777 [Leave the unit on its side on the table or bench] Leg(s) Cross Support Assembly: Identify Upper Cross Support Tubes (Item Q)(1” Square<br />
Tube) and Lower Cross Support Tubes(Item R)(3/4” Square Tube). Insert (1) Lower Cross Support Tube(3/4") into (1) Upper Cross Support<br />
Tube(1"), align the hole(s) in both pieces and secure together using (1) 8mm x 1-3/8” bolt and (1) 8mm locknut. Repeat for remaining<br />
Cross Support Assemblies, (6) in total. On each Leg Assembly, there are (2) sets of welded "V" connections pads at the top and one near<br />
ground level. Attach (1) Cross Support Assembly (1" tube end) to the OUTSIDE of the top welded V connection pad. Note: Insure the Cross<br />
Support tube assembly(s) are mounted to the OUTSIDE of the welded “V” connections pads. Secure using (1) 8mm x 1-5/8” bolt and (1)<br />
8mm locknut. Next, swing the Cross Support Assembly to the opposite LOWER OUTSIDE welded “V” connection and secure using (1) 8mm<br />
x 1-3/8” bolt and (1) 8mm locknut. Repeat for remaining Cross Support Assemblies. NOTE: The Cross Support Assemblies should form a “X”<br />
pattern on each side of the Leg Assemblies and the Cross Supports ALL are mounted to the OUTSIDE of the "V" connections. (Fig. 9)<br />
888 Go back through and securely tighten all bolts and locknuts before raising the unit. Be careful not to over-tighten the bolts/locknuts in<br />
which the tubes become crushed or deformed.<br />
999 Set-Up: With (3) or more people, carefully rotate the <strong>Tripod</strong> so that the Front Ladder Leg is pointed UPWARD. [Hint: Tie a rope to the Front<br />
Leg Section to aide in raising the unit] Next, with (1) or more people on each back leg section and (1) or more people pulling down on<br />
the rope tied off to the Front Ladder Leg, carefully raise the <strong>Tripod</strong> Assembly up until rests FLAT on the Foot Plates of the Leg Assemblies.<br />
NOTE: Do not allow the unit to slam against the ground during raising/resting of the unit. Insure the ground under the stand is firm and<br />
level and the foot platform is level. Note: Impacting/slamming the unit will stress the unit and cause parts to bend. Thoroughly inspected<br />
the unit for any damage before climbing into the unit and insure all bolts/nuts have been tightly secured. Have (3) points of contact while<br />
leaning forward while you slowly climb into the unit. Inspect the unit for weathering, wear, damage, connection of “X” brace and leg<br />
sections prior to each use/before leaving the ground. Maintain position near the center of the platform and avoid standing near the edge<br />
of the platform. NEVER use any type of motor vehicle or mechanical device to raise this unit. Insure the ground under the foot plates are<br />
firm and level before leaving the ground. It is required to stake the foot plates or secure the platform to the ground by means of a tie<br />
down kit (neither provided with this unit) before using this unit. Do not use this product in adverse weather or if high winds are present.<br />
Inspect this product fully including all leg connections, bolts, and ground beneath the foot plates prior to each use and before leaving<br />
the ground. Do not use this product if it is showing any signs of wear or detoriation or suspect any part of wear or detoriation. This also<br />
includes not using this unit if there are any parts missing or stolen from this product. ALWAYS use good judgement before each use of this<br />
product.<br />
<strong>Big</strong> <strong>Dog</strong> <strong>Treestands</strong>, Inc. 120 Detroit Parkway, PO Box 952,Morton, Illinois 61550<br />
Toll Free 1-866-387-2002 www.bigdogtreestands.com<br />
©2008 <strong>Big</strong> <strong>Dog</strong> <strong>Treestands</strong>, Inc.<br />
Printed in China
1 2 3<br />
4 5 6<br />
7 8 9<br />
10 11<br />
WARNING<br />
• Inspect ALL parts prior to leaving the ground.<br />
• Always test/practice at ground level w/tripod until comfortable with use of products.<br />
• Proper location/tightening of components is critical. Insure all components are properly tightened/secured and free of<br />
damage/wear prior to each use.<br />
• Insure to stake this unit to the ground properly to prevent movement in the tripod assembly during use or due to high<br />
winds.<br />
• Replace ALL straps (ratchet/button/stabilizing) annually and ALL Hardware (bolts/nuts/cables) every (2) years. Use only<br />
<strong>Big</strong> <strong>Dog</strong> <strong>Treestands</strong> certified replacement parts/components, all others are viewed as a modification to the product.<br />
Frequently lubricate all hardware/parts or as needed.<br />
• Inspect/Insure ground under the Foot Plates is firm/level and all sections are connected/bolted together are secured properly<br />
prior to each use and prior to leaving the ground. Do not use if sections are separated or loose.<br />
• It is advisible to have a certified electrican ground this unit to the ground in the event of being struck by lightening.<br />
Thank you for purchasing the <strong>Tripod</strong>. This instruction will tell you how to assemble and use the product. Every year hunters are seriously injured in tree stand accidents.<br />
Please carefully read and follow these instructions. For missing or damaged parts, please visit our web site or call customer service for fast service at 1-866-387-2002.
SAFETY WARNINGS<br />
Please read this instruction for safe hunting<br />
ALWAYS<br />
• Read and Understand ALL instructions and warning pages thoroughly before using your Fall Arrest System (FAS), treestand, ratchet/stabilizing straps, and<br />
climbing device prior to each use. Replace suspected or damaged components with only factory authorized parts and components. Discontinue use if any<br />
part of your product/FAS shows weathering or wear. ALWAYS inspect/check ALL expiration dates/tags on all straps/FAS prior to each use.<br />
• Practice using the treestand and FAS at ground level until comfortable with safe/proper use of the product prior to each use.<br />
• Insure that your Fall Arrest System (FAS), treestand, tree straps, and climbing devices are in good working order without defects, wear, broken or missing<br />
parts before each use. This inspection includes the following prior to each use: Retightening all hardware, inspecting all components made of metallic and<br />
non- metallic items which includes straps/ropes/seats/FAS for excessive wear or damage before using any products.<br />
• Wear a Fall Arrest System attached to the tree from the time you leave the ground until the time you return to the ground. Keep the tether strap between<br />
you and the tree as short as possible to reduce the distance in case of a fall. Keep the linesman strap tight on the tree while you ascend or descend from<br />
the tree. The FAS tether must be tight while in a seated position.<br />
• Practice with your stand and Fall Arrest System (FAS) at ground level before using them in an elevated position.<br />
• Step down into the center of the platform from your climbing aide while being attached to the tree with your FAS. Position your fixed position stand below<br />
the end of your climbing aide to allow you to step down into the platform.<br />
• Store your Fall Arrest System (FAS), treestand, straps/ropes, all instructions/warnings, and climbing devices in a cool/dry location away from sun light,<br />
weathering, sharp objects or any type of wildlife. NOTE: Wildlife may chew on straps/seats while the stand is not in use and may cause serious damage.<br />
Check ALL straps and seats prior to each use. Review all warnings/instructions annually and prior to each use of the products.<br />
• Hunt with a friend/partner to ensure that someone knows your hunting location as well as the time you are due to return home or to camp. Practice a safe<br />
recovery/rescue plan with your FAS and treestand at ground level prior to each use.<br />
• Take your time and move slowly at all times that while you are using, climbing to, or descending from your treestand. Use 3 Point Climbing Technique while<br />
ascending to or descending from this product while using your Fall Arrest System (FAS) at all times.<br />
• Use (3) or more people to set-up or removal of any treestand unless instructed to have more people present. Use a min. 10” diameter straight/healthy<br />
tree on all treestands.<br />
• Use a hoist line to pull fixed position stand(s) up to the positioning height below the end of the climbing aide while attached to the tree with a FAS.<br />
• Understand the intended use for the treestand/FAS and adhere to all instructions/warnings which pertain to the safe use of <strong>Big</strong> <strong>Dog</strong> <strong>Treestands</strong> products.<br />
• Have a cell phone, walkie-talkie, two-way radio, GPS locator or whistle on your person at all times for emergency purposes and ALWAYS inform someone<br />
of your hunting location and return time in the event of an emergency. Always practice/review your rescue/recover plan prior to each use.<br />
NEVER<br />
• Leave the ground without wearing your FAS harness and being attached to the tree from the time you leave the ground until you return to the ground.<br />
Failure to wear FAS or FAS not attached to the tree at ALL times could result in serious injury or death.<br />
• Climb with your weapon. Ensure that the firearm/bow is unloaded with its barrel pointed toward the ground when raising or lowering it to your stand.<br />
Always use a safe hoist/lift system on the opposite side of the tree from which you climbed while attached safely to the tree with your FAS.<br />
• Climb with anything on your back/waist/or side that will restrict your movement or will interfere with safely using your FAS harness.<br />
• Exceed the manufacturer’s weight limit for the product, including your body weight plus the weight of your clothing/gear.<br />
• Adjust ANY straps/ropes/adjustable support bars while standing on or leaning against any treestand.<br />
• Use this product if you are under the influence of alcohol, mind-altering drugs, prescription medicine, cold or flu medications, have heart problems or<br />
conditions, dizzy or have dizzy spells, sleepy or tired, afraid of heights, physically/mentally impaired to use product properly/safely, feeling ill, nauseous,<br />
or if Fall Arrest System is not present. Do not use any product without consent from your doctor for safe & proper use.<br />
• Climb/Use a tree that is diseased, dead, under sized, leaning, has dead/broken branches/loose bark.<br />
• Stand on the seat/footrest/shooting rail/armrest or rely on any branches for support or means of securing.<br />
• Exceed/modify the suggested manufactures hunting height for any product.<br />
• Jump, bounce, lean-out from, lean against shooting rails or SLEEP in any treestand for any reason, at any time.<br />
• Leave any treestand attached to the tree more than (2) two weeks. Tree growth will stress the straps to the point of a possible failure that could result<br />
in serious bodily injury or death.<br />
• Use any treestand during thunderstorm/raining/sleet/snow storms or any other adverse weather conditions that have the potential to produce lightning,<br />
high winds, or if snow/ice/water is present on the platform or steps.<br />
• Use a tree stand for any purpose other than hunting. Do not use on utility poles or any other man made structures.<br />
• Loan or let anyone use the treestand or FAS Harness without reading/understanding all product instructions/warnings of the product(s). If sold, instructions/warnings<br />
must be given to purchaser.<br />
• Make any modifications to this product. Any modifications will void warranties and relieve <strong>Big</strong> <strong>Dog</strong> <strong>Treestands</strong> Inc. from all liabilities.<br />
WARNING<br />
• Failure to Read/Understand ALL Warnings and Instructions stated could result in serious bodily injury or death.<br />
• You must replace ALL straps (ratchet, button, stabilizing, ropes, etc) and suspension seats every year. Use only <strong>Big</strong> <strong>Dog</strong> replacement straps and parts. Any<br />
other straps or parts will be viewed as a modification to the product. Any modification will void the warranties and relieve <strong>Big</strong> <strong>Dog</strong> <strong>Treestands</strong> Inc. from<br />
all liabilities.<br />
• ALWAYS inspect treestand/straps/cables/FAS/ if ladder sections are pinned together/ground beneath the ladder stand is firm and level/adjustable support<br />
bar is connected to the tree properly prior to each use. Do not use if ANY physical/visible damage/wear is suspected or present.<br />
• It is recommended that you oil/lubricate all hardware as needed or at least annually. It is recommended that you replace all hardware/cables/nuts/bolts/<br />
clips on your tree stand every two years or sooner if inspection finds it necessary.<br />
• Failure to use a Fall Arrest System (FAS) at ALL times could result in serious bodily injury or death.<br />
<strong>Big</strong> <strong>Dog</strong> <strong>Treestands</strong>, Inc. 120 Detroit Parkway, PO Box 952,Morton, Illinois 61550<br />
Toll Free 1-866-387-2002 www.bigdogtreestands.com<br />
©2008 <strong>Big</strong> <strong>Dog</strong> <strong>Treestands</strong>, Inc.<br />
Printed in China