SINGLE ROTOR - Revell Control
SINGLE ROTOR - Revell Control
SINGLE ROTOR - Revell Control

You also want an ePaper? Increase the reach of your titles
YUMPU automatically turns print PDFs into web optimized ePapers that Google loves.
Flying the Helicopter<br />
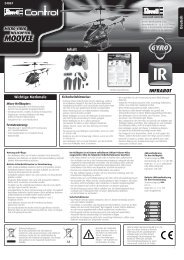
1. GETTING STARTED:<br />
The throttle stick and throttle trim dial must be in the downward position before the controller is turned on. Move the controller’s ON/OFF switch to “ON”. Carefully<br />
connect the helicopter’s fl ight cable. The helicopter’s control LED starts fl ashing red. Wait until the control LED emits a continuous GREEN light. Place the<br />
helicopter two meters away on the ground with the tail pointing towards you. To start fl ying, move the throttle stick slowly forwards.<br />
If the control LED in the helicopter does not emit a continuous GREEN light, check the position of the throttle trim dial and the throttle stick on the controller.<br />
A green light means that the helicopter is ready for fl ight. If the control LED changes to RED during fl ight, the battery is too weak and needs to be recharged.<br />
English<br />
Distance 2 m<br />
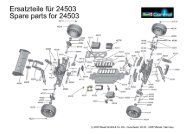
2. TRIMMING:<br />
Correct trimming is crucial for ensuring that the helicopter fl ies smoothly. It is easy to do, but does require a little patience and a light touch.<br />
Please follow these instructions carefully: Slowly move the throttle stick up to raise the helicopter to an altitude of about 0.5 metres to 1 metre.<br />
If the helicopter spirals to the left<br />
or right, or keeps turning slowly<br />
to the left or right<br />
If the helicopter spins or<br />
rotates slowly on its own<br />
axis<br />
If the helicopter keeps moving<br />
forward or backward quickly<br />
or slowly<br />
If the helicopter drifts quickly or slowly to the left, turn the lower<br />
right trim dial gradually to the right. If the helicopter moves to the<br />
right, turn the trim dial gradually to the left.<br />
If the helicopter spins or rotates slowly to the left on its own axis,<br />
turn the lower left trim dial gradually to the right. If the helicopter<br />
turns to the right, move the trim dial gradually to the left. Checking<br />
roll trim may also help resolve these problems.<br />
If the helicopter keeps moving forward quickly or slowly, turn the<br />
upper right trim dial gradually down. If the helicopter moves down,<br />
turn the trim dial gradually upward.<br />
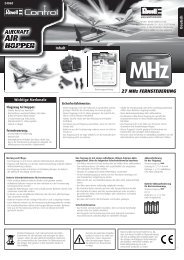
3. FLIGHT CONTROL:<br />
The following information describes the individual functions of the control sticks on a mode 2 controller (throttle on left side). Please note that the position of the sticks is different to those on a mode 1<br />
controller (throttle on right side). All of these functions should be used to ensure that the helicopter fl ies dynamically.<br />
Mode 2 (throttle on left side) CONTROL REVERSE SWITCH SETTINGS<br />
Mode 1 (throttle on right side)<br />
5<br />
3<br />
1<br />
7<br />
1<br />
3<br />
3<br />
1<br />
6<br />
4<br />
2<br />
8<br />
7<br />
8 5<br />
6 5<br />
6 7<br />
8<br />
2<br />
4<br />
4<br />
2<br />
The control reverse switch enables you to change the settings controlling<br />
the direction of the individual controls. However, we recommend that you<br />
retain the default settings.<br />
8