CP705 - Reliable Racing
CP705 - Reliable Racing
CP705 - Reliable Racing

Create successful ePaper yourself
Turn your PDF publications into a flip-book with our unique Google optimized e-Paper software.
___________________________________<br />
P R O F E S S I O N A L<br />
T I M I N G<br />
CHRONOPRINTER 705<br />
Operating Instructions<br />
Version 1.0e December 99<br />
1. DEVICE DESCRIPTION 3-4<br />
2. IMPORTANT OPERATING PRINCIPLES 5-7<br />
3. ALPINE SKI 8-14<br />
4. PARALLEL 15-21<br />
5. CROSS COUNTRY 22-25<br />
6. SPLIT / LAP (Instructions Under construction) 26<br />
7. MULTI-CATEGORY (Alpine Ski / Cross Country) 26<br />
8. CP 705 MENU DESCRIPTION 27-28<br />
9. CP 705 FUNCTION MENU EXPLANATIONS 29-32<br />
10. CP 705 SOFTWARE UPGRADE INSTRUCTIONS 33<br />
11. COMPUTER OUTPUT PROTOCOL 34-35<br />
12. DISPLAY OUTPUT PROTOCOL 36-37<br />
13. CONNNECTOR PIN ASSIGNMENTS 38<br />
1
C P 7 0 5<br />
1 15 2 3 18 19<br />
20 5<br />
17<br />
16 6<br />
21<br />
14<br />
12 13 11 9 8 7<br />
29 29<br />
21 31 22 23 29 29 28 24 25<br />
30 29 29 28 27 26<br />
21 29 29<br />
2
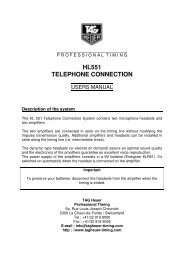
1. DEVICE DESCRIPTION<br />
1 LCD Display – Left : Handles all STARTS in Alpine Ski and Cross-Country.<br />
Handles the BLUE course in parallel racing.<br />
2 POWER LED (Timer) Timer battery condition indicator.<br />
Batteries must be changed if flashing.<br />
3 LCD Display – Right Handles all FINISHES in Alpine Ski and Cross Country<br />
Handles the RED course in parallel racing.<br />
4 Paper Compartment<br />
Cover<br />
Allows access to the printer paper roll compartment. Push on<br />
the sides of the cover to pop up and remove for access. Do<br />
not push down on the Plexiglas.<br />
5 HEATING Internal Timer Printer Heating Indicator. The red LED is on<br />
when the heating circuit is engaged.<br />
6 POWER LED (Printer) Printer battery condition indicator.<br />
Batteries must be changed if flashing.<br />
7 FEED Printer Paper advance.<br />
8 EXT. POWER LED Indicator that glows red when external power is<br />
connected and applied.<br />
9 RESET Reinitializes the Printer<br />
10 CONTROL Tests for correct printer operation and for the presence of<br />
printer paper<br />
11 Keypad – Right Used to control functions and to input competitor numbers for<br />
FINISH operations in Alpine Skiing and Cross-Country. Used<br />
to input Competitor numbers for Starts AND Finishes in<br />
Parallel <strong>Racing</strong>.<br />
12 "M" Key Switches in and out of AUTOMATIC and MANUAL Finish<br />
mode for Alpine Ski or Cross-Country.<br />
In Parallel SEQUENTIAL mode this key requests the<br />
calculation of the difference time between 2 competitors.<br />
13 "F" and ↑↓ Key UP & DOWN Scroll controls while in any menu. The arrows<br />
allow for movement within any menu.<br />
14 Keypad - Left Used to control functions and to input competitor numbers for<br />
START operations in Alpine Skiing and Cross-Country. Used<br />
to input Competitor numbers for Starts AND Finishes in<br />
Parallel <strong>Racing</strong>.<br />
3
15 C Keys Used to effect corrections.<br />
16 R Keys RECALL of unidentified times in memory for identification<br />
with competitor numbers at start or finish.<br />
17 BLOCKING Keys Blocks and/or unblocks external inputs 1 through 4<br />
18 BLOCKING LEDs Indicator lamps. Light as inputs 1 through 4 are blocked.<br />
19 IMPULSES LEDs Indicator lamps that show when external inputs 1 through 4<br />
are triggered.<br />
20 IMPULSES Keys Manual triggering keys for timing channels 1 through 4.<br />
21 HOLDER Provided to hold a paper spindle.<br />
22 POWER External power adapter for 12 to 18 Vdc.<br />
23 HEATING ON / OFF switch to activate internal heating of printer.<br />
24 COMPUTER RS232 / 9600 Baud serial data output for ON LINE or OFF<br />
LINE connection to a PC. Input connection for data transfer to<br />
CP 705 of any upgrade programs.<br />
25 CHRONO ON / OFF switch for timer segment of the CP 705<br />
26 LCD Contrast adjustment of LCD screens<br />
27 DISPLAY RS232 output for Display Board or other serial device.<br />
28 SYNCHRO Initialization synchronization jacks<br />
29 EXTERNAL INPUTS Timing Input Jacks<br />
Timing Typical Typical use for Parallel Events<br />
Usefor<br />
(INPUTS) Alpine Ski or Sequential Mode<br />
Differential Mode<br />
Cross Country<br />
1 Start Start BLUE<br />
COURSE<br />
2 Finish Finish BLUE COURSE<br />
3 Start RED COURSE<br />
4 Finish Finish Finish RED COURSE<br />
30 EXT. CONNECTOR Connector for full access to all 16 timing channels as well as<br />
data outputs and special remote functions<br />
31 PRINTER ON/OFF switch for printer component of CP 705<br />
4
2. IMPORTANT OPERATING INSTRUCTIONS<br />
• Never use the CP 705 without batteries.<br />
• Always remove batteries from the CP 705 if the device will not be used for long periods of<br />
time. Dead or old batteries that leak can seriously damage the system and void your<br />
warranty.<br />
• Use the external supply (AC/DC Adapter Ref. HL 605-1) in conjunction fresh batteries<br />
whenever possible so as to conserve battery power.<br />
• Make certain there is enough paper loaded in the printer prior to starting a timing session<br />
if the printer must be used.<br />
• Under difficult atmospheric conditions (if the CP 705 is used outside or in windy or humid<br />
conditions) you can of course use the CP 705 with the printer turned off. All data can be<br />
reprinted after the termination of the race.<br />
• Although the CP 705 is designed to endure limited outdoor use, always protect it from the<br />
effects of rain, snow or dust when operating outdoors.<br />
• If you wish to clean your CP 705, never use abrasive materials or harsh detergents.<br />
• Pay close attention to all messages on both of the LCD screens and on the printer when<br />
in use.<br />
• If it is necessary to turn the CP 705 off/on (timer section), make certain to leave the power<br />
switch in the off position for at least 2 seconds before turning the system on again.<br />
• To protect your CP 705 from possible damage, it is best to effect all external connections<br />
(start gate, photocell, Computer, Displays, etc.) with the <strong>CP705</strong> turned OFF.<br />
• If you have the optional Aluminum Case for the <strong>CP705</strong>, never store any cables, manuals or<br />
other parts in the cover as it is possible to damage the displays and keyboards.<br />
• Always keep paper loaded in the printer. Absence of paper installed in the printer can cause<br />
progressive deterioration of the printer head.<br />
• The basic operation of the CP 705 is a simple matter of a few key operations. More complex<br />
operations are likewise easily mastered. Please take the time to read this description<br />
carefully to ensure success.<br />
5
Operation<br />
Power system: For added timing security, the CP 705 has two separate battery sets of 6 “C”<br />
cell batteries each for a total of 12 “C” cells. One set is devoted to the timer section of the<br />
device, the other is devoted to the printer and heating functions.<br />
Three (3) separate power switches on the rear of the 705 and associated LED indicators allow<br />
the operator to choose how best to manage the power systems for each application and to<br />
monitor their condition.<br />
A battery compartment for all batteries is accessible on the bottom of the CP 705.<br />
There are 3 power switches There is one power switch each for the TIMER, PRINTER and<br />
HEATING sections of the 705. All of them are located on the rear panel of the 705.<br />
Make certain you use the correct switch and that all power switches are turned off for storage<br />
of the device after use.<br />
Turn the Printer On with the printer power switch on the rear panel. (PRINTER ON). Look for<br />
the red printer power LED to illuminate.<br />
Turn the Timer On with the timer power switch on the rear panel. (CHRONO ON). Likewise<br />
look for the red timer power LED to illuminate.<br />
Check that you have an adequate supply of paper loaded in the printer.<br />
Check that the red LED power indicators for both the Timer and the Printer are not flashing.<br />
If either of them or both are flashing, replacement of the appropriate batteries is required<br />
before your timing session continues.<br />
You can use either the left or the right numeric keypads to respond to<br />
questions and input data during the initialization of the CP 705.<br />
Watch the LCD displays and the printer closely and respond to the questions posed during the<br />
initialization process. In general:<br />
• Use the ✴ Key to scroll through available selections<br />
• Use the # key to validate your selection or to respond with “yes”<br />
• Use any other appropriate numerical key to input a correction.<br />
• Use the C key to clear or correct BEFORE you validate a response<br />
Is the correct date indicated?<br />
• If YES. Accept with the # key<br />
• If NO. input the new date, followed with the # key. Use C to correct any input error.<br />
6
Is the Time of Day correct?<br />
• The CP 705 has an internal Time-of-Day RTC clock circuit that feeds the memorized time of<br />
day to the timer section when the CP 705 is first powered up.<br />
• This is a handy feature but you will often have to override the choice if only to re-synchronize<br />
with other external timers when operating back up systems in synchronous time-of-day, or to<br />
simply synchronize from a time of 00:00:00:000<br />
• If YES Accept with the # key<br />
• If NO or if you wish to synchronize with other systems to a preset time-of-day, use the ✴ key<br />
and then input the time-of-day from which you wish to synchronize. (Use the C key to correct<br />
any input error.)<br />
• Note: Setting the correct time of day and synchronizing to an external time is an important<br />
component of correct time keeping. Once you have input a time of day, the internal clock<br />
of the timer can be triggered by a pulse from a start gate or other device connected to<br />
the “SYNCHRO” jacks, or by manually triggering any of the green keyboard buttons for<br />
channels 1 to 4.<br />
• It is recommended that you always trigger the synchronization from the “SYNCHRO” banana<br />
jacks on the rear of the timer. Note also that if you have a start device connected to the input<br />
jacks of channel 1 - this will not synchronize or trigger the waiting clock.<br />
• The 705 will only trigger a synchronization of the internal time-of-Day clock from the<br />
SYNCHRO jacks or from one of the manual timing buttons on the keyboard for channels 1-4.<br />
Use a simple banana jumper cable from the channel 1 input to the yellow SYNCHRO input<br />
to allow this to happen, or move the start gate pair over to the SYNCHRO jacks for this oneshot<br />
purpose.<br />
• It is recommended that you follow the choices indicated by the arrow → for your first<br />
tests of the system<br />
Erase the memory?<br />
• Yes → Press ✴, confirm with #<br />
The maximum memory capacity of the CP 705 is 21,162 individual times.<br />
A typical timing session for a 200 person event with a start and finish is +/- 500 lines of<br />
memorized times.<br />
You have a GREAT deal of memory to work with even if many events are stored.<br />
• NO Chose this option if you wish to keep all of the previously stored data in the<br />
memory.<br />
Make sure you have enough room for the race you intend to run if you select this option.<br />
Once the memory is filled, new data begins to overwrite older data in a FIFO format (First in,<br />
First Out…)<br />
• 4 sport - timing modes are available. Use the ✴ key to scroll the selections<br />
I<br />
II<br />
III<br />
IV<br />
ALPINE SKI<br />
PARALLEL<br />
CROSS-COUNTRY<br />
SPLIT / LAP<br />
(Individual Starts)<br />
(Parallel <strong>Racing</strong>)<br />
(Mass or Group Starts)<br />
(Start at zero, Lap times)<br />
7
3. ALPINE SKI<br />
1. Chose ALPINE SKI<br />
• On the right hand LCD display, if you see “PARALLEL”, “CROSS-COUNTRY” or any other program<br />
mode, change to the next available selection using the ✴ key until you see ALPINE SKI, and validate<br />
your choice with #.<br />
2. Chose which run (RUN) you wish to work (use the ✴ key to select other runs)<br />
• 1 st run (FIRST RUN) → Validate with #<br />
The 705 manages each successive run or 1-run race in separate files known to the 705 as “RUNS”. You<br />
can elect to combine “runs” together to handle events with two or more heats, such as in Alpine skiing<br />
or in Bobsled In all cases, consider a “run” as either a 1 run race or the 1 st or next successive run of a<br />
multiple run event.<br />
• 2 nd run (or more) (WITH PREVIOUS RUN) allows you to associate this new run you are creating with<br />
any preceding run stored in the 705. (See the MENU section for details)<br />
3. Start Numbers (Change with the ✴ key)<br />
• AUTOMATIC → Accept with the # key. This option automatically presents race numbers in the start<br />
in sequential order.<br />
• FROM PC LIST, if you wish to load a start list of race numbers in pre determined start order from a<br />
results computer system or file.<br />
• MANUAL if race start numbers will appear in random order.<br />
4. AUTOMATIC START NUMBERING (Change with ✴)<br />
• UP → Accept with the # key. Sequences start numbers upwards from 1 or a pre-selected value.<br />
• DOWN Sequences start numbers automatically in a downward progression from 100 or any other<br />
pre-selected number.<br />
Forerunners timed using numbers preceeded by a zero (01,02,03…) are not considered in the run or<br />
race ranking.<br />
5. YOU ARE NOW READY TO BEGIN TIMING<br />
• On the left LCD display, the number 1 is ready for a start.<br />
• To manually simulate starts and finishes during testing, you can trigger a start with the green<br />
button “1” and finishes with green button “4”.<br />
• For live timing applications:<br />
YOU MUST FIRST UNBLOCK the timing inputs 1 and 4 to which your start gate and finish photocell<br />
are connected before any triggering from these sources will occur. Red buttons below the green manual<br />
triggering buttons for channels 1 to 4 must be used to unblock inputs 1 and 4.<br />
Red LED on = BLOCKED INPUT. LED off = UNBLOCKED INPUT.<br />
8
6. RACE TIMING<br />
• Once a start is received on input 1, on the right LCD display you will see the bib number of<br />
the racer on course and the running time.<br />
• You can put as many competitors on course as you like, but you will only see the<br />
corresponding running time of the first three next expected to finish based on start order.<br />
• Finishes are assigned to the racers AUTOMATICALLY in the order of start. Finish impulses<br />
must arrive on input 4.<br />
• Once a start and a finish are received for a particular bib number, the CP 705 will calculate a<br />
net time spent on course and provisional rank for each finishing racer.<br />
• Once your field has completed the race, or in fact at any time during the competition, you<br />
can print a provisional ranking list based on best to worst time using the F and then the #<br />
keys in combination (F+#) In automatic mode, you have just completed your 1 st event with<br />
the CP 705.<br />
• As in life however, nothing is ever so simple as having all who start in perfect order all finish<br />
in the same sequence.<br />
• The following section will allow you to correct for those who do not start, finish or for<br />
common mistakes that can occur in time keeping. The keystrokes for most functions are<br />
simple to learn.<br />
9
7. RECAP of FUNCTIONS, AUTOMATIC Timing Mode<br />
REMINDER<br />
As you key in commands using the keyboards, please read and pay<br />
attention to the directions and printing appearing on the LCD screens and<br />
on the printer.<br />
START (Left-hand keyboard)<br />
N° + #<br />
C + #<br />
C + ✴<br />
To change the N° of the racer who is next to start (Press ✴ to correct any<br />
input mistake BEFORE confirming with the # key)<br />
To desidentify the last competitor(s) started<br />
(Ex. If the racer inadvertently opens the start gate prior to actually starting<br />
and accidentally triggers the #1 start input)<br />
To advance to the next racer number in the start sequence<br />
(Ex. If an expected racer is not present for the start, use this sequence to<br />
simply advance to the next competitor in the start list.)<br />
N° + C + # To disindentify a competitor N°. already started<br />
R Recall of all times canceled using C + #<br />
FINISH (Right-hand Keyboard)<br />
N° + #<br />
C + #<br />
To input another racer number next expected to finish<br />
(Use ✴ to correct any mistake BEFORE using the # key to confirm<br />
your choice.)<br />
To disidentify the last competitor(s) finished<br />
(Ex. Either a course worker or some other disturbance causes the<br />
finish photocell to trigger unexpectedly. This sequence puts the<br />
racer back into finish position waiting for the next - correct - finish<br />
impulse<br />
N° + C + # To disidentify a competitor N°. already finished<br />
C + N° + #<br />
R<br />
M<br />
ATTENTION<br />
F + #<br />
DID NOT FINISH (Aborted)<br />
Removes the selected racer from the list of those waiting to finish.<br />
Recalling of all finish times discarded using the C+# combination<br />
OR stored during operation in MANUAL finish mode<br />
To enter MANUAL finish mode. (Press M again to return to<br />
AUTOMATIC finishes mode).<br />
Make sure that you are certain which racer is to be designated as<br />
a DID NOT FINISH.<br />
QUICK RANKING<br />
Keystroke commands C + # (either at the start or finish) can be quickly repeated in the case<br />
where many false start or finish impulses are received. This theory also applies to the use of the<br />
C + ✴ combination to advance many numbers at the start.<br />
10
8. “ R ” (Recall Times)<br />
This key allows you to manage via the LCD screens any or all times that are either not identified<br />
or associated with a racer number, or those times that were discarded using the C + # key<br />
combinations.<br />
These times that are not directly used by the 705 in time calculations are deemed to be<br />
recallable for use from a special memory location.<br />
Example: False FINISH → C + #. The finish time that is now not being used is printed with a<br />
minus (-) sign beside it.<br />
Press R (on the right hand keyboard). This time now appears on the right LCD preceded by<br />
“>>”.<br />
If this time is:<br />
a) A FALSE AND UNWANTED TIME→ Use the 0 key and confirm your choice with #. The time<br />
is now discarded from the Recall memory. (But it is recorded on the printer and in the<br />
memory of the CP 705…)<br />
b) A VALID Finish for a racer→ Input the racer number and confirm the choice with the # key.<br />
This finish time from the Recall memory is now associated with this racer number and used<br />
in the net time calculation.<br />
It is recommended that you quickly identify or discard any times stored in the Recall memory<br />
pile of either the start or the finish as soon as you can to minimize any confusion if you need to<br />
quickly manage time data under pressure. Keeping this pile small allows you to more easily<br />
identify any time-of-day split being recalled.<br />
9. “ M ” (Switching between AUTOMATIC and MANUAL finish modes)<br />
This key is VERY IMPORTANT<br />
In most cases it is possible to determine who will be the next racer to finish.<br />
The running time on the right hand screen helps you determine if an approaching skier is<br />
headed for a reasonable time or if something is wrong.<br />
In cases where you are not sure what is happening or who is next to finish, the MANUAL mode<br />
of finish management (accessed by pressing the M key) allows you to key in the bib number of<br />
the racer AFTER the finish impulse(s) is/are received.<br />
The M key switches you back and forth between the AUTOMATIC or MANUAL modes of finish<br />
time identification.<br />
Once absorbed in MANUAL finish mode, finish times can be Recalled using the R key and racer<br />
numbers associated to the sequence of times after the fact once you have figured out what took<br />
place and in which order.<br />
11
Examples:<br />
3 racers are on course, and you are not certain which ones are arriving at the finish and in<br />
which order.<br />
Press M (enter MANUAL finish mode). 4 finish times are generated by the photocell connected<br />
to input 4.<br />
Since you were watching the order of finish, you know after the fact that the actual order of<br />
finish was a false impulse - 13 - then 11<br />
You can note this information as it happens on the printer tape if you wish.<br />
Press R, you can now see the sequential pile of recalled memorized finish times.<br />
Input Number 12 first, next to the correct corresponding finish time, confirm with #.<br />
Input No. 0 to delete and discard the false finish time, confirm with #.<br />
Input No. 13 next to the correct finish time for 13, confirm with #<br />
Input No. 11, finally, and confirm with #<br />
Press R again to reenter the normal timing screens.<br />
Consider staying in MANUAL FINISH MODE if managing the finish line is difficult due to blowing<br />
snow or a great variance in the ability of arriving racers.<br />
Press M again to reenter AUTOMATIC finish mode if conditions permit and you are certain that<br />
the finish impulses will be automatically assigned to the correct racer numbers as they finish.<br />
10. OTHER START NUMBERING MODE CHOICES<br />
• Timing from a Start List Downloaded from a PC<br />
Contact your authorized TAG Heuer Dealer<br />
• Timing in MANUAL mode<br />
This mode is similar to timing in AUTOMATIC mode, it differs only in that you must always<br />
input the next racer number to start when a start impulse is received and continue to do so<br />
for each successive racer.<br />
BEFORE a Start N° + #<br />
AFTER a Start<br />
R+N°+# (if the racer number was not previously input.)<br />
OTHER START NUMBERING OPTIONS (See point I.3)<br />
In the last case, AFTER a start impulse is received, the start time is recalled using the R<br />
key. Input the racer number next to the corresponding start time and confirm you selection<br />
with the # key.<br />
During timing it is possible to change from AUTOMATIC to MANUAL start mode or back<br />
again, by accessing this change in the GLOBAL CNTRL (Global Control) Menu found in the<br />
selection found using the F key.<br />
12
11. 2 nd Run in ALPINE SKI timing (or an association of RUNS)<br />
Always check the correctness of your run file data before starting another RUN to which the<br />
information will be added.<br />
Using the F key, chose NEW RUN using the ↑↓, select with # and confirm with ✴.<br />
ALPINE SKI # a NEW run HAS BEEN CREATED<br />
This NEW RUN will now have to be associated with the previous run. Instead of using the<br />
FIRST RUN option, use WITH PREVIOUS RUN with the ✴ key and confirm with #.<br />
The number of the new run is now indicated use ↑↓ to move to the previous RUN number and<br />
confirm your choice with #. The new run is now associated in combination with the previous run.<br />
Select the start numbering mode you wish to use (change with the ✴ key)<br />
• AUTOMATIC this option automatically presents race numbers in the start in sequential<br />
order.<br />
• FROM PREVIOUS RUN → for bib numbers derived from the order of finish of the previous<br />
run.<br />
• FROM PC LIST, if you with to load a start list of race numbers in pre determined start order<br />
from a results computer system or file.<br />
• MANUAL if race start numbers will appear in random order.<br />
• Chose FROM PREVIOUS RUN → confirm with #.<br />
Chose the numbering mode (change with ✴)<br />
• UP Sequences start numbers upwards from 1 or lowest pre-selected value.<br />
• DOWN Sequences start numbers automatically in a downward progression from 100 or<br />
any other highest pre-selected number.<br />
• BIBO → Select with #. To invert a certain number of the ordered finish results from the<br />
proceeding run, input a value as required. Example, to flip the 1 st 15, type in 15 and confirm<br />
with the #.<br />
• You can now request the printing of a START LIST<br />
• YES → #<br />
• NO, press ✴<br />
• Competitor bib numbers will now appear in the start LCD as requested as a function of the<br />
proceeding run’s results in the BIBO format. Begin timing the 2 nd run.<br />
• During the 2 nd run timing you will now see the printing of the 1 st run’s time and the total time<br />
as calculated by the 705.<br />
• The F + # keys give you now a GENERAL ranking of total time results (the two runs added.)<br />
13
12. F key Menu (Functions) Alpine Ski<br />
This Function Menu is quite a powerful resource. It allows, prior to timing an event, the<br />
adjustment of all important function parameters. During timing you may ask for ranking reports<br />
or make corrections to any racer number in terms of time data and net time calculations.<br />
To enter this menu, you must initialize the timer and be in timing mode( point 1.5)<br />
Use the F key to explore the options presented in the Function Menu.<br />
Once in the Function Menu, use the “up and down ” (↑↓) keys to access the different options.<br />
Note that not all options can be seen initially, so scroll down to see all that can be accessed.<br />
Confirm your selected menu choice with #.<br />
To exit, press F. If you are in a sub Menu, press F repeatedly to exit back to timing mode.<br />
The most important menu options are presented at the top of the Functions Menu list to<br />
facilitate easy access by the operator.<br />
A keyboard shortcut to access the FUNCTION RECALL menu is (F + R).<br />
F + # provides a quick or provisional ranking of two or more combined runs<br />
GENERAL RANKING<br />
Once all corrections (if necessary) and disqualifications have been effected, use the RANKING<br />
menu to print definitive results from either one RUN or combination of RUNS<br />
14
4. PARALLEL<br />
Refer to the same initialization process as described in sections 1 to 5<br />
Note that timing is effected to 1/1000 th precision<br />
Choose DUAL and confirm with #<br />
Two timing modes are available (change the selection with ✴)<br />
1. A Mode SEQUENTIAL<br />
This DUAL SEQUENTIAL mode is for simultaneous or separate net timing of two separate<br />
parallel racecourses. The left-hand keypad controls the BLUE racecourse with starts on INPUT<br />
1 and finishes on INPUT 2. The Right-hand keyboard controls the RED racecourse with starts<br />
on INPUT 3 and finishes on INPUT 4. You can opt to link INPUTS 1 and 3 together if on course<br />
net timing for both competitors is taken from a common start signal. Once both competitors<br />
reach the finish line, use of the M key prints the difference in the two measured Net Times on<br />
course for that pairing. This is considered as SEQUENTIAL – DIFFERENTIAL mode timing.<br />
2. B Mode DIFFERENTIAL<br />
In this Differential mode there is no start signal or net time on course considered, only the<br />
difference at the finish between the two competitors on the BLUE and the RED courses.<br />
Mode SEQUENTIAL<br />
3. SEQUENTIAL Mode (Confirm with #)<br />
4. Chose a run (RUN) (Change with ✴)<br />
When creating a RUN, it can be considered as the first run or as a 2 nd run to be associated with<br />
a previous run in memory.<br />
• 1 st run (FIRST RUN) → Select with #<br />
• 2 nd run N th run (WITH PREVIOUS RUN) to be associated with a previous run (see MENU))<br />
5. Start Numbering (change with ✴)<br />
• AUTOMATIC, if the bib numbers will be starting in sequential order<br />
Chose UP, for progressive numbering from 1 on the BLUE course, and from 50 for those<br />
who will race on the RED course. (You may of course use other numbers rather than these<br />
default values using the N° + #).<br />
Select with # if UP is you choice.<br />
Chose DOWN to countdown from bib 50 on the BLUE course and from 100 on the RED<br />
course.<br />
Select with # if DOWN is you choice<br />
• MANUAL → Select with # to allow you to manually introduce start bib numbers<br />
Whichever parameters you select are stored and printed.<br />
Now input the bib number of the racer to start in the BLUE course and confirm with the # key<br />
Do the same for the appropriate bib number ready for a start in the RED course<br />
15
6. Timing<br />
You are now ready to begin timing.<br />
• To manually simulate starts and finishes during testing, you can trigger a starts with<br />
the green buttons “1” and “3”, finishes with green buttons “2” and “4”.<br />
• For live timing applications:<br />
YOU MUST FIRST UNBLOCK the timing inputs to which your start gates and finish<br />
photocells are connected before any triggering from these sources will occur. Red<br />
buttons below the green manual triggering buttons for channels 1 to 4 must be used to<br />
unblock inputs 1 –4. Red LED on = BLOCKED INPUT. LED off = UNBLOCKED<br />
INPUT.<br />
7. RACE TIMING ! (Parallel)<br />
Input bib No 1 with the left-hand keypad + #<br />
Input bib No 2 with the right-hand keypad + #<br />
Start impulses will arrive on inputs 1 and 3 respectively for the BLUE and RED<br />
racecourses.<br />
The running times on course for each racer will appear on the LCD displays. Finishes are<br />
expected automatically and will be assigned in order of start.<br />
You may put as many racers on each course as you can handle, but it gets pretty exciting<br />
pretty quickly for the operator in this dual timing mode.<br />
Finishes for the pair on course will arrive on inputs 2 and 4, Blue and RED course<br />
respectively<br />
The 705 calculates each time on each course and provides a provisional rank-to-date.<br />
Send or simulate a few more pairs of racers and then request a ranking list using the F+#<br />
keys. You will get separate net time rankings for the BLUE and the RED racecours<br />
8. CORRECTIONS OR MODIFICATIONS DURING TIMEKEEPING<br />
N° + # To input or change a bib number ready to start<br />
C + ✴<br />
False Start!<br />
(Ex. Competitor inadvertently opens the start gate)<br />
C + #<br />
False Finish<br />
(Ex : A course worker mistakenly goes through the finish while a racer is<br />
on course)<br />
R<br />
RECALL of times not yet associated with net time calculations<br />
This important key allows you to make net time calculation corrections<br />
using the LCD screens to access start or finish times of the two courses<br />
received on inputs 1 to 4, or using times discarded with the C key.<br />
16
Example:<br />
False start on the BLUE course. Use the left-hand keypad and input C+✴. The unwanted start<br />
time is now printed with a – sign next to it<br />
Press R and the unwanted time appears with the input number beside it, in this case 1.<br />
If this really is a false start on the BLUE course, get rid of the time from the Recall memory with<br />
0 +#<br />
If this is a valid start time for a valid bib number, input the bib number and conform with # (N° +<br />
#)<br />
It is highly recommended to immediately manage and use or discard any times stored in the<br />
Recall memory so that you are always keenly aware of which times are present there to avoid<br />
confusion under pressure.<br />
Press the R key to return to regular timing mode once you have completed any Recall<br />
operations.<br />
More complex net time functions and other operations can be accessed using the F key and<br />
associated MENU<br />
9. 2 nd Run in DUAL Sequential Mode<br />
• Before starting a new run that will be associated with any previous results in the memory of<br />
the 705, make certain that you verify the contents of the memory for correctness.<br />
• Use the F key to enter the MENU. Chose NEW RUN with ↑↓, select with # and confirm<br />
with ✴.<br />
PARALLEL #<br />
SEQUENTIAL #<br />
The new RUN is now created.<br />
• This new run must now be associated with a previous stored run in the memory of the 705 to<br />
be considered as a 2 nd run of anything.<br />
• Change the choice from FIRST RUN to PREVIOUS RUN using the ✴ key and confirm your<br />
choice with #.<br />
• The number of the NEW RUN is now indicated. Use ↑↓ and the number of the stored run<br />
that you wish to associate with, and validate the choice with the # key.<br />
• The NEW RUN is now treated as the 2 nd run of an event associated with the previous run<br />
you selected from the memory of the 705.<br />
• You can now chose to use AUTOMATIC or MANUAL start numbering modes as previously<br />
described.<br />
• Combining results from a previous RUN file in the 705 requires that you swap keypads for<br />
the RED / BLUE race courses. The 705 will only combine times from the 1 st run of a dual<br />
event if it sees the same numbers on the same keypads (left and right) even though the<br />
racers have switched race courses.<br />
• Control of the RED racecourse is now on the Left-hand keyboard; control of the BLUE<br />
racecourse is now on the Right-hand keyboard – the inverse of the 1 st run of this « event »<br />
• As the racers finish, along with their NET times for the 2 nd run you will see their 1 st run times<br />
and a TOTAL combined time and ranking based on total time.<br />
• The F + # key combination will yield a printing of results for the two racecourses based on<br />
TOTAL combined time.<br />
17
2. B Mode DIFFERENTIAL<br />
In this mode there is no start signal or net time on course considered, only the difference at the<br />
finish between the two competitors on the BLUE and the RED courses.<br />
10. DIFFERENTIAL Mode (Confirm with #)<br />
11. Chose a run (RUN) (Change with ✴)<br />
When creating a RUN, it can be considered as the first run or as a 2 nd run to be associated with<br />
a previous run in memory.<br />
• 1 st run (FIRST RUN) → Select with #<br />
• 2 nd run or N th run (WITH PREVIOUS RUN) to be associated with a previous run (see<br />
MENU))<br />
12 PENALTY<br />
• In the first round of any pair racing against one another in Parallel events, a maximum<br />
allowable difference time is often assigned.<br />
• This maximum allowable time difference is called the “PENALTY”. It is used ONLY in the first<br />
round when a racer is either too slow, has missed a gate, or has fallen and then must race<br />
against the same racer in the second round as they change race courses.<br />
• This PENALTY system means that each pair of racres must race two runs in each round in<br />
order to advance to the next round.<br />
• Input the desired PENALTY value. This will depend on course length and is decided by race<br />
officials. Since most parallel race courses are quite short (not in excess of 30 seconds) a<br />
value of 1.5 seconds is often used and is considered a difficult amount to make up over 30<br />
seconds of head-to-head racing. Validate your selected PENALTY value with #.<br />
• The maximum programmable Penalty is 9.9 seconds.<br />
ALL MEMORIZED RACE PARAMETERS ARE PRINTED OUT FOR VERIFICATION.<br />
IF THEY ARE NOT AS YOU WISH, REFER TO THE MAIN MENU (F KEY) FOR CHANGES<br />
13 RACER NUMBERING<br />
• In differential mode, since the time DIFFERENCE at the finish between each pair of racers is<br />
the only concern, there is no start time or sequence to consider. You will be working with<br />
finishes only.<br />
• For the BLUE course, input the racer number expected at the FINISH with the LEFT<br />
Keyboard and validate with #<br />
• For the RED course, input the racer number expected at the FINISH with the RIGHT<br />
Keyboard and validate with #<br />
18
14. TIMING<br />
You are now ready to begin timing.<br />
• To manually simulate finishes during testing, you can trigger finishes with green<br />
buttons “2” and “4”.<br />
For live timing applications: YOU MUST FIRST UNBLOCK the timing inputs to which your<br />
finish photocells are connected before any triggering from these sources will occur. Red<br />
buttons below the green manual triggering buttons for channels 2 and 4 must be used to<br />
unblock inputs 2 & 4. Red LED on = BLOCKED INPUT. LED off = UNBLOCKED INPUT.<br />
15. RACE TIMING! (Parallel)<br />
• Input bib No 1 with the left-hand keypad + #<br />
• Input bib No 2 with the right-hand keypad + #<br />
• Finish impulses will arrive on inputs 2 and 4 respectively for the BLUE and RED race<br />
courses.<br />
• The first racer to finish will get a time of 0.000 as the winner of the run (Printed and<br />
displayed)<br />
• The second racer to finish will get a time based on the actual time since the first racer<br />
finished<br />
• If the time behind exceeds the preprogrammed PENALTY time, the PENALTY time will be<br />
used.<br />
• Send more pairs of racers to simulate an actual run<br />
• Using the F+# key combination, obtain a provisional RANKING listing of those pairs of skiers<br />
who have contected the first run of this round.<br />
19
16. CORRECTIONS OR MODIFICATIONS DURING TIMEKEEPING<br />
N° + #<br />
Left<br />
Keypad<br />
Right<br />
Keypad<br />
To input or change a bib number before a finish in the BLUE course. Press * to<br />
correct any input error befoire confirming you choice with the # key.<br />
Same functions but for RED course.<br />
C + #<br />
Left or<br />
Right<br />
Keypad<br />
R<br />
False Finish, BLUE or RED course.<br />
(Ex : A course worker mistakenly goes through the BLUE finish while a racer is on<br />
course) Use the same concept for the RED course.<br />
RECALL and correction of times incorrectly associated with other finish time<br />
calculations<br />
This important key allows you to make difference time calculation corrections using<br />
the LCD screens to access finish times of the two courses received on inputs 2 & 4.<br />
Example:<br />
The concept of PAIRS of racers in this DIFFERENTIAL mode of operation is very important.<br />
Whenever you make corrections or time adjustments you must respect this concept.<br />
• Racer No. 10 is expected to finish in the BLUE, racer 11 expected to Finish in the RED<br />
• A false finish impulse is is received at the BLUE finish affecting racer Number 10.<br />
• Use C+# in the LEFT KEYPAD to correct this BLUE course false finish.<br />
• Take the two correct finishes for the RED and the BLUE<br />
R Left Keypad – To RECALL and work with times that were incorrecectly identified during timing<br />
Press the R key of the Left Keypad and you will be presented with times to correct<br />
• Use 0 + # to cancel any unwanted times<br />
• Find the correct finish time for racer number 10. Use 10 + # to validate the choice. The Right<br />
LCD Display now asks: WITH WHAT COMPETITOR?<br />
• Input the correct number of the racer that number 10 was racing against. Inthis case racer<br />
11. Confirm with the # key.<br />
• The correct cal;culated difference between the two racers will not be refected in any new<br />
RANKING listing.<br />
• To override the PENALTY function and to assign a difference time GREATER than the<br />
maximum allowable PENALTY of 9.9 seconds, you must first eliminate the finish time of the<br />
2 nd place racer of a pair using the C+# combination, and then use RECALL (R) to reidentify<br />
the finish time in excess of the 9.9 seconds.<br />
20
17. 2 nd RUN in DIFFERENTIAL MODE<br />
• Before moving on to the 2 nd run, make certain that the results of the 1 st run are exactly<br />
correct and that all relevant corrections have been made.<br />
• Enter the MENU using the (F) key and select NEW RUN with the ↑↓ keys, validate with #<br />
and confirm with *.<br />
PARALLEL #<br />
DIFFERENTIAL #<br />
• The new run is created.<br />
• The new run is now considered a 1 st run. You MUST select a receeding run form the<br />
memory to make this a 2 nd run. Change the display from « 1 st RUN » to « WITH OTHER<br />
RUN » using the * key and confirm your choice with #.<br />
• The number of the new Run is indicated. Use the ↑↓ keys to select the run with which you<br />
wish to combine the 2 nd run with.<br />
• Start the second run using the exact same operational concepts as that of the 1 st run,<br />
EXCEPT THAT THE RACER NUMBERS ARE REVERSED in terms of the race course.<br />
• Put the racer numbers who finished in the RED course in the 1 st run using the LEFT Keypad<br />
now (BLUE COURSE).<br />
• The CP 705 will automatically pull up the racer who was associated with your selected BLUE<br />
course racer from the 1 st run and place him in the RED course, along with the memorised<br />
difference time from the 1 st run.<br />
• GENERAL Ranking listing will give you a simplified summary of all pairs and their difference<br />
times of the 1 st and 2 nd runs using the F+# key combination.<br />
21
5. CROSS - COUNTRY<br />
This timing mode allows for « Mass Start » or « Group Start » either by a start IMPULS (Starting<br />
pistol, Start gate, manual contactor etc.), or at a DEFINED TIME<br />
The following menu explanation allows for a better understanding of the different possibilities.<br />
1. SELECT RUN (Change with ✴)<br />
When you create a RUN you can consider it as the 1 st RUN or as the 2 RUN if you like to<br />
associate it WITH A PREVIOUS RUN. (Run addition)<br />
• FIRST RUN → VALIDATE with #<br />
• WITH PREVIOUS RUN (Associate a RUN with a PREVIOUS RUN)<br />
2. NUMBERING CNTRL (Change with ✴)<br />
• USER DEFINED: Manual introduction of the competitor numbers.<br />
• FROM PC LIST: Download the start list from a PC.<br />
3. STARTING MODE (Change with ✴)<br />
• PULSE: By an impulse on Input 1 (or manually on M1) for each Start.<br />
• DEFINED TIME: Automatic start of the competitors (or group of competitors) at a<br />
defined time.<br />
Of course, the CP 705 should be synchronised before<br />
Ex: Group 1, comp. 1 to 10 starts at 10h00, then group 2, comp. 11 to 20 starts at 10h05<br />
4. STARTING LIST (Change with ✴)<br />
• CONTINUOUS: By groups with continuous competitors numbering.<br />
Ex:<br />
Group 1: From 1 to 50<br />
Group 2: From 51 to 90<br />
Etc..<br />
• DISCONTINUOUS: By competitor number or by competitors group with discontinuous<br />
numbering.<br />
Ex:<br />
Group 1: Nr. 1 and 5<br />
Group 2: Nr. 3, 6 and 10<br />
Etc..<br />
22
5. SELECT COMPET.<br />
• Manual introduction of the competitors Nr. by group.<br />
• Validate the Nr. with # after each introduction<br />
REMARQUES:<br />
A) If a competitor number has been forgotten, or if it is presented at the start as all groups<br />
have already been defined, you can insert it, thanks to the DUPLICATE function, directly<br />
after the starts are given.<br />
Ex:<br />
• The first group started with n° 1 to 50. The Nr.112 should also be in this group.<br />
• Enter into the MENU and choose DUPLICATE.<br />
• Ask for a competitor number of this group, Nr. 1 for ex.<br />
• Duplicate its start time with the Nr. 112<br />
B) If a competitor number has been inserted two times, or by mistake, use the MODIFY<br />
function to cancel the number or one of its corresponding times by 0 + #. (See MENU)<br />
6. PRINT START LIST<br />
• When the different groups have been created, the CP 705 allows for printing a start list<br />
(YES # or No✴)<br />
WARNING:<br />
When you insert a lot of competitors in the same group<br />
(Ex: Group 1 from Nr. 1 to 150).<br />
- All the competitor numbers will be printed with their corresponding times<br />
7. FINISH<br />
• The competitor Nr. is inserted manually at the finish.<br />
A) The competitor Nr. is known at the finish.<br />
- Insert the Nr. on the right keyboard and confirm by #.<br />
- The running time of this competitor is shown.<br />
- At his arrival, his net time and his rank can be seen and printed.<br />
B) The competitor Nr. is unidentified at the finish.<br />
- The finish time will be recorded and can quickly be identified by pushing R (Recall).<br />
8. RANKING<br />
• A quick rank can be printed any time with F + #<br />
• A general Ranking can be asked at the end of the competition: enter into the MENU and<br />
select RANKING<br />
23
CROSS - COUNTRY<br />
SELECT RUN NUMBERING CNTRL STARTING MODE STARTING LIST SELECT<br />
COMPET.<br />
PULSE<br />
CONTINUOUS GROUP 001<br />
FROM #<br />
TO #<br />
ETC…<br />
USER DEFINED DISCONTINUOUS GROUP 001<br />
Nr #<br />
Nr #<br />
ETC…<br />
FIRST RUN STARTING TIME<br />
DEFINIED TIME<br />
CONTINUOUS HH : MM : SS GROUP 001<br />
FROM #<br />
TO … . #<br />
ETC…<br />
RUN Nr: 002<br />
FROM PC LIST DISCONTINUOUS HH : MM : SS GROUP 001<br />
Nr …. #<br />
Nr …. #<br />
ETC…<br />
25
6. SPLIT / LAP (Instructions Under construction)<br />
7. MULTI-CATEGORY (Alpine Ski / Cross Country)<br />
The CP 705 allows you to designate many different categories of competitors WITHIN the same<br />
RUN. Doing this is very simple.<br />
The creation or selection of a category for any competitor is done BEFORE a racer starts that<br />
you wish to assign into a particular category of racers. You MUST select the category a racer is<br />
destined to be considered in before the racer starts.<br />
TO CREATE A CATEGORY: F + * + #<br />
The CP 705 will propose the next available category number. You can select another category<br />
number of your choice by simply entering the category number you wish to use, and validating<br />
with #: F + No. + #<br />
With this operating principle, it is thus possible to create or return to any category, again before<br />
any particular racer starts. Here is an operating example:<br />
Ex: Alpine Ski, 1 st Run, Racer No. 1 in the start:<br />
• Create category 1 (F + * + 1), start racers 1 to 3<br />
• Create category 2 (F + * + 2), start racers 4 and 5, racer 6 is absent for now)<br />
• Create category 3 (F + * + 3, start racers 7 to 9<br />
• Racer 6 now arrives at the start, return to category 2 with F + *<br />
• Racer 6 starts and is assigned to category 2<br />
• All finishes are recoreded in the normal way. You will find that all racer net times on<br />
course are indentified with the category number assigned. Note that category 1 is never<br />
indicated.<br />
RANKING<br />
• A quick or provisional ranking can be obtained at any time for the current category selected<br />
by using: F+#<br />
• For General Ranking, use the Menu function (F Key) and select RANKING. Confirm which<br />
run you wish to work with using the # key. You have a choice of:<br />
- General ranking of all categories<br />
- General ranking of one specific or many categories.<br />
MODIFICATIONS<br />
• You can change the category to which a racer has been assigned after the fact. In MENU (F<br />
Key) work under RECALL and choose CATEGORY using the * key (Note that you can<br />
quickly access the RECALL functions using the shortcut of F+R)<br />
2 nd RUN<br />
Use the same principles of operation as for the 1 st run.<br />
Note: Start and BIBO list are not available in the category mode of operation.<br />
26
8. CP 705 MENU DESCRIPTION<br />
Press « F » to enter the Functions Menu<br />
Use the ↑↓ keys to move through the various choices<br />
To select any sub-menu choice, use the # key.<br />
QUICK RANK<br />
DUPLICATE<br />
DISQUALIFY<br />
RANKING<br />
RUN<br />
ON COURSE<br />
LIST BY NR<br />
ABORTED<br />
DISQUALIFIED<br />
NEW RUN<br />
RECALL<br />
RACER STATUS<br />
CANCEL TIMES<br />
INSERT<br />
MODIFY No.<br />
INDENTIFY<br />
CATEGORIES *<br />
GLOBAL CNTRL See page 28<br />
SPEED<br />
PRINTER<br />
COMMUNICATE<br />
NONE<br />
INPUT 1<br />
INPUT 2<br />
INPUT 3<br />
INPUT 4<br />
ON / 1 LINE FEED<br />
ON / 2 LINE FEED<br />
OFF<br />
RUN→ PC<br />
RUN→ PRINT<br />
UPGRADE <strong>CP705</strong><br />
* Insofar as categories were created using F+#<br />
27
GLOBAL CNTRL<br />
PRINT PARAM<br />
LOCK TIME 1<br />
LOCK TIME 4<br />
LOCK TIME..<br />
0.1 – 9.9 sec.<br />
1 – 99 sec.<br />
10 mSec.<br />
no locktime<br />
0.1 – 9.9 sec.<br />
1 – 99 sec.<br />
10 mSec.<br />
no locktime<br />
0.1 – 9.9 sec.<br />
1 – 99 sec.<br />
10 mSec.<br />
no locktime<br />
BLOCK 5-16 BLOCKED /<br />
UNBLOCKED<br />
NUMBERING AUTOMATIC UP<br />
DOWN<br />
LOCK T. LCD<br />
MANUAL<br />
FROM PC LIST<br />
EXT. DISPLAY BY WIRE TAG Heuer TIME Of DAY<br />
RUNNING TIME<br />
BLANK THE BOARD<br />
ALGE<br />
TIME Of DAY<br />
RUNNING TIME<br />
BLANK THE BOARD<br />
BY RADIO TAG Heuer TIME Of DAY<br />
RUNNING TIME<br />
BLANK THE BOARD<br />
ALGE<br />
TIME Of DAY<br />
RUNNING TIME<br />
BLANK THE BOARD<br />
BUZZER<br />
ON<br />
OFF<br />
MEMORY FREE<br />
PRECISION NET TIME 1 SEC.<br />
1/10 SEC.<br />
1/100 SEC.<br />
1/1000 SEC.<br />
TIME & SYNC<br />
REAL TIME<br />
1SEC.<br />
1/10 SEC.<br />
1/100 SEC.<br />
1/1000 SEC.<br />
1/10000 SEC<br />
28
9. CP 705 FUNCTION MENU EXPLANATIONS<br />
• This Function Menu is very powerful and allows for the correction or modification of times<br />
and parameters before, during or after timing and event.<br />
• Various ranking and start lists can be printed or recalled.<br />
• Operating parameters and settings can be modified or selected.<br />
• Here is a summary of functions:<br />
• To enter this menu at any time, the 705 must already be in a timing operating mode (Ex:<br />
Alpine Ski)<br />
• Use the « F » key on the <strong>CP705</strong> to gain access to the Function Menu. Use the ↑↓ keys to<br />
move through the different functions and options and confirm your selection with #.<br />
• To exit any selected Function or sub-menu, press F.<br />
• The most important Function options are presented at the start of the list of options for easy<br />
access.<br />
• A keyboard shortcut to gain access to the RECALL functions is F+R<br />
• The « F » key on the <strong>CP705</strong> allows access to the following Function Menu possibilities:<br />
• Use the ↑↓ keys to move through the different functions and options:<br />
3QUICK RANK4<br />
3DUPLICATE4<br />
3DISQUALIFY4<br />
Allows for the rapid printing of a provisional ranking of competitors and<br />
times during a race. Use the # key to validate this choice. Ranking is in<br />
time order with bib number.<br />
Allows another or many bib numbers to be associated with a particular<br />
start or finish time already received. Use the # key to confirm this<br />
choice, then enter the bib number of the competitor you with to<br />
associate with the selected time-of-day start or finish. Confirm the<br />
operation with the # key again. Repeat the same operation for any<br />
additional bib numbers.<br />
Disqualifies selected bib numbers. Use the # key to select this menu<br />
choice, enter the bib numbers of the competitors you wish to disqualify,<br />
confirm your choice with the ✴ key and exit with #. All times obtained by<br />
disqualified competitors will appear with “D”<br />
29
3RANKING4<br />
RUN<br />
ON COURSE<br />
LIST BY NR<br />
ABORTED<br />
DISQUALIFIED<br />
3NEW RUN4<br />
3RECALL4<br />
RACER STATUS<br />
CANCEL TIMES<br />
INSERT<br />
MODIFY<br />
INDENTIFY<br />
Provides a complete final ranking of all race results based on time. Use<br />
the # key to select this menu choice and select the Run number by<br />
using the ↑↓ keys. Below are the different sub-menu options available to<br />
you:<br />
Provides a complete ranking of the selected Run. Use the # key to<br />
select this menu choice. All times, disqualifications and those who did<br />
not finish are printed.<br />
Lists those still on course. Use the # key to select this menu choice.<br />
Provides a listing of all times in Bib order. Use the # key to select this<br />
menu choice.<br />
Lists all competitors who did not finish. Use the # key to select this<br />
menu choice.<br />
Lists those who have been disqualified. Use the # key to select this<br />
menu choice.<br />
Creates a New Run. Use the # key to select this menu choice and<br />
confirm with ✴. BE CAREFUL: The creation of a New Run will prevent<br />
you from returning to and being able to modify any information in<br />
preceding runs. Once selected, confirm the timing sport mode you wish<br />
to work in and follow the directions for start-up as described in the<br />
different timing modes.<br />
Access to the different special functions below, all accessible with the ✴<br />
key : A keyboard shortcut for this valuable RECALL menu is F + R<br />
Pulls up the status of any competitor and displays all relevant data (start<br />
and finish time, net time, DSQ…etc.) Use the # key to select this menu<br />
choice, enter the bib number on the right LCD screen, and confirm your<br />
choice with the # key.<br />
Allows you to eliminate from memory a particular group of times<br />
between two defined times-of-day. (Example: To discard a group of<br />
false impulses received)<br />
Allows you to create a particular start or finish time-of-day for any<br />
competitor.<br />
Changes or eliminates any competitor bib number for any existing timeof-day<br />
start or finish. Confirm your choice with the # key.<br />
Allows you to associate a time-of-day with a bib number. Simply enter<br />
the bib number of the competitor next to the time-of-day you are<br />
working with. Confirm your choice with the # key.<br />
3GLOBAL CNTRL4 As the name suggests , allows you to access many of the <strong>CP705</strong><br />
operating parameters. Confirm your choice with the # key. Use the ↑↓ to<br />
move through the following options:<br />
PRINT PARAM.<br />
Lists the current parameters the 705 is using.<br />
30
LOCK TIME 1<br />
LOCK TIME 4<br />
LOCK TIME ..<br />
Input 1 Lock-out Time. The period of time for which input 1 will not<br />
receive further impulses once an impulse is received. This choice is a<br />
function of the type of competition you are timing. Input 1 Lock-out Time<br />
is selectable between 0.1 and 9.9 seconds. Confirm your choice with<br />
the # key and then manually enter the lock-out time with the keyboard.<br />
You can also command the 705 not to have a lock-out time for this<br />
channel. Confirm your selection with the # key again.<br />
Input 4 Lock-out Time. The period of time for which input 4 will not<br />
receive further impulses once an impulse is received. This choice is a<br />
function of the type of competition you are timing. Input 4 Lock-out Time<br />
is selectable between 0.1 and 9.9 seconds. Confirm your choice with<br />
the # key and then manually enter the lock-out time with the keyboard.<br />
You can also command the 705 not to have a lock-out time for this<br />
channel. Confirm your selection with the # key again.<br />
Subsequent Lock-out Time for the indicated timing input Number as<br />
described above.<br />
BLOCK 5-16 Blocks "BLOCKED" or unblocks "UNBLOCKED" timing inputs 5 to 16<br />
as a group.<br />
NUMBERING<br />
FROM PC LIST<br />
LOCK T. LCD<br />
EXT. DISPLAY<br />
DIRECT TO LINE<br />
BUZZER<br />
MEMO FREE<br />
Access to the different special start functions below, all accessible with<br />
the ✴ key :<br />
AUTOMATIC. Automatically displays bib numbers in ascending UP or<br />
descending DOWN order. Select ✴ and confirm with #<br />
MANUAL Bib numbers are manually input for each successive start.<br />
Confirm selection with the # key.<br />
Follows a start list as loaded from a PC file.<br />
Adjusts the duration net times displayed on the LCD screens. Enter the<br />
number of seconds and confirm with the # key.<br />
There are two functions selectable with the ✴ key.<br />
Direct cable connection to a display using wire. Confirm this choice with<br />
the # key and then select which type of display you are using with the ✴<br />
key TAG Heuer or ALGE. You can also select one of the 3 following<br />
options with the ✴:<br />
TIME OF DAY<br />
TIME<br />
BLANK DISPLAY<br />
THROUGH RADIO Sends data to a display board linked by radio<br />
transmission (using the TAG Heuer HL 620). Confirm this choice with<br />
the # key and then select which type of display you are using with the ✴<br />
key TAG HEUER or ALGE. You can also select one of the 3 following<br />
options with the ✴ key :<br />
TIME OF DAY<br />
TIME<br />
BLANK DISPLAY<br />
ON Audible tone on<br />
OFF Audible tone off<br />
Allows you to check the current memory use and to clear if necessary.<br />
Confirm your choice with the # key.<br />
31
PRECISION<br />
TIME & SYNC<br />
3SPEED4<br />
Two choices are available with the ✴ key:<br />
NET TIME Net time calculation precision (as a function of split-times<br />
used in the calculation process that are always one digit more precise<br />
than the calculated net time on course. Example: Alpine Ski, Swimming,<br />
Euquestrian…)<br />
1 SEC. Select using ✴ and confirm with #.<br />
1/10 SEC.<br />
1/100 SEC.<br />
1/1000 SEC.<br />
REAL TIME Real time calculation precision (as a function of split-times<br />
used that are derived from the same level of timing precision)<br />
1 SEC. Select using ✴ and confirm with #.<br />
1/10 SEC.<br />
1/100 SEC.<br />
1/1000 SEC.<br />
Provides for a new synchronization of the 705. Confirm with the # key,<br />
enter the time of day desired, confirm again with the # key<br />
Allows for speed calculations to be performed between impulses<br />
received on selected timing inputs at known distances. Select with ✴<br />
and confirm with #<br />
NONE Deactivates all speed measurements. Confirm with #.<br />
INPUT 1<br />
INPUT 2<br />
INPUT 3<br />
INPUT 4<br />
3PRINTER4<br />
Activates Input 1 for speed measurement.<br />
Activates Input 2 for speed measurement.<br />
Activates Input 3 for speed measurement.<br />
Activates Input 4 for speed measurement.<br />
Distances from 0.000 to 1 km (1000 meters) or in feet, and calculations<br />
of Km/h, Mph, Meters/ Sec. and Knots are all available to the operator.<br />
Access to the following choices is made with the ✴ key:<br />
ON 1 LINE FEED Prints one line feed between each printed line. Confirm with #.<br />
ON 2 LINE FEEDS Prints two lines between each printed line. Confirm with #.<br />
OFF<br />
Turns the printer off.<br />
3COMMUNICATE4 Access to the following choices is made with the ✴ key:<br />
RUN→ PC<br />
RUN→ PRINT<br />
Sends ranking data of the selected Run out the data port of the 705 to a<br />
connected PC. Confirm the choice of this operation with the # key 3<br />
times and wait until the data transfer is completed.<br />
Reprints all of the data of a selected run on the printer. Confirm this<br />
choice 2 times with the # key.<br />
UPGRADE <strong>CP705</strong> Upgrades the operating program of the 705 with new versions of<br />
software as available from time to time from TAG Heuer. See the 705<br />
UPGRADE operating instructions for more details.<br />
32
10. UPGRADE CP 705 INSTRUCTIONS<br />
Warning:<br />
The software upgrade process of your <strong>CP705</strong> is a delicate operation. Mishandling this<br />
procedure may cause the destruction of the <strong>CP705</strong>’s microprocessor, with no alternative<br />
but to return your CP 705 to the factory for repair. This is why we ask you to strictly<br />
respect the following instructions :<br />
1) Install the « Upgrader » program on your PC using floppy disks or from other means as<br />
delivered by your TAG Heuer agent or via our website. This program is to be installed like<br />
any Windows software (Start – Execute - setup.exe)<br />
2) Make sure the batteries of CP 705 are fresh. For more safety, use the external power<br />
supply.<br />
3) Connect the PC (COM1 or COM2) to the computer port of the <strong>CP705</strong>, making sure that all<br />
connections are snug.<br />
4) Power up the printer of <strong>CP705</strong> and then the <strong>CP705</strong> timer. Enter the timing mode (create a<br />
run).<br />
5) Keep the print out on which you will find the serial number of the CP 705 (you will need it<br />
afterwards).<br />
6) Enter MENU by pressing « F » and select « COMMUNICATE » and validate with #.<br />
7) With ✴ select UPGRADE 705 and validate with #<br />
8) Enter the code R21C47C0 on the left keyboard and valid with #.<br />
9) On the PC, launch the programm UPGRADE (upg_705_1_2.exe).<br />
10) On the PC, click on SELECT FILE and select the file to be loaded in the <strong>CP705</strong><br />
(ex.cp08m.a35) . Then click on UPGRADE to start the transfer.<br />
11) On the screen you can control the progress of transfer (red stripe). The transfer is completed<br />
when the stripe is green (about 8-10 min.) .<br />
12) On the left LCD of the CP 705 ,you find the number of the actual version and the new<br />
version for upgrade.<br />
13) Follow the instructions on the <strong>CP705</strong>’s LCDs. Validate the upgrade with # and wait until the<br />
loading is completed (around 20 seconds) The loading is completed when the message<br />
TURN OFF appears on the LCD.<br />
14) Turn OFF the CP 705. Wait 2-3 seconds and turn it on again. Make sure the new version is<br />
loaded (check the printout for the version number). Make a CLEAR MEMORY at that stage.<br />
15) On the PC click on the free window, enter the serial number of the device (ex. 7050) and<br />
click on « Set serial number » .<br />
16) Turn OFF again the CP 705. After two seconds turn it ON again. The TAG Heuer logo,the<br />
new version number and the serial number appear on the printing.<br />
You’ve done it right, congratulations.<br />
33
11. COMPUTER OUTPUT PROTOCOL<br />
1. General<br />
ON-LINE and OFF-LINE data transmissions from the COMPUTER port of the PTB 705<br />
respect the following transmission format. This format always comprises 30 characters +<br />
CR under the RS232 protocol at 9600 bds.<br />
1 or 2 Characters for Data String Identification<br />
3 Characters for Position or the N. of the speed measurement<br />
1 Space<br />
5 Characters for Competitor Number<br />
1 Space<br />
2 Characters for Timing Input Channel<br />
1 Space<br />
15 Characters for Time<br />
1 = End of Data String<br />
Characters not used in the transmission of any value are replaced with a space.<br />
2. Data String Identification Characters<br />
S Creation of a new RUN<br />
T Time recorded on one of the input channels<br />
R Calculated Net Time for a Competitor<br />
G Cumulative Net Time for a Competitor after multiple runs<br />
V Speed<br />
T- False Start or False Finish (time disassociated)<br />
T* Any time modified through manipulation of start number<br />
T+ Any time used if manually input using RECALL - INSERT<br />
T= Any duplicated time using FUNCTION - DUPLICATE<br />
TA DNF (Did not Finish)<br />
TD DSQ (Disqualified)<br />
TC Any discarded time rejected using FUNCTION-RECALL-CANCEL or “0# in RECALL<br />
3. Examples of Data Strings produced by the CP 705<br />
Example below: Start of Run 4 under Alpine Ski. The last 3 characters to the right of “ALPINE<br />
SKI” show which preceding run is being used to add to net times being generated in this Run<br />
#4. In our example here, Run #3 is used. This indication occurs only in OFF-LINE data<br />
transmission mode.<br />
S 004 ALPINE SKI 003<br />
Times taken for Competitor #2 on input channels 1 and 4 (Manually)<br />
T 2 M1 09:09:15.608778<br />
T 2 M4 09:09:27.277816<br />
Net time for Competitor #2, ranked in position 1 for run number 4 at 11.67 seconds.<br />
Followed by a cumulative time for run#3 and #4 of 2:41.39<br />
R 1 2<br />
11.670000<br />
G 1 2 2.41.390000<br />
Speed Calculation for Competitor #1<br />
V 1 317.903 [km/h]<br />
34
4. Distinctive Characters Placed at the Start of Times Printed or Transmitted to PC<br />
- False Start of False Finish (disassociated times)<br />
* Competitor Number Modified with this time<br />
+ Manually Entered Time using RECALL-INSERT<br />
= Duplicated Time using FUNCTION-DUPLICATE<br />
A DNF, Did not Finish<br />
D DSQ, Disqualified<br />
C Any discarded time rejected using FUNCTION-RECALL-CANCEL or “0# in RECALL<br />
5. Keyboard Shortcuts<br />
General<br />
F + ON<br />
F<br />
F again<br />
M<br />
↑↓<br />
F + R<br />
Rapid Start-Up<br />
FUNCTION menu call-up<br />
Returns to the previous menu when in any FUNCTION mode<br />
Switches between MANUAL or AUTO(matic) finish numbering<br />
Keys to move through the data screens, up or down<br />
Quickly calls-up the RECALL menu.<br />
Left Keyboard<br />
C #<br />
No. C #<br />
C ✴<br />
N #<br />
R<br />
R again<br />
✴<br />
False Start<br />
Disassociates start time from selected bib number<br />
Selects the next starting number in the start list by eliminating the one proposed<br />
Selects the Competitor Number being input<br />
Accesses file of non-associated start times in a Fin – Fout file<br />
Returns to the previous menu or function when in the start time file<br />
Error Correction<br />
Right Keyboard<br />
C # False Finish<br />
No. C # Disassociates finish time from selected bib number<br />
C ✴ Selects the next Finishing number of those on course by eliminating the one<br />
proposed<br />
N # Selects the Competitor Number being input<br />
R<br />
Accesses file of non-associated finish times in a Fin – Fout file<br />
R again Returns to the previous menu or function when in the Finish time file<br />
✴<br />
Error Correction<br />
# Discards times selected under RECALL<br />
35
12. DISPLAY OUTPUT PROTOCOL<br />
Data transmission format for DISPLAY from CP 705.<br />
Official TAG Heuer Data String contents for use with numeric display boards:<br />
Data being sent out the DISPLAY port of the <strong>CP705</strong> adheres to the following format based on<br />
24 characters :<br />
1 1 Identification character at the start of the data string 02h Start of text<br />
2 1 L character for “Line” 4Ch<br />
3 1 Number character for line number 0 à 9 Selects display line #<br />
4 1 Horizontal tab character 09h<br />
5 1 A Character pour “alphanumeric” 41h<br />
6-8 3 Number characters for competitor number 000 à 999<br />
9 1 Horizontal tab character 09h<br />
10-21 12 Characters for time Hh:Mm:Ss.DCM<br />
22 1 Horizontal tab character 09h<br />
23 1 Carriage Return character 0Dh<br />
24 1 Line Feed character 0Ah<br />
Any inactive digit remaining blank, corresponding to character 20 (space) is underlined<br />
in our examples.( _ )<br />
Data string examples for data being sent to display boards from the CP 705:<br />
A) “Alpine Ski” and “Cross-country” Modes<br />
1. Competitor Number and Net Time on display “0”<br />
L 0 A _ 5 2 _ 5 : 3 1 : 3 6 . 2 9 2 <br />
Net time of 5:31:36.292 for competitor 52 sent to display line “0”<br />
2. Rank and Competitor Number on display “1”<br />
L 1 A _ 2 1 _ _ _ _ _ _ 5 2 : _ 2 1 <br />
Rank of 21 for competitor number 52, sent to display #1 (Rank is sent twice)<br />
3. Speed Measurement on Display “2”<br />
L 2 A _ _ _ _ _ _ _ _ 2 9 2 . 5 9 0 <br />
Speed of 292.590 km/h sent to display #2<br />
36
B) 'Dual' Mode<br />
1. Left course Net Times sent to display “0”<br />
L 0 A _ _ _ _ _ _ _ _ _ 4 9 . 3 6 7 <br />
Net time of 49.367 seconds for racer on the left course sent to display #0<br />
2. Right Course Net Times sent to display “1”<br />
L 1 A _ _ _ _ _ _ _ _ _ 4 9 . 8 9 9 <br />
Net time of 49.899 seconds for racer on the right course sent to display #1<br />
3. Calculated Difference of 2 net times sent to display “2” in differential mode only<br />
L 2 A _ _ _ _ _ _ _ _ z 0 . 5 3 2 _ <br />
Calculated net time difference of 0.532 seconds sent to display #2<br />
C) Miscellaneous Messages<br />
1. General all-clear data string<br />
L _ A _ _ _ _ _ _ _ _ _ _ _ _ _ _ <br />
All display locations are sent blanks<br />
2. Time-of-Day Display<br />
L _< HT> A _ _ _< HT> 1 3 : 0 5 : 3 6 _ _ _ _<br />
Time-of-Day is13:05:36.<br />
D) Transmission Protocol<br />
9600 baud / 8 Data bits / 1 Stop bit / No parity<br />
37
13. CONNECTOR PIN ASSIGNMENTS<br />
DB 9 female plug « Computer »<br />
2 TX data output RS232<br />
3 RX data input RS232<br />
5 Ground<br />
DB 9 male plug « Display »<br />
2 TX data output RS232<br />
5 Ground<br />
DB 25 female plug « external connector »<br />
1 Input 1<br />
2 Input 2<br />
3 Input 3<br />
4 Input 4<br />
5 Input 5<br />
6 Input 6<br />
7 Input 7<br />
8 Input 8<br />
9 Input 9<br />
10 Input 10<br />
11 Input 11<br />
12 Input 12<br />
13 Input 13<br />
14 Input 14<br />
15 Input 15<br />
16 Input 16<br />
17 Synchronisation<br />
18 Ground of the inputs<br />
19 + Top minute (isolated)<br />
20 – Top minute (isolated)<br />
21 « Ground » of the commands (isolated)<br />
22 Command 1 (isolated)<br />
23 Command 2 (isolated)<br />
24 Command 3 (isolated)<br />
25 Command 4 (isolated)<br />
38