WP1-AG - Rain Bird irrigation
WP1-AG - Rain Bird irrigation
WP1-AG - Rain Bird irrigation

You also want an ePaper? Increase the reach of your titles
YUMPU automatically turns print PDFs into web optimized ePapers that Google loves.
<strong>WP1</strong>/<strong>AG</strong> GB 3/02/04 15:21 Page 4<br />
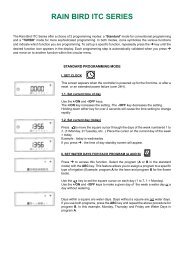
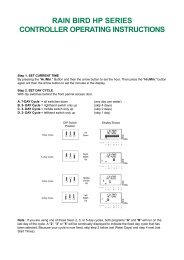
1/ Select time mode (AM/PM or 24H)<br />
2/ Set current year<br />
3/ Set current date<br />
4/ Set clock<br />
5/ Select F mode<br />
6/ Select F1 ou F1F2<br />
7/ Select Watering schedule<br />
8/ Select open time window<br />
9/ Select close time window<br />
10/ Select run times<br />
11/ Select soak times<br />
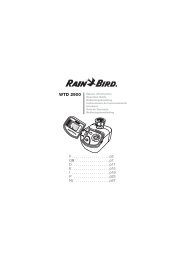
10<br />
11<br />
9<br />
1<br />
GB<br />
2<br />
3<br />
4<br />
8<br />
5<br />
INSTRUCTION MANUAL<br />
7<br />
6<br />
Single-station controller operates one Burkert type 9V latching solenoid (<strong>Rain</strong> <strong>Bird</strong> JA<br />
3000) for <strong>AG</strong> series valves or <strong>Rain</strong> <strong>Bird</strong> TBOS latching solenoid for <strong>Rain</strong> <strong>Bird</strong> series valves.<br />
Select the suitable wire size to connect valves to the controller. If your cables are installed<br />
underground, make sure you use a mechanical protection or a specific model intended for<br />
underground use. All connections must be waterproof. Use <strong>Rain</strong> <strong>Bird</strong> Quick Connect<br />
“King” connectors supplied with the product or <strong>Rain</strong> <strong>Bird</strong> DBY connectors.<br />
Important : Maximum distance between the controller and the valve using wire sized 1,5<br />
mm 2 : 30 m.<br />
88