Component/S-Video A/V Selector Switch - Radio Shack
Component/S-Video A/V Selector Switch - Radio Shack
Component/S-Video A/V Selector Switch - Radio Shack

Create successful ePaper yourself
Turn your PDF publications into a flip-book with our unique Google optimized e-Paper software.
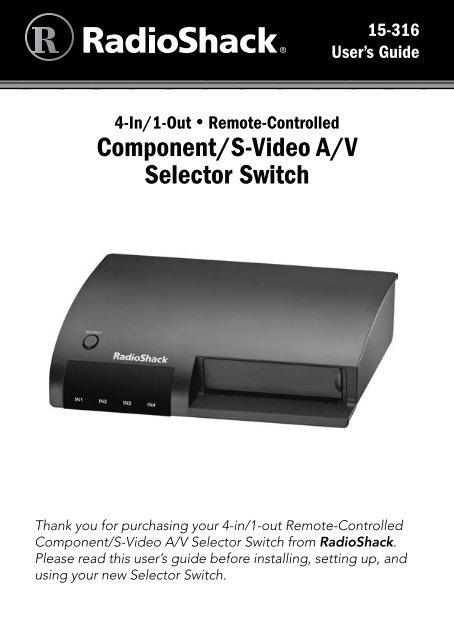
15-316<br />
User’s Guide<br />
4-In/1-Out • Remote-Controlled<br />
<strong>Component</strong>/S-<strong>Video</strong> A/V<br />
<strong>Selector</strong> <strong>Switch</strong><br />
Thank you for purchasing your 4-in/1-out Remote-Controlled<br />
<strong>Component</strong>/S-<strong>Video</strong> A/V <strong>Selector</strong> <strong>Switch</strong> from <strong>Radio</strong><strong>Shack</strong>.<br />
Please read this user’s guide before installing, setting up, and<br />
using your new <strong>Selector</strong> <strong>Switch</strong>.
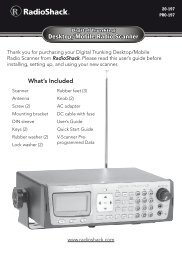
Package contents<br />
• <strong>Selector</strong> <strong>Switch</strong><br />
• Remote Control<br />
• Quick Start<br />
Features<br />
• AC Adapter<br />
• User’s Guide<br />
• Supports up to 1080i resolution.<br />
• <strong>Switch</strong>es between four component, S-<strong>Video</strong>, or composite<br />
video sources.<br />
1 Connect the <strong>Selector</strong> <strong>Switch</strong><br />
Place the selector switch on a flat surface. Use composite,<br />
component, or S-<strong>Video</strong> cables (available at your local <strong>Radio</strong><strong>Shack</strong><br />
store and online at <strong>Radio</strong><strong>Shack</strong>.com) to make all connections.<br />
Audio<br />
1. Connect each device’s audio outputs to a set of<br />
INPUT (1-4) R/L jacks on the switchbox.<br />
2. Connect the TV or monitor’s audio inputs to the<br />
OUTPUT (1) R/L jacks.<br />
<strong>Video</strong><br />
1. Connect each device’s Y/Pb/Pr component video outputs<br />
to a set of INPUT (1-4) Y/Pb/Pr component video jacks on<br />
the switchbox.<br />
– OR –<br />
Connect each device’s composite video outputs to a set of<br />
INPUT(1-4) composite video jacks on the switch box.<br />
– OR –<br />
2
Connect each device’s S-video outputs to a set of INPUT<br />
(1-4) S-video jacks on the switch box.<br />
2. Connect the TV or monitor’s Y/Pb/Pr component video<br />
inputs to OUTPUT Y/Pb/Pr component video jacks.<br />
– OR –<br />
Connect the TV or monitor’s composite video inputs to<br />
OUTPUT composite video jacks.<br />
– OR –<br />
Connect the TV or monitor’s S-video inputs to<br />
OUTPUT S-video jacks.<br />
Power<br />
Connect the supplied AC adapter’s barrel plug to the selector<br />
switch’s DC 12V jack, then connect the adapter’s AC plug to a<br />
standard AC outlet.<br />
w Caution:<br />
• You must use a Class 2 power source that supplies 12V<br />
DC and delivers 300 mA. Its center tip must be set to<br />
negative and its plug must fit the switchbox’s DC 12V jack.<br />
The supplied adapter meets these specifications. Using<br />
an adapter that does not meet these specifications could<br />
damage the switchbox or the adapter.<br />
• Do not place the selector switch on the top of a TV or other<br />
electrical appliance. Electromagnetic interference from the<br />
TV might distort the sound from any devices connected to<br />
the switchbox.<br />
3
Front view<br />
SELECT<br />
Select device<br />
Back view<br />
Input1<br />
Audio<br />
– OR –<br />
<strong>Video</strong><br />
– OR –<br />
Input2<br />
Input3<br />
Audio<br />
<strong>Video</strong><br />
Audio<br />
<strong>Video</strong><br />
OR<br />
OR<br />
OR<br />
O<br />
n Note: Always connect the AC adapter to the switch befor<br />
disconnect the adapter from AC power before you disconnect<br />
4
Input4<br />
<strong>Video</strong><br />
– OR –<br />
– OR –<br />
Audio<br />
Output<br />
Audio<br />
<strong>Video</strong><br />
R<br />
OR OR INPUT (1-4)<br />
Select device<br />
e you connect it to AC power. When you finish,<br />
it from the switch.<br />
5
2 Use the <strong>Selector</strong> <strong>Switch</strong><br />
Using the remote control to operate the selector switch<br />
1. Press 1-4 on the remote to view the device connected to<br />
INPUT 1-4.<br />
2. Operate the device as usual.<br />
Manually operating the selector switch<br />
1. Press SELECT on the front panel to view the device<br />
connected to INPUT 1-4, in sequence.<br />
2. Operate the device as usual.<br />
Replacing the Battery in the Remote Control<br />
Your remote comes with a battery installed. Remove the plastic<br />
tab before using the remote. Replace the battery if the remote<br />
control stops operating properly.<br />
1. Press the tab on the battery compartment tray, slide the<br />
battery compartment tray out.<br />
2. Insert a new 3V, CR2025 battery,<br />
positive “+” side up.<br />
3. Slide the tray back into the battery<br />
compartment until it clicks.<br />
b Battery Notes:<br />
• Keep button-cell battery away from children. Swallowing a<br />
button-cell battery can be fatal.<br />
• Dispose of batteries promptly and properly. Do not burn or<br />
bury them.<br />
• Use only fresh batteries of the required size and type.<br />
6
Specifications<br />
Input.................................................................120VAC 60Hz 75mA<br />
Output.......................................................................12VDC 300mA<br />
<strong>Video</strong> resolution................................... 480i / 480p / 720p / 1080i<br />
Remote control distance.....................................up to 16.4 ft (5m)<br />
RCA Connector............................................................Gold-plated<br />
Specifications are subject to change and improvement without notice. Actual<br />
product may vary from the images found in this document.<br />
FCC Information<br />
This equipment has been tested and found to comply with the limits for a Class B<br />
digital device, pursuant to Part 15 of the FCC Rules. These limits are designed to<br />
provide reasonable protection against harmful interference in a residential installation.<br />
This equipment generates, uses, and can radiate radio frequency energy and,<br />
if not installed and used in accordance with the instructions, may cause harmful<br />
interference to radio communications. However, there is no guarantee that interference<br />
will not occur in a particular installation. If this equipment does cause harmful<br />
interference to radio or television reception, which can be determined by turning<br />
the equipment off and on, the user is encouraged to try to correct the interference<br />
by one or more of the following measures:<br />
• Reorient or relocate the receiving antenna.<br />
• Increase the separation between the equipment and receiver.<br />
• Connect the equipment into an outlet on a circuit different from that to which the<br />
receiver is connected.<br />
• Consult your local <strong>Radio</strong><strong>Shack</strong> store or an experienced radio/TV technician for<br />
help.<br />
If you cannot eliminate the interference, the FCC requires that you stop using your<br />
equipment. Changes or modifications not expressly approved by <strong>Radio</strong><strong>Shack</strong> may<br />
cause interference and void the user’s authority to operate the equipment.<br />
This device complies with Part 15 of the FCC rules. Operation is subject to the<br />
following two conditions: (1) This device may not cause harmful interference, and (2)<br />
This device must accept any interference received, including interference that may<br />
cause undesired operation.<br />
Limited Warranty<br />
<strong>Radio</strong><strong>Shack</strong> warrants this product against defects in materials and workmanship<br />
under normal use by the original purchaser for ninety (90) days after the date of<br />
purchase from a <strong>Radio</strong><strong>Shack</strong>-owned store or an authorized <strong>Radio</strong><strong>Shack</strong> franchisee<br />
or dealer. RADIOSHACK MAKES NO OTHER EXPRESS WARRANTIES.<br />
This warranty does not cover: (a) damage or failure caused by or attributable to<br />
abuse, misuse, failure to follow instructions, improper installation or maintenance,<br />
7
alteration, accident, Acts of God (such as floods or lightning), or excess voltage<br />
or current; (b) improper or incorrectly performed repairs by persons who are not a<br />
<strong>Radio</strong><strong>Shack</strong> Authorized Service Facility; (c) consumables such as fuses or batteries;<br />
(d) ordinary wear and tear or cosmetic damage; (e) transportation, shipping or<br />
insurance costs; (f) costs of product removal, installation, set-up service, adjustment<br />
or reinstallation; and (g) claims by persons other than the original purchaser.<br />
Should a problem occur that is covered by this warranty, take the product and the<br />
<strong>Radio</strong><strong>Shack</strong> sales receipt as proof of purchase date to any <strong>Radio</strong><strong>Shack</strong> store in<br />
the U.S. <strong>Radio</strong><strong>Shack</strong> will, at its option, unless otherwise provided by law: (a) repair<br />
the product without charge for parts and labor; (b) replace the product with the<br />
same or a comparable product; or (c) refund the purchase price. All replaced parts<br />
and products, and products on which a refund is made, become the property of<br />
<strong>Radio</strong><strong>Shack</strong>. New or reconditioned parts and products may be used in the performance<br />
of warranty service. Repaired or replaced parts and products are warranted<br />
for the remainder of the original warranty period. You will be charged for repair or<br />
replacement of the product made after the expiration of the warranty period.<br />
RADIOSHACK EXPRESSLY DISCLAIMS ALL WARRANTIES AND CONDITIONS NOT<br />
STATED IN THIS LIMITED WARRANTY. ANY IMPLIED WARRANTIES THAT MAY BE<br />
IMPOSED BY LAW, INCLUDING THE IMPLIED WARRANTY OF MERCHANTABILITY<br />
AND, IF APPLICABLE, THE IMPLIED WARRANTY OF FITNESS FOR A PARTICULAR<br />
PURPOSE, SHALL EXPIRE ON THE EXPIRATION OF THE STATED WARRANTY PERIOD.<br />
EXCEPT AS DESCRIBED ABOVE, RADIOSHACK SHALL HAVE NO LIABILITY<br />
OR RESPONSIBILITY TO THE PURCHASER OF THE PRODUCT OR ANY OTHER<br />
PERSON OR ENTITY WITH RESPECT TO ANY LIABILITY, LOSS OR DAMAGE<br />
CAUSED DIRECTLY OR INDIRECTLY BY USE OR PERFORMANCE OF THE<br />
PRODUCT OR ARISING OUT OF ANY BREACH OF THIS WARRANTY, INCLUDING,<br />
BUT NOT LIMITED TO, ANY DAMAGES RESULTING FROM INCONVENIENCE<br />
AND ANY LOSS OF TIME, DATA, PROPERTY, REVENUE, OR PROFIT AND ANY<br />
INDIRECT, SPECIAL, INCIDENTAL, OR CONSEQUENTIAL DAMAGES, EVEN IF<br />
RADIOSHACK HAS BEEN ADVISED OF THE POSSIBILITY OF SUCH DAMAGES.<br />
Some States do not allow limitations on how long an implied warranty lasts or<br />
the exclusion or limitation of incidental or consequential damages, so the above<br />
limitations or exclusions may not apply to you. This warranty gives you specific legal<br />
rights, and you may also have other rights which vary from State to State. You may<br />
contact <strong>Radio</strong><strong>Shack</strong> at: <strong>Radio</strong><strong>Shack</strong> Customer Relations<br />
300 <strong>Radio</strong><strong>Shack</strong> Circle, Fort Worth, TX 76102 04/08<br />
www.<strong>Radio</strong><strong>Shack</strong>.com<br />
Protect the environment by recycling used electronics. Go to<br />
E-CyclingCentral.com to find an electronic recycling center near you.<br />
©2009. <strong>Radio</strong><strong>Shack</strong> Corporation.<br />
All rights reserved. <strong>Radio</strong><strong>Shack</strong> and <strong>Radio</strong><strong>Shack</strong>.com are<br />
trademarks used by <strong>Radio</strong><strong>Shack</strong> Corporation.<br />
Printed<br />
in China<br />
10A09<br />
15-316<br />
8