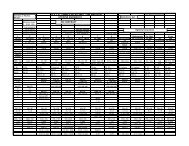
CT Protocols: (Brain, ENT, Spine, Vascular) - Department of Radiology
CT Protocols: (Brain, ENT, Spine, Vascular) - Department of Radiology
CT Protocols: (Brain, ENT, Spine, Vascular) - Department of Radiology

Create successful ePaper yourself
Turn your PDF publications into a flip-book with our unique Google optimized e-Paper software.
135 Revised 7/22/09 (Gentry/Ranallo)<br />
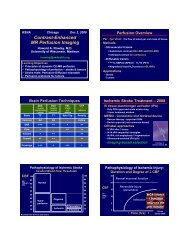
GE Advantage: <strong>CT</strong> Perfusion Post Processing Protocol<br />
a. Select Perfusion series from patient list<br />
b. From Applications menu at right <strong>of</strong> screen choose <strong>CT</strong> PerfusionN (exam will load)<br />
c. From list <strong>of</strong> protocols choose <strong>Brain</strong> Tumor<br />
d. Using slide bar at bottom <strong>of</strong> upper left port, slide back and forth to look for motion. If there<br />
is motion click apply registration, then click next. If not, click next.<br />
e. Now you will see a box called Processing Thresholds. Your object here is to get all little<br />
boxes/pixels out <strong>of</strong> the brain tissue and include as much brain parenchyma as you can.<br />
Your slide bar that you used to check for motion must be all the way to the left and rank<br />
should be 1/89. Slide air bar to left to remove boxes/pixels from ventricles and there are<br />
any diagonal lines with pieces missing, this air bar may fill them in. This is a very slight<br />
movement. Your average range should be (-27 to around -63). It can go higher and that is<br />
ok but usually doesn’t<br />
f. Slide bone bar to right to bring circle out to edge <strong>of</strong> bone only. This is easiest when using a<br />
bone window. Middle mouse will change window/level. Click next.<br />
g. Using slide bar in upper left port again, move it left to right to find a slice where contrast is<br />
fairly bright. Look on upper slices for anterior cerebrals, just above frontal horns.<br />
This is the best place to look for an artery.<br />
You can move up levels by right-clicking<br />
on your image location in your upper left port. Click on ROI to the left <strong>of</strong> your screen<br />
and place over an artery. Click next. This should result in a small purple circle being<br />
placed in an artery with a label and arrow.<br />
h. Now do the same for a vein. A good place to look is down in the sinus. Click next. If you<br />
have gone up several levels to find your vein/artery, make sure you go back to the<br />
beginning to place your ROIs! The vein and artery do not have to be on the same slice!<br />
i. Roam your image over to the right. Do this by grabbing the “ P” on the bottom <strong>of</strong> your<br />
upper left port (you will see a hand) and moving your head.<br />
j. Now place your cursor in the upper right port and hit the space bar. This will bring up a<br />
graph with 2 lines (1) and (2). 1 is the artery you marked and 2 is the vein. On the line that<br />
says “Last pre-enhancement image” grab the number and a white line will appear in your<br />
graph. You want to move the line to the last spot before the contrast spikes. You do this on<br />
line 1 only. (If you are having trouble seeing the 2 lines separately, click on the word artery<br />
in your upper left port. This will activate it and turn it green and you will be able to<br />
distinguish the two lines. When you are done click in the upper left port to de-activate the<br />
artery so it returns to purple.) Click next.<br />
k. Click compute. This will take a minute. Close Final Settings box.<br />
l. In the lower left port there will be a drop down menu under DFOV called Blood Flow.<br />
Change this view to Mean Transit Time.<br />
m. Click on Film/Save box and choose ROIs/Templates. Click on Neuro template for upper<br />
levels and Neuro-lower for lower levels (the only difference between these two is that<br />
Neuro-lower only has 2 ROIs to place instead <strong>of</strong> four. Hit Load. This will bring up your<br />
ROIs and Axis line. You may need to adjust their placement depending on your centering.<br />
You can now close this box.<br />
n. Look for any obvious perfusion abnormality. This is where you will place your ROI. If there<br />
isn’t any obvious abnormality then you will place your ROIs in the standard places.