
You also want an ePaper? Increase the reach of your titles
YUMPU automatically turns print PDFs into web optimized ePapers that Google loves.
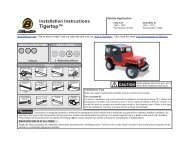
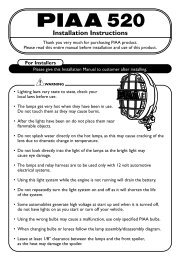
<strong>JK8</strong><br />
<strong>Body</strong> <strong>Kit</strong><br />
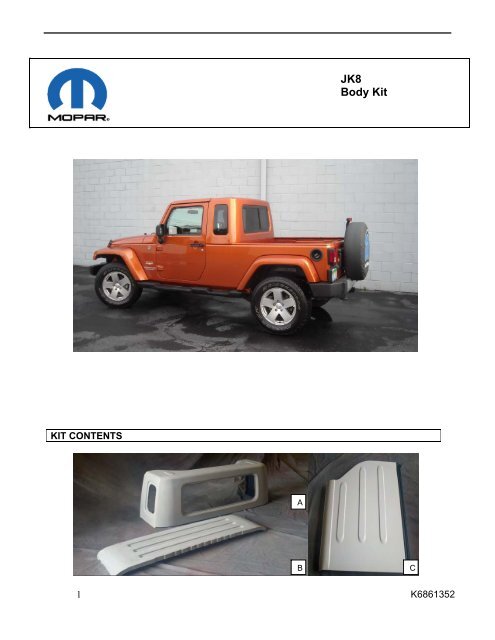
KIT CONTENTS<br />
A<br />
B<br />
C<br />
1 K6861352
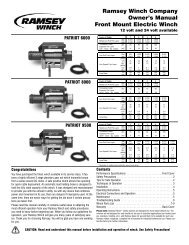
D<br />
E<br />
G<br />
F<br />
H<br />
2 K6861352
I<br />
M<br />
N<br />
J K L<br />
O<br />
P<br />
Q<br />
R<br />
S<br />
3 K6861352
T<br />
U<br />
V W X Y<br />
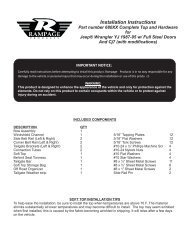
CALL OUT PART NUMBER DESCRIPTION QUANTITY<br />
A P5156021 HARDTOP 1<br />
B P5155997 BULKHEAD 1<br />
C 1PH98/9TZZAE RH/LH FREEDOM PANELS 2<br />
D P5156009/10 OUTER RH/LH QUARTER TRIM PANELS 2<br />
E 68001172/3AD INNER RH/LH QUARTER TRIM PANELS 2<br />
F P5156007/8 RH/LH 2 DOOR SPORTS BAR RH\LH 2<br />
G P5156004 FLOOR PAN 1<br />
H P5156006 REAR STORAGE COVER 1<br />
I P5156012 BULKHEAD BAR 1<br />
J 68026036/7AB FRONT RH/LH BELT RAIL 2<br />
K 55395640/1AG REAR RH/LH BELT RAIL 2<br />
L P5156005 CROSSMEMBER 1<br />
M P5156011 CROSSMEMBER BRACKETS 2<br />
N 55395270/1AB RH/LH MUCKETS 2<br />
O 68001202/3AB B PILLAR RH/LH LOWER TRIM PANEL 1<br />
P 68088042AA HARDTOP SEAL 1<br />
Q 5KP66/7DX9AD UPPER B PILLAR TRIM RH\LH PANELS 2<br />
R 1CD06/7DX9AD UPPER B PILLAR TRIM COVER 2<br />
S 5KP70/1DX9AD LOWER B PILLAR TRIM RH\LH PANELS 2<br />
T P5155994/5 HARDTOP RH\LH WINDOWS 2<br />
U P5155996 HARDTOP REAR SLIDING WINDOW 1<br />
V P5156002 HARDTOP TO BULKHEAD SEAL 1<br />
W 82213093 BADGE 1<br />
X P5156021 HARDTOP AND WINDOW HARDWARE KIT 1<br />
Y P5155993 ASSORTED HARDWARE KIT 1<br />
4 K6861352
KIT INSTALLATION<br />
1. Disconnect Battery<br />
2. Remove in the following order prior to installation of the kit:<br />
- Freedom Top Panel - Hard Top Including Wiring<br />
- Soft Top - Front and Rear Doors<br />
- Dome Light and Speaker - Sport Bar Padding<br />
Bar Including Wiring<br />
- Sill Trim<br />
- B Pillar Trim - Seat Belts and Mounting Hardware<br />
- Seats Front and Rear - Rear Subwoofer<br />
- Carpet - Rear Storage Enclosure<br />
- Fuel Door - Tail Lamps<br />
- License Plate Bracket - Spare Tire<br />
- Tailgate and Wiring - Tailgate Hinges<br />
- Rear Bumper - Rear Wheel Liners<br />
- Rear Wheel Flares - Running Boards<br />
*Use Chrysler Service Manual or Chrysler Tech Connect for proper removal and<br />
installation procedures.<br />
* Recommended to be installed by a certified body shop facility. This is a one way<br />
conversion kit.<br />
3. Apply protective covering to Instrument Panel and Center Console.<br />
4. Belt Rail Removal – Remove spot welds in 11 places per side and remove<br />
from quarter trim panels.<br />
5 K6861352
5. Outer Quarter Trim Panel Removal – Remove spot welds in 75 places per side<br />
and remove from inner quarter trim panels and vehicle body.<br />
6. Rear Corner Trim Panel Removal – Remove spot welds in 22 places per side<br />
and remove from vehicle body.<br />
CAUTION: When removing gas trim ring ease clips from trim panel.<br />
7. Outer B Pillar Panel Removal – Remove spot<br />
welds in 67 places per side and remove<br />
from vehicle body.<br />
6 K6861352
8. Inner Lower B Pillar Panel Removal – Remove B pillar bolts in 2 places. Remove spot<br />
welds in 18 places per side and remove from vehicle body. Cut B pillar bar 24” up<br />
from vehicle floor pan. Remove any excess foam material in B pillar and lower rocker.<br />
9. Remove Sport Bar – Stabilize B pillar portion<br />
of the sport bar when cutting rear portion<br />
of the sport bar remove spot welds 16 places<br />
per side. Save sport bar to remove upper<br />
crossmember.<br />
7 K6861352
10. Upper Crossmember removal – Remove spot welds in 6 places per side. Keep<br />
Crossmember for later install.<br />
SAVE and REUSE Crossmember<br />
11. Remove Lock Pillar Support.<br />
12. Outer Wheel House Removal – Remove spot welds in 29 places per side<br />
remove from vehicle body.<br />
8 K6861352
13. Remove spot welds in 4 places on the 2 brackets referenced as A and B. Then,<br />
remove any adhesive from the ribs reference C that may affect installation of the<br />
floor pan. Also remove any drain plugs in the storage enclosure bumper opening<br />
and rear seat area.<br />
C<br />
A<br />
B<br />
Drain Plugs<br />
14. Remove any caulk, clean and straighten all edges of metal, sand and prep<br />
surfaces for welding.<br />
15. Install Lower B Pillar Panel. Align lower edge with rocker and weld into location.<br />
Install b pillar bolts after creating a slot.<br />
Slot Location<br />
9 K6861352
16. Install B Pillar Sport Bar. Measure 44 ¾” from vehicle floor to lower weld on B<br />
pillar re-use B pillar bolts and tighten to 48Nm.<br />
17. Weld Upper Crossmember into B Pillar Sports Bar.<br />
18. Cut back hard top brackets 5 5/8”. Fasten into place with 3 bolts per side at 20-<br />
27Nm.<br />
5 5/8”.<br />
5 5/8”.<br />
10 K6861352
19. To align inner quarter panel align both panels to the bottom clamp outer corner and<br />
inner quarter panel together and insert a couple set screws on the inner panels for<br />
welding location. Remove outer panel after alignment.<br />
20. Remove outer panel and weld both Inner Quarter Panels to vehicle body remove<br />
any set screws and weld holes. Surface Primer grinded areas.<br />
21. Install Outer Quarter Panels. Align holes for tail lamps. Measure width in between<br />
Rear Corners to 43.0”.<br />
43.0”<br />
11 K6861352
22. Weld RH/LH Front and Rear Belt Rails.<br />
Align with front and rear locating holes.<br />
23. Install Bulkhead Support Bar. Fasten bracket<br />
using rear seat bolts 75Nm and insert<br />
bulkhead bar into the B pillar. Fasten center<br />
sport bar with M12 bolts to 81Nm.<br />
Install M12 bolts.<br />
12 K6861352
24. Install Lower Cross Member – Install the lower bracket hole to the bulkhead bar<br />
mounting plate using the same M8 bolt to 75Nm. Dry fit cross member and mark<br />
drill locations for the upper bracket hole and center drain hole. Drill 3/8” hole in left<br />
and right side lower cross member. Drill 1” drain hole in vehicle floor pan to line up<br />
with the center drain hole in the cross member. Align floor pan (G) to lower cross<br />
member prior to welding. Apply body adhesive around center drain hole and lip<br />
portion of cross member. Place cross member center and use 3/8” bolt at 48Nm to<br />
fasten bracket to cross member.<br />
Cross Member<br />
13 K6861352
25. Weld Floor Pan – Align with 3 bolt hole locations. After floor pan is welded in fill<br />
any holes with body adhesive.<br />
26. Weld Cover Storage – Fit rear cover storage area to floor pan and weld.<br />
14 K6861352
27. Prep vehicle, hardtop and bulkhead for paint at this time.<br />
28. To determine the location of the bulkhead dry fit hard top, remove and mark<br />
location on belt rail. Pre drill 13 holes evenly across lower bulkhead surface.1/8”.<br />
Install Bulkhead to Floor Pan using 13 ¼” self-tapping bolts. Adhere to inner trim<br />
panels with <strong>Body</strong> Adhesive and then caulk.<br />
Drill 3/4” access holes for bracket access then re-use and insert the access plugs<br />
from the rear door handle.<br />
Pre drill 13 holes<br />
in this location.<br />
Drain Plug<br />
Install Bulkhead<br />
15 K6861352
29. Trim muckets by removing an 1/8” of inch material to the right of white line prior to<br />
pressing into place. This will seat the hardtop properly into place.<br />
30. Install Windows into hard top using the hardware kit provided. Holes are predrilled.<br />
Window frame seam located on the bottom.<br />
31. Install hard top to bulkhead by drilling 5/16” holes reusing hardtop fasteners.<br />
Equally space 4 along the back and one on each side of the hard top. Prep bottom<br />
hard top surface with alcohol wipe and apply hard top to Bulkhead Seal. Fit hard<br />
top seal to hard top. Install freedom panels.<br />
16 K6861352
32. Install Side Airbag Sensor. Drill a 3/16” hole 4 ½” rear ward and 13” from floor pan<br />
in the inner b pillar panel. Install 6mm self- tapping bolt in the top hole and then<br />
drill the lower 3/16” hole.<br />
33. Trim lower b pillar trim 55mm wide top length 26mm and lower length<br />
75mm.<br />
17 K6861352
34. Install lower push pin locating hole. Press trim firmly into place and mark and drill a<br />
¼” top hole in sheet metal. Center hole is present in sheet metal and ¼” hole<br />
needs to be aligned and drilled in plastic. Locate trim with push pin in top hole.<br />
Use paint marker to mark tip of push pin and contact sheet metal. Drill two 1/4”<br />
holes to attach lower push pins in sheet metal.<br />
Drill hole in<br />
sheet metal<br />
Drill hole in<br />
plastic<br />
Locating<br />
hole<br />
35. Install upper trim panel and wrap upper trim cover. Trim carpet to fit.<br />
18 K6861352
36. Use masking tape to align end of badge a ½” from the tailgate and a ¼” up from<br />
the tailgate bracket. Prep badge location using alcohol to clean. Make sure<br />
vehicle is at room temperature and install badge.<br />
37. Repeat step 2 on the components that are applicable per the Chrysler Manual or<br />
TECH Support.<br />
19 K6861352