AIR FILTER SERVICE INSTRUCTIONS - Quadratec
AIR FILTER SERVICE INSTRUCTIONS - Quadratec
AIR FILTER SERVICE INSTRUCTIONS - Quadratec

You also want an ePaper? Increase the reach of your titles
YUMPU automatically turns print PDFs into web optimized ePapers that Google loves.
Service Intervals<br />
The service interval of a K&N air filter varies depending on the conditions that it is subjected to. It is recommended to inspect the filter<br />
at every oil change and to service the filter at least once a year unless conditions necessitate servicing it sooner or when indicated by<br />
your air filter restriction gauge (if one is available).<br />
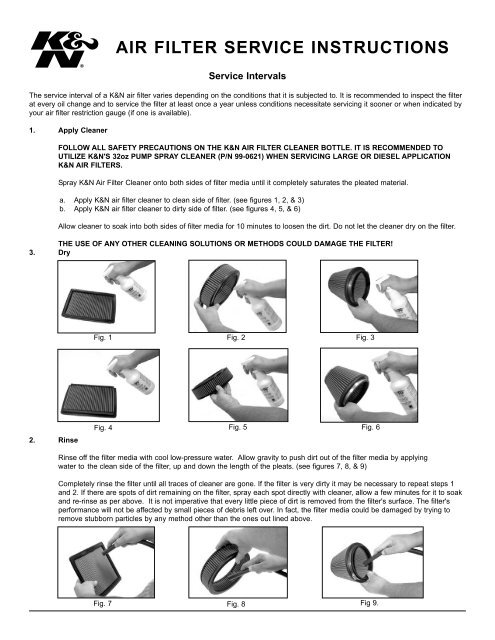
1. Apply Cleaner<br />
<strong>AIR</strong> <strong>FILTER</strong> <strong>SERVICE</strong> <strong>INSTRUCTIONS</strong><br />
FOLLOW ALL SAFETY PRECAUTIONS ON THE K&N <strong>AIR</strong> <strong>FILTER</strong> CLEANER BOTTLE. IT IS RECOMMENDED TO<br />
UTILIZE K&N'S 32oz PUMP SPRAY CLEANER (P/N 99-0621) WHEN SERVICING LARGE OR DIESEL APPLICATION<br />
K&N <strong>AIR</strong> <strong>FILTER</strong>S.<br />
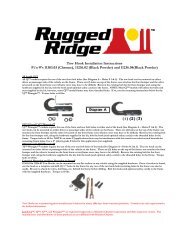
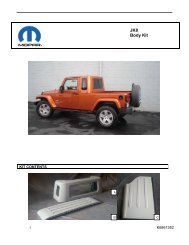
Spray K&N Air Filter Cleaner onto both sides of filter media until it completely saturates the pleated material.<br />
a. Apply K&N air filter cleaner to clean side of filter. (see figures 1, 2, & 3)<br />
b. Apply K&N air filter cleaner to dirty side of filter. (see figures 4, 5, & 6)<br />
Allow cleaner to soak into both sides of filter media for 10 minutes to loosen the dirt. Do not let the cleaner dry on the filter.<br />
THE USE OF ANY OTHER CLEANING SOLUTIONS OR METHODS COULD DAMAGE THE <strong>FILTER</strong>!<br />
3. Dry<br />
Fig. 1 Fig. 2 Fig. 3<br />
2. Rinse<br />
Fig. 4 Fig. 5 Fig. 6<br />
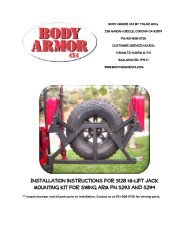
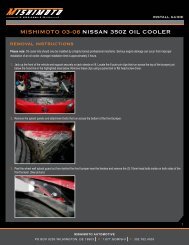
Rinse off the filter media with cool low-pressure water. Allow gravity to push dirt out of the filter media by applying<br />
water to the clean side of the filter, up and down the length of the pleats. (see figures 7, 8, & 9)<br />
Completely rinse the filter until all traces of cleaner are gone. If the filter is very dirty it may be necessary to repeat steps 1<br />
and 2. If there are spots of dirt remaining on the filter, spray each spot directly with cleaner, allow a few minutes for it to soak<br />
and re-rinse as per above. It is not imperative that every little piece of dirt is removed from the filter's surface. The filter's<br />
performance will not be affected by small pieces of debris left over. In fact, the filter media could be damaged by trying to<br />
remove stubborn particles by any method other than the ones out lined above.<br />
Fig. 7 Fig. 8 Fig 9.
After rinsing, gently shake off excess water and inspect the filter for damage. Check for damaged sealing surfaces, bent<br />
pleats, holes in the material, broken screen wires or any other problems that might affect the function of the air filter. Do not<br />
use a filter that is damaged. Allow the filter to air dry naturally. Do not proceed to the oiling step until the filter is completely<br />
dry.<br />
4. Oiling<br />
THE USE OF ANY OTHER DRYING METHODS COULD DAMAGE THE <strong>FILTER</strong>.<br />
USE ONLY K&N <strong>AIR</strong> <strong>FILTER</strong> OIL. DO NOT OVER-OIL <strong>AIR</strong> <strong>FILTER</strong>.<br />
Over-oiling may interfere with the proper performance of the engine and/or certain engine components. If there is oil draining<br />
or dripping from the filter after sitting 20 minutes the filter must be serviced again starting at step 1. It is better to apply<br />
several lighter coats of oil than 1 or 2 heavy ones. Refer to oil amount listed on original air filter package (top side label) or<br />
K&N website @ http://www.knfilter.com.<br />
Apply K&N air filter oil sparingly to the dirty side of the filter only. This will allow for a visual reference of complete coverage.<br />
a. If using a K&N squeeze bottle, squeeze a bead of oil along the crown of each pleat using the lip on the squeeze bottle<br />
tip as a guide. Utilize graduated view strip on bottle to dispense proper amount of oil.<br />
b. If using a K&N aerosol spray, spray an even amount of oil along the crown of each pleat.<br />
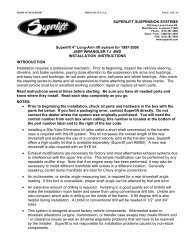
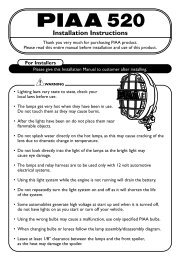
Wait 20 minutes for the oil to be absorbed into the filter media. Inspect the clean side of the filter for any areas that are lighter<br />
in color. Touch up these areas in the media by applying oil to the dirty side of the filter as before. Continue with above oiling<br />
procedures until there is an even pink color over the entire surface of the media (both clean and dirty side). (see figures 10,<br />
11, 12, 13, 14, & 15)<br />
THE USE OF ANY OTHER OIL OR METHODS COULD DAMAGE THE <strong>FILTER</strong>!<br />
Fig. 10 Fig. 11 Fig. 12<br />
Fig. 13 Fig. 14 Fig. 15<br />
5. Filter installation<br />
Before installing the filter back into the vehicle inspect it again for damage. Pay particular attention to the sealing surfaces<br />
and/or gaskets. Do not use a filter that has a compromised seal. K&N sealing grease should be applied to the sealing surface<br />
of the filter when it will be used in very dusty conditions. Follow any and all specific installation instructions that came with the<br />
K&N air filter.<br />
FAILURE TO FOLLOW THE K&N INSTALLATION <strong>INSTRUCTIONS</strong> COULD LEAD TO A <strong>FILTER</strong> THAT DOES NOT SEAL<br />
PROPERLY AND DAMAGE TO THE ENGINE COULD RESULT! PLEASE CALL THE K&N CUSTOMER <strong>SERVICE</strong><br />
DEPARTMENT AT 1-951-826-4000 IF YOU DO NOT KNOW THE SPECIAL INSTALLATION <strong>INSTRUCTIONS</strong> FOR YOUR<br />
APPLICATION.<br />
• 1455 CITRUS AVE., P.O. BOX 1329, RIVERSIDE, CA., U.S.A. 92502 • TECH <strong>SERVICE</strong> 800-858-3333 • FAX 951-824-4000<br />
• e-mail: tech@knfilters.com • WWW: http://www.knfilters.com<br />
10/26/05<br />
18627