TURBOVAC 1100 C - PTB Sales
TURBOVAC 1100 C - PTB Sales
TURBOVAC 1100 C - PTB Sales

Create successful ePaper yourself
Turn your PDF publications into a flip-book with our unique Google optimized e-Paper software.
Vakuum-Lösungen<br />
Applikations-<br />
Unterstützung Service LEYBOLD VACUUM<br />
GA 05.128/7<br />
View our inventory<br />
<strong>TURBOVAC</strong> <strong>1100</strong> C<br />
Turbo-Molekularpumpe<br />
mit fettgeschmierten Lagern<br />
Turbomolecular pump with<br />
grease-lubricated bearings<br />
Kat.-Nr. / Cat. No.<br />
894 80<br />
894 83<br />
894 84<br />
Gebrauchsanleitung<br />
Operating instructions
Beschreibung<br />
Inhalt<br />
Seite<br />
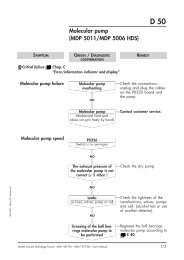
1 Beschreibung<br />
1 Beschreibung..................................................... 2<br />
1.1 Lieferumfang...................................................... 3<br />
1.2 Bestell-Daten ..................................................... 3<br />
1.3 Technische Daten .............................................. 3<br />
2 Anschluss .......................................................... 4<br />
2.1 Umweltbedingungen .......................................... 4<br />
2.2 Pumpe an den Vakuumbehälter anbauen ......... 5<br />
2.3 Vorvakuum-Anschluss ....................................... 6<br />
2.4 Kühlung anschließen ......................................... 7<br />
2.5 Sperrgas und Belüftung anschließen ................ 7<br />
2.6 TURBOTRONIK anschließen ............................ 8<br />
2.7 Rotorlager-Überwachung anschließen .............. 8<br />
3 Betrieb ............................................................... 9<br />
3.1 Einschalten ........................................................ 9<br />
3.2 Betrieb ............................................................... 9<br />
3.3 Abschalten ....................................................... 10<br />
3.4 Belüften............................................................ 10<br />
3.5 Pumpe aus der Anlage ausbauen ................... 10<br />
4 Wartung............................................................ 11<br />
4.1 Service bei Leybold ......................................... 11<br />
5 Fehlersuche ..................................................... 12<br />
EG-Herstellererklärung .................................... 13<br />
The English Operating Instructions start on<br />
page 14<br />
Erläuterungen<br />
Abbildungen<br />
Abbildungshinweise, z. B. (2/10), geben mit der ersten Ziffer<br />
die Abbildungsnummer an und mit der zweiten Ziffer die Position<br />
in dieser Abbildung.<br />
Vorsicht<br />
Steht bei Arbeits- und Betriebsverfahren, die genau einzuhalten<br />
sind, um eine Gefährdung von Personen auszuschließen.<br />
Die <strong>TURBOVAC</strong> <strong>1100</strong> C ist eine Turbo-Molekularpumpe<br />
mit fettgeschmierten Lagern. Sie ist geeignet zum<br />
Abpumpen von Vakuumbehältern auf Druckwerte im<br />
Hochvakuumbereich. Zum Betrieb der <strong>TURBOVAC</strong> sind<br />
ein Frequenzwandler TURBOTRONIK und eine Vorvakuumpumpe<br />
erforderlich.<br />
Die Pumpen sind nicht geeignet zum Betrieb ohne Vorvakuumpumpe.<br />
Die <strong>TURBOVAC</strong> <strong>1100</strong> C hat eine Rotorlager-Überwachung<br />
Turbo Guard 3 mit Betriebsstundenzähler.<br />
Medienverträglichkeit<br />
Turbo-Molekularpumpen sind nicht geeignet zum Fördern<br />
von Flüssigkeiten oder staubhaltigen Gasen.<br />
Turbo-Molekularpumpen ohne Sperrgas sind nur geeignet<br />
zum Pumpen von Luft oder von inerten Gasen. Sie<br />
sind nicht geignet zum Pumpen von reaktiven oder partikelhaltigen<br />
Gasen, hierbei ist Sperrgasbetrieb notwendig.<br />
<strong>TURBOVAC</strong> mit einem „C“ in der Typenbezeichnung<br />
haben eine Sperrgas-Einrichtung. Das Sperrgas schützt<br />
nur den Lager-Bereich und den Motor der <strong>TURBOVAC</strong>.<br />
Einige Medien (z.B. Aluminiumtrichlorid) können in der<br />
Pumpe sublimieren und Beläge bilden. Dicke Beläge<br />
führen zu Spielaufzehrung und damit zum Blockieren<br />
der Pumpe. Bei einigen Prozessen kann die Belagbildung<br />
durch Erwärmen der Pumpe verhindert werden.<br />
Dazu erbitten wir Ihre Anfrage.<br />
Ätzende Gase (z.B. Chlor) können die Rotoren zersetzen.<br />
Bei Betrieb der <strong>TURBOVAC</strong> ist der Druck in der Pumpe<br />
so gering, dass keine Zündgefahr besteht (bei Drücken<br />
unter ca. 100 mbar). Gefahr besteht, wenn zündfähige<br />
Gemische über 100 mbar Druck in die heiße Pumpe<br />
gelangen. Die Pumpentemperatur bei Betrieb beträgt bis<br />
zu 120 °C. Zündfunken sind im Schadensfall möglich<br />
und können zur Explosion zündfähiger Gemische<br />
führen.<br />
Lassen Sie sich bitte von uns beraten, welche Medien<br />
mit oder ohne Sperrgas gepumpt werden können.<br />
Achtung<br />
Bezieht sich auf Arbeits- und Betriebsverfahren, die genau einzuhalten<br />
sind, um Beschädigungen und Zerstörungen des<br />
Gerätes zu vermeiden.<br />
Vorsicht<br />
Keine Körperteile dem Vakuum aussetzen.<br />
Eine Änderung der Konstruktion und der angegebenen Daten<br />
behalten wir uns vor.<br />
Die Abbildungen sind unverbindlich.<br />
2 GA 05.128/7 - 05/2002
Beschreibung<br />
1.1 Lieferumfang<br />
Die <strong>TURBOVAC</strong> wird in einem verschlossenen PE-Beutel<br />
mit Trockenmittel ausgeliefert.<br />
Wirkungsdauer des Trockenmittels max. 1 Jahr.<br />
Zum Lieferumfang gehören zum Hochvakuum-<br />
Anschluss<br />
Splitterschutz,<br />
Zentrierring mit FPM-Dichtring, Außenring.<br />
und zum Vorvakuum-Anschluss<br />
Zentrierring mit FPM-Dichtring, Außenring.<br />
Der Sperrgas- und der Belüftungs-Anschluss sind blindgeflanscht.<br />
Der zum Betrieb notwendige elektronische Frequenzwandler<br />
und die Verbindungsleitungen sind nicht im Lieferumfang<br />
der Pumpe enthalten.<br />
————————————-<br />
PE=Polyethylen<br />
FPM=Fluor-Kautschuk, temperaturbeständig bis 150°C<br />
1.2 Bestelldaten<br />
<strong>TURBOVAC</strong> <strong>1100</strong> C<br />
Kat.-Nr.<br />
mit Hochvakuum-Flansch DN 250 ISO-K 894 80<br />
DN 200 ISO-K 894 83<br />
DN 160 ISO-K 894 84<br />
Elektronischer Frequenzwandler<br />
TURBOTRONIK NT 20<br />
230 V 857 20<br />
120 V 857 21<br />
Verbindungsleitung <strong>TURBOVAC</strong> - TURBOTRONIK<br />
3 m lang 857 65<br />
5 m lang 857 66<br />
10 m lang 857 67<br />
20 m lang 857 68<br />
Sperrgasfilter mit O-Ring 200 18 515<br />
1.3 Technische Daten<br />
<strong>TURBOVAC</strong><br />
<strong>1100</strong> C<br />
————————————————————————<br />
Hochvakuum-Anschluss DN 250/200/160 ISO-K<br />
Max. zulässiger Hochvakuum-Druck (p HV<br />
)<br />
bei Dauerbetrieb<br />
1·10 -2 mbar<br />
bei Kurzzeitbetrieb<br />
auf Anfrage<br />
Saugvermögen für N 2<br />
bei p HV<br />
≤ 10 -3 mbar ca. 1050 l·s -1<br />
bei p HV<br />
≥ 10 -3 mbar<br />
siehe Datenblatt<br />
Vorvakum-Anschluss<br />
DN 63 ISO-K<br />
Max. zulässiger Vorvakuum-Druck (p VV<br />
)<br />
am Vorvakuum-Anschlussflansch<br />
bei Dauerbetrieb<br />
1·10 -1 mbar<br />
bei Kurzzeitbetrieb<br />
auf Anfrage<br />
Erforderliches Vorpump-Saugvermögen<br />
entsprechend HV-Absaug- + Sperrgasrate<br />
bei p HV<br />
≤ 10 -4 mbar 7 l·s -1<br />
Nenndrehzahl 30 000 min -1<br />
Hochlaufzeit<br />
ca. 9 min<br />
Gewicht<br />
22 kg<br />
Erforderlicher Frequenzwandler<br />
TURBOTRONIK NT 20<br />
Kat.-Nr. 857 20 (230 V) ab Fabr.-Nr. Z9601221<br />
Kat.-Nr. 857 21 (120 V) ab Fabr.-Nr. Z9600321<br />
Sperrgas-Anschluss DN 10 KF oder DN 16 KF<br />
Sperrgas Umgebungsluft oder N 2<br />
Sperrgas-Bedarf 0,6 mbar·l·s -1<br />
Belüftungs-Anschluss DN 10 KF oder DN 16 KF<br />
Belüftungsgas<br />
Umgebungsluft oder<br />
spez. Belüftungsgas<br />
Kühlwasser-Anschlüsse, Schlauchtülle Ø 10 mm<br />
Kühlwasser-Zulauftemperatur 10 - 30 °C<br />
Kühlwasser-Bedarf siehe Abschnitt 2.4<br />
Turbo Guard 3<br />
Messbereich<br />
0 °C - 140 °C (± 2 °C)<br />
Schaltpunkte<br />
ab Werk programmiert<br />
Relaiskontakte<br />
24 V, max. 1 A, potentialfrei<br />
Umgebungstemperatur 0 °C - 55 °C<br />
Lagerungstemperatur -25 °C - 70 °C<br />
EMV: Störaussendung gemäß EN 50081 Teil 1<br />
EMV: Störfestigkeit gemäß EN 50082 Teil 2<br />
GA 05.128/7 - 05/2002<br />
3
Anschluss<br />
A<br />
Abb. 2 Transport<br />
E<br />
F<br />
A Hochvakuum-Anschlussflansch<br />
B Vorvakuum-Anschlussflansch<br />
C Belüftungsflansch<br />
D Sperrgasflansch<br />
E Anschluss für Wasserkühlung<br />
F Anschluss TURBOTRONIK<br />
G Sub-D-Stecker für<br />
- Meldesignal-Verarbeitung<br />
- manuelle Abfrage der Rotorlager-Temperatur<br />
C<br />
B<br />
G<br />
E<br />
D<br />
2 Anschluss<br />
Achtung<br />
Die <strong>TURBOVAC</strong> sind ohne geeignetes<br />
Zubehör nicht geeignet zum Abpumpen<br />
staubhaltiger, aggressiver oder korrosiver<br />
Medien.<br />
Beim Abpumpen von reaktiven oder partikelhaltigen<br />
Gasen müssen Pumpen<br />
der C-Version eingesetzt und mit Sperrgas<br />
betrieben werden.<br />
Beachten Sie die Hinweise zur Medienverträglichkeit<br />
am Anfang der Gebrauchsanleitung.<br />
Die Verpackung erst unmittelbar vor der Montage öffnen.<br />
Die Abdeckungen und Blindflansche an der Turbo-Molekularpumpe<br />
erst kurz vor dem Anbau an die Apparatur<br />
entfernen, damit die Montage der <strong>TURBOVAC</strong> unter<br />
saubersten Bedingungen durchgeführt werden kann.<br />
Für den Transport der schwereren Pumpen eignen sich<br />
die unteren Flächen am Basisflansch für die Aufnahme<br />
einer Transportgabel; siehe Abb. 2.<br />
Achtung<br />
Stecker und Kühlwasser-Anschlüsse beim<br />
Transport nicht beschädigen.<br />
Beim Anschließen oder Ausbauen der <strong>TURBOVAC</strong> nicht<br />
unter der Pumpe stehen.<br />
Abb. 1 <strong>TURBOVAC</strong> <strong>1100</strong> C<br />
4 GA 05.128/7 - 05/2002
Anschluss<br />
max. 100 mm<br />
max. 100 mm<br />
max. 100 mm<br />
Falsch<br />
Abb. 3 Feste Anflanschung der <strong>TURBOVAC</strong> an den Vakuumbehälter<br />
2.1 Umweltbedingungen<br />
Sollte die <strong>TURBOVAC</strong> im Bereich eines Magnetfeldes<br />
zum Einsatz kommen, darf die magnetische Induktion an<br />
der Manteloberfläche der Pumpe nicht größer sein als:<br />
B=5 mT bei radialem Eintritt und<br />
B=15 mT bei axialem Eintritt.<br />
Werden diese Werte überschritten, geeignete Abschirmmaßnahmen<br />
vorsehen.<br />
Die Standard-Ausführung ist strahlenfest bis 10 3 Gy<br />
——————————————-<br />
1 mT (milliTesla) = 10 G (Gauß)<br />
1 Gy (Gray) = 100 rad<br />
GA 05.128/7 - 05/2002<br />
2.2 Pumpe an den Vakuumbehälter<br />
anbauen<br />
Den Verpackungsflansch vom Hochvakuumflansch<br />
abnehmen. Beim Anschluss auf größte Sauberkeit achten.<br />
Vorsicht<br />
Der Hochvakuumflansch muss fest am<br />
Vakuumbehälter angebaut werden. Nicht<br />
ausreichende Befestigung kann bei<br />
Blockieren der Pumpe zum Losreißen der<br />
Pumpe oder zum Umherfliegen von Pumpen-Innenteilen<br />
führen. Die Pumpe niemals<br />
betreiben, ohne sie an den Vakuumbehälter<br />
anzuflanschen, z.B. im Tischversuch.<br />
Bei plötzlichem Blockieren der Pumpe muss das Bremsmoment<br />
von 2500 Nm in der Anlage abgefangen werden.<br />
Dazu sind bei der Befestigung des ISO-K-Hochvakuum-Flansches<br />
10 Klammerschrauben notwendig.<br />
Das Anzieh-Drehmoment der Klammerschrauben ist 35<br />
Nm bei Stahl- und 50 Nm bei Edelstahl-Schrauben.<br />
Die Bestell-Nummern der (Klammer-) Schrauben finden<br />
Sie im Leybold-Katalog.<br />
Klammerschrauben gehören nicht zum Lieferumfang<br />
der Pumpe.<br />
5
Anschluss<br />
Außen-Zentrierring<br />
einbauen<br />
Abb. 4 Verwendung von ISO-K-Flanschen<br />
In den meisten Anwendungsfällen wird die <strong>TURBOVAC</strong><br />
direkt an den Hochvakuumflansch der Apparatur angeflanscht.<br />
Aufgrund des Schmiersystems lässt sich die<br />
<strong>TURBOVAC</strong> in jeder beliebigen Lage montieren und<br />
betreiben. Eine Abstützung der Pumpe ist nicht notwendig.<br />
Die <strong>TURBOVAC</strong> ist hochgenau ausgewuchtet und wird<br />
im allgemeinen ohne Schwingungsdämpfer betrieben.<br />
Zur Entkopplung höchstempfindlicher Geräte sowie zur<br />
Verhinderung externer Schwingungsübertragung auf die<br />
<strong>TURBOVAC</strong> ist ein Spezial-Schwingungsdämpfer lieferbar,<br />
der am Hochvakuumflansch der <strong>TURBOVAC</strong> montiert<br />
wird. Die <strong>TURBOVAC</strong> <strong>1100</strong> C bei Anbau über einen<br />
Schwingungsdämpfer zusätzlich an den Füßen oder am<br />
Basisflansch befestigen.<br />
Ausführung mit Klammerflansch ISO-K<br />
Den O-Ring an den Zentrierring anlegen.<br />
Der O-Ring muss glatt und unverdreht eingelegt werden.<br />
Danach den Außenring dazulegen.<br />
Zum Anschluss der <strong>TURBOVAC</strong> kann auch ein Überwurfflansch<br />
mit Sprengring und entsprechender Dichtscheibe<br />
verwendet werden.<br />
Beim Einsatz von Ultra-Dichtscheiben ist ein Überwurfflansch<br />
erforderlich.<br />
Splitterschutz<br />
Im Hochvakuumflansch ist zum Schutz der <strong>TURBOVAC</strong><br />
ein Splitterschutz eingesetzt, der nicht entfernt werden<br />
darf.<br />
Die Pumpe nur mit dem Splitterschutz betreiben, da<br />
Fremdkörper, die über den Ansaugstutzen in die Pumpe<br />
gelangen, zu schweren Schäden in der Pumpe führen.<br />
Schäden, die durch Eindringen von Fremdkörpern in den<br />
Rotorbereich entstehen, sind von der Gewährleistung<br />
ausgeschlossen.<br />
6<br />
Das Laufgeräusch der Pumpe liegt unter 70 dB(A); es<br />
sind keine lärmdämmenden Maßnahmen erforderlich.<br />
2.3 Vorvakuum-Anschluss<br />
Eine geeignete Vorvakuumpumpe mit einer Verbindungsleitung<br />
am Vorvakuum-Anschlussflansch anschließen.<br />
Vorvakuumpumpe und Verbindungsleitung so<br />
auswählen, dass der Vorvakuumdruck und das Saugvermögen<br />
am Vorvakuum-Anschlussflansch bei allen<br />
Pumpprozessen ausreichend sind.<br />
Die Vorvakuumpumpe so anschließen, dass bei Ausschalten,<br />
Ausfall oder Stillstand der Vorvakuumpumpe<br />
die <strong>TURBOVAC</strong> nicht von der Vorvakuumseite belüftet<br />
wird. Belüften von der Vorvakuumseite kann dazu<br />
führen, dass Öldampf in die <strong>TURBOVAC</strong> gelangt.<br />
Auf ausreichende Schwingungsentkopplung der TUR-<br />
BOVAC von der Vorvakuumpumpe achten.<br />
Vorsicht<br />
Die Vorvakuumleitung muss dicht sein.<br />
Aus undichten Stellen können gefährliche<br />
Gase austreten oder die gepumpten Gase<br />
können mit Luft oder Luftfeuchtigkeit reagieren.<br />
GA 05.128/7 - 05/2002
Anschluss<br />
1,2<br />
l/min<br />
1<br />
Kühlwasser-Durchfluss<br />
0,8<br />
0,6<br />
0,4<br />
0,2<br />
0<br />
5 10 15 20 25 30 °C 35<br />
Kühlwasser-Temperatur<br />
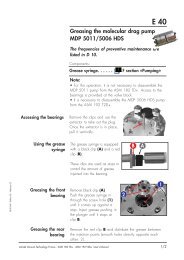
Abb. 5 Kühlwasserbedarf<br />
2.4 Kühlung anschließen<br />
Die <strong>TURBOVAC</strong> benötigt Wasserkühlung.<br />
Kühlwasser-Spezifikationen<br />
Zulauftemperatur 10 - 30 °C<br />
Zulaufdruck<br />
3 - 7 bar absolut<br />
Kühlwasserbedarf siehe Abb. 5<br />
Aussehen<br />
farblos, klar,<br />
frei von Ölen und Fetten<br />
Sinkstoffe<br />
< 250 mg/l<br />
Partikelgröße < 150 µm<br />
pH-Wert 7 - 8,5<br />
Gesamthärte (Summe der Erdalkalien) max. 20°dH<br />
(= 3,57 mmol/l)<br />
Weitere Informationen auf Anfrage.<br />
Kühlwasser anschließen<br />
Kühlwasser-Schläuche an den Schlauchtüllen anschließen<br />
und mit Schlauchschellen sichern.<br />
Wenn das Kühlwasser über ein elektrisches Ventil einund<br />
ausgeschaltet wird, das Ventil so anschließen, dass<br />
das Kühlwasser gemeinsam mit der Pumpe ein- und<br />
ausgeschaltet wird.<br />
2.5 Sperrgas und Belüftung<br />
anschließen<br />
Sperrgas<br />
Beim Abpumpen von reaktiven oder staubhaltigen<br />
Gasen muss die <strong>TURBOVAC</strong> mit Sperrgas betrieben<br />
werden. Dazu ein geeignetes Sperrgasventil mit Gasfilter<br />
am Sperrgasflansch der <strong>TURBOVAC</strong> anschließen.<br />
Das Sperrgasventil so anschließen, dass es mit dem<br />
Start der Pumpe öffnet und frühestens mit dem Ausschalten<br />
der Pumpe schließt.<br />
Zum Anschluss geeignet sind alle Gase,<br />
• die keine Korrosion oder Lochfraß an Aluminium und<br />
Stahl verursachen und<br />
• die auch im Zusammenspiel mit Prozessablagerungen<br />
in der Pumpe nicht zu Korrosion oder zu Verklebungen<br />
führen.<br />
Wir empfehlen für die Belüftung und das Sperrgas inerte<br />
Gase wie Stickstoff oder Argon. Die Temperatur sollte<br />
zwischen 5 °C und 80 °C liegen, die max. Feuchte soll<br />
10 ppm nicht überschreiten.<br />
In Einzelfällen nach Rücksprache kann auch trockene,<br />
gefilterte, ölfreie Luft oder gefilterte Umgebungsluft verwendet<br />
werden. (Filtermaschenweite < 1µm)<br />
Die Filter nach angemessener Zeit wechseln, mindestens<br />
jährlich.<br />
Zum Belüftungsweg siehe Abschnitt 3.4.<br />
GA 05.128/7 - 05/2002<br />
7
Anschluss<br />
Anschluss<br />
TURBO-<br />
TRONIK<br />
Operating<br />
Warning<br />
Failure<br />
00123.45h<br />
1<br />
2<br />
3<br />
4<br />
5<br />
6<br />
7<br />
8<br />
9<br />
10<br />
11<br />
12<br />
13<br />
14<br />
15<br />
X1<br />
grüne LED<br />
gelbe LED<br />
rote LED<br />
Betriebsstundenzähler<br />
Abb. 6 Rotorlager-Überwachung Turbo Guard 3<br />
Pin-Belegung von X1<br />
1 nicht belegt<br />
2 Schnittstelle<br />
3 Schnittstelle<br />
4 Schnittstelle<br />
5 Masse<br />
6<br />
Relaiskontakt grüne LED<br />
7 Kontakt<br />
8<br />
Relaiskontakt gelbe LED<br />
geschlossen,<br />
9 wenn LED<br />
10 aktiv<br />
Relaiskontakt rote LED<br />
11<br />
12 Pt 100 extern Pin 12 und 13 sind<br />
13 Pt 100 Eingang im Stecker gebrückt<br />
14 Pt 100 extern Pin 14 und 15 sind<br />
15 Masse im Stecker gebrückt<br />
2.6 Frequenzwandler TUR-<br />
BOTRONIK anschließen<br />
Zur erforderlichen TURBOTRONIK und zu den Verbindungsleitungen<br />
siehe Abschnitte 1.2 und 1.3. Die Verbindungsleitung<br />
darf bis zu 100 m lang sein; dazu erbitten<br />
wir Ihre Anfrage.<br />
<strong>TURBOVAC</strong> mit der Verbindungsleitung an die TUR-<br />
BOTRONIK anschließen; siehe dazu die Gebrauchsanleitung<br />
zur TURBOTRONIK NT 20 (GA 05.208).<br />
Vorsicht<br />
Die Pumpe nur mit dem passenden Frequenzwandler<br />
und einer geeigneten Verbindungsleitung<br />
betreiben.<br />
An der Verbindungsleitung zwischen Frequenzwandler<br />
und Pumpe liegen Spannungen<br />
bis 400 V an, an Flanschheizungen<br />
oder an Ventilen oder deren Zuleitungen<br />
liegt Netzspannung an.<br />
Leitungen so verlegen, dass sie nicht<br />
beschädigt werden können.<br />
Die Schutzart der Verbindungen ist IP 40. Pumpe, Frequenzwandler<br />
und Verbindungen keinem Tropfwasser<br />
aussetzen.<br />
2.7 Rotorlager-Überwachung<br />
anschließen<br />
An die Relaiskontakte kann eine Fernüberwachung<br />
angeschlossen werden.<br />
Zum Anschluss der Schnittstelle oder eines externen<br />
Messgeräts an die Pt-100-Ausgänge erbitten wir Ihre<br />
Anfrage.<br />
Achtung<br />
Der mitgelieferte Gegenstecker zu X1 mit<br />
den Brücken an den Pins 12-13 und 14-15<br />
muss gesteckt sein, damit der Turbo Guard<br />
funktioniert.<br />
8 GA 05.128/7 - 05/2002
Betrieb<br />
10 3<br />
mbar<br />
10 2<br />
Startdruck<br />
10 1<br />
Sv = Saugvermögen der Vorpumpe (m 3·h -1 )<br />
V = Behältervolumen (m 3 )<br />
Abb. 7 Startdruck-Bestimmung einer <strong>TURBOVAC</strong><br />
beim Evakuieren großer Volumina<br />
10 0<br />
0 25 50 75 100<br />
S v<br />
/ V<br />
125<br />
-1<br />
h<br />
3 Betrieb<br />
3.1 Einschalten<br />
Große Vakuumbehälter müssen zunächst mit der Vorvakuumpumpe<br />
oder dem Vorvakuum-Pumpsystem evakuiert<br />
werden.<br />
Bei kleineren Vakuumbehältern kann der Startdruck der<br />
<strong>TURBOVAC</strong> der Abb. 7 entnommen werden.<br />
Wenn S v<br />
/ V > 100 [h -1 ] ist, können <strong>TURBOVAC</strong> und Vorvakuumpumpe<br />
gleichzeitig gestartet werden.<br />
Dann die Kühlung und das Sperrgas einschalten und die<br />
<strong>TURBOVAC</strong> an der TURBOTRONIK einschalten.<br />
Siehe auch Gebrauchsanleitung zur TURBOTRONIK.<br />
Nach dem Einschalten der Pumpe dauert es etwa 2<br />
Minuten bis die LEDs des Turbo Guard leuchten.<br />
3.2 Betrieb<br />
Während des Betriebes plötzliche Lageänderungen der<br />
Pumpe, erhebliche Fremdschwingungen und Stöße an<br />
die Pumpe vermeiden.<br />
Anzeigen und Informationen der TURBOTRONIK und<br />
des Turbo Guard beachten. Die Temperatur der Pumpenlager<br />
ist auch ein Maß für ihren Verschleiß.<br />
LEDs am Turbo Guard<br />
LED Temperatur der Maßnahmen<br />
Pumpenlager<br />
grün normal —<br />
Operating (0 - 80 °C)<br />
gelb auffällig Die Pumpe darf weiter<br />
Warning (80 - 95 °C) betrieben werden.<br />
Kühlwasser-Versorgung<br />
und Prozessdrücke<br />
prüfen, ggf. ändern.<br />
rot mindestens Evtl. die Temperatur der<br />
Failure 1 Stunde Pumpenlager messen.<br />
kritischer Die Pumpe so bald wie<br />
Betrieb möglich austauschen<br />
(> 95 °C) und zum Leybold-Service<br />
schicken. Die rote LED<br />
ist nicht zurücksetzbar.<br />
GA 05.128/7 - 05/2002<br />
9
Betrieb<br />
mbar<br />
10 3<br />
10 2<br />
Vorvakuumdruck<br />
10<br />
1<br />
10 -1<br />
10 -2<br />
0 5 10 15 20 25 30 35<br />
s<br />
40<br />
Zeit<br />
Abb. 8 Druckanstiegskurve<br />
3.3 Abschalten<br />
Die <strong>TURBOVAC</strong> an der TURBOTRONIK abschalten.<br />
Einzelheiten siehe Gebrauchsanleitung zur TUR-<br />
BOTRONIK.<br />
Die Vorvakuumpumpe abschalten.<br />
Die <strong>TURBOVAC</strong> vor dem Stillstand belüften und das<br />
Sperrgas ausschalten; siehe Abschnitt 3.4.<br />
Unmittelbar nach dem Abschalten der <strong>TURBOVAC</strong> die<br />
Kühlwasserzufuhr absperren, um Kondensat-Bildung in<br />
der Pumpe zu vermeiden.<br />
3.4 Belüften<br />
Zu geeigneten Gasen siehe Abschnitt 2. 5.<br />
Belüftungsweg<br />
Man kann die Turbo-Molekularpumpe über 3 verschiedene<br />
Wege belüften.<br />
Bei Prozessen, bei denen Sperrgas erforderlich ist,<br />
muss die Pumpe beim Abschalten über das Sperrgasund<br />
Belüftungsventil belüftet werden.<br />
Bei einer zusätzlichen Belüftung der Vakuumkammer<br />
muss vor dem Öffnen des Kammerventils die Belüftungsfunktion<br />
des Sperrgas- und Belüftungsventils<br />
geöffnet sein. Dadurch ist sichergestellt, dass im Bereich<br />
der Kugellager ein höherer Druck herrscht als im übrigen<br />
Vakuumbereich. Somit wird vermieden, dass Partikel,<br />
Stäube oder aggressive Gase durch die Lager in den<br />
noch nicht belüfteten Motorraum der Pumpe gedrückt<br />
werden.<br />
Eine schonende Belüftung der Pumpe ist von der Hochvakuumseite<br />
möglich, da hier die geringsten Lagerkräfte<br />
auftreten. Dabei darf sich kein freier Gasstrahl auf den<br />
Rotor bilden, um zusätzliche Kräfte auf den Rotor zu vermeiden.<br />
Bei einer Belüftung durch den Vorvakuumanschluss<br />
der Pumpe dürfen weder Öl noch Partikel aus dem Vorvakuumbereich<br />
mit dem Gasstrom in die Pumpe transportiert<br />
werden.<br />
Druckanstiegsgeschwindigkeit<br />
Jede Turbo-Molekularpumpe kann bei voller Drehzahl<br />
belüftet werden.<br />
Der Druck darf nicht schneller ansteigen als in der<br />
Druckanstiegskurve festgelegt.<br />
Die Pumpe muss deutlich langsamer belüftet werden,<br />
wenn die Gefahr besteht, dass Partikel aus dem Prozess<br />
in die Pumpe gelangen können. Es dürfen beim Belüften<br />
nur laminare Strömungen in der Vakuumkammer und in<br />
der Turbo-Molekularpumpe auftreten.<br />
Die Druckanstiegsgeschwindigkeit hat beim Belüften der<br />
laufenden Pumpe den größten Einfluss auf die Beanspruchung<br />
des Rotor-Stator-Paketes und der Lager. Je<br />
10 GA 05.128/7 - 05/2002
Betrieb / Wartung<br />
langsamer die Pumpe belüftet wird, desto höher ist die<br />
Lagerlebensdauer.<br />
Die Pumpe darf nicht über Umgebungsdruck belüftet<br />
werden.<br />
3.5 Pumpe aus der Anlage<br />
ausbauen<br />
Pumpe abschalten und belüften gemäß den Abschnitten<br />
3.3 und 3.4.<br />
<strong>TURBOVAC</strong>s, die in kritischen Prozessen eingesetzt<br />
waren, können mit gefährlichen Prozessgasen oder<br />
Belägen verschmutzt sein.<br />
Wenn die Pumpe vorher reaktive oder gesundheitsschädliche<br />
Gase gefördert hat, das Sperrgas beim Ausbau<br />
so lange wie möglich weiterfließen lassen.<br />
Vorsicht<br />
Wenn die Pumpe vorher gefährliche Gase<br />
gefördert hat, vor dem Öffnen das Ansaugoder<br />
Auspuff-Anschlusses entsprechende<br />
Vorsichtsmaßnahmen treffen.<br />
Falls nötig, Handschuhe, Atemschutz oder<br />
Schutzkleidung tragen und unter einem<br />
Abzug arbeiten.<br />
<strong>TURBOVAC</strong> aus der Anlage ausbauen.<br />
Bei den <strong>TURBOVAC</strong> mit einem „C“ in der Typenbezeichnung<br />
gehört ein Verpackungs-Set zum Lieferumfang.<br />
Dieses Verpackungs-Set nach dem Ausbau benutzen.<br />
Fehler beim dichten Verpacken einer <strong>TURBOVAC</strong> führen<br />
zum Verlust der Garantie.<br />
Die Pumpe so verpacken, dass sie beim Transport nicht<br />
beschädigt wird, und dass keine Schadstoffe aus der<br />
Verpackung austreten können. Besonders die Flansche,<br />
die Kühlwasser-Anschlusstüllen und die Stromdurchführung<br />
schützen.<br />
Falls Sie eine Pumpe an Leybold schicken, beachten Sie<br />
Abschnitt 4.1.<br />
4 Wartung<br />
Nach spätestens 10 000 Betriebsstunden muss ein<br />
Standard-Lagerwechsel durchgeführt werden. Weiter<br />
empfehlen wir, je nach thermischer Belastung des<br />
Rotors, jeweils nach 45 000 bis 100 000 Betriebsstunden<br />
die Rotoreinheit austauschen zu lassen. Das kann<br />
nur durch den Leybold-Service geschehen. Dazu erbitten<br />
wir Ihre Anfrage.<br />
Bei Anwendung von Sperrgasventilen<br />
Abhängig vom Verschmutzungsgrad des Sperrgases<br />
setzt sich der Filter zu und muss ausgetauscht werden<br />
(erfahrungsgemäß nach 1 bis 6 Monaten).<br />
Achtung<br />
Die Pumpe darf nur von Personen geöffnet<br />
werden, die dazu von Leybold autorisiert<br />
sind.<br />
4.1 Service bei LEYBOLD<br />
Falls Sie eine Pumpe an LEYBOLD schicken, geben Sie<br />
an, ob die Pumpe frei von gesundheitsgefährdenden<br />
Schadstoffen ist oder ob sie kontaminiert ist. Wenn sie<br />
kontaminiert ist, geben Sie auch die Art der Gefährdung<br />
an. Dazu müssen Sie ein von uns vorbereitetes Formular<br />
benutzen, das wir Ihnen auf Anfrage zusenden.<br />
Eine Kopie dieses Formulars ist am Ende der Gebrauchsanleitung<br />
abgedruckt: “Erklärung über Kontaminierung<br />
von Vakuumgeräten und -komponenten”.<br />
Befestigen Sie das Formular an der Pumpe oder legen<br />
Sie es der Pumpe bei. Das Formular nicht mit der<br />
Pumpe in den PE-Beutel packen.<br />
Diese Erklärung über Kontaminierung ist erforderlich zur<br />
Erfüllung gesetzlicher Auflagen und zum Schutz unserer<br />
Mitarbeiter.<br />
Pumpen ohne Erklärung über Kontaminierung muss<br />
LEYBOLD an den Absender zurückschicken.<br />
GA 05.128/7 - 05/2002<br />
11
Fehlersuche<br />
5 Fehlersuche<br />
Vorsicht<br />
Bei angeschlossener Verbindungsleitung<br />
zur <strong>TURBOVAC</strong> sind die Ausgänge des<br />
Frequenzwandlers TURBOTRONIK nicht<br />
potentialfrei.<br />
Bevor Sie mit einer Fehlersuche beginnen, sollten Sie<br />
folgende einfache Dinge prüfen:<br />
Ist die <strong>TURBOVAC</strong> mit elektrischer Energie versorgt?<br />
Sind die Anschlüsse:<br />
-Netzleitung zum Frequenzwandler,<br />
-Verbindungsleitung Frequenzwandler/Netz in Ordnung?<br />
Funktionieren Kühlwasser- oder Sperrgasströmungswächter<br />
?<br />
Strömungswächter zur Prüfung kurz überbrücken und<br />
die <strong>TURBOVAC</strong> starten.<br />
Ist der Vorvakuumdruck ausreichend?<br />
Ist der Vakuumbehälter dicht?<br />
Beachten Sie auch die Fehlersuche in der TURBOTRO-<br />
NIK-Gebrauchsanleitung.<br />
Störung<br />
Mögliche Ursache<br />
Beseitigung<br />
<strong>TURBOVAC</strong> startet nicht.<br />
Stecker oder Verbindungsleitung<br />
Verbindungsleitungen richtig einstecken,<br />
nicht gesteckt, lose oder defekt.<br />
ggf. ersetzen.<br />
Pumpe festgelaufen.<br />
Pumpe ersetzen.<br />
Frequenzwandler passt nicht zur Pumpe oder Pumpe mit passendem Frequenzwandler betreiben:<br />
Pumpen-Kodierung am Frequenzwandler ist falsch. NT 20, Kat.-Nr. 857 20,<br />
(siehe Gebrauchsanleitung zum Frequenzwandler) ab Fabrikations-Nr. Z96 01221 oder<br />
NT 20, Kat.-Nr. 857 21,<br />
ab Fabrikations-Nr. Z96 00321<br />
<strong>TURBOVAC</strong> verursacht<br />
starke Laufgeräusche und<br />
Vibrationen.<br />
Massen der Apparatur ändern oder Schwingungs-<br />
dämpfer zur Schwingungsentkopplung einbauen.<br />
Unwucht am Rotor.<br />
Lager defekt.<br />
Pumpe läuft im Eigenfrequenzbereich<br />
der Apparatur.<br />
Auswuchten (nur durch Leybold-Service).<br />
Lagerwechsel erforderlich.<br />
(nur durch Leybold-Service).<br />
<strong>TURBOVAC</strong> erreicht keinen<br />
Enddruck.<br />
Messgerät defekt.<br />
Messröhre verschmutzt.<br />
Undichtheit an Apparatur, Leitungen oder Pumpe.<br />
Pumpe verschmutzt.<br />
Vorvakuumpumpsystem mit zu geringem<br />
Saugvermögen oder zu hohem Enddruck.<br />
Undichtheit an der Stromdurchführung.<br />
<strong>TURBOVAC</strong> hat die falsche Drehrichtung.<br />
Messgerät kontrollieren.<br />
Messröhre reinigen oder ersetzen.<br />
Lecksuche.<br />
Pumpe reinigen lassen. (nur durch Leybold-Service).<br />
Enddruck der Vorvakuumpumpe prüfen;<br />
ggf. größeres Vorvakuumpumpsystem anbauen.<br />
Lecksuche / Reparatur. (nur durch Leybold-Service).<br />
Verbindungsleitung prüfen; ggf. die<br />
Leitungsbelegung ändern.<br />
<strong>TURBOVAC</strong> wird zu heiß.<br />
(Fehlermeldung an der<br />
TURBOTRONIK oder<br />
gelbe oder rote LED am<br />
Turbo Guard leuchten;<br />
siehe Abschnitt 3.2)<br />
Vorvakuumdruck zu hoch.<br />
Vorvakuumpumpe prüfen; ggf.<br />
größere Vorvakuumpumpe einsetzen.<br />
Gasmenge zu groß / Leck in der Anlage.<br />
Leck abdichten; ggf. größere Vovakuumpumpe<br />
einsetzen.<br />
Umgebungstemperatur zu hoch. —<br />
Kühlwasser fehlt oder ist ungenügend.<br />
Für ausreichende Kühlwasser-Versorgung sorgen.<br />
Lager defekt.<br />
Pumpe reparieren lassen<br />
(nur durch Leybold-Service).<br />
Am Turbo Guard leuchtet<br />
nach Erreichen des Normalbetriebs<br />
keine LED.<br />
Der mitgelieferte Gegenstecker zu X1 wurde Mitgelieferten Gegenstecker oder Stecker mit<br />
nicht aufgesteckt.<br />
Brücken 12-13, 14-15 aufstecken.<br />
Externes Messgerät ist angeschlossen. —<br />
12<br />
GA 05.128/7 - 05/2002
EG-Herstellererklärung<br />
im Sinne der Maschinenrichtlinie 89/392/EWG, Anhang IIb<br />
Hiermit erklären wir, die Leybold Vakuum GmbH, dass<br />
die Inbetriebnahme der nachfolgend bezeichneten<br />
unvollständigen Maschine solange untersagt ist, bis festgestellt<br />
wurde, dass die Maschine, in die diese unvollständige<br />
Maschine eingebaut werden soll, den Bestimmungen<br />
der EG-Maschinenrichtlinie entspricht.<br />
Gleichzeitig bestätigen wir Konformität zur Niederspannungsrichtlinie<br />
73/23/EWG.<br />
Bei Verwendung des entsprechenden Leybold-Zubehörs,<br />
z.B. Verbindungsleitungen oder Flanschheizungen,<br />
und bei Betrieb der Pumpe mit dem vorgesehenen<br />
Leybold-Frequenzwandler werden die Schutzziele der<br />
EMV-Richtlinie eingehalten.<br />
Angewandte harmonisierte Normen:<br />
• EN 292 Teil 1 und Teil 2 Nov. 1991<br />
• EN 1012 Teil 2 1996<br />
• EN 60 204 1993<br />
Angewandte nationale Normen und technische<br />
Spezifikationen:<br />
• DIN 31 001 April 1983<br />
• DIN ISO 1940 Dez. 1993<br />
Bezeichnung: Turbo-Molekularpumpe<br />
Typ: <strong>TURBOVAC</strong> <strong>1100</strong> C<br />
Katalog-Nummern: 894 80/83/84<br />
LV.GT.0134.01.10.97<br />
Köln, den 20.10. 1997<br />
Köln, den 20.10. 1997<br />
—————————————————————<br />
Dr. Mattern-Klosson, Geschäftsbereichsleiterin<br />
Turbo-Molekularpumpen<br />
—————————————————————<br />
Hölzer, Konstruktionsleiter<br />
Turbo-Molekularpumpen<br />
GA 05.128/7 - 05/2002 13
Description<br />
Contents<br />
Page<br />
1 Description . . . . . . . . . . . . . . . . . . . . . . . . . . 14<br />
1.1 Standard equipment . . . . . . . . . . . . . . . . . . . 15<br />
1.2 Order data . . . . . . . . . . . . . . . . . . . . . . . . . . 15<br />
1.3 Technical data . . . . . . . . . . . . . . . . . . . . . . . 15<br />
2 Connections . . . . . . . . . . . . . . . . . . . . . . . . . 16<br />
2.1 Operating environment . . . . . . . . . . . . . . . . . 17<br />
2.2 Connecting the pump to<br />
the vacuum chamber . . . . . . . . . . . . . . . . . . 17<br />
2.3 Making the forevacuum connection . . . . . . . . 18<br />
2.4 Connecting the cooling . . . . . . . . . . . . . . . . . 19<br />
2.5 Connecting the purge gas and<br />
the airing device . . . . . . . . . . . . . . . . . . . . . . 19<br />
2.6 Connecting the TURBOTRONIK . . . . . . . . . . . 20<br />
2.7 Connecting the rotor bearing monitoring unit . 20<br />
3 Operation . . . . . . . . . . . . . . . . . . . . . . . . . . . 21<br />
3.1 Switching on . . . . . . . . . . . . . . . . . . . . . . . . . 21<br />
3.2 Operation . . . . . . . . . . . . . . . . . . . . . . . . . . . 21<br />
3.3 Switching off . . . . . . . . . . . . . . . . . . . . . . . . . 22<br />
3.4 Venting . . . . . . . . . . . . . . . . . . . . . . . . . . . . . 22<br />
3.5 Removing the pump from the system . . . . . . 22<br />
4 Maintenance . . . . . . . . . . . . . . . . . . . . . . . . . 23<br />
4.1 Service by Leybold . . . . . . . . . . . . . . . . . . . . 23<br />
5 Troubleshooting . . . . . . . . . . . . . . . . . . . . . . 24<br />
EC Manufacturer’s Declaration . . . . . . . . . . . 25<br />
Die deutsche Gebrauchsanleitung beginnt<br />
auf Seite 2<br />
Conventions used in these instructions<br />
Illustrations<br />
The references to diagrams, e.g. (2/10), consist of the figure<br />
number and the item number, in that order.<br />
Warning<br />
This indicates procedures and operations which must be strictly<br />
observed to prevent hazards to persons.<br />
Caution<br />
This indicates procedures and operations which must be strictly<br />
observed to prevent damage to or destruction of the unit.<br />
We reserve the right to change at any time the design and data<br />
given in these operating instructions.<br />
The illustrations are approximate.<br />
1 Description<br />
The <strong>TURBOVAC</strong> <strong>1100</strong> C is a turbomolecular pump featuring<br />
grease-lubricated bearings. It is engineered to<br />
pump vacuum chambers down to pressures in the highvacuum<br />
range. A TURBOTRONIK frequency converter<br />
and a forevacuum pump are required for the operation of<br />
the <strong>TURBOVAC</strong>.<br />
These units are not suitable for operation without a forevacuum<br />
pump.<br />
The <strong>TURBOVAC</strong> <strong>1100</strong> C is equipped with a type Turbo<br />
Guard 3 rotor bearing monitoring device featuring an<br />
operating hours counter.<br />
Compatibility with pumped media<br />
Turbomolecular pumps are not suitable for pumping<br />
either gases which contain dust particles or liquids.<br />
Turbomolecular pumps without purge gas are suitable<br />
only for moving air or inert gases. They are not suitable<br />
for pumping reactive gases or gases which contain particles;<br />
in this case purge gas operation is required.<br />
<strong>TURBOVAC</strong> versions identified with a “C” in the model<br />
number are equipped with a purge gas feature, it protects<br />
only the bearing area and the motor in the TURBO-<br />
VAC.<br />
Some media (such as aluminum trichloride) can sublime<br />
inside the pump and form deposits. Thick deposits reduce<br />
the play between moving parts to the point that the<br />
pump could seize. In some processes deposits can be<br />
prevented by heating the pump. Please consult with us<br />
in case such problems arise.<br />
Corrosive gases (such as chlorine) can destroy the<br />
rotors.<br />
During operation the pressure inside the <strong>TURBOVAC</strong> is<br />
so low that there is no danger of ignition (at pressures<br />
below about 100 mbar, 75 Torr). A hazardous condition<br />
will be created if flammable mixtures enter the hot pump<br />
at pressures above 100 mbar (75 Torr). During operation<br />
the pump can reach temperatures as high as 120°C<br />
(248 °F). Sparks could occur in case of damage to the<br />
pump and these could ignite explosive mixtures.<br />
We would be glad to consult with you as regards the<br />
media which can safely be handled with this unit.<br />
Warning<br />
Never expose any parts of the body to the<br />
vacuum.<br />
14 GA 05.128/7 - 05/2002
Description<br />
1.1 Standard equipment<br />
The <strong>TURBOVAC</strong> is shipped in a sealed PE bag which<br />
also contains a desiccant.<br />
The maximum effective life of the desiccant is one year.<br />
Part of the standard equipment for the high-vacuum port<br />
are<br />
- Splinter guard,<br />
- Centering ring with FPM sealing ring; outer ring.<br />
and for the forevacuum port<br />
- Centering ring with O-ring and clamping ring.<br />
Both the purge gas port and the airing port are blanked<br />
off for shipping.<br />
The electronic frequency converter and the connector<br />
cables required for operation are not included as<br />
standard equipment with the pump.<br />
——————————<br />
PE = Polyethylene<br />
FPM = Fluoroelastomer, resistant to temperatures of up to<br />
150°C (300 °F)<br />
1.2 Order data<br />
<strong>TURBOVAC</strong> <strong>1100</strong> C<br />
Part No.<br />
with high-vacuum port DN 250 ISO-K 894 80<br />
DN 200 ISO-K 894 83<br />
DN 160 ISO-K 894 84<br />
Electronic frequency converter<br />
TURBOTRONIK NT 20<br />
230 V 857 20<br />
120 V 857 21<br />
Connection cable <strong>TURBOVAC</strong> - TURBOTRONIK<br />
3 m long 857 65<br />
5 m long 857 66<br />
10 m long 857 67<br />
20 m long 857 68<br />
Purge gas filter with O-ring 200 18 515<br />
1.3 Technical data<br />
<strong>TURBOVAC</strong><br />
<strong>1100</strong> C<br />
————————————————————————<br />
High-vacuum connection DN 250/200/160 ISO-K<br />
Max. permissible high-vacuum pressure (p HV<br />
)<br />
During continuous-duty operation 1·10 -2 mbar<br />
In intermittent operation<br />
on inquiry<br />
Pumping speed for N 2<br />
At p HV<br />
≤ 10 -3 mbar<br />
approx. 1050 l/sec<br />
At p HV<br />
≥ 10 -3 mbar<br />
see data sheet<br />
Forevacuum connection<br />
DN 63 ISO-K<br />
Max. permissible forevacuum pressure (p FV<br />
)<br />
at the forevacuum connector flange<br />
During continuous-duty operation 1·10 -1 mbar<br />
In intermittent operation<br />
on inquiry<br />
Required pumping speed at forevacuum pump<br />
corresponding to high-vacuum extraction<br />
+ purging gas rate<br />
at p HV<br />
≤ 10 -4 mbar 7 l/sec<br />
Nominal rotation speed<br />
30,000 r.p.m.<br />
Run-up period<br />
approx. 9 min.<br />
Weight<br />
22 kg<br />
Required frequency converter<br />
TURBOTRONIK NT 20<br />
Ref. No. 857 20 (230 V) as of serial No. Z9601221<br />
Ref. No. 857 21 (120 V) as of serial No. Z9600321<br />
Purging gas connection<br />
10 or 16 mm KF<br />
Purging gas Ambient air or N 2<br />
Purging gas requirement 0.6 mbar·l·sec -1<br />
Vent connection<br />
DN 10 or 16 KF<br />
Venting gas<br />
Ambient air or<br />
special venting gas<br />
Cooling water connections, hose nipple 10 mm diam.<br />
Cooling water inlet temperature 10 to 30 °C<br />
Cooling water requirements See section 2.4<br />
Turbo Guard 3<br />
Measuring range<br />
0 °C - 140 °C (± 2 °C)<br />
Switching points<br />
factory set<br />
Relay contacts<br />
24 V, max. 1 A, floating<br />
Ambient temperature 0 °C - 55 °C<br />
Storage temperature -25 °C - 70 °C<br />
EMC: Generic emission acc. to EN 50081 Part 1<br />
EMC: Generic immunity acc. to EN 50082 Part 2<br />
GA 05.128/7 - 05/2002<br />
15
Connections<br />
A<br />
Fig. 2 Transport<br />
E<br />
F<br />
A High-vacuum connector flange<br />
B Forevacuum connector flange<br />
C Airing flange<br />
D Purge gas flange<br />
E Connection for water cooling<br />
F Connection for TURBOTRONIK<br />
G Sub-D socket for<br />
- Processing status signals<br />
- Manual query of the rotor bearing temperature<br />
C<br />
B<br />
G<br />
E<br />
D<br />
2 Connections<br />
Caution<br />
Unless appropriate accessories and attachments<br />
are used, the <strong>TURBOVAC</strong> is not<br />
suitable for aggressive or corrosive media,<br />
or those containing dust. When handling<br />
reactive media or media which contain particles<br />
the C version pump must be operated<br />
with purge gas.<br />
Observe the information on media compatibility,<br />
to be found at the beginning of these<br />
operating instructions.<br />
Do not open the packaging until immediately prior to<br />
installation.<br />
Remove the covers and the blank flanges at the turbomolecular<br />
pump only just before installing, to ensure that<br />
the <strong>TURBOVAC</strong> is installed under the cleanest possible<br />
conditions.<br />
When moving the heavier pumps, the lower surfaces on<br />
the base flange are suitable for accepting a lifting fork;<br />
see Fig. 2.<br />
Caution<br />
Take care not to damage the plugs and<br />
coolant connections during movement.<br />
Do not stand below the <strong>TURBOVAC</strong> pump while it is being<br />
connected to or detached from the system.<br />
Fig. 1 <strong>TURBOVAC</strong> <strong>1100</strong> C<br />
16 GA 05.128/7 - 05/2002
Connections<br />
max. 100 mm<br />
(4 inch)<br />
max. 100 mm (4 inch)<br />
max. 100 mm<br />
(4 inch)<br />
Incorrect<br />
Fig. 3 Permanent flanging of the <strong>TURBOVAC</strong> to the vacuum chamber<br />
2.1 Operating environment<br />
When using the <strong>TURBOVAC</strong> inside a magnetic field, the<br />
magnetic induction at the pump housing surface may not<br />
exceed the following values:<br />
B = 5 mT in case of radial impingement<br />
B = 15 mT in case of axial impingement<br />
Provide suitable shielding measures if these values are<br />
exceeded.<br />
The standard version is resistant to radiation at levels up<br />
to 10 3 Gy.<br />
——————————————-<br />
1 mT (milliTesla) = 10 G (Gauss)<br />
1 Gy (Gray) = 100 rad<br />
GA 05.128/7 - 05/2002<br />
2.2 Connecting the pump to<br />
the vacuum chamber<br />
Remove the packing flange from the high-vacuum<br />
flange. Pay attention to maintaining maximum cleanliness<br />
during connection work.<br />
Warning<br />
The high-vacuum flange must be securely<br />
attached to the vacuum chamber . If the<br />
pump were to become blocked, insufficient<br />
attachment could cause the pump to break<br />
away from its mount or allow internal pump<br />
parts to be discharged. Never operate the<br />
pump (in bench tests, for instance) without<br />
its being flanged to the vacuum chamber.<br />
If the pump should suddenly seize, the ensuing deceleration<br />
torque of 2500 Nm will have to be absorbed by the<br />
system. To accomplish this, 10 clamping bolts are required<br />
when securing an ISO-K type high-vacuum flange.<br />
Clamping bolts made of steel must be torqued down to<br />
35 Nm, those made of stainless steel to 50 Nm.<br />
You will find the order numbers for the (clamping) bolts<br />
in the Leybold Catalog.<br />
The clamping bolts are not included as standard equipment<br />
with the pump.<br />
17
Connections<br />
Install outer<br />
centering ring<br />
Fig. 4 Using ISO-K flanges<br />
In most applications the <strong>TURBOVAC</strong> will be flanged direct<br />
to the high-vacuum flange for the system. The design of<br />
the lubricating system makes it possible to mount and<br />
run the <strong>TURBOVAC</strong> in any desired attitude. It is not<br />
necessary to support the pump.<br />
The <strong>TURBOVAC</strong> is precision balanced and is generally<br />
operated without a vibration damper. A special-design<br />
vibration damper is available for mounting at the TUR-<br />
BOVAC high-vacuum flange to decouple extremely sensitive<br />
equipment and to prevent external vibrations from<br />
being transferred to the <strong>TURBOVAC</strong>. If the <strong>TURBOVAC</strong><br />
<strong>1100</strong> C is flanged via a vibration damper secure it in<br />
addition at the foot or the base flange.<br />
Design with ISO-K clamp flange<br />
Fit the O-ring at the centering ring.<br />
The O-ring should be flat and even; it must not be<br />
twisted. Then add the outer ring.<br />
A collar flange with retaining ring and suitable sealing<br />
washer can also be used to connect the <strong>TURBOVAC</strong>.<br />
A collar flange is required when using ultra-high-vacuum<br />
sealing washers.<br />
Splinter guard<br />
A splinter guard is installed in the high-vacuum flange to<br />
protect the <strong>TURBOVAC</strong>. Do not remove this splinter<br />
guard.<br />
Operate the pump only with this splinter guard in place<br />
as foreign objects passing through the intake port and<br />
into the pump can cause serious damage. Damage<br />
caused by foreign objects in the rotor section is excluded<br />
from the guarantee.<br />
The pump running noise is below 70 dB(A); no noiseinsulating<br />
measures are required.<br />
2.3 Making the forevacuum<br />
connection<br />
Use a connector line to attach a suitable forevacuum<br />
pump at the forevacuum connection flange. Select the<br />
forevacuum pump and the connector line so that the<br />
forevacuum pressure and the pumping speed at the<br />
forevacuum connector flange are sufficient to serve all<br />
pumping processes.<br />
Connect the forevacuum pump in such a way that the<br />
<strong>TURBOVAC</strong> will not be vented from the forevacuum side<br />
in case it is switched off, fails or comes to as standstill.<br />
Venting from the forevacuum side can result in oil vapors<br />
entering the <strong>TURBOVAC</strong>.<br />
Be sure that there is sufficient vibration decoupling between<br />
the <strong>TURBOVAC</strong> and the forevacuum pump.<br />
Warning<br />
The forevacuum line must be tight.<br />
Hazardous gases could escape from leaks<br />
or the gases being pumped could react with<br />
air or humidity.<br />
18 GA 05.128/7 - 05/2002
Connections<br />
1,2<br />
l/min<br />
1<br />
Cooling water flow<br />
0,8<br />
0,6<br />
0,4<br />
0,2<br />
0<br />
5 10 15 20 25 30 °C 35<br />
Cooling water temperature<br />
Fig. 5 Cooling water consumption<br />
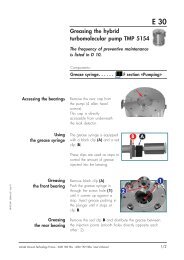
2.4 Connecting the cooling<br />
The <strong>TURBOVAC</strong> must be cooled with water.<br />
Cooling water specifications<br />
Inlet temperature 10 - 30 °C<br />
Inlet pressure<br />
3 to 7 bar absolute<br />
Cooling water requirement See Fig. 5<br />
Appearance<br />
Colorless, clear,<br />
free of oils and greases<br />
Sediments<br />
< 250 mg/l<br />
Particle size < 150 µm<br />
pH value 7 to 8.5<br />
Overall hardness (total alkaline earths)<br />
max. 20 ° German hardness scale<br />
(= 3.57 mmol/l)<br />
Further information on request.<br />
Connecting the cooling water<br />
Connect the coolant hoses to the hose nipples and<br />
secure with hose clamps.<br />
If the coolant flow is turned on and off by means of a<br />
solenoid valve, make the electrical connection in such a<br />
way that coolant flow will be started and stopped<br />
together with the pump itself.<br />
2.5 Connecting the purge gas<br />
and the airing device<br />
Purging gas<br />
When evacuating reactive gases or gases containing<br />
dust, the <strong>TURBOVAC</strong> will have to be used with purging<br />
gas. To do so, a suitable purging gas valve with a gas filter<br />
will have to be installed at the purging gas flange on<br />
the <strong>TURBOVAC</strong>.<br />
Connect the purging gas valve in such a way that it will<br />
open when the pump is started and will close, at the very<br />
earliest, when the pump is switched off.<br />
Suited are all gases,<br />
• which will not cause corrosion or pitting in aluminium<br />
and steel and<br />
• which in connection with process deposits in the<br />
pump will not cause corrosion or sticking.<br />
For venting and as the purge gas we recommend inert<br />
gases like nitrogen or argon. The temperature of these<br />
gases should be between 5 °C and 80 °C , max. relative<br />
humidity should not exceed 10 ppm.<br />
In individual cases and after consultation also dry, filtered,<br />
oil-free air or filtered ambient air may be used (filter<br />
mesh < 1µm).<br />
Change the filters after some time, at least annually.<br />
Different venting methods are described in Chapter 3.4.<br />
GA 05.128/7 - 05/2002<br />
19
Connections<br />
Connection<br />
TURBO-<br />
TRONIK<br />
Operating<br />
Warning<br />
Failure<br />
00123.45h<br />
1<br />
2<br />
3<br />
4<br />
5<br />
6<br />
7<br />
8<br />
9<br />
10<br />
11<br />
12<br />
13<br />
14<br />
15<br />
X1<br />
green LED<br />
yellow LED<br />
red LED<br />
Operating hours counter<br />
Fig. 6 Rotor bearing monitoring device Turbo Guard 3<br />
Pin assignment of X1<br />
1 not connected<br />
2 Interface<br />
3 Interface<br />
4 Interface<br />
5 Ground<br />
6<br />
Relay contact green LED<br />
7 Contact<br />
8<br />
Relay contact yellow LED<br />
closed<br />
9 when LED<br />
10 aktive<br />
Relay contact red LED<br />
11<br />
12 Pt 100 external Pins 12 and 13 are<br />
13 Pt 100 Input bridged in the plug<br />
14 Pt 100 external Pins 14 and 15 are<br />
15 Ground bridged in the plug<br />
2.6 Connecting the frequency<br />
converter TURBOTRONIK<br />
Please refer to Sections 1.2 and 1.3 for information on<br />
the TURBOTRONIK model required and on the connector<br />
lines. The connector line may be up to 100 m long;<br />
please forward your inquiry for details.<br />
Use the connector cable to attach the <strong>TURBOVAC</strong> and<br />
the TURBOTRONIK; see the operating instructions on the<br />
TURBOTRONIK NT 20 for details (GA 05.208).<br />
Warning<br />
Operate the pump only with the matching<br />
frequency converter and connector cable.<br />
Voltages of up to 400 V will be present at<br />
the connection cable between the frequency<br />
converter and the pump; mains voltage<br />
will be present at the flange heater, the valves<br />
and their supply leads.<br />
Route the conductors and cables so as to<br />
protect them from damage.<br />
The connections are of the IP 40 safety classification.<br />
Do not expose the pump, frequency converter or<br />
connectors to dripping water.<br />
2.7 Connecting the rotor<br />
bearing monitoring unit<br />
A remote monitoring can be connected to the relay<br />
contacts.<br />
Please forward your inquiry concerning the connection of<br />
the interface or an external measuring instrument to the<br />
Pt 100 outputs.<br />
Caution<br />
The supplied plug for X1 with the bridges<br />
between pins 12-13 and 14-15 must be<br />
plugged in for proper operation of the Turbo<br />
Guard.<br />
20 GA 05.128/7 - 05/2002
Operation<br />
10 3<br />
mbar<br />
Starting pressure<br />
10 2<br />
10 1<br />
S f = Pumping speed at the forevacuum pump (m 3 /h)<br />
V = Chamber volume (m 3 )<br />
Fig. 7 Determining the starting pressure for a <strong>TURBOVAC</strong><br />
when evacuating larger volumes<br />
10 0<br />
0 25 50 75 100<br />
S f<br />
/ V<br />
125<br />
-1<br />
h<br />
3 Operation<br />
3.1 Switching on<br />
Large vacuum chambers will first have to be pumped<br />
down with the forevacuum pump or the forevacuum<br />
pump system.<br />
When dealing with smaller vacuum chambers, the starting<br />
pressure for the <strong>TURBOVAC</strong> will be found in Figure<br />
7.<br />
Where S f<br />
/ V > 100 [h -1 ], the <strong>TURBOVAC</strong> and the forevacuum<br />
pump can be started simultaneously.<br />
Then switch on the cooling and the purging gas and<br />
switch on the <strong>TURBOVAC</strong> at the TURBOTRONIK control<br />
unit.<br />
Details will be found in the operating instructions for the<br />
TURBOTRONIK.<br />
After switching on the pump it takes approx. 2 minutes<br />
before the LEDs at the Turbo Guard light up.<br />
3.2 Operation<br />
Avoid sudden changes of attitude during operation and<br />
avoid severe outside vibrations and shock to the pump.<br />
Observe the displays and information provided by the<br />
TURBOTRONIK and the Turbo Guard. The temperature<br />
of the pump bearings is also an indicator for their wear.<br />
LEDs at the Turbo Guard<br />
LED Pump bearing Measures<br />
temperature<br />
green normal —<br />
Operating (0 - 80 °C)<br />
yellow conspicuous You may continue to<br />
Warning (80 - 95 °C) operate the pump.<br />
Check cooling water<br />
supply and process<br />
pressures and improve if<br />
necessary.<br />
red critical Possibly measure the<br />
Failure operation pump bearing temperafor<br />
at least ture. Replace the pump<br />
1 hour as soon as possible and<br />
(> 95 °C) send it to the Leybold<br />
Service. The red LED<br />
cannot be reset.<br />
GA 05.128/7 - 05/2002<br />
21
Operation<br />
mbar<br />
10 3<br />
10 2<br />
Forevacuum pressure<br />
10<br />
1<br />
10 -1<br />
10 -2<br />
0 5 10 15 20 25 30 35 40<br />
s<br />
Time<br />
Fig. 8 Curve showing the pressure rise<br />
3.3 Switching off<br />
Switch off the <strong>TURBOVAC</strong> at the TURBOTRONIK. Refer to<br />
the TURBOTRONIK operating instructions for details.<br />
Switch off the forevacuum pump.<br />
Vent the <strong>TURBOVAC</strong> and close off the purging gas supply<br />
before the pump comes to a complete stop.<br />
Close off the cooling water supply immediately after switching<br />
off the <strong>TURBOVAC</strong> in order to prevent condensate<br />
formation inside the pump.<br />
3.4 Venting<br />
As to suitable gases, see Chapter 2.5.<br />
Venting Methods<br />
There are three different methods of venting the turbomolecular<br />
pump.<br />
In the case processes requiring a purge gas, the pump<br />
must be vented via the purge gas and venting valve<br />
when shutting the pump down.<br />
When additionally venting the vacuum chamber, the venting<br />
function of the purge gas and venting valve must be<br />
opened before opening the chamber valve. This will<br />
ensure the presence of a higher pressure in the area of<br />
the ball bearings compared to the remaining vacuum<br />
area. This will prevent particles, dust or aggressive<br />
gases from being forced through the bearings into the<br />
not yet vented motor chamber of the pump.<br />
Cautious venting of the pump is possible from the high<br />
vacuum side, since here the bearing forces will be<br />
lowest. When doing so, no free jet of gas must be allowed<br />
to form on the rotor so as to avoid exposing the rotor<br />
to additional forces.<br />
When venting the pump through its foreline connection,<br />
neither oil nor particles may be entrained in the gas<br />
flow from the forevacuum side into the pump.<br />
Speed of the Pressure Rise<br />
All turbomolecular pumps may be vented at full speed.<br />
However, the pressure must not increase faster than<br />
specified through the pressure rise curve.<br />
The pump must be vented significantly slower when<br />
there is the risk of particles entering into the pump from<br />
the process. During venting, the flow must be of the laminar<br />
type in both the vacuum chamber and the turbomolecular<br />
pump.<br />
The speed of the pressure rise during venting of the running<br />
pump will greatly influence the load on the rotor/stator<br />
pack and the bearings. The slower the pump is vented,<br />
the longer the service life of the bearings will be.<br />
The pump must not be vented to pressures above<br />
atmospheric pressure.<br />
22 GA 05.128/7 - 05/2002
Operation / Maintenance<br />
3.5 Removing the pump<br />
from the system<br />
Switch off the pump and vent it as per the instructions in<br />
Sections 3.3 and 3.4.<br />
<strong>TURBOVAC</strong> pumps which are used in critical processes<br />
may be contaminated with hazardous process gases or<br />
deposits.<br />
If the pump previously handled reactive or hazardous<br />
gases, then allow the purge gas to flow for as long as<br />
possible before detaching the pump from the system.<br />
Warning<br />
Take the appropriate precautionary measures<br />
prior to opening the intake or discharge<br />
connection if the pump has previously<br />
handled hazardous gases.<br />
If necessary, use gloves, a respirator and/or<br />
protective clothing and work under an<br />
exhaust hood.<br />
4 Maintenance<br />
After 10,000 operating hours at the latest a standard<br />
bearing exchange will be required. Moreover we recommend<br />
to have the rotor assy. exchanged , depending on<br />
the thermal stress on the rotor, after 45,000 to 100,000<br />
operating hours. This can only be done by Leybold Service.<br />
For this ask for a quotation.<br />
When using purge gas valves:<br />
Depending on the degree of contamination of the purge<br />
gas used the filter will clog and will have to be<br />
exchanged (our experience indicates that this will become<br />
necessary after 1 to 6 months).<br />
Caution<br />
The pump must only be opened by such<br />
persons who have been authorised by Leybold<br />
to do so.<br />
4.1 Service by LEYBOLD<br />
Remove the <strong>TURBOVAC</strong> from the system.<br />
A packing set is included with <strong>TURBOVAC</strong> models with a<br />
“C” in the type designation. Use this packing set after<br />
detaching the pump from the system.<br />
Faulty (leaky) packing of a <strong>TURBOVAC</strong> will nullify the<br />
guarantee.<br />
Pack the pump so that it cannot be damaged during<br />
shipping and so that no contaminants can escape from<br />
the packaging. Protect in particular the flanges, the coolant<br />
connection nipples and the cable grommets.<br />
If you return a pump to Leybold, be absolutely sure to<br />
observe the instructions given in Section 4.1.<br />
Whenever you send a pump to LEYBOLD, indicate<br />
whether the pump is contaminated or is free of substances<br />
which could pose a health hazard. If it is contaminated,<br />
specify exactly which substances are involved.<br />
You must use the form we have prepared for this<br />
purpose; we will forward that form on request.<br />
A copy of the form is printed at the end of the operating<br />
instructions: “Declaration of contamination for vacuum<br />
equipment and components”.<br />
Attach the form to the pump or enclose it to the pump.<br />
Do not place it together with the pump inside the PE bag.<br />
This statement detailing the contamination is required to<br />
satisfy legal requirements and for the protection of our<br />
employees.<br />
LEYBOLD must return to the sender any pumps which<br />
are not accompanied by a contamination statement.<br />
GA 05.128/7 - 05/2002<br />
23
Troubleshooting<br />
5 Troubleshooting<br />
Warning<br />
When the connector cable to the TURBO-<br />
VAC is attached, the outputs of the TURBO-<br />
TRONIK frequency converter are not free of<br />
voltage.<br />
Before commencing troubleshooting procedures, make<br />
the following simple checks:<br />
Is the <strong>TURBOVAC</strong> being supplied with electrical energy?<br />
Are the connections . . .<br />
- from the mains power cord to the frequency converter<br />
- at the connector cable from the frequency converter to<br />
the mains network in good working order?<br />
If a water flow or purge gas monitoring device is connected,<br />
is it functioning properly?<br />
Check the flow monitoring devices by jumping their terminals<br />
and starting the <strong>TURBOVAC</strong>.<br />
Is the forevacuum pressure sufficient?<br />
Is the vacuum chamber free of leaks?<br />
Observe also the troubleshooting instructions for the<br />
TURBOTRONIK.<br />
Malfunction<br />
<strong>TURBOVAC</strong> does not start.<br />
Possible cause<br />
Motor connection cable not attached, is loose or is<br />
defective.<br />
Pump has seized.<br />
The frequency converter does not match the pump<br />
or the frequency converter is encoded incorrectly for<br />
the pump (see the operating instructions for the frequency<br />
converter).<br />
Rectification<br />
Check the motor connection cable and connect correctly;<br />
replace if necessary.<br />
Replace the pump.<br />
Run the pump with a suitable frequency converter:<br />
NT 20, Ref. No. 857 20 as of serial No. Z9601221 or<br />
NT 20, Ref. No. 857 21 as of serial No. Z9600321<br />
<strong>TURBOVAC</strong> generates loud<br />
running noises and vibrations.<br />
The <strong>TURBOVAC</strong> does not<br />
achieve ultimate pressure.<br />
Rotor is out of balance.<br />
Bearing is defective.<br />
Pump running within the natural frequency range of<br />
the system, causing resonance.<br />
Measurement device is defective.<br />
Measurement gauges are soiled.<br />
Leak at the system, lines or pump.<br />
Grime collection at the pump.<br />
Forevacuum pump with insufficient pumping speed<br />
or ultimate pressure which is too high.<br />
Leak at the power cord passage port.<br />
<strong>TURBOVAC</strong> is rotating in the wrong direction.<br />
Balance the rotor (only by the Leybold Service<br />
Department).<br />
Bearings will have to be replaced (only by the Leybold<br />
Service Department).<br />
Change the masses of the system or install vibration<br />
damper to isolate oscillations.<br />
Check the measurement device.<br />
Clean or replace the measurement gauges.<br />
Locate the leaks.<br />
Have the pump cleaned (only by the Leybold Service<br />
Department).<br />
Check ultimate pressure of the forevacuum pump or<br />
install a more powerful forevacuum pump.<br />
Locate and repair leaks (only by the Leybold Service<br />
Department).<br />
Check the connector lines; interchange poles if<br />
necessary.<br />
<strong>TURBOVAC</strong> overheats<br />
(malfunction indication at the<br />
TURBOTRONIK or yellow or<br />
red LED at the the Turbo<br />
Guard light up; see Section<br />
3.2).<br />
Forevacuum pressure too high.<br />
Gas volume too great / leak in the system.<br />
Ambient temperature is too high.<br />
Cooling water is lacking or insufficient.<br />
Bearings are defective.<br />
Check the forevacuum pump; install a more powerful<br />
forevacuum pump if necessary.<br />
Seal leak; install a more powerful forevacuum pump<br />
if necessary.<br />
—<br />
Ensure sufficient supply of cooling water.<br />
Have the pump repaired (only by the Leybold Service<br />
Department).<br />
No LED lights up at the Turbo<br />
Guard after normal operation<br />
is reached.<br />
The supplied plug for X1 hasn’t been plugged in.<br />
External measuring instrument connected.<br />
Plug in the supplied plug or plug with bridges 12-13<br />
and 14-15.<br />
—<br />
24 GA 05.128/7 - 05/2002
EC Manufacturer’s Declaration<br />
in the spirit of Appendix IIb to the 89/392/EEC Machinery Guidelines<br />
We, the Leybold Vakuum GmbH, declare herewith that<br />
the commissioning of the incomplete machine designated<br />
below is prohibited until such time as it has been<br />
determined that the system in which this complete<br />
machine is to be installed corresponds with the EC<br />
Machinery Guidelines.<br />
At the same time we certify conformity with the Low-<br />
Voltage Guidelines 73/23/EEC.<br />
When using the appropriate Leybold accessories, e.g.<br />
connector lines or flange heaters, and when powering<br />
the pump with the specified Leybold frequency converters,<br />
the protection level prescribed in the EMC Guidelines<br />
will be attained<br />
Applicable, harmonized standards:<br />
• EN 292 Part 1 and Part 2 November 1991<br />
• EN 1012 Part 2 1996<br />
• EN 60 204 1993<br />
Applied national standards and technical<br />
specifications:<br />
• DIN 31 001 April 1983<br />
• DIN ISO 1940 December 1993<br />
Designation: Turbomolecular pump<br />
Model: <strong>TURBOVAC</strong> <strong>1100</strong> C<br />
Catalog no.: 894 80/83/84<br />
LV.GT.0134.02.10.97<br />
Cologne, Oct. 20, 1997<br />
Cologne, Oct. 20, 1997<br />
—————————————————————<br />
Dr. Mattern-Klosson, Turbomolecular Pump<br />
Division Manager<br />
—————————————————————<br />
Hölzer, Turbomolecular Pump<br />
Engineering Manager<br />
GA 05.128/7 - 05/2002<br />
25
Verteiler: Blatt 1 (weiß) an den Hersteller oder seinen Beauftragten senden - Blatt 2 (gelb) den Begleitpapieren der Sendung beifügen - Blatt 3 (blau) Kopie für den Versender<br />
Erklärung über Kontaminierung von Vakuumgeräten und -komponenten<br />
Die Reparatur und/oder die Wartung von Vakuumgeräten und -komponenten wird nur durchgeführt, wenn eine korrekt und<br />
vollständig ausgefüllte Erklärung vorliegt. Ist das nicht der Fall, kommt es zu Verzögerungen der Arbeiten. Wenn die Reparatur/Wartung<br />
im Herstellerwerk und nicht am Ort ihres Einsatzes erfolgen soll, wird die Sendung gegebenenfalls zurückgewiesen.<br />
Diese Erklärung darf nur von autorisiertem Fachpersonal ausgefüllt und unterschrieben werden.<br />
1. Art der Vakuumgeräte und -komponenten:<br />
- Typenbezeichnung: ______________________<br />
- Artikelnummer: ______________________<br />
- Seriennummer: ______________________<br />
- Rechnungsnummer: ______________________<br />
- Lieferdatum: ______________________<br />
3. Zustand der Vakuumgeräte und -komponenten:<br />
- Waren die Vakuumgeräte und -komponenten in<br />
Betrieb?<br />
ja ❒ nein ❒<br />
- Welches Pumpenöl wurde verwendet ? _________<br />
- Sind die Vakuumgeräte und -komponenten frei von<br />
gesundheitsgefährdenden Schadstoffen?<br />
ja ❒ (weiter siehe Absatz 5)<br />
nein ❒ (weiter siehe Absatz 4)<br />
2. Grund für die Einsendung:<br />
______________________________________________<br />
______________________________________________<br />
______________________________________________<br />
______________________________________________<br />
______________________________________________<br />
4. Einsatzbedingte Kontaminierung der Vakuumgeräte<br />
und -komponenten:<br />
- toxisch ja ❒ nein ❒<br />
- ätzend ja ❒ nein ❒<br />
- mikrobiologisch*) ja ❒ nein ❒<br />
- explosiv*) ja ❒ nein ❒<br />
- radioaktiv*) ja ❒ nein ❒<br />
- sonstige Schadstoffe ja ❒ nein ❒<br />
*) Mikrobiologisch, explosiv oder radioaktiv kontaminierte Vakuumgeräte und -komponenten werden nur bei Nachweis einer<br />
vorschriftsmäßigen Reinigung entgegengenommen!<br />
Art der Schadstoffe oder prozessbedingter, gefährlicher Reaktionsprodukte, mit denen die Vakuumgeräte und -komponenten in<br />
Kontakt kamen:<br />
Handelsname<br />
Produktname Chemische Bezeichnung Gefahrklasse Maßnahmen bei Freiwerden Erste Hilfe<br />
Hersteller (evtl. auch Formel) der Schadstoffe bei Unfällen<br />
1.<br />
2.<br />
3.<br />
4.<br />
5.<br />
5. Rechtsverbindliche Erklärung<br />
M U S T E R<br />
Hiermit versichere(n) ich/wir, dass die Angaben in diesem Vordruck korrekt und vollständig sind. Der Versand der kontaminierten<br />
Vakuumgeräte und -komponenten erfolgt gemäß den gesetzlichen Bestimmungen.<br />
Firma/Institut: ______________________________________________________________________________<br />
Straße: _____________________________ PLZ, Ort: ________________________________<br />
Telefon:<br />
______________________________________________________________________________<br />
Fax: _____________________________ Telex: _________________________________________<br />
Name: (in Druckbuchstaben) ______________________________________________________________________________<br />
Position:<br />
______________________________________________________________________________<br />
Datum: _____________________________ Firmenstempel<br />
Rechtsverbindliche Unterschrift:<br />
_________________________________________________________________________________________________<br />
Copyright © 1991 by MaschinenbauVerlag GmbH, Lyoner Straße 18, 6000 Frankfurt/M. 71 Bestell-Nr.: 2121<br />
26 GA 05.128/7 - 05/2002
Declaration of Contamination of Vacuum Equipment and Components<br />
The repair and/or service of vacuum equipment and components will only be carried out if a correctly completed declaration has<br />
been submitted. Non-completion will result in delay. The manufacturer could refuse to accept any equipment without a declaration.<br />
This declaration can only be completed and signed by authorized and qualified staff.<br />
Copies: Page 1 (white) to manufacturer or representative - Page 2 (yellow) attach to consignment packaging securety - Page 3 (blue) copy for file of sender<br />
1. Description of Vacuum Equipment and Components<br />
- Equipment type/model: _________________________________<br />
- Code No.: _________________________________<br />
- Serial No.: _________________________________<br />
- Invoice No.: _________________________________<br />
- Delivery date: __________________________<br />
3. Condition of the Vacuum Equipment and Components<br />
- Has the equipment been used?<br />
yes ❒ no ❒<br />
- What type of pump oil/liquid was used? _________<br />
- Is the equipment free from potentially<br />
harmful substances?<br />
yes ❒ (go to Section 5)<br />
no ❒ (go to Section 4)<br />
2. Reason for Return<br />
____________________________________________<br />
____________________________________________<br />
____________________________________________<br />
____________________________________________<br />
____________________________________________<br />
____________________________________________<br />
4. Process related Contamination of Vacuum<br />
Equipment and Components:<br />
- toxic yes ❒ no ❒<br />
- corrosive yes ❒ no ❒<br />
- explosive*) yes ❒ no ❒<br />
- biological hazard*) yes ❒ no ❒<br />
- radioactive*) yes ❒ no ❒<br />
- other harmful substances yes ❒ no ❒<br />
S A M P L E<br />
*) Vacuum equipment and components which have been contaminated by biological explosive or radioactive substances,<br />
will not accepted without written evidence of decontamination!<br />
Please list all substances, gases and by-products which may have come into contact with the equipment:<br />
Trade name<br />
Product name Chemical name Dangerous Measures First aid in case of<br />
Manufacturer (or Symbol) material class if spillage human contact<br />
1.<br />
2.<br />
3.<br />
4.<br />
5.<br />
5. Legally Binding Declaration<br />
I hereby declare that the information supplied on this form is complete and accurate. The despatch of the contaminated<br />
vacuum equipment and components will be in accordance with the appropriate regulations covering Packaging, Transportation<br />
and Labelling of Dangerous Substances.<br />
Name of organisation or company:_____________________________________________________________________<br />
Address: _____________________________ Post code:______________________________________<br />
Tel.:<br />
______________________________________________________________________________<br />
Fax: _____________________________ Telex: _________________________________________<br />
Name:<br />
______________________________________________________________________________<br />
Job title:<br />
______________________________________________________________________________<br />
Date: _____________________________ Company stamp:<br />
Legally binding signature:____________________________________________________________________________<br />
Copyright © 1991 by MaschinenbauVerlag GmbH, Lyoner Straße 18, 6000 Frankfurt/M. 71 Order No.: 2121<br />
GA 05.128/7 - 05/2002<br />
27
LEYBOLD VAKUUM GmbH<br />
Bonner Strasse 498 (Bayenthal)<br />
D-50968 Köln<br />
Tel.: (0221) 347-0<br />
Fax: (0221) 347-1250<br />
http://www.leyboldvac.de<br />
e-mail:documentation@leyboldvac.de<br />
AMCL_04773_2002 PG 05.02 Printed in Germany on chlorine-free bleached paper Technical alterations reserved