Operating Instructions - PTB Sales
Operating Instructions - PTB Sales
Operating Instructions - PTB Sales

You also want an ePaper? Increase the reach of your titles
YUMPU automatically turns print PDFs into web optimized ePapers that Google loves.
Aerzener Maschinenfabrik GmbH<br />
Reherweg 28 / D-31855 Aerzen, Postfach 11 63 / D-31849 Aerzen, Tel.: 05154/810, Fax: 05154/81191<br />
<strong>Operating</strong> <strong>Instructions</strong><br />
for<br />
High-Vacuum Rotary Piston Blower HV<br />
with sizes: GMa/GLa 10.0, 10.1, 10.2, 11.3, 11.4,<br />
12.5, 12.6, 13.f7, 13.8<br />
GMb/GLb 14.9, 15.10, 15.11, 16.12, 16.f13,<br />
16.13, 17.15, 18.17, 19.19, 20.21<br />
Roots Principle<br />
EN<br />
<strong>Instructions</strong> for the transportation,<br />
storage, installation, commissioning,<br />
maintenance and cleaning<br />
4PG-401 EN page 1 of 14<br />
07.98<br />
0368-002
Aerzener Maschinenfabrik GmbH<br />
Reherweg 28 / D-31855 Aerzen, Postfach 11 63 / D-31849 Aerzen, Tel.: 05154/810, Fax: 05154/81191<br />
LIST OF CONTENTS<br />
1. Safety instructions<br />
1.1 General<br />
1.2 Points of safety<br />
1.3 Spare parts and accessories<br />
2. General<br />
3. Notes on transportation<br />
4. Storage<br />
5. Installation<br />
5.1 Preparation<br />
5.2 Type of foundation<br />
5.3 Preparing the foundation<br />
5.4 Alignment<br />
5.5 Anchoring bolts<br />
5.6 Coupling and pulleys<br />
5.7 V-belts<br />
5.8 Final adjustment<br />
5.9 Pipelines<br />
6. Initial start-up<br />
6.1 Test run of drive motor<br />
6.2 Test run of blower<br />
7. Maintenance<br />
7.1 General<br />
7.2 Standard seals<br />
7.3 Heatable vacuum blowers wHV<br />
8. Lubrication<br />
8.1 General<br />
8.2 Qil lubrication qualities<br />
8.3 Oil filling - transparent reservoir<br />
8.4 Oil fillings<br />
8.5 Oil change<br />
9. Blower - cleaning<br />
10. Change of flow direction<br />
11. Watercooled seal ring housing<br />
12. Spare parts list<br />
13. Mechanical load limits of the<br />
Rough Vacuum blowers<br />
13.1 Direct coupled speeds<br />
13.2 V-belt-drive<br />
4PG-401 EN page 2 of 14<br />
0368-002
Aerzener Maschinenfabrik GmbH<br />
Reherweg 28 / D-31855 Aerzen, Postfach 11 63 / D-31849 Aerzen, Tel.: 05154/810, Fax: 05154/81191<br />
1. Safety information<br />
1.1 General<br />
The Positive Displacement Blowers are constructed according to the latest technical standards;<br />
the requirements of the German regulations for accident prevention VBG 16 are fulfilled.<br />
Nevertheless, operating risks resulting from improper handling, inappropriate use or operation by untrained<br />
personnel cannot be excluded.<br />
These may result in injuries, as well as damage to the machines and production work.<br />
In the user’s plant, anyone involved in the operation, maintenance and repair of the machines must have read and<br />
understood the operating/maintenance manual, and in particular this safety information.<br />
The machines must only be handled and operated by trained and authorized personnel.<br />
Responsibility for the operation of the machines must be clearly defined in order to avoid uncertainties of<br />
competence.<br />
All work performed on the machines, including repairs, oil changes, maintenance etc. are to be carried out during<br />
machine shutdown, with the electrical power supply to the compressor shut-off and locked out.<br />
1.2 Recommendations - operator safety<br />
- Working methods reducing the safe operation of the machine must be avoided.<br />
- The user is responsible for ensuring that no unauthorized persons are in any way involved with the machine.<br />
- <strong>Operating</strong> personnel have the obligation of advising their superior of any changes occurring to the machine and<br />
which reduce the safety of its operation.<br />
- The user is responsible for ensuring that the machines are operated when in proper working condition only.<br />
- Management must inform operating personnel of the need to wear safety clothing, safety glasses, and hearing<br />
protection.<br />
- By means of appropriate procedures and controls, the user must guarantee cleanliness in the work<br />
place and ease of access to and around the machines.<br />
- Under absolutely no circumstances may safety devices be removed or disabled.<br />
- Work on electrical components must be carried out by authorized persons only.<br />
- While carrying out machine verification tasks, and in particular when opening the acoustic hood, the use of<br />
hearing protection is compulsory.<br />
- The discharge piping may reach a temperature of up to 150 °C and must not be touched.<br />
- Piping must not be disassembled prior to having been depressurized and purged with a neutral gas.<br />
- Pressurized lube and instrumentation lines must not be opened, i.e. connections must not be tightened. There is<br />
risk of injury, for example resulting from escaping oil.<br />
- Machines conveying oxygen must remain free of grease and oil in the vicinity of the conveyed medium. There is<br />
risk of fire and explosion.<br />
- Extreme caution must be exercised in the case of internal combustion engine driven machines, given<br />
the risk of poisening resulting from exhaust gases. The machine rooms must be sufficiently ventilated.<br />
- In the case of machines operating in nuclear power plants, specific instructions apply. There is risk of radiation.<br />
- Cleaning operations involving the use of sprays or cleansing agents must be carried out in accordance with the<br />
relevant guidelines. There is risk of poisoning resulting from inhalation, and burns resulting from contact with<br />
caustic substances.<br />
- Safety devices, for example safety relief valves, coupling guards, belt guards, contact thermometers, and contact<br />
switches, must not be removed or modified.<br />
- Conversions and modifications not authorized by the manufacturer are not allowed for reasons of safety.<br />
1.3 Spare parts and accessories<br />
We expressly draw your attention to the fact that replacement parts and accessories not supplied by us are neither<br />
tested nor approved by us. The integration or installation, as well as the use of such products can, under certain<br />
circumstances, alter the original design characteristics of the equipment. We exempt ourselves from any liability<br />
for damages resulting from the use of parts and accessories not supplied by us.<br />
4PG-401 EN page 3 of 14<br />
0368-002
Aerzener Maschinenfabrik GmbH<br />
Reherweg 28 / D-31855 Aerzen, Postfach 11 63 / D-31849 Aerzen, Tel.: 05154/810, Fax: 05154/81191<br />
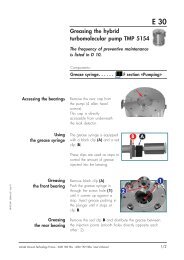
2. General<br />
These rotary piston blowers (Roots principle), used in vacuum operation, are distinguished by the<br />
letter "G". The subsequent letters "L" or "M" indicate the direction of flow.<br />
The numbers, e.g. "14.9", indicate the model size. The letters "HV" following mean "high vacuum"<br />
and the letter "m" following means "with auxiliary inlet".<br />
coolant channel<br />
water cooling at blower size<br />
18.17 and above.<br />
The radial sealing rings run on a hardened and ground shaft protection sleeve. The oil chamber<br />
ensures that the radial sealing rings are vacuum-tight and have a long service life.<br />
The level of sealing oil can be checked visually through the transparent oil tank. Oil must be always<br />
be present. (see: Lubrication)<br />
Concerning the blower types HV 18.17 to 20.21 the sealing ring casings at the driving shaft are to be<br />
provided with cooling water. The connections are designed in G 1/4". All other blowers do not need<br />
a water cooling.<br />
External machined parts are coated with rust preventing varnish, and the inlet and outlet flanges<br />
are fitted with plastic caps to prevent the entry of dirt and water spray.<br />
4PG-401 EN page 4 of 14<br />
0368-002
Aerzener Maschinenfabrik GmbH<br />
Reherweg 28 / D-31855 Aerzen, Postfach 11 63 / D-31849 Aerzen, Tel.: 05154/810, Fax: 05154/81191<br />
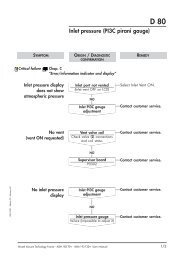
oil filter screw<br />
main inlet<br />
oil filler screw<br />
oil tank<br />
coolingwater<br />
connection<br />
water drain plug<br />
oil level indicator<br />
oil drain plug<br />
discharge side<br />
3. Notes on transportation<br />
3.1 The unit must be protected against jolts and impact during transportation.<br />
3.2 When lifting the unit by crane, do not use the free ends of the shaft nor the cast eyes on the side<br />
plates or the top of the housing: use instead a suitable hemp or wire rope sling placed around the<br />
side plates.<br />
3.3 When the unit arrives at its destination, check that it is undamaged and that the delivery is complete.<br />
4. Storage<br />
If the units have to be stored before use, a dry, well protected space should be provided. If<br />
necessary, the rust preventing varnish coating on the machined surfaces should be renewed, using a<br />
rust preventing oil. If the unit has to be stored for a longer period and there is insufficient protection<br />
from dampness, the smooth faces of the flanges and the interior chambers of the blower must be<br />
coated with a conservation oil to prevent corrosion.<br />
Protective oils:<br />
External Oil chambers Conveying chamber<br />
TECREX 39 (MOBIL OIL) ESSO LUB MZ 20 W/20 Ballistol-oil<br />
RUST BAN 324 (ESSO) SHELL Ensis Motor Del 20 (biodegradable, no ground<br />
V-Produkt 9703 (SHELL) MOBIL Mobilarma 523 or 524 water contamination)<br />
AVIA Avilub MK 2000<br />
or other equivalent products offered by mineral oil manufacturers.<br />
Cleaning agent: e.g. Certrex 62 from Mobil or Varsol from Esso.<br />
5. Installation<br />
4PG-401 EN page 5 of 14<br />
0368-002
Aerzener Maschinenfabrik GmbH<br />
Reherweg 28 / D-31855 Aerzen, Postfach 11 63 / D-31849 Aerzen, Tel.: 05154/810, Fax: 05154/81191<br />
5.1 Preparation<br />
Before transporting the unit to the prepared base, all surfaces which will come into contact with the<br />
base should be cleaned of oil and grease to ensure proper contact.<br />
Leave the plastic caps on the flange until the pipework is ready to be finally connected.<br />
5.2 Type of foundation<br />
Rotary piston blowers should be mounted on a flat, vibration-free foundation. The dimensions for the<br />
foundations should be taken from our drawings. If the unit is to be located on a steel structure or a<br />
deck which is capable of vibrating, then we recommend that it be mounted on elastic machine feet<br />
which absorb transmitted noise; in this case, the blower and its drive motor are mounted on a single<br />
common steel base frame, a cast concrete bed slab, laid on rubber blocks, is also suitable.<br />
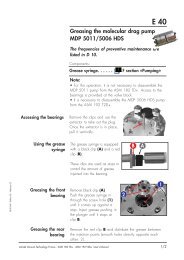
Mounting on flexible elements<br />
a) steel base frame and b) concrete bed slab c) steel tubes cast into the base make<br />
elastic machine feet on rubber blocks handling and transport easier<br />
5.3 Preparing the foundation<br />
The surface of the foundation should be roughened and then cleaned. Blow out the anchoring holes.<br />
5.4 Alignment<br />
Place the blower unit onto the foundation, and adjust it until it is accurately<br />
level, using steel shim plates (no wedges !). Use a machinist‘s level on<br />
machined surfaces or on the drive shaft.<br />
The maximum permitted deviation from true horizontal is 0,2 mm per meter<br />
length. The steel shim plates should be pushed in under the base frame so<br />
Sheet steel washer<br />
plate<br />
that it completely covers them; they are then also grouted in, with the anchoring bolts. If the blower<br />
and the drive motor are not mounted on the same base, then the blower should be mounted higher, to<br />
enable the subsequent alignment to be carried out properly.<br />
5.5 Anchoring bolts<br />
After levelling has been completed, the anchoring bolts should be grouted in, and<br />
once the grout has set and hardened, tightened. It should be possible to turn the<br />
blower easily by hand: If, there is any resistance then this indicates either that the<br />
base plate or the housing is distorted, or there is dirt in the cylinder. In cases<br />
where the blower will be subject t wide temperature variations, only the feet on the<br />
drive side should be rigidly fixed to the foundation: the rear feet should be held by<br />
means of spacer bushes in such a way that a slight movement parallel to the shaft<br />
is possible, to allow for thermal expansion of the housing.<br />
4PG-401 EN page 6 of 14<br />
0368-002
Aerzener Maschinenfabrik GmbH<br />
Reherweg 28 / D-31855 Aerzen, Postfach 11 63 / D-31849 Aerzen, Tel.: 05154/810, Fax: 05154/81191<br />
5.6 Couplings and pulleys<br />
The shaft journals should be thoroughly cleaned of rust-preventing varnish or oil before fitting the<br />
pulleys or the couplings. A suitable jig must be used for fitting the pulleys or couplings; the jig is<br />
centred in the centering hole on the end of the shaft. Fitting (and later removal if necessary) are made<br />
easier by first coating the end of the shaft with molybdenum<br />
disulphide (e.g. Molykote).<br />
Only couplings that have been machined on all sides and balanced according to VDI 2060 quality<br />
grade Q 6.3.<br />
5.7 Keilriemen<br />
1. Consult the table to find the test force "f" appropriate to the type of belt used.<br />
2. Find the smallest-diameter pulley in the system, and use this to find the deflection "E" from the<br />
table.<br />
3. Calculate the deflection "Ea" from the actual shaft centre distance "e" using formula (1).<br />
4. Apply the test force "f" to the belt exactly midway between the two shafts (whose centre distance<br />
is "e") and exactly at right angles to its original (undeflected) path.<br />
Then tighten the belt until the deflection equals the correct calculated deflection "Ea".<br />
Belt tension example:<br />
belt profile SPZ; dk = 100 mm; e = 380 mm; f = 2.5 daN; Ea = 5.5 mm<br />
The belts should be retightened after they have run for about 30 minutes.<br />
5.8 Final adjustment<br />
For the final adjustment, the shaft of the blower should be taken as the fixed reference point. The drive<br />
motor, which was deliberately mounted slightly lower than the blower, should now be raised by means<br />
of steel shims, until the shafts marry up. Each shim must be of at least the same area as the foot which<br />
it supports.<br />
The gap between the two halves of the coupling must be precisely as stated in the specification.<br />
If special couplings are used, follow the fitting instructions accurately.<br />
The coupling must be tested for true running using dial gauges. If the two halves of the coupling have<br />
identical flange diameters, this check can also be carried out using a straight edge and a feeler gauge.<br />
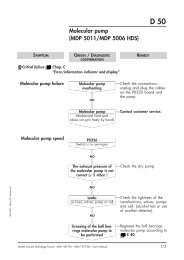
When using dial gauges for the alignment, proceed as shown in<br />
the diagram.<br />
A jig is fixed to one half of the coupling, and is used to hold two<br />
dial gauges which bear onto the other half of the coupling, as<br />
shown.<br />
Then turn both shafts simultaneously and note the maximum<br />
deflections from true running.<br />
4PG-401 EN page 7 of 14<br />
0368-002
Aerzener Maschinenfabrik GmbH<br />
Reherweg 28 / D-31855 Aerzen, Postfach 11 63 / D-31849 Aerzen, Tel.: 05154/810, Fax: 05154/81191<br />
Tolerances for rotation of couplings<br />
Radial: max. 0.05 mm shaft misalignment (i.e. 0.1 mm total on a full revolution)<br />
Axial: max. 0.05 mm shaft misalignment over a complete revolution; if possible the misalignment<br />
should be kept lower than 0.03 mm at a distance r = 100 mm from the middle of the shaft<br />
(for distances other than this, calculate the corresponding tolerance in linear proportion).<br />
5.9 Pipelines<br />
When installing the vacuum pipes, take particular care that the pairs of flanges are accurately parallel<br />
to one another (if necessary, use a feeler gauge to check), as otherwise they will be under strain and<br />
may disort when connected.<br />
The seal rings should be lightly greased with vacuum grease before being inserted. The weight of the<br />
piping and of any silencers etc. must be supported on separate brackets, and not carried by the flange.<br />
Once the flange bolts have been tightened, turn the blower over by hand and check that it turns easily.<br />
If any resistance is felt, then check that the blower has been mounted correctly without any<br />
mechanical strain or distortion. To do this, undo the flange connections and if necessary also the<br />
foundation anchoring bolts. Check the inside chambers of the blower for dirt.<br />
Note:<br />
Experience has shown, that, when starting up the blower for the first time, it is advisable to fit a strainer<br />
of 0.3 mm mesh size to the inlet side of the blower for the initial running-in period. The strainer should<br />
be of conical form, with the tip of the cone pointing AGAINST the direction of flow. The fine-mesh<br />
strainer should be supported on a perforated metal sheet.<br />
If the strainer is still clean after the first 200 hours operation, it can be removed.<br />
6. Initial start-up<br />
6.1 Test run of drive motor<br />
Uncouple the blower, and check that the motor alone runs smoothly and in the correct direction. If any<br />
electrically-operated instruments are provided (e.g. thermometer, manometer with electrical contacts),<br />
these must be checked for correct functioning.<br />
6.2 Test run of blower<br />
On the test run, watch for the following points: smooth running of blower and coupling, temperature of<br />
housing, shaft seals, long run-down when switched off, still turns easily by hand after test run,<br />
maximum pressure difference not exceeded.<br />
Important: Guards for the coupling or for the belts must be fitted. Danger of accidents.<br />
4PG-401 EN page 8 of 14<br />
0368-002
Aerzener Maschinenfabrik GmbH<br />
Reherweg 28 / D-31855 Aerzen, Postfach 11 63 / D-31849 Aerzen, Tel.: 05154/810, Fax: 05154/81191<br />
7. Maintenance<br />
7.1 General<br />
If run under normal operating conditions, a rotary piston blower needs scarely any maintenance. The<br />
rotary pistons do not touch metal at any point and thus do not need any lubricant.<br />
Maintenance is restricted to the oil system and the instrumentation.<br />
7.2 Standard seals<br />
The compression chamber is sealed from the bearing housings with a piston ring labyrinth seal.<br />
The drive shaft is sealed with two radial lip seals.<br />
7.3 Heatable vacuum blowers wHV<br />
To prevent deposits in the compression chamber, blowers of model GMa 12.5 to 13f7 have double<br />
walled cylinders and model GMb 14.9 to 17.15 double walled side plates to allow the injection of a<br />
heating medium.<br />
Allowable heating mediums are oil, sream or water. However to prevent damage to the bearings<br />
maximum temperature of 110 °C must not be exceeded.<br />
Max. pressure of heating medium: 2.0 bar (g).<br />
8. Lubrication<br />
8.1 General<br />
Vacuum blowers are normally splash lubricated. In case of increased speed operation of vakuum<br />
blowers is admissible with an installed oil guiding device (wheel side) only. For reasens of space the<br />
installation of such an oil guiding device is possible in blowers sizes 14...20 only. Admissible<br />
application limits can be taken from the sheets 4TG-3381 and 4TG-3382. The correct oil level has to be<br />
checked at regular intervals. For this purpose th blower has to be switched off. Wait a few minutes<br />
until the oil has run down from the walls and the oil level is static.<br />
The oil has to be filled up as follows:<br />
GMa 10 - 13 centre of sight glasses<br />
GLa 10 - 13 upper edge of reflector<br />
GLb 14 - 17 upper edge of hole<br />
GLb 14 - 16 (with oil feed device) 2 mm below upper edge of sight glasses<br />
GMb 14 - 17 (without oil feed device) centre of sight glasses<br />
GMb 14 - 17 (with oil feed device) drive side - centre of sight glasses<br />
gear side - upper edge of hole<br />
GMb 18 - 20 centre of sight glasses<br />
upper edge - sight glasses<br />
upper edge - reflector<br />
upper edge - hole<br />
centre of sight glasses<br />
4PG-401 EN page 9 of 14<br />
0368-002
Aerzener Maschinenfabrik GmbH<br />
Reherweg 28 / D-31855 Aerzen, Postfach 11 63 / D-31849 Aerzen, Tel.: 05154/810, Fax: 05154/81191<br />
Note: Through the oil filling opening it can be checked whether an oil feed device is installed.<br />
8.2 Oil lubrication qualities<br />
<strong>Instructions</strong> for lube oils upon operating of standard positivedisplacement machines<br />
Commercial full-synthetic high-performance light motor oil<br />
API oil specification SH / CF or higher.<br />
Viscosity classes DIN 51 511 0W - 40 / 5W - 40 / 10W - 40<br />
Kinematic viscosity of at least 13mm²/s at 100°C.<br />
Special requirements:<br />
Oxidation stability at oil temperatures up to 110°C.<br />
Special recommendations:<br />
In case of change-over from mineral to synthetic oil, an oil exchange is to be effected within an<br />
operation period of 24 h.<br />
It is not necessary to clean the oil chambers separately.<br />
Concerning the following oil brands, good practical experiences are available:<br />
Oil brand Name SAE - viscosity class Pour-point<br />
Aral Aral High Tronic 5W - 40 - 60°C<br />
Esso Ultron 5W - 40 - 54°C<br />
Mobil Mobil 1 0W - 40 - 55°C<br />
Shell Helix Diesel Ultra 5W - 30 - 55°C<br />
Other oils brands may also be applied, provided the specification is observed.<br />
Before the test run the bearing and gear covers are be filled with the conservation oil<br />
ESSOLUB MZ 20W-20.<br />
After the mechanical test run the lube- and conservation oil is to be drained.<br />
The blower is delivered without lubricant filling.<br />
Prior to commissioning fill up oil<br />
8.3 Oil filling - transparent reservoir<br />
In order to avoid a dry-running of the seal rings of the driving shaft during commissioning on delivery<br />
of the blower stage the seal ring housing is filled with ARAL Motanol HV100.<br />
Adjust oil level to center of transparent reservoir<br />
For supplies of blowers with transparent reservoirs (oiler) of code No. 117502 (applicable until May<br />
1998) a deventilation of the sealing chamber can be achieved as follows: a hose, Ø 4 mm, is lead into<br />
the sealing chamber through the transparent reservoir. By means of oil feeder pump in oil, until the<br />
reservoir is approx. half-full. It must be guaranteed, that the sealing chamber is deventilated.<br />
4PG-401 EN page 10 of 14<br />
0368-002
Aerzener Maschinenfabrik GmbH<br />
Reherweg 28 / D-31855 Aerzen, Postfach 11 63 / D-31849 Aerzen, Tel.: 05154/810, Fax: 05154/81191<br />
8.4 Oil fillings (total, for drive and gear side together)<br />
Type approx. litres<br />
—————————————————————<br />
GLa 10.0 10.1 10.2 0,7<br />
GMa 10.1 10.1 10.2 0,9<br />
GLa 11.3 11.4 0,8<br />
GMa 11.3 11.4 1,1<br />
GLa 12.5 12.6 1,1<br />
GMa 12.5 12.6 1,5<br />
GLa 13.f7 13.8 2,1<br />
GMa 13.f7 13.8 2,5<br />
GLb 14.9 3,5<br />
GMb 14.9 7,0<br />
GLb 15.10 15.11 5,4<br />
GMb 15.10 15.11 12,0<br />
GLb 16.12 16.f13 16.13 7,6<br />
GMb 16.12 16.f13 16.13 11,0<br />
GMb 17.15 18,5<br />
GMb 18.17 22,0<br />
GMb 19.19 35,0<br />
GMb 20.21 140,0<br />
8.5 Oil change<br />
Machine part<br />
Lubrica-tingType of<br />
point lubrication<br />
Lubricant<br />
symbol acc.<br />
DIN 51502<br />
Lubricanting qty.<br />
oil<br />
litres<br />
Change of lubricant<br />
acc. to<br />
first<br />
further*<br />
driving side<br />
1<br />
splash<br />
lubrication<br />
Motor oil<br />
5W-40<br />
see<br />
list<br />
-<br />
200<br />
4000<br />
wheel side<br />
2<br />
splash<br />
lubrication<br />
Motor oil<br />
5W-40<br />
see<br />
list<br />
-<br />
200<br />
4000<br />
* all year at the latest<br />
4PG-401 EN page 11 of 14<br />
0368-002
Aerzener Maschinenfabrik GmbH<br />
Reherweg 28 / D-31855 Aerzen, Postfach 11 63 / D-31849 Aerzen, Tel.: 05154/810, Fax: 05154/81191<br />
9. Cleaning of the blower<br />
As the rotors operate without contact with one another, the clearances between rotors and housing<br />
allow the conveyance of dust laden media to a limited extent. Thus deposits in the blower can occur.<br />
When removing the piping the conveying chamber can be checked and cleaned.<br />
Adhesive and sticking deposits can be removed either with a scraper or an appropriate solvent on<br />
their nature.<br />
After every thorough cleaning the lubricating oil is to be changed.<br />
10. Change of flow direction (GMa 10.0 - GMb 16.13)<br />
In case it is necessary to change an already dispatched machine from GM to GL the following steps<br />
have to be carried out:<br />
1) Extract oil<br />
2) Relocate feet, drive shaft is now at the bottom<br />
3) Exchange oil sight glasses and filler/drain<br />
4) Remove seal ring housing<br />
5) Lengthen pipe between seal ring housing and oil reservoir<br />
6) Mount seal ring housing with oil reservoir vertical<br />
7) Fill up oil in accordance with the operating instruction<br />
11. Watercooled seal ring housing<br />
Water quantities at 1 bar (g) and ∆t = 10 °C<br />
blower type<br />
GMb / GLb 17<br />
18<br />
19<br />
20<br />
water quantity<br />
40 l/h<br />
40 l/h<br />
50 l/h<br />
50 l/h<br />
The max. admissible water pressure amounts to 1 bar (g).<br />
Aerzener Maschinenfabrik<br />
GmbH<br />
Reherweg 28 Postfach 11 63<br />
D-31855 Aerzen D-31849 Aerzen<br />
Tel.: 05154/810, Telex: 92847 am d, Fax: 05154/81191<br />
4PG-401 EN page 12 of 14<br />
0368-002
Aerzener Maschinenfabrik GmbH<br />
Reherweg 28 / D-31855 Aerzen, Postfach 11 63 / D-31849 Aerzen, Tel.: 05154/810, Fax: 05154/81191<br />
12. Spare parts list<br />
GMa / GMb<br />
GLa / GLb<br />
item<br />
denomination<br />
GMa / GLa<br />
10...-13... HV<br />
GMb / GLb<br />
14...HV<br />
GMb 17...HV<br />
GMb / GLb<br />
15...HV<br />
GMb / GLb<br />
16...HV<br />
1 single-row ball bearing<br />
2 single-row ball bearing<br />
3 single-row ball bearing<br />
4 radial shaft seal ring<br />
5 radial shaft seal ring<br />
6 shaft sleeve<br />
7 piston ring<br />
8 pair of gear wheels<br />
9 O-ring<br />
10 O-ring<br />
11 rotary piston with driving shaft<br />
12 rotary piston with secondary shaft<br />
13 fitting key<br />
14 O-ring<br />
15 adjusting key<br />
16 oil level indicator<br />
17 shaft nut<br />
18 bearing cover<br />
19 ring retainer<br />
20 ring retainer<br />
21 ring retainer<br />
22 sealing bush<br />
23 oil splasher<br />
24 bearing cover<br />
25 oil thrower<br />
26 oil thrower<br />
27 foot<br />
28 foot<br />
29 cylinder<br />
30 side plate<br />
31 gear case<br />
32 housing cover<br />
33 seal ring housing<br />
34 shaft nut<br />
35 O-ring<br />
36 bearing fixing washer<br />
4<br />
-<br />
-<br />
1<br />
1<br />
1<br />
16<br />
1<br />
1<br />
1<br />
1<br />
1<br />
1<br />
4<br />
-<br />
4<br />
-<br />
4<br />
-<br />
-<br />
4<br />
4<br />
4<br />
-<br />
1<br />
1<br />
-<br />
2<br />
1<br />
2<br />
1<br />
1<br />
1<br />
2<br />
4<br />
2<br />
4<br />
-<br />
-<br />
1<br />
1<br />
1<br />
16<br />
1<br />
1<br />
1<br />
1<br />
1<br />
1<br />
4<br />
6<br />
4<br />
-<br />
4<br />
-<br />
-<br />
4<br />
4<br />
4<br />
-<br />
1<br />
1<br />
-<br />
2<br />
1<br />
2<br />
1<br />
1<br />
1<br />
4<br />
4<br />
-<br />
3<br />
1<br />
-<br />
1<br />
1<br />
1<br />
16<br />
1<br />
1<br />
1<br />
1<br />
1<br />
1<br />
4<br />
8<br />
4<br />
1<br />
3<br />
-<br />
1<br />
3<br />
4<br />
4<br />
-<br />
1<br />
1<br />
-<br />
2<br />
1<br />
2<br />
1<br />
1<br />
1<br />
2<br />
4<br />
-<br />
-<br />
1<br />
5<br />
1<br />
1<br />
1<br />
16<br />
1<br />
1<br />
1<br />
1<br />
1<br />
1<br />
5<br />
16<br />
4<br />
1<br />
1<br />
3<br />
1<br />
-<br />
4<br />
4<br />
2<br />
1<br />
1<br />
4<br />
-<br />
1<br />
2<br />
1<br />
1<br />
1<br />
2<br />
4<br />
-<br />
4PG-401 EN page 13 of 14<br />
0368-002
Aerzener Maschinenfabrik GmbH<br />
Reherweg 28 / D-31855 Aerzen, Postfach 11 63 / D-31849 Aerzen, Tel.: 05154/810, Fax: 05154/81191<br />
normal speed 4TG - 3381<br />
blower<br />
pressure<br />
differ.<br />
speed motor theor. intake pressure<br />
differ.<br />
higher speed with oil feed device<br />
speed<br />
motor<br />
theor. intake<br />
4 ) (a) *GMa/b 15.10 and *GMa/b 15.11 at speed greater than 3000 1/min P max = 15 kW res. 18,5 kW.<br />
5 ) Types with *): GMa - type only spare blowers.<br />
normal speed 4TG - 3382<br />
press.diff.<br />
higher speed with oil feed device<br />
speed motor blower theor. intakepress.diff.<br />
speed motor<br />
pulley d<br />
blower<br />
pulley d<br />
theor. intake<br />
6 ) Types with *): GMa - type only spare blowers.<br />
4PG-401 EN Mechanical load limits of the Rough HV - blowers<br />
page 14 of 14<br />
0368-002