LM3445 Triac Dimmable Offline LED Driver
LM3445 Triac Dimmable Offline LED Driver
LM3445 Triac Dimmable Offline LED Driver

Create successful ePaper yourself
Turn your PDF publications into a flip-book with our unique Google optimized e-Paper software.
<strong>LM3445</strong><br />
<strong>Triac</strong> <strong>Dimmable</strong> <strong>Offline</strong> <strong>LED</strong> <strong>Driver</strong><br />
General Description<br />
The <strong>LM3445</strong> is an adaptive constant off-time AC/DC buck<br />
(step-down) constant current controller designed to be compatible<br />
with triac dimmers. The <strong>LM3445</strong> provides a constant<br />
current for illuminating high power <strong>LED</strong>s and includes a triac<br />
dim decoder. The dim decoder allows wide range <strong>LED</strong> dimming<br />
using standard triac dimmers. The high frequency capable<br />
architecture allows the use of small external passive<br />
components. The <strong>LM3445</strong> includes a bleeder circuit to ensure<br />
proper triac operation by allowing current flow while the line<br />
voltage is low to enable proper firing of the triac. A passive<br />
PFC circuit ensures good power factor by drawing current directly<br />
from the line for most of the cycle, and provides a<br />
constant positive voltage to the buck regulator. Additional<br />
features include thermal shutdown, current limit and V CC under-voltage<br />
lockout.<br />
Features<br />
February 10, 2009<br />
■ <strong>Triac</strong> dim decoder circuit for <strong>LED</strong> dimming<br />
■ Application voltage range 80V AC – 270V AC<br />
■ Capable of controlling <strong>LED</strong> currents greater than 1A<br />
■ Adjustable switching frequency<br />
■ Low quiescent current<br />
■ Adaptive programmable off-time allows for constant ripple<br />
current<br />
■ Thermal shutdown<br />
■ No 120Hz flicker<br />
■ Low profile 10 pin MSOP Package<br />
■ Patent pending drive architecture<br />
Applications<br />
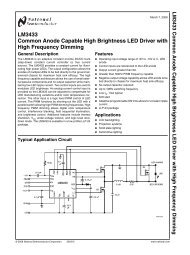
Typical <strong>LM3445</strong> <strong>LED</strong> <strong>Driver</strong> Application Circuit<br />
■ Retro Fit <strong>Triac</strong> Dimming<br />
■ Solid State Lighting<br />
■ Industrial and Commercial Lighting<br />
■ Residential Lighting<br />
<strong>LM3445</strong> <strong>Triac</strong> <strong>Dimmable</strong> <strong>Offline</strong> <strong>LED</strong> <strong>Driver</strong><br />
30060305<br />
30060301<br />
© 2009 National Semiconductor Corporation 300603 www.national.com
<strong>LM3445</strong><br />
Connection Diagram<br />
Top View<br />
10-Pin MSOP<br />
NS Package Number MUB10A<br />
30060303<br />
Ordering Information<br />
Order Number Spec. Package<br />
Type<br />
NSC Package<br />
Drawing<br />
Top Mark<br />
Supplied As<br />
<strong>LM3445</strong>MM NOPB MSOP-10 MUB10A SULB 1000 Units, Tape and Reel<br />
<strong>LM3445</strong>MMX NOPB MSOP-10 MUB10A SULB 3500 Units, Tape and Reel<br />
Pin Descriptions<br />
Pin # Name Description<br />
1 ASNS PWM output of the triac dim decoder circuit. Outputs a 0 to 4V PWM signal with a duty cycle proportional to<br />
the triac dimmer on-time.<br />
2 FLTR1 First filter input. The 120Hz PWM signal from ASNS is filtered to a DC signal and compared to a 1 to 3V, 5.85<br />
kHz ramp to generate a higher frequency PWM signal with a duty cycle proportional to the triac dimmer firing<br />
angle. Pull above 4.9V (typical) to tri-state DIM.<br />
3 DIM Input/output dual function dim pin. This pin can be driven with an external PWM signal to dim the <strong>LED</strong>s. It may<br />
also be used as an output signal and connected to the DIM pin of other <strong>LM3445</strong> or <strong>LED</strong> drivers to dim multiple<br />
<strong>LED</strong> circuits simultaneously.<br />
4 COFF OFF time setting pin. A user set current and capacitor connected from the output to this pin sets the constant<br />
OFF time of the switching controller.<br />
5 FLTR2 Second filter input. A capacitor tied to this pin filters the PWM dimming signal to supply a DC voltage to control<br />
the <strong>LED</strong> current. Could also be used as an analog dimming input.<br />
6 GND Circuit ground connection.<br />
7 ISNS <strong>LED</strong> current sense pin. Connect a resistor from main switching MOSFET source, ISNS to GND to set the<br />
maximum <strong>LED</strong> current.<br />
8 GATE Power MOSFET driver pin. This output provides the gate drive for the power switching MOSFET of the buck<br />
controller.<br />
9 V CC Input voltage pin. This pin provides the power for the internal control circuitry and gate driver.<br />
10 BLDR Bleeder pin. Provides the input signal to the angle detect circuitry as well as a current path through a switched<br />
230Ω resistor to ensure proper firing of the triac dimmer.<br />
www.national.com 2
Absolute Maximum Ratings (Notes 1, 2)<br />
If Military/Aerospace specified devices are required,<br />
please contact the National Semiconductor Sales Office/<br />
Distributors for availability and specifications.<br />
BLDR to GND -0.3V to +17V<br />
V CC , GATE, FLTR1 to GND -0.3V to +14V<br />
ISNS to GND<br />
-0.3V to +2.5V<br />
ASNS, DIM, FLTR2, COFF to<br />
GND<br />
-0.3V to +7.0V<br />
COFF Input Current<br />
100mA<br />
Continuous Power Dissipation Internally Limited<br />
(Note 3)<br />
ESD Susceptibility<br />
HBM (Note 4)<br />
2 kV<br />
Junction Temperature (T J-MAX ) 150°C<br />
Storage Temperature Range<br />
-65°C to +150°C<br />
Maximum Lead Temp.<br />
Range (Soldering) 300°C<br />
Operating Conditions<br />
V CC<br />
Junction Temperature<br />
8.0V to 12V<br />
−40°C to +125°C<br />
<strong>LM3445</strong><br />
Electrical Characteristics Limits in standard type face are for T J = 25°C and those with boldface type apply<br />
over the full Operating Temperature Range ( T J = −40°C to +125°C). Minimum and Maximum limits are guaranteed through test,<br />
design, or statistical correlation. Typical values represent the most likely parametric norm at T J = +25ºC, and are provided for<br />
reference purposes only.<br />
BLEEDER<br />
Symbol Parameter Conditions Min Typ Max Units<br />
V CC SUPPLY<br />
COFF<br />
R BLDR Bleeder resistance to GND I BLDR = 10mA 230 325 Ω<br />
I VCC Operating supply current 2.00 2.85 mA<br />
V CC-UVLO Rising threshold 7.4 7.7 V<br />
Falling threshold 6.0 6.4<br />
Hysterisis 1<br />
V COFF Time out threshold 1.225 1.276 1.327 V<br />
R COFF Off timer sinking impedance 33 60 Ω<br />
t COFF Restart timer 180 µs<br />
CURRENT LIMIT<br />
V ISNS ISNS limit threshold 1.174 1.269 1.364 V<br />
t ISNS Leading edge blanking time 125 ns<br />
INTERNAL PWM RAMP<br />
Current limit reset delay 180 µs<br />
ISNS limit to GATE delay ISNS = 0 to 1.75V step 33 ns<br />
f RAMP Frequency 5.85 kHz<br />
V RAMP Valley voltage 0.96 1.00 1.04 V<br />
Peak voltage 2.85 3.00 3.08<br />
D RAMP Maximum duty cycle 96.5 98.0 %<br />
DIM DECODER<br />
t ANG_DET Angle detect rising threshold Observed on BLDR pin 6.79 7.21 7.81 V<br />
V ASNS ASNS filter delay 4 µs<br />
ASNS VMAX 3.85 4.00 4.15 V<br />
I ASNS ASNS drive capability sink V ASNS = 2V 7.6 mA<br />
ASNS drive capability source V ASNS = 2V -4.3<br />
DIM low sink current V DIM = 1V 1.65 2.80<br />
DIM High source current V DIM = 4V -4.00 -3.00<br />
V DIM DIM low voltage PWM input voltage<br />
threshold<br />
0.9 1.33 V<br />
DIM high voltage 2.33 3.15<br />
V TSTH Tri-state threshold voltage Apply to FLTR1 pin 4.87 5.25 V<br />
R DIM DIM comparator tri-state impedance 10 MΩ<br />
3 www.national.com
<strong>LM3445</strong><br />
Symbol Parameter Conditions Min Typ Max Units<br />
CURRENT SENSE COMPARATOR<br />
V FLTR2 FLTR2 open circuit voltage 720 750 780 mV<br />
R FLTR2 FLTR2 impedance 420 kΩ<br />
V OS Current sense comparator offset voltage -4.0 0.1 4.0 mV<br />
GATE DRIVE OUTPUT<br />
V DRVH GATE high saturation I GATE = 50 mA 0.24 0.50 V<br />
V DRVL GATE low saturation I GATE = 100 mA 0.22 0.50<br />
I DRV Peak souce current GATE = V CC /2 -0.77 A<br />
Peak sink current GATE = V CC /2 0.88<br />
t DV Rise time C load = 1 nF 15 ns<br />
Fall time C load = 1 nF 15<br />
THERMAL SHUTDOWN<br />
T SD Thermal shutdown temperature (Note 5) 165 °C<br />
Thermal shutdown hysteresis 20<br />
THERMAL SHUTDOWN<br />
R θJA<br />
MSOP-10 junction to ambient 121 °C/W<br />
Note 1: Absolute maximum ratings are limits beyond which damage to the device may occur. Operating Ratings are conditions for which the device is intended<br />
to be functional, but device parameter specifications may not be guaranteed. For guaranteed specifications and test conditions, see the Electrical Characteristics.<br />
Note 2: All voltages are with respect to the potential at the GND pin, unless otherwise specified.<br />
Note 3: Internal thermal shutdown circuitry protects the device from permanent damage. Thermal shutdown engages at T J = 165°C (typ.) and disengages at T J<br />
= 145°C (typ).<br />
Note 4: Human Body Model, applicable std. JESD22-A114-C.<br />
Note 5: Junction-to-ambient thermal resistance is highly application and board-layout dependent. In applications where high maximum power dissipation exists,<br />
special care must be paid to thermal dissipation issues in board design. In applications where high power dissipation and/or poor package thermal resistance is<br />
present, the maximum ambient temperature may have to be derated. Maximum ambient temperature (T A-MAX ) is dependent on the maximum operating junction<br />
temperature (T J-MAX-OP = 125°C), the maximum power dissipation of the device in the application (P D-MAX ), and the junction-to ambient thermal resistance of the<br />
part/package in the application (R θJA ), as given by the following equation: T A-MAX = T J-MAX-OP – (R θJA × P D-MAX ).<br />
www.national.com 4
Typical Performance Characteristics<br />
f SW vs Input Line Voltage<br />
Efficiency vs Input Line Voltage<br />
<strong>LM3445</strong><br />
30060304<br />
30060305<br />
BLDR Resistor vs Temperature<br />
V CC UVLO vs Temperature<br />
Min On-Time (t ON ) vs Temperature<br />
30060306<br />
Off Threshold (C11) vs Temperature<br />
30060307<br />
30060308<br />
30060309<br />
5 www.national.com
<strong>LM3445</strong><br />
Normalized Variation in f SW over V BUCK Voltage<br />
Leading Edge Blanking Variation Over Temperature<br />
30060310<br />
30060372<br />
www.national.com 6
Simplified Internal Block Diagram<br />
<strong>LM3445</strong><br />
30060311<br />
FIGURE 1. Simplified Block Diagram<br />
7 www.national.com
<strong>LM3445</strong><br />
Application Information<br />
FUNCTIONAL DESCRIPTION<br />
The <strong>LM3445</strong> contains all the necessary circuitry to build a linepowered<br />
(mains powered) constant current <strong>LED</strong> driver whose<br />
output current can be controlled with a conventional triac dimmer.<br />
OVERVIEW OF PHASE CONTROL DIMMING<br />
A basic "phase controlled" triac dimmer circuit is shown in<br />
Figure 2.<br />
30060312<br />
FIGURE 2. Basic <strong>Triac</strong> Dimmer<br />
An RC network consisting of R1, R2, and C1 delay the turn<br />
on of the triac until the voltage on C1 reaches the trigger voltage<br />
of the diac. Increasing the resistance of the potentiometer<br />
(wiper moving downward) increases the turn-on delay which<br />
decreases the on-time or "conduction angle" of the triac (θ).<br />
This reduces the average power delivered to the load. Voltage<br />
waveforms for a simple triac dimmer are shown in Figure 3.<br />
Figure 3a shows the full sinusoid of the input voltage. Even<br />
when set to full brightness, few dimmers will provide 100%<br />
on-time, i.e., the full sinusoid.<br />
FIGURE 3. Line Voltage and Dimming Waveforms<br />
30060313<br />
Figure 3b shows a theoretical waveform from a dimmer. The<br />
on-time is often referred to as the "conduction angle" and may<br />
be stated in degrees or radians. The off-time represents the<br />
delay caused by the RC circuit feeding the triac. The off-time<br />
be referred to as the "firing angle" and is simply 180° - θ.<br />
Figure 3c shows a waveform from a so-called reverse phase<br />
dimmer, sometimes referred to as an electronic dimmer.<br />
These typically are more expensive, microcontroller based<br />
dimmers that use switching elements other than triacs. Note<br />
that the conduction starts from the zero-crossing, and terminates<br />
some time later. This method of control reduces the<br />
noise spike at the transition.<br />
Since the <strong>LM3445</strong> has been designed to assess the relative<br />
on-time and control the <strong>LED</strong> current accordingly, most phasecontrol<br />
dimmers, both forward and reverse phase, may be<br />
used with success.<br />
www.national.com 8
Theory of Operation<br />
Refer to figure 4 below which shows the <strong>LM3445</strong> along with<br />
basic external circuitry.<br />
<strong>LM3445</strong><br />
30060301<br />
FIGURE 4. <strong>LM3445</strong> Schematic<br />
9 www.national.com
<strong>LM3445</strong><br />
SENSING THE RECTIFIED TRIAC WAVEFORM<br />
A bridge rectifier, BR1, converts the line (mains) voltage (5c)<br />
into a series of half-sines as shown in 5b. Figure 5a shows a<br />
typical voltage waveform after diode D3 (valley fill circuit, or<br />
V BUCK ).<br />
30060315<br />
FIGURE 5. Voltage Waveforms After Bridge Rectifier<br />
Without <strong>Triac</strong> Dimming<br />
Figure 6c and 6b show typical triac dimmed voltage waveforms<br />
before and after the bridge rectifier. Figure 6a shows a<br />
typical triac dimmed voltage waveform after diode D3 (valley<br />
fill circuit, or V BUCK ).<br />
30060316<br />
FIGURE 6. Voltage Waveforms After Bridge Rectifier With<br />
<strong>Triac</strong> Dimming<br />
<strong>LM3445</strong> LINE SENSING CIRCUITRY<br />
An external series pass regulator (R2, D1, and Q1) translates<br />
the rectified line voltage to a level where it can be sensed by<br />
the BLDR pin on the <strong>LM3445</strong>.<br />
30060317<br />
FIGURE 7. <strong>LM3445</strong> AC Line Sense Circuitry<br />
D1 is typically a 15V zener diode which forces transistor Q1<br />
to “stand-off” most of the rectified line voltage. Having no capacitance<br />
on the source of Q1 allows the voltage on the BLDR<br />
pin to rise and fall with the rectified line voltage as the line<br />
voltage drops below zener voltage D1 (see the section on<br />
Angle Detect).<br />
A diode-capacitor network (D2, C5) is used to maintain the<br />
voltage on the VCC pin while the voltage on the BLDR pin<br />
goes low. This provides the supply voltage to operate the<br />
<strong>LM3445</strong>.<br />
Resistor R5 is used to bleed charge out of any stray capacitance<br />
on the BLDR node and may be used to provide the<br />
necessary holding current for the dimmer when operating at<br />
light output currents.<br />
TRIAC HOLDING CURRENT RESISTOR<br />
In order to emulate an incandescent light bulb (essentially a<br />
resistor) with any <strong>LED</strong> driver, the existing triac will require a<br />
small amount of holding current throughout the AC line cycle.<br />
An external resistor (R5) needs to be placed on the source of<br />
Q1 to GND to perform this function. Most existing triac dimmers<br />
only require a few milliamps of current to hold them on.<br />
A few “less expensive” triacs sold on the market will require<br />
a bit more current. The value of resistor R5 will depend on:<br />
• What type of triac the <strong>LM3445</strong> will be used with<br />
• How many light fixtures are running off of the triac<br />
With a single <strong>LM3445</strong> circuit on a common triac dimmer, a<br />
holding current resistor between 3 kΩ and 5 kΩ will be required.<br />
As the number of <strong>LM3445</strong> circuits is added to a single<br />
dimmer, the holding resistor R5’s resistance can be increased.<br />
A few triac dimmers will require a resistor as low as<br />
1 kΩ or lower for a single <strong>LM3445</strong> circuit. The trade-off will be<br />
www.national.com 10
performance vs efficiency. As the holding resistor R5 is increased,<br />
the overall efficiency per <strong>LM3445</strong> will also increase.<br />
ANGLE DETECT<br />
The Angle Detect circuit uses a comparator with a fixed<br />
threshold voltage of 7.21V to monitor the BLDR pin to determine<br />
whether the triac is on or off. The output of the comparator<br />
drives the ASNS buffer and also controls the Bleeder<br />
circuit. A 4 µs delay line on the output is used to filter out noise<br />
that could be present on this signal.<br />
The output of the Angle Detect circuit is limited to a 0V to 4.0V<br />
swing by the buffer and presented to the ASNS pin. R1 and<br />
C3 comprise a low-pass filter with a bandwidth on the order<br />
of 1.0Hz.<br />
The Angle Detect circuit and its filter produce a DC level which<br />
corresponds to the duty cycle (relative on-time) of the triac<br />
dimmer. As a result, the <strong>LM3445</strong> will work equally well with<br />
50Hz or 60Hz line voltages.<br />
BLEEDER<br />
While the BLDR pin is below the 7.21V threshold, the bleeder<br />
MOSFET is on to place a small load (230Ω) on the series pass<br />
regulator. This additional load is necessary to complete the<br />
circuit through the triac dimmer so that the dimmer delay circuit<br />
can operate correctly. Above 7.21V, the bleeder resistor<br />
is removed to increase efficiency.<br />
FLTR1 PIN<br />
The FLTR1 pin has two functions. Normally, it is fed by ASNS<br />
through filter components R1 and C3 and drives the dim decoder.<br />
However, if the FLTR1 pin is tied above 4.9V (typical),<br />
e.g., to VCC, the Ramp Comparator is tri-stated, disabling the<br />
dim decoder. See the Master/Slave section.<br />
DIM DECODER<br />
The ramp generator produces a 5.85 kHz saw tooth wave with<br />
a minimum of 1.0V and a maximum of 3.0V. The filtered ASNS<br />
signal enters pin FLTR1 where it is compared against the<br />
output of the Ramp Generator.<br />
The output of the ramp comparator will have an on-time which<br />
is inversely proportional to the average voltage level at pin<br />
FLTR1. However, since the FLTR1 signal can vary between<br />
0V and 4.0V (the limits of the ASNS pin), and the Ramp Generator<br />
signal only varies between 1.0V and 3.0V, the output<br />
of the ramp comparator will be on continuously for V FLTR1 <<br />
1.0V and off continuously for V FLTR1 > 3.0V. This allows a decoding<br />
range from 45° to 135° to provide a 0 – 100% dimming<br />
range.<br />
The output of the ramp comparator drives both a commonsource<br />
N-channel MOSFET through a Schmitt trigger and the<br />
DIM pin (see the Master/Slave section for further functions of<br />
the DIM pin). The MOSFET drain is pulled up to 750 mV by a<br />
50 kΩ resistor.<br />
Since the MOSFET inverts the output of the ramp comparator,<br />
the drain voltage of the MOSFET is proportional to the duty<br />
cycle of the line voltage that comes through the triac dimmer.<br />
The amplitude of the ramp generator causes this proportionality<br />
to "hard limit" for duty cycles above 75% and below 25%.<br />
The MOSFET drain signal next passes through an RC filter<br />
comprised of an internal 370 kΩ resistor, and an external capacitor<br />
on pin FLTR2. This forms a second low pass filter to<br />
further reduce the ripple in this signal, which is used as a reference<br />
by the PWM comparator. This RC filter is generally set<br />
to 10Hz.<br />
The net effect is that the output of the dim decoder is a DC<br />
voltage whose amplitude varies from near 0V to 750 mV as<br />
the duty cycle of the dimmer varies from 25% to 75%. This<br />
corresponds to conduction angles of 45° to 135°, respectively.<br />
The output voltage of the Dim Decoder directly controls the<br />
peak current that will be delivered by Q2 during its on-time.<br />
See the Buck Converter section for details.<br />
As the triac fires beyond 135°, the DIM decoder no longer<br />
controls the dimming. At this point the <strong>LED</strong>s will dim gradually<br />
for one of two reasons:<br />
1. The voltage at V BUCK decreases and the buck converter<br />
runs out of headroom and causes <strong>LED</strong> current to<br />
decrease as V BUCK decreases.<br />
2. Minimum on-time is reached which fixes the duty-cycle<br />
and therefore reduces the voltage at V BUCK .<br />
The transition from dimming with the DIM decoder to headroom<br />
or minimum on-time dimming is seamless. <strong>LED</strong> currents<br />
from full load to as low as 0.5 mA can be easily achieved.<br />
VALLEY-FILL CIRCUIT<br />
V BUCK supplies the power which drives the <strong>LED</strong> string. Diode<br />
D3 allows V BUCK to remain high while V+ cycles on and off.<br />
V BUCK has a relatively small hold capacitor C10 which reduces<br />
the voltage ripple when the valley fill capacitors are being<br />
charged. However, the network of diodes and capacitors<br />
shown between D3 and C10 make up a "valley-fill" circuit. The<br />
valley-fill circuit can be configured with two or three stages.<br />
The most common configuration is two stages. Figure 8 illustrates<br />
a two and three stage valley-fill circuit.<br />
<strong>LM3445</strong><br />
30060318<br />
FIGURE 8. Two and Three Stage Valley Fill Circuit<br />
11 www.national.com
<strong>LM3445</strong><br />
The valley-fill circuit allows the buck regulator to draw power<br />
throughout a larger portion of the AC line. This allows the capacitance<br />
needed at V BUCK to be lower than if there were no<br />
valley-fill circuit, and adds passive power factor correction<br />
(PFC) to the application. Besides better power factor correction,<br />
a valley-fill circuit allows the buck converter to operate<br />
while separate circuitry translates the dimming information.<br />
This allows for dimming that isn’t subject to 120Hz flicker that<br />
can be perceived by the human eye.<br />
VALLEY-FILL OPERATION<br />
When the “input line is high”, power is derived directly through<br />
D3. The term “input line is high” can be explained as follows.<br />
The valley-fill circuit charges capacitors C7 and C9 in series<br />
(see figure 9) when the input line is high.<br />
30060319<br />
FIGURE 9. Two stage Valley-Fill Circuit when AC Line is<br />
High<br />
A three stage valley-fill circuit performs exactly the same as<br />
two-stage valley-fill circuit except now three capacitors are<br />
now charged in series, and when the line voltage decreases<br />
to:<br />
Diode D3 is reversed biased and three capacitors are in parallel<br />
to each other.<br />
The valley-fill circuit can be optimized for power factor, voltage<br />
hold up and overall application size and cost. The<br />
<strong>LM3445</strong> will operate with a single stage or a three stage valley-fill<br />
circuit as well. Resistor R8 functions as a current<br />
limiting resistor during start-up, and during the transition from<br />
series to parallel connection. Resistors R6 and R7 are 1 MΩ<br />
bleeder resistors, and may or may not be necessary for each<br />
application.<br />
BUCK CONVERTER<br />
The <strong>LM3445</strong> is a buck controller that uses a proprietary constant<br />
off-time method to maintain constant current through a<br />
string of <strong>LED</strong>s. While transistor Q2 is on, current ramps up<br />
through the inductor and <strong>LED</strong> string. A resistor R3 senses this<br />
current and this voltage is compared to the reference voltage<br />
at FLTR2. When this sensed voltage is equal to the reference<br />
voltage, transistor Q2 is turned off and diode D10 conducts<br />
the current through the inductor and <strong>LED</strong>s. Capacitor C12<br />
eliminates most of the ripple current seen in the inductor. Resistor<br />
R4, capacitor C11, and transistor Q3 provide a linear<br />
current ramp that sets the constant off-time for a given output<br />
voltage.<br />
The peak voltage of a two stage valley-fill capacitor is:<br />
As the AC line decreases from its peak value every cycle,<br />
there will be a point where the voltage magnitude of the AC<br />
line is equal to the voltage that each capacitor is charged. At<br />
this point diode D3 becomes reversed biased, and the capacitors<br />
are placed in parallel to each other (figure 10), and<br />
V BUCK equals the capacitor voltage.<br />
30060321<br />
FIGURE 10. Two stage Valley-Fill Circuit when AC Line is<br />
Low<br />
www.national.com 12
<strong>LM3445</strong><br />
30060323<br />
FIGURE 11. <strong>LM3445</strong> Buck Regulation Circuit<br />
OVERVIEW OF CONSTANT OFF-TIME CONTROL<br />
A buck converter’s conversion ratio is defined as:<br />
against the voltage of dim decoder output, FLTR2, at which<br />
point Q2 is turned off by the controller.<br />
Constant off-time control architecture operates by simply<br />
defining the off-time and allowing the on-time, and therefore<br />
the switching frequency, to vary as either V IN or V O changes.<br />
The output voltage is equal to the <strong>LED</strong> string voltage (V <strong>LED</strong> ),<br />
and should not change significantly for a given application.<br />
The input voltage or V BUCK in this analysis will vary as the<br />
input line varies. The length of the on-time is determined by<br />
the sensed inductor current through a resistor to a voltage<br />
reference at a comparator. During the on-time, denoted by<br />
t ON , MOSFET switch Q2 is on causing the inductor current to<br />
increase. During the on-time, current flows from V BUCK ,<br />
through the <strong>LED</strong>s, through L2, Q2, and finally through R3 to<br />
ground. At some point in time, the inductor current reaches a<br />
maximum (I L2-PK ) determined by the voltage sensed at R3 and<br />
the ISNS pin. This sensed voltage across R3 is compared<br />
FIGURE 12. Inductor Current Waveform in CCM<br />
30060325<br />
During the off-period denoted by t OFF , the current through L2<br />
continues to flow through the <strong>LED</strong>s via D10.<br />
13 www.national.com
<strong>LM3445</strong><br />
MASTER/SLAVE OPERATION<br />
Multiple <strong>LM3445</strong>s can be configured so that large strings of<br />
<strong>LED</strong>s can be controlled by a single triac dimmer. By doing so,<br />
smooth consistent dimming for multiple <strong>LED</strong> circuits is<br />
achieved.<br />
When the FLTR1 pin is tied above 4.9V (typical), preferably<br />
to VCC, the ramp comparator is tri-stated, disabling the dim<br />
decoder. This allows one or more <strong>LM3445</strong> devices or PWM<br />
<strong>LED</strong> driver devices (slaves) to be controlled by a single<br />
<strong>LM3445</strong> (master) by connecting their DIM pins together.<br />
MASTER/SLAVE CONFIGURATION<br />
National Semiconductor offers an <strong>LM3445</strong> demonstration<br />
PCB for customer evaluation through our website. The following<br />
description and theory uses reference designators that<br />
follow our evaluation PCB. The <strong>LM3445</strong> Master/Slave<br />
schematics are illustrated below (figures 13 - 15) for clarity.<br />
Each board contains a separate circuit for the Master and<br />
Slave function. Both the Master and Slave boards will need<br />
to be modified from their original stand alone function so that<br />
they can be coupled together. Only the Master <strong>LM3445</strong> requires<br />
use of the Master/Slave circuit for any number of<br />
slaves.<br />
MASTER BOARD MODIFICATIONS<br />
• Remove R10 and replace with a BAS40 diode<br />
• Connect TP18 to TP14 (V CC )<br />
• Connect TP17 (gate of Q5) to TP15 (gate of Q2)<br />
SLAVE BOARD(S) MODIFICATIONS<br />
• Remove R11 (disconnects BLDR)<br />
• Tie TP14 (FLTR1) to V CC<br />
MASTER/SLAVE(S) INTERCONNECTION<br />
• Connect TP19 of Master to TP10 of Slave (Master VCC<br />
Control)<br />
• Connect TP6 (DIM pin) of Master to TP6 (DIM pin) of Slave<br />
(Master DIM Control)<br />
MASTER/SLAVE THEORY OF OPERATION<br />
By placing two series diodes on the Master VCC circuit one<br />
forces the master VCC UVLO to become the dominant threshold.<br />
When Master VCC drops below UVLO, GATE stops<br />
switching and the RC timer (>200 µs) rises above the TL431<br />
threshold (2.5V) which in turn pulls down on the gate of the<br />
Slave pass device (Q1).<br />
The valley-fill circuit could consist of one large circuit to power<br />
all <strong>LM3445</strong> series connected, or each <strong>LM3445</strong> circuit could<br />
have a separate valley-fill circuit located near the buck converter.<br />
www.national.com 14
MASTER/SLAVE CONNECTION DIAGRAM<br />
<strong>LM3445</strong><br />
30060326<br />
FIGURE 13. Master Slave Configuration<br />
MASTER/SLAVE BLOCK DIAGRAMS<br />
30060327<br />
FIGURE 14. Master/Slave configuration with Separate Valley-Fill Circuits<br />
15 www.national.com
<strong>LM3445</strong><br />
30060328<br />
FIGURE 15. Master/Slave configuration with One Valley-Fill Circuit<br />
THERMAL SHUTDOWN<br />
Thermal shutdown limits total power dissipation by turning off<br />
the output switch when the IC junction temperature exceeds<br />
165°C. After thermal shutdown occurs, the output switch<br />
doesn’t turn on until the junction temperature drops to approximately<br />
145°C.<br />
www.national.com 16
Design Guide<br />
DETERMINING DUTY-CYCLE (D)<br />
Duty cycle (D) approximately equals:<br />
With efficiency of the buck converter in mind:<br />
<strong>LM3445</strong><br />
Substitute equations and rearrange:<br />
With efficiency considered:<br />
For simplicity, choose efficiency between 75% and 85%.<br />
CALCULATING OFF-TIME<br />
The “Off-Time” of the <strong>LM3445</strong> is set by the user and remains<br />
fairly constant as long as the voltage of the <strong>LED</strong> stack remains<br />
constant. Calculating the off-time is the first step in determining<br />
the switching frequency of the converter, which is integral<br />
in determining some external component values.<br />
PNP transistor Q3, resistor R4, and the <strong>LED</strong> string voltage<br />
define a charging current into capacitor C11. A constant current<br />
into a capacitor creates a linear charging characteristic.<br />
Resistor R4, capacitor C11 and the current through resistor<br />
R4 (i COLL ), which is approximately equal to V <strong>LED</strong> /R4, are all<br />
fixed. Therefore, dv is fixed and linear, and dt (t OFF ) can now<br />
be calculated.<br />
Off-time, and switching frequency can now be calculated using<br />
the equations above.<br />
SETTING THE SWITCHING FREQUENCY<br />
Selecting the switching frequency for nominal operating conditions<br />
is based on tradeoffs between efficiency (better at low<br />
frequency) and solution size/cost (smaller at high frequency).<br />
The input voltage to the buck converter (V BUCK ) changes with<br />
both line variations and over the course of each half-cycle of<br />
the input line voltage. The voltage across the <strong>LED</strong> string will,<br />
however, remain constant, and therefore the off-time remains<br />
constant.<br />
The on-time, and therefore the switching frequency, will vary<br />
as the V BUCK voltage changes with line voltage. A good design<br />
practice is to choose a desired nominal switching frequency<br />
knowing that the switching frequency will decrease as the line<br />
voltage drops and increase as the line voltage increases (see<br />
figure 16).<br />
Common equations for determining duty cycle and switching<br />
frequency in any buck converter:<br />
30060310<br />
Therefore:<br />
FIGURE 16. Graphical Illustration of Switching<br />
Frequency vs V BUCK<br />
17 www.national.com
<strong>LM3445</strong><br />
The off-time of the <strong>LM3445</strong> can be programmed for switching<br />
frequencies ranging from 30 kHz to over 1 MHz. A trade-off<br />
between efficiency and solution size must be considered<br />
when designing the <strong>LM3445</strong> application.<br />
The maximum switching frequency attainable is limited only<br />
by the minimum on-time requirement (200 ns).<br />
Worst case scenario for minimum on time is when V BUCK is at<br />
its maximum voltage (AC high line) and the <strong>LED</strong> string voltage<br />
(V <strong>LED</strong> ) is at its minimum value.<br />
The maximum voltage seen by the Buck Converter is:<br />
Given a fixed inductor value, L, this equation states that the<br />
change in the inductor current over time is proportional to the<br />
voltage applied across the inductor.<br />
During the on-time, the voltage applied across the inductor is,<br />
V L(ON-TIME) = V BUCK - (V <strong>LED</strong> + V DS(Q2) + I L2 x R3)<br />
Since the voltage across the MOSFET switch (Q2) is relatively<br />
small, as is the voltage across sense resistor R3, we<br />
can simplify this to approximately,<br />
V L(ON-TIME) = V BUCK - V <strong>LED</strong><br />
During the off-time, the voltage seen by the inductor is approximately:<br />
V L(OFF-TIME) = V <strong>LED</strong><br />
The value of V L(OFF-TIME) will be relatively constant, because<br />
the <strong>LED</strong> stack voltage will remain constant. If we rewrite the<br />
equation for an inductor inserting what we know about the<br />
circuit during the off-time, we get:<br />
INDUCTOR SELECTION<br />
The controlled off-time architecture of the <strong>LM3445</strong> regulates<br />
the average current through the inductor (L2), and therefore<br />
the <strong>LED</strong> string current. The input voltage to the buck converter<br />
(V BUCK ) changes with line variations and over the course of<br />
each half-cycle of the input line voltage. The voltage across<br />
the <strong>LED</strong> string is relatively constant, and therefore the current<br />
through R4 is constant. This current sets the off-time of the<br />
converter and therefore the output volt-second product<br />
(V <strong>LED</strong> x off-time) remains constant. A constant volt-second<br />
product makes it possible to keep the ripple through the inductor<br />
constant as the voltage at V BUCK varies.<br />
Re-arranging this gives:<br />
From this we can see that the ripple current (Δi) is proportional<br />
to off-time (t OFF ) multiplied by a voltage which is dominated<br />
by V <strong>LED</strong> divided by a constant (L2).<br />
These equations can be rearranged to calculate the desired<br />
value for inductor L2.<br />
Where:<br />
Finally:<br />
30060340<br />
FIGURE 17. <strong>LM3445</strong> External Components of the Buck<br />
Converter<br />
The equation for an ideal inductor is:<br />
Refer to “Design Example” section of the datasheet to better<br />
understand the design process.<br />
www.national.com 18
SETTING THE <strong>LED</strong> CURRENT<br />
The <strong>LM3445</strong> constant off-time control loop regulates the peak<br />
inductor current (I L2 ). The average inductor current equals the<br />
average <strong>LED</strong> current (I AVE ). Therefore the average <strong>LED</strong> current<br />
is regulated by regulating the peak inductor current.<br />
This is important to calculate because this peak current multiplied<br />
by the sense resistor R3 will determine when the<br />
internal comparator is tripped. The internal comparator turns<br />
the control MOSFET off once the peak sensed voltage reaches<br />
750 mV.<br />
<strong>LM3445</strong><br />
FIGURE 18. Inductor Current Waveform in CCM<br />
30060325<br />
Knowing the desired average <strong>LED</strong> current, I AVE and the nominal<br />
inductor current ripple, Δi L , the peak current for an application<br />
running in continuous conduction mode (CCM) is<br />
defined as follows:<br />
Current Limit: Under normal circumstances, the trip voltage<br />
on the PWM comparator would be less than or equal to 750<br />
mV, depending on the amount of dimming. However, if there<br />
is a short circuit or an excessive load on the output, higher<br />
than normal switch currents will cause a voltage above 1.27V<br />
on the ISNS pin which will trip the I-LIM comparator. The I-<br />
LIM comparator will reset the RS latch, turning off Q2. It will<br />
also inhibit the Start Pulse Generator and the COFF comparator<br />
by holding the COFF pin low. A delay circuit will<br />
prevent the start of another cycle for 180 µs.<br />
VALLEY FILL CAPACITORS<br />
Determining voltage rating and capacitance value of the valley-fill<br />
capacitors:<br />
The maximum voltage seen by the valley-fill capacitors is:<br />
Or, the maximum, or "undimmed", <strong>LED</strong> current would then be,<br />
This is, of course, if the capacitors chosen have identical capacitance<br />
values and split the line voltage equally. Often a<br />
20% difference in capacitance could be observed between<br />
like capacitors. Therefore a voltage rating margin of 25% to<br />
50% should be considered.<br />
19 www.national.com
<strong>LM3445</strong><br />
Determining the capacitance value of the valley-fill capacitors:<br />
The valley fill capacitors should be sized to supply energy to<br />
the buck converter (V BUCK ) when the input line is less than its<br />
peak divided by the number of stages used in the valley fill<br />
(t X ). The capacitance value should be calculated when the<br />
triac is not firing, i.e. when full <strong>LED</strong> current is being drawn by<br />
the <strong>LED</strong> string. The maximum power is delivered to the <strong>LED</strong><br />
string at this time, and therefore the most capacitance will be<br />
needed.<br />
operate at much lower and higher input voltages a range<br />
is needed to illustrate the design process.<br />
2. How many stages are implemented in the valley-fill circuit<br />
(1, 2 or 3).<br />
In this example the most common valley-fill circuit will be used<br />
(two stages).<br />
30060354<br />
FIGURE 20. AC Line with Firing Angles<br />
30060352<br />
FIGURE 19. Two Stage Valley-Ffill V BUCK Voltage with no<br />
TRIAC Dimming<br />
Figure 21 show three triac dimmed waveforms. One can easily<br />
see that the peak voltage (V PEAK ) from 0° to 90° will always<br />
be:<br />
From the above illustration and the equation for current in a<br />
capacitor, i = C x dV/dt, the amount of capacitance needed at<br />
V BUCK will be calculated as follows:<br />
At 60Hz, and a valley-fill circuit of two stages, the hold up time<br />
(t X ) required at V BUCK is calculated as follows. The total angle<br />
of an AC half cycle is 180° and the total time of a half AC line<br />
cycle is 8.33 ms. When the angle of the AC waveform is at<br />
30° and 150°, the voltage of the AC line is exactly ½ of its<br />
peak. With a two stage valley-fill circuit, this is the point where<br />
the <strong>LED</strong> string switches from power being derived from AC<br />
line to power being derived from the hold up capacitors (C7<br />
and C9). 60° out of 180° of the cycle or 1/3 of the cycle the<br />
power is derived from the hold up capacitors (1/3 x 8.33 ms<br />
= 2.78 ms). This is equal to the hold up time (dt) from the<br />
above equation, and dv is the amount of voltage the circuit is<br />
allowed to droop. From the next section (“Determining Maximum<br />
Number of Series Connected <strong>LED</strong>s Allowed”) we know<br />
the minimum V BUCK voltage will be about 45V for a 90V AC to<br />
135V AC line. At 90V AC low line operating condition input, ½ of<br />
the peak voltage is 64V. Therefore with some margin the voltage<br />
at V BUCK can not droop more than about 15V (dv). (i) is<br />
equal to (P OUT /V BUCK ), where P OUT is equal to (V <strong>LED</strong> x I <strong>LED</strong> ).<br />
Total capacitance (C7 in parallel with C9) can now be calculated.<br />
See “ Design Example" section for further calculations<br />
of the valley-fill capacitors.<br />
Determining Maximum Number of Series Connected<br />
<strong>LED</strong>s Allowed:<br />
The <strong>LM3445</strong> is an off-line buck topology <strong>LED</strong> driver. A buck<br />
converter topology requires that the input voltage (V BUCK ) of<br />
the output circuit must be greater than the voltage of the <strong>LED</strong><br />
stack (V <strong>LED</strong> ) for proper regulation. One must determine what<br />
the minimum voltage observed by the buck converter will be<br />
before the maximum number of <strong>LED</strong>s allowed can be determined.<br />
Two variables will have to be determined in order to<br />
accomplish this.<br />
1. AC line operating voltage. This is usually 90V AC to<br />
135V AC for North America. Although the <strong>LM3445</strong> can<br />
Once the triac is firing at an angle greater than 90° the peak<br />
voltage will lower and equal to:<br />
The voltage at V BUCK with a valley fill stage of two will look<br />
similar to the waveforms of figure 22.<br />
The purpose of the valley fill circuit is to allow the buck converter<br />
to pull power directly off of the AC line when the line<br />
voltage is greater than its peak voltage divided by two (two<br />
stage valley fill circuit). During this time, the capacitors within<br />
the valley fill circuit (C7 and C8) are charged up to the peak<br />
of the AC line voltage. Once the line drops below its peak<br />
divided by two, the two capacitors are placed in parallel and<br />
deliver power to the buck converter. One can now see that if<br />
the peak of the AC line voltage is lowered due to variations in<br />
the line voltage, or if the triac is firing at an angle above 90°,<br />
the DC offset (V DC ) will lower. V DC is the lowest value that<br />
voltage V BUCK will encounter.<br />
Example:<br />
Line voltage = 90V AC to 135V AC<br />
Valley-Fill = two stage<br />
Depending on what type and value of capacitors are used,<br />
some derating should be used for voltage droop when the<br />
www.national.com 20
capacitors are delivering power to the buck converter. When<br />
the triac is firing at 135° the current through the <strong>LED</strong> string will<br />
be small. Therefore the droop should be small at this point<br />
and a 5% voltage droop should be a sufficient derating. With<br />
this derating, the lowest voltage the buck converter will see is<br />
about 42.5V in this example.<br />
<strong>LM3445</strong><br />
30060355<br />
FIGURE 21. AC Line with Various Firing Angles<br />
30060356<br />
FIGURE 22. V BUCK Waveforms with Various Firing Angles<br />
To determine how many <strong>LED</strong>s can be driven, take the minimum<br />
voltage the buck converter will see (42.5V) and divide it<br />
by the worst case forward voltage drop of a single <strong>LED</strong>.<br />
Example: 42.5V/3.7V = 11.5 <strong>LED</strong>s (11 <strong>LED</strong>s with margin)<br />
OUTPUT CAPACITOR<br />
A capacitor placed in parallel with the <strong>LED</strong> or array of <strong>LED</strong>s<br />
can be used to reduce the <strong>LED</strong> current ripple while keeping<br />
the same average current through both the inductor and the<br />
<strong>LED</strong> array. With a buck topology the output inductance (L2)<br />
can now be lowered, making the magnetics smaller and less<br />
expensive. With a well designed converter, you can assume<br />
that all of the ripple will be seen by the capacitor, and not the<br />
<strong>LED</strong>s. One must ensure that the capacitor you choose can<br />
handle the RMS current of the inductor. Refer to<br />
manufacture’s datasheets to ensure compliance. Usually an<br />
X5R or X7R capacitor between 1 µF and 10 µF of the proper<br />
voltage rating will be sufficient.<br />
SWITCHING MOSFET<br />
The main switching MOSFET should be chosen with efficiency<br />
and robustness in mind. The maximum voltage across the<br />
switching MOSFET will equal:<br />
The average current rating should be greater than:<br />
I DS-MAX = I <strong>LED</strong>(-AVE) (D MAX )<br />
RE-CIRCULATING DIODE<br />
The <strong>LM3445</strong> Buck converter requires a re-circulating diode<br />
D10 (see the Typical Application circuit figure 4) to carry the<br />
inductor current during the MOSFET Q2 off-time. The most<br />
efficient choice for D10 is a diode with a low forward drop and<br />
near-zero reverse recovery time that can withstand a reverse<br />
voltage of the maximum voltage seen at V BUCK . For a common<br />
110V AC ± 20% line, the reverse voltage could be as high as<br />
190V.<br />
The current rating must be at least:<br />
Or:<br />
I D = 1 - (D MIN ) x I <strong>LED</strong>(AVE)<br />
21 www.national.com
<strong>LM3445</strong><br />
Design Example<br />
The following design example illustrates the process of calculating<br />
external component values.<br />
Known:<br />
1. Input voltage range (90V AC – 135V AC )<br />
2. Number of <strong>LED</strong>s in series = 7<br />
3. Forward voltage drop of a single <strong>LED</strong> = 3.6V<br />
4. <strong>LED</strong> stack voltage = (7 x 3.6V) = 25.2V<br />
Choose:<br />
1. Nominal switching frequency, f SW-TARGET = 250 kHz<br />
2. I <strong>LED</strong>(AVE) = 400 mA<br />
3. Δi (usually 15% - 30% of I<strong>LED</strong>(AVE) ) = (0.30 x 400 mA) =<br />
120 mA<br />
4. Valley fill stages (1,2, or 3) = 2<br />
5. Assumed minimum efficiency = 80%<br />
Calculate:<br />
1. Calculate minimum voltage V BUCK equals:<br />
5. Calculate C11 and R4:<br />
6. Choose current through R4: (between 50 µA and 100 µA)<br />
70 µA<br />
7. Use a standard value of 365 kΩ<br />
8. Calculate C11:<br />
9.<br />
10. Use standard value of 120 pF<br />
11. Calculate ripple current: 400 mA X 0.30 = 120 mA<br />
12. Calculate inductor value at t OFF = 3 µs:<br />
2. Calculate maximum voltage V BUCK equals:<br />
3. Calculate t OFF at V BUCK nominal line voltage:<br />
13. Choose C10: 1.0 µF 200V<br />
14. Calculate valley-fill capacitor values: V AC low line =<br />
90V AC , V BUCK minimum equals 60V (no triac dimming at<br />
maximum <strong>LED</strong> current). Set droop for 20V maximum at<br />
full load and low line.<br />
4. Calculate t ON(MIN) at high line to ensure that<br />
t ON(MIN) > 200 ns:<br />
i) equals P OUT /V BUCK (270 mA), dV equals 20V, dt equals<br />
2.77 ms, and then C TOTAL equals 37 µF. Therefore C7 =<br />
C9 = 22 µF<br />
www.national.com 22
<strong>LM3445</strong> Design Example 1:<br />
Input = 90V AC<br />
to 135V AC<br />
, V <strong>LED</strong><br />
= 7 x HB <strong>LED</strong> String Application @ 400 mA<br />
<strong>LM3445</strong><br />
30060369<br />
23 www.national.com
<strong>LM3445</strong><br />
Bill of Materials<br />
Qty Ref Des Description Mfr Mfr PN<br />
1 U1 IC, CTRLR, DRVR-<strong>LED</strong>, MSOP10 NSC <strong>LM3445</strong>MM<br />
1 BR1 Bridge Rectifiier, SMT, 400V, 800 mA DiodesInc HD04-T<br />
1 L1 Common mode filter DIP4NS, 900 mA, 700<br />
µH<br />
Panasonic<br />
ELF-11090E<br />
1 L2 Inductor, SHLD, SMT, 1A, 470 µH Coilcraft MSS1260-474-KLB<br />
2 L3, L4 Diff mode inductor, 500 mA 1 mH Coilcraft MSS1260-105KL-KLB<br />
1 L5 Bead Inductor, 160Ω, 6A Steward HI1206T161R-10<br />
3 C1, C2, C15 Cap, Film, X2Y2, 12.5MM, 250V AC , 20%, 10<br />
nF<br />
Panasonic<br />
ECQ-U2A103ML<br />
1 C3 Cap, X7R, 0603, 16V, 10%, 470 nF MuRata GRM188R71C474KA88D<br />
1 C4 Cap, X7R, 0603, 16V, 10%, 100 nF MuRata GRM188R71C104KA01D<br />
2 C5, C6 Cap, X5R, 1210, 25V, 10%, 22 µF MuRata GRM32ER61E226KE15L<br />
2 C7, C9 Cap, AL, 200V, 105C, 20%, 33 µF UCC EKXG201ELL330MK20S<br />
1 C10 Cap, Film, 250V, 5%, 10 nF Epcos B32521C3103J<br />
1 C12 Cap, X7R, 1206, 50V, 10%, 1.0 uF Kemet C1206F105K5RACTU<br />
1 C11 Cap, C0G, 0603, 100V, 5%, 120 pF MuRata GRM1885C2A121JA01D<br />
1 C13 Cap, X7R, 0603, 50V, 10%, 1.0 nF Kemet C0603C102K5RACTU<br />
1 C14 Cap, X7R, 0603, 50V, 10%, 22 nF Kemet C0603C223K5RACTU<br />
1 D1 Diode, ZNR, SOT23, 15V, 5% OnSemi BZX84C15LT1G<br />
2 D2, D13 Diode, SCH, SOD123, 40V, 120 mA NXP BAS40H<br />
4 D3, D4, D8, D9 Diode, FR, SOD123, 200V, 1A Rohm RF071M2S<br />
1 D10 Diode, FR, SMB, 400V, 1A OnSemi MURS140T3G<br />
1 D11 IC, SHNT, ADJ, SOT23, 2.5V, 0.5% TI TL431BIDBZR<br />
1 D12 TVS, VBR = 144V Fairchild SMBJ130CA<br />
1 R1 Resistor, 0603, 1%, 280 kΩ Panasonic ERJ-3EKF2803V<br />
1 R2 Resistor, 1206, 1%, 100 kΩ Panasonic ERJ-8ENF1003V<br />
1 R3 Resistor, 1210, 5%, 1.8Ω Panasonic ERJ-14RQJ1R8U<br />
1 R4 Resistor, 0603, 1%, 576 kΩ Panasonic ERJ-3EKF5763V<br />
1 R5 Resistor, 1206, 1%, 1.00 kΩ Panasonic ERJ-8ENF1001V<br />
2 R6, R7 Resistor, 0805, 1%, 1.00 MΩ Rohm MCR10EZHF1004<br />
2 R8, R10 Resistor, 1206, 0.0Ω Yageo RC1206JR-070RL<br />
1 R9 Resistor, 1812, 0.0Ω<br />
1 R11 Resistor, 0603, 0.0Ω Yageo RC0603JR-070RL<br />
1 R12 Resistor, 0603, 1%, 33.2 kΩ Panasonic ERJ-3EKF3322V<br />
1 R13 Resistor, 0603, 1%, 2.0 kΩ Panasonic ERJ-3EKF2001V<br />
1 R14 Resistor, 0805, 1%, 3.3 MΩ Rohm MCR10EZHF3304<br />
1 RT1 Thermistor, 120V, 1.1A, 50Ω @ 25°C Thermometrics CL-140<br />
2 Q1, Q2 XSTR, NFET, DPAK, 300V, 4A Fairchild FQD7N30TF<br />
1 Q3 XSTR, PNP, SOT23, 300V, 500 mA Fairchild MMBTA92<br />
1 Q5 XSTR, NFET, SOT23, 100V, 170 mA Fairchild BSS123<br />
1 J1 Terminal Block 2 pos Phoenix Contact 1715721<br />
1 F1 Fuse, 125V, 1,25A bel SSQ 1.25<br />
www.national.com 24
Physical Dimensions inches (millimeters) unless otherwise noted<br />
<strong>LM3445</strong><br />
MSOP-10 Pin Package (MM)<br />
For Ordering, Refer to Ordering Information Table<br />
NS Package Number MUB10A<br />
25 www.national.com
<strong>LM3445</strong> <strong>Triac</strong> <strong>Dimmable</strong> <strong>Offline</strong> <strong>LED</strong> <strong>Driver</strong><br />
Notes<br />
For more National Semiconductor product information and proven design tools, visit the following Web sites at:<br />
Products<br />
Design Support<br />
Amplifiers www.national.com/amplifiers WEBENCH® Tools www.national.com/webench<br />
Audio www.national.com/audio App Notes www.national.com/appnotes<br />
Clock and Timing www.national.com/timing Reference Designs www.national.com/refdesigns<br />
Data Converters www.national.com/adc Samples www.national.com/samples<br />
Interface www.national.com/interface Eval Boards www.national.com/evalboards<br />
LVDS www.national.com/lvds Packaging www.national.com/packaging<br />
Power Management www.national.com/power Green Compliance www.national.com/quality/green<br />
Switching Regulators www.national.com/switchers Distributors www.national.com/contacts<br />
LDOs www.national.com/ldo Quality and Reliability www.national.com/quality<br />
<strong>LED</strong> Lighting www.national.com/led Feedback/Support www.national.com/feedback<br />
Voltage Reference www.national.com/vref Design Made Easy www.national.com/easy<br />
PowerWise® Solutions www.national.com/powerwise Solutions www.national.com/solutions<br />
Serial Digital Interface (SDI) www.national.com/sdi Mil/Aero www.national.com/milaero<br />
Temperature Sensors www.national.com/tempsensors SolarMagic www.national.com/solarmagic<br />
Wireless (PLL/VCO) www.national.com/wireless Analog University® www.national.com/AU<br />
THE CONTENTS OF THIS DOCUMENT ARE PROVIDED IN CONNECTION WITH NATIONAL SEMICONDUCTOR CORPORATION<br />
(“NATIONAL”) PRODUCTS. NATIONAL MAKES NO REPRESENTATIONS OR WARRANTIES WITH RESPECT TO THE ACCURACY<br />
OR COMPLETENESS OF THE CONTENTS OF THIS PUBLICATION AND RESERVES THE RIGHT TO MAKE CHANGES TO<br />
SPECIFICATIONS AND PRODUCT DESCRIPTIONS AT ANY TIME WITHOUT NOTICE. NO LICENSE, WHETHER EXPRESS,<br />
IMPLIED, ARISING BY ESTOPPEL OR OTHERWISE, TO ANY INTELLECTUAL PROPERTY RIGHTS IS GRANTED BY THIS<br />
DOCUMENT.<br />
TESTING AND OTHER QUALITY CONTROLS ARE USED TO THE EXTENT NATIONAL DEEMS NECESSARY TO SUPPORT<br />
NATIONAL’S PRODUCT WARRANTY. EXCEPT WHERE MANDATED BY GOVERNMENT REQUIREMENTS, TESTING OF ALL<br />
PARAMETERS OF EACH PRODUCT IS NOT NECESSARILY PERFORMED. NATIONAL ASSUMES NO LIABILITY FOR<br />
APPLICATIONS ASSISTANCE OR BUYER PRODUCT DESIGN. BUYERS ARE RESPONSIBLE FOR THEIR PRODUCTS AND<br />
APPLICATIONS USING NATIONAL COMPONENTS. PRIOR TO USING OR DISTRIBUTING ANY PRODUCTS THAT INCLUDE<br />
NATIONAL COMPONENTS, BUYERS SHOULD PROVIDE ADEQUATE DESIGN, TESTING AND OPERATING SAFEGUARDS.<br />
EXCEPT AS PROVIDED IN NATIONAL’S TERMS AND CONDITIONS OF SALE FOR SUCH PRODUCTS, NATIONAL ASSUMES NO<br />
LIABILITY WHATSOEVER, AND NATIONAL DISCLAIMS ANY EXPRESS OR IMPLIED WARRANTY RELATING TO THE SALE<br />
AND/OR USE OF NATIONAL PRODUCTS INCLUDING LIABILITY OR WARRANTIES RELATING TO FITNESS FOR A PARTICULAR<br />
PURPOSE, MERCHANTABILITY, OR INFRINGEMENT OF ANY PATENT, COPYRIGHT OR OTHER INTELLECTUAL PROPERTY<br />
RIGHT.<br />
LIFE SUPPORT POLICY<br />
NATIONAL’S PRODUCTS ARE NOT AUTHORIZED FOR USE AS CRITICAL COMPONENTS IN LIFE SUPPORT DEVICES OR<br />
SYSTEMS WITHOUT THE EXPRESS PRIOR WRITTEN APPROVAL OF THE CHIEF EXECUTIVE OFFICER AND GENERAL<br />
COUNSEL OF NATIONAL SEMICONDUCTOR CORPORATION. As used herein:<br />
Life support devices or systems are devices which (a) are intended for surgical implant into the body, or (b) support or sustain life and<br />
whose failure to perform when properly used in accordance with instructions for use provided in the labeling can be reasonably expected<br />
to result in a significant injury to the user. A critical component is any component in a life support device or system whose failure to perform<br />
can be reasonably expected to cause the failure of the life support device or system or to affect its safety or effectiveness.<br />
National Semiconductor and the National Semiconductor logo are registered trademarks of National Semiconductor Corporation. All other<br />
brand or product names may be trademarks or registered trademarks of their respective holders.<br />
Copyright© 2009 National Semiconductor Corporation<br />
For the most current product information visit us at www.national.com<br />
National Semiconductor<br />
Americas Technical<br />
Support Center<br />
Email: support@nsc.com<br />
Tel: 1-800-272-9959<br />
National Semiconductor Europe<br />
Technical Support Center<br />
Email: europe.support@nsc.com<br />
German Tel: +49 (0) 180 5010 771<br />
English Tel: +44 (0) 870 850 4288<br />
National Semiconductor Asia<br />
Pacific Technical Support Center<br />
Email: ap.support@nsc.com<br />
National Semiconductor Japan<br />
Technical Support Center<br />
Email: jpn.feedback@nsc.com<br />
www.national.com