Event V3 Operating Manual - Jands
Event V3 Operating Manual - Jands Event V3 Operating Manual - Jands
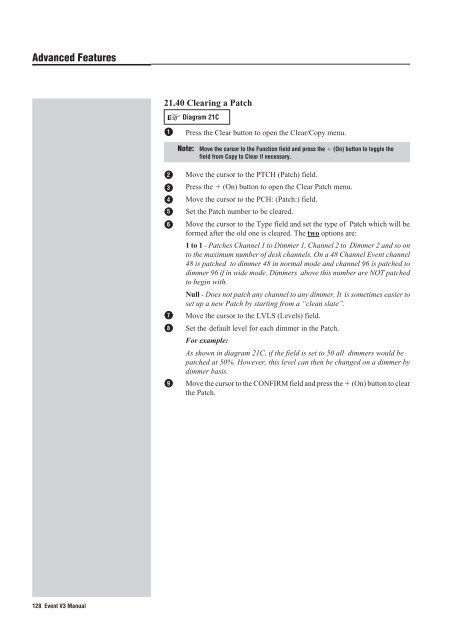
Advanced Features 21.40 Clearing a Patch ☞ 1 Diagram 21C Press the Clear button to open the Clear/Copy menu. Note: Move the cursor to the Function field and press the (On) button to toggle the field from Copy to Clear if necessary. 2 3 4 5 6 7 8 9 Move the cursor to the PTCH (Patch) field. Press the (On) button to open the Clear Patch menu. Move the cursor to the PCH: (Patch:) field. Set the Patch number to be cleared. Move the cursor to the Type field and set the type of Patch which will be formed after the old one is cleared. The two options are: 1 to 1 - Patches Channel 1 to Dimmer 1, Channel 2 to Dimmer 2 and so on to the maximum number of desk channels. On a 48 Channel Event channel 48 is patched to dimmer 48 in normal mode and channel 96 is patched to dimmer 96 if in wide mode. Dimmers above this number are NOT patched to begin with. Null - Does not patch any channel to any dimmer. It is sometimes easier to set up a new Patch by starting from a “clean slate”. Move the cursor to the LVLS (Levels) field. Set the default level for each dimmer in the Patch. For example: As shown in diagram 21C, if the field is set to 50 all dimmers would be patched at 50%. However, this level can then be changed on a dimmer by dimmer basis. Move the cursor to the CONFIRM field and press the (On) button to clear the Patch. 128 Event V3 Manual
© Jands Electronics May 1995 F un c t : C r ion l e a P + T t C o H M + e t m o C + h t s o e S + t t c o k END 7 8 9 MEMORY EDIT CHASE 4 5 6 PAGE ASSIGN FILE 1 2 3 BUILD CLEAR STACK 0 EXIT SETUP RECORD OR s CONF IRM CONF IRM O f f On 8 9 7 8 9 7 8 9 MEMORY EDIT CHASE MEMORY EDIT CHASE 4 5 6 4 5 6 PAGE ASSIGN FILE PAGE ASSIGN FILE 1 2 3 1 2 3 BUILD CLEAR STACK BUILD CLEAR STACK 0 EXIT SETUP RECORD OR P CH : P x x x ____ P t c h Ty pe 1 t o1 Lv 5 l 0 7 0 EXIT SETUP RECORD OR Ty pe x t o x s Lv F l F 5 6 C l r C hse P C H : ____ P 1 P t c h Ty pe Lv l s 1 t o1 F F Conf i rm Of f 4 P C H : ____ P 1 P t c h 7 8 MEMORY EDIT 4 5 9 6 CHASE FUNCT ION : C l e a r P t ch + t o M em + t o C h s e S t c k + t o + t o FUNCTION : P t ch M em C h s e S t c k C op y + t o + t o + t o + t o P TCH + o 2 3 START PAGE ASSIGN FILE 1 2 3 BUILD CLEAR STACK 0 EXIT SETUP RECORD 1 ▼ 21C Clearing a Patch Event V3 Manual 129
- Page 77 and 78: © Jands Electronics July 1995 [STA
- Page 79 and 80: © Jands Electronics July 1995 [STA
- Page 81 and 82: © Jands Electronics July 1995 [STA
- Page 83 and 84: © Jands Electronics July 1995 STAR
- Page 85 and 86: © Jands Electronics July 1995 Cont
- Page 87 and 88: © Jands Electronics July 1995 * So
- Page 89 and 90: © Jands Electronics July 1995 1S T
- Page 91 and 92: © Jands Electronics July 1995 2. T
- Page 93 and 94: © Jands Electronics July 1995 [STA
- Page 95 and 96: © Jands Electronics July 1995 14.0
- Page 97 and 98: © Jands Electronics July 1995 [STA
- Page 99 and 100: © Jands Electronics July 1995 14.4
- Page 101 and 102: © Jands Electronics May 1995 Advan
- Page 103 and 104: © Jands Electronics May 1995 15.20
- Page 106 and 107: Advanced Features 15.50 Edit Page 1
- Page 108 and 109: Advanced Features Example 1: When s
- Page 110 and 111: Advanced Features 16.00 Restricting
- Page 112 and 113: Advanced Features 17.10To Record a
- Page 114 and 115: Advanced Features 18.00 Advanced Ch
- Page 116 and 117: Advanced Features 18.20 Setting Cha
- Page 118 and 119: Advanced Features 18.30 Setting Cha
- Page 120 and 121: Advanced Features 19.00 Advanced De
- Page 122 and 123: Advanced Features 19.20 Changing th
- Page 124 and 125: Advanced Features 21.00 Clearing Me
- Page 126 and 127: Advanced Features 21.20 Clearing a
- Page 130 and 131: Advanced Features 22.00 Copying Mem
- Page 132 and 133: Advanced Features 22.20 Copying a C
- Page 134 and 135: Advanced Features 22.30 Copying a P
- Page 136 and 137: Advanced Features 23.00 Resetting t
- Page 138 and 139: Advanced Features 24.00 Connecting
- Page 140 and 141: Advanced Features 26.00 Setting the
- Page 142 and 143: Advanced Features 28.00 Connecting
- Page 144 and 145: Advanced Features 30. 00 Floppy Dis
- Page 146 and 147: General 31.00 Maintenance With care
- Page 148 and 149: General 33.00 Battery Replacement T
- Page 150 and 151: Appendix A A EVENT Setup Menu Struc
- Page 152 and 153: Appendix B B Pin Assignments DMX Di
Advanced Features<br />
21.40 Clearing a Patch<br />
☞<br />
1<br />
Diagram 21C<br />
Press the Clear button to open the Clear/Copy menu.<br />
Note: Move the cursor to the Function field and press the (On) button to toggle the<br />
field from Copy to Clear if necessary.<br />
2<br />
3<br />
4<br />
5<br />
6<br />
7<br />
8<br />
9<br />
Move the cursor to the PTCH (Patch) field.<br />
Press the (On) button to open the Clear Patch menu.<br />
Move the cursor to the PCH: (Patch:) field.<br />
Set the Patch number to be cleared.<br />
Move the cursor to the Type field and set the type of Patch which will be<br />
formed after the old one is cleared. The two options are:<br />
1 to 1 - Patches Channel 1 to Dimmer 1, Channel 2 to Dimmer 2 and so on<br />
to the maximum number of desk channels. On a 48 Channel <strong>Event</strong> channel<br />
48 is patched to dimmer 48 in normal mode and channel 96 is patched to<br />
dimmer 96 if in wide mode. Dimmers above this number are NOT patched<br />
to begin with.<br />
Null - Does not patch any channel to any dimmer. It is sometimes easier to<br />
set up a new Patch by starting from a “clean slate”.<br />
Move the cursor to the LVLS (Levels) field.<br />
Set the default level for each dimmer in the Patch.<br />
For example:<br />
As shown in diagram 21C, if the field is set to 50 all dimmers would be<br />
patched at 50%. However, this level can then be changed on a dimmer by<br />
dimmer basis.<br />
Move the cursor to the CONFIRM field and press the (On) button to clear<br />
the Patch.<br />
128 <strong>Event</strong> <strong>V3</strong> <strong>Manual</strong>


