Primare I21 Integrated Amplifier
Primare I21 Integrated Amplifier
Primare I21 Integrated Amplifier

Create successful ePaper yourself
Turn your PDF publications into a flip-book with our unique Google optimized e-Paper software.
<strong>Primare</strong> <strong>I21</strong> <strong>Integrated</strong> <strong>Amplifier</strong>
Copyright and acknowledgements<br />
Copyright © 2004 <strong>Primare</strong> Systems AB.<br />
All rights reserved.<br />
<strong>Primare</strong> Systems AB<br />
Renvägen 1<br />
SE-352 45 Växjö<br />
Sweden<br />
Issue: <strong>I21</strong><br />
The information in this guide is believed to be correct as<br />
of the date of publication. However, our policy is one of<br />
continuous development and so the information is subject<br />
to change without notice, and does not represent a commit<br />
ment on the part of <strong>Primare</strong> Systems AB.<br />
<strong>Primare</strong> is a trademark of <strong>Primare</strong> Systems AB. All rights<br />
reserved. All other product names are trademarks or registered<br />
trade marks of their respective owners.<br />
PREFACE<br />
FCC Warning: This equipment generates and can radiate<br />
radio frequency energy and if not installed and used<br />
correctly in accordance with our instructions may cause<br />
interference to radio communications or radio and television<br />
reception. It has been type-tested and complies with<br />
the limits set out in Subpart J, Part 15 of FCC rules for<br />
a Class B computing device. These limits are intended to<br />
provide reasonable protection against such interference in<br />
home installations.<br />
EEC: This product has been de signed and type-tested<br />
to comply with the limits set out in EN55013 and<br />
EN55020.<br />
This guide was produced by Condesign Ljungby AB.<br />
www.condesign.se<br />
200429<br />
<strong>I21</strong> AMPLIFIER USER GUIDE<br />
I
II<br />
<strong>I21</strong> AMPLIFIER USER GUIDE
CONTENTS<br />
INTRODUCTION<br />
Welcome to the <strong>I21</strong> <strong>Integrated</strong> <strong>Amplifier</strong> ....................... 1<br />
High-performance power amplifier ................................ 1<br />
Flexible inputs................................................................ 1<br />
Fixed and variable outputs.............................................. 1<br />
Superb technical design .................................................. 1<br />
Intuitive user interface.................................................... 1<br />
Using the <strong>I21</strong> with other <strong>Primare</strong> products .................... 2<br />
Technical specification.................................................... 2<br />
OPERATING THE <strong>I21</strong> INTEGRATED AMPLIFIER<br />
Selecting a source ........................................................... 7<br />
To select a source............................................................ 7<br />
Changing the volume..................................................... 7<br />
To change the volume .................................................... 7<br />
To dim the front panel display........................................ 8<br />
To restore the normal display ......................................... 8<br />
HOW TO GET STARTED<br />
Power connection........................................................... 3<br />
Safety instruction ........................................................... 3<br />
Switching on and off ..................................................... 3<br />
To switch on................................................................... 3<br />
To switch on from standby or to standby........................ 3<br />
Back panel connections ................................................. 4<br />
Outputs ......................................................................... 4<br />
Loudspeaker outputs ...................................................... 4<br />
Preamplifier outputs....................................................... 4<br />
Inputs............................................................................. 4<br />
Source inputs ................................................................. 4<br />
Front panel controls ....................................................... 5<br />
<strong>I21</strong> AMPLIFIER USER GUIDE<br />
III
IV<br />
<strong>I21</strong> AMPLIFIER USER GUIDE
INTRODUCTION<br />
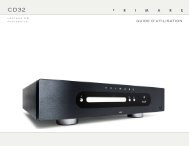
Welcome to the <strong>Primare</strong> <strong>I21</strong> <strong>Integrated</strong> <strong>Amplifier</strong>! This chapter<br />
introduces you to its key features, and explains how you can<br />
take advantage of its superb sound as the key component in<br />
your hi-fi system.<br />
Welcome to the <strong>I21</strong> <strong>Integrated</strong> <strong>Amplifier</strong><br />
The <strong>I21</strong> is an integrated preamplifier and power amplifier<br />
with extraordinary performance for its price.<br />
High-performance power amplifier<br />
The <strong>I21</strong> incorporates a power amplifier providing 75 Watts<br />
per channel of superb quality sound.<br />
Flexible inputs<br />
The <strong>I21</strong> preamplifier stage provides four inputs, labelled<br />
CD, TUNER, LINE 1, and LINE 2, to cater for a flexible<br />
range of sources.<br />
Fixed and variable outputs<br />
The currently selected source is provided on two pairs of<br />
line-level outputs, for connecting the <strong>I21</strong> to other equipment.<br />
The TAPE OUT sockets are independent of the position<br />
of the volume control, and allow you to connect the<br />
<strong>I21</strong> AMPLIFIER USER GUIDE<br />
<strong>I21</strong> to a tape recorder. The PRE OUT sockets are controlled<br />
by the volume control, and can be used to connect the I20<br />
to another output stage.<br />
Superb technical design<br />
The <strong>I21</strong> incorporates a classic circuit design based on J-FET<br />
input devices and bipolar output devices, typical of far more<br />
expensive equipment, giving high performance and excellent<br />
reliability.<br />
Intuitive user interface<br />
In keeping with the philosophy of the <strong>Primare</strong> range of systems,<br />
the <strong>I21</strong> can be controlled through a very simple and<br />
intuitive set of front panel controls.<br />
Alternatively all the functions of the <strong>I21</strong> can be controlled<br />
by the C22 Remote Control supplied with the <strong>I21</strong>, along<br />
with the other <strong>Primare</strong> components in your system.<br />
1
INTRODUCTION<br />
Using the <strong>I21</strong> with other <strong>Primare</strong><br />
products<br />
Although the <strong>I21</strong> is flexible enough to work with virtually<br />
any other equipment you have in your system, it is<br />
ideal for use with the other products in the <strong>Primare</strong> range.<br />
A particular benefit of using the <strong>I21</strong> with other <strong>Primare</strong><br />
sources is that you can control your entire system with a<br />
single remote control, to give you a fully integrated system<br />
with the simplest possible user interface.<br />
Technical specification<br />
Output power per channel 2 x 75W into 8Ω,<br />
2 x 125W into 4Ω<br />
Speaker terminals<br />
4 –16 Ω<br />
Output impedance
HOW TO GET STARTED<br />
This chapter provides a quick overview of how to connect<br />
the <strong>I21</strong> integrated amplifier to other components in your<br />
system.<br />
Power connection<br />
Warning: Before connecting power check<br />
that the required supply voltage, indicated<br />
on the back panel, cor re sponds to your local<br />
AC supply. If a different voltage is stated on<br />
the type plate do not connect the <strong>I21</strong> to the mains power,<br />
and seek advice from your dealer.<br />
Connect the mains power using the enclosed mains cable.<br />
NOTE: Always disconnect the <strong>I21</strong> and all other units in<br />
the system from the mains power before connecting or disconnecting<br />
any of the cables. Never short circuit speaker<br />
terminals. This might seriously damage the unit.<br />
Safety instructions<br />
To prevent fire or shock hazard, do not expose this<br />
appliance to dripping or splashing. No objects filled with<br />
liquids, such as vases, should be placed on the <strong>I21</strong>.<br />
If you want to build in the <strong>I21</strong> you need to be sure to<br />
allow space of at least 20 cm behind, 10 cm on both sides<br />
and 30 cm above the top panel of the unit. This is to prevent<br />
fire or damage caused by overheating. Also make sure<br />
that the main switch is accessable.<br />
<strong>I21</strong> AMPLIFIER USER GUIDE<br />
Switching on and off<br />
To switch on<br />
• Use the main switch under the left-hand edge of the<br />
housing (1).<br />
1<br />
During normal operation you can leave the <strong>I21</strong> switched<br />
on and in standby mode.<br />
To switch on from standby or to standby<br />
• Pressing on the front panel or on the remote control,<br />
will change the standby mode.<br />
3
HOW TO GET STARTED<br />
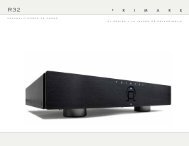
Back panel connections<br />
A<br />
B<br />
C<br />
D<br />
E<br />
F<br />
A. Right loudspeaker outputs<br />
B. Audio inputs<br />
C. Tape outputs<br />
D. Preamplifier outputs<br />
E. Right loudspeaker outputs<br />
F. Mains power input<br />
4<br />
<strong>I21</strong> AMPLIFIER USER GUIDE
HOW TO GET STARTED<br />
Outputs<br />
Loudspeaker outputs<br />
Connect the left and right loudspeakers to the corresponding<br />
terminals. The terminals can accept speaker cables<br />
terminated with 4mm banana plugs, spade terminals, or<br />
bare wires. To connect bare wires unscrew the terminal,<br />
pass the bare wire through the hole in the terminal bolt,<br />
and clamp the wire in place by screwing the terminal back<br />
down.<br />
Preamplifier outputs<br />
The PRE OUT sockets provide a line-level output from<br />
the <strong>I21</strong> preamplifier stage which can be connected to<br />
another preamplifier. The level of this output is controlled<br />
by the VOLUME control on the <strong>I21</strong>.<br />
The TAPE OUT sockets provide a fixed level copy of the<br />
currently selected source, suitable for connecting to a tape<br />
recorder.<br />
Inputs<br />
Source inputs<br />
Connect each source to the appropriate source input,<br />
connecting the right channel to the red socket and the left<br />
channel to the white socket.<br />
To connect an analogue turntable with a moving magnet<br />
or moving coil cartridge you will need an additional<br />
phono preamplifier such as the <strong>Primare</strong> R20. The output<br />
of the turntable is connected to the R20, and the output<br />
of the R20 should be connected to a spare input on the<br />
<strong>I21</strong>, such as LINE1.<br />
<strong>I21</strong> AMPLIFIER USER GUIDE<br />
5
HOW TO GET STARTED<br />
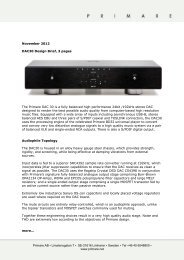
Front panel controls<br />
All the functions of the <strong>I21</strong> <strong>Integrated</strong> <strong>Amplifier</strong> can be<br />
accessed using the five front panel push buttons and the<br />
volume control. Information about all operations is displayed<br />
on the front panel display<br />
A B C D<br />
A. The display keeps you informed about the volume<br />
setting and currently selected inputs.<br />
B. The VOLUME control changes the volume<br />
C. The INPUT SELECTOR buttons select one of the<br />
four source inputs.<br />
D. The STANDBY button switches the <strong>I21</strong> to standby, or<br />
switches it on from standby.<br />
6<br />
<strong>I21</strong> AMPLIFIER USER GUIDE
OPERATING THE <strong>I21</strong> INTEGRATED AMPLIFIER<br />
This chapter explains how to operate the <strong>I21</strong> <strong>Integrated</strong><br />
<strong>Amplifier</strong>, using either the front panel controls or the remote<br />
control.<br />
Selecting a source<br />
The <strong>I21</strong> <strong>Integrated</strong> <strong>Amplifier</strong> provides a choice of four line<br />
inputs, labelled: CD, TUNER, LINE 1, and LINE 2.<br />
Changing the volume<br />
The <strong>I21</strong> allows you to vary the volume from 0 (silence) to<br />
79 (maximum volume).<br />
To select a source<br />
• Press the button on the front panel or the remote<br />
control corresponding to the source you want to select.<br />
The currently selected source is indicated on the front<br />
panel display:<br />
To change the volume<br />
• Rotate the VOLUME control on the front panel, or<br />
press the – or + buttons on the remote control.<br />
The current volume setting is shown on the front panel.<br />
• Alternatively, press the or buttons on the remote<br />
control to step between sources.<br />
<strong>I21</strong> AMPLIFIER USER GUIDE<br />
7
OPERATING THE <strong>I21</strong> INTEGRATED AMPLIFIER<br />
Changing the balance<br />
You can change the balance of the sound between the<br />
left and right channels to shift the position of the stereo<br />
image.<br />
To dim the front panel display<br />
• Press the DIM button on the remote control.<br />
The display will dim to show just the currently<br />
selected source.<br />
To change the balance<br />
• Press the BAL/ST button on the remote control.<br />
The front panel display shows the current balance setting,<br />
where -6 corresponds to the leftmost position, 0<br />
corresponds to centre, and 6 corresponds to the rightmost<br />
position.<br />
To restore the normal display<br />
• Press the DIM button again.<br />
• Press the – or + buttons on the remote control to<br />
adjust the balance.<br />
• Press the BAL/ST button again to revert to the<br />
normal volume display.<br />
Alternatively the normal display will revert automatically<br />
after four seconds.<br />
8<br />
<strong>I21</strong> AMPLIFIER USER GUIDE