Create successful ePaper yourself
Turn your PDF publications into a flip-book with our unique Google optimized e-Paper software.
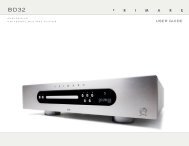
<strong>Primare</strong> <strong>T23</strong> <strong>Tuner</strong> <strong>User</strong> <strong>Guide</strong>
Copyright and<br />
acknowledgments<br />
Copyright © 2006 <strong>Primare</strong> Systems AB.<br />
All rights reserved.<br />
<strong>Primare</strong> Systems AB<br />
Renvägen 1<br />
SE-352 45 Växjö<br />
Sweden<br />
http://www.primare.net<br />
Issue: <strong>T23</strong>/1<br />
The information in this guide is believed to be<br />
correct as of the date of publication. However, our<br />
policy is one of continuous development and so the<br />
information is subject to change without notice,<br />
and does not represent a commitment on the part<br />
of <strong>Primare</strong> Systems AB.<br />
<strong>Primare</strong> is a trademark of <strong>Primare</strong> Systems AB.<br />
This guide was produced by Human-Computer<br />
Interface Ltd, http://www.interface.co.uk<br />
Safety compliance<br />
This product has been designed to meet the IEC<br />
60065 international electrical safety standard.<br />
<br />
CAUTION<br />
RISK OF ELECTRIC SHOCK DO NOT OPEN<br />
CAUTION: To reduce the risk of electrical shock do not remove cover (or<br />
back). No user serviceable parts inside. Refer servicing to qualified service<br />
personnel.<br />
WARNING: To reduce the risk of fire or electrical shock, do not expose<br />
this apparatus to rain or moisture.<br />
CAUTION: In Canada and the USA, to prevent electric shock, match the<br />
wide blade of the plug to the wide slot in the socket and insert the plug<br />
fully into the socket.<br />
Important safety instructions<br />
This product is designed and manufactured to meet<br />
strict quality and safety standards. However, you<br />
should be aware of the following installation and<br />
operation precautions.<br />
1. Take heed of warnings and instructions<br />
You should read all the safety and operating<br />
instructions before operating this appliance. Retain<br />
this handbook for future reference and adhere to all<br />
warnings in the handbook or on the appliance.<br />
2. Water and moisture<br />
The presence of electricity near water can be<br />
dangerous. Do not use the appliance near water<br />
– for example next to a bathtub, washbowl, kitchen<br />
sink, in a wet basement or near a swimming pool,<br />
etc.<br />
3. Object or liquid entry<br />
Take care that objects do not fall and liquids are<br />
not spilled into the enclosure through any openings.<br />
Liquid-filled objects such as vases should not be<br />
placed on the equipment.<br />
4. Ventilation<br />
Do not place the equipment on a bed, sofa, rug<br />
or similar soft surface, or in an enclosed bookcase<br />
or cabinet, since ventilation may be impeded. We<br />
recommend a minimum distance of 50mm around<br />
the sides and top of the appliance to provide<br />
adequate ventilation.<br />
5. Heat<br />
Locate the appliance away from naked flames or<br />
heat producing equipment such as radiators, stoves<br />
or other appliances (including other amplifiers) that<br />
produce heat.<br />
<br />
6. Climate<br />
The appliance has been designed for use in<br />
moderate climates.<br />
7. Racks and stands<br />
Only use a rack or stand that is recommended for<br />
use with audio equipment. If the equipment is on a<br />
portable rack it should be moved with great care, to<br />
avoid overturning the combination.<br />
8. Cleaning<br />
Unplug the unit from the mains supply before<br />
cleaning.<br />
The case should normally only require a wipe with a<br />
soft, damp, lint-free cloth. Do not use paint thinners<br />
or other chemical solvents for cleaning.<br />
We do not advise the use of furniture cleaning<br />
sprays or polishes as they can cause indelible white<br />
marks if the unit is subsequently wiped with a<br />
damp cloth.<br />
9. Power sources<br />
Only connect the appliance to a power supply of<br />
the type described in the operating instructions or<br />
as marked on the appliance.<br />
This is a Class 1 device and must be earthed.<br />
10. Power-cord protection<br />
Power supply cords should be routed so that they<br />
are not likely to be walked on or pinched by items<br />
placed upon or against them, paying particular<br />
attention to cords and plugs, and the point where<br />
they exit from the appliance.<br />
11. Grounding<br />
Ensure that the grounding means of the appliance<br />
is not defeated.<br />
ATTENTION<br />
RISQUE DE CHOC ELECTRIQUE NE PAS OUVRIR<br />
<br />
The lightning flash with an arrowhead symbol within an equilateral<br />
triangle, is intended to alert the user to the presence of uninsulated<br />
'dangerous voltage' within the product's enclosure that may be of<br />
sufficient magnitude to constitute a risk of electric shock to persons.<br />
The exclamation point within an equilateral triangle is intended to<br />
alert the user to the presence of important operating and maintenance<br />
(servicing) instructions in the literature accompanying the product.<br />
12. Power lines<br />
Locate any outdoor antenna/aerial away from<br />
power lines.<br />
13. Non-use periods<br />
If the unit has a stand-by function, a small amount<br />
of current will continue to flow into the equipment<br />
in this mode. Unplug the power cord of the<br />
appliance from the outlet if left unused for a long<br />
period of time.<br />
14. Abnormal smell<br />
If an abnormal smell or smoke is detected from<br />
the appliance, turn the power off immediately and<br />
unplug the unit from the wall outlet. Contact your<br />
dealer immediately.<br />
15. Servicing<br />
You should not attempt to service the appliance<br />
beyond that described in this handbook. All other<br />
servicing should be referred to qualified service<br />
personnel.<br />
16. Damage requiring service<br />
The appliance should be serviced by qualified<br />
service personnel when:<br />
A. the power-supply cord or the plug has been<br />
damaged, or<br />
B. objects have fallen, or liquid has spilled into the<br />
appliance, or<br />
C. the appliance has been exposed to rain, or<br />
D. the appliance does not appear to operate<br />
normally or exhibits a marked change in<br />
performance, or<br />
E. the appliance has been dropped or the<br />
enclosure damaged.<br />
ii
Welcome<br />
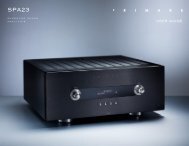
Welcome to the <strong>Primare</strong> <strong>T23</strong>! Your <strong>T23</strong> is a combined high-quality FM and DAB receiver.<br />
This page shows how to set up your <strong>T23</strong> in five simple steps:<br />
DAB/FM aerial<br />
AERIAL<br />
AERIAL<br />
ANALOG OUTPUTS<br />
DIGITAL OUTPUTS<br />
R<br />
L<br />
IR<br />
RS232<br />
Analog<br />
outputs<br />
Digital<br />
outputs<br />
IR<br />
RS232<br />
Power<br />
1 Unpack the <strong>T23</strong><br />
Your <strong>T23</strong> is supplied with the following<br />
components:<br />
• Mains cable.<br />
• C22 remote control.<br />
• Two batteries for the remote control.<br />
If any of these items are missing please contact<br />
your supplier. We recommend you retain the<br />
packaging in case you need to transport the unit at<br />
a later date.<br />
2 Connect to a<br />
preamplifier<br />
Analogue outputs<br />
The <strong>T23</strong> is designed to be connected to the line<br />
input of a preamplifier.<br />
Connect the ANALOG OUTPUTS to a suitable line<br />
input using a pair of analogue RCA leads.<br />
Digital outputs<br />
The <strong>T23</strong> also provides both optical and coax digital<br />
outputs, to allow you to connect the <strong>T23</strong> to a<br />
digital surround processor or digital preamplifier<br />
with digital inputs, or record from the <strong>T23</strong> to a<br />
digital recorder. The <strong>T23</strong> includes an analogue to<br />
digital converter, so FM is also available on the<br />
digital output.<br />
Connect using an optical cable or coax digital cable<br />
as appropriate.<br />
3 Connect an aerial<br />
The <strong>T23</strong> includes a combined FM/DAB (Digital<br />
Audio Broadcasting) radio receiver, and to receive<br />
stations on either of the DAB or FM wavebands<br />
you need to connect a suitable aerial to the aerial<br />
connector on the back panel. The FM/DAB aerial<br />
connector is an F-type screw connector.<br />
Connect the aerial by pushing the pin into the<br />
hole in the center of the connector, then screwing<br />
the sleeve onto the outside. For more information<br />
about connecting and positioning the aerial for<br />
best reception see Using the radio, page 7.<br />
4 Connect power<br />
• Plug one end of the mains cable supplied with<br />
the <strong>T23</strong> into the power connector on the back<br />
panel, and connect the other end to a wall<br />
socket.<br />
If this cable is not suitable for your power outlets<br />
please contact your supplier for an alternative<br />
cable.<br />
5 Tune to a DAB station<br />
• Press d on the front panel, or TUNER on<br />
the remote control, until the display shows:<br />
DAB<br />
The first time you select the DAB receiver it scans<br />
for stations, and the display will show:<br />
DAB autoscan full...<br />
with a progress bar showing the progress of the<br />
scan and the number of stations found.<br />
The tuner will then select the first station found, in<br />
alphabetical order.<br />
WARNING: Always disconnect the<br />
<strong>T23</strong> from the mains power before<br />
connecting or disconnecting any cables.<br />
• Switch on the <strong>T23</strong>, using the switch under the<br />
right-hand end of the front panel.<br />
The standby indicator will light up on the front<br />
panel.
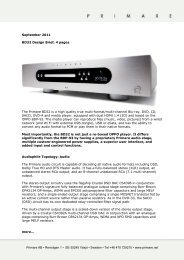
Using the <strong>T23</strong><br />
This page explains how to operate your <strong>T23</strong>, with an explanation of the function of each of the front panel controls.<br />
P R I M A R E<br />
<br />
<br />
Display<br />
Next<br />
FM/DAB<br />
Preset<br />
Previous<br />
Select<br />
Display<br />
Standby<br />
Front panel controls<br />
Listening to DAB radio<br />
Listening to FM radio<br />
Changing the display<br />
Previous V<br />
In tune mode displays the previous station (DAB) or<br />
tunes down manually (FM). In preset mode selects<br />
the previous preset.<br />
Next A<br />
In tune mode displays the next station (DAB) or<br />
tunes up manually (FM). In preset mode selects the<br />
next preset.<br />
To select the DAB tuner<br />
• Press d on the front panel, or TUNER on<br />
the remote control, until the display shows:<br />
DAB<br />
When you first select the DAB tuner, the<br />
tuner scans to locate all the stations in your<br />
neighbourhood, and the display shows:<br />
DAB autoscan full...<br />
To select the FM tuner<br />
• Press d on the front panel, or TUNER on<br />
the remote control, until the display shows:<br />
FM<br />
For more information see FM, page 5.<br />
The <strong>T23</strong> allows you to adjust the display brightness<br />
between four options: off, dim, medium, or bright.<br />
• Press DIM on the remote control to step<br />
between the options.<br />
If you turn the display off, it will light up for a short<br />
time each time you change a setting.<br />
Select R<br />
Selects the displayed DAB station.<br />
with a progress bar showing the number of<br />
stations found.<br />
For more information see DAB, page 5.<br />
FM/DAB d<br />
Switches between FM and DAB.<br />
Display i<br />
Changes the displayed information.<br />
Preset mode p<br />
Switches the function of the A and V keys<br />
between tune mode and preset mode.<br />
Standby O<br />
Press to put the <strong>T23</strong> into standby. The display<br />
shows:<br />
-OFF-<br />
Press again to switch the <strong>T23</strong> on.
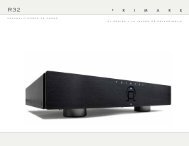
Using the remote control<br />
This page explains how to use the C22 remote control to operate the <strong>T23</strong>, and how to fit the batteries into the remote control.<br />
You can operate all the functions of the <strong>T23</strong> using<br />
the C22 remote control:<br />
Dim display<br />
Switch on/off<br />
Fitting the batteries<br />
Enter preset number<br />
Before using the remote control you need to insert<br />
the two AAA batteries supplied with the C22.<br />
Clear number entry<br />
Enter number >10<br />
• Gently slide open the cover on the back of the<br />
remote control:<br />
Switch between<br />
FM and DAB<br />
Decrease volume of<br />
preamplifier/processor<br />
Previous station (DAB)<br />
Manual tune down (FM)<br />
Select DAB station or<br />
option<br />
Increase volume of<br />
preamplifier/processor<br />
Next preset<br />
Next station (DAB)<br />
Manual tune up (FM)<br />
Previous preset<br />
• Insert the two batteries, observing the polarity<br />
printed on the bottom of battery compartment:<br />
Search down (FM)<br />
Search up (FM)<br />
• Slide back the cover until it clips into place:<br />
Save preset<br />
Display option<br />
Tune mode (DAB),<br />
Auto/Mono (FM)<br />
Note: Replace only with alkaline<br />
batteries type AAA, LR03, or equivalent.<br />
Dispose of old batteries considerately.
Using DAB and FM<br />
This page gives information about using DAB and FM, including scanning for stations, stepping between stations,<br />
and defining presets.<br />
DAB<br />
The DAB tuner covers the main Digital Audio Broadcasting bands, Band III (174-240MHz) and L-Band<br />
(1452-1492MHz).<br />
DAB broadcasts provide the benefits of a wide choice of stations, high-quality digital audio (depending on<br />
the station), and a range of associated text information.<br />
The display shows the name of the station on the first line and the genre on the second line. For example:<br />
Classic FM<br />
Serious Classics<br />
To select a station by name<br />
• Press A or V on the front panel, or > or < on<br />
the remote control, to step through the stations<br />
in alphabetical order.<br />
The second line of the display shows each station<br />
name; for example:<br />
Classic FM<br />
• Press R on the front panel or SELECT on the<br />
remote control to select the station.<br />
To tune manually<br />
• Press MODE on the remote control. The display<br />
shows:<br />
< Manual tune >><br />
• Press SELECT to select Manual tune.<br />
You can then step between the predefined DAB<br />
frequencies using < and > on the remote control.<br />
At each step the display shows the channel number<br />
and frequency; for example:<br />
12B 225.64MHz<br />
When you have displayed the channel you want to<br />
select:<br />
• Press SELECT to select it.<br />
The display shows the frequency and signal<br />
quality (SQ) for the channel, between 0 and 100<br />
(maximum); for example:<br />
225.648 SQ: 64<br />
• Press SELECT to tune the <strong>T23</strong> to that channel.<br />
The display shows:<br />
NOW TUNING...<br />
It will then start playing.<br />
To perform an autoscan<br />
You may wish to autoscan periodically to locate<br />
new stations.<br />
• Press MODE on the remote control. The display<br />
shows:<br />
< Manual tune >><br />
• Press > to select Autoscan local or Autoscan<br />
full.<br />
Autoscan local rescans the current suite of stations.<br />
Autoscan full rescans the entire waveband to find<br />
any new stations.<br />
• Press SELECT to start scanning.<br />
A progress bar shows the progress of the scan,<br />
together with the number of stations found.<br />
The tuner then selects the first station found in<br />
alphabetical order.<br />
To change the text display<br />
• Press i on the front panel or DISP on the<br />
remote control.<br />
The display steps between the following options:<br />
• Genre<br />
• Station name<br />
• Time and date<br />
• Channel and frequency<br />
• Bit rate and stereo/mono<br />
• Blank<br />
• Scrolling text display<br />
• Signal meter<br />
• Quality meter<br />
FM<br />
The FM tuner covers the FM Waveband, 87.5-<br />
108MHZ. It includes RDS (Radio Data System) to<br />
display text associated with many FM stations.<br />
To scan for a station<br />
• Press ] on the remote control to scan up in<br />
frequency or [ to scan down in frequency.<br />
The FM tuner will stop when it finds a station.<br />
To tune manually<br />
• Press A or V on the front panel, or > or < on<br />
the remote control.<br />
The display shows the current frequency; for<br />
example:<br />
89.10MHz<br />
To select mono<br />
You can reduce the noise on weak stations by<br />
selecting mono mode.<br />
• Press the MODE button to switch between<br />
AUTO, which automatically selects stereo for<br />
strong signals, or MONO.<br />
To change the text display<br />
• Press i on the front panel or DISP on the<br />
remote control.<br />
The display steps between the following options:<br />
• Programme type<br />
• Radio text<br />
• Clock time<br />
• Blank<br />
• Frequency and mono/stereo<br />
Using presets (DAB or FM)<br />
You can define up to 10 preset stations on DAB<br />
and 40 preset stations on FM.<br />
To save the current station as a preset<br />
• Press MEM on the remote control.<br />
The display shows the last preset number you used,<br />
and the station name or frequency; for example:<br />
DAB P04 Classic 10<br />
Save?<br />
• Press A or V on the remote control to select<br />
a preset number, or type the preset number on<br />
the remote control, and press MEM or SELECT<br />
to save it.<br />
To select a preset using the remote control<br />
• Press A or V to display the preset number, or<br />
type the preset number on the remote control<br />
pressing +10 first to enter a number greater<br />
than 10.<br />
After a short delay the preset will be selected.<br />
To select a preset using the front panel<br />
• Press p to switch to preset mode.<br />
• Press A or V to step between presets.<br />
To delete a preset (FM only)<br />
When listening to the preset:<br />
• Hold down C on the remote until the display<br />
shows:<br />
Delete?<br />
• Press SELECT to delete the preset.
Technical specification<br />
Additional information<br />
Analogue output<br />
RCA connector, 2.5V RMS, 100Ω.<br />
Digital outputs<br />
Optical output: TOSlink connector.<br />
Coax output: SPDIF (RCA connector), 75Ω.<br />
PCM Sample Rate 48kHz.<br />
DAB receiver<br />
Tuning range: Band III 174-240MHz, L-Band 1452-<br />
1492MHz<br />
Usable sensitivity: Band III 29dBuV, L-Band<br />
30dBuV.<br />
Number of presets: 10<br />
FM tuner<br />
Frequency range: 87.5-108MHz<br />
Usable sensitivity: FM Mono 10dBuV, FM stereo<br />
20dBuV<br />
Number of presets: 40<br />
Antenna: 50Ω<br />
General<br />
Supply voltage: 100/120 or 230V AC (must be set<br />
internally).<br />
Power consumption: Standby 14W, operational<br />
16W.<br />
Size: 430 x 385 x 106mm (WxDxH)<br />
Weight: 7.5kg<br />
Performing a factory<br />
reset<br />
If the <strong>T23</strong> is moved to another location you may<br />
need to clear the DAB memory and presets in<br />
order to receive any new local stations. In this<br />
case perform a factory reset as follows:<br />
• Switch the <strong>T23</strong> to standby.<br />
• While holding down the V button press<br />
STANDBY until the display shows:<br />
Set Factory Default?<br />
1:FM 2:DAB 3:FM+DAB<br />
• Using the remote control press 1 to use FM<br />
only, 2 to use DAB only, or 3 to use FM and<br />
DAB.<br />
The display will confirm that a factory reset has<br />
been performed.<br />
WARNING: This will delete all the DAB and FM<br />
presets and settings.<br />
IR input<br />
The <strong>T23</strong> normally receives remote control<br />
commands from an infra-red eye on the front<br />
panel. If you want to control the <strong>T23</strong> remotely<br />
you can connect the IR socket on the back panel<br />
to an infra-red eye or multi-room system infra-red<br />
output.<br />
Connecting an aerial<br />
The type of aerial you need for DAB and/or FM<br />
reception depends on the quality of the signal in<br />
your area and your listening preferences.<br />
For best results from both DAB and FM reception<br />
you will need separate DAB and FM aerials, with<br />
an aerial combiner to combine the signals from<br />
both aerials into the connector on the back panel<br />
of the <strong>T23</strong>.<br />
DAB<br />
In an area with good reception you should get<br />
good results with a simple dipole aerial, with<br />
two elements or wires arranged in a T. The aerial<br />
should be mounted with the elements pointing<br />
vertically as the transmissions are vertically<br />
polarised.<br />
FM<br />
In an area of strong FM reception a dipole aerial<br />
should also give good results with FM. Arrange<br />
the elements horizontally as FM receptions are<br />
horizontally polarised.<br />
In an area of poor reception you will need a roof<br />
or loft mounted FM aerial; contact your local<br />
dealer for information and advice.<br />
To enable the IR socket<br />
• Turn on the main power switch while holding<br />
down the i button on the front panel.<br />
The display will show:<br />
BACK IR<br />
RS232<br />
The RS232 connector allows your dealer to<br />
upgrade the firmware on your <strong>T23</strong>, or control<br />
the <strong>T23</strong> as part of a multi-room system. Do not<br />
connect anything to this socket unless instructed<br />
by your dealer.
<strong>Primare</strong> Systems AB, Renvägen 1, SE-352 45 Växjö, Sweden. http://www.primare.net