You also want an ePaper? Increase the reach of your titles
YUMPU automatically turns print PDFs into web optimized ePapers that Google loves.
SPA23<br />
s u r r o u n d s o u n d<br />
a m p l i f i e r<br />
user guide
S P A 2 3 U S E R G U I D E<br />
Welcome!<br />
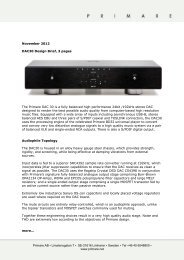
Welcome to the <strong>Primare</strong> SPA23! Your SPA23 is an advanced surround sound<br />
amplifier with the latest sound and video processing, making it the ultimate choice<br />
for home theatre.<br />
Digital outputs<br />
IR input<br />
HDMI inputs<br />
HDMI<br />
outputs<br />
Analogue<br />
inputs<br />
Analogue<br />
outputs<br />
On/off<br />
Digital inputs<br />
Trigger outputs<br />
Right front or<br />
surround back<br />
speaker<br />
Left front or<br />
surround back<br />
speaker<br />
Right surround<br />
speaker<br />
Left surround<br />
speaker<br />
Centre<br />
speaker<br />
Power
S P A 2 3 U S E R G U I D E<br />
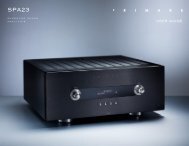
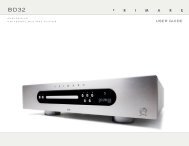
Connecting the SPA23<br />
This page shows how to connect your SPA23 to other equipment in your system.<br />
P o w e r<br />
A u d i o i n p u t s<br />
V i d e o c o n n e c t i o n s<br />
R e c o r d o u t p u t s<br />
Connect the power connector on the back<br />
panel to your power outlet using the mains cable<br />
supplied with the SPA23.<br />
If this cable is not suitable for your power outlets<br />
contact your supplier for an alternative cable.<br />
<br />
WARNING: Always disconnect the<br />
SPA23 from the mains power before<br />
connecting or disconnecting any<br />
cables, including the HDMI cables.<br />
M a i n o u t p u t s<br />
The SPA23 provides five loudspeaker outputs<br />
for connecting directly to the loudspeakers in a<br />
5-channel surround system. It also provides eight<br />
analog audio outputs, for connecting to power<br />
amplifiers and loudspeakers.<br />
The SPA23 provides a total of eight analog<br />
inputs and six digital inputs. Because the SPA23 is<br />
configurable, you have total flexibility about which<br />
input you use for each of your sources. In addition,<br />
you can optionally use four pairs of analog inputs<br />
for a single, multi-channel source, such as SACD.<br />
The SPA23 is supplied with a suggested set of<br />
sources already set up, and you may choose to<br />
leave the inputs assigned in this way. However, if<br />
you prefer, you can re-assign the inputs to sources<br />
in any way you prefer.<br />
Digital inputs<br />
The SPA23 provides a total of six digital inputs:<br />
three SPDIF digital inputs and three optical<br />
TOSlink digital inputs.<br />
Analog inputs<br />
The SPA23 provides eight line-level stereo RCA<br />
inputs.<br />
The SPA23 provides a choice of five HDMI inputs<br />
and two HDMI outputs.<br />
You can adjust the settings for each output for<br />
optimum performance with the display device,<br />
for example a TV and a projector. The on-screen<br />
display is provided on both outputs.<br />
Connecting to a television or monitor<br />
Connect the appropriate output to your television<br />
or display.<br />
If your television includes an HDMI tuner output<br />
you can use the SPA23 to perform switching<br />
between the television tuner and your other<br />
video sources such as DVD or Blu-Ray. In this<br />
case connect the television tuner output to the<br />
HDMI input corresponding to your TV source. If<br />
your television does not provide a tuner output<br />
you will need to switch the television between its<br />
internal tuner and the external video input.<br />
Z o n e 2<br />
An additional audio output is provided to feed a<br />
second zone, such as a second room system.<br />
The SPA23 Multi-Channel Processor allows you<br />
to make a recording of a digital source to the two<br />
digital record outputs, or of an analog source to<br />
the analog record output.<br />
The SPA23 provides two digital record outputs,<br />
SPDIF and optical TOSlink, and one analog RCA<br />
record output.<br />
I R , R S 2 3 2 , a n d<br />
T r i g g e r s<br />
The IR input allows you to connect an external<br />
infra-red eye, for operation of the SPA23 if the<br />
front panel is inaccessible.<br />
The RS232 input allows an authorized dealer to<br />
connect the SPA23 to a computer, for service<br />
and future upgrades, or to controller systems. For<br />
more information and details of control codes<br />
contact <strong>Primare</strong> or see the <strong>Primare</strong> Audio Web<br />
site at www.primare.net.<br />
The Trigger outputs allow the SPA23 to control<br />
external equipment, such as power amplifiers, or a<br />
projector screen.
S P A 2 3 U S E R G U I D E<br />
Getting Started<br />
Set up your SPA23 in seven simple steps:<br />
1 U n p a c k t h e S P A 2 3<br />
Your SPA23 is supplied with the following<br />
components:<br />
• Mains cable.<br />
• C24 remote control.<br />
• Two button cells for the remote control.<br />
If any of these items are missing please contact<br />
your supplier. We recommend you retain the<br />
packaging in case you need to transport the unit<br />
at a later date.<br />
2 C o n n e c t a d i s p l a y<br />
Connect the HDMI 1 or HDMI 2 output from<br />
your SPA23 to your television or display HDMI<br />
input.<br />
For more information see Video connections,<br />
page 3.<br />
3 C o n n e c t t o<br />
s p e a k e r s<br />
The SPA23 can directly drive the five loudspeakers<br />
in a surround system. In addition it provides linelevel<br />
outputs for seven full-frequency channels and<br />
one subwoofer.<br />
If your surround system does not include a full set<br />
of speakers, the SPA23 will distribute the signals<br />
from these channels to the other channels as<br />
appropriate in your system.<br />
• Connect the front, centre, and surround<br />
loudspeaker outputs to the loudspeakers in<br />
your system.<br />
If your system includes both side surround and<br />
back surround speakers:<br />
• Reassign the LEFT and RIGHT FRONT<br />
channels to the additional surrounds,<br />
and use the analogue FRONT LEFT and<br />
RIGHT outputs to connect to an additional<br />
A34.2 stereo power amplifier; see AUDIO<br />
SETTINGS, page 9.<br />
If your system includes a subwoofer:<br />
• Connect the SUB analog output to the audio<br />
input of the subwoofer.<br />
4 C o n n e c t s o u r c e s<br />
The SPA23 is supplied with seven standard<br />
sources already configured; see Selecting a source,<br />
page 5.<br />
Alternatively you can configure up to 15 sources<br />
to use the particular combination of analogue,<br />
digital, and video input you prefer; for more<br />
information see Input setting, page 8.<br />
5 C o n n e c t p o w e r<br />
• Connect the SPA23 to a wall socket, using the<br />
supplied mains cable.<br />
• Switch on the SPA23, using the switch next to<br />
the power connector on the back panel.<br />
• Press the O button to switch on the SPA23.<br />
The button indicators will light up, showing the<br />
function of the two controls and four buttons on<br />
the front panel.<br />
6 C o n f i g u r e t h e<br />
s p e a k e r s<br />
Before using the SPA23 you need to configure it<br />
to specify the combination of speakers you have in<br />
your surround system. For more information see<br />
SPEAKER SETTING, page 10.<br />
You then need to set up the speaker levels and<br />
speaker distances, to ensure that the sound image<br />
is correctly focused at the listening position. For<br />
more information see LEVEL ADJUST, page 10,<br />
and SPEAKER DIST, page 11.<br />
7 P l a y a s o u r c e<br />
• Use the SELECTOR control on the front<br />
panel or the A and V buttons on the remote<br />
control to select the source.<br />
• Use the VOLUME control on the front panel<br />
or the VOL + and VOL – buttons on the<br />
remote control to increase or decrease the<br />
volume.<br />
For more information about playing sources see<br />
Selecting a source, page 5.
S P A 2 3 U S E R G U I D E<br />
Using the SPA23<br />
This page explains how to operate your SPA23, using the functions available from<br />
the front panel or C24 remote control.<br />
F r o n t p a n e l<br />
c o n t r o l s<br />
Almost all the functions of the SPA23 Multi-<br />
Channel Processor can be accessed using the two<br />
front panel controls and four push buttons, and<br />
information about its operation is displayed on the<br />
front panel display:<br />
Selector<br />
Selects an input, or operates the on-screen menus<br />
Menu @<br />
Selects the on-screen menus.<br />
Select R<br />
Selects the current menu option.<br />
Level _<br />
Selects which setting you change with the<br />
VOLUME control.<br />
Mute/Standby O<br />
Press briefly to mute the sound.<br />
Hold down to switch the SPA23 to standby.<br />
Volume<br />
Adjusts the volume.<br />
F r o n t p a n e l d i s p l a y<br />
The front panel display shows:<br />
• The processing mode; eg STEREO, or NO<br />
LOCK if there is no signal on a digital input.<br />
• The current source; eg DVD<br />
• The volume; eg 41 or MUTE.<br />
To blank the front panel display<br />
• Press the DIM button on the remote control.<br />
The normal display will reappear while you adjust<br />
any settings.<br />
Press the DIM button again to restore the display.<br />
S w i t c h i n g o n a n d<br />
o f f<br />
To switch on<br />
• Use the switch on the back panel.<br />
During normal operation you can leave the SPA23<br />
switched on and in standby.<br />
To switch to standby<br />
• Hold down the O button on the front panel<br />
or remote control.<br />
To switch on from standby<br />
• Press the O button on the front panel or<br />
remote control.<br />
S e l e c t i n g a s o u r c e<br />
The SPA23 allows you to define up to 15<br />
sources. Each source can use one of the six<br />
digital and eight analog inputs, and any source<br />
can be combined with one of the HDMI inputs.<br />
Alternatively, a multi-channel source, called<br />
EXT 7.1, can be defined using analog inputs 5 to 8.<br />
When the SPA23 is first supplied the seven<br />
standard sources shown in the table below are<br />
already set up for you.<br />
You can simply disable any of these sources that<br />
you do not need; see Input setting, page 8. You<br />
can also change any source to use different inputs,<br />
or configure your own sources with any name<br />
you choose and using any particular inputs as<br />
appropriate for the source.<br />
To select a source<br />
• Turn the SELECTOR control on the front<br />
panel until the name of the source is shown<br />
on the front panel display.<br />
• Alternatively, press the A or V buttons on the<br />
remote control to step between sources.<br />
C h a n g i n g t h e v o l u m e<br />
The SPA23 allows you to vary the volume from 0<br />
(silence) to 99 (maximum volume).<br />
To change the volume<br />
• Rotate the VOLUME control on the front<br />
panel, or press the VOL + or VOL – buttons<br />
on the remote control.<br />
The current volume setting is shown on the front<br />
panel display.<br />
Input Source Audio Video 2CH mode Description<br />
1 Blu-ray HDMI 1 HDMI 1 Stereo Blu-Ray disc player<br />
2 DVB HDMI 2 HDMI 2 Stereo Digital satellite receiver<br />
3 Games HDMI 3 HDMI 3 Stereo Game console<br />
4 Server HDMI 4 HDMI 4 Stereo Streaming server<br />
5 DVB-T HDMI 5 HDMI 5 Stereo Digital television receiver<br />
6 CD Analog 1 None Bypass CD player<br />
7 SACD Ext 7.1 None Stereo SACD player
S P A 2 3 U S E R G U I D E<br />
T o m u t e t h e s o u n d<br />
• Press the O button on the front panel or the<br />
MUTE button on the remote control.<br />
To restore the sound to its original volume<br />
• Press the O or MUTE button again.<br />
The sound is also restored to its original volume if<br />
you increase the volume.<br />
C h a n g i n g t h e<br />
l e v e l s<br />
You can independently change the balance, center<br />
level, surround level, surround back level, and<br />
subwoofer level to alter the balance of sound in<br />
your surround system.<br />
Changing the balance alters the level of both<br />
the left and right main loudspeakers to shift<br />
the position of the stereo image, keeping the<br />
overall level of the sound the same. The other<br />
adjustments change the level of the corresponding<br />
speaker(s) without affecting the remaining<br />
speakers in the surround system.<br />
To change a level<br />
• Press the _ button on the front panel, or<br />
the BAL/ST button on the remote control,<br />
until the display shows the level you want to<br />
change.<br />
The first step allows you to change the balance of<br />
the main speakers:<br />
0.0dB L=R<br />
0.0dB<br />
Subsequent steps allow you to change the levels<br />
of the surround speakers:<br />
CENTER<br />
SUBWOOFER<br />
SURROUND<br />
SURR BACK<br />
0.0dB<br />
0.0dB<br />
0.0dB<br />
0.0dB<br />
• Use the VOLUME control on the front<br />
panel, or the A and V buttons on the remote<br />
control, to adjust the value.<br />
Each setting can be changed from -10.0dB to<br />
+10.0dB.<br />
After a short delay the display will revert to the<br />
normal display.<br />
C h a n g i n g t h e<br />
l i p s y n c<br />
You can change the AV Delay (lipsync) from the<br />
front panel to compensate for processing delay in<br />
some video displays. Choose the setting that gives<br />
correct lipsync.<br />
To change the lipsync<br />
• Press the _ button on the front panel, or<br />
the ST/BAL button on the remote control,<br />
until the display shows the current AV Delay:<br />
AV DELAY 0ms<br />
• Use the VOLUME control on the front<br />
panel, or the A and V buttons on the remote<br />
control, to adjust the value.<br />
The AV Delay can be changed from 0ms to<br />
140ms. After a short delay the display will revert<br />
to the normal display.<br />
C h o o s i n g t h e<br />
s u r r o u n d m o d e<br />
The surround mode determines how the sound<br />
is divided between the loudspeakers in your<br />
surround system. Each source is associated with<br />
a default surround mode, which will be used<br />
when you select that source, but you can choose<br />
a different surround mode for the source if you<br />
prefer.<br />
For example, the standard surround mode for<br />
the DVB source is PLIIX Movie, since most TV<br />
broadcasts are Pro Logic encoded, but if you<br />
are watching a music concert you may prefer to<br />
choose the Stereo or Bypass surround modes, as<br />
these give a more natural sound when listening<br />
to music.<br />
To change the surround mode<br />
• Press the AUDIO button on the remote<br />
control to step between the available<br />
surround modes.<br />
The options available depend on the source you<br />
are listening to.<br />
Lossless sources<br />
Blu-ray players provide three lossless audio<br />
formats: Dolby TrueHD, DTS-HD Master Audio,<br />
and Linear Pulse-Code Modulation (LPCM). These<br />
formats will all convey eight discrete channels (7.1)<br />
of lossless audio that exactly duplicate the original<br />
studio masters:<br />
Format<br />
Dolby<br />
Dolby Digital<br />
Variants<br />
Dolby Prologic IIx<br />
EX, Plus, TrueHD<br />
DTS DTS-ES, DTS-NEO:6, DTS 96/24,<br />
DTS-HD Master Audio, DTS-HD<br />
High Resolution Audio<br />
PCM<br />
2ch-PCM, Multi-PCM, LPCM<br />
Multi-channel sources<br />
For Dolby Digital or DTS sources only the<br />
following option is available:<br />
Option<br />
AUTO<br />
Description<br />
Automatically detects an<br />
incoming digital signal and<br />
locks onto it.<br />
The SPA23 automatically detects a Dolby Digital<br />
or DTS input and displays Dolby Digital on the<br />
front panel display.<br />
If the Dolby Digital input only contains two<br />
channels, or it is a PCM signal, the default surround<br />
mode specified in the INPUT SETTINGS menu<br />
is also displayed. For more information see Input<br />
setting, page 8.<br />
Two-channel sources<br />
If you are listening to a conventional two-channel<br />
analog or digital source, such as a CD, the<br />
following options are available:<br />
Option<br />
BYPASS<br />
(analog sources<br />
only)<br />
STEREO<br />
PLIIX<br />
PLIIX CINEMA<br />
PLIIX MUSIC<br />
PARTY<br />
DTS NEO:6<br />
CINEMA<br />
DTS NEO:6<br />
MUSIC<br />
Description<br />
The inputs are fed directly to<br />
the output, with no decoding<br />
for the most faithful possible<br />
reproduction of stereo or<br />
multi-channel sources.<br />
Conventional stereo, using<br />
just the main left and right<br />
loudspeakers.<br />
Dolby’s updated Pro Logic<br />
decoder provides 7.1 channel<br />
surround sound from any two<br />
channel source, with stereo<br />
surround back channels and<br />
full frequency range.<br />
A variant of PLIIX optimised<br />
for movie soundtracks.<br />
A variant of PLIIX optimised<br />
for music sources.<br />
The same signal to the front<br />
left and right, surround left<br />
and right, and surround back<br />
left and right loudspeakers, if<br />
connected and enabled.<br />
DTS Neo:6 provides up to<br />
6.1 channel surround sound<br />
from conventional stereo<br />
sources..<br />
A version of DTS Neo:6 ideal<br />
for stereo music sources.
S P A 2 3 U S E R G U I D E<br />
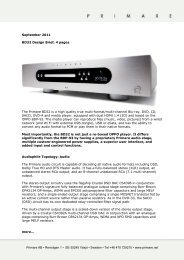
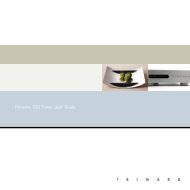
Using the remote control<br />
This page explains how to use the C24 remote control to<br />
operate the SPA23, and how to fit the batteries into the remote<br />
control.<br />
Press briefly to<br />
mute the sound<br />
Switch on/off<br />
F i t t i n g t h e b a t t e r i e s<br />
Before using the remote control you need to insert<br />
the two button cells supplied with the C24.<br />
• Open the cover on the back of the remote<br />
control by pressing the tab gently:<br />
Select SPA23 mode<br />
Move left on settings menu<br />
Edit item on settings menu<br />
Select an input<br />
Press +10 first to select an input > 9<br />
Select next input, increase level,<br />
or move up on settings menu<br />
Move right on settings menu<br />
Select previous input, reduce level,<br />
or move down on settings menu<br />
• Insert the two batteries, positive side uppermost:<br />
Increase the volume<br />
+<br />
CR2025<br />
LITHIUM BATTERY<br />
3V<br />
+<br />
CR2025<br />
LITHIUM BATTERY<br />
3V<br />
Decrease the volume<br />
Control the CD player<br />
• Replace the cover and push until it clips into place.<br />
<br />
Note: Replace only with 3V button cells<br />
type CR2025 or equivalent.<br />
Display the settings menus<br />
Change the surround mode<br />
Change the balance or levels<br />
When disposing of old batteries please be considerate<br />
to the environment.<br />
Change the display brightness
S P A 2 3 U S E R G U I D E<br />
Configuring the settings<br />
This page explains how to use the SPA23 menus to configure the operation of your<br />
SPA23.<br />
U s i n g t h e m e n u s<br />
The SETUP MENU gives access to a series of<br />
menus which allow you to customize different<br />
aspects of the operation of the SPA23.<br />
To display the SETUP MENU<br />
• Press @ on the front panel or SETUP on the<br />
remote control.<br />
To display a menu<br />
• Use the SELECTOR control on the front<br />
panel or the A or V buttons on the remote<br />
control to highlight the menu on the SETUP<br />
MENU that you want to display.<br />
• Press R on the front panel, or SELECT or<br />
> on the remote control, to select it.<br />
To change a setting<br />
• Use the SELECTOR on the front panel or<br />
the A or V buttons on the remote control to<br />
highlight the setting you want to change.<br />
• Press R on the front panel, or SELECT or<br />
> on the remote control, to display a list of<br />
the alternative values for the setting.<br />
• Use the SELECTOR control on the front<br />
panel the A or V buttons on the remote<br />
control to step between the alternative values.<br />
• Press R on the front panel, or SELECT on<br />
the remote control, to select the highlighted<br />
setting.<br />
Alternatively, press @ on the front panel, or<br />
RETURN or < on the remote control, to return<br />
to the menu without changing the setting.<br />
To edit an input alias<br />
• Press SELECT to edit the name of the<br />
source.<br />
• Use < or > to select a character.<br />
• Use A or V to edit it.<br />
• Finally press R on the front panel or<br />
SELECT on the remote control to finish.<br />
To exit from the current menu<br />
• Press @ on the front panel or RETURN on<br />
the remote control.<br />
Exiting from the SETUP MENU returns to<br />
normal operation of the SPA23.<br />
I N P U T S E T T I N G<br />
The INPUT SETTING menu allows you to<br />
configure any of the 15 inputs.<br />
• Use the INPUT option to select the input<br />
you want to edit.<br />
The menu then shows the current settings for that<br />
input and allows you to edit them.<br />
Option<br />
STATUS<br />
ALIAS<br />
Description<br />
ENABLED or DISABLED to<br />
specify whether the source can be<br />
selected from the front panel or<br />
remote control.<br />
See To edit an input alias on this<br />
page.<br />
Option<br />
AUDIO<br />
Description<br />
The audio input used for the<br />
source: NONE, ANALOG 1 to<br />
8, EXT 7.1, DIGITAL 1 to 6, or<br />
HDMI 1 to 5.<br />
TRIGGER 1-3 Can be set to ON or OFF, to<br />
set the corresponding trigger, or<br />
--- to take the value from the<br />
CONTROL menu.; see Trigger<br />
settings, page 11.<br />
VIDEO<br />
HDMI VIDEO<br />
OUT<br />
The video input used for the<br />
source: NONE or HDMI 1 to 5.<br />
The video output used for the<br />
source: OUT 1 or OUT 2.<br />
HDMI AUDIO Set to TV to pass the HDMI<br />
audio to the TV, or SPA23 to get<br />
the SPA23 to process the audio.<br />
VOLUME<br />
OFFSET<br />
AV DELAY<br />
2CH MODE<br />
Press < or > to vary the<br />
sensitivity of the source between<br />
-12.0dB to +12.0dB in 0.5dB steps.<br />
Can be adjusted between 0ms<br />
and 140ms to compensate for<br />
processing delay in some displays.<br />
The default surround mode for<br />
two-channel sources: BYPASS,<br />
STEREO, PLIIX MOVIE, PLIIX<br />
MUSIC, NEO6 CINEMA,<br />
NEO6 MUSIC, or PARTY.
S P A 2 3 U S E R G U I D E<br />
V I D E O A D J U S T<br />
Option<br />
Description<br />
A u d i o s e t t i n g s<br />
V i d e o O U T P U T<br />
1:1 FRAME RATE Set to ON to set the output<br />
frame rate to the input<br />
frame rate, which may cause<br />
stuttering, or OFF for a<br />
fixed output frame rate.<br />
The VIDEO ADJUST menu allows you to<br />
specify advanced video input settings:<br />
• Use the INPUT option to select the input<br />
you want to edit.<br />
The menu then shows the current settings for that<br />
input and allows you to edit them.<br />
Option<br />
ALIAS<br />
ASPECT RATIO<br />
DEINTERLACING<br />
PrEP<br />
Description<br />
See To edit an input alias on<br />
the previous page.<br />
Set to 16:9 or 4:3 to specify<br />
the display aspect ratio.<br />
Specifies how a 480i, 576i, or<br />
1080i source is deinterlaced.<br />
FILM is for 24p film,<br />
VIDEO is for 50Hz or<br />
60Hz video, and AUTO<br />
selects the correct option<br />
based on the input signal..<br />
Select AUTO to select<br />
Progressive ReProcessing to<br />
clean up poor source video<br />
processing, or DISABLE to<br />
disable it.<br />
UNDERSCAN<br />
BRIGHTNESS,<br />
CONTRAST,<br />
COLOR<br />
SATURATION,<br />
HUE (TINT)<br />
DETAIL/EDGE<br />
ENHANCEMENT,<br />
MOSQUITO NR<br />
Set to 0 to 20 to shrink<br />
the picture to adjust for an<br />
overscanned source..<br />
Set to 100 to -100, default<br />
0. Allow you to adjust the<br />
color characteristics of the<br />
image.<br />
Set to 100 to -100, default<br />
0. Allow you to accurately<br />
adjust the sharpness of the<br />
picture..<br />
Set to DISABLE, ON-<br />
LOW, or ON-HIGH to<br />
reduce the compression<br />
artifacts in digitally<br />
compressed signals, like cable,<br />
satellite and internet-based<br />
video.<br />
The AUDIO SETTINGS menu allows you to<br />
specify options affecting all audio outputs:<br />
Option<br />
INT AMP<br />
LATE NIGHT<br />
Description<br />
The normal setting is FRONT.<br />
Can be set to BACK to change<br />
the front power amplifier to<br />
operate with the Surround Back<br />
channels, if you prefer to use a<br />
separate power amplifier with<br />
the front channels.<br />
Set to ON to apply dynamic<br />
range compression to the audio,<br />
to reduce loud transients for late<br />
night listening.<br />
DOUBLE BASS Set to ON to copy the bass<br />
from speakers specified as<br />
LARGE and send this to the<br />
subwoofer.<br />
LFE LEVEL<br />
ADC LEVEL<br />
Can be adjusted between 0.0dB<br />
and -10.0dB to reduce the LFE<br />
level.<br />
Allows you to adjust the<br />
threshold for automatically<br />
setting the ADC input level. Can<br />
be adjusted between 12.0dB<br />
(more dynamic range) and<br />
‐12.0dB (more headroom).<br />
The VIDEO OUTPUT menu allows you to<br />
customise the HDMI output settings.<br />
For each output you can set:<br />
Option Description<br />
RESOLUTION Set to PASS-THRU, AUTO,<br />
480p/576p, 720p, 1080i,<br />
1080p, or 1080p24.<br />
COLOR SPACE Set to AUTO, RGB for a<br />
Red, Green, Blue color space<br />
standard using 8 bits per<br />
primary color, YCbCr 422 for<br />
10-bit component, or YCbCr<br />
444 for 8-bit component.<br />
COLORIMETRY Determines how RGB is<br />
converted to YCbCr: AUTO,<br />
ITU.601 for Standard<br />
Definition video formats, or<br />
ITU.709 for High Definition<br />
video formats.<br />
OUTPUT VID Set to VIDEO for levels<br />
LEVEL suitable for a TV, or PC for<br />
levels suitable for a computer<br />
display.
S P A 2 3 U S E R G U I D E<br />
You can also set the following settings that apply<br />
to both outputs:<br />
Option<br />
Description<br />
DEFAULT FRAME Set to 50p (PAL) or 60p<br />
RATE<br />
(NTSC) to specify the native<br />
system of your display.<br />
TESTPATTERN<br />
Displays one of a set of<br />
alternative test patterns for<br />
aligning projection displays.<br />
S p e a k e r s e t t i n g<br />
• Set MODE to GENERAL, and then set<br />
the other parameters as appropriate for the<br />
speakers in your system.<br />
You can then define DOLBY D, DTS, and<br />
OTHER modes, which can be used to add an<br />
offset to the GENERAL settings for Dolby<br />
Digital, DTS, and 2-channel sources respectively.<br />
L e v e l A D J U S T<br />
The SPEAKER SETTING menu allows you to<br />
set up the speakers:<br />
Option<br />
MODE<br />
FRONT L+R<br />
Description<br />
See below.<br />
Select SMALL or LARGE<br />
to specify whether the front<br />
speakers can handle bass.<br />
The LEVEL ADJUST menu allows you to adjust<br />
the levels so that the sound from each speaker is<br />
equally loud at the listening position.<br />
• Highlight each of the speakers in turn; a white<br />
noise signal will be played through the speaker.<br />
• Use the < and > buttons on the remote<br />
control to adjust the level.<br />
CENTER<br />
Select NONE, SMALL, or<br />
LARGE to specify whether<br />
there is a center speaker in the<br />
system, and whether it is small<br />
or large.<br />
For best results measure the level at the listening<br />
position using a Sound Pressure Level meter.<br />
SURROUND<br />
Select NONE, SMALL, or<br />
LARGE to specify information<br />
about the surround speakers.<br />
SURR BACK<br />
Select NONE, 1/SMALL,<br />
1/LARGE, 2/SMALL, or 2/<br />
LARGE to specify the number<br />
and size of the surround back<br />
speakers.<br />
SUBWOOFER<br />
Select OFF or ON to specify<br />
whether the layout should<br />
include a subwoofer.<br />
LR+LFE XOVER Allows you to define the<br />
CENTER XOVER crossover frequency (40Hz<br />
SURR XOVER to 200Hz) used for the LFE,<br />
CENTER, and SURR speakers.<br />
1 0
S P A 2 3 U S E R G U I D E<br />
S p e a k e r d i s t<br />
The SPEAKER DIST menu allows you to<br />
specify the distance of each speaker from the<br />
listening position, in feet or metres. The SPA23 will<br />
then add delays to each channel to ensure that<br />
the sound from each speaker reaches the listener<br />
at the same time.<br />
You can also add an extra delay to the surround<br />
speakers to make the sound more spacious.<br />
• Use the < and > buttons on the remote<br />
control to adjust the distance or delay.<br />
In GENERAL mode you can adjust the<br />
distance between 0 and 20 feet (0 and 6m).<br />
Setting DISTANCE UNITS to MS shows the<br />
calculated delays and allows you to adjust them<br />
directly.<br />
C o n t r o l s e t t i n g s<br />
Allows you to configure hardware settings of the<br />
SPA23.<br />
Option<br />
Description<br />
OSD Set to YES to allow the video<br />
TRANSPARENT image to show through the<br />
background of the on-screen<br />
display, or NO to blank the<br />
video image when the on-screen<br />
display is displayed.<br />
OSD POPUP<br />
OSD POPUP<br />
TIME<br />
OSD POPUP<br />
POS.<br />
VFD<br />
BRIGHTNESS<br />
Determines what information is<br />
shown on the on-screen display<br />
when changing source. FULL<br />
shows the same information as<br />
the front panel display, SIMPLE<br />
shows just the source name, and<br />
OFF turns it off.<br />
Set to 1-10 sec to determine<br />
how long the on-screen display<br />
stays on the screen.<br />
Position of on-screen display.<br />
1-3 to specify the front panel<br />
display brightness.<br />
Option<br />
VFD DISPLAY<br />
TIME<br />
TRIGGER 1 to<br />
TRIGGER 3<br />
REMOTE<br />
SELECT *<br />
Description<br />
Set to 1-10 sec to set the time<br />
before the front panel display<br />
dims.<br />
See Trigger settings below.<br />
Select FRONT to use an infrared<br />
remote control pointer at<br />
the front panel, or BACK to<br />
control the SPA23 using the IR<br />
input on the back panel.<br />
FRONT PANEL Select LOCKED to lock the<br />
front panel; you will then only<br />
be able to operate the SPA23<br />
via the remote control. Reset to<br />
UNLOCKED when you turn<br />
off the SPA23 at the back panel.<br />
* Note: After changing this option you will not<br />
be able to use the remote control to control the<br />
SPA23. To reset this option operate the menus<br />
from the front panel.<br />
Trigger settings<br />
For each trigger you can set the following:<br />
Option<br />
TRIGGER 1-3<br />
TRIGGER 1-3<br />
ON DELAY<br />
Description<br />
Specifies when the current<br />
trigger is active: OFF,<br />
STANDBY to enable it when<br />
the SPA23 is in standby, INPUT<br />
S to take the setting from the<br />
INPUT SETTING menu, or<br />
ZONE 2 to take the setting<br />
from the ZONE 2 menu.<br />
Allows you to specify a delay<br />
of 0, 1, 2, or 5 secs before the<br />
trigger is activated.<br />
Z o n e 2<br />
For each input the ZONE 2 SETTINGS menu<br />
allows you to specify an analogue audio input to<br />
be output to the Zone 2 output.<br />
Option<br />
INPUT<br />
AUDIO<br />
TRIGGER 1-3<br />
VOLUME<br />
VOLUME<br />
DEFAULT<br />
Description<br />
Select one of the 15 inputs to<br />
be configured.<br />
Allows you to specify an<br />
analogue audio input to be<br />
output to the Zone 2 output.<br />
Zone 2 trigger settings; see<br />
Trigger settings on this page.<br />
Allows you to set the current<br />
Zone 2 volume (0 to 99).<br />
Determines the default Zone<br />
2 volume (0 to 99) when<br />
the SPA23 is turned on from<br />
standby.<br />
1 1
S P A 2 3 U S E R G U I D E<br />
M e m o r y<br />
The MEMORY menu allows you to save and<br />
recall the SPA23 settings, or restore the factory<br />
settings.<br />
Saving installer settings<br />
Once you have configured the SPA23 you can<br />
save the settings in a password-protected <strong>file</strong>, and<br />
then recall them at any time to restore the SPA23<br />
to your custom configuration.<br />
• Select SAVE INST. SETTINGS from the<br />
MEMORY menu.<br />
• Enter the password using the number keys (or<br />
A, V, ) on the remote, then press @<br />
on the front panel or SETUP on the remote<br />
control.<br />
If you have successfully saved the settings you will<br />
be returned to the MEMORY menu..<br />
Recalling installer settings<br />
You can recall the installer settings at any time:<br />
• On the MEMORY menu select RECALL<br />
INST. SETTINGS, then select YES<br />
The SPA23 will restart with the new configuration.<br />
Changing the installer password<br />
To change the installer password:<br />
• Highlight CHANGE INST. PASSWORD,<br />
then press @ on the front panel or SETUP<br />
on the remote control.<br />
• Enter the old password using the number<br />
keys (or A, V, ) on the remote, then<br />
press @ on the front panel or SETUP on the<br />
remote control.<br />
The screen will prompt PLEASE ENTER<br />
YOUR NEW PASSWORD TWICE.<br />
• Enter the new password and press @ on the<br />
front panel or SETUP on the remote control.<br />
• Enter the new password again and press @<br />
on the front panel or SETUP on the remote<br />
control.<br />
If you have successfully changed the password you<br />
will be returned to the MEMORY menu..<br />
1 2
S P A 2 3 U S E R G U I D E<br />
Technical specification<br />
I N P U T S A N D O U T P U T S<br />
Loudspeaker outputs<br />
Front (left and right, can be switched to surr back)<br />
Center, Sub,<br />
Surr (left and right)<br />
Analogue outputs<br />
Front (left and right)<br />
Center, Sub<br />
Surr (left and right)<br />
Surr back (left and right)<br />
Analogue record output<br />
1 RCA (left and right)<br />
Zone2 output<br />
1 RCA (left and right)<br />
Digital outputs<br />
1 RCA, 1 TOS-Link<br />
Video Output<br />
2 HDMI<br />
Analogue inputs<br />
8 RCA, incl. 7.1 inputs<br />
Digital inputs<br />
3 RCA, 3 TOS-Link.<br />
Video Inputs<br />
5 HDMI<br />
D i g i t a l<br />
Frequency response<br />
20Hz-20kHz ±0.2dB<br />
THD and noise<br />
0.005% @1kHz (AES17 filter)<br />
A N A L O G U E<br />
THD<br />
S P A 2 3 U S E R G U I D E<br />
C o p y r i g h t a n d<br />
a c k n o w l e d g m e n t s<br />
Copyright © 2013 <strong>Primare</strong> AB.<br />
All rights reserved.<br />
<strong>Primare</strong> AB<br />
Limstensgatan 7<br />
21616 Limhamn<br />
Sweden<br />
http://www.primare.net<br />
Issue: SPA23/1<br />
The information in this guide is believed to be<br />
correct as of the date of publication. However,<br />
our policy is one of continuous development and<br />
so the information is subject to change without<br />
notice, and does not represent a commitment on<br />
the part of <strong>Primare</strong> AB.<br />
CAUTION<br />
RISK OF ELECTRIC SHOCK DO NOT OPEN<br />
ATTENTION<br />
RISQUE DE CHOC ELECTRIQUE NE PAS<br />
OUVRIR<br />
<br />
The lightning flash with an arrowhead symbol within an equilateral triangle, is intended to alert the<br />
user to the presence of uninsulated 'dangerous voltage' within the product's enclosure that may be<br />
of sufficient magnitude to constitute a risk of electric shock to persons.<br />
<strong>Primare</strong> is a trademark of <strong>Primare</strong> AB.<br />
This guide was produced by<br />
Human-Computer Interface Ltd.<br />
http://www.interface.co.uk<br />
Safety compliance<br />
This product has been designed to meet the IEC<br />
60065 international electrical safety standard.<br />
<br />
The<br />
exclamation point within an<br />
equilateral triangle is intended to alert<br />
the user to the presence of important<br />
operating and maintenance (servicing)<br />
instructions in the literature accompanying<br />
the product.<br />
CAUTION: To reduce the risk of electrical shock<br />
do not remove cover (or back). No user serviceable<br />
parts inside. Refer servicing to qualified service<br />
personnel.<br />
WARNING: To reduce the risk of fire or electrical<br />
shock, do not expose this apparatus to rain or<br />
moisture.<br />
CAUTION: In Canada and the USA, to prevent<br />
electric shock, match the wide blade of the plug to<br />
the wide slot in the socket and insert the plug fully<br />
into the socket.<br />
This product is designed and manufactured to meet<br />
strict quality and safety standards. However, you<br />
should be aware of the following installation and<br />
operation precautions.<br />
1. Take heed of warnings & instructions<br />
You should read all the safety and operating<br />
instructions before operating this appliance. Retain<br />
this handbook for future reference and adhere to all<br />
warnings in the handbook or on the appliance.<br />
2. Water and moisture<br />
The presence of electricity near water can be<br />
dangerous. Do not use the appliance near water – for<br />
example next to a bathtub, washbowl, kitchen sink, in<br />
a wet basement or near a swimming pool, etc.<br />
3. Object or liquid entry<br />
Take care that objects do not fall and liquids are<br />
not spilled into the enclosure through any openings.<br />
Liquid-filled objects such as vases should not be<br />
placed on the equipment.<br />
4. Ventilation<br />
Do not place the equipment on a bed, sofa, rug<br />
or similar soft surface, or in an enclosed bookcase<br />
or cabinet, since ventilation may be impeded. We<br />
recommend a minimum distance of 50mm around<br />
the sides and top of the appliance to provide<br />
adequate ventilation.<br />
5. Heat<br />
Locate the appliance away from naked flames or<br />
heat producing equipment such as radiators, stoves<br />
or other appliances (including other amplifiers) that<br />
produce heat.<br />
6. Climate<br />
The appliance has been designed for use in moderate<br />
climates.<br />
7. Racks and stands<br />
Only use a rack or stand that is recommended for<br />
use with audio equipment. If the equipment is on a<br />
portable rack it should be moved with great care, to<br />
avoid overturning the combination.<br />
8. Cleaning<br />
Unplug the unit from the mains supply before cleaning.<br />
The case should normally only require a wipe with a<br />
soft, damp, lint-free cloth. Do not use paint thinners or<br />
other chemical solvents for cleaning.<br />
We do not advise the use of furniture cleaning sprays<br />
or polishes as they can cause indelible white marks if<br />
the unit is subsequently wiped with a damp cloth.<br />
9. Power sources<br />
This appliance must be connected to a mains socket<br />
outlet using the supplied power cord. To disconnect<br />
this apparatus from power, you must disconnect the<br />
power cord. Make sure the power cord is always easily<br />
accessible.<br />
Only connect the appliance to a power supply of the<br />
type described in the operating instructions or as<br />
marked on the appliance.<br />
This is a Class 1 device and must be earthed.<br />
The power switch is a single-pole switch. When the<br />
switch is in the “Off” position, the appliance is not<br />
completely disconnected from the main power.<br />
10. Power-cord protection<br />
Power supply cords should be routed so that they are<br />
not likely to be walked on or pinched by items placed<br />
upon or against them, paying particular attention to<br />
cords and plugs, and the point where they exit from the<br />
appliance.<br />
11. Grounding<br />
Ensure that the grounding means of the appliance is not<br />
defeated.<br />
12. Power lines<br />
Locate any outdoor antenna/aerial away from power<br />
lines.<br />
13. Non-use periods<br />
If the unit has a stand-by function, a small amount of<br />
current will continue to flow into the equipment in this<br />
mode. Unplug the power cord of the appliance from<br />
the outlet if left unused for a long period of time.<br />
14. Abnormal smell<br />
If an abnormal smell or smoke is detected from the<br />
appliance, turn the power off immediately and unplug<br />
the unit from the wall outlet. Contact your dealer<br />
immediately.<br />
15. Servicing<br />
You should not attempt to service the appliance<br />
beyond that described in this handbook. All other<br />
servicing should be referred to qualified service<br />
personnel.<br />
16. Damage requiring service<br />
The appliance should be serviced by qualified service<br />
personnel when:<br />
A. the power-supply cord or the plug has been<br />
damaged, or<br />
1 4
t h e s o u n d a n d v i s i o n o f s c a n d i n a v i a<br />
p l e a s e v i s i t p r i m a r e . n e t f o r m o r e<br />
i n f o r m a t i o n a b o u t o u r p r o d u c t s<br />
primare ab limstensgatan 7 21616 limhamn sweden primare.net