AB510 AB710 Manual - Polk Audio
AB510 AB710 Manual - Polk Audio
AB510 AB710 Manual - Polk Audio

You also want an ePaper? Increase the reach of your titles
YUMPU automatically turns print PDFs into web optimized ePapers that Google loves.
<strong>AB510</strong><br />
<strong>AB710</strong><br />
Instruction<br />
<strong>Manual</strong><br />
AB SERIES<br />
A WORD FROM MATTHEW POLK<br />
Dear Music Lover,<br />
Thank you for purchasing <strong>Polk</strong> <strong>Audio</strong> speakers. Designing and building<br />
speakers is more than just a business for the people of <strong>Polk</strong> <strong>Audio</strong> –<br />
it is our passion. We are all dedicated to your complete satisfaction<br />
and delight.<br />
Your new <strong>Polk</strong> speakers include the latest loudspeaker technology to<br />
assure outstanding performance and unmatched quality. Please take a<br />
moment to read through this manual for information on getting the<br />
greatest enjoyment from these fine instruments.<br />
We make a wide variety of main, center, rear channel, powered subwoofer,<br />
and accessory speakers so you can assemble a complete and<br />
well matched high-performance surround sound system. If you would<br />
like more information on building the <strong>Polk</strong> system of your dreams, consult<br />
your <strong>Polk</strong> <strong>Audio</strong> dealer or call our Customer Service Department. In<br />
North America call (800) 377-7655, Monday through Friday, 9:00am<br />
through 6:00pm Eastern time.<br />
Sincerely,<br />
Matthew S. <strong>Polk</strong><br />
Chairman and Co-Founder<br />
P.S.: A wealth of information can also be found on our awardwinning<br />
web site: www.polkaudio.com.<br />
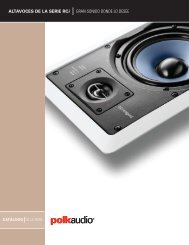
SYSTEM PLACEMENT<br />
The <strong>Polk</strong> AB Series Loudspeaker Systems are designed to provide superior<br />
sonic performance without intruding on the design of your living<br />
space. The design goals were to create open, three-dimensional sound<br />
and smooth, accurate frequency response in an easy-to-install chassis.<br />
Placement of the system in a room bears careful consideration, as the<br />
installation is permanent. The <strong>AB510</strong> and <strong>AB710</strong> loudspeakers can be<br />
mounted on almost any wall or ceiling. Keep in mind that placing the<br />
loudspeakers at least 6-8 feet apart and away from room edges or corners<br />
will result in better stereo imaging.<br />
As ceiling mounted speakers point downward and are closer to the listener<br />
than most wall-mount positions, it is sometimes advisable to use<br />
more than one pair to get even distribution of sound. Intended uses,<br />
ceiling height, room size, and listening position all play a part in<br />
determining how many pairs should be used. In an average size room<br />
with 8' ceilings we recommend using 2 pairs of ceiling-mounted<br />
loudspeakers. Your <strong>Polk</strong> <strong>Audio</strong> dealer can help you make the right<br />
choice for your room.<br />
If your speakers are used in an outdoor installation, the best location is<br />
one that provides shelter from rain and other outdoor elements. The<br />
most common and ideal location is under an eave of your house facing<br />
downward. If you position the AB loudspeakers where water will directly<br />
contact them, it is advisable to use a sealant or caulk between the<br />
frame of the loudspeaker and the wall surface. This seal should prevent<br />
water from getting behind the loudspeaker and wall surface. Do not<br />
position the loudspeakers where water can pool on the surface of the<br />
woofer cone or tweeter dome. This will greatly decrease your speaker’s<br />
useful life.
PAINTING THE SPEAKERS<br />
The <strong>Polk</strong> AB Series Loudspeakers can be painted to fit your decorating<br />
tastes. Paint the speaker frames before assembling them. The grilles<br />
and frames should be painted separately. Grille – Either hang the grille<br />
in free space or place it on paper before painting. The grilles must be<br />
sprayed – do not use a brush or roller – Spray two or more thin<br />
coats rather than one thick coat to avoid clogging the perforations of<br />
your metal grilles, which can impair performance. If you are using an<br />
interior paint, it should be thinned before spraying.<br />
LISTENING LEVELS AND AMPLIFIER CONNECTIONS<br />
Our AB Series Loudspeakers are highly efficient systems and will easily<br />
achieve high listening levels with moderate amounts of power.<br />
Remember that the greatest chance of damage to any speaker occurs<br />
when the amplifier, regardless of size, is overdriven. Surprisingly, the<br />
possibility is usually greater with small amplifiers than with larger ones.<br />
If the sound becomes harsh and steely in character, then you may be<br />
pushing your amplifier into “clipping” mode. Amplifier clipping creates<br />
undesirable high frequency energy and runs the risk of tweeter damage.<br />
Regardless of amplifier size or speaker power rating, when you turn the<br />
volume control past the point where distortion becomes audible you are<br />
risking damage to both the speaker and amplifier.<br />
IMPORTANT—Proper polarity is essential to the <strong>Polk</strong> AB series. The<br />
positive terminal on the driver is designated with a plus(+). It must be<br />
connected to the positive(red) terminal on your amplifier. The other terminal,<br />
designated with a minus(-) must be connected to the<br />
negative(black) terminal of your amplifier.<br />
Use the pigtails to connect your speaker wire to the loudspeakers. You<br />
may use a wirenut, solder, or twist and tape to connect the two wires.<br />
Take special care to ensure a clean, positive connection. Make sure that<br />
the connections are insulated from touching any other metal or each<br />
other.<br />
WIRING CONSIDERATIONS<br />
As with the mounting locations, the wire routing is permanent, and so<br />
demands special attention. The following recommendations will help you<br />
make the best decisions in selecting and installing the wire used to connect<br />
the loudspeakers to the amplifier.<br />
Wire Recommendations<br />
Wiring inside your walls or ceiling should be done before or in conjunction<br />
with installation of your in-wall speakers. Wire meeting appropriate<br />
building and fire codes must be used. Use at least 18 gauge wire or<br />
heavier. Wiring is best performed by a licensed professional.<br />
Routing the Wire<br />
It is beyond the scope of this manual to address all possible situations,<br />
but certain basic rules should be followed:<br />
1.) The wiring scheme you choose is determined by the number of<br />
units you are installing, the way you wish to distribute the sound,<br />
the amplifier you have chosen, and degree of flexibility you wish to<br />
provide in your system.<br />
2.) The wire run lengths should be kept as short as possible.<br />
If runs over fifty feet long are necessary, heavier gauge wire<br />
is recommended.<br />
3.) Avoid routing speaker wires near house electrical cables. If this<br />
cannot be avoided, try to make the speaker wires cross the power<br />
cable at right angles.<br />
4.) Try to avoid routing the wires against sharp objects, particularly<br />
plumbing or electrical fittings.<br />
5.) Allow about two feet of free wire at the wall cutout to facilitate<br />
installation of the loudspeaker.<br />
TOOLS NEEDED<br />
•Pencil and template for marking cutout<br />
(template is part of packaging insert)<br />
•Keyhole saw and/or utility knife for cutting<br />
mounting opening<br />
•No. 2 phillips head screwdriver<br />
•Wire strippers<br />
•Sharp pointed metal device, such as ball point pen,<br />
paper clip, or metal scriber for lifting off the grille<br />
INSTALLING IN EXISTING CONSTRUCTION<br />
Your <strong>Polk</strong> AB Loudspeakers have been designed for easy installation.<br />
If you intend to do the installation yourself we assume that you possess<br />
some skill in the proper use of hand and power tools. You should have<br />
a thorough understanding of local building and fire codes and a<br />
familiarity with the area behind the wall or ceiling where the speakers<br />
will be installed.<br />
If you are not accustomed to working on your walls or ceiling, the time<br />
to get help is before you start cutting. There must be at least one inch of<br />
clearance between the cutout and any studs or joists in order for the<br />
mounting hardware (dogs) to place themselves properly. Wall studs are<br />
spaced on 16 inch centers in most parts of the country, but actual spacing<br />
should be verified.<br />
Your AB’s require a mounting depth of at least three inches measured<br />
from the face of the wall; they can be installed in walls faced with<br />
paneling as little as 5/16" thick or plaster-on-lath as thick as two inches.<br />
For acoustical considerations you may wish to insulate the area<br />
behind the speaker loosely with a small amount of fiberglass batting or<br />
dacron to reduce the potential problem of sound transmission into an<br />
adjoining room.<br />
For more information visit our web site at http://www.polkaudio.com
Removal after Installation<br />
If it should ever be necessary to remove the AB Series Loudspeaker<br />
from the wall, you must first remove the loudspeaker from the baffle.<br />
Loosen the mounting screws just enough to allow the dogs to rotate out<br />
of the way of the chassis.<br />
INSTALLING IN NEW CONSTRUCTION<br />
A rough-in kit is available separately to facilitate installations in open<br />
framed walls and ceilings. Instructions and suggestions are provided<br />
with this kit.<br />
INSTALLING IN EXISTING CONSTRUCTION<br />
CLAMP WILL<br />
ROTATE AS YOU<br />
TIGHTEN.<br />
Once you have determined the exact placement of your speakers and the<br />
templates are in position on your wall or ceiling, you are ready to cut<br />
your mounting hole:<br />
1.) Select locations for both of your loudspeakers.<br />
2.) Check locations for interference from studs, pipes, wiring etc.<br />
before cutting.<br />
3.) Use the template (supplied in packaging) to scribe the mounting<br />
holes.<br />
4.) Cut mounting holes.<br />
5.) Fish wires from amplifier (leave at least two feet slack).<br />
6.) Secure cables to the wall, ceiling or a stud with cable tie or<br />
tape.<br />
7.) Make sure mounting screws are extended adequately for wall<br />
thickness, fold clamps in towards chassis and place the baffle in<br />
the mounting hole.<br />
8.) Tighten all three mounting screws. Clamps will rotate into place<br />
as you tighten.<br />
9.) Connect the speaker wires to the pigtails with wire nuts<br />
or solder. Use electrical tape to protect connections. Connect<br />
pigtails to loudspeaker matching amplifier positive and negative<br />
terminals to plus(+) and minus(-) terminals<br />
on loudspeaker.<br />
10.) Install the loudspeaker into the baffle with 4 supplied screws.<br />
Install the grilles.<br />
TROUBLESHOOTING<br />
1. No sound from speakers.<br />
•Check all amplifier connections and connections to speakers.<br />
•Make sure amp is connected to AC outlet and<br />
switched on.<br />
2. Distortion at very high listening levels.<br />
•Listen at lower levels.<br />
•Purchase larger amplifier.<br />
3. Not enough bass.<br />
•Make sure speakers are in phase.<br />
TECHNICAL ASSISTANCE<br />
If you have any questions or problems with your loudspeaker system,<br />
please do not hesitate to contact your authorized <strong>Polk</strong> <strong>Audio</strong> dealer from<br />
whom you purchased your loudspeakers. Your <strong>Polk</strong> <strong>Audio</strong> dealer has the<br />
experience needed to pinpoint any problems that may exist and has easy<br />
access to technical information from the <strong>Polk</strong> <strong>Audio</strong> factory. If you<br />
need assistance or information on other <strong>Polk</strong> <strong>Audio</strong> loudspeakers<br />
for your home or car, call 1-800-377-7655.<br />
For more information visit our web site at http://www.polkaudio.com
AB SPECIFICATIONS<br />
<strong>AB510</strong><br />
Driver Complement:<br />
5.25" (133mm) polymer laminate midwoofer<br />
.5" (12mm) polymer dome tweeter<br />
Overall Size:<br />
8.125" (207mm) round<br />
Cutout Size:<br />
7.25" (184mm) round<br />
Mounting Depth (less wall thickness):<br />
1.525" (39mm)<br />
Overall Frequency Response:<br />
60 - 20,000 Hz<br />
-3dB Limits:<br />
78 - 18,000 Hz<br />
Recommended Amplification:<br />
5 - 75 watts / channel<br />
Nominal Impedance:<br />
Compatible with 8 ohm outputs<br />
Sensitivity:<br />
88 dB @ 1 watt / 1meter<br />
<strong>AB710</strong><br />
Driver Complement:<br />
6.5" (165mm) polymer laminate midwoofer<br />
.5" (12mm) polymer dome tweeter<br />
Overall Size:<br />
8.125" (207mm) round<br />
Cutout Size:<br />
7.25" (184mm) round<br />
Mounting Depth (less wall thickness):<br />
3.135" (79mm)<br />
Overall Frequency Response:<br />
40 - 20,000 Hz<br />
-3dB Limits:<br />
58 - 18,000 Hz<br />
Recommended Amplification:<br />
5 - 100 watts / channel<br />
Nominal Impedance:<br />
Compatible with 8 ohm outputs<br />
Sensitivity:<br />
88 dB @ 1 watt / 1meter<br />
Note: Specifications are subject to change without notice.<br />
POLK AUDIO LIMITED WARRANTY<br />
<strong>Polk</strong> <strong>Audio</strong>, Inc. warrants to the original purchaser only that this <strong>Polk</strong> <strong>Audio</strong> Loudspeaker Product (the “Product”) will be free from defects in materials and workmanship<br />
for a period of five (5) years from the date of original retail purchase from a <strong>Polk</strong> <strong>Audio</strong> Authorized Dealer. However, this Warranty will automatically terminate prior to<br />
the expiration of the five (5) years if the original retail purchaser sells or otherwise transfers the Product to any other party. The original retail purchaser shall hereinafter<br />
be referred to as “you.” To allow <strong>Polk</strong> <strong>Audio</strong> to offer the best possible warranty service, please fill out the Product Registration Card(s) and send it to the Factory,<br />
at the address provided on the Product Cards(s) within ten (10) days of the date of purchase.<br />
Defective Products must be shipped, together with proof of purchase, prepaid insured to the <strong>Polk</strong> <strong>Audio</strong> Authorized Dealer from whom you purchased the Product, or to<br />
the Factory at the address given on this manual. Products must be shipped in the original shipping container or its equivalent; in any case the risk of loss or damage in<br />
transit is to be borne by you. If upon examination at the Factory or <strong>Polk</strong> <strong>Audio</strong> Authorized Dealer it is determined that the unit was defective in materials or workmanship<br />
at any time during this Warranty period, <strong>Polk</strong> <strong>Audio</strong> or the <strong>Polk</strong> <strong>Audio</strong> Authorized Dealer will, at its option, repair or replace this Product at no additional charge, except<br />
as set forth below. All replaced parts and Products become the property of <strong>Polk</strong> <strong>Audio</strong>. Products replaced or repaired under this warranty will be returned to you, within<br />
a reasonable time, freight prepaid.<br />
This warranty does not include service or parts to repair damage caused by accident, disaster, misuse, abuse, negligence, inadequate packing or shipping procedures,<br />
commercial use, voltage inputs in excess of the rated maximum of the unit, cosmetic appearance of cabinetry not directly attributable to defect in materials or workmanship,<br />
or service, repair, or modification of the Product which has not been authorized or approved by <strong>Polk</strong> <strong>Audio</strong>. This warranty shall terminate if the Serial number on<br />
the Product has been removed, tampered with or defaced.<br />
This warranty is in lieu of all other expressed Warranties. If this Product is defective in materials or workmanship as warranted above, your sole remedy shall be repair<br />
or replacement as provided above. In no event will <strong>Polk</strong> <strong>Audio</strong>, Inc. be liable to you for any incidental or consequential damages arising out of the use or inability to use<br />
the Product, even if <strong>Polk</strong> <strong>Audio</strong>, Inc. or a <strong>Polk</strong> <strong>Audio</strong> Authorized Dealer has been advised of the possibility of such damages, or for any claim by any other party. Some<br />
states do not allow the exclusion or limitation of consequential damages, so the above limitation and exclusion may not apply to you.<br />
All implied warranties on this Product are limited to the duration of this expressed Warranty. Some states do not allow limitation on how long an implied Warranty lasts,<br />
so the above limitations may not apply to you. This Warranty gives you specific legal rights, and you also may have other rights which vary from state to state.<br />
This Warranty applies only to Products purchased in the United States of America, its possessions, and U.S. and NATO armed forces exchanges and audio<br />
clubs. The Warranty terms and conditions applicable to Products purchased in other countries are available from the <strong>Polk</strong> <strong>Audio</strong> AuthorizedDistributors in<br />
such countries.<br />
5601 Metro Drive<br />
Baltimore, MD 21215 USA<br />
(800) 377-7655<br />
http://www.polkaudio.com<br />
RM0451-1<br />
“<strong>Polk</strong>”, “<strong>Polk</strong> <strong>Audio</strong>”, “The Speaker Specialists” and “Dynamic Balance” are registered trademarks of <strong>Polk</strong> Investment Corporation used under license by <strong>Polk</strong> <strong>Audio</strong> Incorporated.