Instruction - Pentron Clinical
Instruction - Pentron Clinical
Instruction - Pentron Clinical

Create successful ePaper yourself
Turn your PDF publications into a flip-book with our unique Google optimized e-Paper software.
F I B E R R E I N F O R C E D C O M P O S I T E S ( F R C )<br />
B A S I C D I E / M O D E L P R E P A R A T I O N<br />
1. Using diestone material, pour the impression and prepare the model/die in the usual manner. Prepare this model so it is removable from<br />
the articulator. This will allow the model to fit into the Sculpture ® Curing Light.<br />
2. Optional Step – Re-pour impression using diestone material without pins for a "solid model technique."<br />
3. Inspect die and blockout any undercut. Note: All die blockout should be accomplished with high temperature inlay-wax, polymer<br />
blockout material or gypsum material prior to sealing the die.<br />
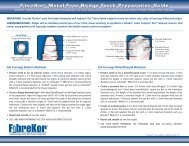
4. Mark and define the margins of the abutment dies with a permanent marking pencil. (Fig 1)<br />
5. Protect and seal the margins by applying a thin coat of Zip Sep * Sealer (Fig 2). Apply a second coat within 15 seconds. Allow to dry<br />
for 2 minutes.<br />
6. Paint a thin coat of Sculpture Plus Die Spacer all over the die, including margins (Fig 3). Allow to dry for 5 minutes. For a more<br />
passive fit, a second or third coat should be applied. Keep any additional coats 1mm away from the margin. Sculpture Plus Die Spacer<br />
also acts as a separator.<br />
7. Use Zip Sep* Sealer to seal contact areas, opposing models and saddle areas (Fig 4). Note: Use Zip Sep* Sealer and Zip Sep*<br />
Universal Separator when adding to short, incomplete margins on the die.<br />
* Zip Sep is a trademark of Dental Ventures of America, Inc.<br />
Fig. 1<br />
Fig. 2 Fig. 3<br />
Fig. 4<br />
4