Brass Eagle Stingray Manual.pdf - SOVA SpecOps
Brass Eagle Stingray Manual.pdf - SOVA SpecOps
Brass Eagle Stingray Manual.pdf - SOVA SpecOps

You also want an ePaper? Increase the reach of your titles
YUMPU automatically turns print PDFs into web optimized ePapers that Google loves.
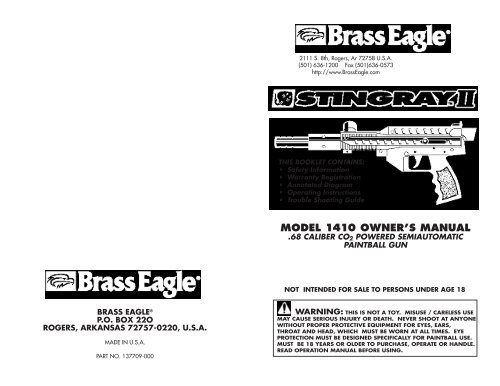
2111 S. 8th, Rogers, Ar 72758 U.S.A.<br />
(501) 636-1200 Fax (501)636-0573<br />
http://www.<strong>Brass</strong><strong>Eagle</strong>.com<br />
THIS BOOKLET CONTAINS:<br />
• Safety Information<br />
• Warranty Registration<br />
• Annotated Diagram<br />
• Operating Instructions<br />
• Trouble Shooting Guide<br />
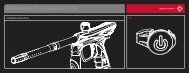
MODEL 1410 OWNER’S MANUAL<br />
.68 CALIBER CO 2 POWERED SEMIAUTOMATIC<br />
PAINTBALL GUN<br />
NOT INTENDED FOR SALE TO PERSONS UNDER AGE 18<br />
BRASS EAGLE ®<br />
P.O. BOX 22O<br />
ROGERS, ARKANSAS 72757-0220, U.S.A.<br />
MADE IN U.S.A.<br />
PART NO. 137709-000<br />
WARNING: THIS IS NOT A TOY. MISUSE / CARELESS USE<br />
MAY CAUSE SERIOUS INJURY OR DEATH. NEVER SHOOT AT ANYONE<br />
WITHOUT PROPER PROTECTIVE EQUIPMENT FOR EYES, EARS,<br />
THROAT AND HEAD, WHICH MUST BE WORN AT ALL TIMES. EYE<br />
PROTECTION MUST BE DESIGNED SPECIFICALLY FOR PAINTBALL USE.<br />
MUST BE 18 YEARS OR OLDER TO PURCHASE, OPERATE OR HANDLE.<br />
READ OPERATION MANUAL BEFORE USING.
TROUBLE SHOOTING GUIDE<br />
WARNING: NEVER SHOOT AT ANYONE WITHOUT<br />
PROPER PROTECTIVE EQUIPMENT FOR EYES, EARS, THROAT AND<br />
HEAD, WHICH MUST BE WORN AT ALL TIMES. EYE PROTECTION<br />
MUST BE DESIGNED SPECIFICALLY FOR PAINTBALL USE. FAILURE<br />
TO FOLLOW THESE SAFETY PRECAUTIONS MAY RESULT IN BODILY<br />
INJURY INCLUDING BLINDNESS AND DEAFNESS.<br />
PROBLEM CAUSE CURE<br />
Gas Leaks from<br />
Bottle Connection<br />
Gas Leaks from<br />
Inside Barrel<br />
Damaged Bottle O’ring<br />
Damaged Valve Seal<br />
Replace O’ring<br />
Replace Valve Seal<br />
This safety alert symbol indicates important<br />
safety messages in this manual. When you see<br />
this symbol, be alert to the possibility of personal<br />
injury and carefully read the message that<br />
follows.<br />
Welcome to the <strong>Brass</strong> <strong>Eagle</strong> team and thank you for purchasing this<br />
high quality <strong>Brass</strong> <strong>Eagle</strong> paintball gun.<br />
We at <strong>Brass</strong> <strong>Eagle</strong> stand committed to providing you with the best<br />
product and service available. Your <strong>Stingray</strong> II is designed and<br />
manufactured to provide ease of maintenance with trouble free<br />
performance. We ask that you read this manual to obtain the<br />
maximum enjoyment of your purchase.<br />
Gun Fails to<br />
Discharge<br />
Gun Fails to<br />
Recock<br />
Gun Wasn’t Cocked<br />
Lack of Gas Pressure<br />
Gas Source Not Fully<br />
Engaged<br />
Damaged Hammer<br />
O’ring<br />
Lack of Gas Pressure<br />
Cock Gun Before<br />
Firing<br />
Refill Bottle or Change<br />
CO2 cylinder<br />
Screw Gas Source into<br />
Constant Air Adapter.<br />
Replace Hammer<br />
O’ring<br />
Refill Bottle or Change<br />
CO2 cylinder<br />
Should you need assistance in any way, contact us and we will do<br />
everything in our power to help you.<br />
Bolt Sticks<br />
Shell Fragment Stuck<br />
Between Bolt and<br />
Receiver<br />
Remove Bolt, Clean,<br />
and Lubricate<br />
Broken Paintballs<br />
Excessive Paint Buildup<br />
in barrel<br />
Defective Paintballs<br />
Squeegee Paint out of<br />
Barrel<br />
Replace paintballs<br />
2 11
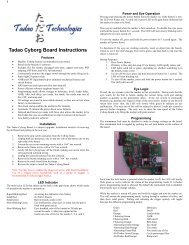
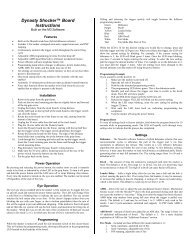
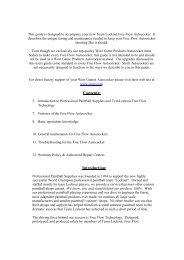
INTERNAL<br />
SUB-ASSEMBLY<br />
REMOVAL CONTINUED<br />
Step 3. Remove cocking<br />
handle by turning<br />
counter-clockwise.<br />
Fig. 3.<br />
FIG. 3<br />
Step 4. Push out two push<br />
pins located in front of<br />
and behind the trigger<br />
area and one push<br />
pin located behind the<br />
feed port area.<br />
Step 5. Remove lower receiver<br />
(containing trigger).<br />
Fig. 4.<br />
Step 6. You can now remove<br />
internal sub -assembly<br />
from rear of gun.<br />
Fig 5.<br />
Step 7. Remove bolt from bolt<br />
guide and clean bolt<br />
and other internals<br />
which may have dirt or<br />
paint residue on them.<br />
REASSEMBLY<br />
Follow above steps in reverse<br />
order. Lubricate bolt and<br />
hammer with a light grade oil<br />
prior to reinstalling.<br />
FIG. 4<br />
FIG. 5<br />
MODEL 1410 OWNER’S MANUAL<br />
.68 CALIBER CO 2 POWERED SEMIAUTOMATIC<br />
PAINTBALL GUN<br />
TOPIC<br />
TABLE OF CONTENTS<br />
PAGE<br />
Rules of Safe Gun handling . . . . . . . . . . . . . . 4<br />
Warranty Information . . . . . . . . . . . . . . . . . . 5<br />
Annotated Diagram of Gun . . . . . . . . . . . . . 6-7<br />
Operating Instructions . . . . . . . . . . . . . . . . . 8-9<br />
Field Strip Instructions . . . . . . . . . . . . . . . . 9-10<br />
Trouble Shooting Guide . . . . . . . . . . . . . . . . 11<br />
10<br />
3
RULES OF SAFE GUN HANDLING<br />
1. Treat every gun as if it were loaded.<br />
2. Never point the gun at anything you don't<br />
wish to shoot.<br />
3. Keep the gun on safe until ready to shoot.<br />
4. Keep the barrel plug in the gun’s muzzle<br />
when not shooting. (barrel plug sold as an<br />
accessory)<br />
5. Always remove gas source before<br />
disassembly.<br />
6. Store the gun unloaded and degassed in a<br />
locked place.<br />
7. Follow warnings listed on gas source for<br />
handling and storage.<br />
8. Never use ammunition other than .68 caliber<br />
paintballs.<br />
9. Do not shoot fragile objects such as<br />
windows.<br />
10. Paintballs may cause staining of some<br />
porous surfaces such as brick, stucco and<br />
wood.<br />
11. Always wear proper eye, face and ear<br />
protection designed specifically to stop<br />
paintballs.<br />
12. Never shoot a person who is not wearing<br />
proper protection.<br />
13. Always measure velocity before playing<br />
paintball.<br />
14. Never shoot at velocities in excess of 300<br />
feet per second.<br />
cause subsequent balls to break and will adversely affect<br />
the gun’s accuracy. RECOMMENDED: <strong>Brass</strong> <strong>Eagle</strong> ® brand,<br />
tournament quality .68 caliber paintballs. Balls should be<br />
stored in a cool dry place in sealed plastic bags. Do not<br />
subject to freezing, excessive heat, humidity or store in direct<br />
sunlight. These conditions may cause ball breakage and/or<br />
poor feeding.<br />
Step 5. Make sure everyone within 200 yards is properly protected<br />
from paintball impacts.<br />
Step 6. Remove barrel plug and take off safe by pressing safety from<br />
right side of gun until red band is showing. (Barrel Plug sold as<br />
an accessory)<br />
Step 7. VERIFY VELOCITY: Verify that the gun’s velocity is below<br />
300 feet per second or less if required by playing field.<br />
Velocity should be measured with a chronograph prior to<br />
playing paintball. Velocity may be adjusted by turning velocity<br />
adjustment screw (using a 3/16 allen key). Turning the screw<br />
counterclockwise decreases velocity.<br />
Step 8. FIRE. Gun is now ready to fire.<br />
WARNING: Never shoot at anyone without proper<br />
protective equipment for eyes, ears, throat and head, which must<br />
be worn at all times. Eye protection must be designed specifically<br />
for paintball use. Failure to follow these safety precautions<br />
may result in bodily injury including blindness and deafness.<br />
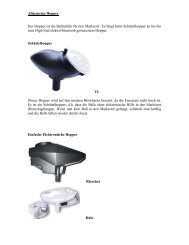
FIELD STRIP GUIDE<br />
INTERNAL<br />
SUB-ASSEMBLY<br />
REMOVAL<br />
Step 1. Remove gas supply<br />
from gun.<br />
Step 2. Make sure bolt is in the<br />
forward position (sear is<br />
not engaged). Fig. 2<br />
FIG. 2<br />
4<br />
9
OPERATING INSTRUCTIONS<br />
WARNING: Be sure the gun is always pointed in a safe<br />
direction. Read the following operating instructions and WITHOUT<br />
LOADING ANY AMMUNITION, proceed several times through the<br />
operating steps with your gun (dry fire the gun at a safe target) so<br />
that you will be able to operate the <strong>Stingray</strong> properly and safely.<br />
Step 1. Put on 'SAFE'. Push safety from left to right; no red band<br />
showing. Make sure barrel plug is placed securely in muzzle<br />
of gun. (Barrel Plug sold as an accessory)<br />
Step 2. COCK: Cock gun by pulling cocking knob fully back until<br />
locked in sear position. The <strong>Stingray</strong> II is a semiautomatic gun,<br />
which will re-cock itself after firing when working properly. It is<br />
only necessary to cock the gun when installing gas, or for<br />
initial shot.<br />
Step 3. SCREW IN POWER SOURCE: Gun can be used with<br />
either quick change adapter (12 gram cylinders) or constant<br />
air tank. RECOMMENDED: Daisy 12 gram cylinders or <strong>Brass</strong><br />
<strong>Eagle</strong> ® item #1471 9oz. constant air tank. When using 12<br />
gram cylinders one can expect to get around 18 shots from<br />
each cylinder whereas 9 ounce refillable bottles will provide in<br />
excess of 400 shots.<br />
WARNING: For quick change adaptor CO2 use: Use only<br />
CO2 cylinders which are 12 gram type. Any attempt to use other<br />
sizes and/or cylinders containing other types of gas could be<br />
extremely dangerous. The use of gasses other than CO2 could<br />
result in an explosion or rupture of the gun, causing seroius injury.<br />
CAUTION: CO2 cylinders or tanks may explode at<br />
temperatures above 130˚F (54.4˚C).<br />
Step 4. LOAD PAINTBALLS:<br />
1) Firmly press one inch elbow on feedport.<br />
8<br />
2) Make sure elbow is perpendicular to barrel of gun.<br />
3) Insert hopper into elbow. RECOMMENDED: <strong>Brass</strong> <strong>Eagle</strong> ®<br />
item #1475 200-round hopper with flip top lid.<br />
4) Pour balls into hopper. NOTE: Balls are gravity fed from<br />
hopper to the gun each time the trigger is pulled. Too rapid a<br />
rate of fire, broken balls or too many balls in hopper may<br />
WARRANTY INFORMATION<br />
WARRANTY: LIMITED 90 DAY WARRANTY<br />
For 90 days from date of purchase, <strong>Brass</strong> <strong>Eagle</strong> ® will repair or<br />
replace and return this gun free of charge if defective in material or<br />
workmanship. Service is available through <strong>Brass</strong> <strong>Eagle</strong> ® Paintball<br />
Service Centers. Paintball Service Centers may be located by calling<br />
<strong>Brass</strong> <strong>Eagle</strong> ® , 1-501-636-1200 or checking http://www.<strong>Brass</strong><strong>Eagle</strong>.<br />
com. Guns may also be returned to <strong>Brass</strong> <strong>Eagle</strong> for service. Attach<br />
your name, address, telephone number, description of problem and<br />
proof of purchase (sales receipt) to the gun. Package prepaid. This<br />
warranty gives you specific legal rights. You may also have other<br />
rights which may vary from state to state.<br />
GUNS OUT OF WARRANTY<br />
Parts can be ordered through <strong>Brass</strong> <strong>Eagle</strong> ® on order form provided.<br />
To order, list part number, quantity and price. Include shipping and<br />
handling cost, and tax as required. No parts will be shipped until paid.<br />
For a fee, <strong>Brass</strong> <strong>Eagle</strong> ® Paintball Service Centers will repair guns<br />
which are no longer under warranty. Paintball Service Centers may<br />
be located by calling <strong>Brass</strong> <strong>Eagle</strong> ® 1-501-636-1200 or checking<br />
http://www.<strong>Brass</strong><strong>Eagle</strong>.com. Guns may also be returned to <strong>Brass</strong><br />
<strong>Eagle</strong> ® for service. Attach your name, address and brief description of<br />
the problem to the gun. Package and send, transportation prepaid, to<br />
<strong>Brass</strong> <strong>Eagle</strong> ® , Service Department. <strong>Brass</strong> <strong>Eagle</strong> ® will repair the gun or<br />
replace it with a reconditioned gun of the same model. A fee will be<br />
charged for repairing or replacing your gun. Call 1-501-636-1200<br />
for the amount you need to send.<br />
All guns should be accompanied by check or money order (not cash) in<br />
payment of the fee. If payment is not included, you will be invoiced for<br />
the fee, plus a handling charge. Upon receipt of payment, the gun will<br />
be shipped to you.<br />
FOR UPS DELIVERY:<br />
<strong>Brass</strong> <strong>Eagle</strong><br />
Attn: Service Department<br />
2111 South 8th<br />
Rogers, Arkansas 72758<br />
(501) 636-1200<br />
NOTE: The <strong>Stingray</strong> II paintball gun is controlled by Federal Postal<br />
Regulations. You may only send via U.S. Mail an inoperative <strong>Stingray</strong> II<br />
gun to <strong>Brass</strong> <strong>Eagle</strong> ® . The gun will be returned to your attention via UPS.<br />
Be certain to include a street address for UPS delivery.<br />
5
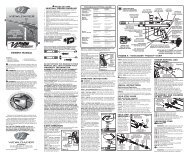
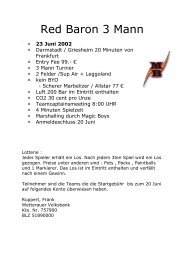
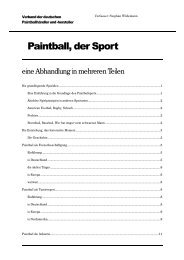
ANNOTATED DIAGRAM:<br />
BRASS EAGLE MODEL 1410 STINGRAY II<br />
FIG. 1<br />
Barrel<br />
Top<br />
Barrel<br />
Pin<br />
Feed Port<br />
Velocity<br />
Adjustment<br />
Screw<br />
Top<br />
Frame<br />
Pin<br />
Cocking Handle<br />
Sight<br />
Rail<br />
Muzzle<br />
Elbow<br />
For Ammo<br />
Box<br />
BottomBarrel<br />
Pin<br />
Ammo<br />
Box Cap<br />
BottomFrame<br />
Pin<br />
Trigger<br />
BottomFrame<br />
Pin<br />
CA Adaptor<br />
Safety<br />
Ammo Box<br />
Grip<br />
Assembly<br />
6<br />
7