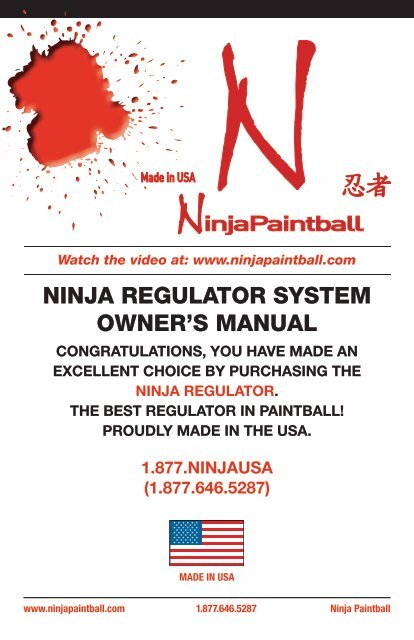
NINJA REGULATOR SYSTEM OWNER'S MANUAL - PBportal.de
NINJA REGULATOR SYSTEM OWNER'S MANUAL - PBportal.de
NINJA REGULATOR SYSTEM OWNER'S MANUAL - PBportal.de

You also want an ePaper? Increase the reach of your titles
YUMPU automatically turns print PDFs into web optimized ePapers that Google loves.
Watch the vi<strong>de</strong>o at: www.ninjapaintball.com<br />
<strong>NINJA</strong> <strong>REGULATOR</strong> <strong>SYSTEM</strong><br />
OWNER’S <strong>MANUAL</strong><br />
CONGRATULATIONS, YOU HAVE MADE AN<br />
EXCELLENT CHOICE BY PURCHASING THE<br />
<strong>NINJA</strong> <strong>REGULATOR</strong>.<br />
THE BEST <strong>REGULATOR</strong> IN PAINTBALL!<br />
PROUDLY MADE IN THE USA.<br />
1.877.<strong>NINJA</strong>USA<br />
(1.877.646.5287)<br />
MADE IN USA<br />
www.ninjapaintball.com 1.877.646.5287 Ninja Paintball<br />
PSI OM.indd 1<br />
2/18/09 1:22:12 PM
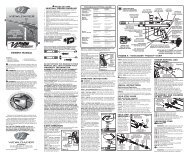
2<br />
ASTM compliant, <strong>NINJA</strong> Regulators can toggle from STANDARD 800-900 PSI to a<br />
medium 650 PSI or low 450-550 PSI output in a few minutes, eliminating the need to<br />
purchase 2 regulators or separate spring kits, see page 5.<br />
PATENT NUMBERS 6,851,447 / 7,059,343 / 7,051,751<br />
Low Profile<br />
Fill Valve<br />
Removable<br />
Black Brass<br />
Bonnet<br />
ASTM<br />
825-14 NGO<br />
Thread<br />
Black<br />
High and Low<br />
Pressure<br />
Burst Disks<br />
High Pressure not shown<br />
High Pressure Gauge<br />
Safety Snubber<br />
ASTM<br />
Safety Vent<br />
Groove<br />
www.ninjapaintball.com 1.877.646.5287 Ninja Paintball<br />
PSI OM.indd 2<br />
2/18/09 1:22:15 PM
THE SAFETY <strong>SYSTEM</strong><br />
The <strong>NINJA</strong> Regulator is equipped with<br />
an ASTM APPROVED bottle Burst<br />
Disk required by the Department Of<br />
Transportation. (D.O.T.)<br />
In addition to the required safety burst<br />
disk, the regulator has a Low Pressure<br />
(LP) safety burst disk (stamped 1.8K).<br />
The 1.8K PSI safety burst disk is there to<br />
protect you and your marker in the unlikely<br />
event that the <strong>NINJA</strong> Regulator fails.<br />
REMEMBER, most<br />
regulator failures are<br />
the result of<br />
contaminated air.<br />
If the (LP) 1.8K PSI safety burst disk vents,<br />
it did so for a reason. We recommend you<br />
do the following:<br />
Disassemble the regulator (refer to Service<br />
and Rebuild procedures), inspect the<br />
regulator for contamination and clean if<br />
necessary.<br />
Install a new 1.8K PSI burst disc, available<br />
at <strong>NINJA</strong>PAINTBALL.COM and refill<br />
the system.<br />
3<br />
<strong>NINJA</strong> <strong>REGULATOR</strong>S have a Safety<br />
Vent Groove and Safety Snubber<br />
on the stem (As shown in the<br />
illustration on page 2). These<br />
lifesaving features allow for the<br />
venting of the bottle, in the event<br />
that the regulator is unscrewed<br />
from the bottle with pressure<br />
present in the bottle.<br />
ALWAYS CHECK TO MAKE SURE<br />
THERE IS NO GAP BETWEEN THE<br />
BOTTLE AND <strong>REGULATOR</strong> SEAL.<br />
SEE ILLUSTRATION BELOW. IF<br />
THERE IS A GAP<br />
STOP!!! DO NOT FILL<br />
OR USE YOUR <strong>SYSTEM</strong>.<br />
Place the system on<br />
the ground<br />
and wait for the system to FULLY<br />
DEGAS! Contact a qualified<br />
airsmith IMMEDIATELY!<br />
OR CALL 1.877.<strong>NINJA</strong>USA •<br />
(1.877.646.5287) for assistance.<br />
If the (LP) 1.8K PSI burst disc vents after<br />
rebuild see an airsmith for help or call:<br />
1.877.<strong>NINJA</strong>USA • (1.877.646.5287)<br />
No Gap Here<br />
www.ninjapaintball.com 1.877.646.5287 Ninja Paintball<br />
PSI OM.indd 3<br />
2/18/09 1:22:16 PM
4<br />
FILLING THE <strong>NINJA</strong> <strong>REGULATOR</strong> <strong>SYSTEM</strong><br />
The <strong>NINJA</strong> Regulator system is equipped with the industry standard “QD Style” fill<br />
fitting, which allows your <strong>NINJA</strong> Regulator system to be refilled either on or off the<br />
marker. The <strong>NINJA</strong> Regulator system may be filled with either Clean, Dry Compressed<br />
Air or nitrogen.<br />
UNDER NO CIRCUMSTANCES SHOULD<br />
THE <strong>NINJA</strong> <strong>REGULATOR</strong> <strong>SYSTEM</strong> BE REFILLED<br />
WITH PURE OXYGEN.<br />
When filling your <strong>NINJA</strong> Regulator system do not exceed the pressure rating shown on<br />
<strong>NINJA</strong> <strong>REGULATOR</strong> CYLINDER’S LABEL<br />
DO NOT APPLY OR INJECT OIL OF ANY TYPE TO THE FILL<br />
OR BURST DISC PORTS. OIL WILL VAPORIZE AND POSSIBLY<br />
IGNITE DURING THE FILL PROCEDURE.<br />
It is important to keep dirt, oil and water out of your <strong>NINJA</strong> Regulator system. Most<br />
regulator failures are due to dirt or contamination. Always keep a cover on the fill nipple<br />
when you are not filling the <strong>NINJA</strong> Regulator system. If you use compressed air, make<br />
sure that the compressor providing that air is equipped with WORKING filters and<br />
moisture separators.<br />
CONNECTING YOUR <strong>NINJA</strong> <strong>REGULATOR</strong><br />
SLOWLY Screw your <strong>NINJA</strong> Regulator system into your markers ASA fitting. It is<br />
recommen<strong>de</strong>d that you apply Ninja Lube lubricant on the <strong>NINJA</strong> Regulator bonnet<br />
threads. This simple procedure will reduce bonnet and ASA thread wear. The <strong>NINJA</strong><br />
Regulator has a “pin valve” output valve which shuts off the gas <strong>de</strong>livery when the power<br />
system is removed from the marker.<br />
www.ninjapaintball.com 1.877.646.5287 Ninja Paintball<br />
PSI OM.indd 4<br />
2/18/09 1:22:17 PM
PRESSURE CONVERSION<br />
WATCH THE VIDEO AT WWW.<strong>NINJA</strong>PAINTBALL.COM<br />
5<br />
BEFORE PROCEEDING, MAKE SURE YOUR <strong>SYSTEM</strong> HAS BEEN<br />
COMPLETELY DEGASSED VIA THE OUTPUT PIN VALVE, TO<br />
INSURE THAT NO TRAPPED COMPRESSED GAS IS PRESENT!<br />
ALWAYS WEAR EYE PROTECTION, GLOVES AND POINT THE<br />
AIR <strong>SYSTEM</strong> IN A SAFE DIRECTION PRIOR TO DEGASSING<br />
THE <strong>SYSTEM</strong>!!!<br />
1. Remove the two 10-32 set screws that lock the Bonnet (the top portion of the<br />
regulator) to the Reg Body.<br />
2. Unscrew the Bonnet counter clockwise from the Reg Body. (It has normal righthand<br />
threads.) Bonnet should remove easily. Make sure there is no trapped air in the<br />
bonnet by <strong>de</strong>pressing the pin valve.<br />
Helpful Hint: A 10-32 bonnet removal tool (2” long screw) was inclu<strong>de</strong>d with you<br />
airsystem, simply screw the tool into one on the bonnet set screw holes to ease the<br />
removal and reinstallation of the bonnet.<br />
Be careful not to lose the brass Output Pin Valve or its spring.<br />
3. PRESSURE ADJUSTMENT:<br />
The shims are located in the bottom “pocket” of the gas distribution body. Due<br />
to the <strong>NINJA</strong> Regulator being hand crafted and tested the number of silver shims<br />
may vary.<br />
4. Reinstall the remaining shims first into the bottom pocket of the gas distribution<br />
body, then install the main spring into the gas distribution body on top of the<br />
shims.<br />
5. Carefully screw the Bonnet back onto the Reg Body. Make sure the bonnet is installed<br />
fully. The bonnet should be contacting the top of the gas distribution body there<br />
should be no gap. The 2” bonnet assembly tool will help with the install. Do not apply<br />
excessive torque screwing the Bonnet to the Gas Distribution body.<br />
7. Replace the two locking set screws and tighten securely. DO NOT OVER TIGHTEN.<br />
Bonnet Piston Assembly Spring<br />
Pressure<br />
Adjustment<br />
Shims<br />
Thin<br />
Silver<br />
Thick<br />
Red<br />
Gas<br />
Distribution<br />
Body<br />
www.ninjapaintball.com 1.877.646.5287 Ninja Paintball<br />
PSI OM.indd 5<br />
2/18/09 1:22:18 PM
SERVICE & REBUILD PROCEDURES<br />
WATCH THE VIDEO AT WWW.<strong>NINJA</strong>PAINTBALL.COM<br />
For reference purposes, consult the explo<strong>de</strong>d parts diagram.<br />
6<br />
ALWAYS WEAR EYE PROTECTION, GLOVES AND POINT THE<br />
AIR <strong>SYSTEM</strong> IN A SAFE DIRECTION PRIOR TO DEGASSING<br />
THE <strong>SYSTEM</strong>!!!<br />
SPARE PARTS & REBUILD KITS AVAILABLE AT <strong>NINJA</strong>PAINTBALL.COM<br />
PRIOR TO DISASSEMBLY FULLY DEGAS THE AIR <strong>SYSTEM</strong> BY<br />
DEPRESSING THE PIN VALVE UNTIL NO AIR REMAINS IN THE BOTTLE!!!<br />
IF YOU ARE NOT COMFORTABLE WITH DISASSEMBLING THE <strong>REGULATOR</strong><br />
BRING THE <strong>REGULATOR</strong> TO A QUALIFIED AIR SMITH!<br />
OR CALL 1.877.<strong>NINJA</strong>USA. • (1.877.646.5287)<br />
1. All internal parts are accessed by unscrewing the Bonnet from the Gas Distribution<br />
Body, see page 5 for <strong>de</strong>tails<br />
DO NOT APPLY HEAT! If the bonnet does not easily unscrew,<br />
MAKE SURE THE <strong>SYSTEM</strong> IS COMPLETELY DEGASSED BY<br />
DEPRESSING THE PIN VALVE TO EXHAUST ANY TRAPPED GAS.<br />
2. After separating the bonnet from the gas distribution body the coil spring, shims,<br />
SRT piston, and Output Pin Valve components can be removed. Helpful Hint: Do<br />
not use tools to remove the SRT piston as this may damage the piston. Firmly grip<br />
the end of the piston and wiggle the piston while pulling.<br />
3. Clean the insi<strong>de</strong> of the <strong>NINJA</strong> <strong>REGULATOR</strong> body and bonnet with a cotton swab.<br />
4. To reassemble,lightly lubricate both SRT piston “O” rings using Ninja Lube.<br />
5. Re-install the Output Pin Valve & Spring.<br />
6. Carefully push the Piston Assembly into the piston bore in the bonnet. The Piston<br />
must be properly seated in the Bonnet before proceeding further. The Piston is<br />
properly seated when it cannot be pushed in any further.<br />
7. Reinstall the coil spring and shims as <strong>de</strong>scribed on page 5. Do not apply<br />
excessive torque when screwing the Bonnet and Gas Distribution together.<br />
Replace and securely tighten the (2) 10-32 bonnet retaining screws with the<br />
supplied 10-32” wrench.<br />
PLAY SAFE HAVE FUN ALWAYS WEAR ASTM APPROVED EYEWEAR PROTECTION!<br />
www.ninjapaintball.com 1.877.646.5287 Ninja Paintball<br />
PSI OM.indd 6<br />
2/18/09 1:22:18 PM
7<br />
1. Tank O-Rings 015-9OU-RED<br />
2. Bonnet: <strong>NINJA</strong>421B (brass)<br />
<strong>NINJA</strong>421A (alum.)<br />
1<br />
3. Bonnet Screws*<br />
4. Pin Valve Seat***<br />
5. Pin Valve**<br />
2<br />
6. Pin Valve Spring**<br />
7. Piston O-Ring*<br />
8. SRT Piston*<br />
3<br />
9. Piston O-Ring*<br />
10. Reg. Seat*<br />
11. Thin Pressure<br />
Adjustment Shims*<br />
4<br />
5<br />
12. Thick Pressure<br />
Adjustment Shims (red)*<br />
13. Main Springs<br />
NIJAMDW3537<br />
14. Low Pressure<br />
Burst Disk: 1800BDBLK<br />
15. High Pressure Bottle<br />
Burst Disk:<br />
5000BDBLK<br />
(for 3K systems)<br />
7500BDBLK<br />
(for 4.5K systems)<br />
7<br />
12<br />
6<br />
8<br />
9<br />
10<br />
13<br />
11<br />
16. Gas Distribution Body:<br />
FACTORY ONLY<br />
17. Guage <strong>NINJA</strong>GAUGE<br />
15<br />
16<br />
14<br />
18. Mini Fill Valve:<br />
<strong>NINJA</strong>MFV<br />
19. Restrictor:<br />
FACTORY ONLY<br />
18<br />
17<br />
19<br />
* Inclu<strong>de</strong>d in rebuild kit; <strong>NINJA</strong>RBK<br />
** Inclu<strong>de</strong>d in pin valve kit; <strong>NINJA</strong>PVK<br />
*** Inclu<strong>de</strong>d in both kits<br />
www.ninjapaintball.com 1.877.646.5287 Ninja Paintball<br />
PSI OM.indd 7<br />
2/18/09 1:22:22 PM
Watch the vi<strong>de</strong>o at: www.ninjapaintball.com<br />
1.877.<strong>NINJA</strong>USA<br />
(1.877.646.5287)<br />
MADE IN USA<br />
February 2009<br />
www.ninjapaintball.com 1.877.646.5287 Ninja Paintball<br />
PSI OM.indd 8<br />
2/18/09 1:22:23 PM