Macdev Cyborg RX - Paintball Gun Manuals
Macdev Cyborg RX - Paintball Gun Manuals
Macdev Cyborg RX - Paintball Gun Manuals

Create successful ePaper yourself
Turn your PDF publications into a flip-book with our unique Google optimized e-Paper software.
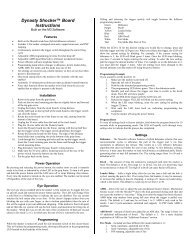
OWNERS MANUAL
<strong>Cyborg</strong> <strong>RX</strong> Owners Manual<br />
V1.00<br />
Copyright Mac Developments Pty. Ltd. 2008<br />
All rights reserved<br />
No part of this document may be copied or reproduced in any form or by any means without the<br />
prior written consent of Mac Developments Pty. Ltd.<br />
Notice is hereby given that this manual is part of the article owned in whole by Mac Developments<br />
Pty. Ltd., known as indicated in this manual and drawings. All rights of manufacture and reproduction<br />
of such articles or any part thereof are reserved by Mac Developments Pty Ltd. Neither said<br />
article nor any part thereof may be manufactured or reproduced without the written authorization<br />
from Mac Developments Pty. Ltd. All proprietary rights and information are the sole property of<br />
Mac Developments Pty. Ltd.<br />
MacDev, <strong>Cyborg</strong>, Conquest, Gladiator, MatchStick, Droid and Sonic are all trademarks of Mac<br />
Developments Pty Ltd.<br />
Statement of Liability<br />
Mac Developments Pty. Ltd. makes no warranties with respect to this documentation and disclaims<br />
any implied warranties of merchantability or fitness for a particular purpose. The information<br />
in this document is subject to change without notice. Mac Developments Pty. Ltd. assumes<br />
no responsibility for its resale or safe handling. Mac Developments Pty. Ltd. assumes no responsibility<br />
for physical injury or property damage resulting from its use.<br />
Warranty<br />
Your marker is covered by the MacDev 12 month warranty against manufacturing<br />
defects. Your Marker is guaranteed free of manufacturing defects<br />
for a period of twelve (12) consecutive months beginning immediately after<br />
purchase from a registered retailer. The solenoid is warranted for a period<br />
of thirty (30) days after the date of purchase. If a manufacturing defect is<br />
detected, the defective part will be either repaired or replaced at no cost<br />
to the owner. Your warranty is not transferrable in the event of 2nd hand<br />
sales - the warranty may only be claimed by the original retail purchaser.<br />
Your warranty does not cover damage due to theft, misadventure or operator error/abuse.<br />
To make a successful warranty claim, the owner must produce their warranty card and proof of<br />
purchase.<br />
Caution!<br />
Contents<br />
Know your <strong>Cyborg</strong><br />
Quick Setup<br />
Using your <strong>Cyborg</strong><br />
Advanced Setup<br />
Maintenance<br />
Parts List<br />
Troubleshooting<br />
This is not a toy. Misuse may cause serious injury or death. Eye protection designed<br />
specifically for paintball must be worn by user and persons within range. Recommend<br />
18 years or older to purchase. Persons under 18 must have adult supervision.<br />
READ OWNER’S MANUAL BEFORE USING.<br />
2
CONTENTS<br />
Know your <strong>Cyborg</strong> <strong>RX</strong> (Page 5)<br />
All users should read this section to learn the parts of your <strong>Cyborg</strong> and their names.<br />
Quick Setup (page 7)<br />
Learn how to set your <strong>Cyborg</strong> up for use the first time.<br />
Switching your <strong>Cyborg</strong> on and off<br />
Firing your <strong>Cyborg</strong><br />
Understanding the beam sensor<br />
Disabling the beam sensor<br />
Installing a preset air system<br />
Turning the air on and off<br />
Using a loader with your <strong>Cyborg</strong><br />
Installing a loader onto your <strong>Cyborg</strong><br />
Removing your loader<br />
Using your <strong>Cyborg</strong> (Page 10)<br />
Essential reading on how to use your <strong>Cyborg</strong> marker.<br />
Adjusting the velocity<br />
Adjusting the trigger<br />
Replacing the battery<br />
Advanced Setup (Page 11)<br />
A section for those who are comfortable with making fine adjustments to the <strong>Cyborg</strong> marker.<br />
About the tourney lock<br />
Programming the software<br />
Debounce<br />
Cycle mode<br />
Cycle speed<br />
Cycle speed fine<br />
Ramp start<br />
Ramp degree<br />
Mechanical debounce<br />
Anti bolt stick (ABS)<br />
Cycle filter<br />
Ball settle delay<br />
Solenoid on time (dwell)<br />
Eye function<br />
Auto power off<br />
Game timer<br />
Brightness<br />
User profiles<br />
Reset to default<br />
Using an RF transmitter<br />
Using the USB connector<br />
Maintenance (Page 17)<br />
Maintaining your purchase is essential to long term product satisfaction.<br />
Basic cleaning<br />
Maintaining the bolt<br />
Maintaining the drivetrain<br />
Maintaining the low pressure regulator (LPR)<br />
Maintaining the inline regulator<br />
Parts List (Page 21)<br />
An exploded view of your <strong>Cyborg</strong> with parts labelled.<br />
Troubleshooting (Page 25)<br />
Solving common difficulties.<br />
Common problems and solutions<br />
Technical assistance<br />
Parts and Accessories<br />
Enhance the <strong>Cyborg</strong> experience with a range of genuine accessories and spare parts.<br />
Contents<br />
Know your <strong>Cyborg</strong><br />
Quick Setup<br />
Using your <strong>Cyborg</strong><br />
Advanced Setup<br />
Maintenance<br />
Parts List<br />
Troubleshooting<br />
4
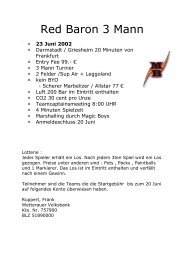
KNOW YOUR CYBORG <strong>RX</strong><br />
1<br />
2<br />
3<br />
Your <strong>Cyborg</strong> <strong>RX</strong> marker has been CNC milled from a solid billet of 6061 aircraft<br />
grade aluminium, representing the highest quality workmanship available in<br />
aluminium manufacturing. The milling has been performed by a 3D surfacing<br />
machine, with each marker taking many hours to produce.<br />
Please take the time to learn the parts of your <strong>Cyborg</strong>, it will help you when<br />
reading this manual.<br />
Contents<br />
Know your <strong>Cyborg</strong><br />
Quick Setup<br />
Using your <strong>Cyborg</strong><br />
Advanced Setup<br />
Maintenance<br />
Parts List<br />
Troubleshooting<br />
Numbered basic parts as shown in the figure on the left:<br />
7<br />
8<br />
9<br />
6<br />
13<br />
10<br />
11<br />
4<br />
12<br />
5<br />
1. Matchstik 2 piece barrel<br />
2. Feed clamp lever (used to affix your loader)<br />
3. Feed clamp adjuster screw<br />
4. Bolt assembly, twist anti clockwise and pull to remove<br />
5. Drivetrain, unscrew to remove (note: bolt must be removed first)<br />
6. Eye covers and screws<br />
7. LPR (Low Pressure Regulator)<br />
8. Gladiator Inline (High Pressure Regulator)<br />
9. Velocity adjustment screw (anti clockwise to increase velocity)<br />
10. Trigger with screw adjustments<br />
11. OLED display used to view gun status/settings<br />
12. Membrane pad with power and programming buttons<br />
13. Air hose<br />
14. Venting ASA, screw your air system in here<br />
15. Venting ASA on/off cap (used to turn the air on or off)<br />
15<br />
14<br />
6
QUICK SETUP<br />
Switching your marker on and off<br />
The on/off button is located on a membrane pad on the rear of the frame. Push<br />
the button with the power symbol ( ), when done correctly, your OLED will<br />
display the MacDev logo and the marker will be set with the beam sensor system<br />
on and ready to fire. Turn your marker off by holding the power button down<br />
until the OLED system goes blank.<br />
Membrane Pad<br />
Installing a preset air system<br />
Your <strong>Cyborg</strong> comes equipped with a high quality venting ASA (Air System Adaptor)<br />
that is designed for use with commercially available air/nitrogen systems.<br />
The venting ASA included with your <strong>Cyborg</strong> uses a screw cap to turn the air<br />
from your preset system on or off. Before installing your preset air system, you<br />
must unscrew the ASA cap by approximately 3 turns (do not unscrew it further,<br />
as the cap can come off completely).<br />
Contents<br />
Know your <strong>Cyborg</strong><br />
Quick Setup<br />
Using your <strong>Cyborg</strong><br />
Advanced Setup<br />
Maintenance<br />
Parts List<br />
Troubleshooting<br />
Firing your marker<br />
If a paintball is loaded in your marker, and the power is switched on, you may<br />
fire the marker by pulling the trigger. If a paintball is not loaded, then you need<br />
to either load one, or read the section below on disabling the beam sensor.<br />
Understanding the beam sensor<br />
Your <strong>Cyborg</strong> is equipped with a visible light sensor to determine if a paintball is<br />
correctly loaded. This system is used to prevent accidental ball breakage due to<br />
misloaded paintballs. The OLED indicator on the side of your grip will show you<br />
the status of the beam sensor:<br />
Ball loaded<br />
No ball loaded<br />
Sensor disabled<br />
Sensor fault<br />
Power button<br />
(for power on/off)<br />
Scroll button<br />
(for eyes on/off and programming)<br />
OLED Display<br />
Battery meter<br />
Cycle mode<br />
Lock status<br />
Disabling the beam sensor<br />
To disable the sensor (for dry firing), hold the scroll button on the membrane<br />
Cycle speed (max)<br />
pad ( )until the beam sensor disabled icon appears on the OLED display. You<br />
can re-enable the beam sensor the same way.<br />
Sensor status Game timer/<br />
ROF meter<br />
Once this is done, carefully screw your air system into the ASA until it stops.<br />
WHEN SCREWING YOUR AIR SYSTEM INTO THE ASA, THE<br />
THREADS SHOULD BE LOOSE. IF AT ANY POINT THEY BECOME<br />
TIGHT, DO NOT FORCE THE THREADS, THIS MAY CAUSE DAMAGE<br />
TO YOUR AIR SYSTEM OR YOUR MARKER!<br />
Turning the air on and off<br />
To pressurise your marker, screw the ASA cap down until it stops. This will<br />
depress the pin on the end of your air system and pressurise the marker<br />
(provided you have sufficient air in your air system).<br />
To depressurise your <strong>Cyborg</strong>, unscrew the ASA cap until you hear the air<br />
being vented from the cap. Your air system is now turned off and safe to<br />
remove.<br />
Turn air off<br />
NOTE: WHEN YOU UNSCREW THE ASA CAP, YOUR MARKER MAY<br />
STORE ONE SHOT. POINT THE MARKER IN A SAFE DIRECTION AND<br />
FIRE OFF THAT SHOT BEFORE ENTERING A SAFE AREA. Turn air on<br />
8
Using a loader with your <strong>Cyborg</strong><br />
Your <strong>Cyborg</strong> marker can operate using any commercially available loader.<br />
The software and beam sensor will compensate for the speed of the hopper,<br />
ensuring that the marker fires as quickly as the loader allows.<br />
All <strong>Cyborg</strong> markers are equipped with a cam lever clamping feed tube. This<br />
system allows the easy installation and removal of your loader. You will need<br />
to adjust the feed tube to suit the loader that you have.<br />
Installing a loader onto your <strong>Cyborg</strong><br />
Open the cam lever as shown. This should allow your loader neck to fit into<br />
the feed tube as shown. If your loader does not fit into the feed tube, then<br />
you may have to loosen the adjustment screw slightly. Once your loader is<br />
pushed all the way down into the feed tube, close the cam lever. If your loader<br />
is loose, you may now tighten the adjustment screw (by turning clockwise) to<br />
tighten the loader in place.<br />
DO NOT OVER TIGHTEN YOUR FEED CLAMP! OVERTIGHTENING<br />
MAY RESULT IN DAMAGE TO YOUR LOADER OR CLAMP.<br />
Open clamp and<br />
push loader in<br />
Close clamp<br />
firmly<br />
Removing your loader<br />
Open the clamp by swinging the lever on its hinge. This will loosen the loader and allow you to remove it<br />
easily. If it does not remove easily, then it means that you have the clamp adjustment screw overtightened.<br />
USING YOUR CYBORG<br />
To get the most out of your marker, make sure that you follow the instructions<br />
in this section to ensure that the marker is adjusted correctly.<br />
Adjusting the velocity<br />
The velocity of the <strong>Cyborg</strong> is adjusted via an adjustment screw on the bottom<br />
your inline regulator. To increase velocity, use a 1/8” allen key to turn the<br />
adjustment screw anti clockwise. Always adjust your velocity gently and use a<br />
chronograph.<br />
DO NOT ADJUST YOUR VELOCITY ABOVE 300FPS, AND ALWAYS<br />
OBEY LOCAL LAWS AND REQUIREMENTS.<br />
Adjusting the trigger<br />
Your trigger has three adjustment screws, they are located in the front face of<br />
the trigger in the following order from top to bottom:<br />
- Pull tension<br />
- Switch actuation point<br />
- Pull length<br />
You may easily adjust these three screws to personalise the feel of your trigger.<br />
CAUTION! WHEN ADJUSTING THE SWITCH ACTUATION SCREW,<br />
MAKE CERTAIN THAT YOU DO NOT ADJUST THE SCREW IN TOO<br />
FAR, AS THIS MAY RESULT IN DAMAGE TO YOUR MICROSWITCH.<br />
Contents<br />
Know your <strong>Cyborg</strong><br />
Quick Setup<br />
Using your <strong>Cyborg</strong><br />
Advanced Setup<br />
Maintenance<br />
Parts List<br />
Troubleshooting<br />
Decrease<br />
Velocity<br />
Increase<br />
Velocity<br />
Tension<br />
Actuation<br />
Length<br />
10
Replacing the battery<br />
Remove all six screws holding the wrap around grip onto your grip frame.<br />
Push the battery out of the frame by pushing the bottom right hand side of the<br />
battery.<br />
Place the replacement battery into the marker, NOTE: make sure you put the<br />
bottom of the battery in first then push it onto the terminals. Only use high<br />
quality alkaline 9V batteries, the best possible choice is to use a MacDev<br />
Militia PowerPack (type 6LR61).<br />
ADVANCED SETUP<br />
About the tourney lock<br />
The <strong>Cyborg</strong> board is equipped with a tourney lock system. When the tourney<br />
lock system is activated, the gun cannot be reprogrammed on the field -<br />
making it tournament legal.<br />
Your marker has a tourney lock status indicator:<br />
unlocked<br />
locked<br />
When in unlocked mode, settings on the board my be changed, when in the<br />
locked mode settings cannot be changed.<br />
The lock status can be changed by opening the right hand side of the marker<br />
wrap around grip to gain access to the back of your circuit board. The tournament<br />
lock is a black button. Hold the button until you see the tournament lock<br />
status change.<br />
Fit bottom first<br />
then press top<br />
down to replace<br />
Push here to<br />
remove battery<br />
Programming the <strong>Cyborg</strong> software<br />
To program the board, first ensure that the tournament lock is off, then turn the<br />
marker off. Hold down the trigger whilst turning the marker on. When done correctly,<br />
you will see a message on your display screen indicating that programming<br />
mode is loading.<br />
When in the programming mode, settings will be displayed ready to be adjusted.<br />
If you would like to adjust the setting displayed, hold the trigger until the word<br />
“Set” appears before the setting value. Press the scroll button ( ) to increase<br />
the set value, and the power button ( ) if you would like to decrease the set<br />
value. When you are satisfied with the new setting, hold the trigger until the word “Set” is removed.<br />
If you would like to advance to the next setting, press the scroll button. If you would like to go backwards,<br />
press the power button.<br />
When you are finished with the program mode, hold the power button until the display goes blank (marker<br />
is powered down).<br />
Each setting is described in detail below:<br />
Contents<br />
Know your <strong>Cyborg</strong><br />
Quick Setup<br />
Using your <strong>Cyborg</strong><br />
Advanced Setup<br />
Maintenance<br />
Parts List<br />
Troubleshooting<br />
Debounce<br />
The debounce setting of your marker is used to control the amount of ”bounce” in your trigger. A very<br />
low debounce setting will result in a lot of bounce. In some tournaments or fields, it will be necessary to<br />
reduce the amount of bounce by increasing the debounce setting. Always increase the debounce slowly,<br />
because settings higher than 15 may result in your marker feeling unresponsive.<br />
12
Cycle mode<br />
Your <strong>Cyborg</strong> is equipped with 10 different cycle modes. These cycle<br />
modes will allow you to use your <strong>Cyborg</strong> in many different situations -<br />
tournament play, recreational and scenario. Always follow the rules and<br />
local regulations when selecting your cycle mode.<br />
NOTE: SOME VERSIONS MAY<br />
HAVE SOME MODES REMOVED<br />
TO COMPLY WITH LOCAL LAWS.<br />
FOR EXAMPLE, ALL MARKERS<br />
SOLD IN AUSTRALIA OFFER<br />
ONLY SEMI AUTO MODES.<br />
Semi-auto unlimited - one pull, one shot as fast as your loader can feed.<br />
Semi-auto adj - one pull, one shot as fast as the cycle speed setting.<br />
PSP ramping - ramping mode legal in the PSP league limited by the cycle speed setting.<br />
PSP burst - more agressive ramping mode legal in the PSP league limited by the cycle speed setting.<br />
NXL full auto - full auto mode legal in the NXL league limited by the cycle speed setting.<br />
Millennium - ramping mode legal in the Millennium league limited by the cycle speed setting.<br />
Ramping - standard ramping mode limited by the cycle speed setting.<br />
Response - fires both when the trigger is pulled and released limited by the cycle speed setting.<br />
Burst - a burst is fired for each individual trigger pull, limited by the cycle speed setting.<br />
Full auto - marker is cycled continuously when trigger is held, limited by the cycle speed setting.<br />
Cycle speed<br />
This setting is measured in Balls Per Second (BPS). If you are using a cycle mode that is limited by the<br />
cycle speed setting, then your marker will not cycle faster than this setting (plus the fine adjustment in the<br />
next setting).<br />
Cycle speed fine<br />
The fine adjustment allows the addition of 0.1bps increments for the very precise adjustment of your<br />
cycle speed.<br />
Ramp start<br />
In ramping modes, the software requires you to achieve a given cycle speed before ramping shots are<br />
added. This may be adjusted in this ramp start setting. This parameter is measured<br />
in trigger pulls per second (PPS). A low PPS setting will begin ramping<br />
more easily than a high PPS setting.<br />
Ramp degree<br />
Once ramping is achieved (by exceeding the PPS setting above), the software<br />
will add shots. The ramp degree setting allows you to set the amount of shots<br />
added and is specified as a multiple of the actual trigger pulls. For example a<br />
setting of 2.0 will add double the actual trigger pulls - if the trigger pulls are 5<br />
pulls per second, it will add 2X5=10, giving you a total speed of 5+10=15bps.<br />
Contents<br />
Know your <strong>Cyborg</strong><br />
Quick Setup<br />
Using your <strong>Cyborg</strong><br />
Advanced Setup<br />
Maintenance<br />
Parts List<br />
Troubleshooting<br />
Mechanical debounce<br />
Most difficulties experienced with bounce in your marker can be rectified by increasing the debounce<br />
setting at the start of your settings list. However, the mechanical debounce system is an alternative<br />
method for electronically removing bounce, and its setting can be increased to help remove bounce if<br />
the standard debounce setting is inneffective.<br />
Anti bolt stick (ABS)<br />
When your marker is idle for long periods, friction and settling effects can cause your bolt or other moving<br />
parts to be sticky. The ABS system is used to overcome this on the first shot by temporarily increasing<br />
the dwell setting. The ABS is adjustable in increments of 1ms.<br />
Cycle filter<br />
Your software allows the buffering of a single shot in case you pull the trigger during a cycle. This filter<br />
can be used to reduce the time allowed to buffer this shot. Adjustable from off (0%)-100%. Higher<br />
settings will reduce the amount of mechanical bounce in the marker, whilst low settings will make the<br />
marker feel aggressive and responsive.<br />
14
Ball settle delay<br />
Most paintball loaders will bounce the paintball in the breech. The ball settle delay allows some time<br />
(measured in milliseconds) for the ball to settle in place before firing. If you experience excessive paint<br />
chopping, you should try increasing your ball settle delay.<br />
Solenoid on time (dwell)<br />
When your marker is cycled, the solenoid valve is held open for the solenoid on time. If this setting is too<br />
low, the marker cannot cycle. If this setting is too high, the marker will use too much air. The correct setting<br />
for a <strong>Cyborg</strong> is 8-10ms.<br />
Eye function<br />
Your <strong>Cyborg</strong> can utilise the beam sensor (eye) in different ways. This setting can be used to select which<br />
way you would like to have the sensor used. The system can use a delayed mode, where if a ball is not<br />
detected in the breech, a shot will be fired after a half second delay. This mode is useful if you are using<br />
a sound activated loader, or if you would like your gun to indicate to you when you are out of paintballs.<br />
Another option is the forced mode. In this mode, the marker will only fire if a ball is detected. However,<br />
the user can force a shot to be fired by holding the trigger until the marker fires.<br />
Auto power off<br />
Your display system and other software uses power when switched on. To conserve power, the system<br />
can power off after a given period of time, this may be adjusted here.<br />
Game timer<br />
Your display system can display either a rate of fire indicator or a game timer. If the game timer is<br />
switched off, the rate of fire indicator will be displayed. The game timer will be started when the user<br />
presses and releases (not hold) the power button ( ).<br />
Brightness<br />
Your OLED display system has an adjustable brightness setting. Lower brightness<br />
settings conserve battery power.<br />
User profiles<br />
Users who make changes to the default settings can save these settings as<br />
profiles so that they can be reloaded at a later time. There are three different<br />
profile slots available.<br />
Contents<br />
Know your <strong>Cyborg</strong><br />
Quick Setup<br />
Using your <strong>Cyborg</strong><br />
Advanced Setup<br />
Maintenance<br />
Parts List<br />
Troubleshooting<br />
To save a profile, enter the save profile setting by holding the trigger. Once inside<br />
the setting, you can use the scroll button to select the profile slot number you would like to save to.<br />
Once the desired slot is displayed, hold the trigger again, and the software will ask you to confirm (with<br />
the power button) or cancel (with the scroll button).<br />
To load a profile, follow the same steps after entering the load profile setting. Please note that when<br />
loading a profile, the current settings will be replaced by the loaded profile.<br />
Reset to default<br />
The default settings on your software are preset by the factory to give good all round performance from<br />
your <strong>Cyborg</strong>. If you have made changes to your software, and would like to return your software to factory<br />
default settings, you can use this reset feature.<br />
To reset your software, enter the reset setting by holding the trigger. Once inside the setting, you can<br />
use the scroll button to select the word “yes”, hold the trigger again, and the software will ask you to<br />
confirm (with the power button) or cancel (with the scroll button).<br />
16
Using an RF transmitter<br />
Your stock board has provision for an RF transmitter attachment. To use the RF transmitter function, you<br />
must plug a compatible RF transmitter module into the RF transmitter plug (directly under the eye plugs on<br />
your board), and it will be activated automatically.<br />
Using the USB connector<br />
Your stock board has a mini USB connector on the bottom of the board to the right of the 9V battery. The<br />
USB connectivity may be used to update your software via a standard USB/mini USB cable.<br />
Never operate the USB connection while the board is powered on. Never update your board with software<br />
unless it has been downloaded directly from the MacDev website (www.macdev.net), the use of<br />
non genuine software on your stock board will immediately void your entire marker warranty.<br />
MAINTENANCE<br />
If you take 10 minutes after every day of play to maintain your marker, you will be rewarded with consistent<br />
reliable performance.<br />
You should perform basic cleaning after every day of play, and you should perform drivetrain and inline regulator<br />
maintenance after at least every 2 days of play. You can clean and maintain your <strong>Cyborg</strong> more often, it<br />
is up to you.<br />
When maintaining your <strong>Cyborg</strong>, use only MacDev accessories. Your <strong>Cyborg</strong> is packaged with an allen key<br />
set and a small tub of MacDev Militia Lube, only use Militia Lube to lubricate your <strong>Cyborg</strong>.<br />
Basic cleaning<br />
After using your <strong>Cyborg</strong>, always clean old paint from the outside. Always clean<br />
your barrel using a barrel swab to remove traces of dirt and paint. Use your<br />
barrel swab to clean the breech and feed tube in a similar way.<br />
Your <strong>Cyborg</strong> internal parts are quite well protected and sealed. However, when<br />
not in use, dirt can get into the marker and cause problems - so storage of your<br />
marker is just as important as cleaning. When storing your marker, ensure that<br />
it is stored in the <strong>Cyborg</strong> bag that is free of dirt, otherwise dirt may get into the<br />
venting ASA or breech.<br />
Maintaining the bolt<br />
Your <strong>Cyborg</strong> bolt is held into the gun by the patented bolt sleeve. Before the bolt<br />
can be removed, your bolt must be back (in the loading position). The bolt is<br />
always back when the <strong>Cyborg</strong> is gassed up (unless it is firing).<br />
Twist the bolt through 45 degrees as shown, then pull the bolt assembly out of<br />
the <strong>Cyborg</strong>. If your bolt sleeve will not twist, check that the bolt is back. If there is<br />
no pressure in the gun, you can reach down the feed tube to push the bolt back.<br />
The bolt should be clean and lightly greased on the tip o-rings. Clean the bolt<br />
bore and breach using a barrel swab.<br />
Contents<br />
Know your <strong>Cyborg</strong><br />
Quick Setup<br />
Using your <strong>Cyborg</strong><br />
Advanced Setup<br />
Maintenance<br />
Parts List<br />
Troubleshooting<br />
BOLT REMOVAL<br />
Twist<br />
Pull<br />
18
Maintaining the drivetrain<br />
The drivetrain can only be removed after the bolt assembly has been completely removed (see above).<br />
To remove the drivetrain, unscrew the rear cap, and then pull the drivetrain out in one piece.<br />
Once separated from the gun, remove the screw holding the ram and hammer guide together. Remove<br />
the hammer and valve cupseal and clean the old grease and dirt from all parts including the inside of<br />
the ram body and hammer guide (use a q-tip for this).<br />
Use a small amount of militia lube on the inside of the ram body, and generous amounts on the hammer<br />
switch and hammer front o-rings. Slide the lubricated hammer back into the ram body and then secure<br />
the hammer guide in place using the locking screw.<br />
Before sliding the drivetrain back into the gun, locate the cupseal spring on the cupseal and take care<br />
that it is aligned correctly after installation.<br />
Maintaining the low pressure regulator (LPR)<br />
The LPR on your <strong>Cyborg</strong> does not require as much maintenance as the drivetrain,<br />
bolt and inline regulator. Most of the time you will not need to open it to<br />
maintain it. However, after many days of play, you should perform the following<br />
maintenance steps.<br />
Remove the LPR cap and load spring. Under the load spring is a piston, remove<br />
this piston with a pair of needle nosed pliers. Clean the old grease from<br />
the piston and piston bore. Now use MacDev Militia lube to lubricate both the<br />
bore and the piston before re-assembly.<br />
Lubricate these O-rings<br />
Contents<br />
Know your <strong>Cyborg</strong><br />
Quick Setup<br />
Using your <strong>Cyborg</strong><br />
Advanced Setup<br />
Maintenance<br />
Parts List<br />
Troubleshooting<br />
LPR Spring<br />
Adjuster Screw<br />
Rear cap<br />
Ram body<br />
Hammer<br />
Valve body<br />
Cupseal<br />
Bump stop<br />
Switch o-ring<br />
Hammer front o-ring<br />
Cupseal spring<br />
LPR Cap<br />
Lubricate this bore<br />
20
Maintaining the inline regulator<br />
Your inline regulator (otherwise know as Gladiator reg), regulates the pressure from your air system<br />
down to the pressure used to fire your <strong>Cyborg</strong>. It is very important that your inline regulator is working<br />
well, if not, you may experience problems with velocity fluctuation or shootdown.<br />
Before working on your Gladiator reg, make certain that the air supply is turned off (via the venting<br />
ASA), and safely fire any gas out of the gun to ensure it does not have any residual pressure.<br />
Contents<br />
Know your <strong>Cyborg</strong><br />
Quick Setup<br />
Using your <strong>Cyborg</strong><br />
Advanced Setup<br />
Maintenance<br />
Parts List<br />
Troubleshooting<br />
Remove the hose from the fitting in the bottom of the Gladiator reg - you do this by pushing the collar<br />
in, whilst pulling the hose out. Once the hose is removed, you can unscrew the Gladiator reg from your<br />
<strong>Cyborg</strong>. Put your <strong>Cyborg</strong> aside so that you can concentrate on your Gladiator reg.<br />
Unscrew the bottomworks from the topworks of the Gladiator reg. Use an allen key from your tool set to<br />
push the internals out of the topworks. Disassemble the internals as shown.<br />
Gladiator <strong>RX</strong> inline regulator cleaning<br />
Lube Retainer<br />
O-Rings<br />
Lube Piston<br />
O-Ring<br />
Use a clean cloth to wipe the old grease from the o-rings. Use a q-tip to clean the old grease from inside<br />
the topworks bore. Apply a thin film of grease to the shaft of the piston and the retainer o-rings before<br />
re-assembling the internals. Use your finger or a q-tip to apply a thin film of grease to the topworks bore,<br />
and apply a generous film of grease to the piston o-ring before pushing the internals back into the Gladiator<br />
reg topworks.<br />
Now use your clean cloth to remove any excess grease from the piston tip and clean the seat (the red<br />
plastic part in the centre of the bottomworks. Screw the topworks and bottomworks back together. Make<br />
certain that the Gladiator reg is screwed together firmly by hand. This will prevent it from unscrewing<br />
accidentally during play.<br />
Lube this bore<br />
Re-assemble your <strong>Cyborg</strong> by attaching the Gladiator inline reg and hose. Push the hose in firmly until it<br />
stops. Re-chronograph your <strong>Cyborg</strong> before use on the field. 22
CYBORG <strong>RX</strong> MAIN PARTS<br />
LPR Assembly<br />
Transfer Fitting<br />
Inline Regulator<br />
(Gladiator <strong>RX</strong>)<br />
LPR Hose<br />
LPR Locating<br />
Pin<br />
Inline Regulator<br />
Hose<br />
Solenoid<br />
ASA Cap<br />
Eye Covers<br />
Feed Tube<br />
ASA Crossbar<br />
Bolt<br />
Display Module<br />
9V Battery<br />
Subplate<br />
Membrane Pad<br />
ASA Body<br />
ASA Fitting<br />
Cupseal Spring<br />
Cupseal<br />
Bolt Sleeve<br />
Bolt Pin<br />
Frame Screw<br />
ASA Wheel<br />
ASA Pin<br />
Drivetrain<br />
Hose Fitting<br />
Adjuster Screw<br />
GLADIATOR <strong>RX</strong> INLINE REGULATOR<br />
Sleeve<br />
O-Ring<br />
Filter<br />
Sleeve O-Ring<br />
End Cap<br />
O-Ring<br />
End Cap<br />
BottomWorks<br />
O-Ring<br />
Sleeve<br />
Lower Retainer<br />
Seat<br />
Bottomworks<br />
Inner Retainer<br />
O-Ring<br />
Seat Retainer<br />
Piston<br />
Topworks<br />
O-Ring<br />
Upper Retainer<br />
Outer Retainer<br />
O-Ring<br />
Contents<br />
Know your <strong>Cyborg</strong><br />
Quick Setup<br />
Using your <strong>Cyborg</strong><br />
Advanced Setup<br />
Maintenance<br />
Parts List<br />
Troubleshooting<br />
TopWorks<br />
Spring Pack<br />
Piston O-Ring<br />
24
TROUBLESHOOTING<br />
If you are experiencing difficulties with your marker, please check this table first to see if there is an easy<br />
solution listed. If at any time you are unsure about how to work on your marker, please contact a certified<br />
MacDev technician or service centre.<br />
Symptom Possible Cause Solution<br />
Although a fresh battery<br />
has been fitted, your<br />
<strong>Cyborg</strong> will not turn on<br />
Your <strong>Cyborg</strong> leaks from<br />
the solenoid<br />
Your <strong>Cyborg</strong> uses<br />
excessive air<br />
The battery has not been fitted<br />
correctly<br />
Leaking hammer switch o-ring<br />
Leaking manifold o-rings<br />
Dwell set too high<br />
General leak<br />
Ensure that the battery is firmly connected<br />
to both terminals. Ensure that the<br />
positive (+) terminal is connected to the<br />
positive terminal on your battery.<br />
Clean and relubricate the drivetrain with<br />
particular attention to the hammer switch<br />
o-ring. Replace if necessary.<br />
Check that the 3 manifold o-rings are in<br />
place between the solenoid and subplate.<br />
If they are damaged or missing, then<br />
replace them.<br />
Check the Dwell setting on your board. It<br />
should be 8-10ms.<br />
Make certain that there are no leaks from<br />
your fittings or air system wasting your air<br />
supply.<br />
Symptom Possible Cause Solution<br />
Your <strong>Cyborg</strong> is<br />
chopping paintballs<br />
Beam sensor is turned off<br />
Beam sensor is dirty or blocked<br />
Loader is set on a force setting<br />
too high for your paintballs<br />
Detents are missing or incorrectly<br />
installed<br />
Always play with the beam sensor<br />
enabled.<br />
Clean the breach, bolt and sensor.<br />
Some force fed loaders can apply enough<br />
force to break a fragile paintball. If this is<br />
the case, consult your loader manual to<br />
reduce the force setting.<br />
Replace or re-install your detents.<br />
Your <strong>Cyborg</strong> will not fire The trigger is set up incorrectly Ensure that the trigger actuates the microswitch<br />
by adjusting the actuator screw.<br />
Your <strong>Cyborg</strong> fires high<br />
on the first shot or<br />
inconsistently.<br />
Your <strong>Cyborg</strong> fires low<br />
on the first shot<br />
The beam sensor is on, and there<br />
are no paintballs loaded<br />
The solenoid is not plugged in<br />
Creeping inline regulator<br />
Sticking drivetrain<br />
Load some paintballs.<br />
Plug the solenoid into the board.<br />
Clean and lubricate the inline regulator,<br />
ensure that the seat and piston are in<br />
good condition.<br />
Clean and relubricate the drivetrain. If you<br />
continue to have problems:<br />
-increase the dwell by 1-2 ms.<br />
-increase the ABS parameter on your<br />
board.<br />
26
Symptom Possible Cause Solution<br />
The beam sensor is not<br />
reading correctly<br />
Eyes are connected incorrectly<br />
Eyes are faulty<br />
Red/black wire eye is the left hand plug<br />
Yellow/black wire eye is the centre plug.<br />
Replace the eye pair.<br />
MACDEV TECHNICAL ASSISTANCE<br />
If you require technical assistance, please contact your local MacDev service centre. You can also find assistance<br />
on the <strong>Cyborg</strong> Website, www.cyborgmarker.com, or the MacDev main website www.macdev.net.<br />
Alternatively, you can contact one of our main distribution points:<br />
MacDev Australia<br />
(Sydney, Australia)<br />
Ph: +612 9531 5055<br />
Fax: +612 9531 5188<br />
Visit: www.macdev.net<br />
Mail: info@macdev.net<br />
MacDev USA<br />
(Miami, USA)<br />
Ph: +1 305 681 4385<br />
Fax: +1 305 953 3843<br />
Tollfree: +1 877 MACDEV1<br />
Visit: www.macdevusa.com<br />
Mail: info@macdevusa.com<br />
28
CYBORG <strong>RX</strong> SPECIFICATIONS<br />
PARTS AND ACCESSORIES<br />
Use only genuine <strong>Cyborg</strong> spares and accessories - to do anything less may result in sub standard<br />
performance of your marker.<br />
Physical<br />
Length<br />
Width<br />
Height<br />
Weight<br />
Barrel Threads<br />
Performance<br />
Operating pressure<br />
Cycling pressure<br />
Rate of Fire<br />
Efficiency<br />
257mm (522mm with 14” barrel)<br />
30mm<br />
220mm<br />
960g with barrel and battery<br />
Autococker<br />
180psi<br />
50psi<br />
30+ BPS<br />
1800+ shots per 68/4500psi tank<br />
Visit your local MacDev retailer for spares kits, barrels, air systems and other MacDev Products.<br />
Electronics<br />
Software Militia Soft Version 1.0<br />
Hardware<br />
Militia Version 1.0 (Lead Free)<br />
Display<br />
OLED high visibility low power usage 96x16px<br />
Power<br />
9V standard battery 6LR61<br />
Fire modes<br />
Semi, NXL, PSP, Response, Burst, Full Auto<br />
Connectivity<br />
Mini USB<br />
Solenoid<br />
5V 1W<br />
www.macdev.net<br />
www.cyborgmarker.com<br />
www.macdevmilitia.com<br />
30
(c) Copyright 2008-2009 Mac Developments Pty Ltd (MacDev).<br />
MacDev - Proudly Australian<br />
The <strong>Cyborg</strong> <strong>RX</strong> paintball marker is covered by the following granted patents as well as international pending<br />
patents: U.S. Patent Nos. 5,228,427; 5,755,213; 5,957,119; 6,260,821; 6,349,711; 6,494,195; 6,644,295;<br />
6,644,296; 6,823,857; 6,694,963; 6,810,871; 7,017,497; 7,044,119.<br />
<strong>Cyborg</strong>, MacDev, Droid, MacDev Militia and Gladiator are all Trademarks of MacDev.