You also want an ePaper? Increase the reach of your titles
YUMPU automatically turns print PDFs into web optimized ePapers that Google loves.
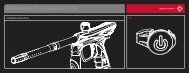
QUick Set-up Gui<strong>de</strong><br />
Connecting the air source<br />
The <strong>Proton</strong> has a standard ASA to accept a screw in air tank. First, make<br />
sure that the knob is all the way out by turning it counterclockwise.<br />
Carefully screw in the air tank until it stops. Turning the knob clockwise will<br />
allow air to flow into the marker from the tank.<br />
To remove the tank, turn the knob counterclockwise. This will release all the<br />
air in the marker and make it safe to remove the tank. We recommend the<br />
use of compressed air or nitrogen air tank with a maximum output pressure<br />
of 800 PSI.<br />
Attaching a loa<strong>de</strong>r<br />
Loosen the screw on the clamping feed neck with a 5/32” hex key and insert<br />
the loa<strong>de</strong>r. Adjust it to the <strong>de</strong>sired location and tighten.<br />
Attaching the barrel<br />
The barrel simply threads on. The barrel threads are autococker type.<br />
Turning the marker ON<br />
The electronic ON/OFF is located insi<strong>de</strong> the trigger guard. Pull the knob<br />
outward to turn the board ON and push in to turn OFF. All three leds will<br />
come on for 2secs and the marker will be ready to fire in semi mo<strong>de</strong> with<br />
the eyes on.<br />
Adjusting the velocity<br />
The <strong>Proton</strong> has an adjustable regulator in the handle frame that controls<br />
the pressure in the marker thereby controlling the velocity. The best<br />
way to adjust the velocity is to turn the adjusting screw clockwise using a<br />
1/8” hex key. This will be the minimum velocity. Check the velocity with<br />
a chronograph and gradually increase the velocity by turning the screw<br />
counterclockwise.<br />
Trigger adjustment<br />
The trigger has adjustments for pre travel, post travel and microswitch<br />
activation point. These are adjusted via the set screws in the trigger using a<br />
1/16” hex key.<br />
Adjustment procedure<br />
1. Ensure that the air is turned off to the marker.<br />
2. Turn the marker on<br />
3. Turn the eyes off. Now when you pull the trigger you will hear the<br />
solenoid valve clicking.<br />
4. Adjust the pre and post travel position of the trigger to suit your liking.<br />
5. Pull the trigger and listen for the solenoid. Turn the set screw clockwise<br />
until you hear the solenoid valve clicking. If you do not hear the<br />
solenoid then the screw may be too far in. Turn the trigger set screw<br />
counterclockwise until you hear the solenoid click when you pull the<br />
trigger.<br />
6. Check for proper function by pulling and releasing the trigger.
Standard firing mo<strong>de</strong>s<br />
The firing mo<strong>de</strong> is changed by pressing the lower mo<strong>de</strong> button. The green LED will indicate the current mo<strong>de</strong>. Pressing the mo<strong>de</strong> button again will cycle<br />
through the various mo<strong>de</strong>s. After 10 seconds the LED will turn off to save power.<br />
Firing Mo<strong>de</strong> Function Green LED Display<br />
Semi-Automatic One shot per trigger pull at a rate of fire (ROF) <strong>de</strong>termined by the user setting. Blinking once slowly<br />
3 Shot Burst Three shots are fired at a shot rate of 10 bps regardless if the eyes are on or off. The marker<br />
will fire the 3 shot string after the first trigger pull, regardless of trigger being held down.<br />
3 quick blinks<br />
Full Automatic Fires continuously at 10 bps while the trigger is pulled regardless if the eyes are on or off. Continuously blinking<br />
Ramping 1<br />
Ramping 2<br />
Fires in semi auto and ramps up to the max ROF when the trigger is pulled more than the ramp<br />
engage parameter. (Parameter 4)<br />
Ex. Ramp engage set to 5 bps. If the trigger is pulled more than 5 bps, the <strong>Proton</strong> will start firing<br />
at the max ROF setting.<br />
Same as above with another ramp engage parameter setting.<br />
(Parameter 5)<br />
Fading LED following by 1 blink<br />
Fading LED following by 2 blinks<br />
Intelligent break beam ball sensor system<br />
The <strong>Proton</strong> has a break beam sensor system with eye shields that prevent any dirt from entering the sensor. The eyes can be cleaned by simply removing<br />
the bolt and using a squeegee. If any malfunction should occur the software automatically overri<strong>de</strong>s the eye function and reduces the rate of fire. The upper<br />
mo<strong>de</strong> button on the foregrip allows you to enable or disable the sensor system. The software <strong>de</strong>tects the actual position of the ball as it approaches the bottom<br />
of the breech. This is a more reliable way of ensuring that the ball is in position rather than using a time <strong>de</strong>lay.<br />
The in-position tolerance can be adjusted <strong>de</strong>pending on the paintballs being used. If you are using relatively tough paintballs you can set the precision to low.<br />
A high precision will ensure that the ball is fully in the breech which would be useful for fragile paintballs. Refer to the user adjustable parameter section to<br />
change this setting.<br />
Turning the ball sensor ON & OFF<br />
The infrared ball sensor can be turned on and off by pressing the eye mo<strong>de</strong> button. Briefly pressing the eye mo<strong>de</strong> button will toggle the current status. The<br />
eye function is indicated by LED display in the following manner:<br />
ORANGE LED, Single Blink<br />
ORANGE LED, Two blinks<br />
Eye sensor ON<br />
Eye sensor OFF
Eye Sensor Alarms:<br />
The <strong>Proton</strong> software monitors the ball sensor and reports an alarm if no ball is present or if the breech has not cleared in the allotted time. This may be due<br />
to <strong>de</strong>bris blocking the sensor, the sensor not functioning or if the bolt is jammed. Ball sensor alarms are indicated by the red LED. When the <strong>Proton</strong> software<br />
<strong>de</strong>tects a breech not cleared error the shot rate is automatically reduced to 12 balls per second. This allows you to use the marker even though the ball<br />
sensor is not working properly, unless the bolt is jammed. The <strong>Proton</strong> will continue to display an error while you are shooting. Refer to the troubleshooting<br />
section to clear the error.<br />
Alarm<br />
No ball present<br />
Breech not cleared<br />
Display-Red LED<br />
3 quick blinks<br />
3 quick blinks followed by a solid light<br />
Tournament Mo<strong>de</strong>s \ Tournament Lock<br />
The tournament mo<strong>de</strong>s are adjusted via the dip switch on the main board located in the foregrip. To access the board, remove the foregrip using a 1/8” hex<br />
key. Sli<strong>de</strong> the foregrip off the marker. Use a small screwdriver to flip the switches to the <strong>de</strong>sired setting. After you change the setting you will need to cycle<br />
the power on and off to load the new setting. The eye mo<strong>de</strong> button and eye sensor function the same way as in standard mo<strong>de</strong>. If there is any ball breakage<br />
or malfunction of the sensors the software will overri<strong>de</strong> the shot rate and reduce it to 12 balls per second. The first dipswitch, SW1, when engaged\turned<br />
“ON”, will lock the board from being programmed from the trigger or via the mo<strong>de</strong> button. If SW1 is engaged\turned “ON” without any other dipswitches<br />
engaged, it will lock the marker with whatever parameters you have configured before engaging the tournament lock. Turn SW1 “OFF” to resume<br />
programming the gun through the trigger or cycling through mo<strong>de</strong>s with the mo<strong>de</strong> button on the foregrip.<br />
Tournament Mo<strong>de</strong> SW1 SW2 SW3 SW4<br />
NPPL \ Semi Auto: One shot per pull, capped at 15 BPS. (SW1 prevents changes \ engages ON ON OFF OFF<br />
tournament lock)<br />
PSP3: Three semi shots then transitions to 3 rounds burst. Capped at 12.5 bps. After 1 second<br />
idle, returns to semi auto. (SW1 prevents changes \ engages tournament lock)<br />
MILLENNIUM: Three semi shots then transitions to 3 rounds burst—6 pulls per second rate of<br />
fire must be pulled for burst to continue. Capped at 12 bps. Reverts to semi if pull rate drops<br />
below 6 pulls-per-second. (SW1 prevents changes \ engages tournament lock)<br />
ON OFF ON OFF<br />
ON OFF OFF ON
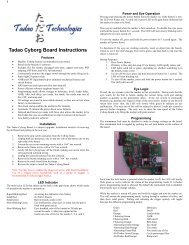
User Adjustable Parameters<br />
The parameters can be adjusted through the mo<strong>de</strong> buttons and trigger. The settings are saved into the non volatile memory.<br />
Changing The Parameters<br />
Hold the trigger down while turning the marker on by pulling the safety switch out. All three LEDs will blink indicating that you are in programming mo<strong>de</strong>.<br />
You can cycle through the parameters by pulling the trigger. The parameter type is indicated by a combination of colored LEDS. After you have selected the<br />
parameter you wish to change, hold down the trigger for two seconds. The corresponding LEDs will then flash a number of times, indicating the current value<br />
that the parameter has been configured to. All LEDs will then go dark—waiting for input from the trigger. Pull and release the trigger the amount you want to<br />
change the value to (e.g., pulling trigger 15 times = 15 balls per second). After you have pulled the trigger the <strong>de</strong>sired amount of times, allow the gun to sit idle<br />
for 5 seconds. The setting is now changed.<br />
Parameter RED LED ORANGE LED GREEN LED Range Default Setting<br />
Shot Rate ON OFF OFF 10.0 to 30 in 1 BPS increments 25 bps<br />
Solenoid Dwell OFF ON OFF 3ms to 15 ms<br />
6 ms<br />
1 ms increments<br />
Trigger Debounce ON ON OFF 2 ms to 10 ms<br />
2 ms<br />
1 ms increments<br />
Ramp 1 Engage OFF OFF ON 3 to 8 trigger pulls per second (pps)<br />
6 bps<br />
1 pps increments<br />
Ramp 2 Engage ON OFF ON 3 to 8 trigger pulls per second (pps)<br />
8 pps<br />
1 pps increments<br />
Ball In Position Accuracy OFF ON ON Low (1)<br />
Medium (2)<br />
High (3) - recommen<strong>de</strong>d for fragile paint<br />
Medium (2)<br />
Programming Procedure Example<br />
Your <strong>Proton</strong> comes out of the box capped at 25 bps. You want to reduce the rate of fire cap to 15 bps. Ensure your <strong>Proton</strong> does not have an air source<br />
or any paintballs in the marker. Hold down the trigger and turn the marker on to boot the marker into programming mo<strong>de</strong>. All of the LEDs will flash to<br />
indicate that you are in programming mo<strong>de</strong>. The first\upper LED will then turn solid red—indicating you are on the “Shot Rate” parameter. (If you wanted<br />
to cycle to another parameter, you would pull and release the trigger to cycle through the parameters). Hold down the trigger for 2 seconds. The red LED<br />
will then flash 25 times—indicating that the parameter was configured at 25 bps. The LED will then go dark—waiting for trigger input. Pull and release<br />
the trigger 15 times to change the parameter to 15bps. Allow the gun to sit for 5 seconds and your parameter will be saved. Turn the gun off, and boot as<br />
normal to use your new configuration.
Features<br />
Inline bolt system<br />
The <strong>Proton</strong> inline bolt system consists of a spool controlled by a direct operated solenoid valve. The movable part of the spool gli<strong>de</strong>s on self lubricating<br />
material which eliminates the need to use special grease like other spool type bolts. The low operating pressure and built in air cushion minimize recoil<br />
while firing.<br />
Eye shields<br />
When a paintball breaks in a marker you almost always have to remove the bolt to completely clean out all the mess. Very rarely will it clean out by itself.<br />
And you will also have to remove the eyes to clean them properly. This is why the eye shields are so useful. When you use a squeegee to clean out the<br />
breech this will also clean the eyes. In addition they are slightly recessed so they will never get scratched by the movement of the bolt.<br />
ASA with on/off and purge system<br />
The <strong>Proton</strong> has a standard threa<strong>de</strong>d ASA with an ON/OFF knob that not only makes it safe to remove the tank but also releases all the air in the marker<br />
and dump chamber. This simple and useful feature eliminates the need to shoot out the air in the marker when you remove the tank.<br />
Intelligent break beam sensor system<br />
The <strong>Proton</strong> has a re<strong>de</strong>signed break beam sensor system with eye shields that prevent any dirt from interfering with the sensor. The eyes can be cleaned by<br />
simply removing the bolt and using a squeegee. If any malfunction should occur the software automatically overri<strong>de</strong>s the eye function and reduces the rate<br />
of fire to keep you in the game. The upper mo<strong>de</strong> button on the foregrip allows you to enable or disable the sensor system. The software <strong>de</strong>tects the actual<br />
position of the ball as it approaches the bottom of the breech. This is a more reliable way of ensuring that the ball is in position rather than using a time<br />
<strong>de</strong>lay. The in-position tolerance can be adjusted <strong>de</strong>pending on the paintballs being used. If you are using relatively tough paintballs you can set the precision<br />
to low. A high precision will ensure that the ball is fully in the breech which would be useful for fragile paintballs.<br />
Electronic On/Off<br />
We have built in a convenient electrical on/off switch into the handle that cuts off all power from the battery. Unlike other electronic markers ,when you<br />
are not using your marker you do not have to worry about draining the battery. We have also eliminated those cumbersome 9 volt battery connectors; the<br />
battery simply snaps into the handle frame.<br />
Simple <strong>de</strong>sign<br />
The <strong>Proton</strong> has all the air lines machined in the handle eliminated those bulky and leak prone macro fittings. The electronic controls and status leds are<br />
conveniently located in the foregip. The inline bolt system is completely removable from the back of the marker.<br />
Adjustable trigger<br />
The trigger has adjustments for pre and post travel as well as microswitch activation point.
Firing mo<strong>de</strong>s<br />
There are 5 firing mo<strong>de</strong>s and 4 tournament mo<strong>de</strong>s. You can adjust the settings through the foregrip control without removing any covers.<br />
Maintaining your <strong>Proton</strong><br />
The <strong>Proton</strong> has been <strong>de</strong>signed to require a minimal amount of maintenance for proper operation. It is recommen<strong>de</strong>d that before each use you put 2 drops<br />
of light gun oil in the ASA. When the marker is gassed up the oil will distribute through the marker. This will be a<strong>de</strong>quate to keep the marker working<br />
properly.<br />
Removing the ball <strong>de</strong>tents for cleaning<br />
The <strong>Proton</strong> uses two spring loa<strong>de</strong>d ball <strong>de</strong>tents to prevent the double feeding of paintballs. They are located near the front of the receiver. To remove, insert<br />
a 1/16” hex key into the access hole in the cover. Make sure that the hex key is fully engaged in the screw otherwise you may strip the hex in the screw.<br />
Unscrew the cover and lift out the ball <strong>de</strong>tent and spring.<br />
To install the ball <strong>de</strong>tent<br />
• Place the ball <strong>de</strong>tent in the hole in the receiver.<br />
• Put the spring in the ball <strong>de</strong>tent,<br />
• Put the cover screw in the slot of the cover and put the hex key in the screw through the access hole in the cover.<br />
• Place the cover over the ball <strong>de</strong>tent and spring.<br />
• Tighten the screw.<br />
Note: Do not over-tighten the screw otherwise you may strip the hex in the screw which will make it difficult to remove the cover.<br />
Cleaning the <strong>Proton</strong><br />
First remove the bolt assembly by inserting a 5/32” hex key in the rear cap. Unscrew the bolt assembly and pull it out. You can use a standard squeegee to<br />
clean the bore of the marker. Insert the squeegee from the back of the marker and pull it through the front.<br />
Battery replacement<br />
Remove the four screws hold the wraparound grip and push the battery out from the access hole on the handle frame. Note the proper polarity when<br />
installing a new battery. The + si<strong>de</strong> of the battery is indicated on the board in the handle frame. We recommend the use of a high quality alkaline battery.<br />
Removing the frame from the body<br />
In the event that you need to separate the frame and body, ensure that you unplug the wiring harness (the two small wires with white plastic connector<br />
blocks on either si<strong>de</strong>) from the circuit board in the grip frame ONLY. While removing the wiring harness from your upper\horizontal board will not<br />
permanently damage your marker, it is very difficult to replace correctly and can result in damage if it is not replaced carefully.
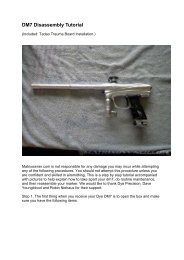
Diagrams & PArts<br />
WARNING:<br />
READ before disassembling!<br />
*ALWAYS remove Trigger before<br />
removing Grip Frame from Receiver!<br />
**ALWAYS reinstall Trigger AFTER Grip<br />
Frame is reinstalled to Receiver.<br />
***Failure to follow the above<br />
instructions can damage your Solenoid<br />
and void your <strong>Proton</strong> warranty.
Bolt Assembly<br />
5a<br />
5b<br />
5d<br />
Incline Bolt Assembly<br />
5a Bolt Head<br />
5b Oring M1 X 14<br />
5c Oring -018 70 Duro<br />
5d Front U Cup Seal<br />
5e Front Sleeve<br />
5f Oring -109 70 Duro<br />
5g Front Cap<br />
5h Oring M1 X 12<br />
5i Front Bumper<br />
5j Rear Shaft<br />
5k Oring -010 70 Duro<br />
5l Oring -016 70 Duro<br />
5m Rear Sleeve<br />
5n Screw Set 6-32 X 3/16"<br />
5o Rear Shaft Seat<br />
5p Rear Cushion<br />
5q Oring M1 X 16.5<br />
5r Rear Cushion Cap<br />
Regulator Assembly<br />
12a C-Clip<br />
Incline Bolt Assembly<br />
5a Bolt Head<br />
5b Oring M1<br />
5h<br />
X 14<br />
5i<br />
5c Oring -018 70 Duro<br />
5d Front U Cup Seal<br />
5e<br />
5f<br />
Front Sleeve<br />
Oring -109 70 Duro<br />
5g Front Cap<br />
5h Oring M1 X 12<br />
5i Front Bumper<br />
5j Rear Shaft<br />
5k Oring -010 70 Duro<br />
5l Oring -016 70 Duro<br />
5m Rear Sleeve<br />
5n Screw Set 6-32 X 3/16"<br />
5o<br />
5p<br />
Rear Shaft Seat<br />
Rear Cushion<br />
5q Oring M1 X 16.5<br />
5r Rear Cushion Cap<br />
5j<br />
5c 5e 5f<br />
Incline Bolt Assembly<br />
5a Bolt Head<br />
5b Oring M1 X 14<br />
5c Oring -018 70 Duro<br />
5d Front U Cup Seal<br />
5e Front Sleeve<br />
5f Oring -109 70 Duro<br />
5g Front Cap<br />
5h Oring M1 X 12<br />
5i Front Bumper<br />
Rear Shaft<br />
5k Oring -010 70 Duro<br />
5l Oring -016 70 Duro<br />
5m Rear Sleeve<br />
5n Screw Set 6-32 X 3/16"<br />
5o Rear Shaft Seat<br />
5p Rear Cushion<br />
5q Oring 5d M1 X 16.5 5h<br />
5r Rear Cushion Cap<br />
Regulator Assembly<br />
12a C-Clip<br />
12b Adjusting Screw Seal<br />
12c Adjusting Screw<br />
12d Regulator Stem Seal<br />
12e Regulator Cap<br />
12f Oring -014 70 Duro<br />
12g Oring -011 70 Duro<br />
12h Regulator Spring<br />
12i Regulator Stem<br />
12j Oring -014 70 Duro<br />
5a<br />
5g 5j 5k<br />
5i<br />
5a<br />
5b<br />
5b<br />
5d<br />
5l 5m 5n 5o 5p<br />
5c 5e 5f<br />
5h<br />
5c<br />
5i<br />
5q<br />
5g 5j 5k<br />
Regulator Assembly<br />
12a C-Clip<br />
12b Adjusting Screw Seal<br />
12c Adjusting Screw<br />
12d Regulator Stem Seal<br />
5a 12e 5b Regulator 5c Cap 5e 5f<br />
12f Oring -014 70 Duro<br />
5g 5j 5k<br />
5c 5q 5r<br />
12g Oring -011 70 Duro<br />
12h Regulator Spring<br />
12i Regulator Stem<br />
12a 12b 12c 12d 12e 12f 12g 12h 12i 12j<br />
12j Oring -014 70 Duro<br />
5d<br />
Regulator Assembly<br />
5c 5e 5f<br />
5h<br />
5l 5m 5n 5o 5p<br />
5i<br />
5g 5j 5k<br />
12a 12b 12c 12d 12e 12f 12g 12h 12i 12j<br />
5l 5m 5n 5o<br />
5r<br />
5c<br />
5<br />
5
WARNING: Important Safety Instructions<br />
This is not a toy. Misuse may cause serious injury or <strong>de</strong>ath. Eye protection<br />
<strong>de</strong>signed specifically for paintball must be worn by the user and persons<br />
within range. Recommend 18 years of age or ol<strong>de</strong>r to purchase. Persons<br />
un<strong>de</strong>r 18 years of age must have adult supervision.<br />
READ OWNERS MANUAL BEFORE USING.<br />
Rules of Safe Marker Handling”<br />
1. Treat every marker as if it were loa<strong>de</strong>d.<br />
2. Never look down the barrel of a paintball marker.<br />
3. Keep your finger off the trigger until ready to shoot.<br />
4. Never point the marker at anything you don’t wish to shoot.<br />
5. Keep the marker on “safe” until ready to shoot.<br />
6. Keep the barrel blocking <strong>de</strong>vice in/on the marker’s muzzle when not<br />
shooting.<br />
7. Always remove paintballs and propellant source before disassembly.<br />
8. After removing propellant source, point marker in safe direction and<br />
discharge until marker is <strong>de</strong>gassed.<br />
9. Store the marker unloa<strong>de</strong>d and <strong>de</strong>gassed in a secure place.<br />
10. Follow warnings listed on propellant source for handling and storage.<br />
11. Do not shoot at fragile objects such as windows.<br />
12. Every person within range must wear eye, face and ear protection<br />
<strong>de</strong>signed specifically to stop paintballs and meeting ASTM standard F1776.<br />
13. Always measure your marker’s velocity before playing paintball and never<br />
shoot at velocities in excess of 300 feet-per-second.
LIMITED WARRANTY<br />
<strong>Valken</strong> Paintball guarantees the <strong>Proton</strong> against <strong>de</strong>fects in<br />
material and/or workmanship of this marker for twelve (12)<br />
months from the original date of purchase by the original<br />
retail purchaser. To activate your warranty, fill out the<br />
warranty card and mail it along with a copy of the original<br />
purchase receipt. In the event that a part is <strong>de</strong>fective <strong>Valken</strong><br />
Sports will send out a replacement part free of charge.<br />
Wearable items such as o-rings, screws, ball <strong>de</strong>tents and<br />
the like are not covered un<strong>de</strong>r this warranty. Failure of any<br />
part due to an acci<strong>de</strong>nt, abuse, neglect, modification, misuse,<br />
operator error, lack of maintenance, or use of parts inconsistent<br />
with the use originally inten<strong>de</strong>d for the marker as<br />
sold is not covered by this warranty.<br />
<strong>Valken</strong> makes no other warranties or guarantees, expressed<br />
or implied. <strong>Valken</strong> Paintball limits its sole and exclusive liability<br />
and that of it’s authorized <strong>de</strong>alers, affiliates, or agents<br />
pursuant to this warranty to cover repair or replacement of<br />
the <strong>de</strong>fective part. Inci<strong>de</strong>ntal and consequential damages are<br />
expressly exclu<strong>de</strong>d hereun<strong>de</strong>r. <strong>Valken</strong> Paintball, its authorized<br />
<strong>de</strong>alers, affiliates, or agents, will not be liable un<strong>de</strong>r this<br />
warranty, nor un<strong>de</strong>r any state or fe<strong>de</strong>ral law, or the common<br />
law or otherwise for any damage or failure, including<br />
personal injury, resulting from such use and/or alteration.<br />
This warranty gives you specific legal rights, and you may<br />
also have other rights that may vary from state to state.<br />
(856) 812-2800 • www.valkenpaintball.com<br />
Warranty Registration Card<br />
Name ________________________________________________________<br />
Address ______________________________________________________<br />
City _________________________________________________________<br />
State/Province _________________________________________________<br />
Zip Co<strong>de</strong> _____________________________________________________<br />
Country ______________________________________________________<br />
Phone _______________________________________________________<br />
E-Mail _______________________________________________________<br />
Purchased from ________________________________________________<br />
Store location __________________________________________________<br />
Purchase price _________________________________________________<br />
For warranty parts, service or information contact:<br />
<strong>Valken</strong> Paintball • 1 Hawk Court • Swe<strong>de</strong>sboro NJ 08085<br />
(856) 812-2800 • www.valkenpaintball.com<br />
To activate your warranty, fill out &<br />
Detach this warranty card and mail<br />
it along with a copy of the original<br />
purchase receipt to valken.
<strong>Valken</strong> Sports, Inc.<br />
1 Hawk Court<br />
Swe<strong>de</strong>sboro, NJ. 08085