Create successful ePaper yourself
Turn your PDF publications into a flip-book with our unique Google optimized e-Paper software.
Read this manual first!<br />
Congratulations on purchasing this <strong>Philips</strong> product.<br />
We’ve included everything you need to get started.<br />
If you have any problems, <strong>Philips</strong> Representatives can<br />
help you get the most from your new product by explaining:<br />
• Hookups,<br />
• First Time Setup, and<br />
• Feature Operation.<br />
Do not attempt to return this product to the store.<br />
For fast help, call us first!<br />
1-800-531-0039<br />
Thank you for making <strong>Philips</strong> a part of your home!<br />
3121 235 20371
Return your Warranty Registration card today to ensure you<br />
receive all the benefits you’re entitled to.<br />
Once your PHILIPS purchase is registered, you’re eligible to receive all the privileges of owning a<br />
PHILIPS product. So complete and return the Warranty Registration Card enclosed with your purchase<br />
at once. And take advantage of these important benefits.<br />
Warranty<br />
Verification<br />
Registering your product within<br />
10 days confirms your right to<br />
maximum protection under the<br />
terms and conditions of your<br />
PHILIPS warranty.<br />
Congratulations on your purchase,<br />
and welcome to the “family!”<br />
Owner<br />
Confirmation<br />
Your completed Warranty<br />
Registration Card serves as<br />
verification of ownership in the<br />
event of product theft or loss.<br />
Model<br />
Registration<br />
Returning your Warranty<br />
Registration Card right away guarantees<br />
you’ll receive all the information<br />
and special offers which<br />
you qualify for as the owner of your<br />
model.<br />
I<br />
R E G<br />
D A Y S<br />
S T R A T<br />
I O N<br />
N E E D E D<br />
Hurry!<br />
W<br />
Dear PHILIPS product owner:<br />
1 0<br />
I N<br />
I T H<br />
Thank you for your confidence in PHILIPS. You’ve selected one of the best-built, best-backed products<br />
available today. And we’ll do everything in our power to keep you happy with your purchase for many<br />
years to come.<br />
As a member of the PHILIPS “family,” you’re entitled to protection by one of the most comprehensive<br />
warranties and outstanding service networks in the industry.<br />
What’s more, your purchase guarantees you’ll receive all the information and special offers for which<br />
you qualify, plus easy access to accessories from our convenient home shopping network. And most<br />
importantly you can count on our uncompromising commitment to your total satisfaction.<br />
All of this is our way of saying welcome–and thanks for investing in a PHILIPS product.<br />
Sincerely,<br />
<strong>Philips</strong> Consumer Electronics Company<br />
P.S. Remember, to get the most from your PHILIPS product, you<br />
must return your Warranty Registration Card within 10 days.<br />
So please mail it to us right now!<br />
Know these<br />
safetysymbols<br />
CAUTION<br />
RISK OF ELECTRIC SHOCK<br />
DO NOT OPEN<br />
CAUTION: TO REDUCE THE RISK OF ELECTRIC SHOCK, DO NOT<br />
REMOVE COVER (OR BACK). NO USER-SERVICEABLE PARTS<br />
INSIDE. REFER SERVICING TO QUALIFIED SERVICE PERSONNEL.<br />
t This “bolt of lightning” indicates uninsulated material within your unit may cause an electrical<br />
shock. For the safety of everyone in your household, please do not remove product covering.<br />
s The “exclamation point” calls attention to features for which you should read the enclosed<br />
literature closely to prevent operating and maintenance problems.<br />
WARNING: TO PREVENT FIRE OR SHOCK HAZARD, DO NOT EXPOSE THIS EQUIPMENT<br />
TO RAIN OR MOISTURE.<br />
CAUTION: To prevent electric shock, match wide blade of plug to wide slot, and fully insert.<br />
ATTENTION: Pour éviter les chocs électriques, introduire la lame la plus large de la fiche dans la<br />
borne correspondante de la prise et pousser jusqu’au fond.<br />
Visit our World Wide Web Site at http://www.philipsusa.com<br />
2
IMPORTANT SAFETY INSTRUCTIONS<br />
Read before operating equipment<br />
1. Read these instructions.<br />
2. Keep these instructions.<br />
3. Heed all warnings.<br />
4. Follow all instructions.<br />
5. Do not use this apparatus near water.<br />
6. Clean only with a dry cloth.<br />
7. Do not block any of the ventilation openings. Install in<br />
accordance with the manufacturers instructions.<br />
8. Do not install near any heat sources such as radiators, heat<br />
registers, stoves, or other apparatus (including amplifiers)<br />
that produce heat.<br />
9. Do not defeat the safety purpose of the polarized or grounding-type<br />
plug. A polarized plug has two blades with one<br />
wider than the other. A grounding type plug has two blades<br />
and third grounding prong. The wide blade or third prong<br />
are provided for your safety. When the provided plug does<br />
not fit into your outlet, consult an electrician for replacement<br />
of the obsolete outlet.<br />
10. Protect the power cord from being walked on or pinched<br />
particularly at plugs, convenience receptacles, and the point<br />
where they exit from the apparatus.<br />
11. Only use attachments/accessories specified by the manufacturer.<br />
12. Use only with a cart, stand, tripod, bracket, or table<br />
specified by the manufacturer, or sold with the apparatus.<br />
When a cart is used, use caution when<br />
moving the cart/apparatus combination to avoid<br />
injury from tip-over.<br />
13. Unplug this apparatus during lightning storms or when<br />
unused for long periods of time.<br />
14. Refer all servicing to qualified service personnel. Servicing<br />
is required when the apparatus has been damaged in any<br />
way, such as power-supply cord or plug is damaged, liquid<br />
has been spilled or objects have fallen into apparatus, the<br />
apparatus has been exposed to rain or moisture, does not<br />
operate normally, or has been dropped.<br />
15. This product may contain lead and mercury. Disposal of<br />
these materials may be regulated due to environmental considerations.<br />
For disposal or recycling information, please<br />
contact your local authorities or the Electronic Industries<br />
Alliance: www.eiae.org<br />
16. Damage Requiring Service - The appliance should be<br />
serviced by qualified service personnel when:<br />
A. The power supply cord or the plug has been damaged;<br />
or<br />
B. Objects have fallen, or liquid has been spilled into the<br />
appliance; or<br />
C. The appliance has been exposed to rain; or<br />
D. The appliance does not appear to operate normally or<br />
exhibits a marked change in performance; or<br />
E. The appliance has been dropped, or the enclosure<br />
damaged.<br />
17. Tilt/Stability - All televisions must comply with recommended<br />
international global safety standards for tilt and stability<br />
properties of its cabinet design.<br />
• Do not compromise these design standards by applying<br />
excessive pull force to the front, or top, of the cabinet which<br />
could ultimately overturn the product.<br />
• Also, do not endanger yourself, or children, by placing<br />
electronic equipment/toys on the top of the cabinet. Such<br />
items could unsuspectingly fall from the top of the set and<br />
cause product damage and/or personal injury.<br />
18. Wall or Ceiling Mounting - The appliance should be<br />
mounted to a wall or ceiling only as recommended by the<br />
manufacturer.<br />
19. Power Lines - An outdoor antenna should be located away<br />
from power lines.<br />
20. Outdoor Antenna Grounding - If an outside antenna is<br />
connected to the receiver, be sure the antenna system is<br />
grounded so as to provide some protection against voltage<br />
surges and built up static charges.<br />
Section 810 of the National Electric Code, ANSI/NFPA No.<br />
70-1984, provides information with respect to proper<br />
grounding of the mats and supporting structure grounding of<br />
the lead-in wire to an antenna discharge unit, size of<br />
grounding connectors, location of antenna-discharge unit,<br />
connection to grounding electrodes and requirements for<br />
the grounding electrode. See Figure below.<br />
21. Object and Liquid Entry - Care should be taken so that<br />
objects do not fall and liquids are not spilled into the enclosure<br />
through openings.<br />
Note to the CATV system installer: This reminder is provided to call the CATV system installer's attention to Article 820-40 of the NEC that provides<br />
guidelines for proper grounding and, in particular, specifies that the cable ground shall be connected to the grounding system of the building, as close<br />
to the point of cable entry as practical.<br />
Example of Antenna Grounding<br />
as per NEC - National Electric Code<br />
GROUND CLAMP<br />
ANTENNA LEAD IN WIRE<br />
ANTENNA DISCHARGE UNIT (NEC SECTION 810-20)<br />
GROUNDING CONDUCTORS (NEC SECTION 810-21)<br />
GROUND CLAMPS<br />
ELECTRIC SERVICE EQUIPMENT<br />
POWER SERVICE GROUNDING ELECTRODE SYSTEM (NEC ART 250, PART H)<br />
3
SAFETY INSTRUCTIONS - Read before operating equipment<br />
Safety Precautions<br />
Warning: To prevent fire or shock hazard, do not expose this equipment<br />
to rain or moisture.<br />
Federal Communications Commission (FCC) Warning: Any<br />
unauthorized changes or modifications to this equipment void the<br />
user’s authority to operate it.<br />
Laser Safety<br />
This unit employs a laser. Only a qualified service person should<br />
remove the cover or attempt to service this device, due to possible<br />
eye injury.<br />
CAUTION: USE OF CONTROLS OR ADJUSTMENTS OR<br />
PERFORMANCE OF<br />
PROCEDURES OTHER THAN THOSE SPECIFIED HEREIN<br />
MAY RESULT IN<br />
HAZARDOUS RADIATION EXPOSURE.<br />
CAUTION: VISIBLE AND INVISIBLE LASER RADIATION<br />
WHEN OPEN AND INTERLOCK DEFEATED. DO NOT<br />
STARE INTO BEAM. THE BEAM IS LOCATED INSIDE,<br />
NEAR THE DECK MECHANISM.<br />
Special Information for Canadian Users<br />
This digital apparatus does not exceed the Class B limits for<br />
radio noise emissions from digital apparatus as set out in the<br />
Radio Interference Regulations of the Canadian Department of<br />
Communications.<br />
Radio/TV Interference<br />
This equipment has been tested and found to comply with the limits<br />
for a Class B digital device, pursuant to Part 15 of the FCC Rules.<br />
These limits are designed to provide reasonable protection against<br />
harmful interference in a residential installation. This equipment generates,<br />
uses, and can radiate radio frequency energy and, if not installed<br />
and used in accordance with the instructions, may cause harmful interference<br />
to radio communications. However, there is no guarantee that<br />
interference will not occur in a particular installation. If this equipment<br />
does cause harmful interference to radio or television reception, which<br />
can be determined by turning the equipment off and on, the user is<br />
encouraged to try to correct the interference by one or more of the following<br />
measures:<br />
1) Reorient or relocate the receiving antenna.<br />
2) Increase the separation between the equipment and the<br />
receiver.<br />
3) Connect the equipment into an outlet on a circuit different<br />
from that to which the receiver is connected.<br />
4) Consult the dealer or an experienced radio/TV technician for<br />
help.<br />
WARNING<br />
To reduce the risk of fire or electric shock, do not expose this appliance<br />
to rain or moisture.<br />
CAUTION<br />
Use of controls or adjustments or performance of procedures other<br />
than herein may result in hazardous radiation exposure.<br />
The set complies with the FCC-Rules, Part 15 and with 21 CFR<br />
1040.10.<br />
Copyright Protection<br />
Unauthorized copying, broadcasting, public performance and lending<br />
of Discs are prohibited.<br />
This product incorporates copyright protection technology that is<br />
protected by method claims of certain U.S. patents and other intellectual<br />
property rights owned by Macrovision Corporation and<br />
other rights owners.<br />
Use of this copyright protection technology must be authorized by<br />
Macrovision Corporation and is intended for home and other limited<br />
viewing uses only unless otherwise authorized by Macrovision<br />
Corporation. Reverse engineering or disassembly is prohibited.<br />
Declaration of Conformity<br />
Trade Name:<br />
Responsible Party:<br />
<strong>Philips</strong><br />
<strong>Philips</strong> Consumer Electronics<br />
P.O. Box 14810<br />
Knoxville, TN 37914-1810<br />
(865) 521-4316<br />
CLASS 1<br />
LASER PRODUCT<br />
LASER SAFETY<br />
This unit employs a laser. Due to possible<br />
eye injury, only a qualified service person<br />
should remove the cover or attempt to service<br />
this device.<br />
USE OF CONTROLS OR ADJUST-<br />
MENTS OR PERFORMANCE OF<br />
PROCEDURES OTHER THAN<br />
THOSE SPECIFIED HEREIN MAY<br />
RESULT IN HAZARDOUS RADIA-<br />
TION EXPOSURE.<br />
LASER<br />
Type<br />
laser GaAlAs<br />
Wave length<br />
Output Power<br />
Beam divergence<br />
ALL<br />
1<br />
4<br />
Semiconductor<br />
650 nm (DVD)<br />
785 nm (VCD/CD)<br />
7 mW (DVD)<br />
10 mW (VCD/CD)<br />
60 degree<br />
The region code for<br />
this set is ALL or 1.<br />
DVDs must be labeled<br />
for ALL regions or for Region 1 in order to<br />
play on this TV/DVD Player. You can not<br />
play Discs that are labeled for other<br />
regions. Look for the symbols above on<br />
your DVDs. If these region symbols do not<br />
appear on your DVDs, you can not play the<br />
DVD in this TV/DVD Player.<br />
CAUTION<br />
RISK OF ELECTRIC SHOCK<br />
DO NOT OPEN<br />
CAUTION: TO REDUCE THE RISK OF ELECTRIC SHOCK, DO NOT<br />
REMOVE COVER (OR BACK). NO USER-SERVICEABLE PARTS<br />
INSIDE. REFER SERVICING TO QUALIFIED SERVICE PERSONNEL.<br />
NOTE: PICTURES SHOWN MAYBE<br />
DIFFERENT BETWEEN COUNTRIES.<br />
NEVER MAKE OR CHANGE CON-<br />
NECTIONS WITH THE POWER<br />
SWITCHED ON.<br />
CAUTION<br />
VISIBLE AND INVISIBLE LASER<br />
RADIATION WHEN OPEN AVOID<br />
EXPOSURE TO BEAM (WARNING<br />
LOCATION: INSIDE ON LASER COV-<br />
ERSHIELD OR THE BACKPLATE OF<br />
SET)<br />
This product incorporates copyright protection<br />
technology that is protected by method<br />
claims of certain U.S. patents and other<br />
intellectual property rights owned by<br />
Macrovision Corporation and other rights<br />
owners. Use of this copyright protection<br />
technology must be authorized by<br />
Macrovision Corporation, and is intended<br />
for home and other limited viewing uses<br />
only unless otherwise authorized by<br />
Macrovision Corporation. Reverse engineering<br />
or disassembly is prohibited.
TABLE OF CONTENTS<br />
Introduction<br />
✧Welcome/Registration of Your TV . . . . . . . . . . . . . . . . .2<br />
✧Safety/Precautions . . . . . . . . . . . . . . . . . . . . . . . . . . . .2-4<br />
✧Table of Contents . . . . . . . . . . . . . . . . . . . . . . . . . . . . . .5<br />
✧Features . . . . . . . . . . . . . . . . . . . . . . . . . . . . . . . . . . . . .6<br />
ON-SCREEN MENU<br />
✧ Adjusting the Picture Controls . . . . . . . . . . . . . . .7<br />
✧Turning ON the Dynamic Noise Reduction<br />
Control . . . . . . . . . . . . . . . . . . . . . . . . . . . . . . . . . . . . . .8<br />
✧Turning ON the Contrast + Control . . . . . . . . . . . . . . . .9<br />
✧ The Timer – Setting the Clock . . . . . . . . . . . . . . . . . . .10<br />
✧ The Timer – Setting the Start Time . . . . . . . . . . . . . .11<br />
✧The Timer – Setting the Stop Time . . . . . . . . . . . . . . .12<br />
✧The Timer – Selecting the Start Up Channel . . . . . . . .13<br />
✧The Timer – Setting Activate to ON or OFF . . . . . . . .14<br />
✧The Timer – Turning ON the Timer Display . . . . . . . .15<br />
✧Using the Closed Captioning Control . . . . . . . . . . . . . .16<br />
✧Using the Format (Screen) Control . . . . . . . . . . . . . . .17<br />
✧Activating the Blue Mute Control . . . . . . . . . . . . . . . .18<br />
✧Using the Sleep Timer Control . . . . . . . . . . . . . . . . . . .19<br />
The AutoLockª Feature<br />
✧ Understanding AutoLock . . . . . . . . . . . . . . . . . .20<br />
✧ AutoLock – Setting Up the Access Code . . . . . . . .21<br />
✧AutoLock – Blocking Channels . . . . . . . . . . . . . . . .22<br />
✧AutoLock – Blocking by Movie Rating . . . . . . . . . .23<br />
✧AutoLock – Blocking by TV Rating . . . . . . . . . . . .24<br />
✧AutoLock – Turning Block ON or OFF . . . . . . . . . .25<br />
✧AutoLock – Blocking Unrated Broadcasts . . . . . . . .26<br />
✧AutoLock – Blocking Broadcasts That<br />
Have No Rating . . . . . . . . . . . . . . . . . . . . . . . . . . . . .27<br />
✧AutoLock – Reviewing Your Settings . . . . . . . . . . .28<br />
✧AutoLock – Viewing Blocked Programming . . . . . .29<br />
Sound<br />
✧ Sound – Adjusting the Treble, Bass, and<br />
and Balance . . . . . . . . . . . . . . . . . . . . . . . . . . . . . . . . .30<br />
✧Sound – Setting the Volume . . . . . . . . . . . . . . . . . . . .31<br />
✧Sound – Using the AVL (Audio Volume Leveler) . . . .32<br />
✧Sound – Using Incredible Surround . . . . . . . . . . . . . . .33<br />
✧Sound – Setting the TV for Stereo and<br />
SAP (Second Audio Program) . . . . . . . . . . . . . . . . . . .34<br />
✧Sound – Setting the Audio Out Control . . . . . . . . . . . .35<br />
✧Sound – Using the TV Speaker Control<br />
and Audio Output Jacks . . . . . . . . . . . . . . . . . . . . . . . .36<br />
Remote Control Operation<br />
✧ Remote Control – Using AutoPicture . . . . . .37<br />
✧ Remote Control – Using AutoSound . . . . . .38<br />
✧ Remote Control – Using Channel Surf . . . . . . . . . .39<br />
DVD Player Operation<br />
✧ General DVD Operation . . . . . . . . . . . . . . . .40<br />
✧ Personal Preference - Picture . . . . . . . . . . . . . . . . . .42<br />
✧ Personal Preference - Sound . . . . . . . . . . . . . . . . . .43<br />
✧ Personal Preference - Language . . . . . . . . . . . . . . .44<br />
✧ Personal Preference - Features . . . . . . . . . . . . . . . .45<br />
✧ Personal Preference - Access Code . . . . . . . . . . . . .46<br />
✧ Authorizing and Deauthorizing Discs . . . . . . . . . . .47<br />
✧ Playing a DVD or Video CD . . . . . . . . . . . . . . . . . .48<br />
✧ Moving to Another Title or Track . . . . . . . . . . . . . .49<br />
✧ Moving to Another Chapter or Index . . . . . . . . . . . .49<br />
✧ Still Picture and Picture by Picture Viewing . . . . . .50<br />
✧ Search Forward and Reverse . . . . . . . . . . . . . . . . . .50<br />
✧ Repeat and Repeat A-B Commands . . . . . . . . . . . . .51<br />
✧ Shuffle Command . . . . . . . . . . . . . . . . . . . . . . . . . .51<br />
✧ Time Search Feature . . . . . . . . . . . . . . . . . . . . . . . .52<br />
✧ Zooming and Panning the Picture . . . . . . . . . . . . . .52<br />
✧ Favorite Track Selection Programs - Video . . . . . . .53<br />
✧ Erasing Favorite Track Selections - Video . . . . . . . .54<br />
✧ Title/Chapter/Disc Menus . . . . . . . . . . . . . . . . . . . .55<br />
✧ Changing the Camera Angle . . . . . . . . . . . . . . . . . .55<br />
✧ Changing the Audio Language Control . . . . . . . . . .56<br />
✧ Changing the Subtitle Control . . . . . . . . . . . . . . . . .56<br />
✧ Video CD Playback Control . . . . . . . . . . . . . . . . . .57<br />
✧ Playing an Audio CD . . . . . . . . . . . . . . . . . . . . . . .57<br />
✧ Favorite Track Selection Programs - Audio . . . . . . .58<br />
General Information<br />
✧ Troubleshooting . . . . . . . . . . . . . . . . . . . . . . . . .59<br />
✧Glossary of Television Terms . . . . . . . . . . . . . . . . . . . .60<br />
✧Index . . . . . . . . . . . . . . . . . . . . . . . . . . . . . . . . . . . . . .61<br />
✧Warranty . . . . . . . . . . . . . . . . . . . . . . . . . . . . . . . . . . . 62<br />
NOTE: This owner's manual may be used with several<br />
different television models. Not all features (and<br />
drawings) discussed in this manual will necessarily<br />
match those found with your television system. This is<br />
normal and does not require that you contact your<br />
dealer or request service.<br />
AutoLock, AutoPicture, AutoSound,<br />
are trademarks of <strong>Philips</strong> Consumer Electronics Company.<br />
Copyright © 2001 <strong>Philips</strong> Consumer Electronics Company.<br />
All rights reserved.<br />
5
FEATURES<br />
Audio/Video Jack Panel allows direct connections with<br />
accessory devices, providing quality TV picture and sound<br />
playback.<br />
Audio Volume Leveler (AVL) Control keeps the TV sound<br />
at an even level. Peaks and valleys that occur during program<br />
changes or commercial breaks are reduced, making for<br />
a more consistent, comfortable sound.<br />
AutoLockª allows you to block the viewing of certain<br />
channels or programs with certain ratings if you do not want<br />
your children to view inappropriate materials.<br />
Auto Programming scans (when activated) for all available<br />
channels from regular antenna or cable signals and stores<br />
only active broadcast stations in the TVÕs memory.<br />
AutoPictureª allows you to change the picture settings<br />
(color, tint, contrast, etc.) for various types of programming,<br />
such as sports, movies, multimedia (games), or weak signals<br />
with the push of one button.<br />
AutoSoundª allows you to select from three factory-set<br />
controls and a personal control that you set according to your<br />
own preferences through the on-screen Sound menu. The<br />
three factory-set controls (Voice, Music, and Theatre) enable<br />
you to tailor the TV sound so as to enhance the particular<br />
programming you are watching.<br />
Channel Edit allows you to add or delete channels from the<br />
list stored in the TVÕs memory. Channel Edit makes it easy<br />
to limit or expand the number of channels that are available<br />
to you when you press the Channel (+) or (Ð) buttons on your<br />
remote control.<br />
Closed Captioning allows the viewer to read TV program<br />
dialogue or voice conversations as on-screen text.<br />
Contrast + helps you sharpen the picture quality by making<br />
dark portions of the picture darker and light portions brighter.<br />
Infrared Remote Control controls your TV and the built in<br />
DVD player.<br />
On-screen Menu shows helpful messages and instructions<br />
for setting TV feature controls (can be viewed in English,<br />
French, or Spanish).<br />
Sleep Timer automatically turns the TV OFF after a set<br />
amount of time that you choose.<br />
Standard Broadcast (VHF/UHF) or Cable TV (CATV)<br />
channel capability allows for viewing by antenna or cable.<br />
Stereo capability, including a built-in audio amplifier and<br />
twin-speaker system, allows for the reception of TV programs<br />
broadcast in stereo sound.<br />
Surf Button allows you to easily switch among only the<br />
channels that are of interest to you (the ones that you have<br />
programmed into the TVÕs Surf control through the on-screen<br />
menu).<br />
Timer allows you to set your TV to turn itself ON and OFF<br />
once or daily like an alarm clock.<br />
DVD Player plays DVD discs, Video CDs, Audio CDs, etc.<br />
Create Favorite Track Programs and store them in the<br />
TV/DVD Players memory.<br />
Playable Disc Types<br />
This DVD Player will play Digital Video Discs (DVDs), Audio<br />
CDs, CD-Rs and CD-RW discs. In order to play a DVD or<br />
Audio CD on this DVD Player, make sure the Disc meets the<br />
requirements for the Region Code as described on page 4.<br />
The Discs should contain the logos shown below and meet<br />
the standards listed for each.<br />
Disc<br />
Type<br />
Digital<br />
Video<br />
Disc<br />
Audio<br />
CD<br />
Video<br />
CD<br />
Compact<br />
Disc<br />
Recordable<br />
Compact<br />
Disc<br />
Rewritable<br />
Logo<br />
Recordable<br />
Contents Disc Size<br />
Sound<br />
and<br />
Pictures<br />
Sound<br />
Sound<br />
and<br />
Pictures<br />
Sound<br />
and<br />
Pictures<br />
Sound<br />
and<br />
Pictures<br />
12 cm<br />
8 cm<br />
12 cm<br />
8 cm<br />
(singles)<br />
12 cm<br />
8 cm<br />
(singles)<br />
Maximum<br />
Playback Time<br />
Approx. 4 hours<br />
(single-sided)<br />
Approx. 8 hours<br />
(double-sided)<br />
Approx. 80 minutes<br />
(single-sided)<br />
Approx. 160 minutes<br />
(double-sided)<br />
74 minutes<br />
20 minutes<br />
74 minutes<br />
20 minutes<br />
12 cm 74 minutes<br />
Disc<br />
Segments<br />
DVDs are<br />
divided into Titles,<br />
which are divided<br />
into Chapters.<br />
Titles and Chapters<br />
are numbered.<br />
Audio CDs are<br />
divided into numbered<br />
Tracks, i.e., a track<br />
may be one song.<br />
Video CDs are<br />
divided into Tracks.<br />
CLEANING DISCS<br />
Some problems occur because the disc inside the player<br />
is dirty. To avoid these problems clean your discs<br />
regularly, in the following way:<br />
• When a disc becomes dirty, clean it with a CD<br />
cleaning cloth. Wipe the disc from the center out.<br />
Caution: Do not use solvents such as benzine, thinner,<br />
commercially available cleaners, or anti-static<br />
spray intended for analog discs.<br />
END-OF-LIFE DISPOSAL<br />
Your new television and its packing contain materials<br />
that can be recycled and reused. Specialized companies<br />
can recycle your product to increase the amount<br />
of reusable materials and minimize the amounts that<br />
need to be properly disposed.<br />
Your product also uses batteries that should not be<br />
thrown away when depleted, but should be handed in<br />
and disposed of as small chemical waste.<br />
When you replace your existing equipment, please<br />
find out about the local regulations regarding disposal<br />
of your old television, batteries, and packing materials.<br />
6
To adjust your TV picture controls,<br />
select a channel and follow these<br />
steps.<br />
ADJUSTING THE PICTURE<br />
Press the MENU button on the<br />
remote control to show the on-screen<br />
menu. PICTURE will be highlighted.<br />
Press the CURSOR RIGHT button<br />
and the menu will shift to the left.<br />
BRIGHTNESS will be highlighted and an<br />
adjustment bar will be shown to the right.<br />
Use the CURSOR LEFT or CUR-<br />
SOR RIGHT button to adjust the<br />
BRIGHTNESS level of the picture.<br />
After adjusting the BRIGHTNESS<br />
control, press the CURSOR DOWN<br />
button to select another picture adjustment:<br />
COLOR, PICTURE, SHARP-<br />
NESS, TINT, OR COLOR TEMP.<br />
Press the CURSOR LEFT or CUR-<br />
SOR RIGHT button to adjust the<br />
selected control.<br />
NOTE: The menu will show only five<br />
items at a time, so you will need to continue<br />
scrolling with the CURSOR<br />
DOWN button to adjust the TINT and<br />
COLOR TEMP.<br />
Press the STATUS button to<br />
remove the menu from the screen.<br />
1<br />
TV<br />
DVD<br />
PICTURE<br />
SOUND<br />
FEATURES<br />
INSTALL<br />
SLEEP<br />
SOURCE STATUS CC CLOCK<br />
REPEAT<br />
SOUND<br />
MENU<br />
REPEAT<br />
A-B<br />
SHUFFLE<br />
BRIGHTNESS<br />
COLOR<br />
PICTURE<br />
SHARPNESS<br />
TINT<br />
POWER<br />
SCAN<br />
PICTURE<br />
OK<br />
5<br />
2<br />
3<br />
PICTURE<br />
BRIGHTNESS 30<br />
COLOR<br />
PICTURE<br />
SHARPNESS<br />
STORE<br />
PICTURE<br />
BRIGHTNESS<br />
COLOR 30<br />
PICTURE<br />
SHARPNESS<br />
STORE<br />
PICTURE<br />
BRIGHTNESS<br />
COLOR<br />
PICTURE 30<br />
SHARPNESS<br />
STORE<br />
PICTURE<br />
BRIGHTNESS<br />
COLOR<br />
PICTURE<br />
SHARPNESS 30<br />
TINT<br />
Remember, when the bar scale is centered<br />
, the control settings<br />
are at normal, mid-range levels.<br />
Picture adjustments are described here.<br />
BRIGHTNESS Ð adds or subtracts<br />
light from the darkest part of the picture.<br />
COLOR Ð adds or eliminates color.<br />
4<br />
VOL<br />
CH<br />
MUTE<br />
AUDIO<br />
T/C FTS ANGLE<br />
PREVIOUS ZOOM SUBTITLE NEXT<br />
REVERSE STOP PLAY FORWARD<br />
INCR.SURR. PAUSE SURF<br />
OPEN/CLOSE<br />
PICTURE<br />
BRIGHTNESS<br />
COLOR<br />
PICTURE<br />
SHARPNESS<br />
TINT 0<br />
PICTURE<br />
COLOR<br />
PICTURE<br />
SHARPNESS<br />
TINT<br />
COLOR TEMP<br />
NORMAL<br />
PICTURE Ð improves the detail of the<br />
lightest parts of the picture.<br />
SHARPNESS Ð improves the detail in<br />
the picture.<br />
TINT Ð adjusts the picture to obtain<br />
natural skin tones.<br />
OR<br />
COLOR TEMP<br />
OR<br />
COLOR TEMP<br />
WARM<br />
COOL<br />
COLOR TEMP offers NORMAL,<br />
COOL, or WARM picture preferences.<br />
NORMAL Ð keeps whites, white.<br />
COOL Ð makes whites, bluish.<br />
WARM Ð makes whites, reddish.<br />
7
TURNING ON THE DYNAMIC NOISE REDUCTION CONTROL<br />
Due to many reasons, such as poor<br />
cable reception, the picture can<br />
sometimes appear slightly ÒspeckledÓ<br />
(an indication of signal noise in the<br />
picture). The DNR (Dynamic Noise<br />
Reduction) control can help eliminate<br />
this type of interference and improve<br />
the quality of the picture.<br />
Press the MENU button on the<br />
remote to show the on-screen menu.<br />
PICTURE will be highlighted.<br />
Press the CURSOR RIGHT button<br />
and the menu will shift to the left.<br />
BRIGHTNESS will be highlighted.<br />
Press the CURSOR DOWN button<br />
repeatedly until the DNR control<br />
is highlighted.<br />
Press the CURSOR RIGHT button<br />
to switch DNR ON or press the<br />
CURSOR LEFT button to switch<br />
DNR OFF.<br />
Press the STATUS button to<br />
remove the menu from the screen.<br />
1<br />
TV<br />
DVD<br />
PICTURE<br />
SOUND<br />
FEATURES<br />
INSTALL<br />
SLEEP<br />
SOURCE STATUS CC CLOCK<br />
REPEAT<br />
SOUND<br />
MENU<br />
REPEAT<br />
A-B<br />
SHUFFLE<br />
BRIGHTNESS<br />
COLOR<br />
PICTURE<br />
SHARPNESS<br />
TINT<br />
POWER<br />
SCAN<br />
PICTURE<br />
OK<br />
5<br />
2<br />
4<br />
PICTURE<br />
BRIGHTNESS 30<br />
COLOR<br />
PICTURE<br />
SHARPNESS<br />
TINT<br />
PICTURE<br />
PICTURE<br />
SHARPNESS<br />
TINT<br />
COLOR TEMP<br />
DNR ON<br />
DNR<br />
OR<br />
OFF<br />
3<br />
VOL<br />
CH<br />
MUTE<br />
T/C AUDIO FTS ANGLE<br />
PREVIOUS ZOOM SUBTITLE NEXT<br />
REVERSE<br />
STOP<br />
PLAY<br />
FORWARD<br />
INCR.SURR.<br />
PAUSE<br />
SURF<br />
OPEN/CLOSE<br />
8
The Contrast + Control helps you<br />
sharpen the picture quality by making<br />
dark portions of the picture darker<br />
and light portions of the picture<br />
brighter.<br />
TURNING ON THE CONTRAST + CONTROL<br />
Press the MENU button on the<br />
remote control to show the on-screen<br />
menu. PICTURE will be highlighted.<br />
Press the CURSOR RIGHT button<br />
and the menu will shift to the left.<br />
BRIGHTNESS will be highlighted.<br />
Press the CURSOR DOWN button<br />
repeatedly until the Contrast +<br />
control is highlighted.<br />
Press the CURSOR RIGHT button<br />
to switch between ON and OFF.<br />
Press the STATUS button to<br />
remove the menu from the screen.<br />
TV<br />
DVD<br />
PICTURE<br />
SOUND<br />
FEATURES<br />
INSTALL<br />
SLEEP<br />
SOURCE STATUS CC CLOCK<br />
REPEAT<br />
REPEAT<br />
A-B<br />
SHUFFLE<br />
BRIGHTNESS<br />
COLOR<br />
PICTURE<br />
SHARPNESS<br />
TINT<br />
POWER<br />
SCAN<br />
PICTURE<br />
BRIGHTNESS 30<br />
COLOR<br />
PICTURE<br />
SHARPNESS<br />
TINT<br />
PICTURE<br />
SHARPNESS<br />
TINT<br />
COLOR TEMP<br />
DNR<br />
CONTRAST +<br />
ON<br />
ON<br />
1<br />
SOUND<br />
MENU<br />
PICTURE<br />
OK<br />
2<br />
4<br />
CONTRAST +<br />
OR<br />
OFF<br />
3<br />
VOL<br />
CH<br />
MUTE<br />
AUDIO<br />
T/C FTS ANGLE<br />
PREVIOUS ZOOM SUBTITLE NEXT<br />
5<br />
REVERSE<br />
STOP<br />
PLAY<br />
FORWARD<br />
INCR.SURR.<br />
PAUSE<br />
SURF<br />
OPEN/CLOSE<br />
9
Your television comes with an onscreen<br />
clock. During normal operation,<br />
the clock appears on the screen<br />
when the STATUS button is pressed or<br />
if the TIMER DISPLAY control is<br />
turned ON.<br />
THE TIMER – SETTING THE CLOCK<br />
Press the MENU button on the<br />
remote control to show the on-screen<br />
menu.<br />
Press the CURSOR DOWN button<br />
twice to highlight FEATURES.<br />
Press the CURSOR RIGHT button<br />
and the menu will shift to the left.<br />
TIMER will be highlighted.<br />
With TIMER selected, press the<br />
CURSOR RIGHT button again to<br />
shift the display left and highlight the<br />
TIME control.<br />
Press the CURSOR RIGHT button<br />
again to highlight the time indicator<br />
area.<br />
Press the CURSOR LEFT or<br />
CURSOR RIGHT button to select<br />
the position or digit you wish to enter.<br />
Press the CURSOR UP or CUR-<br />
SOR DOWN button to select the<br />
digits for the time. Or press the<br />
NUMBERED buttons to enter the<br />
correct time.<br />
Press the CURSOR RIGHT button<br />
to move to the AM or PM position.<br />
Press the CURSOR UP or<br />
DOWN button to set AM or PM.<br />
10 Press the STATUS button to<br />
remove the menu from the screen.<br />
1<br />
6<br />
7<br />
9<br />
TV<br />
DVD<br />
2<br />
PICTURE<br />
SOUND<br />
FEATURES<br />
INSTALL<br />
SLEEP<br />
SOURCE STATUS CC CLOCK<br />
REPEAT<br />
VOL<br />
SOUND<br />
MENU<br />
REPEAT<br />
A-B<br />
MUTE<br />
PICTURE<br />
T/C AUDIO FTS ANGLE<br />
PREVIOUS ZOOM SUBTITLE NEXT<br />
REVERSE<br />
INCR.SURR.<br />
STOP<br />
PAUSE<br />
SHUFFLE<br />
PLAY<br />
OPEN/CLOSE<br />
TIMER<br />
AutoLock<br />
CLOSED CAP<br />
FORMAT<br />
BLUE MUTE<br />
POWER<br />
OK<br />
SCAN<br />
A/CH<br />
SURF<br />
CH<br />
FORWARD<br />
10<br />
7<br />
7<br />
9<br />
4<br />
3<br />
FEATURES<br />
TIMER<br />
TIMER<br />
AutoLock<br />
CLOSED CAP<br />
FORMAT<br />
BLUE MUTE<br />
5<br />
6<br />
FEATURES<br />
TIMER<br />
TIME<br />
START TIME<br />
STOP TIME<br />
CHANNEL<br />
ACTIVATE<br />
8<br />
FEATURES<br />
TIMER<br />
TIME<br />
START TIME<br />
STOP TIME<br />
CHANNEL<br />
ACTIVATE<br />
TIME<br />
START TIME<br />
STOP TIME<br />
CHANNEL<br />
TUNER MODE<br />
_ _:_ _ AM<br />
10:30 AM<br />
11<br />
NOTE: The TIME (Clock) feature<br />
can be accessed directly by<br />
pressing the CLOCK button on the<br />
remote control, and then by simply<br />
following steps 5 through 10 to<br />
complete the task.<br />
SMART HELP<br />
Remember, be sure to press<br />
0 first and then the hour number<br />
for single-digit entries.<br />
The TVÕs clock settings may be lost<br />
when the TV is unplugged (or when<br />
AC power to the set is interrupted).<br />
POWER<br />
SLEEP<br />
TV SOURCE STATUS CC CLOCK<br />
REPEAT REPEAT SHUFFLE SCAN<br />
DVD<br />
A-B<br />
11<br />
FEATURES<br />
TIMER<br />
TIME<br />
START TIME<br />
STOP TIME<br />
CHANNEL<br />
ACTIVATE<br />
_ _:_ _ AM<br />
SOUND<br />
PICTURE<br />
10
Just as you would an alarm clock,<br />
you can set the TV to turn itself<br />
ON once or at the same time every<br />
day. Follow these steps to set the<br />
Start Time.<br />
THE TIMER – SETTING THE START TIME<br />
Press the MENU button on the<br />
remote control to show the onscreen<br />
menu.<br />
Press the CURSOR DOWN<br />
button twice to highlight FEA-<br />
TURES.<br />
Press the CURSOR RIGHT<br />
button and the menu will shift to<br />
the left. TIMER will be highlighted.<br />
Press the CURSOR RIGHT<br />
button again to shift the display<br />
left. Then press the CURSOR<br />
DOWN button once to highlight<br />
the START TIME control.<br />
Press the CURSOR RIGHT<br />
button again to highlight the time<br />
indicator area.<br />
Press the CURSOR RIGHT<br />
or CURSOR LEFT button to<br />
move among the positions where<br />
the time is input.<br />
1<br />
TV<br />
DVD<br />
PICTURE<br />
SOUND<br />
FEATURES<br />
INSTALL<br />
SLEEP<br />
SOURCE STATUS CC CLOCK<br />
REPEAT<br />
SOUND<br />
MENU<br />
REPEAT<br />
A-B<br />
SHUFFLE<br />
TIMER<br />
AutoLock<br />
CLOSED CAP<br />
FORMAT<br />
BLUE MUTE<br />
POWER<br />
SCAN<br />
PICTURE<br />
OK<br />
A/CH<br />
10<br />
7<br />
7<br />
9<br />
4<br />
3<br />
5<br />
6<br />
FEATURES<br />
TIMER<br />
AutoLock<br />
CLOSED CAP<br />
FORMAT<br />
BLUE MUTE<br />
FEATURES<br />
TIMER<br />
TIME<br />
START TIME<br />
STOP TIME<br />
CHANNEL<br />
ACTIVATE<br />
8<br />
FEATURES<br />
TIMER<br />
TIME<br />
START TIME<br />
STOP TIME<br />
CHANNEL<br />
ACTIVATE<br />
TIME<br />
START TIME<br />
STOP TIME<br />
CHANNEL<br />
ACTIVATE<br />
_ _:_ _ AM<br />
_ _:_ _ AM<br />
Press the CURSOR UP or<br />
CURSOR DOWN button to select<br />
the digits for the time. Or press the<br />
NUMBERED buttons to enter the<br />
correct time.<br />
Press the CURSOR RIGHT<br />
button to move to the AM or PM<br />
position.<br />
Press the CURSOR UP or<br />
DOWN button to set AM or PM.<br />
7<br />
6<br />
4<br />
9<br />
2<br />
VOL<br />
MUTE<br />
T/C AUDIO FTS ANGLE<br />
PREVIOUS ZOOM SUBTITLE NEXT<br />
REVERSE<br />
INCR.SURR.<br />
STOP<br />
PAUSE<br />
PLAY<br />
OPEN/CLOSE<br />
SURF<br />
CH<br />
FORWARD<br />
FEATURES<br />
TIMER<br />
TIME<br />
START TIME<br />
STOP TIME<br />
CHANNEL<br />
ACTIVATE<br />
10:30 AM<br />
10 Press the STATUS button to<br />
remove the menu from the screen.<br />
11
Use the START TIME control to<br />
set the TV to turn itself ON<br />
once or at the same time every day<br />
(see page 13 for details). The following<br />
steps will guide you in setting<br />
the TV to turn itself OFF once<br />
or at the same time every day.<br />
THE TIMER – SETTING THE STOP TIME<br />
Press the MENU button on the<br />
remote control to show the onscreen<br />
menu.<br />
Press the CURSOR DOWN<br />
button twice to highlight FEA-<br />
TURES.<br />
PICTURE<br />
SOUND<br />
FEATURES<br />
INSTALL<br />
TIMER<br />
AutoLock<br />
CLOSED CAP<br />
FORMAT<br />
BLUE MUTE<br />
FEATURES<br />
TIMER<br />
AutoLock<br />
CLOSED CAP<br />
FORMAT<br />
BLUE MUTE<br />
TIME<br />
START TIME<br />
STOP TIME<br />
CHANNEL<br />
ACTIVATE<br />
Press the CURSOR RIGHT<br />
button and the menu will shift to<br />
the left. TIMER will be highlighted.<br />
Press the CURSOR RIGHT<br />
button again to shift the display<br />
left. Then press the CURSOR<br />
DOWN button once twice to highlight<br />
the STOP TIME control.<br />
Press the CURSOR RIGHT<br />
button again to highlight the time<br />
indicator area.<br />
Press the CURSOR RIGHT<br />
or CURSOR LEFT button to<br />
move among the positions where<br />
the time is input.<br />
Press the CURSOR UP or<br />
CURSOR DOWN button to select<br />
the digits for the time. Or press the<br />
NUMBERED buttons to enter the<br />
correct time.<br />
1<br />
6<br />
4<br />
7<br />
9<br />
TV<br />
DVD<br />
2<br />
SLEEP<br />
SOURCE STATUS CC CLOCK<br />
REPEAT<br />
VOL<br />
SOUND<br />
MENU<br />
REPEAT<br />
A-B<br />
MUTE<br />
PICTURE<br />
T/C AUDIO FTS ANGLE<br />
PREVIOUS ZOOM SUBTITLE NEXT<br />
REVERSE<br />
STOP<br />
SHUFFLE<br />
PLAY<br />
POWER<br />
OK<br />
SCAN<br />
A/CH<br />
CH<br />
FORWARD<br />
10<br />
7<br />
7<br />
9<br />
4<br />
3<br />
5<br />
6<br />
FEATURES<br />
TIMER<br />
TIME<br />
START TIME<br />
STOP TIME<br />
CHANNEL<br />
ACTIVATE<br />
8<br />
FEATURES<br />
TIMER<br />
TIME<br />
START TIME<br />
STOP TIME<br />
CHANNEL<br />
ACTIVATE<br />
FEATURES<br />
TIMER<br />
TIME<br />
START TIME<br />
STOP TIME<br />
CHANNEL<br />
ACTIVATE<br />
_ _:_ _ AM<br />
_ _:_ _ AM<br />
10:30 AM<br />
Press the CURSOR RIGHT<br />
button to move to the AM or PM<br />
position.<br />
INCR.SURR.<br />
PAUSE<br />
OPEN/CLOSE<br />
SURF<br />
Press the CURSOR UP or<br />
DOWN button to set AM or PM.<br />
10 Press the STATUS button to<br />
remove the menu from the screen.<br />
12
THE TIMER – SELECTING THE START UP CHANNEL<br />
You can select a specific channel<br />
that the television will tune to<br />
when the timer turns the set ON.<br />
Follow these steps to select the<br />
channel.<br />
Press the MENU button on the<br />
remote control to show the onscreen<br />
menu.<br />
Press the CURSOR DOWN<br />
button twice to highlight FEA-<br />
TURES.<br />
Press the CURSOR RIGHT<br />
button and the menu will shift to<br />
the left. TIMER will be highlighted.<br />
Press the CURSOR RIGHT<br />
button again to shift the menu to<br />
the left. Then press the CURSOR<br />
DOWN button repeatedly until the<br />
CHANNEL control is highlighted.<br />
Press the NUMBERED buttons<br />
to enter the desired start-up<br />
channel. Or, press the CURSOR<br />
RIGHT button repeatedly to enter<br />
the start-up channel you want.<br />
Press the STATUS button to<br />
remove the menu from the screen.<br />
1<br />
4<br />
TV<br />
DVD<br />
2<br />
PICTURE<br />
SOUND<br />
FEATURES<br />
INSTALL<br />
SLEEP<br />
SOURCE STATUS CC CLOCK<br />
REPEAT<br />
VOL<br />
SOUND<br />
MENU<br />
REPEAT<br />
A-B<br />
MUTE<br />
SHUFFLE<br />
POWER<br />
SCAN<br />
PICTURE<br />
T/C AUDIO FTS ANGLE<br />
PREVIOUS ZOOM SUBTITLE NEXT<br />
TIMER<br />
AutoLock<br />
CLOSED CAP<br />
FORMAT<br />
BLUE MUTE<br />
OK<br />
A/CH<br />
CH<br />
6<br />
3<br />
5<br />
4<br />
5<br />
FEATURES<br />
TIMER<br />
AutoLock<br />
CLOSED CAP<br />
FORMAT<br />
BLUE MUTE<br />
FEATURES<br />
TIMER<br />
TIME<br />
START TIME<br />
STOP TIME<br />
CHANNEL<br />
ACTIVATE<br />
TIME<br />
START TIME<br />
STOP TIME<br />
CHANNEL<br />
ACTIVATE<br />
_ _:_ _ AM<br />
FEATURES<br />
TIMER<br />
TIME<br />
START TIME<br />
STOP TIME<br />
CHANNEL 12<br />
ACTIVATE<br />
FEATURES<br />
TIMER<br />
TIME<br />
START TIME 10:30 AM<br />
STOP TIME<br />
CHANNEL 13<br />
ACTIVATE<br />
REVERSE<br />
STOP<br />
PLAY<br />
FORWARD<br />
INCR.SURR.<br />
PAUSE<br />
SURF<br />
OPEN/CLOSE<br />
13
After you have set the Time, Start<br />
Time, Stop Time, and Start<br />
Channel, the timer must be set to<br />
come on ONCE or DAILY, or<br />
turned OFF through the ACTIVATE<br />
control.<br />
THE TIMER – SETTING ACTIVATE TO ON OR OFF<br />
Press the MENU button on the<br />
remote control to show the onscreen<br />
menu.<br />
Press the CURSOR DOWN<br />
button twice to highlight FEA-<br />
TURES.<br />
Press the CURSOR RIGHT<br />
button and the menu will shift to<br />
the left. TIMER will be highlighted.<br />
Press the CURSOR RIGHT<br />
button again to shift the display to<br />
the left. Then press the CURSOR<br />
DOWN button repeatedly until the<br />
ACTIVATE control is highlighted.<br />
Press the CURSOR RIGHT<br />
button again to set ACTIVATE to<br />
ONCE; press the CURSOR<br />
RIGHT button again for DAILY;<br />
and press the CURSOR RIGHT<br />
button again to toggle ACTIVATE<br />
to OFF.<br />
1<br />
TV<br />
DVD<br />
PICTURE<br />
SOUND<br />
FEATURES<br />
INSTALL<br />
SLEEP<br />
SOURCE STATUS CC CLOCK<br />
REPEAT<br />
SOUND<br />
MENU<br />
REPEAT<br />
A-B<br />
SHUFFLE<br />
TIMER<br />
AutoLock<br />
CLOSED CAP<br />
FORMAT<br />
BLUE MUTE<br />
POWER<br />
SCAN<br />
PICTURE<br />
OK<br />
6<br />
3<br />
4<br />
5<br />
FEATURES<br />
TIMER<br />
AutoLock<br />
CLOSED CAP<br />
FORMAT<br />
BLUE MUTE<br />
FEATURES<br />
TIMER<br />
TIME<br />
START TIME<br />
STOP TIME<br />
CHANNEL<br />
ACTIVATE<br />
TIME<br />
START TIME<br />
STOP TIME<br />
CHANNEL<br />
ACTIVATE<br />
FEATURES<br />
TIMER<br />
TIME<br />
START TIME<br />
STOP TIME<br />
CHANNEL<br />
ACTIVATE<br />
OR<br />
_ _:_ _ AM<br />
OFF<br />
Press the STATUS button to<br />
remove the menu from the screen.<br />
4<br />
2<br />
VOL<br />
MUTE<br />
T/C AUDIO FTS ANGLE<br />
PREVIOUS ZOOM SUBTITLE NEXT<br />
CH<br />
ACTIVATE<br />
ACTIVATE<br />
OR<br />
ONCE<br />
DAILY<br />
REVERSE<br />
STOP<br />
PLAY<br />
FORWARD<br />
SMART HELP<br />
INCR.SURR.<br />
PAUSE<br />
SURF<br />
Remember, before setting<br />
the TIMER controls,<br />
the TVÕs clock must be set to the<br />
correct time (see page 10).<br />
OPEN/CLOSE<br />
Try it! After following the steps on<br />
pages 10-15, use your TV as an<br />
alarm clock.<br />
14
THE TIMER – TURNING ON THE TIMER DISPLAY<br />
After the TVÕs clock has been set,<br />
you can use your TV as a clock.<br />
The TIMER DISPLAY control<br />
allows you to permanently display<br />
the time in the upper right corner<br />
of the screen.<br />
Press the MENU button on<br />
the remote to show the on-screen<br />
menu.<br />
Press the CURSOR DOWN<br />
button twice to highlight FEA-<br />
TURES.<br />
Press the CURSOR RIGHT<br />
button and the menu will shift to<br />
the left. TIMER will be highlighted.<br />
Press the CURSOR RIGHT<br />
button again to shift the menu left.<br />
Then press the CURSOR DOWN<br />
button repeatedly until the DIS-<br />
PLAY control is highlighted.<br />
Press the CURSOR RIGHT<br />
or CURSOR LEFT button to turn<br />
the TIMER DISPLAY ON or OFF.<br />
Press the STATUS button to<br />
remove the menu from the screen.<br />
1<br />
TV<br />
DVD<br />
PICTURE<br />
SOUND<br />
FEATURES<br />
INSTALL<br />
SLEEP<br />
SOURCE STATUS CC CLOCK<br />
REPEAT<br />
SOUND<br />
MENU<br />
REPEAT<br />
A-B<br />
SHUFFLE<br />
TIMER<br />
AutoLock<br />
CLOSED CAP<br />
FORMAT<br />
BLUE MUTE<br />
POWER<br />
SCAN<br />
PICTURE<br />
OK<br />
6<br />
3<br />
4<br />
5<br />
FEATURES<br />
TIMER<br />
AutoLock<br />
CLOSED CAP<br />
FORMAT<br />
BLUE MUTE<br />
FEATURES<br />
TIMER<br />
TIME<br />
START TIME<br />
STOP TIME<br />
CHANNEL<br />
ACTIVATE<br />
FEATURES<br />
TIMER<br />
START TIME<br />
STOP TIME<br />
CHANNEL<br />
ACTIVATE<br />
DISPLAY<br />
TIME<br />
START TIME<br />
STOP TIME<br />
CHANNEL<br />
ACTIVATE<br />
_ _:_ _ AM<br />
ON<br />
OR<br />
SMART HELP<br />
Remember, be sure you<br />
have set the TVÕs clock with<br />
the correct current time. (Refer to<br />
page 10 to set the correct time.)<br />
4<br />
2<br />
VOL<br />
CH<br />
MUTE<br />
AUDIO<br />
T/C FTS ANGLE<br />
PREVIOUS ZOOM SUBTITLE NEXT<br />
REVERSE STOP PLAY FORWARD<br />
INCR.SURR. PAUSE SURF<br />
OPEN/CLOSE<br />
DISPLAY<br />
OFF<br />
15
USING THE CLOSED CAPTIONING CONTROL<br />
Closed Captioning (CC) allows<br />
you to read the voice content of<br />
television programs on the TV<br />
screen. Designed to help the hearing<br />
impaired, this feature uses onscreen<br />
Òtext boxesÓ to show dialogue<br />
and conversations while the<br />
TV program is in progress.<br />
NOTE: Not all TV programs and product commercials are broadcast with Closed<br />
Captioning (CC). Nor are all Closed Captioning MODEs (CAPTION 1Ð4 or TEXT<br />
1Ð4) necessarily being used by broadcast stations during the transmission of a program<br />
offering Closed Captioning. Refer to your areaÕs TV program listings for the<br />
stations and times of shows being broadcast with Closed Captioning.<br />
Press the MENU button on<br />
the remote control to show the onscreen<br />
menu.<br />
Press the CURSOR DOWN<br />
button twice to highlight FEA-<br />
TURES.<br />
PICTURE<br />
SOUND<br />
FEATURES<br />
INSTALL<br />
TIMER<br />
AutoLock<br />
CLOSED CAP<br />
FORMAT<br />
BLUE MUTE<br />
FEATURES<br />
TIMER<br />
AutoLock<br />
CLOSED CAP<br />
FORMAT<br />
BLUE MUTE<br />
TIME<br />
START TIME<br />
STOP TIME<br />
CHANNEL<br />
ACTIVATE<br />
Press the CURSOR RIGHT<br />
button and the menu will shift to<br />
the left.<br />
Press the CURSOR DOWN<br />
button repeatedly until the<br />
CLOSED CAP control is highlighted.<br />
Press the CURSOR RIGHT<br />
button again. The menu will shift<br />
to the left and CAPTION MODE<br />
will be highlighted. Then press the<br />
CURSOR RIGHT button to highlight<br />
CAPTION MODEs.<br />
Press the CURSOR UP or<br />
CURSOR DOWN button to<br />
select a CAPTION MODE: CC1,<br />
CC2, CC3, CC4, CC MUTE,<br />
TXT1, TXT2, TXT3, or TXT4. CC<br />
DISPLAY turns text OFF or ON if<br />
the TV station broadcasting on the<br />
channel is making CLOSED CAP-<br />
TIONING available. With CC DIS-<br />
PLAY highlighted, press the CUR-<br />
SOR RIGHT button to toggle<br />
Closed Captioning ON or OFF.<br />
1<br />
7<br />
4<br />
POWER<br />
SLEEP<br />
TV SOURCE STATUS CC CLOCK<br />
REPEAT<br />
DVD<br />
SOUND<br />
MENU<br />
VOL<br />
2<br />
REPEAT SHUFFLE SCAN<br />
A-B<br />
PICTURE<br />
OK<br />
CH<br />
MUTE<br />
AUDIO<br />
T/C FTS ANGLE<br />
PREVIOUS ZOOM SUBTITLE NEXT<br />
REVERSE STOP PLAY FORWARD<br />
INCR.SURR. PAUSE SURF<br />
OPEN/CLOSE<br />
6<br />
3<br />
5<br />
You can press the<br />
CC button on the<br />
remote control to<br />
turn the CC text<br />
ON or OFF.<br />
FEATURES<br />
TIMER<br />
AutoLock<br />
CLOSED CAP<br />
FORMAT<br />
BLUE MUTE<br />
FEATURES<br />
CLOSED CAP<br />
CAPTION MODE<br />
CC DISPLAY<br />
NOTE: The CC MUTE<br />
option can be used to set the<br />
TV to turn the CLOSED<br />
CAPTIONING mode ON<br />
whenever the MUTE button<br />
is pressed.<br />
FEATURES<br />
CLOSED CAP<br />
CAPTION MODE<br />
CC DISPLAY<br />
CAPTION MPDE<br />
CC DISPLAY<br />
CC1<br />
CC2<br />
CC3<br />
CC1<br />
CC2<br />
CC3<br />
CC4<br />
CC MUTE<br />
CC1<br />
CC2<br />
CC3<br />
CC4<br />
CC MUTE<br />
TXT1<br />
TXT2<br />
TXT3<br />
TXT4<br />
NOTE: You also can press the CC<br />
button on the remote control to turn<br />
the CC TEXT option ON or OFF.<br />
CC OFF<br />
CAPTION Mode<br />
Example Display<br />
TEXT Mode Example Display -<br />
The TV screen will be<br />
blocked from viewing.<br />
Press the STATUS button to<br />
remove the menu from the screen.<br />
CC ON<br />
CLOSE CAPTION PROGRAMS ON WXYZ<br />
ALL ITEMS ARE EASTERN STANDARD TIME (EST)<br />
CHECK LOCAL LISTINGS<br />
FOR TIMES IN YOUR AREA<br />
6:00 TOP OF THE MORNING<br />
10:00 THE BEST LITTLE CALL-IN SHOW EVER<br />
12:00 NOONDAY NEWS<br />
1:30 AS YOUR LIFE TURNS MY WORLD AROUND<br />
JOHN: Why did they move the<br />
meeting up to this week?<br />
MARSHA: I don't know, but they<br />
are pushing to close the deal.<br />
6:00 WORLD NEWS FOR TODAY<br />
9:00 PLAYHOUSE MOVIE OF THE WEEK<br />
16
You can change the screen format<br />
size to match the type of<br />
program youÕre watching. Select<br />
the normal 4:3 aspect ratio or<br />
expand the 4:3 aspect ratio to completely<br />
fill the screen. There also is<br />
a compressed 16:9 aspect ratio,<br />
which allows movies to be viewed<br />
in their full width (known as letterbox<br />
style).<br />
Press the MENU button on<br />
the remote control to show the onscreen<br />
menu.<br />
Press the CURSOR DOWN<br />
button twice to highlight FEA-<br />
TURES.<br />
Press the CURSOR RIGHT<br />
button and the menu will shift to<br />
the left.<br />
Press the CURSOR DOWN<br />
button repeatedly until the FOR-<br />
MAT control is highlighted.<br />
Press the CURSOR RIGHT<br />
button repeatedly to toggle among<br />
the three screen format sizes Ð 4:3,<br />
EXPAND 4:3, or COMPRESS<br />
16:9.<br />
Press the STATUS button to<br />
remove the menu from the screen.<br />
SELECTING THE SCREEN FORMAT SIZE<br />
1<br />
4<br />
PICTURE<br />
SOUND<br />
FEATURES<br />
INSTALL<br />
TV<br />
DVD<br />
2<br />
SLEEP<br />
SOURCE STATUS CC CLOCK<br />
REPEAT<br />
VOL<br />
SOUND<br />
MENU<br />
REPEAT<br />
A-B<br />
MUTE<br />
TIMER<br />
AutoLock<br />
CLOSED CAP<br />
FORMAT<br />
BLUE MUTE<br />
SHUFFLE<br />
POWER<br />
SCAN<br />
PICTURE<br />
OK<br />
T/C AUDIO FTS ANGLE<br />
PREVIOUS ZOOM SUBTITLE NEXT<br />
CH<br />
6<br />
3<br />
5<br />
FEATURES<br />
TIMER<br />
AutoLock<br />
CLOSED CAP<br />
FORMAT<br />
BLUE MUTE<br />
TIME<br />
START TIME<br />
STOP TIME<br />
CHANNEL<br />
ACTIVATE<br />
FEATURES<br />
TIMER<br />
AutoLock<br />
CLOSED CAP<br />
FORMAT 4:3<br />
BLUE MUTE<br />
OR<br />
FORMAT EXPAND 4:3<br />
OR<br />
FORMAT COMPRESS 16:9<br />
REVERSE<br />
STOP<br />
PLAY<br />
FORWARD<br />
INCR.SURR.<br />
PAUSE<br />
SURF<br />
OPEN/CLOSE<br />
SMART HELP<br />
Without the on-screen<br />
menu display showing, you<br />
also can press the CURSOR UP or<br />
CURSOR DOWN button on the<br />
remote control to toggle among the<br />
screen sizes 4:3, Expand 4:3, or<br />
Compress 16:9.<br />
FORMAT 4:3 FORMAT EXPAND 4:3 FORMAT COMPRESS 16:9<br />
17
ACTIVATING THE BLUE MUTE CONTROL<br />
The Blue Mute feature will eliminate<br />
annoying snow from the<br />
screen when no video signal is present<br />
by displaying a pleasant blue<br />
screen. This occurs in cases such as<br />
when a VCR tape is removed or an<br />
antenna signal is broken. To turn the<br />
Blue Mute feature ON or OFF, follow<br />
the steps below.<br />
Press the MENU button on<br />
the remote control to show the onscreen<br />
menu.<br />
PICTURE<br />
SOUND<br />
FEATURES<br />
INSTALL<br />
TIMER<br />
AutoLock<br />
CLOSED CAP<br />
FORMAT<br />
BLUE MUTE<br />
FEATURES<br />
TIMER<br />
AutoLock<br />
CLOSED CAP<br />
FORMAT<br />
BLUE MUTE<br />
TIME<br />
START TIME<br />
STOP TIME<br />
CHANNEL<br />
ACTIVATE<br />
Press the CURSOR DOWN<br />
button twice to highlight FEA-<br />
TURES.<br />
Press the CURSOR RIGHT<br />
button and the menu will shift to<br />
the left.<br />
TV<br />
DVD<br />
SLEEP<br />
SOURCE STATUS CC CLOCK<br />
REPEAT<br />
REPEAT<br />
A-B<br />
SHUFFLE<br />
POWER<br />
SCAN<br />
6<br />
FEATURES<br />
TIMER<br />
AutoLock<br />
CLOSED CAP<br />
FORMAT<br />
BLUE MUTE<br />
OFF<br />
Press the CURSOR DOWN<br />
button repeatedly until the BLUE<br />
MUTE control is highlighted.<br />
Press the CURSOR RIGHT<br />
button repeatedly to toggle the<br />
Blue Mute option ON or OFF.<br />
Press the STATUS button to<br />
remove the menu from the screen.<br />
1<br />
4<br />
2<br />
VOL<br />
SOUND<br />
MENU<br />
MUTE<br />
PICTURE<br />
OK<br />
T/C AUDIO FTS ANGLE<br />
PREVIOUS ZOOM SUBTITLE NEXT<br />
CH<br />
3<br />
5<br />
FEATURES<br />
TIMER<br />
AutoLock<br />
CLOSED CAP<br />
FORMAT<br />
BLUE MUTE<br />
OR<br />
ON<br />
BLUE MUTE OFF<br />
-with no video signal; screen is<br />
snowing looking.<br />
REVERSE<br />
STOP<br />
PLAY<br />
FORWARD<br />
INCR.SURR.<br />
PAUSE<br />
SURF<br />
OPEN/CLOSE<br />
BLUE MUTE ON<br />
-with no video signal; screen is<br />
a pleasant blue color.<br />
18
USING THE SLEEP TIMER<br />
Have you ever fallen asleep in<br />
front of the TV, only to have it<br />
wake you up at two in the morning<br />
with a test pattern sound screeching<br />
in your ears? Well, your TV can<br />
enable you to avoid that discomfort<br />
by automatically turning itself off.<br />
With the Sleep Timer feature, you<br />
can set a timer to automatically<br />
switch the TV OFF after a period<br />
of time you choose (15-minute<br />
increments up to 60 minutes, then<br />
30-minute increments up to 90 minutes,<br />
then 60-minute increments up<br />
to 240 minutes).<br />
2<br />
1<br />
SLEEP<br />
SLEEP OFF<br />
POWER<br />
SLEEP 15<br />
TV<br />
SOURCE STATUS CC CLOCK<br />
SLEEP 30<br />
Press the SLEEP button on<br />
the remote control. The SLEEP<br />
timer on-screen display will appear<br />
in the upper part of the screen.<br />
Within five seconds, press the<br />
SLEEP button repeatedly to pick<br />
the amount of time (15-minute<br />
increments up to 60 minutes, then<br />
30-minute increments up to 90 minutes,<br />
then 60-minute increments up<br />
to 240 minutes) before the TV will<br />
turn itself off.<br />
An on-screen countdown will<br />
appear during the last minute<br />
before the TV shuts itself off.<br />
REPEAT<br />
DVD<br />
SOUND<br />
MENU<br />
VOL<br />
REPEAT SHUFFLE SCAN<br />
A-B<br />
A/CH<br />
PICTURE<br />
OK<br />
CH<br />
MUTE<br />
AUDIO<br />
T/C FTS ANGLE<br />
PREVIOUS ZOOM SUBTITLE NEXT<br />
REVERSE STOP PLAY FORWARD<br />
INCR.SURR. PAUSE SURF<br />
SLEEP 45<br />
SLEEP 60<br />
SLEEP 90<br />
OPEN/CLOSE<br />
SMART HELP<br />
To see how many minutes<br />
remain before the TV<br />
shuts itself off, press the STATUS<br />
button.<br />
SLEEP 120<br />
During the last minute of a<br />
SLEEP timer setting, an on-screen<br />
countdown will be displayed.<br />
During the last 10 seconds of a<br />
SLEEP timer setting, an on-screen<br />
display will read GOOD BYE.<br />
SLEEP 180<br />
SLEEP 50<br />
GOOD BYE<br />
SLEEP 9<br />
SLEEP 240<br />
19
The AutoLock feature receives<br />
and processes data sent by<br />
broadcasters or other program<br />
providers that contain program content<br />
advisories. When programmed<br />
by the viewer, a TV with AutoLock<br />
can respond to the content advisories<br />
and block program content that may<br />
be found objectionable (such as<br />
offensive language, violence, sexual<br />
situations, etc.). This is a great feature<br />
to censor the type of programming<br />
children may watch.<br />
In the AutoLock section, you’ll<br />
learn how to block channels and programming<br />
that is not rated, is unrated,<br />
or has no rating. You will also<br />
find out how to turn these blocking<br />
features ON or OFF. Following are<br />
brief explanations of some terms and<br />
ratings related to the AutoLock<br />
feature.<br />
AutoLock offers various<br />
Blocking Options from which to<br />
choose:<br />
BLOCKING: The BLOCKING control<br />
is what can be thought of as the<br />
Òmaster switchÓ for AutoLockª.<br />
This control affects the settings you<br />
have chosen for blocking programs<br />
according to movie ratings or TV<br />
ratings, or for blocking programs<br />
that have no rating or are unrated.<br />
When the BLOCKING control is<br />
OFF, the blocking or censoring of<br />
programs is disabled. When the<br />
BLOCKING control is ON, blocking<br />
will occur according to the settings<br />
you have chosen.<br />
BLOCK UNRATED: ALL unrated<br />
programs will be blocked if this feature<br />
is set to ON.<br />
UNRATED programming is encoded<br />
with information from the MPAA<br />
(Motion Picture Association of<br />
America) or TV broadcasters, but it<br />
does not have a specific rating. In<br />
other words, the MPAA or the TV<br />
broadcasters have chosen not to<br />
assign a rating to the programming.<br />
NO RATING: ALL programming<br />
with no content advisory data can be<br />
blocked if NO RATING is set to<br />
ON.<br />
Programming that has No Rating is<br />
not encoded with any rating information<br />
from the MPAA or the<br />
Parental Guidelines. Any programming<br />
could fall into this category.<br />
You also can block individual<br />
channels or block programming<br />
based on ratings of the MPAA and<br />
TV broadcasters. (See a description<br />
of the ratings on this page.)<br />
UNDERSTANDING AUTOLOCK<br />
AutoLock<br />
MOVIE RATING<br />
G<br />
PG<br />
PG-13<br />
R<br />
NC-17<br />
20<br />
ON<br />
MOVIE RATINGS<br />
(MOTION PICTURE ASSOCIATION OF AMERICA)<br />
G: General Audience - All ages admitted.<br />
Most parents would find this programming<br />
suitable for all ages. This type of<br />
programming contains little or no violence,<br />
no strong language, and little or no<br />
sexual dialogue or sexual situations.<br />
PG: Parental Guidance Suggested - This<br />
programming contains material that parents<br />
may find unsuitable for younger children. It<br />
may contain one or more of the following:<br />
Moderate violence, some sexual situations,<br />
infrequent coarse language, or some suggestive<br />
dialogue.<br />
PG-13: Parents Strongly Cautioned - This<br />
programming contains material that parents<br />
may find unsuitable for children under the<br />
age of 13. It contains one or more of the<br />
following: violence, sexual situations,<br />
coarse language, or suggestive dialogue.<br />
R: Restricted -This programming is specifically<br />
designed for adults. Anyone under the<br />
age of 17 should view this programming<br />
only with an accompanying parent or adult<br />
guardian. It contains one or more of the following:<br />
intense violence; intense sexual situations;<br />
strong, coarse language; or intensely<br />
suggestive dialogue.<br />
NC-17: No one under the age of 17 will be<br />
admitted. - This type of programming<br />
should be viewed by adults only. It contains<br />
graphic violence; explicit sex; or crude,<br />
indecent language.<br />
X: Adults Only - This type of programming<br />
contains one or more of the following: very<br />
graphic violence, very graphic and explicit<br />
or indecent sexual acts, very coarse and<br />
intensely suggestive language.<br />
AutoLock<br />
TV RATING<br />
TV-Y<br />
TV-Y7<br />
TV-G<br />
TV-PG<br />
TV-14<br />
ON<br />
TV PARENTAL GUIDELINES<br />
(TV BROADCASTERS)<br />
TV TV-Y: (All children -- This program<br />
is designed to be appropriate for all<br />
Y children.) Designed for a very young<br />
audience, including children ages 2-6. This<br />
type of programming is not expected to<br />
frighten younger children.<br />
TV TV-Y7: (Directed to Older<br />
Children -- This program is designed<br />
Y7 for children ages 7 and above.) It<br />
may be more appropriate for children who<br />
have acquired the development skills needed<br />
to distinguish between make-believe and<br />
reality. This programming may include mild<br />
fantasy and comic violence (FV).<br />
TV-G: (General Audience -- Most<br />
TV<br />
parents would find this program suitable<br />
for all ages.) This type of pro-<br />
G<br />
gramming contains little or no violence, no<br />
strong language, and little or no sexual dialogue<br />
or sexual situations.<br />
TV-PG: (Parental Guidance<br />
TV<br />
Suggested -- This program contains<br />
PG material that parents may find unsuitable<br />
for younger children.) This type of programming<br />
contains one or more of the following:<br />
Moderate violence (V), some sexual<br />
situations (S), infrequent coarse language<br />
(L), or some suggestive dialogue (D).<br />
TV<br />
TV-14: (Parents Strongly<br />
Cautioned -- This program contains<br />
14 some material that many parents<br />
would find unsuitable for children under 14<br />
years of age.) This type of programming<br />
contains one or more of the following:<br />
intense violence (V); intense sexual situations<br />
(S); strong, coarse language (L); or<br />
intensely suggestive dialogue (D).<br />
TV<br />
TV-MA: (Mature Audience Only --<br />
This program is specifically designed<br />
MA to be viewed by adults and therefore<br />
may be unsuitable for children under 17.)<br />
This type of programming contains one or<br />
more of the following: graphic violence (V);<br />
explicit sexual situations (S); or crude, indecent<br />
language (L).
AUTOLOCK – SETTING UP THE ACCESS CODE<br />
A utoLockTM allows parents to<br />
block out or ÒcensorÓ any<br />
channels they think children should<br />
not watch. A channel blocked by<br />
the AutoLock TM control cannot be<br />
viewed until a correct access code<br />
is used to unlock the channel for<br />
viewing. First, letÕs set your<br />
AutoLock access code.<br />
Press the MENU button on<br />
the remote control to show the onscreen<br />
menu.<br />
Press the CURSOR DOWN<br />
button twice to highlight FEA-<br />
TURES.<br />
Press the CURSOR RIGHT<br />
button and the menu will shift to<br />
the left. Then press the CURSOR<br />
DOWN button once to highlight<br />
the AutoLock control.<br />
Press the CURSOR RIGHT<br />
button to highlight ACCESS<br />
CODE.<br />
Press 0,7,1,1 on the remote<br />
control. INCORRECT will appear<br />
on the screen.<br />
Press 0,7,1,1 on the remote control<br />
again. ENTER NEW CODE<br />
will appear on the screen.<br />
Enter a new four-digit code<br />
using the number buttons. CON-<br />
FIRM CODE will appear on the<br />
screen.<br />
Enter your new four-digit<br />
code again. CORRECT will flash<br />
on the screen briefly and the highlight<br />
bar goes back to AutoLock.<br />
Press the STATUS button to<br />
remove the menu from the screen.<br />
NOTE TO PARENTS:<br />
It isnÕt possible for<br />
your child to unblock a<br />
channel without knowing<br />
your access code or<br />
changing it to a new<br />
one. If your code has<br />
been changed without<br />
your knowledge, then<br />
you will become aware<br />
that blocked channels<br />
may have been viewed.<br />
FEATURES<br />
TIMER<br />
AutoLock<br />
CLOSED CAP<br />
FORMAT<br />
BLUE MUTE<br />
FEATURES<br />
TIMER<br />
AutoLock<br />
CLOSED CAP<br />
FORMAT<br />
BLUE MUTE<br />
1<br />
3<br />
ACCESS CODE<br />
X X X X<br />
INCORRECT<br />
ENTER<br />
NEW CODE<br />
- - - -<br />
TV<br />
DVD<br />
2<br />
PICTURE<br />
SOUND<br />
FEATURES<br />
INSTALL<br />
SLEEP<br />
SOURCE STATUS CC CLOCK<br />
REPEAT<br />
VOL<br />
SOUND<br />
MENU<br />
REPEAT<br />
A-B<br />
MUTE<br />
PICTURE<br />
T/C AUDIO FTS ANGLE<br />
PREVIOUS ZOOM SUBTITLE NEXT<br />
REVERSE<br />
INCR.SURR.<br />
STOP<br />
PAUSE<br />
SHUFFLE<br />
PLAY<br />
OPEN/CLOSE<br />
OPEN/CLOSE<br />
TIMER<br />
AutoLock<br />
CLOSED CAP<br />
FORMAT<br />
BLUE MUTE<br />
POWER<br />
OK<br />
SCAN<br />
A/CH<br />
SURF<br />
CH<br />
FORWARD<br />
TUNER A/B<br />
9<br />
FEATURES<br />
TIMER<br />
AutoLock<br />
CLOSED CAP<br />
FORMAT<br />
BLUE MUTE<br />
FEATURES<br />
TIMER<br />
AutoLock<br />
CLOSED CAP<br />
FORMAT<br />
BLUE MUTE<br />
8 7<br />
5 6<br />
3<br />
4<br />
ACCESS CODE<br />
- - - -<br />
ENTER<br />
NEW CODE<br />
X X X X<br />
FEATURES<br />
TIMER<br />
AutoLock<br />
CLOSED CAP<br />
FORMAT<br />
BLUE MUTE<br />
FEATURES<br />
TIMER<br />
AutoLock<br />
CLOSED CAP<br />
FORMAT<br />
BLUE MUTE<br />
FEATURES<br />
TIMER<br />
AutoLock<br />
CLOSED CAP<br />
FORMAT<br />
BLUE MUTE<br />
FEATURES<br />
TIMER<br />
AutoLock<br />
CLOSED CAP<br />
FORMAT<br />
BLUE MUTE<br />
FEATURES<br />
TIMER<br />
AutoLock<br />
CLOSED CAP<br />
FORMAT<br />
BLUE MUTE<br />
FEATURES<br />
TIMER<br />
AutoLock<br />
CLOSED CAP<br />
FORMAT<br />
BLUE MUTE<br />
TIME<br />
START TIME<br />
STOP TIME<br />
CHANNEL<br />
ACTIVATE<br />
ACCESS CODE<br />
- - - -<br />
ACCESS CODE<br />
- - - -<br />
ACCESS CODE<br />
X X X X<br />
ACCESS CODE<br />
X X X X<br />
CONFIRM<br />
CODE<br />
- - - -<br />
Remember that 0711 is the default<br />
AutoLock TM code. If your access code has<br />
been changed by someone other than you<br />
(a child, for example) or you have forgotten<br />
the code, you can always get in by<br />
inputting the default code.<br />
FEATURES<br />
TIMER<br />
AutoLock<br />
CLOSED CAP<br />
FORMAT<br />
BLUE MUTE<br />
CONFIRM<br />
CODE<br />
X X X X<br />
FEATURES<br />
TIMER<br />
AutoLock<br />
CLOSED CAP<br />
FORMAT<br />
BLUE MUTE<br />
CONFIRM<br />
CODE<br />
X X X X<br />
CORRECT<br />
FEATURES<br />
TIMER<br />
AutoLock<br />
CLOSED CAP<br />
FORMAT<br />
BLUE MUTE<br />
ACCESS CODE<br />
- - - -<br />
21
After your personal access code<br />
has been set (see the previous<br />
page), you are ready to select the<br />
channels or inputs you want to<br />
block out or censor.<br />
Press the MENU button on<br />
the remote control to show the onscreen<br />
menu.<br />
Press the CURSOR DOWN<br />
button twice to highlight FEA-<br />
TURES.<br />
Press the CURSOR RIGHT<br />
button and the menu will shift to<br />
the left. Then press the CURSOR<br />
DOWN button once to highlight<br />
the AutoLockª control.<br />
Press the CURSOR RIGHT<br />
button again to highlight ACCESS<br />
CODE.<br />
Enter your four-digit<br />
ACCESS CODE. CORRECT will<br />
flash very briefly and the menu will<br />
move to the left with BLOCK<br />
CHANNEL highlighted.<br />
Press the CURSOR RIGHT<br />
button to highlight the TVÕs available<br />
channels.<br />
Press the CURSOR UP or<br />
CURSOR DOWN button to highlight<br />
the channel you want to block.<br />
Press the CURSOR RIGHT<br />
button to block the channel. A<br />
padlock image appears to the right<br />
of the channel number.<br />
Repeat steps 7 and 8 for any channels<br />
you want to block from viewing.<br />
Press the STATUS button to<br />
remove the menu from the screen.<br />
AUTOLOCK – BLOCKING CHANNELS<br />
NOTE: Blocked<br />
channels will be<br />
skipped when you<br />
press the Channel<br />
+/Ð buttons. To<br />
view a blocked<br />
channel, refer to<br />
page 28 for details.<br />
FEATURES<br />
AutoLock<br />
BLOCK CHANNEL<br />
SETUP CODE<br />
CLEAR ALL<br />
MOVIE RATING<br />
TV RATING<br />
FEATURES<br />
AutoLock<br />
BLOCK CHANNEL<br />
SETUP CODE<br />
CLEAR ALL<br />
MOVIE RATING<br />
TV RATING<br />
7<br />
1<br />
AV2<br />
AV3<br />
ALL<br />
1<br />
2<br />
12<br />
13<br />
14<br />
15<br />
16<br />
3<br />
TV<br />
DVD<br />
2<br />
PICTURE<br />
SOUND<br />
FEATURES<br />
INSTALL<br />
SLEEP<br />
SOURCE STATUS CC CLOCK<br />
REPEAT<br />
VOL<br />
SOUND<br />
MENU<br />
REPEAT<br />
A-B<br />
MUTE<br />
PICTURE<br />
T/C AUDIO FTS ANGLE<br />
PREVIOUS ZOOM SUBTITLE NEXT<br />
REVERSE<br />
INCR.SURR.<br />
STOP<br />
PAUSE<br />
SHUFFLE<br />
PLAY<br />
OPEN/CLOSE<br />
TIMER<br />
AutoLock<br />
CLOSED CAP<br />
FORMAT<br />
BLUE MUTE<br />
POWER<br />
OK<br />
SCAN<br />
SURF<br />
CH<br />
FORWARD<br />
9<br />
5<br />
7<br />
FEATURES<br />
AutoLock<br />
BLOCK CHANNEL<br />
SETUP CODE<br />
CLEAR ALL<br />
MOVIE RATING<br />
TV RATING<br />
3<br />
AV2<br />
AV3<br />
ALL<br />
1<br />
2<br />
8<br />
4<br />
6<br />
If a channel is blocked by the<br />
BLOCK CHANNEL option, the<br />
TV will display the screen shown<br />
to the right. To watch the channel,<br />
enter your access code or change<br />
the BLOCK CHANNEL option<br />
back to off.<br />
FEATURES<br />
TIMER<br />
AutoLock<br />
CLOSED CAP<br />
FORMAT<br />
BLUE MUTE<br />
FEATURES<br />
TIMER<br />
AutoLock<br />
CLOSED CAP<br />
FORMAT<br />
BLUE MUTE<br />
FEATURES<br />
TIMER<br />
AutoLock<br />
CLOSED CAP<br />
FORMAT<br />
BLUE MUTE<br />
FEATURES<br />
TIMER<br />
AutoLock<br />
CLOSED CAP<br />
FORMAT<br />
BLUE MUTE<br />
TIME<br />
START TIME<br />
STOP TIME<br />
CHANNEL<br />
ACTIVATE<br />
FEATURES<br />
AutoLock<br />
BLOCK CHANNEL<br />
SETUP CODE<br />
CLEAR ALL<br />
MOVIE RATING<br />
TV RATING<br />
FEATURES<br />
AutoLock<br />
BLOCK CHANNEL<br />
SETUP CODE<br />
CLEAR ALL<br />
MOVIE RATING<br />
TV RATING<br />
ACCESS CODE<br />
- - - -<br />
ACCESS CODE<br />
- - - -<br />
ACCESS CODE<br />
X X X X<br />
AV2<br />
AV3<br />
ALL<br />
1<br />
2<br />
12<br />
13<br />
14<br />
15<br />
16<br />
Channel 12<br />
Blocked by AutoLock<br />
TV rating TV-PG<br />
Access code<br />
- - - -<br />
NOTE: You also can block out the use of the A/V external inputs on the rear of the TV. This stops the viewing of VCR, DVD, and other sources that can be<br />
shown through the A/V input jacks. Select AV1, AV2, or AV3 and then select BLOCK.<br />
22
AUTOLOCK – BLOCKING BY MOVIE RATING<br />
After your personal access code<br />
has been set (see page 19), you<br />
can select specific movie ratings<br />
that you want to censor.<br />
Press the MENU button on<br />
the remote control to show the onscreen<br />
menu.<br />
PICTURE<br />
SOUND<br />
FEATURES<br />
INSTALL<br />
TIMER<br />
AutoLock<br />
CLOSED CAP<br />
FORMAT<br />
BLUE MUTE<br />
FEATURES<br />
TIMER<br />
AutoLock<br />
CLOSED CAP<br />
FORMAT<br />
BLUE MUTE<br />
TIME<br />
START TIME<br />
STOP TIME<br />
CHANNEL<br />
ACTIVATE<br />
Press the CURSOR DOWN<br />
button twice to highlight FEA-<br />
TURES.<br />
Press the CURSOR RIGHT<br />
button and the menu will shift to<br />
the left. Then press the CURSOR<br />
DOWN button once to highlight<br />
the AutoLock control.<br />
Press the CURSOR RIGHT<br />
button again to highlight<br />
ACCESS CODE.<br />
1<br />
TV<br />
DVD<br />
SLEEP<br />
SOURCE STATUS CC CLOCK<br />
REPEAT<br />
SOUND<br />
MENU<br />
REPEAT<br />
A-B<br />
SHUFFLE<br />
POWER<br />
SCAN<br />
PICTURE<br />
OK<br />
9<br />
5<br />
8<br />
3<br />
8<br />
4<br />
7<br />
FEATURES<br />
TIMER<br />
AutoLock<br />
CLOSED CAP<br />
FORMAT<br />
BLUE MUTE<br />
FEATURES<br />
TIMER<br />
AutoLock<br />
CLOSED CAP<br />
FORMAT<br />
BLUE MUTE<br />
ACCESS CODE<br />
- - - -<br />
ACCESS CODE<br />
- - - -<br />
Enter your four-digit<br />
ACCESS CODE. CORRECT will<br />
flash very briefly in red and the<br />
menu will move to the left with<br />
BLOCK CHANNEL highlighted.<br />
Press the CURSOR DOWN<br />
button repeatedly until MOVIE<br />
RATING is highlighted.<br />
Press the CURSOR RIGHT<br />
button and the Rating menu shifts<br />
to the left with G highlighted.<br />
Press the CURSOR UP or<br />
CURSOR DOWN button to highlight<br />
each rating you want. Then<br />
press the CURSOR RIGHT button<br />
to turn the rating ON or OFF.<br />
Turning the rating ON will block<br />
programs with that rating from<br />
being seen.<br />
Press the STATUS button to<br />
remove the menu from the screen.<br />
8<br />
6<br />
3<br />
2<br />
VOL<br />
MUTE<br />
T/C AUDIO FTS ANGLE<br />
PREVIOUS ZOOM SUBTITLE NEXT<br />
REVERSE<br />
INCR.SURR.<br />
STOP<br />
PAUSE<br />
PLAY<br />
OPEN/CLOSE<br />
SURF<br />
CH<br />
FORWARD<br />
FEATURES<br />
AutoLock<br />
BLOCK CHANNEL<br />
SETUP CODE<br />
CLEAR ALL<br />
MOVIE RATING<br />
TV RATING<br />
G<br />
PG<br />
PG-13<br />
R<br />
NC-17<br />
FEATURES<br />
TIMER<br />
AutoLock<br />
CLOSED CAP<br />
FORMAT<br />
BLUE MUTE<br />
FEATURES<br />
AutoLock<br />
BLOCK CHANNEL<br />
SETUP CODE<br />
CLEAR ALL<br />
MOVIE RATING<br />
TV RATING<br />
AutoLock<br />
MOVIE RATING<br />
G<br />
PG<br />
PG-13<br />
R<br />
NC-17<br />
ACCESS CODE<br />
X X X X<br />
AV2<br />
AV3<br />
ALL<br />
1<br />
2<br />
OFF<br />
AV3<br />
ALL<br />
1<br />
2<br />
NOTE: When a rating is turned<br />
ON, all higher ratings also will be<br />
turned on automatically. For example,<br />
if the R rating is turned on, the<br />
NC-17 and X ratings also will be<br />
turned on.<br />
AutoLock<br />
MOVIE RATING<br />
G<br />
PG<br />
PG-13<br />
R<br />
NC-17<br />
ON<br />
AV3<br />
ALL<br />
1<br />
2<br />
MOVIE RATING OPTIONS<br />
G ON or OFF<br />
PG ON or OFF<br />
PG-13 ON or OFF<br />
R ON or OFF<br />
NC-17 ON or OFF<br />
X ON or OFF<br />
23
You also can select specific TV<br />
ratings that you want to censor<br />
by following these steps.<br />
AUTOLOCK – BLOCKING BY TV RATING<br />
Press the MENU button on the<br />
remote control to show the onscreen<br />
menu.<br />
Press the CURSOR DOWN<br />
button twice to highlight FEA-<br />
TURES.<br />
Press the CURSOR RIGHT<br />
button and the menu will shift to<br />
the left. Then press the CURSOR<br />
DOWN button once to highlight<br />
the AutoLock control.<br />
Press the CURSOR RIGHT<br />
button again to highlight ACCESS<br />
CODE.<br />
1<br />
TV<br />
DVD<br />
PICTURE<br />
SOUND<br />
FEATURES<br />
INSTALL<br />
SLEEP<br />
SOURCE STATUS CC CLOCK<br />
REPEAT<br />
SOUND<br />
MENU<br />
REPEAT<br />
A-B<br />
SHUFFLE<br />
TIMER<br />
AutoLock<br />
CLOSED CAP<br />
FORMAT<br />
BLUE MUTE<br />
POWER<br />
SCAN<br />
PICTURE<br />
OK<br />
11<br />
5<br />
10<br />
9<br />
4<br />
3<br />
7<br />
FEATURES<br />
TIMER<br />
AutoLock<br />
CLOSED CAP<br />
FORMAT<br />
BLUE MUTE<br />
FEATURES<br />
TIMER<br />
AutoLock<br />
CLOSED CAP<br />
FORMAT<br />
BLUE MUTE<br />
FEATURES<br />
TIMER<br />
AutoLock<br />
CLOSED CAP<br />
FORMAT<br />
BLUE MUTE<br />
TIME<br />
START TIME<br />
STOP TIME<br />
CHANNEL<br />
ACTIVATE<br />
ACCESS CODE<br />
- - - -<br />
ACCESS CODE<br />
- - - -<br />
10 8<br />
AutoLock<br />
Enter your four-digit ACCESS<br />
CODE and the menu will move to<br />
the left with BLOCK CHANNEL<br />
highlighted.<br />
Press the CURSOR DOWN<br />
button repeatedly until TV RAT-<br />
ING is highlighted.<br />
Press the CURSOR RIGHT<br />
button and the menu will shift to<br />
highlight the TV RATING options.<br />
6<br />
3<br />
2<br />
VOL<br />
MUTE<br />
T/C AUDIO FTS ANGLE<br />
PREVIOUS ZOOM SUBTITLE NEXT<br />
REVERSE<br />
INCR.SURR.<br />
STOP<br />
PAUSE<br />
PLAY<br />
OPEN/CLOSE<br />
SURF<br />
CH<br />
FORWARD<br />
FEATURES<br />
AutoLock<br />
BLOCK CHANNEL<br />
SETUP CODE<br />
CLEAR ALL<br />
MOVIE RATING<br />
TV RATING<br />
FEATURES<br />
TIMER<br />
AutoLock<br />
CLOSED CAP<br />
FORMAT<br />
BLUE MUTE<br />
AV2<br />
AV3<br />
ALL<br />
1<br />
2<br />
ACCESS CODE<br />
X X X X<br />
FEATURES<br />
BLOCK CHANNEL<br />
SETUP CODE<br />
CLEAR ALL<br />
MOVIE RATING<br />
TV RATING<br />
TV-Y<br />
TV-Y7<br />
TV-G<br />
TV-PG<br />
TV-14<br />
Press the CURSOR UP or<br />
DOWN button to select a rating.<br />
Press the CURSOR RIGHT or<br />
LEFT button to turn the block on<br />
the rating ON or OFF.<br />
NOTE: More specific subratings<br />
(for violence, sexual content, dialogue,<br />
or fantasy violence) are available<br />
for TV-Y7, TV-PG, TV-14, and<br />
TV-MA.<br />
10 To access these subratings, press<br />
the CURSOR RIGHT button.<br />
Press the CURSOR UP or DOWN<br />
button to select the subrating that<br />
you want to block or unblock. Then<br />
press the CURSOR RIGHT or<br />
CURSOR LEFT button to turn the<br />
block on the subrating ON or OFF.<br />
11 Press the STATUS button to<br />
remove the menu.<br />
AutoLock<br />
TV RATING<br />
TV-Y<br />
TV-Y7<br />
TV-G<br />
TV-PG<br />
TV-14<br />
OFF<br />
AV3<br />
ALL<br />
1<br />
2<br />
AutoLock<br />
TV RATING<br />
TV-Y<br />
TV-Y7<br />
TV-G<br />
TV-PG<br />
TV-14<br />
TV-Y: (All children -- This program is designed to be appropriate for all children.) Designed for a very young audience, including<br />
children ages 2–6. This type of programming is not expected to frighten younger children.<br />
TV-Y7: (Directed to Older Children -- This program is designed for children age 7 and above.) It may be more appropriate for children<br />
who have acquired the development skills needed to distinguish between make-believe and reality. This programming may<br />
include mild fantasy and comic violence (FV).<br />
TV-G: (General Audience -- Most parents would find this program suitable for all ages.) This type of programming contains little<br />
or no violence, no strong language, and little or no sexual dialogue or situations.<br />
TV-PG: (Parental Guidance Suggested -- This program contains material that parents may find unsuitable for younger children.)<br />
This type of programming contains one or more of the following: some suggestive dialogue (D), infrequent coarse language (L),<br />
some sexual situations (S), or moderate violence (V).<br />
TV-14: (Parents Strongly Cautioned -- This program contains some material that many parents would find unsuitable for children<br />
under 14 years of age.) This type of programming contains one or more of the following: intensely suggestive dialogue (D); strong,<br />
coarse language (L); intense sexual situations (S); or intense violence (V).<br />
TV-MA: (Mature Audience Only -- This program is specifically designed to be viewed by adults and therefore may be unsuitable for<br />
children under 17.) This type of programming contains one or more of the following: crude, indecent language (L); explicit sexual<br />
situations (S); or graphic violence (V).<br />
ON<br />
AV3<br />
ALL<br />
1<br />
2<br />
24
AUTOLOCK – TURNING BLOCK ON OR OFF<br />
The BLOCKING control is what<br />
can be thought of as the Òmaster<br />
switchÓ for AutoLockª. This<br />
control affects the settings you have<br />
chosen for blocking programs<br />
according to movie ratings or TV<br />
ratings, or for blocking programs<br />
that have no rating or are unrated.<br />
When the BLOCKING control is<br />
OFF, the blocking or censoring of<br />
programs is disabled. When the<br />
BLOCKING control is ON, blocking<br />
will occur according to the settings<br />
you have chosen. Follow<br />
these steps to toggle BLOCKING<br />
OFF or ON.<br />
Press the MENU button on the<br />
remote control to show the onscreen<br />
menu.<br />
Press the CURSOR DOWN<br />
button twice to highlight FEA-<br />
TURES.<br />
Press the CURSOR RIGHT<br />
button and the menu will shift to<br />
the left. Then press the CURSOR<br />
DOWN button once to highlight<br />
the AutoLock control.<br />
Press the CURSOR RIGHT<br />
button again to highlight ACCESS<br />
CODE.<br />
Enter your four-digit<br />
ACCESS CODE and the menu<br />
will move to the left with BLOCK<br />
CHANNEL highlighted.<br />
Press the CURSOR DOWN<br />
button repeatedly until BLOCK<br />
OPTIONS is highlighted.<br />
Press the CURSOR RIGHT<br />
button to enter the BLOCK<br />
OPTIONS menu. BLOCKING will<br />
be highlighted.<br />
Press the CURSOR RIGHT or<br />
LEFT button to toggle BLOCK-<br />
ING ON or OFF.<br />
Press the STATUS button to<br />
remove the menu.<br />
FEATURES<br />
AutoLock<br />
SETUP CODE<br />
CLEAR ALL<br />
MOVIE RATING<br />
TV RATING<br />
BLOCK OPTIONS<br />
6<br />
1<br />
8<br />
3<br />
BLOCKING<br />
BLOCK UNRATED<br />
NO RATING<br />
TV<br />
DVD<br />
2<br />
PICTURE<br />
SOUND<br />
FEATURES<br />
INSTALL<br />
SLEEP<br />
SOURCE STATUS CC CLOCK<br />
REPEAT<br />
VOL<br />
SOUND<br />
MENU<br />
REPEAT<br />
A-B<br />
MUTE<br />
PICTURE<br />
T/C AUDIO FTS ANGLE<br />
PREVIOUS ZOOM SUBTITLE NEXT<br />
REVERSE<br />
INCR.SURR.<br />
STOP<br />
PAUSE<br />
SHUFFLE<br />
PLAY<br />
OPEN/CLOSE<br />
TIMER<br />
AutoLock<br />
CLOSED CAP<br />
FORMAT<br />
BLUE MUTE<br />
POWER<br />
OK<br />
SCAN<br />
SURF<br />
CH<br />
FORWARD<br />
9<br />
5<br />
6<br />
AutoLock<br />
BLOCK OPTIONS<br />
BLOCKING<br />
BLOCK UNRATED<br />
NO RATING<br />
3<br />
OFF<br />
AV3<br />
ALL<br />
1<br />
2<br />
8<br />
4<br />
7<br />
FEATURES<br />
TIMER<br />
AutoLock<br />
CLOSED CAP<br />
FORMAT<br />
BLUE MUTE<br />
FEATURES<br />
TIMER<br />
AutoLock<br />
CLOSED CAP<br />
FORMAT<br />
BLUE MUTE<br />
FEATURES<br />
TIMER<br />
AutoLock<br />
CLOSED CAP<br />
FORMAT<br />
BLUE MUTE<br />
FEATURES<br />
TIMER<br />
AutoLock<br />
CLOSED CAP<br />
FORMAT<br />
BLUE MUTE<br />
TIME<br />
START TIME<br />
STOP TIME<br />
CHANNEL<br />
ACTIVATE<br />
FEATURES<br />
AutoLock<br />
BLOCK CHANNEL<br />
SETUP CODE<br />
CLEAR ALL<br />
MOVIE RATING<br />
TV RATING<br />
ACCESS CODE<br />
- - - -<br />
AutoLock<br />
BLOCK OPTIONS<br />
BLOCKING<br />
BLOCK UNRATED<br />
NO RATING<br />
ACCESS CODE<br />
- - - -<br />
ACCESS CODE<br />
X X X X<br />
AV2<br />
AV3<br />
ALL<br />
1<br />
2<br />
ON<br />
AV3<br />
ALL<br />
1<br />
2<br />
25
In addition to blocking specific<br />
ratings or channels, you may<br />
choose to block all programming<br />
that is unrated.<br />
Press the MENU button on the<br />
remote control to show the onscreen<br />
menu.<br />
Press the CURSOR DOWN<br />
button twice to highlight FEA-<br />
TURES.<br />
Press the CURSOR RIGHT<br />
button and the menu will shift to<br />
the left. Then press the CURSOR<br />
DOWN button once to highlight<br />
the AutoLock control.<br />
Press the CURSOR RIGHT<br />
button again to highlight ACCESS<br />
CODE.<br />
Enter your four-digit<br />
ACCESS CODE and the menu<br />
will move to the left with BLOCK<br />
CHANNEL highlighted.<br />
Press the CURSOR DOWN<br />
button repeatedly until BLOCK<br />
OPTIONS is highlighted.<br />
Press the CURSOR RIGHT<br />
button to enter the BLOCK<br />
OPTIONS menu. BLOCKING will<br />
be highlighted.<br />
Press the CURSOR DOWN<br />
button once to select BLOCK<br />
UNRATED.<br />
AUTOLOCK – BLOCKING UNRATED BROADCASTS<br />
8<br />
6<br />
1<br />
3<br />
TV<br />
DVD<br />
2<br />
PICTURE<br />
SOUND<br />
FEATURES<br />
INSTALL<br />
SLEEP<br />
SOURCE STATUS CC CLOCK<br />
REPEAT<br />
VOL<br />
SOUND<br />
MENU<br />
REPEAT<br />
A-B<br />
MUTE<br />
PICTURE<br />
T/C AUDIO FTS ANGLE<br />
PREVIOUS ZOOM SUBTITLE NEXT<br />
REVERSE<br />
INCR.SURR.<br />
STOP<br />
PAUSE<br />
SHUFFLE<br />
PLAY<br />
OPEN/CLOSE<br />
TIMER<br />
AutoLock<br />
CLOSED CAP<br />
FORMAT<br />
BLUE MUTE<br />
POWER<br />
OK<br />
SCAN<br />
SURF<br />
CH<br />
FORWARD<br />
10<br />
5<br />
3<br />
9<br />
4<br />
7<br />
FEATURES<br />
TIMER<br />
AutoLock<br />
CLOSED CAP<br />
FORMAT<br />
BLUE MUTE<br />
FEATURES<br />
TIMER<br />
AutoLock<br />
CLOSED CAP<br />
FORMAT<br />
BLUE MUTE<br />
FEATURES<br />
TIMER<br />
AutoLock<br />
CLOSED CAP<br />
FORMAT<br />
BLUE MUTE<br />
FEATURES<br />
TIMER<br />
AutoLock<br />
CLOSED CAP<br />
FORMAT<br />
BLUE MUTE<br />
TIME<br />
START TIME<br />
STOP TIME<br />
CHANNEL<br />
ACTIVATE<br />
FEATURES<br />
AutoLock<br />
BLOCK CHANNEL<br />
SETUP CODE<br />
CLEAR ALL<br />
MOVIE RATING<br />
TV RATING<br />
ACCESS CODE<br />
- - - -<br />
ACCESS CODE<br />
- - - -<br />
ACCESS CODE<br />
X X X X<br />
AV2<br />
AV3<br />
ALL<br />
1<br />
2<br />
Press the CURSOR RIGHT<br />
or CURSOR LEFT button to<br />
toggle BLOCK UNRATED ON or<br />
OFF.<br />
10 Press the STATUS button to<br />
remove the menu.<br />
FEATURES<br />
AutoLock<br />
SETUP CODE<br />
CLEAR ALL<br />
MOVIE RATING<br />
TV RATING<br />
BLOCK OPTIONS<br />
BLOCKING<br />
BLOCK UNRATED<br />
NO RATING<br />
AutoLock<br />
BLOCK OPTIONS<br />
BLOCKING<br />
BLOCK UNRATED<br />
NO RATING<br />
OFF<br />
OFF<br />
AutoLock<br />
BLOCK OPTIONS<br />
BLOCKING<br />
BLOCK UNRATED<br />
NO RATING<br />
ON<br />
ON<br />
Channel 12<br />
Blocked by AutoLock<br />
Unrated<br />
Access Code<br />
- - - -<br />
NOTE: If the BLOCK OPTION, BLOCK UNRATED<br />
control is turned ON, all unrated programs will display<br />
the screen shown to the left. To watch the channel,<br />
enter your access code or change the BLOCK UNRAT-<br />
ED option back to OFF.<br />
26
AUTOLOCK – BLOCKING BROADCASTS THAT HAVE NO RATING<br />
Some programming is not encoded<br />
with content advisory data by<br />
the MPAA (Motion Picture<br />
Association of America) or the television<br />
broadcasters (see the explanation<br />
on page 18). To block such<br />
programming, follow these steps.<br />
Press the MENU button on the<br />
remote to show the on-screen menu.<br />
Press the CURSOR DOWN<br />
button twice to highlight FEA-<br />
TURES.<br />
Press the CURSOR RIGHT<br />
button and the menu will shift to<br />
the left. Then press the CURSOR<br />
DOWN button once to highlight<br />
the AutoLock control.<br />
Press the CURSOR RIGHT<br />
button again to highlight ACCESS<br />
CODE.<br />
Enter your four-digit ACCESS<br />
CODE and the menu will move to<br />
the left with BLOCK CHANNEL<br />
highlighted.<br />
Press the CURSOR DOWN<br />
button repeatedly until BLOCK<br />
OPTIONS is highlighted.<br />
Press the CURSOR RIGHT<br />
button to enter the BLOCK<br />
OPTIONS menu. BLOCKING will<br />
be highlighted.<br />
Press the CURSOR DOWN<br />
button twice to highlight NO RAT-<br />
ING.<br />
8<br />
6<br />
1<br />
3<br />
TV<br />
DVD<br />
2<br />
PICTURE<br />
SOUND<br />
FEATURES<br />
INSTALL<br />
SLEEP<br />
SOURCE STATUS CC CLOCK<br />
REPEAT<br />
VOL<br />
SOUND<br />
MENU<br />
REPEAT<br />
A-B<br />
MUTE<br />
PICTURE<br />
T/C AUDIO FTS ANGLE<br />
PREVIOUS ZOOM SUBTITLE NEXT<br />
REVERSE<br />
INCR.SURR.<br />
STOP<br />
PAUSE<br />
SHUFFLE<br />
PLAY<br />
OPEN/CLOSE<br />
TIMER<br />
AutoLock<br />
CLOSED CAP<br />
FORMAT<br />
BLUE MUTE<br />
POWER<br />
OK<br />
SCAN<br />
SURF<br />
CH<br />
FORWARD<br />
10<br />
5<br />
3<br />
9<br />
4<br />
7<br />
FEATURES<br />
TIMER<br />
AutoLock<br />
CLOSED CAP<br />
FORMAT<br />
BLUE MUTE<br />
FEATURES<br />
TIMER<br />
AutoLock<br />
CLOSED CAP<br />
FORMAT<br />
BLUE MUTE<br />
FEATURES<br />
TIMER<br />
AutoLock<br />
CLOSED CAP<br />
FORMAT<br />
BLUE MUTE<br />
FEATURES<br />
TIMER<br />
AutoLock<br />
CLOSED CAP<br />
FORMAT<br />
BLUE MUTE<br />
TIME<br />
START TIME<br />
STOP TIME<br />
CHANNEL<br />
ACTIVATE<br />
FEATURES<br />
AutoLock<br />
BLOCK CHANNEL<br />
SETUP CODE<br />
CLEAR ALL<br />
MOVIE RATING<br />
TV RATING<br />
ACCESS CODE<br />
- - - -<br />
ACCESS CODE<br />
- - - -<br />
ACCESS CODE<br />
X X X X<br />
AV2<br />
AV3<br />
ALL<br />
1<br />
2<br />
Press the CURSOR RIGHT<br />
or CURSOR LEFT button to toggle<br />
NO RATING ON or OFF.<br />
10 Press the STATUS button to<br />
remove the menu.<br />
FEATURES<br />
AutoLock<br />
SETUP CODE<br />
CLEAR ALL<br />
MOVIE RATING<br />
TV RATING<br />
BLOCK OPTIONS<br />
BLOCKING<br />
BLOCK UNRATED<br />
NO RATING<br />
AutoLock<br />
BLOCK OPTIONS<br />
BLOCKING<br />
BLOCK UNRATED<br />
NO RATING<br />
OFF<br />
OFF<br />
OFF<br />
AutoLock<br />
BLOCK OPTIONS<br />
BLOCKING<br />
BLOCK UNRATED<br />
NO RATING<br />
ON<br />
ON<br />
ON<br />
Channel 12<br />
Blocked by AutoLock<br />
No rating<br />
Access Code<br />
- - - -<br />
NOTE: If the BLOCKING OPTION, NO RATING<br />
control is turned ON, all programs containing NO content<br />
advisory data will display the screen shown to the<br />
left. To watch the channel, enter your access code or<br />
change the NO RATING option back to OFF.<br />
27
To remind you which ratings you<br />
have blocked and which Block<br />
Options you have selected, a review<br />
screen is available to review your<br />
AutoLock TM settings. To access this<br />
screen follow the steps below.<br />
Press the STATUS button on<br />
your remote control twice. Your<br />
AutoLock TM settings will appear on<br />
the screen.<br />
NOTE: If you have blocked specific<br />
subratings, such as V for Violence<br />
in the TV-PG category, these<br />
blocked subratings will not appear<br />
in the review. The subratings however,<br />
are still blocked according to<br />
your selections.<br />
After a few seconds, the settings<br />
will leave the screen automatically,<br />
or you can press the<br />
STATUS button a third time to<br />
remove them from the screen.<br />
AUTOLOCK – REVIEWING YOUR SETTINGS<br />
MOVIE RATING -<br />
-<br />
-<br />
R<br />
NC17<br />
X<br />
TV<br />
DVD<br />
BLOCK UNRATED<br />
NO RATING<br />
SLEEP<br />
SOURCE STATUS CC CLOCK<br />
REPEAT<br />
SOUND<br />
MENU<br />
REPEAT<br />
A-B<br />
SHUFFLE<br />
TV RATING -<br />
Y7<br />
-<br />
PG<br />
14<br />
MA<br />
ON<br />
OFF<br />
POWER<br />
SCAN<br />
PICTURE<br />
OK<br />
1 2<br />
SMART HELP<br />
VOL<br />
MUTE<br />
CH<br />
Remember, the review<br />
screen will appear only if<br />
BLOCKING is set to ON. For<br />
details, see page 25.<br />
AUDIO<br />
T/C FTS ANGLE<br />
PREVIOUS ZOOM SUBTITLE NEXT<br />
REVERSE STOP PLAY FORWARD<br />
INCR.SURR. PAUSE SURF<br />
OPEN/CLOSE<br />
MOVIE RATING -<br />
-<br />
-<br />
R<br />
NC17<br />
X<br />
BLOCK UNRATED<br />
NO RATING<br />
TV RATING -<br />
Y7<br />
-<br />
PG<br />
14<br />
MA<br />
ON<br />
OFF<br />
MOVIE RATINGS – Shows all blocked movie ratings that were set within the MOVIE<br />
RATING feature. Some or all may be blocked at one time. NOTE: If a lower rating is<br />
blocked, higher ratings also will be blocked automatically (for example, if R is set to be<br />
blocked, X also will automatically be blocked).<br />
TV RATINGS – Shows all blocked TV ratings that were set within the feature. Some or all<br />
may be blocked at one time. NOTE: If a lower rating is blocked, higher ratings also will be<br />
blocked automatically (for example, if TV-14 is set to be blocked, TV-MA also will automatically<br />
be blocked). TV ratings also have subratings for Violence (V), Fantasy Violence (FV),<br />
Sexual Situations (S), Coarse Language (L), and Suggestive Language (D). If the main rating<br />
is turned OFF but the subrating is turned ON, the program will be blocked; however, the rating<br />
will not appear within the AutoLock review menu.<br />
BLOCK UNRATED – Shows ON or OFF, depending on the status of the BLOCK UNRAT-<br />
ED feature.<br />
BLOCK NO RATING – Shows ON or OFF, depending on the status of the BLOCK NO<br />
RATING feature.<br />
28
AUTOLOCK – VIEWING BLOCKED PROGRAMMING<br />
Various on-screen messages will<br />
appear when someone tries to<br />
view blocked programming. The<br />
message is determined by how the<br />
current programming is blocked.<br />
You may view the blocked programming<br />
and turn OFF the AutoLock<br />
feature by clearing all blocking<br />
options or by entering your access<br />
code.<br />
PICTURE<br />
SOUND<br />
FEATURES<br />
INSTALL<br />
TIMER<br />
AutoLock<br />
CLOSED CAP<br />
FORMAT<br />
BLUE MUTE<br />
FEATURES<br />
TIMER<br />
AutoLock<br />
CLOSED CAP<br />
FORMAT<br />
BLUE MUTE<br />
TIME<br />
START TIME<br />
STOP TIME<br />
CHANNEL<br />
ACTIVATE<br />
Press the MENU button on the<br />
remote to show the on-screen<br />
menu.<br />
Press the CURSOR DOWN button<br />
twice to highlight FEATURES.<br />
Press the CURSOR RIGHT<br />
button and the menu will shift to<br />
the left. Then press the CURSOR<br />
DOWN button once to highlight<br />
the AutoLock control.<br />
Press the CURSOR RIGHT<br />
button again to highlight ACCESS<br />
CODE.<br />
1<br />
POWER<br />
SLEEP<br />
TV SOURCE STATUS CC CLOCK<br />
REPEAT REPEAT SHUFFLE SCAN<br />
A-B<br />
DVD<br />
SOUND<br />
PICTURE<br />
MENU<br />
OK<br />
8<br />
5<br />
6<br />
3<br />
4<br />
7<br />
FEATURES<br />
TIMER<br />
AutoLock<br />
CLOSED CAP<br />
FORMAT<br />
BLUE MUTE<br />
FEATURES<br />
TIMER<br />
AutoLock<br />
CLOSED CAP<br />
FORMAT<br />
BLUE MUTE<br />
ACCESS CODE<br />
- - - -<br />
ACCESS CODE<br />
- - - -<br />
Enter your four-digit<br />
ACCESS CODE and the menu<br />
will move to the left with BLOCK<br />
CHANNEL highlighted.<br />
Press the CURSOR DOWN<br />
button twice to highlight CLEAR<br />
ALL.<br />
6<br />
3<br />
2<br />
VOL<br />
CH<br />
MUTE<br />
AUDIO<br />
T/C FTS ANGLE<br />
PREVIOUS ZOOM SUBTITLE NEXT<br />
REVERSE STOP PLAY FORWARD<br />
INCR.SURR. PAUSE SURF<br />
OPEN/CLOSE<br />
FEATURES<br />
TIMER<br />
AutoLock<br />
CLOSED CAP<br />
FORMAT<br />
BLUE MUTE<br />
ACCESS CODE<br />
X X X X<br />
Press the CURSOR RIGHT<br />
button twice. The CLEAR ALL<br />
option will display the word<br />
CLEARED. All blocked channels<br />
and programming are now viewable.<br />
Press the STATUS button to<br />
remove the menu.<br />
FEATURES<br />
AutoLock<br />
BLOCK CHANNEL<br />
SETUP CODE<br />
CLEAR ALL<br />
MOVIE RATING<br />
TV RATING<br />
AV2<br />
AV3<br />
ALL<br />
1<br />
2<br />
If you tune to a specific channel<br />
that has been blocked by BLOCK<br />
CHANNEL or any of the<br />
AutoLock RATING options, simply<br />
enter your four-digit access<br />
code to view the channel.<br />
NOTE: this will unblock ALL<br />
channels until the TV is shut OFF.<br />
When powered back ON, all previously<br />
blocked channels will be<br />
blocked again.<br />
FEATURES<br />
AutoLock<br />
BLOCK CHANNEL<br />
SETUP CODE<br />
CLEAR ALL<br />
MOVIE RATING<br />
TV RATING<br />
BLOCK OPTIONS<br />
FEATURES<br />
AutoLock<br />
BLOCK CHANNEL<br />
SETUP CODE<br />
CLEAR ALL<br />
MOVIE RATING<br />
TV RATING<br />
BLOCK OPTIONS<br />
CLEARED<br />
29
SOUND – ADJUSTING THE TREBLE, BASS, AND BALANCE<br />
Besides the normal volume level<br />
control, your TV also has individual<br />
sound-adjustment controls.<br />
The TREBLE (high frequency),<br />
BASS (low frequency), and Speaker<br />
BALANCE may all be used to<br />
adjust the sound playback of TV<br />
programs.<br />
Press the MENU button on the<br />
remote control to show the onscreen<br />
menu.<br />
Press the CURSOR DOWN<br />
button once to highlight SOUND.<br />
PICTURE<br />
SOUND<br />
FEATURES<br />
INSTALL<br />
TREBLE<br />
BASS<br />
BALANCE<br />
AVL<br />
INCR. SURROUND<br />
SOUND<br />
TREBLE 30<br />
BASS<br />
BALANCE<br />
AVL<br />
INCR. SURROUND<br />
Press the CURSOR RIGHT<br />
button and the menu will shift to<br />
the left. TREBLE will be highlighted<br />
and an adjustment bar will be<br />
shown to the right.<br />
Use the CURSOR RIGHT or<br />
CURSOR LEFT button to adjust<br />
the TREBLE (high frequency) level<br />
of the televisionÕs sound.<br />
After adjusting the TREBLE<br />
control, press the CURSOR<br />
DOWN button to select another<br />
sound adjustment: BASS or BAL-<br />
ANCE. Press the CURSOR<br />
RIGHT or CURSOR LEFT button<br />
to adjust the selected control.<br />
1<br />
TV<br />
DVD<br />
SLEEP<br />
SOURCE STATUS CC CLOCK<br />
REPEAT<br />
SOUND<br />
MENU<br />
REPEAT<br />
A-B<br />
SHUFFLE<br />
POWER<br />
SCAN<br />
PICTURE<br />
OK<br />
6<br />
3<br />
4<br />
SOUND<br />
TREBLE<br />
BASS 30<br />
BALANCE<br />
AVL<br />
INCR. SURROUND<br />
SOUND<br />
TREBLE<br />
BASS<br />
BALANCE 0<br />
AVL<br />
INCR. SURROUND<br />
Press the STATUS button to<br />
remove the menu from the screen.<br />
5<br />
2<br />
VOL<br />
MUTE<br />
T/C AUDIO FTS ANGLE<br />
PREVIOUS ZOOM SUBTITLE NEXT<br />
CH<br />
REVERSE<br />
STOP<br />
PLAY<br />
FORWARD<br />
INCR.SURR.<br />
PAUSE<br />
SURF<br />
OPEN/CLOSE<br />
SMART HELP<br />
Remember, when the bar<br />
scale is centered, speaker<br />
BALANCE is centered between the<br />
TVÕs left and right side speakers.<br />
30
Use the Volume Bar control to see<br />
the TVÕs volume level settings<br />
on the TV screen. The Volume Bar<br />
will be seen each time the VOLUME<br />
buttons (on the TV or remote control)<br />
are pressed.<br />
SOUND – ADJUSTING THE VOLUME<br />
Press the VOLUME (+) or (Ð)<br />
button on the remote control to<br />
show the VOLUME bar display on<br />
the screen.<br />
Press the VOLUME (+) or (Ð)<br />
button to adjust the televisionÕs<br />
sound level.<br />
VOLUME 15<br />
SLEEP<br />
POWER<br />
SMART HELP<br />
TV<br />
SOURCE STATUS CC CLOCK<br />
Try it out. Press the VOL<br />
(+) and (Ð) buttons. The<br />
VOLUME bar will appear near the<br />
bottom center of the screen.<br />
DVD<br />
REPEAT<br />
REPEAT<br />
A-B<br />
SHUFFLE<br />
SCAN<br />
A/CH<br />
SOUND<br />
PICTURE<br />
2 1<br />
MENU<br />
OK<br />
VOL<br />
MUTE<br />
CH<br />
T/C AUDIO FTS ANGLE<br />
PREVIOUS ZOOM SUBTITLE NEXT<br />
REVERSE<br />
STOP<br />
PLAY<br />
FORWARD<br />
INCR.SURR.<br />
PAUSE<br />
SURF<br />
OPEN/CLOSE<br />
31
SOUND – USING THE AVL (AUDIO VOLUME LEVELER)<br />
In most cases, the volume levels<br />
coming from broadcast programming<br />
or commercials are never the<br />
same. With the AVL (Audio Volume<br />
Leveler) control turned ON, you can<br />
have the TV level out sound that is<br />
being heard. This makes for a more<br />
consistent sound by reducing the<br />
peaks and valleys that occur during<br />
program changes or commercial<br />
breaks. To turn the AVL ON, follow<br />
these steps.<br />
Press the MENU button on the<br />
remote control to show the onscreen<br />
menu.<br />
Press the CURSOR DOWN<br />
button once to highlight SOUND.<br />
Press the CURSOR RIGHT<br />
button and the menu will shift to<br />
the left. TREBLE will be highlighted<br />
and an adjustment bar will be<br />
shown to the right.<br />
Press the CURSOR DOWN<br />
button repeatedly until AVL is<br />
highlighted. Then press the CUR-<br />
SOR RIGHT or CURSOR LEFT<br />
button to toggle AVL ON or OFF.<br />
Press the STATUS button to<br />
remove the menu from the screen.<br />
1<br />
TV<br />
DVD<br />
PICTURE<br />
SOUND<br />
FEATURES<br />
INSTALL<br />
SLEEP<br />
SOURCE STATUS CC CLOCK<br />
REPEAT<br />
SOUND<br />
MENU<br />
REPEAT<br />
A-B<br />
SHUFFLE<br />
TREBLE<br />
BASS<br />
BALANCE<br />
AVL<br />
INCR. SURROUND<br />
POWER<br />
SCAN<br />
PICTURE<br />
OK<br />
5<br />
3<br />
4<br />
SOUND<br />
TREBLE 30<br />
BASS<br />
BALANCE<br />
AVL<br />
INCR. SURROUND<br />
SOUND<br />
TREBLE<br />
BASS<br />
BALANCE<br />
AVL<br />
INCR. SURROUND<br />
AVL<br />
OR<br />
OFF<br />
ON<br />
4<br />
2<br />
VOL<br />
CH<br />
MUTE<br />
AUDIO<br />
T/C FTS ANGLE<br />
PREVIOUS ZOOM SUBTITLE NEXT<br />
REVERSE<br />
STOP<br />
PLAY<br />
FORWARD<br />
INCR.SURR.<br />
PAUSE<br />
SURF<br />
OPEN/CLOSE<br />
32
The Incredible Surround feature<br />
adds greater depth and dimension<br />
to both monaural (MONO)<br />
and stereo TV sound. With the<br />
control set to INCR. SURROUND<br />
(Incredible Surround), the TVÕs<br />
speakers can add even wider<br />
sound separation to normal broadcasts.<br />
SOUND – USING INCREDIBLE SURROUND<br />
Press the INCR. SURR. button<br />
on the remote control to turn<br />
the Incredible Surround feature<br />
ON.<br />
When the TV signal is being<br />
received in Stereo, pressing this<br />
button will give you these options:<br />
STEREO, or INCR. SURROUND.<br />
When the TV signal is in MONO,<br />
the choices displayed will read<br />
SPATIAL or MONO.<br />
MONO OPTIONS ARE:<br />
INCR. SURROUND<br />
OR<br />
INCR. SURROUND<br />
MONO<br />
SPATIAL<br />
SPATIAL<br />
On-screen menu options for<br />
Incredible Surround in MONO mode<br />
POWER<br />
SLEEP<br />
TV SOURCE STATUS CC CLOCK<br />
REPEAT REPEAT SHUFFLE SCAN<br />
A-B<br />
A/CH<br />
DVD<br />
INCR. SURROUND<br />
STEREO OPTIONS ARE:<br />
INCR. SURROUND<br />
OR<br />
INCR. SURROUND<br />
INCR. SURR<br />
STEREO<br />
On-screen menu options for<br />
Incredible Surround in STEREO<br />
mode<br />
SOUND<br />
PICTURE<br />
MENU<br />
OK<br />
NOTE: If the TV signal is being<br />
received from a mono source, pressing<br />
the INCR. SURR. button will<br />
cause either MONO or SPATIAL to<br />
appear on the the screen.<br />
SPATIAL Ð widens the sound, simulating<br />
a broader, fuller sound.<br />
VOL<br />
CH<br />
MUTE<br />
AUDIO<br />
T/C FTS ANGLE<br />
PREVIOUS ZOOM SUBTITLE NEXT<br />
REVERSE STOP PLAY FORWARD<br />
INCR.SURR. PAUSE SURF<br />
OPEN/CLOSE<br />
NOTE: If the TV signal is being<br />
received from a stereo source, pressing<br />
the INCR. SURR. button will<br />
toggle three choices: STEREO,<br />
INCR. SURROUND, and VIRTUAL<br />
DOLBY SURR.<br />
INCR. SURROUND Ð widens the<br />
sound, simulating a broader, fuller<br />
sound.<br />
1<br />
33
You can receive broadcast<br />
stereo TV programs. The TV<br />
has both an amplifier and twin<br />
speakers through which the stereo<br />
sound can be heard.<br />
Press the MENU button on<br />
the remote control to show the<br />
on-screen menu.<br />
Press the CURSOR DOWN<br />
button once to highlight the<br />
SOUND menu.<br />
Press the CURSOR RIGHT<br />
button and the menu will shift to<br />
the left.<br />
Press the CURSOR DOWN<br />
button repeatedly until the<br />
STEREO control is highlighted.<br />
Press the CURSOR LEFT or<br />
CURSOR RIGHT button to<br />
select STEREO or MONO. When<br />
STEREO has been selected, the<br />
television will reproduce any<br />
stereo broadcast signal it receives.<br />
Press the STATUS button to<br />
remove the menu from the screen.<br />
SOUND – SETTING THE TV FOR STEREO AND SAP<br />
1<br />
4<br />
TV<br />
DVD<br />
2<br />
PICTURE<br />
SOUND<br />
FEATURES<br />
INSTALL<br />
SLEEP<br />
SOURCE STATUS CC CLOCK<br />
REPEAT<br />
VOL<br />
SOUND<br />
MENU<br />
REPEAT<br />
A-B<br />
MUTE<br />
PICTURE<br />
T/C AUDIO FTS ANGLE<br />
PREVIOUS ZOOM SUBTITLE NEXT<br />
REVERSE<br />
INCR.SURR.<br />
STOP<br />
PAUSE<br />
SHUFFLE<br />
PLAY<br />
TREBLE<br />
BASS<br />
BALANCE<br />
AVL<br />
INCR. SURROUND<br />
POWER<br />
OK<br />
SCAN<br />
SURF<br />
CH<br />
FORWARD<br />
6<br />
3<br />
5<br />
SOUND<br />
TREBLE 30<br />
BASS<br />
BALANCE<br />
AVL<br />
INCR. SURROUND<br />
SOUND<br />
BASS<br />
BALANCE<br />
AVL<br />
INCR. SURROUND<br />
STEREO<br />
STEREO<br />
OR<br />
SMART HELP<br />
MONO<br />
STEREO<br />
Remember, if stereo is not present<br />
on a selected show and the TV is<br />
placed in the STEREO mode, the sound<br />
coming from the set will remain monaural.<br />
SECOND AUDIO PROGRAM (SAP)<br />
OPEN/CLOSE<br />
An SAP is an additional part of<br />
the stereo broadcast system. Sent<br />
as a third audio channel, an SAP<br />
can be heard apart from the current<br />
TV program sound. TV stations<br />
are free to use SAP for any<br />
number of purposes.<br />
If an SAP signal is not present<br />
with a selected program, the SAP<br />
option cannot be selected. Also, if<br />
SAP is selected on a channel (with<br />
SAP) and you select another channel,<br />
when you return to the original<br />
channel, SAP will be OFF.<br />
You will have to reselect the SAP<br />
feature.<br />
SOUND<br />
BALANCE<br />
AVL<br />
INCR. SURROUND<br />
STEREO<br />
SAP<br />
NOT AVAILABLE<br />
IF SECONDARY AUDIO PROGRAMING<br />
IS BEING BROADCAST:<br />
SAP AVAILABLE<br />
OR<br />
SAP OFF<br />
SOUND<br />
BALANCE<br />
AVL<br />
INCR. SURROUND<br />
STEREO<br />
SAP<br />
AVAILABLE<br />
IF SECONDARY AUDIO PROGRAMING<br />
IS NOT BEING BROADCAST:<br />
SAP NOT AVAILABLE<br />
OR<br />
SAP OFF<br />
34
SOUND – SETTING THE AUDIO OUT CONTROL<br />
If you have connected the TVÕs<br />
AUDIO OUTPUT jacks to the<br />
AUDIO INPUT jacks on a stereo<br />
receiver, set AUDIO OUT to either<br />
VARIABLE or FIXED to determine<br />
whether you adjust the volume at<br />
the stereo or at the TV. If you<br />
select VARIABLE, change the volume<br />
at the TV using the TVÕs<br />
remote control. If you select<br />
FIXED, adjust the volume at the<br />
stereo using the stereoÕs controls.<br />
To select FIXED or VARIABLE,<br />
follow these steps.<br />
Press the MENU button on<br />
the remote control to show the onscreen<br />
menu.<br />
Press the CURSOR DOWN<br />
button once to highlight SOUND.<br />
Press the CURSOR RIGHT<br />
button and the menu will shift to<br />
the left.<br />
Press the CURSOR DOWN<br />
button repeatedly until AUDIO<br />
OUT is highlighted.<br />
Press the CURSOR LEFT or<br />
CURSOR RIGHT button to set<br />
the AUDIO OUT to VARIABLE or<br />
FIXED.<br />
Press the STATUS button to<br />
remove the menu from the screen.<br />
1<br />
4<br />
TV<br />
DVD<br />
PICTURE<br />
SOUND<br />
FEATURES<br />
INSTALL<br />
2<br />
SLEEP<br />
SOURCE STATUS CC CLOCK<br />
REPEAT<br />
VOL<br />
SOUND<br />
MENU<br />
REPEAT<br />
A-B<br />
MUTE<br />
SHUFFLE<br />
POWER<br />
SCAN<br />
PICTURE<br />
T/C AUDIO FTS ANGLE<br />
PREVIOUS ZOOM SUBTITLE NEXT<br />
TREBLE<br />
BASS<br />
BALANCE<br />
AVL<br />
INCR. SURROUND<br />
OK<br />
CH<br />
6<br />
3<br />
5<br />
SOUND<br />
TREBLE 30<br />
BASS<br />
BALANCE<br />
AVL<br />
INCR. SURROUND<br />
SOUND<br />
AVL<br />
INCR. SURROUND<br />
STEREO<br />
SAP<br />
AUDIO OUT<br />
OR<br />
SOUND<br />
AVL<br />
INCR. SURROUND<br />
STEREO<br />
SAP<br />
AUDIO OUT<br />
FIXED<br />
VARIABLE<br />
REVERSE<br />
STOP<br />
PLAY<br />
FORWARD<br />
INCR.SURR.<br />
PAUSE<br />
SURF<br />
OPEN/CLOSE<br />
35
SOUND – USING THE TV SPEAKER CONTROL AND AUDIO OUTPUT JACKS<br />
Would you like to hear TV programs<br />
through your audio hifi<br />
system? The TVÕs Audio Output<br />
jacks and TV Speaker ON/OFF<br />
control work together to offer you<br />
this TV sound option.<br />
Connect the R(ight) and<br />
L(eft) AUDIO OUT jacks on the<br />
TV to the R and L audio input<br />
jacks on your amplifier or sound<br />
system. Set the audio systemÕs<br />
volume to a normal listening level.<br />
Turn the TV and audio system<br />
ON. You can now adjust the<br />
sound level coming from the audio<br />
system with the VOLUME (+) or<br />
(Ð) buttons on the TV or remote<br />
control.<br />
To hear the TV sound from only<br />
the audio system speakers:<br />
Press the MENU button on<br />
the remote control to show the onscreen<br />
menu.<br />
Press the CURSOR DOWN<br />
button once to highlight SOUND.<br />
Press the CURSOR RIGHT<br />
button and the menu will shift to<br />
the left.<br />
Press the CURSOR DOWN<br />
button repeatedly until the<br />
SPEAKERS control is highlighted.<br />
Press the CURSOR RIGHT<br />
or CURSOR LEFT button to<br />
turn the televisionÕs speakers ON<br />
or OFF. With the SPEAKERS control<br />
set to OFF, you should hear<br />
the TV sound coming only from<br />
the audio system speakers.<br />
3<br />
6<br />
TV<br />
DVD<br />
4<br />
PICTURE<br />
SOUND<br />
FEATURES<br />
INSTALL<br />
SLEEP<br />
SOURCE STATUS CC CLOCK<br />
REPEAT<br />
VOL<br />
SOUND<br />
MENU<br />
REPEAT<br />
A-B<br />
MUTE<br />
PICTURE<br />
T/C AUDIO FTS ANGLE<br />
PREVIOUS ZOOM SUBTITLE NEXT<br />
REVERSE<br />
INCR.SURR.<br />
STOP<br />
PAUSE<br />
SHUFFLE<br />
PLAY<br />
OPEN/CLOSE<br />
TREBLE<br />
BASS<br />
BALANCE<br />
AVL<br />
INCR. SURROUND<br />
POWER<br />
OK<br />
SCAN<br />
SURF<br />
CH<br />
FORWARD<br />
5<br />
5<br />
7<br />
DIGITAL AUDIOOUT<br />
PCM/MPEG2/DOLBYD/DTS<br />
SOUND<br />
TREBLE 30<br />
BASS<br />
BALANCE<br />
AVL<br />
INCR. SURROUND<br />
OPTICAL<br />
COAXIAL<br />
SOUND<br />
INCR. SURROUND<br />
STEREO<br />
SAP<br />
AUDIO OUT<br />
SPEAKERS<br />
SPEAKERS<br />
MONITOR OUT<br />
AUDIO L and R<br />
(RED/WHITE)<br />
75½<br />
1<br />
OR<br />
8<br />
½<br />
ON<br />
OFF<br />
JACK PANEL<br />
(Located on the back of the television)<br />
SURROUND SOUND<br />
+ R Ð Ð L +<br />
VIDEO<br />
L/Mono<br />
AUDIO<br />
R<br />
R<br />
Monitor<br />
out<br />
AUDIO CABLES<br />
L<br />
AV1<br />
in<br />
8<br />
½<br />
AV2<br />
in<br />
S-VIDEO<br />
AUX/TV INPUT<br />
PHONO INPUT<br />
SMART HELP<br />
Remember, the audio<br />
system may have to be in<br />
AUX(iliary) mode to play sound<br />
from the TV.<br />
2<br />
AUDIO SYSTEM<br />
36
Whether you’re watching a<br />
movie or a video game, your<br />
TV has automatic video control settings<br />
that will match with your current<br />
program source or content.<br />
AutoPicture quickly resets your<br />
TV’s video controls for a number of<br />
different types of programs and<br />
viewing conditions that you may<br />
have in your home. The Movies,<br />
Sports, Weak Signal, and<br />
Multimedia AutoPicture controls<br />
have been preset at the factory to<br />
automatically adjust the TV’s<br />
brightness, color, picture, sharpness,<br />
tint, and color temperature<br />
levels. The Personal AutoPicture<br />
settings are the ones that you made<br />
through the PICTURE options within<br />
the on-screen menu.<br />
Press the PICTURE button<br />
on the remote control. The current<br />
AutoPicture TM setting will appear in<br />
the middle of the screen.<br />
Press the PICTURE button<br />
repeatedly to select either PER-<br />
SONAL, MOVIES, SPORTS,<br />
WEAK SIGNAL, or MULTI<br />
MEDIA picture settings.<br />
REMOTE CONTROL – USING AUTOPICTURE<br />
NOTE: The PERSONAL setting<br />
and the PICTURE options within<br />
the on-screen menu are the same.<br />
This is the only option in<br />
AutoPicture TM that can be changed.<br />
To adjust these settings, use the<br />
PICTURE options within the onscreen<br />
menu. All other settings are<br />
set up at the factory during production<br />
and cannot be adjusted.<br />
PERSONAL<br />
BRIGHTNESS 48<br />
COLOR 41<br />
PICTURE 81<br />
SHARPNESS 46<br />
TV<br />
DVD<br />
SLEEP<br />
SOURCE STATUS CC CLOCK<br />
REPEAT<br />
VOL<br />
SOUND<br />
MENU<br />
REPEAT<br />
A-B<br />
MUTE<br />
PICTURE<br />
T/C AUDIO FTS ANGLE<br />
PREVIOUS ZOOM SUBTITLE NEXT<br />
REVERSE<br />
INCR.SURR.<br />
STOP<br />
PAUSE<br />
SHUFFLE<br />
PLAY<br />
OPEN/CLOSE<br />
POWER<br />
OK<br />
SCAN<br />
A/CH<br />
SURF<br />
CH<br />
FORWARD<br />
1<br />
MOVIES<br />
BRIGHTNESS 34<br />
COLOR 34<br />
PICTURE 75<br />
SHARPNESS 70<br />
SPORTS<br />
BRIGHTNESS 34<br />
COLOR 34<br />
PICTURE 67<br />
SHARPNESS 65<br />
WEAK SIGNAL<br />
BRIGHTNESS 34<br />
COLOR WEAK SIGNAL 32<br />
PICTURE 59<br />
SHARPNESS 50<br />
MULTI MEDIA<br />
BRIGHTNESS 34<br />
COLOR 34<br />
PICTURE 71<br />
SHARPNESS 60<br />
37
REMOTE CONTROL – USING AUTOSOUND<br />
AutoSound allows you to<br />
select from three factory-set<br />
controls and a personal control that<br />
you set according to your own preferences<br />
through the on-screen<br />
Sound menu. The three factory-set<br />
controls (Voice, Music, and<br />
Theatre) enable you to tailor the TV<br />
sound so as to enhance the particular<br />
program you are watching.<br />
Follow these steps to select any of<br />
the options.<br />
PERSONAL<br />
TREBLE 49<br />
BASS 49<br />
VOICE<br />
Press the SOUND button on the<br />
remote control. The current<br />
AutoSound TM setting will appear in<br />
the middle of the screen.<br />
TREBLE 56<br />
BASS 47<br />
Press the SOUND button repeatedly<br />
to toggle among the four settings:<br />
PERSONAL, VOICE,<br />
MUSIC, or THEATRE.<br />
TV<br />
SLEEP<br />
SOURCE STATUS CC CLOCK<br />
REPEAT<br />
REPEAT<br />
SHUFFLE<br />
POWER<br />
SCAN<br />
MUSIC<br />
TREBLE 72<br />
BASS 65<br />
Remember, only the PERSONAL<br />
control can be changed by the<br />
viewer. This changes the settings<br />
in the main on-screen menuÕs<br />
SOUND controls.<br />
2 1<br />
DVD<br />
SOUND<br />
MENU<br />
A-B<br />
A/CH<br />
PICTURE<br />
OK<br />
THEATRE<br />
TREBLE 65<br />
BASS 69<br />
SMART HELP<br />
Remember, AutoSound TM<br />
works only with the programs<br />
coming through the<br />
ANTENNA/CABLE (ANT) input<br />
on the rear of the TV (RF audio).<br />
It will not control the sound levels<br />
for the external connections.<br />
VOL<br />
CH<br />
MUTE<br />
AUDIO<br />
T/C FTS ANGLE<br />
PREVIOUS ZOOM SUBTITLE NEXT<br />
REVERSE STOP PLAY FORWARD<br />
INCR.SURR. PAUSE SURF<br />
AutoSound Options<br />
OPEN/CLOSE<br />
PERSONAL Ð presents the TVÕs sound<br />
according to the settings you make within the<br />
sound menu.<br />
VOICE Ð brings voices to the forefront and<br />
emphasizes them. Moves music to the background.<br />
MUSIC Ð emphasizes music over voices.<br />
THEATRE Ð provides a balance between<br />
voices and music.<br />
38
Alist or series of previously<br />
viewed channels can be selected<br />
with the SURF button on your<br />
remote control. With this feature,<br />
you can easily switch between different<br />
TV channels that currently<br />
interest you. The SURF control<br />
allows you to set up to ten channels<br />
in its quick viewing list.<br />
REMOTE CONTROL – USING CHANNEL SURF<br />
SURF<br />
12 ADD?<br />
Press the CHANNEL(+) or (Ð)<br />
button (or the numbered buttons)<br />
to select a channel to add to the<br />
SURF list.<br />
SURF LIST EMPTY<br />
SURF<br />
12 DELETE?<br />
Press the SURF button on the<br />
remote control. The on-screen display<br />
may read, ÒSURF LIST<br />
EMPTY.Ó The number of the current<br />
channel will be shown with<br />
ÒADD?Ó to the right.<br />
While the SURF list message or<br />
the SURF channel list appears on<br />
the screen, press the CURSOR<br />
RIGHT button to add the present<br />
channel to the SURF list.<br />
POWER<br />
SLEEP<br />
TV SOURCE STATUS CC CLOCK<br />
REPEAT REPEAT SHUFFLE SCAN<br />
A-B<br />
A/CH<br />
DVD<br />
SURF<br />
12<br />
24 ADD?<br />
SURF<br />
12<br />
24 DELETE?<br />
If you want to delete the present<br />
channel from the SURF list, press<br />
the CURSOR RIGHT button<br />
again.<br />
Repeat steps 1 through 3 to add<br />
more channels (up to 10) to the<br />
SURF list.<br />
SOUND<br />
PICTURE<br />
MENU<br />
OK<br />
VOL<br />
CH<br />
MUTE<br />
T/C AUDIO FTS ANGLE<br />
4<br />
3<br />
1<br />
SURF<br />
12<br />
24<br />
32 ADD?<br />
NOTE: Along with regularly programmed<br />
channels, the external video<br />
source connections can be added to the<br />
SURF list. This means that the AV1,<br />
AV2, and AV3 channels can be added to<br />
your SURF list. Just tune to their channel<br />
and use the same procedure<br />
described on this page.<br />
PREVIOUS ZOOM SUBTITLE NEXT<br />
REVERSE STOP PLAY FORWARD<br />
INCR.SURR. PAUSE SURF<br />
OPEN/CLOSE<br />
2<br />
SURF<br />
12<br />
24<br />
32 DELETE?<br />
39
OPERATING THE DVD PLAYER<br />
This section of the Directions for Use manual begins to explain the operating procedures<br />
of the DVD Player portion of this television. Be sure the remote control’s<br />
TV/DVD Mode Switch is placed in the DVD position before attempting to operate<br />
the DVD Player.<br />
Let’s learn the simple operation<br />
of the TV’s built-in DVD Player.<br />
Unless otherwise stated, all operations<br />
can be performed by using the<br />
remote control.<br />
4<br />
Press the POWER button on<br />
the remote control (or the TV) to<br />
turn the television ON.<br />
Slide the TV/DVD Mode<br />
Switch on the remote control to the<br />
DVD position.<br />
Press the OPEN/CLOSE button<br />
on the remote control to place<br />
the TV/DVD in the DVD mode.<br />
Press the OPEN/CLOSE button<br />
again to open the disc tray.<br />
Place your chosen disc in the<br />
tray. Be sure that the disc label is<br />
facing up and the disc is centered in<br />
the tray.<br />
Press the OPEN/CLOSE button<br />
on the remote control (or the<br />
EJECT button on the TV) to close<br />
the disc tray.<br />
The on-screen display will indicate<br />
that the DVD Player is reading<br />
the disc. Then playback of the disc<br />
will begin automatically.<br />
Note: If the “Child Lock” option is<br />
set to ON within the Personal<br />
Preference section, the 4-digit<br />
access code must be entered or the<br />
disc must be authorized. (See the<br />
“Access Control” section within<br />
this manual.)<br />
POWER<br />
2<br />
1<br />
POWER<br />
SLEEP<br />
TV SOURCE STATUS CC CLOCK<br />
REPEAT<br />
DVD<br />
SOUND<br />
MENU<br />
VOL<br />
REPEAT SHUFFLE SCAN<br />
A-B<br />
PICTURE<br />
OK<br />
CH<br />
MUTE<br />
AUDIO<br />
T/C FTS ANGLE<br />
PREVIOUS ZOOM SUBTITLE NEXT<br />
REVERSE STOP PLAY FORWARD<br />
2<br />
reading stop<br />
--:--:--<br />
--:--:--<br />
6<br />
reading stop<br />
--:--:--<br />
--:--:--<br />
A Default Screen is displayed when<br />
the DVD Player is in the STOP<br />
mode. It may contain a “Status<br />
Window” and a “Temporary<br />
Feedback Field.” this screen gives<br />
information concerning prohibited<br />
actions, playback, modes, available<br />
angles, etc.<br />
INCR.SURR.<br />
PAUSE<br />
OPEN/CLOSE<br />
SURF<br />
3<br />
5<br />
40
OPERATING THE DVD PLAYER<br />
GENERAL EXPLANATION<br />
This manual gives the basic<br />
instructions for operating this<br />
DVD Player. Some DVD’s require<br />
specific operation or allow only<br />
limited operation during playback.<br />
In these cases, the player may not<br />
respond to all operating commands.<br />
When this occurs, please refer to<br />
the instructions contained with the<br />
DVD (disc). When the symbol X<br />
appears on the TV screen, the operation<br />
is not permitted by the player<br />
or the disc.<br />
Be sure to<br />
place the<br />
TV/DVD Mode<br />
Switch in the<br />
DVD position.<br />
TV<br />
DVD<br />
SOURCE<br />
REPEAT<br />
1 1 1 en 1 en no off<br />
R<br />
X<br />
When the “X” icon appears on<br />
the TV screen, it means the function<br />
cannot be preformed or is not an<br />
available option for that disc.<br />
Unless otherwise stated, all operations<br />
can be performed by using<br />
the remote control.<br />
DVD play<br />
2:45:23<br />
0:00:34<br />
off<br />
st<br />
MENU BAR OPERATION<br />
Press the STATUS button to<br />
display the DVD Player’s onscreen<br />
menu.<br />
Press the CURSOR RIGHT<br />
or LEFT button to highlight and<br />
select Menu Bar options: Personal<br />
Preference, Title/Track,<br />
Chapter/Index, Audio Language,<br />
Subtitle Language, Angle, Zoom,<br />
Video Program, Sound, Picture<br />
by Picture, Slow Motion, Fast<br />
Motion, or Time Search.<br />
Some of these options, along<br />
with a few others, can also be<br />
selected directly from the remote<br />
control through dedicated function<br />
buttons.<br />
Pressing the STATUS button<br />
while the on-screen menu is displayed<br />
will remove the menu from<br />
the TV screen.<br />
4<br />
2<br />
1<br />
POWER<br />
SLEEP<br />
TV SOURCE STATUS CC CLOCK<br />
REPEAT REPEAT SHUFFLE SCAN<br />
A-B<br />
DVD<br />
SOUND<br />
PICTURE<br />
MENU<br />
OK<br />
VOL<br />
CH<br />
MUTE<br />
AUDIO<br />
T/C FTS ANGLE<br />
PREVIOUS ZOOM SUBTITLE NEXT<br />
REVERSE STOP PLAY FORWARD<br />
INCR.SURR. PAUSE SURF<br />
2<br />
Menu Bar Icons<br />
Personal Preference<br />
Title/Track<br />
Chapter/Index<br />
Audio Language<br />
Subtitle Language<br />
Angle<br />
Zoom<br />
Video Program<br />
Sound<br />
Picture by Picture<br />
Slow Motion<br />
Fast Motion<br />
Time Search<br />
OPEN/CLOSE<br />
3<br />
41
OPERATING THE DVD PLAYER - PERSONAL PREFERENCES<br />
PICTURE<br />
Many of the DVD Player’s features<br />
can be set to suit your “Personal<br />
Preference.” Let’s start by looking<br />
at the PICTURE features.<br />
1 1 1 en 1 en no off<br />
Press the STATUS button on<br />
the remote control to display the<br />
on-screen menu.<br />
Press the CURSOR LEFT or<br />
RIGHT until the Personal<br />
Preference Icon is highlighted.<br />
DVD play<br />
2:45:23<br />
0:00:34<br />
DVD play<br />
2:45:23<br />
0:00:34<br />
1 1 1 en 1 en no off<br />
Press the CURSOR DOWN<br />
button to highlight the Picture<br />
Icon .<br />
Press the CURSOR RIGHT<br />
button to highlight the first<br />
Picture feature option “TV Shape”.<br />
TV<br />
SLEEP<br />
SOURCE STATUS CC CLOCK<br />
REPEAT<br />
REPEAT<br />
A-B<br />
SHUFFLE<br />
POWER<br />
SCAN<br />
1 1 1 en 1 en no off<br />
TV shape<br />
Black Level shift<br />
Video shift<br />
4:3 panscan<br />
On<br />
9 1<br />
5<br />
Press the CURSOR UP or<br />
DOWN button to select and highlight<br />
the feature you wish to<br />
change. Choose Picture Shape,<br />
Black Level Shift, or Video Shift.<br />
7<br />
DVD<br />
SOUND<br />
PICTURE<br />
8<br />
1 1 1 en 1 en no off<br />
TV shape<br />
Black Level shift<br />
Video shift<br />
4:3 panscan<br />
On<br />
Press the CURSOR RIGHT<br />
button to display the options for<br />
the selected Picture feature.<br />
Picture Shape: Select 4:3 panscan,<br />
4:3 letterbox, or 16:9.<br />
Black Level Shift: Select ON or<br />
OFF. When ON, richer color contrasts<br />
are obtained.<br />
Video Shift: The factory centers<br />
the video picture on the TV’s<br />
screen. Video Shift will let you<br />
position the picture by pressing<br />
the Cursor Right or Left.<br />
Press the CURSOR UP or<br />
DOWN buttons to scroll and<br />
highlight the options of the selected<br />
feature.<br />
2<br />
7<br />
5<br />
VOL<br />
3<br />
MENU<br />
MUTE<br />
T/C AUDIO FTS ANGLE<br />
PREVIOUS ZOOM SUBTITLE NEXT<br />
REVERSE<br />
INCR.SURR.<br />
STOP<br />
PAUSE<br />
PLAY<br />
OPEN/CLOSE<br />
OK<br />
SURF<br />
CH<br />
FORWARD<br />
2<br />
4<br />
6<br />
1 1 1 en 1 en no off<br />
TV shape<br />
Black Level shift<br />
Video shift<br />
TV Shape<br />
Black Level shift<br />
Video shift<br />
4:3 letterbox<br />
4:3 panscan<br />
16:9<br />
1 1 1 en 1 en no off<br />
On<br />
Off<br />
Press the OK button to select<br />
or activate the chosen option.<br />
Press the STATUS button to<br />
clear the on-screen menu from the<br />
TV screen.<br />
1 1 1 en 1 en no off<br />
TV shape<br />
Black Level shift<br />
Video shift<br />
OK to exit<br />
42
OPERATING THE DVD PLAYER - PERSONAL PREFERENCES<br />
SOUND<br />
The Personal Preference area of the<br />
menu has various SOUND features<br />
to customize and compliment your<br />
viewing and listening pleasure.<br />
DVD play<br />
2:45:23<br />
0:00:34<br />
1 1 1 en 1 en no off<br />
DVD play<br />
2:45:23<br />
0:00:34<br />
1 1 1 en 1 en no off<br />
Press the STATUS button on<br />
the remote control to display the<br />
on-screen menu.<br />
1 1 1 en 1 en no off<br />
Press the CURSOR LEFT or<br />
RIGHT button until the Personal<br />
Preference Icon is highlighted.<br />
Press the CURSOR DOWN<br />
button to highlight the Sound<br />
Icon .<br />
Press the CURSOR RIGHT<br />
button to highlight the first Sound<br />
feature option “Digital output”.<br />
Press the CURSOR UP or<br />
DOWN button to select and highlight<br />
the feature you wish to<br />
change. Choose Digital output,<br />
Analog output, Night mode, or<br />
Karaoke vocal.<br />
Press the CURSOR RIGHT<br />
button to display the options for<br />
the selected Picture feature.<br />
Digital output: Select Off (If<br />
using none of the digital outputs),<br />
PCM only (If your external<br />
equipment does not include a digital<br />
multi-channel decoder), or All<br />
(If using a digital multi-channel<br />
decoder, both coaxial and optical<br />
outputs are switched on.).<br />
Analog output: Select Stereo,<br />
Dolby surround, or 3D sound.<br />
Night mode: Select On<br />
(Optimizes the dynamics of the<br />
sound with low volume playback),<br />
or Off.<br />
Karaoke vocal: Select On (Set to<br />
on only when using a multi-channel<br />
karaoke DVD), or Off.<br />
5<br />
POWER<br />
TV SOURCE STATUS CC CLOCK<br />
REPEAT REPEAT SHUFFLE SCAN<br />
A-B<br />
DVD<br />
7<br />
9 1<br />
SLEEP<br />
2<br />
5<br />
7<br />
SOUND<br />
PICTURE<br />
MENU<br />
OK<br />
VOL<br />
CH<br />
3<br />
MUTE<br />
T/C AUDIO FTS ANGLE<br />
PREVIOUS ZOOM SUBTITLE NEXT<br />
REVERSE STOP PLAY FORWARD<br />
INCR.SURR. PAUSE SURF<br />
OPEN/CLOSE<br />
8<br />
2<br />
4<br />
6<br />
Digital output<br />
Analog output<br />
Night mode<br />
Karaoke vocal<br />
Digital output<br />
Analog output<br />
Night mode<br />
Karaoke vocal<br />
All<br />
Stereo<br />
Off<br />
Off<br />
1 1 1 en 1 en no off<br />
Digital output<br />
Analog output<br />
Night mode<br />
Karaoke vocal<br />
All<br />
Stereo<br />
Off<br />
Off<br />
1 1 1 en 1 en no off<br />
Digital output<br />
Analog output<br />
Night mode<br />
Karaoke vocal<br />
Off<br />
PCM only<br />
All<br />
1 1 1 en 1 en no off<br />
1 1 1 en 1 en no off<br />
Digital output<br />
Analog output<br />
Night mode<br />
Karaoke vocal<br />
Stereo<br />
Dolby Surround<br />
3D sound<br />
On<br />
Off<br />
Press the CURSOR UP or<br />
DOWN buttons to scroll and<br />
highlight the options of the selected<br />
feature.<br />
Press the OK button to select<br />
or activate the chosen option.<br />
Press the STATUS button to<br />
clear the on-screen menu from the<br />
TV screen.<br />
1 1 1 en 1 en no off<br />
Digital output<br />
Analog output<br />
Night mode<br />
Karaoke vocal<br />
On<br />
Off<br />
43
OPERATING THE DVD PLAYER - PERSONAL PREFERENCES<br />
LANGUAGE<br />
Many DVDs are capable of multilingual<br />
settings. The Language feature<br />
within the Personal Preference<br />
area of the DVD on-screen menu will<br />
let the user set the Audio, Subtitle,<br />
and Menu language.<br />
1 1 1 en 1 en no off<br />
Press the STATUS button on<br />
the remote control to display the onscreen<br />
menu.<br />
Press the CURSOR LEFT or<br />
RIGHT until the Personal<br />
Preference Icon is highlighted.<br />
Press the CURSOR DOWN<br />
button to highlight the Language<br />
Icon .<br />
DVD play<br />
2:45:23<br />
0:00:34<br />
SLEEP<br />
POWER<br />
DVD play<br />
2:45:23<br />
0:00:34<br />
1 1 1 en 1 en no off<br />
1 1 1 en 1 en no off<br />
Audio Language<br />
Subtitle<br />
Menu<br />
English<br />
English<br />
English<br />
9 1<br />
5<br />
Press the CURSOR RIGHT<br />
button to highlight the first<br />
Language feature option “Audio<br />
Language.”<br />
Press the CURSOR UP or<br />
DOWN button to select and highlight<br />
the feature you wish to change.<br />
Choose Audio Language, Subtitle,<br />
or Menu.<br />
Press the CURSOR RIGHT<br />
button to display the options for the<br />
selected Picture feature.<br />
Audio Language: Choose from a<br />
list including; English, Español,<br />
Français, Português, Italiano,<br />
Russian, Deutsh, Greek, Japanese,<br />
Korean, Chinese, Quechua,<br />
Guaraní, Aymará, or Inupiaq.<br />
Subtitle: Select from the same list<br />
of languages listed under Audio<br />
Language. Will change the subtitle<br />
test only.<br />
Menu: Select from the same list<br />
of languages listed under Audio<br />
Language. Will change the DVD<br />
on-screen menu only.<br />
NOTE:Audio Language and Subtitle<br />
options are available only if the<br />
DVD being used has these capabilities.<br />
2<br />
7<br />
7<br />
5<br />
TV<br />
DVD<br />
SOURCE STATUS CC CLOCK<br />
REPEAT<br />
VOL<br />
3<br />
SOUND<br />
MENU<br />
REPEAT<br />
A-B<br />
MUTE<br />
PICTURE<br />
T/C AUDIO FTS ANGLE<br />
PREVIOUS ZOOM SUBTITLE NEXT<br />
REVERSE<br />
INCR.SURR.<br />
STOP<br />
PAUSE<br />
SHUFFLE<br />
PLAY<br />
OPEN/CLOSE<br />
OK<br />
SCAN<br />
SURF<br />
CH<br />
FORWARD<br />
8<br />
2<br />
4<br />
6<br />
1 1 1 en 1 en no off<br />
Audio Language<br />
Subtitle<br />
Menu<br />
Audio Language<br />
Subtitle<br />
Menu<br />
English<br />
English<br />
English<br />
1 1 1 en 1 en no off<br />
Audio Language<br />
Subtitle<br />
Menu<br />
English<br />
Español<br />
Français<br />
1 1 1 en 1 en no off<br />
English<br />
Español<br />
Français<br />
1 1 1 en 1 en no off<br />
Press the CURSOR UP or<br />
DOWN buttons to scroll and highlight<br />
the options of the selected feature.<br />
Audio Language<br />
Subtitle<br />
Menu<br />
English<br />
Español<br />
Français<br />
Press the OK button to select or<br />
activate the chosen option.<br />
Press the STATUS button to<br />
clear the on-screen menu from the<br />
TV screen.<br />
44
OPERATING THE DVD PLAYER - PERSONAL PREFERENCES<br />
FEATURES<br />
The Features section of the<br />
Personal Preference options contains<br />
an area where an Access Code<br />
and Parental censoring can be set.<br />
There also are features that can be<br />
turned On or Off (Status Window,<br />
Low Power Standby, and PBC -<br />
Playback Control).<br />
DVD play<br />
2:45:23<br />
0:00:34<br />
1 1 1 en 1 en no off<br />
DVD play<br />
2:45:23<br />
0:00:34<br />
1 1 1 en 1 en no off<br />
Press the STATUS button on<br />
the remote control to display the<br />
on-screen menu.<br />
Press the CURSOR LEFT or<br />
RIGHT button until the Personal<br />
Preference Icon is highlighted.<br />
Press the CURSOR DOWN<br />
button to highlight the Features<br />
Icon .<br />
Press the CURSOR RIGHT<br />
button to highlight the first<br />
Features option “Access code.”<br />
Press the CURSOR UP or<br />
DOWN button to select and highlight<br />
the feature you wish to<br />
change. Choose Access control,<br />
Status window or Low power<br />
standby.<br />
Press the CURSOR RIGHT<br />
button to display the options for<br />
the selected Picture feature.<br />
Access Control: Will require a<br />
four digit code to be entered (refer<br />
to next page for more details).<br />
Select Child Lock (locked or<br />
unlocked), Parental level (Rating<br />
1 to 8 for scenes not suitable for<br />
children), Change Country, or<br />
Change Code.<br />
Status Window: Select On or<br />
Off.<br />
Low Power Standby: Select On<br />
(will put the set into the lower<br />
power standby mode), or Off.<br />
PBC (Playback Control): Select<br />
On to allow viewing of main screen<br />
when playing a PBC featured Video<br />
CD, or Off for playback without<br />
use of the main screen.<br />
Press the CURSOR UP or<br />
DOWN buttons to scroll and highlight<br />
the options of the selected feature.<br />
Press the OK button to select<br />
or activate the chosen option.<br />
Press the STATUS button to<br />
clear the on-screen menu from the<br />
TV screen.<br />
5<br />
POWER<br />
TV SOURCE STATUS CC CLOCK<br />
REPEAT REPEAT SHUFFLE SCAN<br />
A-B<br />
DVD<br />
7<br />
9 1<br />
SLEEP<br />
2<br />
5<br />
7<br />
SOUND<br />
PICTURE<br />
MENU<br />
OK<br />
VOL<br />
CH<br />
3<br />
MUTE<br />
T/C AUDIO FTS ANGLE<br />
PREVIOUS ZOOM SUBTITLE NEXT<br />
REVERSE STOP PLAY FORWARD<br />
INCR.SURR. PAUSE SURF<br />
OPEN/CLOSE<br />
8<br />
2<br />
4<br />
6<br />
1 1 1 en 1 en no off<br />
Access control<br />
Status window<br />
Low power standby<br />
PBC<br />
Access control<br />
Status window<br />
Low power standby<br />
PBC<br />
Enter code...<br />
On<br />
Off<br />
On<br />
1 1 1 en 1 en no off<br />
Access control<br />
Status window<br />
Low power standby<br />
PBC<br />
Enter code...<br />
On<br />
Off<br />
On<br />
1 1 1 en 1 en no off<br />
1 1 1 en 1 en no off<br />
Access control<br />
Status window<br />
Low power standby<br />
PBC<br />
1 1 1 en 1 en no off<br />
Access control<br />
Status window<br />
Low power standby<br />
PBC<br />
Access control<br />
Status window<br />
Low power standby<br />
PBC<br />
On<br />
Off<br />
[ ] [ ] [ ] [ ]<br />
Enter code<br />
On<br />
Off<br />
1 1 1 en 1 en no off<br />
On<br />
Off<br />
45
OPERATING THE DVD PLAYER - PERSONAL PREFERENCES<br />
ACCESS CODE<br />
When using and making changes<br />
within the Access Control option of<br />
the Features sub-menu, an ACCESS<br />
CODE will have to entered before<br />
any new settings can be made. This<br />
page discusses how to set the<br />
Access Code to allow changes to<br />
this section of the on-screen menu.<br />
DVD play<br />
2:45:23<br />
0:00:34<br />
1 1 1 en 1 en no off<br />
DVD play<br />
2:45:23<br />
0:00:34<br />
1 1 1 en 1 en no off<br />
Press the STATUS button on<br />
the remote control to display the<br />
on-screen menu.<br />
Press the CURSOR LEFT or<br />
RIGHT button until the Personal<br />
Preference Icon is highlighted.<br />
Press the CURSOR DOWN<br />
button to highlight the Features<br />
Icon .<br />
Press the CURSOR RIGHT<br />
button to highlight the first<br />
Features option “Access code.”<br />
Press the CURSOR RIGHT<br />
button, the screen will read,<br />
“[ ] [ ] [ ] [ ] Enter code.”<br />
Choose a four digit code and<br />
enter it by pressing the NUM-<br />
BERED buttons on the remote<br />
control. The on-screen menu will<br />
ask to “Confirm code.” Re-enter<br />
your chosen four digit access<br />
code. The on-screen menu will display<br />
the Child lock, Parental<br />
level, change country, and Change<br />
code options.<br />
Press the CURSOR UP or<br />
DOWN button to select and highlight<br />
the option you wish to change.<br />
Press the CURSOR RIGHT<br />
button to enter the highlighted<br />
option choices.<br />
Press the CURSOR UP or<br />
DOWN button to choose one of<br />
the choices.<br />
10 Press the OK button to select<br />
or activate the chosen option.<br />
11 Press the STATUS button to<br />
clear the on-screen menu from the<br />
TV screen.<br />
11 1<br />
TV SOURCE STATUS CC CLOCK<br />
REPEAT REPEAT SHUFFLE SCAN<br />
6<br />
A-B<br />
DVD<br />
9 7 5<br />
SOUND<br />
PICTURE<br />
10<br />
MENU<br />
OK<br />
SLEEP<br />
POWER<br />
4<br />
2<br />
9<br />
7<br />
VOL<br />
3<br />
MUTE<br />
T/C AUDIO FTS ANGLE<br />
PREVIOUS ZOOM SUBTITLE NEXT<br />
REVERSE<br />
INCR.SURR.<br />
STOP<br />
PAUSE<br />
PLAY<br />
OPEN/CLOSE<br />
NOTE:<br />
SURF<br />
CH<br />
FORWARD<br />
Parental Level: (Ratings 1 to 8)<br />
The disc contains scenes not suitable for children. If you set a<br />
rating for the player, all scenes with the same rating or lower<br />
will be played. Higher rated scenes will not be played unless an<br />
alternative is available on the disc. The alternative must have<br />
the same rating or a lower one. If no suitable alternative is<br />
found, playback will stop and the 4-digit code has to be entered.<br />
Parental Control Disclaimer:<br />
This DVD player features the Parental Control system which is<br />
intended to activate when playing DVD discs furnished with<br />
certain software coding. This is according to technical standards<br />
adopted by the set maker and disc content industries. Please<br />
note that the Parental Control system will not operate a DVD<br />
disc which is not furnished with the appropriate software coding.<br />
Also note that at the time of release of this TV/DVD Player,<br />
certain aspects of the technical standards had not been settled<br />
between the set maker and the disc industries.<br />
On this basis <strong>Philips</strong> Consumer Electronics cannot guarantee<br />
functioning of the Parental Control system and denies any liability<br />
with unintended watching of disc content.<br />
If in doubt, please make sure the disc plays according to your<br />
parental Control settings before you allow children access.<br />
2<br />
5<br />
8<br />
1 1 1 en 1 en no off<br />
Access control<br />
Status window<br />
Low power standby<br />
Access control<br />
Status window<br />
Low power standby<br />
Enter code...<br />
On<br />
Off<br />
1 1 1 en 1 en no off<br />
Access control<br />
Status window<br />
Low power standby<br />
Enter code...<br />
On<br />
Off<br />
1 1 1 en 1 en no off<br />
Access control<br />
Status window<br />
Low power standby<br />
[ ] [ ] [ ] [ ]<br />
Enter code<br />
1 1 1 en 1 en no off<br />
Access control<br />
Status window<br />
Low power standby<br />
• • • [ ]<br />
Enter code<br />
1 1 1 en 1 en no off<br />
Access control<br />
Status window<br />
Low power standby<br />
[ ] [ ] [ ] [ ]<br />
Confirm code<br />
1 1 1 en 1 en no off<br />
Child Lock<br />
Parental level<br />
Change country<br />
Change code<br />
46
OPERATING THE DVD PLAYER - PLAYING A DISC<br />
AUTHORIZING DISCS<br />
When the Child Lock or<br />
Parental Level controls are on<br />
and a disc containing material that<br />
will be blocked is inserted, the disc<br />
must first be authorized before playback<br />
can occur.<br />
With the TV/DVD Player<br />
turned on, press the OPEN<br />
/CLOSE button on the remote<br />
control.<br />
2<br />
Place the disc in the disc tray<br />
and press the OPEN/CLOSE<br />
button on the remote control.<br />
If the disc has a rating equal to<br />
or higher than the level allowed,<br />
the child protect “Access control”<br />
dialog box will appear. Press the<br />
CURSOR UP or DOWN button<br />
to select PLAY ONCE or PLAY<br />
ALWAYS.<br />
Play Once: The disc can be<br />
played as long as it is in the player<br />
and the player is ON.<br />
Play Always: The disc will<br />
become child safe (or authorized)<br />
and can be played, even if the<br />
Child Lock control is set to ON.<br />
Press the NUMBERED buttons<br />
on the remote to enter your<br />
four digit Access Code. The Disc<br />
will begin to play or bring you to a<br />
“disc menu” where you might have<br />
to select play.<br />
POWER<br />
POWER<br />
SLEEP<br />
TV SOURCE STATUS CC CLOCK<br />
DVD<br />
3<br />
1<br />
REPEAT REPEAT SHUFFLE SCAN<br />
A-B<br />
SOUND<br />
PICTURE<br />
MENU<br />
OK<br />
4<br />
reading stop<br />
--:--:--<br />
--:--:--<br />
locked<br />
Access Control<br />
Play once [ ] [ ] [ ] [ ]<br />
Play always [ ] [ ] [ ] [ ]<br />
Choose "Play always" to insert the disc in<br />
the child-safe list<br />
DEAUTHORIZING A DISC:<br />
Place the disc in the disc tray<br />
and press the OPEN/CLOSE button.<br />
Playback will begin automatically.<br />
Press the STOP ■ button on<br />
the remote control while the smiley<br />
face is visible. The frownie face<br />
will appear and the disc is then<br />
deauthorized.<br />
6<br />
VOL<br />
MUTE<br />
CH<br />
AUDIO<br />
T/C FTS ANGLE<br />
PREVIOUS ZOOM SUBTITLE NEXT<br />
REVERSE STOP PLAY FORWARD<br />
INCR.SURR. PAUSE SURF<br />
OPEN/CLOSE<br />
3<br />
locked<br />
Access Control<br />
Play once • • [ ] [ ]<br />
Play always [ ] [ ] [ ] [ ]<br />
Choose "Play always" to insert the disc in<br />
the child-safe list<br />
1<br />
5<br />
47
PLAYING A DVD<br />
OR VIDEO CD<br />
After inserting a DVD or Video<br />
CD and closing the tray, playback<br />
will start automatically and<br />
the Status Window will show the<br />
type of disc loaded and the discs<br />
playing time. You may be asked to<br />
select an item from a menu on the<br />
disc itself. Use the CURSOR buttons<br />
to navigate the disc menu and press<br />
the OK button to activate your<br />
selection.<br />
OPERATING THE DVD PLAYER - PLAYING A DISC<br />
Press the PLAY button to<br />
start the playback of a DVD or<br />
Video CD.<br />
DVD Player will read the disc.<br />
Press the STOP ■ button on<br />
the remote control to stop the playback<br />
of a DVD or Video CD and<br />
return to the Status Window.<br />
reading stop<br />
--:--:--<br />
--:--:--<br />
Press the PAUSE II button on<br />
the remote control to temporarily<br />
suspend playback. Additional<br />
pressing of the PAUSE II button<br />
will advance the playback one picture<br />
at a time.<br />
Press the PLAY button on<br />
the remote control to continue normal<br />
playback of the disc.<br />
POWER<br />
SLEEP<br />
TV SOURCE STATUS CC CLOCK<br />
REPEAT REPEAT SHUFFLE SCAN<br />
A-B<br />
DVD<br />
SOUND<br />
PICTURE<br />
reading stop<br />
--:--:--<br />
--:--:--<br />
When finished, press the STOP<br />
■ button to stop playback of the<br />
disc and return to the Status<br />
Window.<br />
MENU<br />
OK<br />
Fantasic Studios Present....<br />
VOL<br />
CH<br />
5<br />
2<br />
MUTE<br />
AUDIO<br />
T/C FTS ANGLE<br />
PREVIOUS ZOOM SUBTITLE NEXT<br />
1<br />
4<br />
A MOVIE<br />
REVERSE<br />
STOP<br />
PLAY<br />
FORWARD<br />
Playback of disc will start automatically.<br />
INCR.SURR.<br />
PAUSE<br />
SURF<br />
OPEN/CLOSE<br />
3<br />
48
OPERATING THE DVD PLAYER - GENERAL FEATURES<br />
MOVING TO ANOTHER<br />
TITLE OR TRACK<br />
Note: Unless stated otherwise, all<br />
operations described on the<br />
next few pages are based on remote<br />
control operation.<br />
When a disc has more than one Title<br />
or Track you can move to another<br />
Title or Track by the following<br />
steps:<br />
POWER<br />
SLEEP<br />
TV SOURCE STATUS CC CLOCK<br />
REPEAT REPEAT SHUFFLE SCAN<br />
A-B<br />
DVD<br />
DVD play<br />
2:45:23<br />
0:00:34<br />
DVD play<br />
2:45:23<br />
0:00:34<br />
1 1 1 en 1 en no off<br />
2 1 1 en 1 en no off<br />
SOUND<br />
PICTURE<br />
With the disc playing, press the<br />
T/C button.<br />
MENU<br />
OK<br />
3 1 1 en 1 en no off<br />
Press the NEXT button to<br />
advance the disc to the next available<br />
title or track.<br />
Press the PREVIOUS button<br />
to move back to the beginning of<br />
the present title/track. Press twice<br />
to step back to the previous title or<br />
track.<br />
1<br />
3<br />
VOL<br />
CH<br />
MUTE<br />
AUDIO<br />
T/C FTS ANGLE<br />
PREVIOUS ZOOM SUBTITLE NEXT<br />
REVERSE STOP PLAY FORWARD<br />
INCR.SURR. PAUSE SURF<br />
2<br />
DVD play<br />
2:45:23<br />
0:00:34<br />
DVD play<br />
2:45:23<br />
0:00:34<br />
4 1 1 en 1 en no off<br />
OPEN/CLOSE<br />
MOVING TO ANOTHER<br />
CHAPTER OR INDEX<br />
When a disc has more than one<br />
Chapter or a track has more than<br />
one Index, you can move to another<br />
Chapter or Index by the following<br />
steps:<br />
POWER<br />
SLEEP<br />
TV SOURCE STATUS CC CLOCK<br />
REPEAT REPEAT SHUFFLE SCAN<br />
A-B<br />
DVD<br />
DVD play<br />
2:45:23<br />
0:00:34<br />
1 1 1 en 1 en no off<br />
With the disc playing, press the<br />
T/C button.<br />
Press the CURSOR RIGHT<br />
button to select “C” in the onscreen<br />
menu bar.<br />
Press the NEXT button to<br />
advance the disc to the next available<br />
chapter or index.<br />
Press the PREVIOUS button<br />
to move back to the beginning of<br />
the present chapter or index. Press<br />
twice to step back to the previous<br />
chapter or index.<br />
2<br />
1<br />
SOUND<br />
PICTURE<br />
MENU<br />
OK<br />
VOL<br />
CH<br />
MUTE<br />
AUDIO<br />
T/C FTS ANGLE<br />
PREVIOUS ZOOM SUBTITLE NEXT<br />
REVERSE STOP PLAY FORWARD<br />
INCR.SURR. PAUSE SURF<br />
2<br />
4<br />
DVD play<br />
2:45:23<br />
0:00:34<br />
DVD play<br />
2:45:23<br />
0:00:34<br />
DVD play<br />
2:45:23<br />
0:00:34<br />
1 2 1 en 1 en no off<br />
1 3 1 en 1 en no off<br />
1 4 1 en 1 en no off<br />
OPEN/CLOSE<br />
49
OPERATING THE DVD PLAYER - GENERAL FEATURES<br />
STILL PICTURE/PICTURE<br />
BY PICTURE PLAYBACK<br />
SLEEP<br />
POWER<br />
With the disc playing, press the<br />
PAUSE button. The playback will<br />
freeze the picture on the screen.<br />
Press the PAUSE button<br />
repeatedly to advance the playback<br />
of the disc “picture by picture.”<br />
Press the PLAY button to<br />
resume normal disc playback.<br />
TV SOURCE STATUS CC CLOCK<br />
REPEAT REPEAT SHUFFLE SCAN<br />
A-B<br />
DVD<br />
SOUND<br />
PICTURE<br />
MENU<br />
OK<br />
VOL<br />
MUTE<br />
CH<br />
AUDIO<br />
T/C FTS ANGLE<br />
2 3<br />
PREVIOUS ZOOM SUBTITLE NEXT<br />
1<br />
REVERSE STOP PLAY FORWARD<br />
INCR.SURR.<br />
PAUSE<br />
SURF<br />
OPEN/CLOSE<br />
SEARCH<br />
FORWARD OR REVERSE<br />
SLEEP<br />
POWER<br />
1 1 1 en 1 en no off<br />
Press the STATUS button to<br />
display the on-screen menu bar.<br />
Press the CURSOR RIGHT<br />
button to select (Fast Motion)<br />
in the on-screen menu bar.<br />
Press the CURSOR DOWN<br />
button to display the Fast Motion<br />
options.<br />
Press the CURSOR RIGHT or<br />
LEFT buttons to select one of the<br />
Fast Motion options (-32, -8, -4<br />
reverse or +4, +8, +32 forward).<br />
Select 1 for normal viewing speed.<br />
Press the STATUS button to<br />
remove the on-screen menu bar<br />
from the TV screen.<br />
Press the FORWARD or<br />
REVERSE buttons to search<br />
through the disc at the speed you set.<br />
Press the PLAY button to<br />
resume normal playback of the disc.<br />
6<br />
4<br />
5 1<br />
6<br />
3<br />
TV<br />
DVD<br />
SOURCE STATUS CC CLOCK<br />
REPEAT<br />
VOL<br />
7<br />
SOUND<br />
MENU<br />
REPEAT<br />
A-B<br />
MUTE<br />
SHUFFLE<br />
SCAN<br />
PICTURE<br />
OK<br />
T/C AUDIO FTS ANGLE<br />
CH<br />
PREVIOUS ZOOM SUBTITLE NEXT<br />
REVERSE STOP PLAY FORWARD<br />
INCR.SURR. PAUSE SURF<br />
2<br />
4<br />
DVD play<br />
2:45:23<br />
0:00:34<br />
DVD play<br />
2:45:23<br />
0:00:34<br />
DVD play<br />
2:45:23<br />
0:00:34<br />
off<br />
off<br />
st<br />
st<br />
-32 -8 -4 1 4 8 32<br />
OPEN/CLOSE<br />
50
OPERATING THE DVD PLAYER - GENERAL FEATURES<br />
REPEAT<br />
REPEAT A-B<br />
Repeat chapter/Title/Index on<br />
DVD Video discs, or repeat<br />
Tracks or the disc on Video CDs.<br />
Press the REPEAT button once<br />
to to repeat the playback of the current<br />
chapter.<br />
Press the REPEAT button<br />
twice to repeat playback of the current<br />
title.<br />
Press the REPEAT button a<br />
third time to repeat the entire disc.<br />
Press the REPEAT button a<br />
fourth time to exit the Repeat mode.<br />
Press the REPEAT A-B button<br />
at your chosen starting point. A-<br />
will appear briefly on the screen.<br />
Press the REPEAT A-B button<br />
again at your chosen ending point.<br />
A-B will appear briefly on the display<br />
and the chosen length of playback<br />
will be repeated.<br />
To exit the repeating sequence,<br />
press the REPEAT A-B button<br />
again.<br />
POWER<br />
SLEEP<br />
2 7<br />
4 1 6<br />
TV SOURCE STATUS CC CLOCK<br />
3<br />
REPEAT REPEAT<br />
A-B<br />
SHUFFLE SCAN<br />
DVD<br />
SOUND<br />
PICTURE<br />
MENU<br />
OK<br />
5<br />
VOL<br />
C<br />
SHUFFLE<br />
The Shuffle command will<br />
rearrange the playback order of<br />
chapters within a title in a Video<br />
CD or tracks of a music CD.<br />
Press the SHUFFLE button to<br />
during playback. “Shuffle” will<br />
briefly appear on the screen.<br />
TV<br />
SLEEP<br />
POWER<br />
SOURCE STATUS CC CLOCK<br />
REPEAT REPEAT SHUFFLE SCAN<br />
1<br />
2<br />
To return to normal playback,<br />
press the SHUFFLE button<br />
again.<br />
DVD<br />
A-B<br />
SOUND<br />
PICTURE<br />
MENU<br />
OK<br />
51
OPERATING THE DVD PLAYER - GENERAL FEATURES<br />
TIME SEARCH<br />
The Time Search control allows<br />
you to start the playback at any<br />
chosen time on the disc<br />
Press the STATUS button to<br />
display the on-screen menu bar.<br />
Press the CURSOR RIGHT<br />
button until the Time Search<br />
Icon is highlighted.<br />
Press the CURSOR DOWN<br />
button to display the “time edit”<br />
box. The player will pause the playback<br />
of the disc.<br />
Press the NUMBERED buttons<br />
to enter a specific time (hour/minutes/seconds).<br />
Press the OK button to confirm<br />
the time and begin playback at that<br />
moment on the disc.<br />
Press the STATUS button to<br />
remove the on-screen menu bar from<br />
the TV screen.<br />
6 1<br />
POWER<br />
SLEEP<br />
TV SOURCE STATUS CC CLOCK<br />
REPEAT REPEAT SHUFFLE SCAN<br />
4<br />
A-B<br />
DVD<br />
5<br />
SOUND<br />
PICTURE<br />
3<br />
MENU<br />
OK<br />
VOL<br />
CH<br />
MUTE<br />
AUDIO<br />
T/C FTS ANGLE<br />
PREVIOUS ZOOM SUBTITLE NEXT<br />
REVERSE STOP PLAY FORWARD<br />
INCR.SURR. PAUSE SURF<br />
2<br />
DVD play<br />
2:45:23<br />
0:00:34<br />
DVD play<br />
2:45:23<br />
0:00:34<br />
DVD play<br />
2:45:23<br />
0:00:34<br />
DVD play<br />
2:45:23<br />
0:00:34<br />
1 1 1 en 1 en no off<br />
off<br />
off<br />
off<br />
st<br />
st<br />
st<br />
0:00:00<br />
1:24:45<br />
OPEN/CLOSE<br />
ZOOM<br />
The Zoom control allows you to<br />
enlarge the video image and pan<br />
through the enlarged image.<br />
Press the ZOOM button to display<br />
the on-screen menu bar with<br />
the Zoom Icon highlighted.<br />
Press the CURSOR UP or<br />
DOWN buttons to select the<br />
desired zoom factor (1.33, 2 or 4).<br />
The player will pause the disc and<br />
the selected zoom factor will be displayed<br />
below the Zoom Icon in the<br />
menu bar. The picture will reformat<br />
itself according to the selected zoom<br />
factor.<br />
Press the OK button to confirm<br />
the selection. The “panning” icon<br />
will appear on the screen.<br />
Use the CURSOR UP, DOWN,<br />
Right or LEFT buttons to pan the<br />
image.<br />
Press the PLAY button to<br />
resume normal playback of the disc.<br />
Press the STATUS button to<br />
remove the menu bar from the TV<br />
screen.<br />
6<br />
POWER<br />
SLEEP<br />
TV SOURCE STATUS CC CLOCK<br />
REPEAT REPEAT SHUFFLE SCAN<br />
A-B<br />
DVD<br />
4 2<br />
SOUND<br />
PICTURE<br />
43<br />
4<br />
1<br />
MENU<br />
OK<br />
VOL<br />
CH<br />
MUTE<br />
AUDIO<br />
T/C FTS ANGLE<br />
PREVIOUS ZOOM SUBTITLE NEXT<br />
REVERSE STOP PLAY FORWARD<br />
INCR.SURR. PAUSE SURF<br />
OPEN/CLOSE<br />
2<br />
4<br />
4<br />
DVD play<br />
2:45:23<br />
0:00:34<br />
DVD play<br />
2:45:23<br />
0:00:34<br />
DVD play<br />
2:45:23<br />
0:00:34<br />
1 1 1 en 1 en no off<br />
1 1 1 en 1 en no 2<br />
Press OK to pan<br />
1 1 1 en 1 en no 2<br />
OK<br />
52
OPERATING THE DVD PLAYER - GENERAL FEATURES<br />
FAVORITE TRACK<br />
SELECTION - VIDEO<br />
The FTS-Video control allows<br />
you to store your favorite<br />
titles/chapters (DVD) and favorite<br />
tracks/indexes (Video CD) for a<br />
particular disc in the players memory.<br />
SLEEP<br />
11 1<br />
6<br />
POWER<br />
1 1 1 en 1 en no off<br />
Storing a FTS-Video Program:<br />
Press the STATUS button to<br />
display the on-screen menu bar.<br />
Press the CURSOR RIGHT<br />
button until the Video FTS<br />
Icon is highlighted.<br />
Press the CURSOR DOWN<br />
button to highlight the ON/OFF<br />
portion of the Favorite Track<br />
Selection dialogue box.<br />
Press the CURSOR RIGHT or<br />
LEFT button to turn the FTS control<br />
ON or OFF.<br />
Storing Titles/Tracks:<br />
Press the CURSOR DOWN<br />
button to select Titles.<br />
Press the CURSOR RIGHT or<br />
LEFT buttons to select the desired<br />
title number.<br />
Press the OK button if you<br />
wish to store the entire title. The<br />
title number will be added to the<br />
list of selections.<br />
Storing Chapters/Indexes:<br />
Press the CURSOR DOWN<br />
button on the selected title number.<br />
Press the CURSOR RIGHT<br />
or LEFT button to select the<br />
desired chapter number.<br />
10 Press the OK button to confirm<br />
the selection. The title/chapter<br />
will be added to the list of selections.<br />
11 Press the STATUS button to<br />
remove the on-screen menu bar<br />
from the TV screen.<br />
TV<br />
DVD<br />
SOURCE STATUS CC CLOCK<br />
REPEAT<br />
REPEAT<br />
A-B<br />
10<br />
SOUND<br />
PICTURE 7<br />
6<br />
4<br />
MENU<br />
OK<br />
4<br />
2<br />
9 9<br />
8<br />
5<br />
3<br />
VOL<br />
MUTE<br />
T/C AUDIO FTS ANGLE<br />
PREVIOUS ZOOM SUBTITLE NEXT<br />
REVERSE<br />
INCR.SURR.<br />
STOP<br />
PAUSE<br />
SHUFFLE<br />
PLAY<br />
OPEN/CLOSE<br />
SCAN<br />
SURF<br />
CH<br />
FORWARD<br />
title<br />
chapter<br />
program<br />
DVD stop<br />
2:45:23<br />
0:00:34<br />
DVD stop<br />
2:45:23<br />
0:00:34<br />
DVD stop<br />
2:45:23<br />
0:00:34<br />
DVD stop<br />
2:45:23<br />
0:00:34<br />
off<br />
off<br />
title<br />
chapter<br />
program<br />
st<br />
st<br />
Favorite Track Selection<br />
On Off<br />
1 2 3 4 5 6 7 8 9 10<br />
1 2 3 4 5 6 7 8 9 10<br />
Clear all<br />
Favorite Track Selection<br />
On Off<br />
1 2 3 4 5 6 7 8 9 10<br />
1 2 3 4 5 6 7 8 9 10<br />
Clear all<br />
off<br />
title<br />
chapter<br />
program<br />
st<br />
Favorite Track Selection<br />
On Off<br />
1 2 3 4 5 6 7 8 9 10<br />
1 2 3 4 5 6 7 8 9 10<br />
2 8 4 9 10<br />
Clear all<br />
The Favorite Track Selection feature can be turned ON<br />
or OFF. Choose Tiles or Chapters to be added to the<br />
Program List in the order you want them to appear<br />
(Up to 20 selections per program).<br />
53
OPERATING THE DVD PLAYER - GENERAL FEATURES<br />
ERASING A FAVORITE<br />
TRACK SELECTION<br />
The FTS-Video control also<br />
allows you to customize or<br />
erase programming set up in the<br />
Favorite Track Selection memory of<br />
the TV/DVD Player.<br />
Erasing a FTS-Video Program:<br />
9<br />
13 2<br />
7<br />
TV<br />
POWER<br />
SLEEP<br />
SOURCE STATUS CC CLOCK<br />
REPEAT REPEAT SHUFFLE SCAN<br />
DVD stop<br />
2:45:23<br />
0:00:34<br />
1 1 1 en 1 en no off<br />
Press the STOP button.<br />
DVD<br />
A-B<br />
Press the STATUS button to<br />
display the on-screen menu bar.<br />
Press the CURSOR RIGHT<br />
button to select the Video FTS<br />
Icon in the menu bar.<br />
Press the CURSOR DOWN<br />
button to select “Program.”<br />
Press the CURSOR RIGHT or<br />
LEFT button to select the number<br />
you wish to erase from the program.<br />
Press the OK button to erase<br />
the selection.<br />
Press the STATUS button to<br />
remove the menu bar from the TV<br />
screen.<br />
5<br />
4<br />
5<br />
11<br />
8<br />
1<br />
SOUND<br />
PICTURE<br />
MENU<br />
OK<br />
VOL<br />
CH<br />
MUTE<br />
AUDIO<br />
T/C FTS ANGLE<br />
PREVIOUS ZOOM SUBTITLE NEXT<br />
REVERSE STOP PLAY FORWARD<br />
INCR.SURR. PAUSE SURF<br />
OPEN/CLOSE<br />
3<br />
6<br />
12<br />
10<br />
5<br />
DVD stop<br />
2:45:23<br />
0:00:34<br />
DVD stop<br />
2:45:23<br />
0:00:34<br />
off st<br />
off st<br />
Favorite Track Selection<br />
On Off<br />
title 1 2 3 4 5 6 7 8 9 10<br />
chapter 1 2 3 4 5 6 7 8 9 10<br />
program<br />
Clear all<br />
Erasing All Selections from a<br />
FTS-Video Program:<br />
Press the STOP button.<br />
off<br />
st<br />
Press the STATUS button to<br />
display the on-screen menu bar.<br />
10 Press the CURSOR RIGHT<br />
button to select the Video FTS<br />
Icon in the menu bar.<br />
11 Press the CURSOR DOWN<br />
button to select “Clear All”.<br />
DVD stop<br />
2:45:23<br />
0:00:34<br />
Favorite Track Selection<br />
On Off<br />
title 1 2 3 4 5 6 7 8 9 10<br />
chapter 1 2 3 4 5 6 7 8 9 10<br />
program 2 8 4 9 10<br />
Clear all<br />
off st<br />
12 Press the OK button. All selections<br />
will be erased.<br />
13 Press the STATUS button to<br />
remove the menu bar from the TV<br />
screen.<br />
DVD stop<br />
2:45:23<br />
0:00:34<br />
Favorite Track Selection<br />
On Off<br />
title 1 2 3 4 5 6 7 8 9 10<br />
chapter 1 2 3 4 5 6 7 8 9 10<br />
program 8 4 9 10<br />
Clear all<br />
54
OPERATING THE DVD PLAYER - SPECIAL FEATURES<br />
TITLE/CHAPTER/DISC<br />
MENUS<br />
For titles and chapters, selection<br />
menus may be included on the<br />
disc. The DVD’s menu feature<br />
allows you to make selections from<br />
these menus. Press the appropriate<br />
numerical buttons or use the CUR-<br />
SOR UP/DOWN, RIGHT/LEFT buttons<br />
to highlight your selection, then<br />
press the OK button to confirm.<br />
TV<br />
POWER<br />
SLEEP<br />
SOURCE STATUS CC CLOCK<br />
REPEAT REPEAT SHUFFLE SCAN<br />
A-B<br />
Fantasic Studios Present....<br />
A MOVIE<br />
DVD<br />
With the disc playing, press the<br />
MENU button to display the<br />
Title/Chapter menu. If no Title or<br />
Chapter menu is available, the Disc<br />
menu will be displayed.<br />
The Title/Chapter/Disc Menu can<br />
list various features such as Camera<br />
Angles, Spoken Language, Subtitle<br />
Options, Chapter lists, or any Bonus<br />
Material specific to each disc.<br />
Press the MENU button again<br />
to resume playback.<br />
2<br />
1<br />
SOUND<br />
PICTURE<br />
MENU<br />
OK<br />
VOL<br />
CH<br />
MUTE<br />
AUDIO<br />
T/C FTS ANGLE<br />
PREVIOUS ZOOM SUBTITLE NEXT<br />
Titles<br />
Chapters<br />
Extras<br />
Play<br />
Disc Menus are specific to each disc. The features<br />
available are determined by the disc manufacturer.<br />
The features could vary widely from disc to disc.<br />
Use the CURSOR UP, DOWN, RIGHT, or LEFT to<br />
move to any listed feature, then press the OK button<br />
to select and activate that feature.<br />
REVERSE<br />
STOP<br />
PLAY<br />
FORWARD<br />
CAMERA ANGLE<br />
If the disc contains sequences<br />
recorded from different camera<br />
angles, the angle icon appears,<br />
showing the number of available<br />
angles and the angle being shown<br />
currently. You can then change the<br />
camera angle. (Not all disc contain<br />
this type of information, so this feature<br />
may not be available on the<br />
disc your using.)<br />
POWER<br />
SLEEP<br />
TV SOURCE STATUS CC CLOCK<br />
REPEAT REPEAT SHUFFLE SCAN<br />
A-B<br />
DVD<br />
DVD play<br />
2:45:23<br />
0:00:34<br />
1 1 1 en 1 en no off<br />
Press the ANGLE button on<br />
the remote control to display the<br />
on-screen menu bar Angle Icon. If<br />
the X appears in the upper left corner<br />
of the screen, NO camera<br />
angles are available.<br />
SOUND<br />
MENU<br />
PICTURE<br />
OK<br />
2<br />
DVD play<br />
2:45:23<br />
0:00:34<br />
1 1 1 en 1 en 2 off<br />
Press the CURSOR UP or<br />
DOWN button to select the<br />
desired camera angle. After a small<br />
delay the playback will switch to<br />
the new camera angle.<br />
VOL<br />
2<br />
CH<br />
MUTE<br />
T/C AUDIO FTS ANGLE<br />
PREVIOUS ZOOM SUBTITLE NEXT<br />
REVERSE STOP PLAY FORWARD<br />
1<br />
NOTE: The Camera Angle feature may not be<br />
available on the DVD or Video CD you are<br />
using. If it is not the X icon will appear on the<br />
screen when the ANGLE button is pressed.<br />
INCR.SURR.<br />
PAUSE<br />
SURF<br />
OPEN/CLOSE<br />
55
AUDIO LANGUAGE<br />
The following steps describe how<br />
to change the Audio Language<br />
control.<br />
OPERATING THE DVD PLAYER - SPECIAL FEATURES<br />
Press the AUDIO button on<br />
the remote control to display the<br />
on-screen menu bar with the Audio<br />
Icon highlighted.<br />
TV<br />
POWER<br />
SLEEP<br />
SOURCE STATUS CC CLOCK<br />
REPEAT REPEAT SHUFFLE SCAN<br />
A-B<br />
DVD<br />
play<br />
2:45:23<br />
0:00:34<br />
1 1 1 en 1 en no off<br />
DVD<br />
Press the CURSOR UP or<br />
DOWN button repeatedly to scroll<br />
and select the available language<br />
options.<br />
NOTE: Not all discs will contain<br />
different Audio Language options.<br />
SOUND<br />
MENU<br />
PICTURE<br />
OK<br />
2<br />
1<br />
VOL<br />
CH<br />
MUTE<br />
T/C AUDIO FTS ANGLE<br />
2<br />
PREVIOUS ZOOM SUBTITLE NEXT<br />
REVERSE<br />
STOP<br />
PLAY<br />
FORWARD<br />
SUBTITLES<br />
The following steps describe how<br />
to change the Subtitle<br />
Language control.<br />
SLEEP<br />
POWER<br />
1 1 1 en 1 en no off<br />
Press the SUBTITLE button<br />
on the remote control to display the<br />
on-screen menu bar with the<br />
Subtitle Icon highlighted.<br />
TV SOURCE STATUS CC CLOCK<br />
REPEAT REPEAT SHUFFLE SCAN<br />
A-B<br />
DVD<br />
DVD<br />
play<br />
2:45:23<br />
0:00:34<br />
Press the CURSOR UP or<br />
DOWN button repeatedly to scroll<br />
and select the available Subtitle<br />
options. Subtitles will automatically<br />
appear at the bottom of the screen.<br />
Or, choose OFF.<br />
SOUND<br />
MENU<br />
PICTURE<br />
OK<br />
2<br />
1<br />
VOL<br />
CH<br />
MUTE<br />
AUDIO<br />
T/C FTS ANGLE<br />
PREVIOUS ZOOM SUBTITLE NEXT<br />
2<br />
REVERSE<br />
STOP<br />
PLAY<br />
FORWARD<br />
INCR.SURR.<br />
PAUSE<br />
SURF<br />
OPEN/CLOSE<br />
56
OPERATING THE DVD PLAYER - SPECIAL VIDEO CD FEATURE<br />
PLAYBACK CONTROL (PBC)<br />
Some Video CDs contain information that allow you to control the playback of the disc through a special playback menu.<br />
Load a Video CD with Playback control and press the PLAY button to start the disc.<br />
Go through the menu with the buttons indicated on the TV screen until your chosen passage starts to play. If a PBC<br />
menu consists of a list of title, you can select a title directly.<br />
Enter your choice with the NUMBERED buttons (0-9).<br />
Press RETURN to go back to the previous menu.<br />
PBC can be set to OFF within the Personal Preference menu.<br />
OPERATING THE DVD PLAYER - PLAYING AUDIO CDS<br />
When an Audio CD is inserted<br />
into the DVD Player, playback<br />
will start automatically. The<br />
AUDIO CD dialogue box will<br />
appear on the screen giving information<br />
such as current track, time,<br />
total tracks, etc.<br />
Press the PLAY button to<br />
begin playback of an audio disc<br />
that has been paused or stopped.<br />
Press the STOP button at any<br />
time to suspend playback.<br />
Press the PAUSE button to<br />
temporarily suspend playback.<br />
Press again to resume playback.<br />
Press the FORWARD or<br />
REVERSE buttons to search the<br />
disc content in either direction.<br />
Press the NEXT or PREVI-<br />
OUS buttons to go to the next<br />
track or the previous track.<br />
Press the SHUFFLE button to<br />
randomly change the play order of<br />
the tracks.<br />
Press the REPEAT button to<br />
repeat the playback of a track or<br />
the entire disk.<br />
Press the REPEAT A-B button<br />
at any point on the disc. Press<br />
again at any ending point on the<br />
disc. The chosen sequence will be<br />
repeated. Press a third time to exit<br />
the repeating sequence.<br />
Press the SCAN button to hear<br />
10 seconds of playback for each<br />
track on the disc.<br />
7<br />
5<br />
4<br />
8<br />
2<br />
TV<br />
DVD<br />
SLEEP<br />
SOURCE STATUS CC CLOCK<br />
REPEAT<br />
VOL<br />
SOUND<br />
MENU<br />
REPEAT<br />
A-B<br />
MUTE<br />
PICTURE<br />
T/C AUDIO FTS ANGLE<br />
PREVIOUS ZOOM SUBTITLE NEXT<br />
REVERSE<br />
INCR.SURR.<br />
STOP<br />
PAUSE<br />
SHUFFLE<br />
PLAY<br />
OPEN/CLOSE<br />
3<br />
POWER<br />
OK<br />
SCAN<br />
SURF<br />
CH<br />
FORWARD<br />
6<br />
1<br />
9<br />
5<br />
4<br />
Audio Disc Mode<br />
1 2.78 14 1.12.78<br />
play track time total tracks total time<br />
repeat track<br />
Favorite Track Selection<br />
On Off<br />
track 1 2 3 4 5 6 7 8 9 10<br />
program<br />
Clear all<br />
57
OPERATING THE DVD PLAYER - PLAYING AUDIO CDS<br />
FAVORITE TRACK<br />
SELECTION - AUDIO CD<br />
FTS allows you to store your<br />
favorite tracks for a particular disc<br />
in the TV/DVD Player memory. Each<br />
FTS program can contain up to 20<br />
tracks.<br />
1<br />
Storing an FTS Program:<br />
Load an audio CD and press the<br />
STOP button.<br />
Press the CURSOR DOWN button<br />
to highlight the list of available<br />
tracks.<br />
Press the CURSOR RIGHT or<br />
LEFT button to highlight a specific<br />
track.<br />
Or, press the NUMBERED buttons<br />
(0-9) to go directly to any track.<br />
With the track number highlighted,<br />
press the OK button to store the<br />
track. Repeat for other tracks.<br />
Switching FTS ON or OFF:<br />
Within the Audio CD dialogue<br />
box, press the CURSOR UP or<br />
DOWN button to highlight the<br />
ON/OFF area.<br />
Press the CURSOR RIGHT or<br />
LEFT button to select ON or OFF.<br />
9<br />
TV<br />
DVD<br />
SLEEP<br />
SOURCE STATUS CC CLOCK<br />
REPEAT<br />
REPEAT<br />
A-B<br />
SHUFFLE<br />
POWER<br />
SCAN<br />
4<br />
8 6<br />
SOUND<br />
PICTURE<br />
5<br />
MENU<br />
OK<br />
3<br />
7<br />
9<br />
12<br />
10<br />
Audio Disc Mode<br />
1 2.78 14 1.12.78<br />
play track time total tracks total time<br />
repeat track<br />
Favorite Track Selection<br />
On Off<br />
track 1 2 3 4 5 6 7 8 9 10<br />
program<br />
Clear all<br />
Erasing a Track from an FTS<br />
Program:<br />
Within the Audio CD dialogue<br />
box, press the CURSOR UP or<br />
DOWN button to highlight “program.”<br />
1<br />
7 3<br />
8<br />
VOL<br />
MUTE<br />
T/C AUDIO FTS ANGLE<br />
CH<br />
PREVIOUS ZOOM SUBTITLE NEXT<br />
REVERSE STOP PLAY FORWARD<br />
INCR.SURR. PAUSE SURF<br />
2<br />
6<br />
11<br />
Press the CURSOR RIGHT or<br />
LEFT button to select a specific<br />
track listed in the FTS Program.<br />
OPEN/CLOSE<br />
10<br />
Press the OK button to remove it.<br />
Erasing a Complete FTS Program:<br />
11 Within the Audio CD dialogue<br />
box, press the CURSOR DOWN<br />
button until “Clear All” is highlighted.<br />
12 Press the OK button to erase the<br />
entire FTS Program.<br />
58
Please make these simple checks<br />
before calling for service.<br />
Because charges for TV installation<br />
and adjustment of customer<br />
controls are not covered under<br />
your warranty, these tips can save<br />
you time and money.<br />
TROUBLESHOOTING<br />
CAUTION: A video source (such as a video game, compact disc interactive [CDI], or<br />
TV information channel) that shows a constant non-moving pattern on the TV screen can<br />
cause picture tube damage. When your TV is continuously used with such a source, the<br />
pattern of the nonmoving portion of the game (or other source) can leave a permanent<br />
image on the picture tube. When youÕre not using the video source, turn it OFF. Also,<br />
regularly alternate the use of such video sources with normal TV viewing.<br />
No Power<br />
No Picture<br />
No Sound<br />
• Check the TV power cord. Unplug the TV, wait 10 seconds, then reinsert the plug into<br />
the outlet and push the POWER button again.<br />
• Check that the outlet is not on a wall switch.<br />
• Be sure the fuse is not blown on the AC power strip, if one is being used.<br />
• Check antenna connections. Are they properly secured to the TV's ANT 75Ω plug?<br />
• Check the TUNER MODE control for the correct tuner setting.<br />
• Try running the Auto Program feature to find all available channels.<br />
• Press the AV button on the remote to make sure the correct signal source is selected<br />
(AV 1, AV 2, AV 3, or S-VIDEO).<br />
• Check the VOLUME buttons.<br />
• Check the MUTE button on the remote control.<br />
• Check the SPEAKER on-screen control. If it is in the OFF position, sound at the set<br />
will be eliminated.<br />
• If you’re attempting to hook up auxiliary equipment, check the audio jack connections.<br />
• (If applicable) Check the audio receiver for the correct operating mode.<br />
Remote Does Not<br />
Work<br />
TV Displays Wrong<br />
Channel or No<br />
Channels Above 13<br />
Cleaning and Care<br />
• Check the batteries. If necessary, replace them with AA Heavy Duty (Zinc Chloride) or<br />
Alkaline batteries.<br />
• Clean the remote control and the remote control sensor window on the TV.<br />
• Check the TV power cord. Unplug the TV, wait 10 seconds, then reinsert the plug into<br />
the outlet and push the POWER button again.<br />
• Be sure the fuse is not blown on the AC power strip, if one is being used.<br />
• Check to be sure the TV outlet is not on a wall switch.<br />
• Repeat channel selection.<br />
• Add the desired channel numbers (using the CHANNEL EDIT control) into the TV’s<br />
memory.<br />
• Check to be sure the TUNER MODES are set to the CABLE option and run the Auto<br />
Program feature to find all available channels.<br />
¥ To avoid possible shock hazard, be sure the TV is unplugged from the electrical outlet<br />
before cleaning.<br />
¥ When you are cleaning the TV, take care not to scratch or damage the screen surface<br />
(avoid wearing jewelry or using anything abrasive). Wipe the front screen with a clean<br />
cloth dampened with water. Use even, easy, vertical strokes when cleaning.<br />
¥ Gently wipe the cabinet surfaces with a clean cloth or sponge dampened in a solution of<br />
cool, clear water. Use a clean, dry cloth to dry the wiped surfaces.<br />
¥ Never use thinners, insecticide sprays, or other chemicals on or near the cabinet, as they<br />
might cause permanent marring of the cabinet finish.<br />
59
GLOSSARY OF TELEVISION TERMS<br />
Alternate Channel ¥ The feature that allows you to toggle<br />
between the last two channels viewed by pressing the A/CH button<br />
on the remote control.<br />
Auto Programming ¥ The feature that, when activated, scans<br />
for all available channels from regular antenna or cable signals<br />
and stores only active broadcast stations in the TVÕs memory.<br />
Channel Edit ¥ The feature that allows you to add or delete<br />
channels from the list of channels stored in the TVÕs memory.<br />
Channel Edit makes it easy to limit or expand the number of<br />
channels that are available to you when you press the Channel<br />
(+) or (Ð) buttons on your remote control.<br />
Closed Captioning ¥ The broadcast standard feature that allows<br />
you to read the voice content of television programs on the TV<br />
screen. Designed to help the hearing impaired, Closed<br />
Captioning uses on-screen Òtext boxesÓ to show dialogue and<br />
conversations while a TV program is in progress.<br />
Coaxial Cable ¥ A single, solid antenna wire normally matched<br />
with a metal plug (F type) end connector that screws (or pushes)<br />
directly onto a 75-ohm input found on the television or VCR.<br />
Direct Audio/Video Inputs ¥ Connectors, located on the rear of<br />
the TV, used for the input of audio and video signals. These<br />
inputs are designed for use with VCRs (or other accessories) in<br />
order to receive higher picture resolution and offer sound-connection<br />
options.<br />
Identify ¥ The method by which a TV remote control searches<br />
and finds an operating code for another product (such as a VCR<br />
or a cable converter). After the code has been Òidentified,Ó the<br />
TV remote control can operate and send commands to the other<br />
product.<br />
Incredible Stereo (or Surround) ¥ False acoustic management<br />
of the audio signal that produces a dramatic expansion of the<br />
wall of sound that surrounds the listener and heightens overall<br />
viewing pleasure.<br />
Menu ¥ An on-screen listing of feature controls that are available<br />
for you to adjust.<br />
Multichannel Television Sound (MTS) ¥ The broadcast standard<br />
that allows for stereo sound to be transmitted with the TV<br />
picture.<br />
On-screen Displays (OSD) ¥ The wording or messages generated<br />
by the television (or VCR) to help you with specific feature<br />
controls (color adjustment or programming, for example).<br />
Programming ¥ The process of adding or deleting channel numbers<br />
into the televisionÕs memory circuits. Through programming,<br />
the TV ÒremembersÓ only the locally available or desired<br />
channel numbers and skips over any unwanted channel numbers.<br />
Remote Control Sensor Window ¥ The window or opening<br />
found on the television control panel and through which infrared<br />
remote control command signals are received.<br />
Second Audio Program (SAP) ¥ An additional audio channel<br />
provided for within the Multichannel Television Sound (MTS)<br />
broadcast standard. The most frequently proposed use for SAP<br />
is the simultaneous bilingual broadcast of TV material.<br />
STATUS Button ¥ The remote control function that allows you<br />
to quickly confirm what channel number is being viewed. STA-<br />
TUS also can be used to clear the television of on-screen displays<br />
or information (rather than waiting for the displays to<br />
Òtime out,Ó or automatically disappear from the screen). In the<br />
DVD mode, pressing the STATUS button will display the DVD<br />
Player on-screen menu.<br />
Twin-Lead Wire ¥ The more commonly used name for the twostrand,<br />
300-ohm antenna wire used with many indoor and outdoor<br />
antenna systems. In many cases, this type of antenna wire<br />
requires an additional adapter (or balun) in order to connect to<br />
the 75-ohm input terminals designed into the more recent TVs<br />
and VCRs.<br />
60
INDEX<br />
DVD Related Items:<br />
Access Code . . . . . . . . . . . . . . . . . . . . . . . . . . . . . . . . . . . .46<br />
Audio Language Control . . . . . . . . . . . . . . . . . . . . . . . . . .56<br />
Authorizing Discs . . . . . . . . . . . . . . . . . . . . . . . . . . . . . . . .47<br />
Camera Angle Control . . . . . . . . . . . . . . . . . . . . . . . . . . . .55<br />
Chapter/Index changing . . . . . . . . . . . . . . . . . . . . . . . . . . .49<br />
Deauthorizing Discs . . . . . . . . . . . . . . . . . . . . . . . . . . . . . .47<br />
Feature Controls . . . . . . . . . . . . . . . . . . . . . . . . . . . . . . . . .45<br />
FTS - Favorite Track Selection - Audio CDs . . . . . . . . . . . .58<br />
FTS - Favorite Track Selection - Video CDs . . . . . . . . .53-54<br />
General Operation . . . . . . . . . . . . . . . . . . . . . . . . . . . . .40-41<br />
Language Control . . . . . . . . . . . . . . . . . . . . . . . . . . . . . . . .44<br />
Panning the Picture . . . . . . . . . . . . . . . . . . . . . . . . . . . . . . .52<br />
Picture by Picture Viewing . . . . . . . . . . . . . . . . . . . . . . . . .50<br />
Picture Controls . . . . . . . . . . . . . . . . . . . . . . . . . . . . . . . . .42<br />
Playing Audio CDs . . . . . . . . . . . . . . . . . . . . . . . . . . . . . . .57<br />
Playing DVD or Video CDs . . . . . . . . . . . . . . . . . . . . . . . .48<br />
Repeat A-B Commands . . . . . . . . . . . . . . . . . . . . . . . . . . .51<br />
Repeat Commands . . . . . . . . . . . . . . . . . . . . . . . . . . . . . . .51<br />
Search Forward or Reverse . . . . . . . . . . . . . . . . . . . . . . . . .50<br />
Shuffle Command . . . . . . . . . . . . . . . . . . . . . . . . . . . . . . . .51<br />
Sound Controls . . . . . . . . . . . . . . . . . . . . . . . . . . . . . . . . . .43<br />
Still Picture Viewing . . . . . . . . . . . . . . . . . . . . . . . . . . . . . .50<br />
Subtitle Control . . . . . . . . . . . . . . . . . . . . . . . . . . . . . . . . .56<br />
Time Search Control . . . . . . . . . . . . . . . . . . . . . . . . . . . . . .52<br />
Title/Chapter/Disc Menus . . . . . . . . . . . . . . . . . . . . . . . . . .55<br />
Titles/Tracks - Changing . . . . . . . . . . . . . . . . . . . . . . . . . . .49<br />
Video CD Playback Control . . . . . . . . . . . . . . . . . . . . . . . .57<br />
Zoom Control . . . . . . . . . . . . . . . . . . . . . . . . . . . . . . . . . . .52<br />
TV Related Items:<br />
Audio Out Control . . . . . . . . . . . . . . . . . . . . . . . . . . . . . . .35<br />
Audio Output Jacks . . . . . . . . . . . . . . . . . . . . . . . . . . . . . .36<br />
AutoLock Items:<br />
Access Code . . . . . . . . . . . . . . . . . . . . . . . . . . . . . . . . . .21<br />
AutoLock Settings - Review Screen . . . . . . . . . . . . . . . . .28<br />
Blocking Channels . . . . . . . . . . . . . . . . . . . . . . . . . . . . . .22<br />
Block Option On/Off . . . . . . . . . . . . . . . . . . . . . . . . . . . .25<br />
Movie Rating Blocking . . . . . . . . . . . . . . . . . . . . . . . . . .23<br />
No Rating Blocking . . . . . . . . . . . . . . . . . . . . . . . . . . . . .27<br />
TV Rating Blocking . . . . . . . . . . . . . . . . . . . . . . . . . . . . .24<br />
Understanding the AutoLock Features . . . . . . . . . . . . . . .20<br />
Unrated Blocking . . . . . . . . . . . . . . . . . . . . . . . . . . . . . . .26<br />
Viewing Blocked Programming . . . . . . . . . . . . . . . . . . . .29<br />
AutoPicture Control . . . . . . . . . . . . . . . . . . . . . . . . . . . . . .37<br />
AutoSound Control . . . . . . . . . . . . . . . . . . . . . . . . . . . . . . .38<br />
AVL (Audio Volume Leveler) . . . . . . . . . . . . . . . . . . . . . . .32<br />
Balance Control . . . . . . . . . . . . . . . . . . . . . . . . . . . . . . . . .30<br />
Bass Control . . . . . . . . . . . . . . . . . . . . . . . . . . . . . . . . . . . .30<br />
Blue Mute Control . . . . . . . . . . . . . . . . . . . . . . . . . . . . . . .18<br />
Brightness Control . . . . . . . . . . . . . . . . . . . . . . . . . . . . . . . .7<br />
Clock Control . . . . . . . . . . . . . . . . . . . . . . . . . . . . . . . . . . .10<br />
Closed Captioning . . . . . . . . . . . . . . . . . . . . . . . . . . . . . . .16<br />
Color Control . . . . . . . . . . . . . . . . . . . . . . . . . . . . . . . . . . . .7<br />
Contrast + Control . . . . . . . . . . . . . . . . . . . . . . . . . . . . . . . .9<br />
Dynamic Noise Reduction (Video) Control . . . . . . . . . . . . . .8<br />
Incredible Sound Control . . . . . . . . . . . . . . . . . . . . . . . . . .33<br />
Picture Control . . . . . . . . . . . . . . . . . . . . . . . . . . . . . . . . . . .7<br />
SAP (Secondary Audio Programming) Control . . . . . . . . . .34<br />
Screen Format Control . . . . . . . . . . . . . . . . . . . . . . . . . . . .17<br />
Sharpness Control . . . . . . . . . . . . . . . . . . . . . . . . . . . . . . . .7<br />
Sleeptimer Control . . . . . . . . . . . . . . . . . . . . . . . . . . . . . . .19<br />
Start Up Channel Control . . . . . . . . . . . . . . . . . . . . . . . . . .13<br />
Start Time Control . . . . . . . . . . . . . . . . . . . . . . . . . . . . . . .11<br />
Stereo/Mono Sound Control . . . . . . . . . . . . . . . . . . . . . . . .34<br />
Stop Time Control . . . . . . . . . . . . . . . . . . . . . . . . . . . . . . .12<br />
Surf Control . . . . . . . . . . . . . . . . . . . . . . . . . . . . . . . . . . . .39<br />
Timer Activation Control . . . . . . . . . . . . . . . . . . . . . . . . . .14<br />
Timer Display Control . . . . . . . . . . . . . . . . . . . . . . . . . . . .15<br />
Tint Control . . . . . . . . . . . . . . . . . . . . . . . . . . . . . . . . . . . . .7<br />
Treble Control . . . . . . . . . . . . . . . . . . . . . . . . . . . . . . . . . .30<br />
TV Speaker Control . . . . . . . . . . . . . . . . . . . . . . . . . . . . . .36<br />
Volume Control . . . . . . . . . . . . . . . . . . . . . . . . . . . . . . . . .31<br />
General Information Items:<br />
Features List . . . . . . . . . . . . . . . . . . . . . . . . . . . . . . . . . . . . .6<br />
Glossary of TV Terms . . . . . . . . . . . . . . . . . . . . . . . . . . . .60<br />
Index . . . . . . . . . . . . . . . . . . . . . . . . . . . . . . . . . . . . . . . . .61<br />
Registration Information . . . . . . . . . . . . . . . . . . . . . . . . . . . .2<br />
Safety /Precautions . . . . . . . . . . . . . . . . . . . . . . . . . . . . . .2-4<br />
Table of Contents . . . . . . . . . . . . . . . . . . . . . . . . . . . . . . . . .5<br />
Troubleshooting . . . . . . . . . . . . . . . . . . . . . . . . . . . . . . . . .59<br />
Warranty . . . . . . . . . . . . . . . . . . . . . . . . . . . . . . . . . . . . . . .62<br />
61
RENEWED<br />
90 DAY<br />
LIMITED WARRANTY

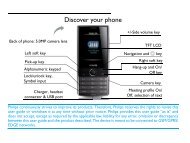
![03_[DE] - Philips](https://img.yumpu.com/25100096/1/184x260/03-de-philips.jpg?quality=85)