Discover Your Phone - Philips
Discover Your Phone - Philips
Discover Your Phone - Philips

You also want an ePaper? Increase the reach of your titles
YUMPU automatically turns print PDFs into web optimized ePapers that Google loves.
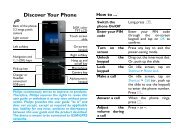
Back of the<br />
phone: camera<br />
Left soft key<br />
Navigation<br />
keys<br />
Pick up key<br />
Headset/<br />
Charger<br />
connector<br />
<strong>Discover</strong> <strong>Your</strong> <strong>Phone</strong><br />
Microphone<br />
Main screen<br />
Right soft key<br />
OK key<br />
Hang up and<br />
on/off key<br />
Alphanumeric<br />
keypad<br />
<strong>Philips</strong> continuously strives to improve its<br />
products. Therefore, <strong>Philips</strong> reserves the rights to<br />
revise this user guide or withdraw it at any time<br />
without prior notice. <strong>Philips</strong> provides this user<br />
guide “as is” and does not accept, except as<br />
required by applicable law, liability for any error,<br />
omission or discrepancy between this user guide<br />
and the product described. The device is meant<br />
to be connected to GSM/GPRS networks.<br />
How to ...<br />
Switch the<br />
phone On/Off<br />
Store numbers<br />
in Contacts<br />
Make a call<br />
Answer a call<br />
Long press ).<br />
Enter the phone number<br />
and press , to select To<br />
SIM or To <strong>Phone</strong>.<br />
Enter the phone number<br />
using the keypad and press<br />
( to dial.<br />
Press ( when your<br />
phone rings.<br />
End a call Press ).<br />
Reject a call Press ) or R when<br />
your phone rings.<br />
Adjust earpiece Press + or - during a call.<br />
volume<br />
Access FM radio In idle mode, press R.<br />
Access main<br />
menu<br />
Press L or , in idle<br />
mode.
Access Music<br />
player<br />
Access View<br />
contacts<br />
Access My files<br />
Access Create<br />
message<br />
Activate/<br />
Deactivate Silent<br />
mode<br />
Lock the keypad<br />
Unlock the<br />
keypad<br />
Return to<br />
previous menu<br />
Press + in idle mode.<br />
Press - in idle mode.<br />
This function is subject to<br />
change based on the<br />
modifications you have<br />
made on the preset<br />
functions. (see "Fast<br />
keys" on page 48)<br />
Press < in idle mode.<br />
Press > in idle mode.<br />
Long press # key in idle<br />
mode.<br />
Long press * in idle<br />
mode.<br />
Press R and * in idle<br />
mode.<br />
Press R.<br />
Quickly return<br />
to idle mode<br />
Soft keys<br />
Press the left and right soft keys L and R<br />
located at the top of the keypad to perform the<br />
function displayed at the bottom of the screen.<br />
Main Menu<br />
Press ).<br />
The following table summarizes the structure of the<br />
main menu, what the icons represent and the page<br />
number on which you can obtain more information<br />
regarding the menu functions.<br />
1
Tools Calls Multimedia<br />
page 17 page 21 page 23<br />
Games Messaging My files<br />
page 31 page 32 page 40<br />
Browser Contacts Settings<br />
page 42 page 44 page 47<br />
2
1. Getting Started ................................. 5<br />
Insert the SIM card .......................................... 5<br />
Remove the SIM card ...................................... 6<br />
Switch on the phone ....................................... 7<br />
Charge the battery .......................................... 7<br />
Insert Micro-SD card ...................................... 8<br />
2. Calling ................................................. 9<br />
Make a call ......................................................... 9<br />
Using the contacts ........................................... 9<br />
Make an Emergency call ................................. 9<br />
Answer and end a call ..................................... 9<br />
Options during a call ....................................... 9<br />
Sound recorder .............................................. 10<br />
Adjust earpiece volume ................................ 10<br />
Speed Dial ........................................................ 10<br />
Handle multiple calls ..................................... 10<br />
3. Text or number Entry ................... 12<br />
Input Method .................................................. 12<br />
Function keys .................................................. 12<br />
T9 ® text input ................................................ 13<br />
Multitap ABC/Abc/abc Input ....................... 14<br />
Table of contents<br />
Stroke input .................................................... 15<br />
Numeric input ................................................ 16<br />
Symbol Input ................................................... 16<br />
4. Tools ................................................. 17<br />
Alarm ................................................................ 17<br />
Calendar ........................................................... 17<br />
To do list ......................................................... 17<br />
World clock .................................................... 18<br />
Sound recorder .............................................. 19<br />
Calculator ........................................................ 19<br />
Units converter .............................................. 19<br />
Currency converter ...................................... 20<br />
STK ................................................................... 20<br />
5. Calls ................................................... 21<br />
Missed calls ...................................................... 21<br />
Outgoing calls ................................................. 21<br />
Answered calls ............................................... 21<br />
Advanced ......................................................... 21<br />
6. Multimedia ....................................... 23<br />
3
Camera/Video ................................................. 23<br />
Music ................................................................. 26<br />
FM radio ........................................................... 28<br />
Melody composer .......................................... 29<br />
7. Games ...............................................31<br />
Games ............................................................... 31<br />
8. Messaging ..........................................32<br />
Create message .............................................. 32<br />
Inbox ................................................................. 34<br />
Sent ................................................................... 35<br />
Outbox ............................................................. 36<br />
Drafts ................................................................ 36<br />
Templates ........................................................ 36<br />
Broadcast SMS ................................................ 37<br />
Settings ............................................................. 37<br />
9. My files ..............................................40<br />
Picture .............................................................. 40<br />
Video ................................................................. 40<br />
Audio ................................................................ 41<br />
Other ................................................................ 41<br />
10. Browser ..........................................42<br />
11. Contacts .........................................44<br />
New contact ................................................... 44<br />
View contacts ................................................. 44<br />
View groups .................................................... 45<br />
Special numbers ............................................. 45<br />
Advanced ......................................................... 46<br />
12. Settings ...........................................47<br />
General.............................................................. 47<br />
Display .............................................................. 48<br />
Profiles .............................................................. 49<br />
Call settings ..................................................... 49<br />
Bluetooth ......................................................... 51<br />
Network settings ........................................... 52<br />
Security ............................................................ 53<br />
Factory settings .............................................. 55<br />
Icons & symbols ...................................56<br />
Precautions ...........................................57<br />
Troubleshooting ..................................63<br />
<strong>Philips</strong> Authentic Accessories ..........65<br />
Trademark Declaration .....................66<br />
Specific Absorption Rate<br />
Information ...........................................67<br />
Limited warranty .................................68<br />
Declaration of conformity ................71<br />
4
1. Getting Started<br />
Please read the safety instructions in the<br />
"Precautions" section before using your phone.<br />
To use your phone, you must insert a valid SIM card<br />
supplied by your GSM operator or retailer. The<br />
SIM card contains your subscription information,<br />
your mobile phone number and a memory in which<br />
you can store phone numbers and messages.<br />
Insert the SIM card<br />
Follow the steps below to insert your new SIM<br />
card. Remember to switch off your mobile phone<br />
before removing the back cover and battery.<br />
Remove the back cover<br />
To insert the SIM card, you must first remove the<br />
back cover. Press on the back cover with your<br />
finger and slide the cover upwards as shown below.<br />
Then lift up the door of the battery compartment.<br />
Remove the battery<br />
To remove the battery, lift up the battery from the<br />
bottom as shown below.<br />
Insert the SIM card<br />
Make sure the clipped corner of the SIM card is<br />
facing the correct direction and the metallic<br />
Getting Started 5
contacts facing downwards. Slide the SIM card into<br />
the slot until it is locked. You can hear a click.<br />
Replace the back cover<br />
Replace the back cover by sliding it down into its<br />
slot, until it stops.<br />
Replace the battery<br />
Align the gold contacts of the battery with the<br />
corresponding connectors on the phone, and push<br />
the opposite contacts end of the battery until it<br />
snaps into place.<br />
Remove the protective film covering the screen<br />
before using the phone.<br />
Remove the SIM card<br />
1. Remove the back cover and the battery as<br />
described above.<br />
6 Getting Started
2. As shown, press the bolt to unlock the SIM<br />
card. Slide the SIM card and take it out.<br />
Charge the battery<br />
<strong>Your</strong> phone is powered by a rechargeable battery.<br />
A new battery is partially charged and a sound alert<br />
will warn you when the battery reaches low. Once<br />
you have installed the battery, you can start<br />
charging the phone.<br />
Plug in the charger connector as shown below.<br />
Then plug the other end into a mains AC power<br />
socket.<br />
3. Replace the battery and the back cover.<br />
Switch on the phone<br />
To switch on the phone, long press ) key. Enter<br />
the PIN code if required. It is preconfigured and<br />
communicated to you by your operator or retailer.<br />
For more information on PIN code, see "Security".<br />
If you enter an incorrect PIN code three times<br />
in succession, your SIM card will be locked. To<br />
unlock it, you must obtain the PUK code from<br />
your network operator.<br />
During charging, the charge indicators will scroll. It<br />
takes around 3 hours to fully charge the battery.<br />
When all the scroll bars are steady, the battery is<br />
fully charged. You can then disconnect the charger.<br />
Keeping the charger plugged to the mobile<br />
phone when the battery is fully charged will not<br />
damage the battery. The only way to turn off the<br />
Getting Started 7
charger is to unplug it, so use an easily accessible<br />
AC power socket.<br />
Insert Micro-SD card<br />
1. Open the micro -SD card slot as shown below.<br />
2. Insert the micro-SD card into the micro-SD<br />
card slot, with golden contacts facing<br />
downwards.<br />
8 Getting Started
Make a call<br />
2. Calling<br />
From idle screen<br />
1. In idle mode, enter the phone number using<br />
the keypad. To correct an error, press R.<br />
2. Press ( to dial the number.<br />
3. Press ) to hang up.<br />
To make an international call, long press 0 to<br />
insert the international prefix “+”.<br />
Using the contacts<br />
1. Press - in idle mode.<br />
2. Select a contact from the list and press (<br />
to dial the selected number. To select a<br />
different number, press + or - (see<br />
"Contacts" for more information).<br />
3. Press ) to hang up.<br />
Make an Emergency call<br />
Without a SIM card in phone, you can press R<br />
(SOS) to make an emergency call.<br />
With a SIM card in phone, you can enter the<br />
emergency number in idle mode, and then press<br />
(.<br />
Different countries have different numbers for<br />
emergency. In Europe the standard emergency<br />
number is 112, in the UK it is 999.<br />
Answer and end a call<br />
When there is an incoming call, the number of the<br />
caller may be displayed if the caller has chosen to<br />
display his or her identity. If the number is stored<br />
in the contacts, the corresponding name will be<br />
displayed instead of the number.<br />
• To answer the call: press ( .<br />
• To reject the call: press ) or R.<br />
• To hang up: press ).<br />
The phone will not ring when it is in silent<br />
mode.<br />
If you have selected Any Key, you can answer a call<br />
by pressing any key, except ) and R.<br />
Options during a call<br />
During a call, press R to activate Handsfree or<br />
Calling 9
L Options to access the following options:<br />
- Put the call on Hold<br />
- End call<br />
- Make a New Call<br />
-Access Contacts<br />
- Send and receive Messages<br />
- Sound recorder<br />
- Mute / Unmute the call<br />
-Enable DTMF (the touch tone dialing system)<br />
Sound recorder<br />
In most countries, recording of telephone<br />
conversation is subject to legislation. We advise<br />
you to notify the caller if you intend to record<br />
the conversation and only do so if they agree.<br />
You should also ensure confidentiality of the<br />
recordings.<br />
To record a conversation during a call, select<br />
Options > Sound recorder. Recorded sound is saved<br />
in .amr format and stored in Audio of My files menu.<br />
Adjust earpiece volume<br />
During a call, press the + or - key to increase or<br />
decrease the volume.<br />
Speed Dial<br />
Speed dial via preset numeric keys<br />
You can set a maximum of 8 speed dial numbers, so<br />
that a long press on the numeric key will dial the<br />
number associated with that numeric key. You<br />
need to set Enable speed dial and Set number.<br />
The default setting of Speed Dial is Off. To<br />
activate this function, you need to activate it in<br />
the General menu.<br />
Speed dial via SIM contacts<br />
If you know the memory location number of the<br />
contact you wish to call (for example: memory<br />
location is 5 or 10), you can simply enter 05# or<br />
10# in idle mode to display the pre-set contact,<br />
then press ( to call.<br />
Speed dial via call logs<br />
In idle mode, press ( to access Call list. Select a<br />
number you wish to call and press ( to dial the<br />
number.<br />
Handle multiple calls<br />
You can handle two or more calls at the same time,<br />
as well as make conference calls using your phone.<br />
10 Calling
The availability of this feature is dependent on your<br />
network operator and/or subscription.<br />
Make a second call<br />
You can make a second call when there is an active<br />
call or with a call on hold. While on the phone, dial<br />
the number (or select a contact from the contacts)<br />
and press (. The first call is put on hold and the<br />
second number is dialed. You can then press R<br />
to activate Handsfree or L to access the<br />
following options:<br />
• Transfer to connect the two calls. You are<br />
disconnected when the transfer in completed.<br />
• End held to disconnect the call on hold.<br />
• End all held to disconnect all of calls on hold.<br />
• End all to disconnect all parties from the call.<br />
Answer a second call<br />
When you receive a second call while already in<br />
communication, the phone will emit a beep tone<br />
and the screen displays information about the<br />
incoming call. You can then:<br />
Press ( To answer the call (the first one<br />
is put on hold).<br />
Press ) To reject the call.<br />
Press L<br />
Options<br />
To access options list. You can<br />
select Answer, Hold active, End<br />
active, Transfer, Mute, Handsfree /<br />
Handsheld and DTMF.<br />
Calling 11
3. Text or number Entry<br />
Input Method<br />
<strong>Your</strong> phone supports several types of input<br />
methods:<br />
T9 PinYin<br />
Simple Chinese Stroke<br />
Traditional Chinese stroke<br />
T9 ABC/abc/Abc<br />
Multitap ABC/Abc/abc<br />
Numeric<br />
Symbols<br />
*During text editing, you can long press * to<br />
activate/deactivate T9. Short press # to switch<br />
from one mode to another. The status bar on the<br />
screen will display your current input mode.<br />
represent English alphabets input<br />
modes; represents T9 Pinyin input mode;<br />
represent T9 English input modes;<br />
represents Simplified Chinese stroke input<br />
mode; represents Traditional Chinese stroke<br />
input mode; represents numeric input mode.<br />
In addition, you can short press * to input<br />
punctuations.<br />
The text editor remembers the last input method you<br />
have used before you exit the editing screen. When<br />
you access the editor again, it will automatically select<br />
the last input method you have used.<br />
Function keys<br />
The supported input methods will vary with the<br />
language selected.<br />
12 Text or number Entry<br />
R<br />
Delete the characters on the left of the<br />
cursor or exit from editing mode.<br />
+/-/ Move the cursor, select a letter, word<br />
or symbol from the list, or scroll down<br />
a list.<br />
) Return to idle mode.<br />
L Select the highlighted word from the list<br />
or enter Options menu.<br />
* Long press to activate/deactivate T9;<br />
Short press to input punctuations.<br />
# Long press to access the Languages<br />
menu; Short press to switch input<br />
methods.
T9 ® text input<br />
Tegic Euro. Pat.<br />
App. 0842463<br />
T9 ® Predictive Text Input is an<br />
intelligent editing mode for entering<br />
text on a mobile phone. It allows you<br />
to enter text more quickly by<br />
anticipating the word you want to<br />
enter based on the keys you have pressed. You<br />
press once on the key corresponding to each letter<br />
needed to spell a word and T9 ® suggests a word<br />
based on your keystrokes. If several words are<br />
available, the first word in the list is displayed and<br />
highlighted. Press +/- to browse the list and press<br />
L to insert the word.<br />
T9 ABC/Abc/abc Input<br />
Smart English input method offers a faster way for<br />
you to enter English words.<br />
1. You only need to press once on the numeric<br />
key (2 to 9) corresponding to each letter<br />
needed to spell a word. As you enter the<br />
letters, the words displayed on the screen will<br />
be updated accordingly.<br />
2. Press R to delete the entries on the left of<br />
the cursor.<br />
3. Use the +/- navigation keys to select the<br />
desired word and press L to enter it.<br />
Examples: how to enter the word “home”:<br />
1. Press 4, 6, 6, 3. The screen displays<br />
the first word of a list: Good.<br />
2. Press - to scroll and select Home.<br />
3. Press L to confirm.<br />
T9 PinYin Input<br />
This is an intelligent editing mode that not only<br />
allows you to press only once on a key<br />
corresponding to each letter needed to form a<br />
character, but is also equipped with association<br />
input feature. Keystrokes are analyzed and all the<br />
possible pinyin combinations will be displayed at<br />
the bottom of the screen.<br />
Using T9 PinYin input method<br />
1. Enter the pinyin letters accordingly. Press once<br />
on the key corresponding to the pinyin letter<br />
without having to consider its position on the<br />
key. As you enter the letters using your<br />
keypad, the pinyin combinations on the screen<br />
will be updated accordingly.<br />
2. Use the navigation keys to select your desired<br />
pinyin combination and press L to select<br />
the candidate line. Press < or > to select the<br />
Text or number Entry 13
character (the selected pinyin character will<br />
be highlighted) and press L to enter the<br />
character. If the desired character is not on<br />
the current list, press + or - to check from<br />
the list.<br />
3. Enter the association character: As soon as<br />
you have selected and entered a character, the<br />
candidate list will be updated and a list of<br />
association characters will be displayed. Use<br />
the navigation key to select the desired<br />
association character and press L to<br />
confirm entry. If you do not need to enter the<br />
association character, simply press R to<br />
exit, or enter the new pinyin letters directly.<br />
Multitap ABC/Abc/abc Input<br />
1. Press once on the numeric key (2 to 9)<br />
to enter the first letter on the key, press twice<br />
to enter the second letter on the key, so on<br />
and so forth. If the letter you wish to enter<br />
and the one you have just entered are on the<br />
same key, just wait for a few seconds for the<br />
cursor to re-appear.<br />
2. Press R to delete the characters on the left<br />
of the cursor.<br />
Example: how to enter the word “home”:<br />
Press 4, 4 (GHI) 6, 6, 6 (MNO), 6<br />
(MNO), 3, 3 (DEF). Press L when the<br />
message is completed.<br />
You can press key 0 to insert a space in ABC/<br />
Abc/abc Multitap input mode.<br />
The letters located on each key are as follows:<br />
Key Characters in the order displayed<br />
1 . , - ? ! ’@ : # $ / _ ( ) 1<br />
2 a b c 2<br />
3 d e f 3<br />
4 g h i 4<br />
5 j k l 5<br />
6 m n o 6<br />
7 p q r s 7<br />
8 t u v 8<br />
9 w x y z 9<br />
0 0<br />
14 Text or number Entry
Stroke input<br />
The strokes are represented on each key as<br />
follows:<br />
1 Horizontal 2 Vertical 3 Left-falling<br />
4 Right-falling<br />
5 Overdown<br />
6 Special<br />
7 8 9<br />
* Punctuation<br />
T9mode<br />
0 # Input method<br />
The basic steps of Stroke input are as follows:<br />
1. Enter strokes 1 to 6 , R<br />
Clear to clear.<br />
2. Select from candidate list < or > / + or -<br />
(scroll list)<br />
3. Confirm selection L or ,<br />
4. Select and enter association character, or<br />
return to step 1 to enter new strokes.<br />
5. Or press RBack to exit from association<br />
character input mode, then press L or , to<br />
complete the editing.<br />
The principle of stroke input is to dissect and<br />
separate every stroke of a Chinese character<br />
according to sequence. When you wish to input the<br />
character, press the keys corresponding to the<br />
required strokes according to sequence to get the<br />
desired character. The stroke input method in this<br />
phone classifies a chinese character into 5 basic<br />
strokes: (horizontal, vertical, left falling stroke,<br />
right falling stroke and over-down) as well as a<br />
special stroke. When the stroke you need does not<br />
Text or number Entry 15
correspond to the 5 basic strokes, replace it with<br />
the special stroke.<br />
The examples below will give you a clearer<br />
understanding of how to use stroke input method:<br />
1. 木 ∶ 1 + 2 + 3 + 4<br />
2. 田 ∶ 2 + 5 + 1 + 2 + 1<br />
+ ><br />
3. 加 ∶ 6 + 3 + 2 + 5 + 1<br />
4. 凉 ∶ 4 + 6 + 4 + 1 + 2<br />
5. 陈 ∶ 6 + 2 + 1 + 6 + 6<br />
3 + 4 + ><br />
Generally, you will be able to find a desired<br />
character before you finished entering all the<br />
strokes. After you have entered the name of the<br />
contacts or SMS, press RBack to exit from the<br />
association character list and press L or , to<br />
confirm completion of text editing.<br />
The input mode for Traditional Chinese stroke<br />
and Simplified Chinese stroke are similar, with<br />
the exception of the character coding.<br />
Numeric input<br />
1. Press the numeric keys (0 to 9) to enter<br />
the numbers corresponding to the keys.<br />
2. To delete a number, press R.<br />
Symbol Input<br />
Short press * to enter punctuation or symbols.<br />
Use the navigation keys to select the desired<br />
punctuation or symbol and press L to enter it.<br />
Press - to scroll down the list of punctuation or<br />
symbols.<br />
16 Text or number Entry
4. Tools<br />
each day of the week individually. You can<br />
switch between On and Off by pressing L.<br />
This menu contains features and options that are<br />
designed to help you get organized and informed at<br />
all times.<br />
Alarm<br />
You can set a maximum of 5 alarms on your mobile<br />
phone.<br />
To set an alarm, follow the steps below:<br />
1. Select an alarm and press L Edit.<br />
2. Set the status to On.<br />
3. Enter the time.<br />
4. Select Repeat: Once, Everyday or Customize.<br />
When you have finished the settings, press<br />
R Done.<br />
5. Select the ring tone for the alarm.<br />
6. Set the Snooze mode: Default or from 1 to 10<br />
minutes.<br />
7. Select the Alert type: Ring only, Vibrate only or<br />
Ring & vibrate.<br />
If you select “Customize” mode, you can select<br />
the week line, and then set the alarm clock for<br />
Calendar<br />
This menu allows you to view the calendar, and add<br />
tasks in the To do list.<br />
You can press the navigation keys to view the<br />
calendar.<br />
Select a date that you wish to view and press L<br />
Options to access the following options:<br />
Add task Allows you to create a new event<br />
in the calendar.<br />
Go to date<br />
Go to weekly<br />
view<br />
Allows you to view a specific day<br />
quickly. Enter the date and press<br />
L.<br />
Display the calendar in week view.<br />
When there is a scheduled task for a particular<br />
day, the date will be highlighted in green.<br />
To do list<br />
This menu helps you manage the different types of<br />
task in your daily work or life. You can add task<br />
description, a specific timing and an alarm for your<br />
Tools 17
To Do List.<br />
If there is no task in your phone, the screen displays<br />
Empty. You can press , to create a new task.<br />
After you have edited the task, press R Done.<br />
Add a task<br />
Date<br />
Allows you to enter the date of<br />
the task.<br />
Time Allows you to enter the time of<br />
the task.<br />
The time you enter must be in<br />
24-hour format.<br />
Note Allows you to enter task<br />
description. Press L Edit, enter<br />
the description and press L to<br />
save.<br />
Alarm Use the navigation keys to set the<br />
alarm status.<br />
Repeat Set task frequency: Once,<br />
Everyday, Customize, Weekly or<br />
Monthly.<br />
Location<br />
Allows you to enter the location<br />
of the task.<br />
Priority Allows you to set the priority of<br />
the task.<br />
If you have selected an existing task, you can press<br />
, to view the task or L Options to access the<br />
option menu.<br />
Option menu of an existing task<br />
Add<br />
Add a new task.<br />
Edit<br />
Edit the selected task.<br />
Delete Delete the selected task.<br />
Delete all Delete all tasks in To Do List.<br />
World clock<br />
This menu allows you to check the time of the main<br />
cities around the world.<br />
Press the navigation keys to select the city. The<br />
local date and time will be displayed at the bottom<br />
of the screen.<br />
Daylight saving for foreign city<br />
Allows you to set the daylight saving option On or<br />
Off for a foreign time zone.<br />
18 Tools
Sound recorder<br />
This menu allows you to make recording and listen<br />
to the sound files you have recorded.<br />
If there is no sound file in the list, select Record to<br />
start recording. You can choose to Pause/Resume<br />
or Stop recording. The sound file will be displayed<br />
on the screen. You can edit the file name before<br />
saving it. If there are already sound files in the list,<br />
select a file and press , to play or L Options<br />
directly to access the following options:<br />
Send Send out the selected recorder<br />
by Bluetooth or MMS.<br />
Set as incoming<br />
call tone<br />
Record<br />
Append<br />
Rename<br />
Delete<br />
Delete all<br />
Settings<br />
Set the selected recorder as the<br />
incoming call tone.<br />
Make a new recording.<br />
Append sound to the recording.<br />
Rename the recording.<br />
Delete the recording.<br />
Delete all recordings.<br />
Set the storage location and audio<br />
quality of the recording.<br />
Calculator<br />
<strong>Your</strong> phone has a built-in calculator which you can<br />
use to perform basic calculations. Enter numbers<br />
using the keypad and insert operators with the<br />
navigation keys as indicated in the following table:<br />
+<br />
Add or M+<br />
-<br />
Subtract or M-<br />
><br />
Multiply or MR<br />
<<br />
Divide or MC<br />
R Clear number<br />
* Decimal point<br />
, or L Result<br />
The result of the calculator is indicative only.<br />
The calculation accuracy is 10 decimal places.<br />
The result is then truncated after the 10th<br />
decimal digit for the next operation.<br />
Units converter<br />
This menu allows you to carry out unit conversion<br />
for length and weight.<br />
Tools 19
Currency converter<br />
This menu allows you to convert a sum from one<br />
currency into another using the exchange rate of<br />
your choice. You can convert from Local to Foreign<br />
currency or vice versa. Enter a rate in the Rate field,<br />
press L, and enter an amount in either the Local<br />
or Foreign field, then press L to obtain the<br />
conversion value.<br />
Press * key to enter decimal point.<br />
STK<br />
The availability of the features in this menu depends<br />
on whether or not your SIM card supports STK. If<br />
your SIM card supports STK function, the STK menu<br />
will be displayed on the screen.<br />
20 Tools
5. Calls<br />
<strong>Your</strong> mobile phone can provide you with a list of<br />
outgoing and incoming calls, attempts at auto redialing,<br />
as well as call details. The different types of<br />
calls (Missed calls, Outgoing calls and Answered calls)<br />
are represented by different icons. They are<br />
displayed in chronological order with the most<br />
recent call on top. If the correspondent is stored in<br />
your contacts, the corresponding name is<br />
displayed.<br />
Missed calls<br />
This menu allows you to view the recent<br />
unanswered calls. You can view the date, time and<br />
the number of times you have missed in each call.<br />
Select an item and press , to view the date, time<br />
and number. Press L Options to access the<br />
following options:<br />
Save<br />
Save the number.<br />
Send message Send an SMS or MMS to<br />
the missed number.<br />
Delete<br />
Delete the number.<br />
Edit number before dail Edit the missed number.<br />
Outgoing calls<br />
This menu allows you to view the recent dialed<br />
calls, including dialing attempts or calls that were<br />
successfully connected.<br />
Answered calls<br />
This menu allows you to view the recent calls<br />
received.<br />
Advanced<br />
Delete call log<br />
This menu allows you to select Missed calls, Dialed<br />
calls, Received calls or Delete all.<br />
Call time<br />
This menu allows you to view Last call time, Total<br />
sent and Total received (displayed in hours, minutes,<br />
and seconds). You can select Reset all time to reset<br />
all the call timers.<br />
Calls 21
Depending on your network, rounding-off<br />
for billing purposes, taxes etc, the actual<br />
time invoiced for calls and services by your<br />
service provider may vary.<br />
Call cost (Network dependent)<br />
Last call cost<br />
Displays the cost of the last call.<br />
Total cost<br />
Displays the total cost of all calls since the cost<br />
counter was last reset. If the total cost exceeds the<br />
maximum cost set in the Max cost option, you will<br />
not be able to make any more calls until you reset<br />
the counter.<br />
Reset cost<br />
Allows you to reset the cost counter. You need to<br />
enter your PIN2 code and confirm.<br />
Max cost<br />
Allows you to set the maximum cost of your calls<br />
(PIN2 code is required).<br />
Price per unit<br />
Allows you to set the unit price for the call cost.<br />
This unit price shall be used for calculating the cost<br />
of your calls (PIN2 code is required).<br />
GPRS info<br />
Tabulates the amount of data sent and received via<br />
GPRS. You can also reset the counter. The unit of<br />
measurement is Byte.<br />
22 Calls
6. Multimedia<br />
This menu and its sub-menus contain options<br />
related to the multimedia features of mobile phone.<br />
Camera/Video<br />
You can take photos and record video clips with<br />
the built-in camera. The camera produces pictures<br />
in jpg format and video clips in avi format. The<br />
camera lens is on the back of the phone.<br />
When taking and using images or video clips, obey all<br />
laws and respect local customs as well as privacy and<br />
legitimate rights of others.<br />
<strong>Your</strong> device supports image capture resolutions of<br />
up to 640 x 480 pixels. The image resolution in<br />
these materials may appear different.<br />
Picture<br />
To open the camera viewfinder, select Menu ><br />
Multimedia > Camera/Video > Picture.<br />
Shortcuts are as follow:<br />
Press 1 to adjust Effect settings.<br />
Press 2 to adjust White balance.<br />
Press 4 to select Delay timer.<br />
Press 5 to select Cont. shot.<br />
Press 6 to select Scene mode.<br />
Press 7 to adjust Image quality.<br />
Press 8 to select Image size.<br />
Take a photo<br />
Frame the image you want to shoot:<br />
1. To zoom in or out in camera mode, press + or<br />
-. (Only invalid for image resolution 640 x 480<br />
pixels).<br />
2. To adjust the exposure compensation in<br />
camera mode, press < or >.<br />
3. To take a photo, press , or 0. The image<br />
is saved automatically in the Picture folder of My<br />
files. See “My files” on page 40.<br />
After the image has been taken, follow these tips:<br />
• If you do not want to keep the image, press<br />
RDelete.<br />
• To return to the viewfinder to take a new<br />
picture, press LGo on.<br />
Multimedia 23
• To send the image via multimedia, press ,. For<br />
more information see “MMS” on page 33.<br />
Take photos in a sequence<br />
In camera mode, select LOptions > Camera<br />
settings > Cont. shot > 1 Shot, 3 Shot or 5 Shot to set<br />
the camera to take photos in a fast sequence.<br />
Use Delay timer<br />
Use the delay timer to delay taking a picture. In<br />
camera mode, select LOptions > Camera settings<br />
> Delay timer > 5 seconds, 10 seconds or 15 seconds.<br />
The phone beeps when the timer is running. The<br />
camera takes the photo after the selected delay has<br />
elapsed.<br />
Camera options<br />
In camera mode, press L to access the Options<br />
menu:<br />
Image viewer View the photos you have taken.<br />
Camera settings Change the settings for the phone<br />
camera.<br />
Image settings Select the Image size and Image<br />
quality.<br />
White balance Select the current lighting<br />
condition from the list. This allows<br />
the camera to reproduce colors<br />
more accurately.<br />
Scene mode Select the scene mode: Auto or<br />
Night.<br />
Effect settings<br />
Add frame<br />
Storage location<br />
Restore default<br />
settings<br />
Select a special effect for the<br />
image.<br />
Add a frame to the photo (Only<br />
available for the image resolution<br />
128x160).<br />
Select the image storage location:<br />
<strong>Phone</strong> or Memory card.<br />
Reset the camera settings to their<br />
default values.<br />
View photos<br />
With the image viewer, you can browse and edit<br />
the photos you have taken.<br />
In camera mode, select LOptions > Image<br />
viewer. The photos you have taken are displayed.<br />
Press LOptions to select your browsing and<br />
editing options.<br />
24 Multimedia
• To set the photo as wallpaper or screen saver in<br />
the idle mode, select Options > Use > To<br />
wallpaper/To screen saver.<br />
• To send the photo via MMS or via Bluetooth,<br />
select Options > Use > To MMS/To bluetooth. See<br />
“MMS” on page 33 and “My files” on page 51.<br />
Video<br />
To have the video function, select Menu ><br />
Multimedia > Camera/Video > Video.<br />
Shortcuts are as follow:<br />
Press 1 to adjust Effect settings.<br />
Press 2 to adjust White balance.<br />
Press 4 to activate or deactivate the night<br />
mode.<br />
Record a video<br />
1. To start the video recording, press ,/0.<br />
2. During the recording, press ,/0 to pause/<br />
resume the recording, press ,/0.<br />
3. To stop the recording, Press R. The video<br />
will be saved in the Video folder of My files. See<br />
“My files” on page 40.<br />
Play video clips<br />
1. Go to My files > <strong>Phone</strong>/Memory card > Video.<br />
2. Select the desired video file. Press , to start<br />
or pause playback.<br />
3. Long press < or > to rewind or fast forward<br />
the video clip.<br />
4. To stop the video, press ).<br />
Send the video<br />
• To send the video via multimedia or via<br />
Bluetooth, select My files > <strong>Phone</strong>/Memory card ><br />
Video > Options > Send. See “MMS” on page 33<br />
and “Bluetooth” on page 51.<br />
Video options<br />
In video mode, press L to access the Options<br />
menu:<br />
Video recorder<br />
settings<br />
Video settings<br />
Effect settings<br />
Storage<br />
location<br />
Restore default<br />
settings<br />
Change the settings for the video<br />
recorder.<br />
Select the video quality.<br />
Select a special effect for the video.<br />
Select the storage location: <strong>Phone</strong><br />
or Memory card.<br />
Reset the video recorder settings<br />
to their default values.<br />
Multimedia 25
Music<br />
Save MP3, AAC, MID and AMR music files under<br />
the Audio folder in the phone memory or on the<br />
memory card.<br />
Create your music library<br />
Edit music files on your PC<br />
1. Run Windows Media Player (or other music<br />
management program) on your PC.<br />
2. To add music files, click Media Library on the<br />
left menu, and then click Add on the top menu.<br />
3. On the left pane, select All Music.<br />
On the right pane, all the music files you<br />
added are displayed.<br />
4. Click Title, Artist, Album to edit them as<br />
desired.<br />
Transfer music files from PC to your phone<br />
1. Check that you have installed a memory card<br />
on your phone (see "Insert Micro-SD card" on<br />
page 8).<br />
2. Use the supplied USB data cable to connect<br />
your phone with the PC. Select Mass storage<br />
on your phone.<br />
3. Copy the music files from the PC to the Audio<br />
folder in the phone memory or on the<br />
memory card.<br />
Play music<br />
On your phone, the music files are organized in<br />
three folders.<br />
• All tracks: all the songs on your phone.<br />
• Playlists: to view recently added playlists or<br />
tracks, find the tracks played last time, and view<br />
all playlists.<br />
• Albums: songs sorted by album.<br />
• Artists: songs sorted by artist.<br />
Refresh the music library each time you turn<br />
on the phone<br />
• On the screen of Music player, press<br />
LOptions > Refresh library.<br />
• To have your music library refreshed<br />
automatically, press LOptions > Settings ><br />
Rebuild library, and select Automatic.<br />
Play music files<br />
To open the music player, press , or select Menu<br />
> Multimedia > Music.<br />
1. Select your desired song in a folder.<br />
You start playback from the song. On the<br />
playback screen, you can see the file<br />
information and selected playback settings.<br />
26 Multimedia
2. To select your playback settings,<br />
press LOptions > Settings:<br />
Options<br />
BT stereo<br />
output<br />
BT stereo<br />
headset<br />
Shuffle<br />
Repeat<br />
Equalizer<br />
Background<br />
play<br />
Rebuild<br />
library<br />
Description<br />
Turn Bluetooth output on or off.<br />
Search the available bluetooth<br />
headset devices.<br />
Play music files in the folder<br />
randomly.<br />
Repeat the current song, all songs,<br />
or turn off repeat.<br />
Predefined sound settings: Normal,<br />
Dance, Classical, Party, Pop and<br />
Rock.<br />
Close the music player and<br />
continue music playback in the<br />
background.<br />
Refresh the track list automatically<br />
or manually.<br />
3. During playback (on the playback or idle<br />
screen),<br />
Key<br />
Operation<br />
, key Pause and resume playback.<br />
< or > Press repeatedly to select a song.<br />
Long press to select a section<br />
within a song.<br />
+or -<br />
Press repeatedly to adjust the<br />
volume level.<br />
Stop playback.<br />
) Go to the idle screen.<br />
R Back Return to previous screen.<br />
Listen to music through a Bluetooth headset<br />
Consult the user documentation of your Bluetooth<br />
headset: Check that your Bluetooth headset<br />
supports A2DP profile.<br />
1. Turn on your Bluetooth headset for<br />
connection.<br />
2. To enable the Bluetooth feature of your phone,<br />
select Bluetooth > Power > On in Settings<br />
menu.<br />
3. When you phone detect the bluetooth<br />
headset, you are prompted to enter a pass<br />
code in order to pair with the device. (For<br />
Multimedia 27
more information, see “Connection with an<br />
audio device” on page 52.)<br />
4. After the connection is ok, you can listen to<br />
music through the bluetooth headset.<br />
5. To listen to music through the loudspeaker<br />
while using the bluetooth headset, press<br />
LOptions > Settings > BT stereo output > Off.<br />
To continue to play music after exiting the<br />
music player<br />
• On the playback screen, press LOptions ><br />
Settings > Background play, select Always.<br />
• To stop the music playback in the background,<br />
press ) and L.<br />
You can also make the selection on the screen of<br />
music file folders.<br />
Create playlists<br />
You can create up to 4 playlists for songs that you<br />
wish to play at this time. <strong>Your</strong> last played songs are<br />
saved to Play list > Last played.<br />
1. Select your desired songs or albums.<br />
2. Press LOptions > Add to playlist to add songs<br />
by file or album.<br />
3. Select a playlist where you add the songs.<br />
A playlist is created.<br />
FM radio<br />
Tune to a radio station<br />
To tune to a radio station, always plug the supplied<br />
earphone into your phone.<br />
• Auto tune: In Multimedia > FM radio, press<br />
LOptions > Auto presets. The radio frequency<br />
scanning starts automatically. Up to nine available<br />
radio stations are saved to Channel list. The first<br />
preset radio station starts to play. Select your<br />
desired station from Channel list. If necessary,<br />
press RBack to go to the playback screen.<br />
On the radio playback screen, select<br />
LOptions > Search channels > On to enable<br />
the auto search function. Press < or > to start<br />
auto tuning.<br />
• Manual tune:<br />
Press LOptions > Manual input to enter your<br />
desired radio frequency;<br />
On the radio playback screen, select<br />
LOptions > Search channels > Off to disable<br />
the auto search function. Press < or ><br />
repeatedly for fine tuning.<br />
Listen to a radio station<br />
1. Go to Menu > Multimedia > FM radio.<br />
The last played station starts to play.<br />
28 Multimedia
2. Tune to your desired station (see "Tune to a<br />
radio station").<br />
3. On the radio playback screen, press<br />
LOptions > Channel list to view the<br />
channels you saved.<br />
4. On the radio playback screen, press<br />
LOptions to select your playback settings.<br />
Background play: Turn it on to play the radio<br />
after exiting Multimedia > FM radio. The station<br />
information appears on the idle screen.<br />
Loud speaker: Turn it on to listen to the radio<br />
through the speaker.<br />
5. On the radio playback screen or idle screen,<br />
press , to pause or resume radio playback.<br />
6. To return to the idle screen during playback,<br />
press ).<br />
7. To stop the radio playback in the background,<br />
press ) and L.<br />
Melody composer<br />
This function is used to edit melody you like and set<br />
it as ring tone.<br />
If there is no melody, the screen displays Empty<br />
folder. You can press LAdd to create a new<br />
melody.<br />
Key operation<br />
0 To insert a rest.<br />
1 to 7 To enter Do-Si.<br />
8 To add a vibration note.<br />
+ or - To change pitch of the note to<br />
high, middle or low.<br />
# To switch the status of the note to<br />
high, normal or low.<br />
* To change the tempo.<br />
How to use a vibration effect<br />
To enrich your melody, you may need to add a<br />
vibration note.<br />
1. To add a vibration note, press 8.<br />
2. To disable the vibration note, select the<br />
vibration note and press -.<br />
Multimedia 29
Options menu in composing<br />
Play<br />
Play speed<br />
Select<br />
instrument<br />
Save<br />
To play the melody.<br />
To select playing speed of the<br />
melody.<br />
To select a musical instrument.<br />
To save the melody.<br />
Options menu for a melody<br />
Edit<br />
Add<br />
Rename<br />
Delete<br />
Delete all files<br />
Use<br />
To edit the melody.<br />
To create a new melody.<br />
To rename the melody.<br />
To delete the melody.<br />
To delete all melodies.<br />
To use the ring tone for other<br />
application: Set as incoming call<br />
tone, To MMS or To bluetooth.<br />
30 Multimedia
7. Games<br />
Games<br />
Select a game and press L. For details regarding<br />
a certain game, please refer to the onscreen<br />
instructions.<br />
Settings<br />
This menu allows you to turn the audio and<br />
vibration effect of the games on or off.<br />
Select Background music, Sound effects or Vibration,<br />
then press the to select On or Off and press<br />
L to confirm.<br />
Games 31
8. Messaging<br />
This menu allows you to send and receive text or<br />
multimedia messages, as well as manage the<br />
messages you have sent and received. In idle mode,<br />
press L to access the main menu, and then<br />
select Messaging and press L OK to create, edit<br />
and send your messages.<br />
Create message<br />
When writing messages, you can toggle<br />
between T9 input and multitap by long pressing<br />
*. More details please refer to the chapter<br />
"Text or number Entry".<br />
SMS<br />
SMS enables you to send text messages to the<br />
other party, using Short Messaging Service (SMS).<br />
You can use the SMS menu to send text messages<br />
to another handphone or a device. To compose<br />
and send a text message, follow the steps below:<br />
1. Select Create message > SMS, enter your text<br />
and press L to access the following<br />
options:<br />
Save as draft Save the message as a draft so<br />
that you can edit, complete and<br />
send later on.<br />
Use template Insert a preset message.<br />
Insert contacts Insert a name from the contact<br />
name list.<br />
Insert contacts Insert a number from the<br />
No.<br />
contact list.<br />
Insert bookmark Insert a bookmark from the list.<br />
2. After you have finished your message, press<br />
, to access the next options:<br />
Contacts Send the message to the recipient<br />
from the contacts list.<br />
Group Send the message to all the<br />
contacts in a caller group.<br />
<strong>Phone</strong> number Enter the phone number of the<br />
recipient.<br />
32 Messaging
When you send a message via the SMS<br />
network, your phone may display “Sent”.<br />
This means the message has been sent to<br />
the SMS centre which you have set in your<br />
SIM card. However, this does not imply<br />
that the message has been sent to its<br />
destination.<br />
MMS<br />
<strong>Your</strong> mobile phone can also send and receive MMS<br />
(Multimedia Messaging Service) messages. With<br />
MMS, you can send multimedia messages that<br />
contain pictures, sound and text.<br />
While sending multimedia messages, your recipient<br />
must also have an MMS-enabled phone in order to<br />
view your messages. Follow the steps described<br />
below to compose and send a multimedia message:<br />
1. Select MMS and enter the following:<br />
To<br />
Set the number or E-mail of the<br />
recipient.<br />
Cc<br />
Set the number or E-mail of other<br />
recipients you wish to send a copy<br />
of the message to.<br />
Bcc<br />
Subject<br />
Edit content<br />
Set the number or E-mail of the<br />
recipients you wish to send a copy<br />
of the message to, by which the<br />
recipients in the Bcc list will be<br />
invisible to other recipients.<br />
Set the subject of the multimedia<br />
message.<br />
Edit the content. field<br />
2. In the Edit content field, press LEdit to write<br />
the message, and then press LOptions to<br />
access the following options:<br />
Done Select Done to finish editing..<br />
Add image Open the picture list to select and<br />
insert a picture to your message.<br />
Add audio Open the audio list to select and<br />
insert a sound file to your<br />
message.<br />
Add Insert a file (txt, jar etc) to your<br />
attachment message.<br />
Add slide<br />
before<br />
Only available when your<br />
multimedia message has more than<br />
1 slide. Insert a slide before<br />
another slide.<br />
Messaging 33
Add slide after Only available when your<br />
multimedia message has more than<br />
1 slide. Insert a slide after another<br />
slide.<br />
Add bookmark Add a subject for your bookmark.<br />
text<br />
Preview Preview the current multimedia<br />
message.<br />
Slide timing Set playing time of the message<br />
slides. The default value is 3<br />
seconds.<br />
3. Select RDone to access the next options:<br />
Send only Send the multimedia message.<br />
Save and send Save and send the multimedia<br />
message.<br />
Save to draft Save the multimedia message to<br />
the draft box.<br />
Save as<br />
template<br />
Send options<br />
Exit<br />
Save the message as the<br />
multimedia message template.<br />
Set Validity period, Delivery report,<br />
Read report, Priority.<br />
Exit<br />
Inbox<br />
This menu allows you to read the SMS/MMS<br />
messages which you have received. The messages<br />
are displayed in a list.<br />
When a text message is displayed, press , to read<br />
it, and then press , to reply to the sender or<br />
press L Options to access the following options:<br />
Forward Forward the selected message.<br />
Delete Delete the selected message.<br />
Delete all Delete all the messages in the Inbox.<br />
Use number Extract and save the number of the<br />
sender or the number displayed in<br />
the message to the SIM card or<br />
phone, or dial the number.<br />
Use URL Extract the URL displayed in the<br />
message to connect the website.<br />
34 Messaging
Advanced Copy to <strong>Phone</strong>/SIM: Copy the selected<br />
message stored in SIM/phone to<br />
phone/SIM.<br />
Move to <strong>Phone</strong>/SIM: Move the selected<br />
message stored in SIM/phone to<br />
phone/SIM.<br />
Copy all SMS: Copy all messages<br />
stored in SIM/phone to phone/SIM.<br />
Move all SMS: Move all messages<br />
stored in SIM/phone to phone/SIM.<br />
When a multimedia message is displayed, press ,<br />
to read it, and then press LOptions to access the<br />
following options:<br />
View To switch back to automatic mode:<br />
the multimedia message will be<br />
played as a continuous slide show.<br />
Reply To reply the sender by MMS.<br />
Reply by To reply the sender by SMS.<br />
SMS<br />
Reply all To reply all senders by MMS.<br />
Forward Forward the selected message.<br />
Edit Edit the selected multimedia<br />
message.<br />
Delete Delete the selected multimedia<br />
message.<br />
Delete all Delete all of messages in the Inbox.<br />
Properties<br />
Save object<br />
Use details<br />
To check details for the selected<br />
message.<br />
To detach the image or audio of the<br />
current slider and save it into the<br />
<strong>Phone</strong> or Memory card.<br />
Extract and save the number of the<br />
sender or the number displayed in<br />
the message to the SIM card or<br />
phone, or dial the number.<br />
Sent<br />
When you send a text or multimedia message<br />
successfully, the messages will be stored in Sent.<br />
Note:<br />
To save sent messages to Sent, select Send and save<br />
> On in the Message settings. (See "Send and save"<br />
on page 38 for more details.)<br />
When you select a text message, you can press ,<br />
to read it, and then press L Options to access:<br />
Forward, Delete, Delete all, Use number, Use URL and<br />
Advanced (Copy/Move to phone/SIM and Copy/Move<br />
Messaging 35
all SMS).<br />
When you select a multimedia message, you can<br />
press , to read it, and then press L Options to<br />
access: View, Forward, Edit, Delete, Delete all,<br />
Properties, Save object and Use details.<br />
You can refer to the section "Inbox" for more<br />
details.<br />
Outbox<br />
When the text or multimedia messages sent<br />
unsuccessfully, the messages will be stored in the<br />
Outbox.<br />
When you select a text message, you can press ,<br />
to read it, and then press L Options to access:<br />
Resend, Forward, Delete, Delete all, Use number, Use<br />
URL and Advanced (Copy/Move to phone/SIM and<br />
Copy/Move all SMS).<br />
When you select a multimedia message, you can<br />
press , to read it, and then press L Options to<br />
access: View, Send, Edit, Delete, Delete all, Properties,<br />
Save object and Use details.<br />
You can refer to the section "Inbox" for more<br />
details.<br />
Drafts<br />
If you select Save as/to draft after you have created<br />
your message, the message will be stored in the<br />
Drafts box.<br />
When you select a text message, you can press ,<br />
to read it, and then press L Options to access:<br />
Resend, Forward, Delete, Delete all, Use number, Use<br />
URL and Advanced (Copy/Move to phone/SIM and<br />
Copy/Move all SMS).<br />
When you select a multimedia message, you can<br />
press , to read it, and then press L Options to<br />
access<br />
View, Send, Edit, Delete, Delete all, Properties, Save<br />
object and Use details.<br />
You can refer to the section "Inbox" for more<br />
details.<br />
Templates<br />
This menu allows you to preset up to 10 text<br />
messages and 5 multimedia messages that you use<br />
most frequently. When you select SMS, you can<br />
36 Messaging
press L to access the following options:<br />
Forward Edit the selected preset message.<br />
Delete Delete the selected preset<br />
message.<br />
Create message Create a new message.<br />
When you select MMS > Default, you can press<br />
L to access the following options:<br />
View<br />
View the template.<br />
Create message Edit the template.<br />
Properties View the form, subject and size<br />
of the MMS.<br />
Broadcast SMS<br />
Broadcast messages are public messages broadcast<br />
to a group of mobile users. The messages are<br />
broadcast on coded channels. Generally, one<br />
broadcast channel can transmit one type of message.<br />
Please contact your network operator for a list of<br />
channel numbers and their respective broadcast<br />
information.<br />
Receive mode<br />
This menu allows you to set the reception of<br />
broadcast messages. When On, you can receive<br />
broadcast messages. When Off, you cannot receive<br />
broadcast messages.<br />
Read message<br />
This menu allows you to read broadcast messages<br />
after you have activated receive mode.<br />
Languages<br />
This menu allows you to set the language of the<br />
broadcast messages that can be received.<br />
Channel settings<br />
Press L to access channel settings. You can<br />
Select, Add, Edit or Delete channels.<br />
Settings<br />
This menu allows you to configure the SMS/MMS<br />
settings. Select SMS or MMS. When you select<br />
SMS, you can access the following options:<br />
Account<br />
Select a profile and access the following options:<br />
Profile name Edit the name of the current<br />
profile.<br />
SC address Select your default SMS centre. If<br />
not available on your SIM card, you<br />
must enter your SMS centre<br />
number.<br />
Messaging 37
Validity period<br />
Message type<br />
Select the length of time your<br />
messages will be stored in the<br />
SMS centre. This is useful when<br />
the recipient is not connected to<br />
the network (and thus cannot<br />
receive your message<br />
immediately).<br />
This feature is subscription<br />
dependent.<br />
Select the format of your sent<br />
messages. This option is network<br />
dependent.<br />
General settings<br />
Delivery report When On, this option will notify<br />
you via SMS whether your<br />
recipient has received your SMS.<br />
This feature is subscription<br />
dependent.<br />
Reply path<br />
When On, this option allows you<br />
to transmit the number of your<br />
SMS message center together<br />
with the message. The recipient<br />
can then reply using your SMS<br />
center and not theirs. This<br />
speeds up the rate of<br />
transmission. This feature is<br />
subscription dependent.<br />
Pref. storage<br />
You can choose to save your messages to <strong>Phone</strong> or<br />
SIM.<br />
Send and save<br />
When On, this option will automatically save the<br />
SMS sent under Sent.<br />
Pref. bearer<br />
This option allows you to set the preferred<br />
transmission mode. You can select Preferred GPRS,<br />
Preferred GSM or GSM Only. For further details,<br />
please contact your network operator.<br />
Memory status<br />
This option can display the memory status of the<br />
messages saved in the SIM card and the phone.<br />
SMS counter<br />
Display the number of messages that have been<br />
38 Messaging
sent and received.<br />
When you select MMS carry out the following<br />
configurations for sending or receiving MMS:<br />
Compose Set Creation mode, Image resizing,<br />
Auto signature and Edit signature.<br />
Send<br />
Retrieve<br />
Filter<br />
Set Validity period, Delivery report,<br />
Read report, Priority, Slide timing and<br />
Delivery time options for sending an<br />
MMS.<br />
Set Home network, Roaming, Read<br />
report and Delivery report options<br />
for receiving an MMS.<br />
Set Anonymous and Advertisement<br />
from whom you want to filter<br />
MMS or e-mail messages.<br />
Server profile Set network configuration. Please<br />
contact your network provider for<br />
more information.<br />
Memory status View the memory status of your<br />
MMS.<br />
Messaging 39
9. My files<br />
This menu allows you to store the files in different<br />
folders (Picture, Video, Audio, Others) to facilitate<br />
more efficient management of files in your phone<br />
or memory card. In addition, you can view the total<br />
memory card and free memory capacity in the<br />
phone and memory card.<br />
Press , to access the following folders:<br />
Picture<br />
Press , to access the menu, and then you can<br />
press , to view the picture or press L to<br />
access the following options:<br />
Send Send out the selected image file by<br />
bluetooth or MMS.<br />
Use Set the selected image file to<br />
screen saver or wallpaper.<br />
Copy Copy the selected file to another<br />
folder.<br />
Move<br />
Delete<br />
Delete all files<br />
Rename<br />
Detail<br />
Sort<br />
Video<br />
Move the selected file to another<br />
folder.<br />
Delete the selected image file.<br />
Delete all files in the folder.<br />
Modify the name of the selected<br />
file.<br />
Display detailed information of the<br />
selected image file, such as date,<br />
file size, etc.<br />
Sort the image and folders By<br />
name, By type, By time, By size or<br />
None.<br />
Press , to access the menu, and then you can<br />
press , to play the video or press L to access<br />
the following options:<br />
Send Send out the selected video file by<br />
bluetooth or MMS.<br />
Copy Copy the selected file to another<br />
folder.<br />
40 My files
Move<br />
Delete<br />
Delete all files<br />
Rename<br />
Detail<br />
Sort<br />
You phone can only play the video clips in avi<br />
format recorded by the build-in camera.<br />
Audio<br />
Move the selected file to another<br />
folder.<br />
Delete the selected video file.<br />
Delete all files in the folder.<br />
Modify the name of the selected<br />
file.<br />
Display detailed information of the<br />
selected video file, such as date,<br />
file size, etc.<br />
Sort the video and folders By<br />
name, By type, By time, By size or<br />
None.<br />
Press , to access the menu, and then you can<br />
press , to play the audio file or press L to<br />
access the following options:<br />
Set as Set the selected audio file as<br />
incoming call incoming call tone.<br />
tone<br />
Send Send out the selected audio file by<br />
bluetooth or MMS.<br />
Copy Copy the selected file to another<br />
folder.<br />
Move Move the selected file to another<br />
folder.<br />
Delete Delete the selected audio file.<br />
Delete all files Delete all files in the folder.<br />
Rename Modify the name of the selected file.<br />
Detail Display detailed information of the<br />
selected audio file, such as date, file<br />
size, etc.<br />
Sort Sort the audio and folders By name,<br />
By type, By time, By size or None.<br />
Others<br />
This menu allows you to store other format files in<br />
your phone or memory card.<br />
My files 41
10. Browser<br />
This option allows you to access the internet. <strong>Your</strong><br />
phone has been pre-configured with a number of<br />
internet access modes. You can start browsing the<br />
internet once you have activated an access mode.<br />
WAP<br />
Homepage<br />
You can store a homepage for each access mode.<br />
When you access the internet with the WAP<br />
browser, the homepage of the access mode which<br />
you have selected will be displayed first.<br />
Enter address<br />
Enter a web address and confirm connection to the<br />
website.<br />
Bookmarks<br />
You can save the URL as a bookmark in your<br />
phone. Select a bookmark and press LOptions to<br />
access the following options:<br />
Goto Access the web page of the<br />
selected bookmark.<br />
Edit Edit the selected bookmark.<br />
Send Send the selected bookmark.<br />
Delete Delete the selected bookmark.<br />
Delete all Delete all bookmarks<br />
Add bookmark Enter the title and URL to create a<br />
new bookmark.<br />
History<br />
This menu allows you to view the websites which<br />
you have visited recently.<br />
Settings<br />
This menu allows you to configure web settings for<br />
web browsing. <strong>Your</strong> phone may be preconfigured<br />
with the settings parameter of a particular network<br />
operator. If you are a subscriber of the network<br />
operator, you may start using your browser.<br />
Otherwise, you need to reconfigure the settings.<br />
42 Browser
<strong>Philips</strong> is not liable to give prior notification nor<br />
shall it bear any consequences for any failures<br />
arising from changes of configuration made by<br />
you or by the network operator. Please check<br />
with your network operator for the most<br />
updated information.<br />
The following options for Web settings are<br />
available:<br />
Edit Profile<br />
Browser<br />
options<br />
Clear cache<br />
Clear<br />
cookies<br />
Make changes on the configuration<br />
of the currently selected profile.<br />
Allows you to configure the<br />
browser parameters, such as set<br />
Timeout and enable or disable Show<br />
images function.<br />
You can enable, disable or clear<br />
cache.<br />
You can enable or disable Cookie,<br />
and clear cookie. Cookie is the<br />
information sent to your browser<br />
when you visit a website.<br />
Enable push Allows you to activate or<br />
deactivate the service message<br />
settings.<br />
Browser 43
11. Contacts<br />
Contacts are stored in one of the two available<br />
contacts: SIM phone book (located on your SIM<br />
card, by which the number of entries you can store<br />
depends on the card capacity) or the Smart phone<br />
book. When you add new contacts, the contacts<br />
will only be added to the phone book you have<br />
selected.<br />
New contact<br />
1. Select Contacts in the main menu and select<br />
New contact. Select the storage location and<br />
press L.<br />
2. If you select To SIM, you need to enter the<br />
name and number. After you have entered the<br />
name, press L. After enter the phone<br />
number, press L to select Yes.<br />
3. If you select To phone, the procedures will be<br />
the same as above.<br />
View contacts<br />
Press - in idle mode to access contacts list and<br />
press the key that corresponds to the letter you<br />
wish to search (e.g. press 8 key three times to<br />
access the letter V). The first record starting with<br />
this letter in the list will be selected.<br />
1. Select a name from the contact list and press<br />
( to dial the number or press L<br />
Options to access the following options:<br />
New contact Delete<br />
Send message Copy to SIM/phone<br />
Dial<br />
Move to SIM/phone<br />
2. Select a name from the contact list and press<br />
, to view the contact’s details. Press (<br />
or , to dial the selected number or press<br />
LOptions to access the following options:<br />
Add detail If the contact is stored in <strong>Phone</strong>,<br />
you can add the contact’s Mobile<br />
Number, Home number, Company<br />
name, Email address, Office number,<br />
Fax number, Birthday, Web URL and<br />
Address.<br />
Edit name<br />
For symbols such as @, /, . etc,<br />
press 1.<br />
Rename the contact’s name.<br />
44 Contacts
Edit field<br />
Delete field<br />
View groups<br />
Modify the contact’s filed.<br />
Delete the selected field.<br />
This option allows you to group the contacts in the<br />
phone book for more efficient management of your<br />
contacts.<br />
1. Select Contacts in the main menu and select<br />
View groups.<br />
2. Select a group and press L.<br />
3. Select the option for which you wish to<br />
modify its settings.<br />
You can set the following options:<br />
Group name Set the group name.<br />
Ring type<br />
Picture<br />
Member list<br />
Set the ring tone for incoming calls<br />
from the contacts in the caller<br />
group.<br />
Set the icon to be displayed on the<br />
screen when there is an incoming<br />
call from the contacts in the caller<br />
group.<br />
Add or delete members of the<br />
caller group.<br />
Special number<br />
My numbers<br />
The My numbers option should contain your own<br />
phone number. If not, we recommend that you<br />
enter your own mobile phone number and other<br />
relevant information.<br />
Voice mail<br />
This menu allows you to set your voice mail server<br />
number, as well as retrieve your voice mails. When<br />
you receive a voice mail, your network operator<br />
will send a notification to your phone.<br />
You can enter two sets of voice mail server<br />
numbers which are supplied by your network<br />
operator.<br />
Select a voice mail box and press L to access<br />
the following options:<br />
Edit<br />
Edit voice mail server number.<br />
Connect to voice Retrieve your voice mail.<br />
You can quickly access your voice mail server by<br />
long pressing 1 in idle mode.<br />
Emergency<br />
This SOS number will call the emergency service<br />
number in your country. In most cases, you can call<br />
Contacts 45
this number even if you have not yet inserted an<br />
SIM card or entered your PIN.<br />
Depending on your network operator, you may<br />
be able to dial the emergency number even<br />
without inserting the SIM card.<br />
Service numbers<br />
This service is provided by your network operator.<br />
For more information regarding the corresponding<br />
function, please contact your network operator.<br />
Advanced<br />
Choose contact list<br />
You can select SIM contacts, <strong>Phone</strong> contacts or Both<br />
contacts to view your contact list.<br />
Copy to SIM<br />
You can copy all the contacts in your phone to your<br />
SIM card.<br />
Select Contacts in the main menu, and then select<br />
Advanced > Copy to SIM and press L.<br />
Copy to phone<br />
You can copy all the contacts in your SIM card to<br />
your phone.<br />
Select Contacts in the main menu, and then select<br />
Advanced > Copy to phone and press L.<br />
When you copy telephone number entries from<br />
your mobile phone onto your SIM card, only<br />
the names and telephone numbers will be<br />
copied.<br />
Delete all<br />
You can select Delete all contacts from SIM or Delete<br />
all contacts from <strong>Phone</strong> to delete all the entries in the<br />
SIM card or mobile phone contacts respectively.<br />
You need to input a password before you can<br />
delete all the entries from the SIM card or<br />
phone. The default password is "1122".<br />
Memory status<br />
Displays the total number of contacts you have<br />
stored in each contact and the total memory used.<br />
46 Contacts
12. Settings<br />
This menu allows you to change the settings<br />
associated with each available option in your phone<br />
(time and date, security, call divert, etc.).<br />
General<br />
Time & date<br />
Allows you to set the time and date with the<br />
keypad or navigation keys. You can set the<br />
following:<br />
World clock Select the city you are currently<br />
situated.<br />
Set time/date<br />
Set format<br />
Enter the time/date with the<br />
keypad or navigation keys.<br />
Set Time format and Date format.<br />
Auto power<br />
On/Off<br />
This menu allows you to set the<br />
time to power on or off your<br />
phone automatically.<br />
Status: You can select Enable<br />
(Activate the setting) or Disable<br />
(Deactivate the setting).<br />
Power on/off: Select whether to<br />
power on or off your phone at the<br />
specified time.<br />
Time: Enter the time with the<br />
keypad.<br />
Languages<br />
This menu allows you to select a language for all the<br />
menu texts. Press + or - to browse the list of<br />
languages and press L to select.<br />
Keypad lock<br />
This menu allows you to lock your keypad<br />
automatically. The default setting is Off.<br />
Select the interval after which the keypad will be<br />
locked and press L to confirm.<br />
Speed dial<br />
This menu allows you to quickly dial the number<br />
stored in your contacts. You can set a maximum of<br />
8 speed dial numbers, so that a long press on the<br />
numeric key will dial the number associated with<br />
Settings 47
that numeric key. You need to set Enable speed dial<br />
and Set number.<br />
Fast keys<br />
In idle mode, you can quickly access certain preset<br />
functions by pressing the navigation keys. This<br />
menu allows you to modify the preset functions<br />
according to your needs.<br />
Auto update of date and time<br />
Set whether or not to update the date and time<br />
automatically by turning this option On or Off.<br />
Shortcuts<br />
This menu allows you to quickly enter the 10<br />
preset menu items. You can also modify the preset<br />
menu items according to your needs.<br />
To access the shortcuts menu, press > in idle mode.<br />
Press LOptions to access the following options:<br />
Add To add a new shortcut.<br />
Edit To edit an existing shortcut.<br />
Delete To delete an existing shortcut.<br />
Delete all To delete all the shortcuts.<br />
Disable<br />
Change<br />
order<br />
Display<br />
To disable the shortcut. You can<br />
press this option a second time to<br />
enable the shortcut.<br />
To change the order of the shortcuts.<br />
For example, you can change the first<br />
shortcut to become the third shortcut<br />
in the list.<br />
Wallpaper<br />
Set the background image of the main screen<br />
displayed in idle mode: Choose Default wallpaper to<br />
select a predefined image or choose User define to<br />
select a downloaded image.<br />
Screen saver<br />
Select Settings to set the status and waiting time of<br />
the screen saver. Enter Select to choose System or<br />
User define. The operation of this function is similar<br />
to Wallpaper.<br />
LCD backlight<br />
This menu allows you to set the Backlight lever and<br />
Backlight duration of the LCD Backlight.<br />
48 Settings
Display time<br />
Set whether or not to display the date and time in<br />
idle mode by turning this option On or Off.<br />
Show own number<br />
Set whether or not to show the owner number.<br />
You can turn this option On or Off.<br />
Show operator name<br />
Set whether or not to display the network<br />
operator’s name by turning this option On or Off.<br />
Greeting<br />
Select On or Off, and edit the greeting text of the<br />
phone.<br />
Profiles<br />
This menu allows you to set the ring tone, ring<br />
volume, alert type, ring type, extra tone, and<br />
answer mode, etc. You can select the different<br />
profile mode according to your need.<br />
Select General, Meeting, Outdoor, Indoor, Headset or<br />
Bluetooth, and then press , to activate or<br />
LEdit to set Ringtones, Volume, Alert type, Ringer<br />
type, Extra tone and Answer mode.<br />
The “Auto” option in Answer Mode is available<br />
only when the phone is in Headset Mode.<br />
Headset mode need not be activated. The<br />
phone will switch to headset mode<br />
automatically when you plug the headset into<br />
your phone.<br />
Call settings<br />
Caller ID<br />
Depending on your network, you may choose to<br />
show or hide your identity from your<br />
correspondent by selecting Set by network, Hide ID<br />
or Send ID.<br />
Call waiting<br />
This option allows you to Activate or Cancel call<br />
waiting. When this option is active, you will hear a<br />
beep tone when someone tries to call you while<br />
you are already on the phone. If this option is<br />
inactive, your phone will not emit any alert and the<br />
caller will hear a busy tone. If you have activated<br />
Divert If Busy option, the call will be diverted to<br />
another phone. Select Status to check the status of<br />
the call waiting option.<br />
Settings 49
Call divert<br />
To divert incoming calls to your voice mailbox or<br />
to another phone number (regardless of whether<br />
or not the number is in your contacts).<br />
All<br />
voice calls<br />
Divert all incoming calls. If you<br />
select this option, you will not<br />
receive any calls until you<br />
deactivate it.<br />
If unreachable Divert when your phone is<br />
switched off or out of the service<br />
area.<br />
If no reply<br />
If busy<br />
All data calls<br />
Divert when you did not answer<br />
the call.<br />
Divert when you are already on<br />
the phone.<br />
Divert all data calls.<br />
Cancel all Cancel all call divert options.<br />
Select Activate and enter the number to divert your<br />
calls. Select Status to check the status of the<br />
corresponding call divert options.<br />
Before diverting your calls to your voice mailbox,<br />
you must enter your voice mailbox number. This<br />
feature is subscription dependent.<br />
Call barring<br />
This menu allows you to limit the use of your<br />
phone to specific calls. This can be applied to<br />
Outgoing calls (All calls, International calls or<br />
International calls except to home PLMN) and/or to<br />
Incoming calls (All calls or When roaming). In both<br />
cases, Cancel all option applies to all calls at once.<br />
Change barring PW allows you to change the call<br />
barring password. Status allows you to check<br />
whether or not a particular type of call has been<br />
barred.<br />
This feature is network dependent and requires<br />
a specific call barring password supplied by<br />
your service provider.<br />
Line switching<br />
This menu allows you to switch between 2 calls.<br />
Call time reminder<br />
This menu allows you to set whether or not the<br />
phone will emit a beep tone after a certain call<br />
duration. You can select Off (does not emit a beep<br />
tone), Single (select a value from 1 to 3000 seconds,<br />
which is the duration after which the phone will<br />
emit a beep tone) or Periodic (select a value from 30<br />
to 60 seconds, which is the periodic time after<br />
which the phone will emit a beep tone. The phone<br />
50 Settings
will emit a beep tone after each periodic time<br />
during a call).<br />
Call time display<br />
This menu allows you to set whether or not to<br />
display the call time during a call.<br />
Auto redial<br />
If the call you have dialed is not answered, your<br />
phone will automatically redial this number at<br />
intervals. Press ) or R to cancel auto redial.<br />
Closed user group<br />
This menu is a network dependent service which<br />
allows you to define a group of users within which<br />
outgoing and incoming call restrictions can be made<br />
by the network (for example only calls to numbers<br />
within the group are possible). The same group of<br />
users is then permitted to communicate with each<br />
other but not with users outside the group. Select<br />
Closed user group and press LAdd, and then you<br />
can press LOption to Edit, Add, Activate, Cancel,<br />
Delete the user group.<br />
Blacklist<br />
This menu displays the list of contacts whose calls<br />
will be rejected. You can select to enable or disable<br />
the Status. To add the corresponding number to<br />
the list, select and enter the Blacklist number, and<br />
then confirm by saving it.<br />
You cannot add a name to the black list directly<br />
from the Contacts, the Calls list and the SMS Inbox.<br />
Bluetooth<br />
<strong>Your</strong> phone supports Bluetooth wireless<br />
technology, allowing connection to a compatible<br />
Bluetooth device within 10 meters. The Bluetooth<br />
connection can be subject to interference from<br />
obstructions such as walls or other electronic<br />
devices.<br />
Before you can apply Bluetooth, make sure the<br />
other device supports Bluetooth function by<br />
contacting the device’s manufacturer or its<br />
accompanied documentation.<br />
Bluetooth menu<br />
Options Description<br />
Power Turn on/off the Bluetooth feature.<br />
Inquire audio<br />
device<br />
Active device<br />
Search the devices that are<br />
available.<br />
Select to connect to devices that<br />
you predefined.<br />
Settings 51
Settings<br />
About<br />
Allow you to set the following<br />
options: Visibility, My name,<br />
Authentication, Audio path, Storage<br />
location and Remote SIM mode.<br />
Display information of the<br />
bluetooth device connecting with<br />
your mobile<br />
Making a Bluetooth connection<br />
To make a Bluetooth connection, first of all, make<br />
sure you switch on the Bluetooth feature in the<br />
Power option. Then select Active device and press<br />
LOk.<br />
Connection with an audio device<br />
Press LOk. When the list of device appears,<br />
select the one you want to make a connection with<br />
it. As soon as you select a device and a connection<br />
is made, you are prompted to enter a passkey in<br />
order to pair with the device. This passkey is<br />
supplied by the manufacturer of the other<br />
Bluetooth device, refer to its documentation for<br />
further information. The passkey feature ensures<br />
that only legitimate connections are allowed to<br />
connect either to your device or the selected<br />
device.<br />
If you do not use the Bluetooth feature for<br />
some time, you should deactivate it in order to<br />
conserve battery power.<br />
Network settings<br />
Select network<br />
This menu allows you to select the service network<br />
New Search Search the network available.<br />
Select network Select a preferred network to be<br />
used currently.<br />
Selection mode Automatic: your phone will<br />
automatically select and register<br />
to an available network.<br />
Manual: provides you with a list of<br />
available network in the area.<br />
Select the network you wish to<br />
register with and press L to<br />
confirm.<br />
You are recommended to select<br />
Automatic.<br />
52 Settings
You can select a network other than your home<br />
network only if it has a valid roaming agreement<br />
with your home network. If you change the<br />
network, some problems may arise during the<br />
operation of your phone.<br />
Pref. networks<br />
This menu allows you to build a network list in<br />
order of preference. Once defined, the phone will<br />
try to register to the network according to your<br />
preference.<br />
GPRS link<br />
This menu allows you to set the GPRS connection<br />
mode. You can select Always or When needed.<br />
Data account<br />
This menu allows you to set your account<br />
information. The existing account information is<br />
supplied by the manufacturer.<br />
CSD profiles<br />
You can set: Account name, Number, User name,<br />
Password, Line type, Speed and DNS.<br />
GPRS profiles<br />
You can set: Account name, APN, User name,<br />
Password and Auth. Type.<br />
Security<br />
SIM lock<br />
This menu allows you to set the PIN code On or<br />
Off. The default setting is Off. If set to On, you have<br />
to enter your PIN code when switching your phone<br />
on. If the enter the wrong PIN code, you will not<br />
be able to use most of the features in this phone.<br />
Press L to activate. Make sure that you have<br />
entered the correct PIN code before you can<br />
enable this feature.<br />
<strong>Phone</strong> lock<br />
This menu allows you to set a password for your<br />
phone. The default setting is Off. Once you have set<br />
<strong>Phone</strong> Lock, you must enter the password each<br />
time you switch on your phone.<br />
Enter the password and press L. If <strong>Phone</strong> Lock is<br />
currently Off, the status will change to On and viceversa.<br />
The default phone lock code is 1122.<br />
Fixed dial<br />
This menu allows you to restrict your outgoing<br />
calls. You need to enter PIN2 code, which has to be<br />
Settings 53
supplied / supported by your network operator.<br />
Mode There are two modes: On (you only dial<br />
the numbers stored in the Fixed Dial<br />
List) and Off (you can dial any number).<br />
Fixed dial<br />
list<br />
Displays the fixed dial list. Press L<br />
Add, enter the name and phone<br />
number, then press L, enter PIN2<br />
code and press L.<br />
Not all SIM cards support PIN2 code. If your<br />
SIM card does not have a PIN2 code, this option<br />
is not available.<br />
Barred dial<br />
This menu allows you to restrict different types of<br />
outgoing calls. You can activate or deactivate this<br />
feature if your SIM card supports it.<br />
Change password<br />
This menu allows you to change the Change PIN<br />
code, Change PIN2 code and <strong>Phone</strong> Lock Password.<br />
Change PIN<br />
It is supplied together with the SIM card. The<br />
default PIN code is supplied by your network<br />
operator.<br />
If you enter an incorrect PIN code three times<br />
in succession, the PIN code of your SIM card<br />
will be locked automatically and you will be<br />
prompted to enter the PUK code to unlock it.<br />
You can obtain the PUK code from your<br />
network operator. If you enter an incorrect<br />
PUK code ten times in succession, the SIM card<br />
will be locked permanently. When this<br />
happens, please contact your network<br />
operator or retailer.<br />
Change PIN2<br />
It is used to access certain network functions such<br />
as call charges or fixed dial, etc. If you enter an<br />
incorrect PIN2 code three times in succession, the<br />
PIN2 code of your SIM card will be locked. To<br />
unlock PIN2 code, you need to obtain the PUK2<br />
code from your network operator. If you enter an<br />
incorrect PUK2 code ten times in succession, the<br />
SIM card will be locked permanently. When this<br />
happens, contact your network operator or<br />
retailer.<br />
<strong>Phone</strong> lock password<br />
It protects your phone against unauthorized use by<br />
other parties. To protect your data, you need to<br />
enter the phone lock password before you restore<br />
54 Settings
factory settings. The default phone lock password<br />
is 1122.<br />
Factory settings<br />
This menu allows you to reset some settings in<br />
your phone to its factory settings.<br />
Enter the phone lock password and press L to<br />
confirm.<br />
Once you have entered the correct password<br />
(same as your <strong>Phone</strong> Lock Password, default<br />
value is 1122), your phone will be restored to its<br />
factory settings.<br />
Settings 55
Icons & symbols<br />
In idle mode, several symbols can be displayed<br />
simultaneously on the main screen.<br />
If the network symbol is not displayed, the<br />
network is currently not available. You may be<br />
in a bad reception area; moving to a different<br />
location may help.<br />
Vibrate - <strong>Your</strong> phone will vibrate when<br />
receiving a call.<br />
Battery - The more bars you see, the<br />
more power you have left.<br />
GPRS - <strong>Your</strong> phone is connected to the<br />
GPRS network.<br />
Reception quality - The more bars are<br />
shown the better the reception is.<br />
Keypad lock - The keypad has been locked.<br />
Alarm - The alarm clock has been<br />
activated.<br />
Ring - The phone will ring when there is an<br />
incoming call.<br />
Call forward - All your incoming voice calls<br />
are being forwarded to a number.<br />
Roaming - Displayed when your phone is<br />
registered to a network other than your<br />
own (especially when you’re abroad).<br />
GPRS attach - <strong>Your</strong> phone is connected to<br />
the GPRS network.<br />
SMS - You have received a new SMS<br />
message.<br />
MMS - You have received a new MMS<br />
message.<br />
SMS full- Memory for messages is full.<br />
New voice message- You have received a<br />
new voice message.<br />
Headset - The headset is plugged into the<br />
phone.<br />
Missed call - You have a missed call.<br />
Bluetooth - Feature is activated<br />
56 Icons & symbols
Radio Waves<br />
Precautions<br />
<strong>Your</strong> cellular mobile phone is a low<br />
power radio transmitter and<br />
receiver. When it is operating, it sends<br />
and receives radio waves. The radio waves<br />
carry your voice or data signal to a base station that<br />
is connected to the telephone network. The<br />
network controls the power at which the phone<br />
transmits.<br />
• <strong>Your</strong> phone transmits/receives radio waves in the<br />
GSM frequency (900 / 1800 MHz).<br />
• The GSM network controls transmission power<br />
(0.01 to 2 watts).<br />
• <strong>Your</strong> phone complies with all relevant safety<br />
standards.<br />
• The CE mark on your phone shows compliancy<br />
with European electromagnetic compatibility<br />
(Ref. 89/336/EEC) and low voltage directives<br />
(Ref. 73/23/EEC).<br />
<strong>Your</strong> cellular mobile phone is your responsibility.<br />
To avoid damage to yourself, to others or to the<br />
phone itself, read and follow all the safety<br />
instructions and make them known to anyone<br />
borrowing your phone. Furthermore to prevent<br />
unauthorised use of your phone:<br />
Keep your phone in a safe place and keep<br />
it out of small children's reach.<br />
Avoid writing down your PIN code. Try<br />
to remember it instead.<br />
Switch off the phone and remove the battery if you<br />
are going to leave it unused for a long time.<br />
Change your PIN code after purchasing the phone<br />
and to activate call restriction options.<br />
The design of your phone complies with<br />
all applicable laws and regulations.<br />
However your phone may cause<br />
interference with other electronic<br />
devices. Consequently you should follow all local<br />
recommendations and regulations when using<br />
your cellular phone both at home and when away.<br />
Regulations on the use of cellular phones in<br />
vehicles and aircraft are particularly<br />
stringent.<br />
Public concern has been focused for some time on<br />
the possible health risks for users of cellular<br />
phones. The current research on radio wave<br />
technology, including the GSM technology, has<br />
been reviewed and safety standards have been<br />
drawn up to ensure protection from exposure to<br />
57
adio wave energy. <strong>Your</strong> cellular telephone<br />
complies with all applicable safety standards<br />
and the Radio Equipment and Telecommunications<br />
Terminal Equipment Directive 1999/5/EC.<br />
Always switch off your phone...<br />
Inadequately protected or sensitive electronic<br />
equipment may be affected by radio energy. This<br />
interference can lead to accidents.<br />
Before boarding an aircraft and/or<br />
when packing the phone in your luggage:<br />
the use of mobile phones in an aircraft<br />
may be dangerous for the operation of<br />
the aircraft, disrupt the mobile phones network<br />
and may be illegal.<br />
In hospitals, clinics, other health care<br />
centres and anywhere else where you may<br />
be in the close vicinity of medical<br />
equipment.<br />
In areas with a potentially explosive<br />
atmosphere (e.g. petrol stations and also<br />
areas where the air contains dust particles,<br />
such as metal powders).<br />
In a vehicle transporting flammable products (even<br />
if the vehicle is parked) or a vehicle powered by<br />
liquefied petroleum gas (LPG), check first that the<br />
vehicle complies with the applicable safety rules.<br />
In areas where you are requested to turn off radio<br />
transmitting devices, such as quarries or other<br />
areas where blasting operations are in progress.<br />
Check with the vehicle manufacturer that<br />
electronic equipment used in your<br />
vehicle will not be affected by radio energy.<br />
Pacemakers<br />
If you have a pacemaker:<br />
• Always keep the phone more than 15 cm from<br />
your pacemaker when the phone is switched on,<br />
in order to avoid potential interference.<br />
• Do not carry the phone in a breast pocket.<br />
• Use the ear opposite to the pacemaker to<br />
minimise the potential interference.<br />
• Switch off your phone if you suspect that<br />
interference is taking place.<br />
Hearing aids<br />
If you are a user of a hearing aid, consult your<br />
physician and hearing aid manufacturer to learn<br />
whether your particular device is susceptible to<br />
cellular phone interference.<br />
58
Improved performance<br />
In order to improve the performance of your<br />
phone, reduce radio energy emission, reduce<br />
battery consumption and ensure safe<br />
operation adhere to the following guidelines:<br />
For the optimal and satisfactory operation<br />
of the phone you are recommended to<br />
use the phone in the normal operating<br />
position (when not using in hands-free<br />
mode or with a hands-free accessory).<br />
• Do not expose your phone to extreme<br />
temperatures.<br />
• Treat the phone with care. Any misuse will void<br />
the International Guarantee.<br />
• Do not immerse the phone in any liquid; if your<br />
phone is damp, switch it off, remove the battery<br />
and let them dry for 24hrs before using them<br />
again.<br />
• To clean the phone, wipe it with a soft cloth.<br />
• Placing and receiving calls consumes the same<br />
amount of battery energy. However, the mobile<br />
consumes less energy in idle screen when kept in<br />
the same place. When in idle screen and while<br />
you are moving, your phone consumes energy to<br />
transmit updated location information to the<br />
network. Setting the backlight for a shorter<br />
period of time as well as avoiding unnecessary<br />
navigating in the menus will also help to save the<br />
battery’s energy for longer phoning and stand-by<br />
performances.<br />
Battery information<br />
• <strong>Your</strong> phone is powered by a rechargeable<br />
battery.<br />
•Use specified charger only.<br />
• Do not incinerate.<br />
• Do not deform or open the battery.<br />
• Do not allow metal objects (such as keys in your<br />
pocket) to short circuit the battery contacts.<br />
• Avoid exposure to excessive heat (>60° C or<br />
140° F), moisture or caustic environments.<br />
You should only use <strong>Philips</strong> Authentic<br />
battery and accessories, as the use of any<br />
other accessories may be dangerous, and<br />
will make all guarantees for your <strong>Philips</strong><br />
phone null and void. The use of an incorrect type<br />
of battery may also cause an explosion.<br />
Make sure damaged parts are replaced immediately<br />
by a qualified technician and that they are replaced<br />
with genuine <strong>Philips</strong> replacement parts.<br />
59
<strong>Your</strong> mobile phone and your car<br />
Studies have shown that speaking on the<br />
telephone while driving lowers your<br />
concentration, which can be dangerous.<br />
Adhere to the following guidelines:<br />
• Give your full attention to driving. Pull off the<br />
road and park before using the phone.<br />
• Respect the local regulations in countries where<br />
you drive and use your GSM phone.<br />
• If you want to use your phone in a vehicle, install<br />
the hands-free car kit which is designed for that<br />
purpose.<br />
• Ensure that your phone and car kit do not block<br />
any air bags or other security devices fitted in<br />
your car.<br />
The use of an alarm system to operate a vehicle's<br />
light or horn to indicate incoming phone calls is<br />
prohibited on public roads in some countries.<br />
Check local regulations.<br />
EN 60950 Norm<br />
In hot weather or after prolonged exposure to the<br />
sun (e.g., behind a window or a windscreen), the<br />
temperature of your phone's casing might increase,<br />
especially when featuring a metallic finish. Be very<br />
careful in this case when picking up your phone and<br />
60<br />
also avoid using it with an ambient temperature<br />
over 40° C or below 5° C.<br />
For your phone, the socket-outlet shall be installed<br />
near the phone and shall be accessible.<br />
Environmental care<br />
Remember to observe the local<br />
regulations regarding the disposal of the<br />
packaging materials, exhausted batteries<br />
and old phone and please promote their<br />
recycling.<br />
<strong>Philips</strong> has marked the battery and packaging with<br />
standard symbols designed to promote the<br />
recycling and appropriate disposal of your eventual<br />
waste.<br />
The labelled packaging material is<br />
recyclable.<br />
A financial contribution has been made<br />
to the associated national packaging<br />
recovery and recycling system.<br />
The plastic material is recyclable (also<br />
identifies the type of plastic).
WEEE Marking in the DFU:<br />
“Information to the Consumer”<br />
Disposal of your old product<br />
<strong>Your</strong> product is designed and manufactured with<br />
high quality materials and components, which can<br />
be recycled and reused.<br />
When this crossed-out wheeled bin<br />
symbol is attached to a product it<br />
means the product is covered by the<br />
European Directive 2002/96/EC<br />
Please inform yourself about the local<br />
separate collection system for<br />
electrical and electronic products.<br />
Please act according to your local rules and do not<br />
dispose of your old products with your normal<br />
household waste. The correct disposal of your old<br />
product will help prevent potential negative<br />
consequences for the environment and human<br />
health.<br />
FCC Compliance Statement<br />
This equipment has been tested and found to<br />
comply with the limits for a Class B digital device,<br />
pursuant to Part 15 of the FCC Rules. These limits<br />
are designed to provide reasonable protection<br />
against harmful interference in a residential<br />
installation. This equipment generates, uses and can<br />
radiate radio frequency energy and, if not installed<br />
and used in accordance with the instructions, may<br />
cause harmful interference to radio<br />
communications. However, there is no guarantee<br />
that interference will not occur in a particular<br />
installation.<br />
If this equipment does cause harmful interference<br />
to radio or television reception, which can be<br />
determined by turning the equipment off and on,<br />
the user is encouraged to try to correct the<br />
interference by one or more of the following<br />
measures:<br />
--Reorient or relocate the receiving antenna.<br />
--Increase the separation between the equipment<br />
and receiver.<br />
--Connect the equipment into an outlet on a circuit<br />
different from that to which the receiver is<br />
connected.<br />
Any changes or modifications not expressly<br />
approved by the party responsible for compliance<br />
could void the user’s authority to operate the<br />
equipment.<br />
61
This device complies with part 15 of the FCC Rules.<br />
Operation is subject to the following two<br />
conditions: (1) This device may not cause harmful<br />
interference, and (2) this device must accept any<br />
interference received, including interference that<br />
may cause undesired operation.<br />
62
Troubleshooting<br />
The phone does not switch on<br />
Remove/reinstall the battery. Then charge the<br />
phone until the battery icon stops scrolling. Unplug<br />
from charger and try to switch the mobile on.<br />
<strong>Your</strong> phone doesn’t return to the idle<br />
screen<br />
Long press the hangup key or switch off the phone,<br />
check that the SIM card and the battery are<br />
installed correctly and switch it on again.<br />
The network symbol is not displayed<br />
The network connection is lost. Either you are in a<br />
radio shadow (in a tunnel or between tall buildings)<br />
or you are outside the network coverage area. Try<br />
from another place, try to reconnect to the<br />
network (especially when abroad), check that the<br />
antenna is in place if your mobile has an external<br />
antenna, or contact your network operator for<br />
assistance/information.<br />
The display doesn’t respond (or the<br />
display responds slowly) to key presses<br />
The display responds more slowly at very low<br />
temperatures. This is normal and does not affect<br />
the operation of the phone. Take the phone to a<br />
warmer place and try again. In other cases please<br />
contact your phone supplier.<br />
<strong>Your</strong> battery seems to over heat<br />
You might be using a charger that was not intended<br />
for your phone. Make sure you always use the<br />
<strong>Philips</strong> authentic accessory shipped with your<br />
phone.<br />
<strong>Your</strong> phone doesn’t display the phone<br />
numbers of incoming calls<br />
This feature is network and subscription<br />
dependent. If the network doesn’t send the caller’s<br />
number, the phone will display Call 1 or Withheld<br />
instead. Contact your operator for detailed<br />
information on this subject.<br />
You can’t send text messages<br />
Some networks don’t allow message exchanges<br />
with other networks. First check that you entered<br />
the number of your SMS centre, or contact your<br />
operator for detailed information on this subject.<br />
You have the feeling that you miss some<br />
calls<br />
Check your call divert options.<br />
63
The display shows INSERT SIM<br />
Check that the SIM card has been inserted in the<br />
right position. If the problem remains, your SIM<br />
card may be damaged. Contact your operator.<br />
When attempting to use a feature in the<br />
menu, the mobile displays NOT<br />
ALLOWED<br />
Some features are network dependent. They are<br />
only available, therefore, if the network or your<br />
subscription supports them. Contact your<br />
operator for detailed information on this subject.<br />
<strong>Your</strong> phone is not charging<br />
If your battery is completely flat, it might take<br />
several minutes of pre-charge (up to 5 minutes in<br />
some cases) before the charging icon is displayed<br />
on the screen.<br />
64
<strong>Philips</strong> Authentic<br />
Accessories<br />
Some accessories, such as a battery and a charger,<br />
are included as standard in the package of your<br />
mobile phone. Additional accessories may also be<br />
provided or sold separately. Package contents may<br />
therefore vary.<br />
To maximise the performance of your <strong>Philips</strong><br />
mobile phone and not to void the warranty,<br />
always purchase <strong>Philips</strong> Authentic Accessories<br />
that are specially designed for use with your<br />
phone. <strong>Philips</strong> Consumer Electronics cannot be<br />
held liable for any damage due to use with non<br />
authorised accessories.<br />
Data cable<br />
Provides easy data connection to your <strong>Philips</strong><br />
mobile phone. The USB cable enables high-speed<br />
communication between your phone and your<br />
computer. The provided software allows you to<br />
download pictures and melodies and to<br />
synchronise your contacts and appointments.<br />
When your mobile phone is connected to the<br />
PC via a USB data cable, the cable also acts as<br />
charger to charge your phone (E210 USB<br />
charging is compatible with most PCs).<br />
Charger<br />
Charges your battery in any AC outlet. Small<br />
enough to carry in a briefcase/handbag.<br />
Headset<br />
<strong>Your</strong> phone will activate headset mode<br />
automatically when you plug in the earphone.<br />
65
Trademark Declaration<br />
Tegic Euro. Pat.<br />
App. 0842463<br />
T9 ® is a trademark of Tegic<br />
Communications Inc.<br />
Bluetooth is a trademark<br />
owned by<br />
telefonaktiebolaget L M<br />
Ericsson, Sweden and<br />
licensed to <strong>Philips</strong>.<br />
PHILIPS and PHILIPS’ Shield<br />
Emblem are registered<br />
trademarks of Koninklijke<br />
<strong>Philips</strong> Electronics N.V.<br />
manufactured by Shenzhen<br />
Sang Fei Consumer<br />
Communications Co., Ltd.<br />
under license from<br />
Koninklijke<br />
<strong>Philips</strong> Electronics N.V.<br />
66
Specific Absorption Rate Information<br />
International standards<br />
THIS MOBILE PHONE MEETS THE INTERNATIONAL RECOMMENDATIONS FOR EXPOSURE TO<br />
RADIO WAVES<br />
<strong>Your</strong> mobile phone is a radio transmitter and receiver. It is designed and manufactured not to exceed the<br />
limits for exposure to radio frequency (RF) energy defined by the international standards. These<br />
recommendations have been established by the International Commission on Non-Ionizing Radiation<br />
Protection (ICNIRP) that forecast a substantial safety margin for assuring the protection of all persons,<br />
regardless of age and health.<br />
The exposure recommendations for mobile phones use a measurement unit known as the Specific<br />
Absorption Rate (SAR). The SAR limit recommended by the ICNIRP for the mobile phones used by the<br />
general public is 2.0W/kg averaged over ten grams of tissue.<br />
Tests for SAR have been conducted using recommended operating positions with the mobile phone<br />
transmitting at its highest certified power level in all tested frequency bands. Although the SAR is determined<br />
at the highest certified power level, the actual SAR levels of the mobile phone while operating are generally<br />
below the maximum SAR value. This is because the phone is designed to operate at multiple power levels so<br />
as to use only the power required to reach the network. In general, the closer you are to a base station<br />
antenna, the lower the power output.<br />
While there may be differences between the SAR levels of various phones and at various positions, they all<br />
meet the international protection standards for exposure to radio waves.<br />
The highest SAR value for this <strong>Philips</strong> E210 model phone when tested for compliance against the standard<br />
was 0.993W/kg for ICNIRP recommendation.<br />
For limiting the radio waves exposure, it is recommended to reduce the mobile phone call duration or to<br />
use a headset. The purpose of those precautions is to take the mobile phone away from the head and the<br />
body.<br />
Specific Absorption Rate Information 67
68<br />
Limited warranty<br />
1. What Does This Limited Warranty Cover?<br />
<strong>Philips</strong> warrants to the original retail purchaser<br />
(“Consumer” or “You”) that this <strong>Philips</strong><br />
cellular product and all accessories originally<br />
provided by <strong>Philips</strong> in the sales package<br />
(“Product”) are free from defects in materials,<br />
design and workmanship under normal use in<br />
accordance with the operating instructions and<br />
pursuant to the following terms and<br />
conditions. This limited warranty extends only<br />
to the Consumer for Products purchased and<br />
used in the original country of purchase. The<br />
limited warranty is valid only in <strong>Philips</strong>’<br />
intended country of sales of the product.<br />
2. How Long is The Limited Warranty Period?<br />
The limited warranty period for the Product<br />
extends for ONE (1) YEAR from the date of<br />
purchase of the Product, documented by valid<br />
proof of purchase. The limited warranty for<br />
original <strong>Philips</strong> rechargeable battery extends<br />
for six (6) months from the date of purchase.<br />
3. What Will <strong>Philips</strong> Do if The Product is Not<br />
Free From Material Defects in Materials and<br />
Workmanship During The Limited Warranty<br />
Period?<br />
During the limited warranty period, <strong>Philips</strong> or<br />
its authorized service representative will, at its<br />
option either repair or replace, without charge<br />
for parts or labour, a materially defective<br />
Product with new or refurbished parts or<br />
Product and return such repaired or replaced<br />
Product to the Consumer in working<br />
condition. <strong>Philips</strong> will retain defective parts,<br />
modules or equipment.<br />
Repaired or replaced Product will be covered<br />
by this limited warranty for the balance of the<br />
original limited warranty period or ninety (90)<br />
days from the date of repair or replacement<br />
whichever is longer. Repair or replacement of<br />
Product, at <strong>Philips</strong>’ option is your exclusive<br />
remedy.<br />
4. What is Not Covered By This Limited<br />
Warranty?<br />
This limited warranty does not cover:<br />
a) Product that has been subjected to<br />
misuse, accident, shipping or other<br />
physical damage, improper installation,<br />
abnormal operation handling, neglect,
inundation, fire, water or other liquid<br />
intrusion; or<br />
b) Product that has been damaged due to<br />
repair, alteration, or modification by<br />
anyone not authorized by <strong>Philips</strong>; or<br />
c) Product that has reception or operation<br />
problems caused by signal conditions,<br />
network reliability or cable or antenna<br />
systems; or<br />
d) Product defects or problems caused by<br />
uses with non-<strong>Philips</strong> products or<br />
accessories; or<br />
e) Product which warranty/quality stickers,<br />
product serial number or electronic serial<br />
number has been removed, altered or<br />
rendered illegible; or<br />
f) Product purchased, used, serviced, or<br />
shipped for repair from outside the<br />
original country of purchase, or used for<br />
commercial or institutional purposes<br />
(including but not limited to Products used<br />
for rental purposes); or<br />
g) Product returned without valid proof of<br />
purchase or which proof of purchase has<br />
been altered or is illegible.<br />
h) Normal wear and tear or Force Majeure.<br />
5. How Do You Get Warranty Service?<br />
a) Return the Product to an authorized<br />
service center of <strong>Philips</strong>. You may contact<br />
the local <strong>Philips</strong> office for the location of<br />
the nearest authorized service center.<br />
b) The SIM card must be removed from the<br />
Product before it is given to <strong>Philips</strong>. <strong>Philips</strong><br />
assumes no liability for damaged or loss of<br />
the SIM card or the data contained<br />
therein.<br />
c) If the Product failure is not covered by this<br />
limited warranty, or this limited warranty<br />
is inapplicable, void or invalid due to any<br />
terms and conditions stated herein, the<br />
Consumer will be charged for the cost of<br />
repair or replacement of the Product and<br />
all other related cost incurred in repairing<br />
or replacing the Product.<br />
d) IMPORTANT - you are required to return<br />
the Product together with a valid proof of<br />
purchase which must identify the point of<br />
purchase, date of purchase, Product<br />
model and Product serial number clearly.<br />
6. Other Limitation: This Warranty is The Entire<br />
Agreement.<br />
EXCEPT FOR THE EXPRESS WARRANTIES<br />
SET FORTH ABOVE AND THOSE IMPLIED<br />
BY LAW AND WHICH CANNOT BE<br />
EXCLUDED OR MODIFIED BY<br />
69
70<br />
AGREEMENT, PHILIPS PROVIDES NO<br />
OTHER WARRANTY WHETHER EXPRESS<br />
OR IMPLIED (WHETHER BY STATUTE,<br />
UNDER THE OPERATION OF LAW OR<br />
OTHERWISE) AND SPECIALLY DISCLAIMS<br />
ANY WARRANTY OF SATISFACTORY<br />
QUALITY MERCHANTABILITY OR FITNESS<br />
FOR A PARTICULAR PURPOSE.<br />
PHILIPS’ TOTAL LIABILITY FOR DAMAGES<br />
RELATING TO OR ARISING OUT OF THE<br />
PURCHASE OR USE OF THE PRODUCT,<br />
REGARDLESS OF THE TYPE OR CAUSE OF<br />
SUCH DAMAGE OR THE FORM OR<br />
CHARACTERISATION OF THE CLAIM<br />
ASSERTED (E.G. CONTRACT OR TOPIT),<br />
SHALL NOT EXCEED THE ORIGINAL<br />
PURCHASE PRICE PAID FOR THE<br />
PRODUCT.<br />
HOWEVER IN NO EVENT SHALL PHILIPS BE<br />
LIABLE FOR ANY PUNITIVE, SPECIAL,<br />
INCIDENTAL, INDIRECT OR<br />
CONSEQUENTIAL DAMAGES (INCLUDING<br />
BUT NOT LIMITED TO THE LOSS OF USE,<br />
LOSS OF TIME, INCONVENIENCE,<br />
COMMERIAL LOSS, LOST PROFITS, LOST<br />
BUSINESS OPPORTUNITIES, COST OF<br />
SUBSTITUTION OF GOODS OR SERVICES,<br />
INVESTMENTS, DAMAGE TO GOODWILL<br />
OR REPUTATION, OR LOSS OF DATA AND<br />
CLAIMS BY THIRD PARTIES) RESULTING<br />
FROM PURCHASE OR USE OF THE<br />
PRODUCT, TO THE FULLEST EXTENT<br />
ALLOWED BY LAW, WHETHER OR NOT<br />
PHILIPS HAS BEEN ADVISED OF THE<br />
POSSIBILTY OF SUCH DAMAGES. THESE<br />
LIMITATIONS SHALL APPLY<br />
NOTWITHSTANDING THE FAILURE OF<br />
THE ESSENTIAL PURPOSE OF ANY LIMITED<br />
REMEDY.<br />
This limited warranty represents the complete<br />
and exclusive agreement between the<br />
Consumer and <strong>Philips</strong> with respect to this<br />
cellular Product and it supercedes all prior<br />
agreements between the parties, oral or<br />
written, and all other communications<br />
between the parties relating to the subject<br />
matter of this limited warranty. No carrier,<br />
retailer, agent, dealer, employee, thereof, or<br />
employee of <strong>Philips</strong> is authorized to make<br />
modifications to this limited warranty and you<br />
should not rely on any such representation.<br />
This limited warranty does not affect the<br />
Consumer’s statutory rights under applicable<br />
national laws in force.
Declaration of<br />
conformity<br />
We,<br />
Shenzhen Sang Fei Consumer<br />
Communications Co., Ltd.<br />
11 Science and Technology Road,<br />
Shenzhen Hi-tech Industrial Park,<br />
Nanshan District, Shenzhen 518057<br />
China<br />
declare under our sole responsibility that the<br />
product<br />
<strong>Philips</strong> E210<br />
Cellular Mobile Radio GSM 900/1800<br />
TAC: 35569402<br />
to which this declaration relates, is in conformity<br />
with the following Standards:<br />
SAFETY : EN 60950-1: 2006<br />
HEALTH: EN 50360: 2001<br />
EN 62209-1:2006<br />
EMC: ETSI EN 301 489-1 V1.6.1;<br />
EN 301 489-7 V1.3.1;<br />
EN 301 489-17 V1.2.1<br />
SPECTRUM: ETSI EN 301 511 v9.0.2;<br />
EN 300 328 V1.7.1<br />
We hereby declare that all essential radio test<br />
suites have been carried out and that the above<br />
named product is in conformity to all the essential<br />
requirements of Directive 1999/5/EC.<br />
The conformity assessment procedure referred to<br />
in Article 10 and detailed in Annex V of Directive<br />
1999/ 5/EC has been followed related to articles 3.1<br />
and 3.2 with the involvement of the following Notified<br />
Body: CETECOM ICT Services GmbH<br />
Identification mark: 0682<br />
August 11, 2008<br />
Quality Manager
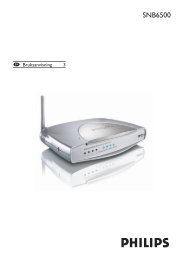

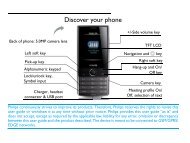


![03_[DE] - Philips](https://img.yumpu.com/25100096/1/184x260/03-de-philips.jpg?quality=85)