You also want an ePaper? Increase the reach of your titles
YUMPU automatically turns print PDFs into web optimized ePapers that Google loves.
<strong>pottery</strong> <strong>barn</strong> <strong>kids</strong><br />
MADELINE BUNK BED<br />
! WARNING: Failure to follow these warnings and assembly<br />
instructions could result in serious injury or death. To help prevent serious or fatal<br />
injuries from entrapment or falls:<br />
Read all instructions before assembling bunk bed. KEEP INSTRUCTIONS FOR<br />
FUTURE USE.<br />
Before each usage or assembly, inspect bunk bed for damaged hardware, loose joints,<br />
missing parts or sharp edges. DO NOT use bunk bed if any parts are missing or<br />
broken. Telephone or write to Pottery Barn Kids for replacement parts and instructional<br />
literature if needed. DO NOT substitute parts.<br />
Follow the information on the warnings appearing on the upper bunk end structure and<br />
on the carton. DO NOT REMOVE WARNING LABEL FROM THE BED.<br />
Always use the recommended size mattress or mattress support, or both, to help<br />
prevent the likelihood of entrapment or falls.<br />
Ensure thickness of mattress does not exceed 9” and the surface of the mattress is at<br />
least 5" (127 mm) below the upper edge of guardrails.<br />
Use only mattress which is 74"-75" long and 37.5"-38.5" wide on upper bunk.<br />
Surface of mattress must be at least 5 inches (127 mm) below the upper edge of the<br />
guardrails.<br />
The use of water or sleep flotation mattress is prohibited.<br />
Periodically check and ensure that the guardrail, ladder and other components are in<br />
their proper position, free from damage, and that all connectors are tight.<br />
Never allow children under 6 years of age to use the upper bunk.<br />
Do not allow horseplay on or under the bed and prohibit jumping on the bed.<br />
Always use the ladder for entering and leaving the upper bunk.<br />
Use of a night light may provide added safety precautions for a child using the upper<br />
bunk.<br />
Prohibit more than one person on the upper bunk.<br />
Always use guardrails on both long sides of the upper bunk.<br />
If the bunk bed will be placed next to a wall, the guardrail that runs the full length of the<br />
bed should be placed against the wall to prevent entrapment between the bed and the<br />
wall.<br />
If refinishing, use a non-toxic finish specified for children’s products.<br />
STRANGULATION HAZARD – Never attach or hang items to any part of the bunk bed<br />
that are not designed for use with the bed; for example, but not limited to, hooks, belts,<br />
and jump ropes.<br />
04-000044-4<br />
1
PRE-ASSEMBLY:<br />
<br />
<br />
<br />
<br />
<br />
<br />
Please read all instructions before beginning assembly. The illustrations provided allow for easier assembly<br />
when used in conjunction with the assembly instructions.<br />
For your safety and ease, assembly by four adults is recommended.<br />
Remove all parts and hardware from box and lay out on a carpeted or scratch-free work surface. The shipping<br />
box provides and ideal work surface. Do not dispose of any contents until assembly is completed to avoid<br />
accidentally discarding small parts or hardware.<br />
Use the parts and hardware lists to identify and separate each of the pieces included prior to starting<br />
assembly.<br />
Note: DO not fully tighten the bolts until all parts are in place. Failure to follow these instructions may cause<br />
the bolts to misalign during assembly.<br />
The use of power tools for assembly is not recommended. Power tools can damage hardware and split<br />
wood.<br />
2
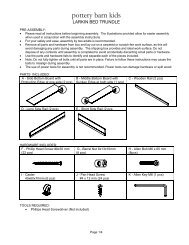
PARTS INCLUDED:<br />
A – Tall End Board (Head board)-Lower bed (2)<br />
B – Short End Board (Foot board)-Upper bed (2)<br />
C – Side rails (4)<br />
D – Long Guardrail (1)<br />
E – Short Guardrail (1)<br />
F – Slat Rolls (2)<br />
G – Ladder (1)<br />
H – Middle post (4)<br />
I – Feet (4)<br />
J – Finial (4)<br />
((I&J) for when assembling as 2 twin beds)<br />
TOOLS REQUIRED:<br />
Phillips Head Screwdriver (not included)<br />
HARDWARE:<br />
K – Allen Wrench (x1)<br />
L – Allen Bolts M8x110mm (x16)<br />
M – Threaded Dowels 10x80mm (x4)<br />
N – Barrel Nut M8x15mmx12mm (x 16)<br />
O – Small Phillips Head Screws8x19mm (x18)<br />
P – Large Phillips Head Screws 8x30mm (x 56)<br />
3
ASSEMBLY INSTRUCTION<br />
Steps #1 through 3 (assembly of the lower bed):<br />
1. Assemble lower bunk first using the (2) Tall End Board (A) as headboard and footboard.<br />
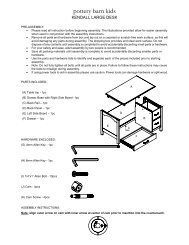
2. Insert (2) Long Bolts (L) into pre-drilled holes on each end of Tall End Board (A). Place (2) Barrel Nut (N)<br />
in the corresponding openings on the Side Rail (C) and use Allen Key (K) to connect. Repeat with<br />
another (6) Long Bolts. (See Fig. 1). Do not fully tighten until all bolts are in place.<br />
3. Insert 4pcs Threaded Dowels (M) into the top of each post of the lower bunk as shown.<br />
4
Steps #4 through 5 (assembly of the upper bed):<br />
4. Assemble the upper bunk using the Short End board as both the head board and foot board. Screw in<br />
the Middle post (H) to the bottom of the post of upper bunk as shown, make sure they are align with the<br />
bed post. DO NOT over tighten.<br />
5. Now assemble bottom bunk using the (2) Short End Board (B) as headboard and footboard. Insert (2)<br />
Long Bolts (L) into pre-drilled holes on each end of Tall End Board (B). Place (2) Barrel Nut (N) in the<br />
corresponding openings on the Side Rail (C) and use Allen Key (K) to connect. Repeat with the<br />
remaining (6) Long Bolts. Do not fully tighten until all bolts are in place.<br />
5
Step #6(attaching guardrail to Upper bunk):<br />
6. Install Long guardrail (D) onto the backside of the bed by placing metal bracket over the side rail. Make sure<br />
there are no gaps in between end of long guardrail and bed end structure before you start fastening the parts.<br />
Turn the bracket on the bottom of the guardrail end under the side rail. Use small Philips head screws (O) to<br />
fasten guardrail bracket to side rail.<br />
Place short guardrail with one end firm against the upper bunk bed end depending on which end the ladder will<br />
be placed. Repeat fastening procedure with short guardrail as described/shown for the long guardrail.<br />
NOTE: Long guardrail (D) and Short guardrail (E) are interchangeable at the bed left or right side as shown.<br />
6
Step #7 (attaching the slat roll)<br />
7.Lay the slat roll in between the side rails (C ) and use Large Philips Head Screws 8x30mm (P) to fasten slats to<br />
the side rails with Philips head screwdriver for both upper bunk and lower bunk (for each of the twin beds)<br />
NOTE: Feet (I) and Finials (J) are to be used on Tall End board /lower bunk bed end ONLY when set up as two<br />
beds as shown or when set up using one tall and one short end on each bed. Be sure to store whichever finials,<br />
Middle post, feet, and threaded dowels are not used so that they can be utilized at a later date if needed.<br />
Single twin bed set up with upper bunk end as Footboard and lower bunk end as Headboard.<br />
7
Step #8 (assembling the bunk bed)<br />
8. After both bunks are assembled, set the upper bunk on top of the lower bunk by placing the pre-drilled holes in<br />
the bottom of upper bunk bed posts (mid posts) over the Thread dowels (M) in bottom bed.<br />
8
Step #9(securing the ladder)<br />
9. Attach ladder (G) in the opening between the short guardrail and the end by hooking it over topside rail and<br />
bottom side rail as shown. Fasten the ladder with the remaining Small Philips head screws 8x20mm (O) as<br />
shown.<br />
Finally: Retighten all bolts and screws to make sure all are tight and bunk bed structures is rigid. It is<br />
recommended all bolts and screws be checked from time to time for safety.<br />
CARE INSTRUCTIONS:<br />
• Dust often using a clean, soft, dry lint-free cloth.<br />
• Bolt spills immediately, and wipe with a clean, damp, cloth.<br />
• We do not recommend the use of chemical cleansers, abrasives, or furniture polish on our lacquered finish.<br />
• Check fasteners periodically for tightness, DO NOT over tighten; this may cause distortion or breakage.<br />
• Parents should ensure a safe environment for the child by checking regularly, before placing the child in the<br />
product, that every component is properly and securely in place.<br />
Thank you for your purchase.<br />
Stores | catalog | www.<strong>pottery</strong><strong>barn</strong><strong>kids</strong>.com<br />
USA 1.800.290.8181<br />
9