You also want an ePaper? Increase the reach of your titles
YUMPU automatically turns print PDFs into web optimized ePapers that Google loves.
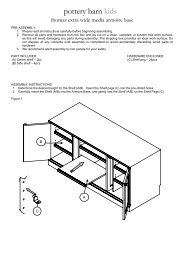
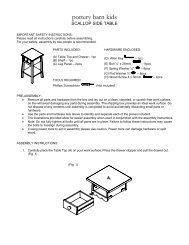
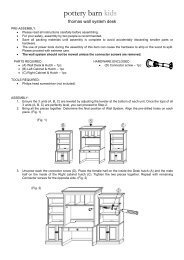
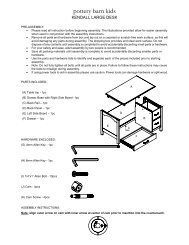
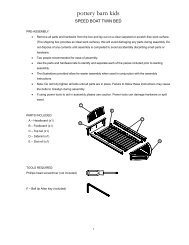
pottery <strong>barn</strong> <strong>kids</strong><br />
THOMAS BUNK BED<br />
WARNING:<br />
Failure to follow these warnings and assembly instructions could result in serious injury or<br />
death.<br />
• Read all instructions before assembling bunk bed. KEEP INSTRUCTIONS FOR<br />
FUTURE USE.<br />
• Before each usage or assembly. Inspect bunk bed for damaged hardware, loose joints,<br />
missing parts or sharp edges. DO NOT use bunk bed if any parts are missing or broken.<br />
Telephone or write to <strong>Pottery</strong> Barn Kids for replacement parts and instruction literature if<br />
needed. DO NOT substitute parts.<br />
• Follow the information on the warnings appearing on the upper end structure and on the<br />
carton. DO NOT REMOVE WARNING LABEL FROM THE BED.<br />
• Never allow a child less than 6 years on upper bunk.<br />
• Use only mattress, which is 74”-75” long and 37.5”-38.5” wide on upper bunk.<br />
• Ensure thickness mattress does not exceed 9’ and mattress is at least 5” below upper<br />
edge of guardrails.<br />
• Always use the recommended size mattress or mattress support, or both, to help prevent<br />
the likelihood of entrapment or falls.<br />
• Surface of mattress must be at least 5inches(127mm) below the upper edge of the<br />
guardrails.<br />
• Periodically check and ensure that the guardrail, adder and other components are in their<br />
proper position, free from damage, and that all connectors are tight.<br />
• Do not allow horseplay on or under the bed and prohibit jumping on the bed.<br />
• Always use the ladder for entering and leaving the upper bunk.<br />
• Use of a nightlight may provide added safety precautions for a child using the upper<br />
bunk.<br />
• Always use guardrail on both long sides of the upper bunk.<br />
• Prohibit more than one person on the upper bunk.<br />
• If the bunk bed will bed placed next to a wall, the guardrail that runs the full length of the<br />
bed should be placed against the wall to prevent entrapment between the bed and the<br />
wall.<br />
• If refinishing, use a non-toxic finish specified for children’s products.<br />
• DO NOT use a water mattress with this bunk bed.
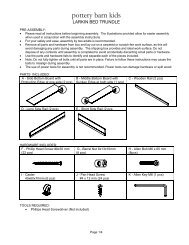
PARTS INCLUDE:<br />
A – Headboard & Footboard (lower)<br />
B – Headboard & Footboard (upper)<br />
C – Side rails (4)<br />
D – Long Guardrail (1)<br />
E – Short Guardrail (1)<br />
F – Slat Rolls (2)<br />
G – Ladder (1)<br />
H – Top Finials (8)<br />
I - Middle Finials (4)<br />
J – Feet (8)
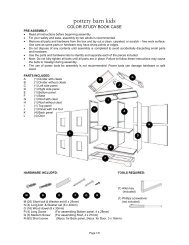
TOOLS INCLUDED:<br />
Phillips head screw driver (not included)<br />
Allen Wrench (included)<br />
HARDWARE:<br />
K – Allen Wrench (x1)<br />
L – Long Bolts (x16)<br />
M – Threaded Dowel (x 4)<br />
N – Barrel Nuts (x16)<br />
O – Small Phillips Head Screws (x16)<br />
P - Large Phillips Head Screws (x56)
ASSEMBLY:<br />
Steps #1 through 3<br />
1. Assembly lower bunk first using the (A) taller end boards as both headboard and foot board for<br />
the bed. (Note: if you decide to use the bunk bed set as 2 single beds use the (A) taller end<br />
boards from the lower bunk and each shorter bed end boards from the upper bunk as head<br />
boards for each single bed.)<br />
2. Screw in the feet to the lower bunk and insert (M) Threaded dowels into each post of the lower<br />
bunk.<br />
3. Install (N) Barrel nuts to each end of side rails.<br />
4. Hold side rails up to lower most pre-drilled holes as shown below in headboard and foot head<br />
board and insert (L) long bolts from the outside of headboard and foot board into the (N) Barrel<br />
nuts. Tighten with (K) Allen wrench provided.
Steps #4 through 5<br />
5. Screw in the (I) middle finials to the post of upper bunk. Insert (N) barrel nuts into each end of side<br />
rails. Hold side rails up to lower most pre-drilled holes as shown below in headboard and foot head<br />
board and insert (L) long bolts from the outside of headboard and foot board into the barrel nuts.<br />
Tighten with (K) Allen wrench provided.
Step #6<br />
6. Install (D) long guardrail onto the backside of the bed by placing metal bracket over side rail. Make<br />
sure there are no gap in between end of long guardrail and bed end structure before you start<br />
fastening the parts. Use small Phillips head screws to fasten guardrail to side rail.<br />
7. Repeat procedure with short guardrail on upper bunk as shown.
Steps #7 through 8<br />
8. Lay the slat roll in between the side rails and use (P) Large Phillips head screws to fasten slats to<br />
the side rails with a Phillips head screwdriver for both upper bunk and lower bunk.<br />
9. Screw (H) top finials into the upper bunk as shown below.
Step #9<br />
10. After both bunks are assembled, set the upper bunk on top of the lower bunk<br />
by placing the pre-drilled holes in the bottom of upper bunk bed posts over<br />
Thread dowels.<br />
Step #10<br />
11. Attach ladder to side of both topside rail and bottom side rail as shown by<br />
placing ladder bracket over side rails and fastening with the (O) remaining<br />
small Phillips head screws.<br />
12. Retighten all bolts and screws to make sure all are tight and bunk bed<br />
structures is rigid, It is recommended all bolts and screws be checked from time<br />
to time for safety.