

Gamma3 Trochanteric Nail 180 - Stryker
Gamma3 Trochanteric Nail 180 - Stryker
Gamma3 Trochanteric Nail 180 - Stryker

You also want an ePaper? Increase the reach of your titles
YUMPU automatically turns print PDFs into web optimized ePapers that Google loves.
Operative Technique<br />
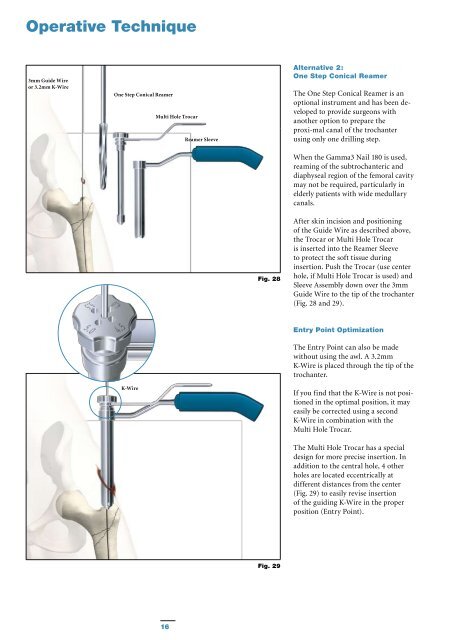
3mm Guide Wire<br />
or 3.2mm K-Wire<br />
One Step Conical Reamer<br />
Multi Hole Trocar<br />
Reamer Sleeve<br />
Alternative 2:<br />
One Step Conical Reamer<br />
The One Step Conical Reamer is an<br />
optional instrument and has been developed<br />
to provide surgeons with<br />
another option to prepare the<br />
proxi-mal canal of the trochanter<br />
using only one drilling step.<br />
When the <strong>Gamma3</strong> <strong>Nail</strong> <strong>180</strong> is used,<br />
reaming of the subtrochanteric and<br />
diaphyseal region of the femoral cavity<br />
may not be required, particularly in<br />
elderly patients with wide medullary<br />
canals.<br />
Fig. 28<br />
After skin incision and positioning<br />
of the Guide Wire as described above,<br />
the Trocar or Multi Hole Trocar<br />
is inserted into the Reamer Sleeve<br />
to protect the soft tissue during<br />
insertion. Push the Trocar (use center<br />
hole, if Multi Hole Trocar is used) and<br />
Sleeve Assembly down over the 3mm<br />
Guide Wire to the tip of the trochanter<br />
(Fig. 28 and 29).<br />
Entry Point Optimization<br />
The Entry Point can also be made<br />
without using the awl. A 3.2mm<br />
K-Wire is placed through the tip of the<br />
trochanter.<br />
K-Wire<br />
If you find that the K-Wire is not positioned<br />
in the optimal position, it may<br />
easily be corrected using a second<br />
K-Wire in combination with the<br />
Multi Hole Trocar.<br />
The Multi Hole Trocar has a special<br />
design for more precise insertion. In<br />
addition to the central hole, 4 other<br />
holes are located eccentrically at<br />
different distances from the center<br />
(Fig. 29) to easily revise insertion<br />
of the guiding K-Wire in the proper<br />
position (Entry Point).<br />
Fig. 29<br />
16


