Untitled - Stryker
Untitled - Stryker Untitled - Stryker
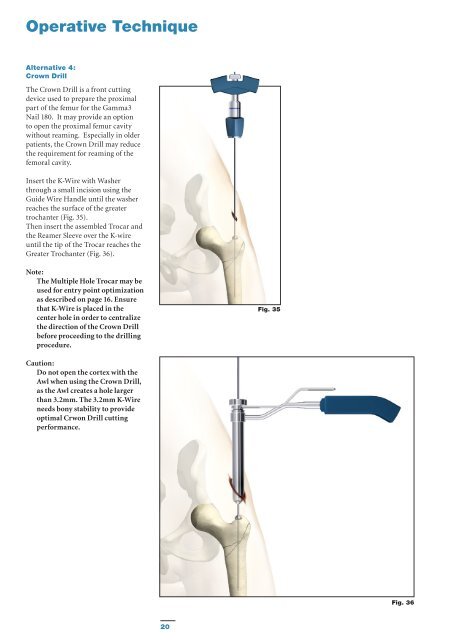
Operative Technique Alternative 4: Crown Drill The Crown Drill is a front cutting device used to prepare the proximal part of the femur for the Gamma3 Nail 180. It may provide an option to open the proximal femur cavity without reaming. Especially in older patients, the Crown Drill may reduce the requirement for reaming of the femoral cavity. Insert the K-Wire with Washer through a small incision using the Guide Wire Handle until the washer reaches the surface of the greater trochanter (Fig. 35). Then insert the assembled Trocar and the Reamer Sleeve over the K-wire until the tip of the Trocar reaches the Greater Trochanter (Fig. 36). Note: The Multiple Hole Trocar may be used for entry point optimization as described on page 16. Ensure that K-Wire is placed in the center hole in order to centralize the direction of the Crown Drill before proceeding to the drilling procedure. Fig. 35 Caution: Do not open the cortex with the Awl when using the Crown Drill, as the Awl creates a hole larger than 3.2mm. The 3.2mm K-Wire needs bony stability to provide optimal Crwon Drill cutting performance. Fig. 36 20
Operative Technique Remove the Trocar and then connect the Crown Drill to the T-Handle and slide it over the K-Wire to the tip of the greater trochanter. With gentle clockwise turning and pushing movements, the Crown Drill will drill into the proximal part of the trochanter and prepare the canal for the proximal part of the Gamma3 Nail. The Crown Drill stops when the correct depth is reached (Fig. 37 and 38). Warning: If using a power tool to drive the Crown Drill, particular attention must be paid to the position of the K-Wire. The Crown Drill is a front and side cutting instrument and should be used with great care to ensure that the sharp edges of the reamer do not inadventently damage intact bone. Fig. 37 Fig. 38 21
- Page 2 and 3: Trochanteric Nail 180 Contributing
- Page 4 and 5: Introduction The Gamma3 Locking Nai
- Page 6 and 7: Features Lag Screw and Set Screw Fu
- Page 8 and 9: Features D d D > d Fig. 6 Gamma3 Sy
- Page 10 and 11: Operative Technique Pre-operative P
- Page 12 and 13: Operative Technique Incision Incisi
- Page 14 and 15: Operative Technique Incision Using
- Page 16 and 17: Operative Technique When reaming is
- Page 18 and 19: Operative Technique The Trocar is t
- Page 22 and 23: Operative Technique Assembly of Tar
- Page 24 and 25: Operative Technique Before checking
- Page 26 and 27: Operative Technique When the Gamma3
- Page 28 and 29: Operative Technique Lag Screw Inser
- Page 30 and 31: Operative Technique Warning: In the
- Page 32 and 33: Operative Technique Lag Screw Inser
- Page 34 and 35: Operative Technique Lag Screw Fixat
- Page 36 and 37: Operative Technique Alternative: Se
- Page 38 and 39: Operative Technique The Trocar is n
- Page 40 and 41: Operative Technique Nail Extension
- Page 42 and 43: Operative Technique Step IV (Fig. 6
- Page 44 and 45: Implants Packaging All implants are
- Page 46 and 47: Ordering Information - Implants TRO
- Page 48 and 49: Ordering Information - Instruments
- Page 50 and 51: References Publications More than 1
- Page 52: Stryker Trauma GmbH Prof.-Küntsche
Operative Technique<br />
Alternative 4:<br />
Crown Drill<br />
The Crown Drill is a front cutting<br />
device used to prepare the proximal<br />
part of the femur for the Gamma3<br />
Nail 180. It may provide an option<br />
to open the proximal femur cavity<br />
without reaming. Especially in older<br />
patients, the Crown Drill may reduce<br />
the requirement for reaming of the<br />
femoral cavity.<br />
Insert the K-Wire with Washer<br />
through a small incision using the<br />
Guide Wire Handle until the washer<br />
reaches the surface of the greater<br />
trochanter (Fig. 35).<br />
Then insert the assembled Trocar and<br />
the Reamer Sleeve over the K-wire<br />
until the tip of the Trocar reaches the<br />
Greater Trochanter (Fig. 36).<br />
Note:<br />
The Multiple Hole Trocar may be<br />
used for entry point optimization<br />
as described on page 16. Ensure<br />
that K-Wire is placed in the<br />
center hole in order to centralize<br />
the direction of the Crown Drill<br />
before proceeding to the drilling<br />
procedure.<br />
Fig. 35<br />
Caution:<br />
Do not open the cortex with the<br />
Awl when using the Crown Drill,<br />
as the Awl creates a hole larger<br />
than 3.2mm. The 3.2mm K-Wire<br />
needs bony stability to provide<br />
optimal Crwon Drill cutting<br />
performance.<br />
Fig. 36<br />
20


