

S2 Femoral Nail Compression Operative Technique - Stryker
S2 Femoral Nail Compression Operative Technique - Stryker
S2 Femoral Nail Compression Operative Technique - Stryker

Create successful ePaper yourself
Turn your PDF publications into a flip-book with our unique Google optimized e-Paper software.
<strong>Operative</strong> <strong>Technique</strong><br />
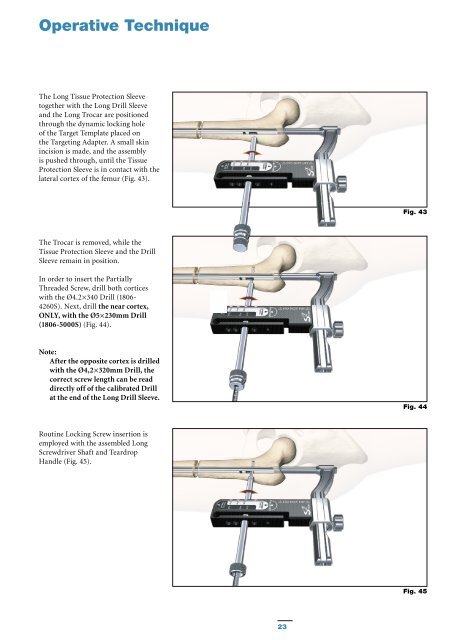
The Long Tissue Protection Sleeve<br />
together with the Long Drill Sleeve<br />
and the Long Trocar are positioned<br />
through the dynamic locking hole<br />
of the Target Template placed on<br />
the Targeting Adapter. A small skin<br />
incision is made, and the assembly<br />
is pushed through, until the Tissue<br />
Protection Sleeve is in contact with the<br />
lateral cortex of the femur (Fig. 43).<br />
Fig. 43<br />
The Trocar is removed, while the<br />
Tissue Protection Sleeve and the Drill<br />
Sleeve remain in position.<br />
In order to insert the Partially<br />
Threaded Screw, drill both cortices<br />
with the Ø4.2×340 Drill (1806-<br />
4260S). Next, drill the near cortex,<br />
ONLY, with the Ø5×230mm Drill<br />
(1806-5000S) (Fig. 44).<br />
Note:<br />
After the opposite cortex is drilled<br />
with the Ø4,2×320mm Drill, the<br />
correct screw length can be read<br />
directly off of the calibrated Drill<br />
at the end of the Long Drill Sleeve.<br />
Fig. 44<br />
Routine Locking Screw insertion is<br />
employed with the assembled Long<br />
Screwdriver Shaft and Teardrop<br />
Handle (Fig. 45).<br />
Fig. 45<br />
23


