S2 Femoral Nail Compression Operative Technique - Stryker
S2 Femoral Nail Compression Operative Technique - Stryker
S2 Femoral Nail Compression Operative Technique - Stryker
You also want an ePaper? Increase the reach of your titles
YUMPU automatically turns print PDFs into web optimized ePapers that Google loves.
<strong>Operative</strong> <strong>Technique</strong><br />
Distal Targeting Device Calibration<br />
Note:<br />
Calibration of the <strong>S2</strong> Distal<br />
Targeting Device must be performed<br />
prior to nail insertion,<br />
if decided to be used for Distal<br />
Guided Locking procedure.<br />
For detailed information about<br />
Calibration technique, please refer to<br />
the <strong>Operative</strong> <strong>Technique</strong> for <strong>S2</strong> Distal<br />
Targeting Device (REF B1000012).<br />
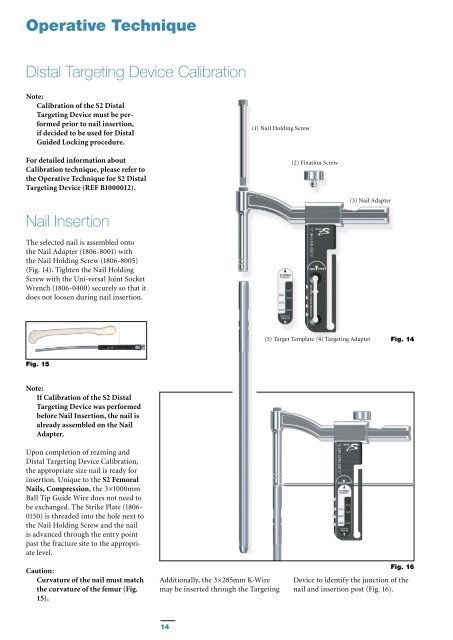
(1) <strong>Nail</strong> Holding Screw<br />
(2) Fixation Screw<br />
<strong>Nail</strong> Insertion<br />
(3) <strong>Nail</strong> Adapter<br />
The selected nail is assembled onto<br />
the <strong>Nail</strong> Adapter (1806-8001) with<br />
the <strong>Nail</strong> Holding Screw (1806-8005)<br />
(Fig. 14). Tighten the <strong>Nail</strong> Holding<br />
Screw with the Uni-versal Joint Socket<br />
Wrench (1806-0400) securely so that it<br />
does not loosen during nail insertion.<br />
(5) Target Template (4) Targeting Adapter<br />
Fig. 14<br />
Fig. 15<br />
Note:<br />
If Calibration of the <strong>S2</strong> Distal<br />
Targeting Device was performed<br />
before <strong>Nail</strong> Insertion, the nail is<br />
already assembled on the <strong>Nail</strong><br />
Adapter.<br />
Upon completion of reaming and<br />
Distal Targeting Device Calibration,<br />
the appropriate size nail is ready for<br />
insertion. Unique to the <strong>S2</strong> <strong>Femoral</strong><br />
<strong>Nail</strong>s, <strong>Compression</strong>, the 3×1000mm<br />
Ball Tip Guide Wire does not need to<br />
be exchanged. The Strike Plate (1806-<br />
0150) is threaded into the hole next to<br />
the <strong>Nail</strong> Holding Screw and the nail<br />
is advanced through the entry point<br />
past the fracture site to the appropriate<br />
level.<br />
Caution:<br />
Curvature of the nail must match<br />
the curvature of the femur (Fig.<br />
15).<br />
Additionally, the 3×285mm K-Wire<br />
may be inserted through the Targeting<br />
Fig. 16<br />
Device to identify the junction of the<br />
nail and insertion post (Fig. 16).<br />
14


