S2 Femoral Nail Compression Operative Technique - Stryker
S2 Femoral Nail Compression Operative Technique - Stryker S2 Femoral Nail Compression Operative Technique - Stryker
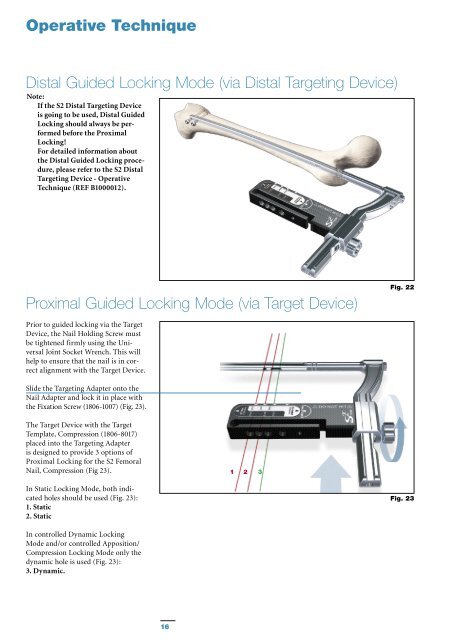
Operative Technique Distal Guided Locking Mode (via Distal Targeting Device) Note: If the S2 Distal Targeting Device is going to be used, Distal Guided Locking should always be performed before the Proximal Locking! For detailed information about the Distal Guided Locking procedure, please refer to the S2 Distal Targeting Device - Operative Technique (REF B1000012). Proximal Guided Locking Mode (via Target Device) Fig. 22 Prior to guided locking via the Target Device, the Nail Holding Screw must be tightened firmly using the Universal Joint Socket Wrench. This will help to ensure that the nail is in correct alignment with the Target Device. Slide the Targeting Adapter onto the Nail Adapter and lock it in place with the Fixation Screw (1806-1007) (Fig. 23). The Target Device with the Target Template, Compression (1806-8017) placed into the Targeting Adapter is designed to provide 3 options of Proximal Locking for the S2 Femoral Nail, Compression (Fig 23). 1 2 3 In Static Locking Mode, both indicated holes should be used (Fig. 23): 1. Static 2. Static Fig. 23 In controlled Dynamic Locking Mode and/or controlled Apposition/ Compression Locking Mode only the dynamic hole is used (Fig. 23): 3. Dynamic. 16
Operative Technique Note: The Target Template, Compression can be placed into the Targeting Adapter in two directions. For S2 Femoral Nail, Compression procedures, the arrow on the Target Template has to line up with the arrow on the Targeting Adapter (Fig.24). Note: The Target Template will block all holes in the Targeting Adapter that cannot be used with the selected nail. Caution: Do not use the Target Device without Target Template! locked Fig. 24 The Tissue Protection Sleeve, Long (1806-0185) together with the Drill Sleeve, Long (1806-0215) and the Trocar, Long (1806-0315) are inserted into the Target Device by pressing the Safety Clip. The Friction Locking mechanism will keep the sleeve in place and prevent it from falling out (Fig. 24 & 25). It will also prevent the sleeve from sliding during screw measurement. To release the Tissue Protection Sleeve, the Safety Clip must be pressed again. free Fig. 25 17
- Page 1 and 2: S2 Femoral Nail Compression Operati
- Page 3 and 4: Contents Page 1. Introduction & Fea
- Page 5 and 6: Introduction & Features S2 Femoral
- Page 7 and 8: Indications & Relative Contraindica
- Page 9 and 10: Operative Technique Patient Positio
- Page 11 and 12: Operative Technique Entry Point The
- Page 13 and 14: Operative Technique Nail Selection
- Page 15: Operative Technique The Slotted Ham
- Page 19 and 20: Operative Technique When the Drill
- Page 21 and 22: Operative Technique End Cap Inserti
- Page 23 and 24: Operative Technique The Long Tissue
- Page 25 and 26: Operative Technique Nail Removal Na
- Page 27 and 28: Ordering Information - Implants 5mm
- Page 29 and 30: Ordering Information - Instruments
- Page 31 and 32: Ordering Information - Instruments
<strong>Operative</strong> <strong>Technique</strong><br />
Distal Guided Locking Mode (via Distal Targeting Device)<br />
Note:<br />
If the <strong>S2</strong> Distal Targeting Device<br />
is going to be used, Distal Guided<br />
Locking should always be performed<br />
before the Proximal<br />
Locking!<br />
For detailed information about<br />
the Distal Guided Locking procedure,<br />
please refer to the <strong>S2</strong> Distal<br />
Targeting Device - <strong>Operative</strong><br />
<strong>Technique</strong> (REF B1000012).<br />
Proximal Guided Locking Mode (via Target Device)<br />
Fig. 22<br />
Prior to guided locking via the Target<br />
Device, the <strong>Nail</strong> Holding Screw must<br />
be tightened firmly using the Universal<br />
Joint Socket Wrench. This will<br />
help to ensure that the nail is in correct<br />
alignment with the Target Device.<br />
Slide the Targeting Adapter onto the<br />
<strong>Nail</strong> Adapter and lock it in place with<br />
the Fixation Screw (1806-1007) (Fig. 23).<br />
The Target Device with the Target<br />
Template, <strong>Compression</strong> (1806-8017)<br />
placed into the Targeting Adapter<br />
is designed to provide 3 options of<br />
Proximal Locking for the <strong>S2</strong> <strong>Femoral</strong><br />
<strong>Nail</strong>, <strong>Compression</strong> (Fig 23).<br />
1 2 3<br />
In Static Locking Mode, both indicated<br />
holes should be used (Fig. 23):<br />
1. Static<br />
2. Static<br />
Fig. 23<br />
In controlled Dynamic Locking<br />
Mode and/or controlled Apposition/<br />
<strong>Compression</strong> Locking Mode only the<br />
dynamic hole is used (Fig. 23):<br />
3. Dynamic.<br />
16


