

AxSOS Targeting System Distal Lateral Femur Operative - Stryker
AxSOS Targeting System Distal Lateral Femur Operative - Stryker
AxSOS Targeting System Distal Lateral Femur Operative - Stryker

You also want an ePaper? Increase the reach of your titles
YUMPU automatically turns print PDFs into web optimized ePapers that Google loves.
<strong>Operative</strong> Technique<br />
Locking Fixation of the metaphyseal<br />
portion of the plate can now be<br />
started. Remove the preset K-Wire and<br />
K-Wire Sleeve in the metaphyseal plate<br />
hole.<br />
Using the calibrated Drill Bit Ø4.3mm<br />
(REF 703541), drill the core hole for<br />
the Locking Screw. Stop drilling once<br />
the drill tip touches the medial cortex<br />
to ensure that the screw tip will not<br />
protrude.<br />
It is recommended to use fluoroscopy<br />
to check the correct depth of the drill.<br />
The screw length can be determined<br />
with a direct read off the calibration<br />
of the drill or any other measurement<br />
option as described on page 8.<br />
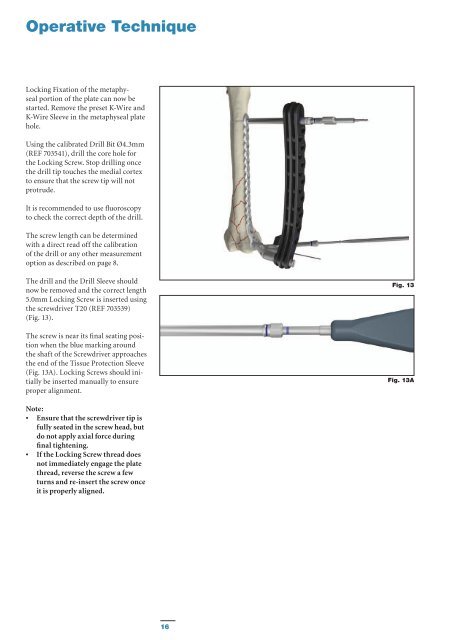
The drill and the Drill Sleeve should<br />
now be removed and the correct length<br />
5.0mm Locking Screw is inserted using<br />
the screwdriver T20 (REF 703539)<br />
(Fig. 13).<br />
The screw is near its final seating position<br />
when the blue marking around<br />
the shaft of the Screwdriver approaches<br />
the end of the Tissue Protection Sleeve<br />
(Fig. 13A). Locking Screws should initially<br />
be inserted manually to ensure<br />
proper alignment.<br />
Fig. 13<br />
Fig. 13A<br />
Note:<br />
• Ensure that the screwdriver tip is<br />
fully seated in the screw head, but<br />
do not apply axial force during<br />
final tightening.<br />
• If the Locking Screw thread does<br />
not immediately engage the plate<br />
thread, reverse the screw a few<br />
turns and re-insert the screw once<br />
it is properly aligned.<br />
16


