

T2 Tibial Nailing System - Stryker
T2 Tibial Nailing System - Stryker
T2 Tibial Nailing System - Stryker

You also want an ePaper? Increase the reach of your titles
YUMPU automatically turns print PDFs into web optimized ePapers that Google loves.
Operative Technique<br />
Note:<br />
A fully threaded End Cap is<br />
available to lock down on the<br />
most proximal screw and create a<br />
fixed angle construct.<br />
Caution:<br />
Distal locking should always<br />
be performed with two screws,<br />
locking the hole nearest the<br />
fracture site first. On the<br />
Standard and Proximal <strong>Tibial</strong><br />
nails, always lock the most<br />
proximal M/L hole. The most<br />
distal hole of all three nail types<br />
is M/L. The next most proximal<br />
hole on all three nails is A/P. The<br />
Proximal and Standard Nails<br />
have a third more proximal M/L<br />
hole.<br />
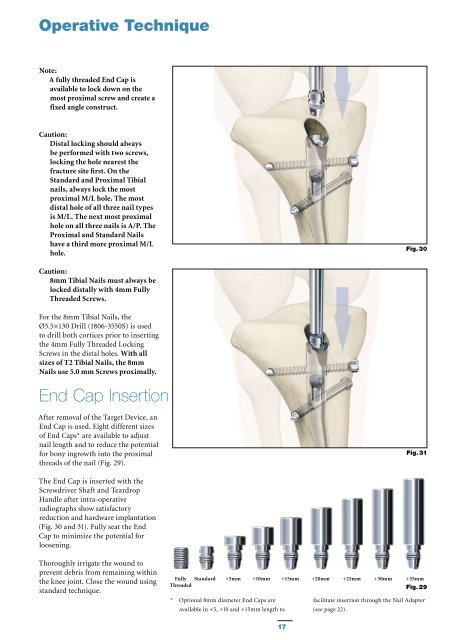
Fig. 30<br />
Caution:<br />
8mm <strong>Tibial</strong> Nails must always be<br />
locked distally with 4mm Fully<br />
Threaded Screws.<br />
For the 8mm <strong>Tibial</strong> Nails, the<br />
Ø3.5×130 Drill (1806-3550S) is used<br />
to drill both cortices prior to inserting<br />
the 4mm Fully Threaded Locking<br />
Screws in the distal holes. With all<br />
sizes of <strong>T2</strong> <strong>Tibial</strong> Nails, the 8mm<br />
Nails use 5.0 mm Screws proximally.<br />
End Cap Insertion<br />
After removal of the Target Device, an<br />
End Cap is used. Eight different sizes<br />
of End Caps* are available to adjust<br />
nail length and to reduce the potential<br />
for bony ingrowth into the proximal<br />
threads of the nail (Fig. 29).<br />
Fig. 31<br />
The End Cap is inserted with the<br />
Screwdriver Shaft and Teardrop<br />
Handle after intra-operative<br />
radiographs show satisfactory<br />
reduction and hardware implantation<br />
(Fig. 30 and 31). Fully seat the End<br />
Cap to minimize the potential for<br />
loosening.<br />
Thoroughly irrigate the wound to<br />
prevent debris from remaining within<br />
the knee joint. Close the wound using<br />
standard technique.<br />
Fully<br />
Threaded<br />
Standard +5mm +10mm +15mm +20mm +25mm +30mm +35mm<br />
Fig. 29<br />
* Optional 8mm diameter End Caps are<br />
available in +5, +10 and +15mm length to<br />
facilitate insertion through the Nail Adapter<br />
(see page 22).<br />
17


