OMI Surgical Technique Guide Draft 1.pub - OsteoMed
OMI Surgical Technique Guide Draft 1.pub - OsteoMed
OMI Surgical Technique Guide Draft 1.pub - OsteoMed

You also want an ePaper? Increase the reach of your titles
YUMPU automatically turns print PDFs into web optimized ePapers that Google loves.
<strong>Surgical</strong> <strong>Technique</strong> <strong>Guide</strong>
The Orthodontic Mini-Implant (<strong>OMI</strong>) <strong>Surgical</strong> Placement <strong>Guide</strong><br />
By<br />
Judah S. Garfinkle, D.M.D. and<br />
Larry L. Cunningham, Jr., D.D.S., M.D.<br />
<strong>OMI</strong> Indications:<br />
▪ <strong>OMI</strong>’s are intended to provide a fixed-point of orthodontic anchorage. They are to be removed after<br />
the necessary tooth movement has occurred. In this way, <strong>OMI</strong>’s are to serve as a single-use, temporary<br />
anchorage device. <strong>OMI</strong>’s can be loaded immediately after placement, eliminating prolonged latency periods<br />
necessary for traditional implant techniques.<br />
Site Determination:<br />
▪ The optimal location for <strong>OMI</strong> placement is based on the assessment of both the anatomic limitations<br />
and the orthodontic treatment considerations.<br />
▪ <strong>OMI</strong>’s can be placed anywhere in the maxilla and the mandible in which adequate bone exists, while<br />
avoiding surrounding vital structures. Examples of placement locations are the buccal or lingual alveolus,<br />
the palate, the maxillary retromola region and the mandibular tuberosity area.<br />
Anatomic Considerations:<br />
▪ Vital structures (e.g. dental roots, blood vessels, nerves, maxillary sinus, etc.) should be avoided.<br />
The use of radiographs and/or other imaging techniques is recommended. <strong>Surgical</strong> stents can prove<br />
helpful as well.<br />
▪ Attempts should be made to place the <strong>OMI</strong> through attached gingiva rather than unattached gingiva.<br />
This will decrease inflammation, the chance of tissue overgrowth, and simplify the surgical procedure,<br />
while increasing the success rate. The thickness of the attached gingiva can be determined prior to placement<br />
of the <strong>OMI</strong>. This will help in choosing the appropriate implant length.<br />
Orthodontic Considerations:<br />
▪ Since the ultimate goal of an <strong>OMI</strong> is to provide a point of anchorage against which teeth can be<br />
moved, it is paramount to recognize the amount and direction of the desired dental movements prior to<br />
placement. Placement of the <strong>OMI</strong> should be in an appropriate relationship to the orthodontic appliances<br />
and readily available to work with the proposed treatment mechanics. For example, if an <strong>OMI</strong> is placed<br />
too apically on the alveolar ridge, it could result in an excessive vertical force vector, interfering with<br />
orthodontic sliding mechanics. If an <strong>OMI</strong> is placed too close to the tooth to be moved, it may be challenging<br />
to generate the desired orthodontic biomechanical system.<br />
<strong>OMI</strong> Selection:<br />
▪ Length: One of the primary determinants of <strong>OMI</strong> length is the quantity and quality of the bone at the<br />
site of insertion. Since the thickness and density of the mandibular cortex is generally greater than that<br />
of the maxilla, the length of the <strong>OMI</strong> should provide ideally 5mm of mini-implant to bone contact in the<br />
mandible and 6mm in the maxilla. For example, if the attached gingiva in the mandible measures 3mm<br />
in thickness over the desired insertion point, an 8mm long implant should be selected. The longest <strong>OMI</strong><br />
should be used that will not compromise the adjacent tissues. The overall length of the <strong>OMI</strong> will thus<br />
depend on the available bone, thickness of the soft tissue and the proximity of vital structures. Diameter:<br />
Assuming adequate bone quantity and quality, the 1.2mm diameter <strong>OMI</strong> should be able to withstand<br />
orthodontic forces of approximately 300 grams. When the existing bone is less dense or higher forces<br />
are needed, consider using an <strong>OMI</strong> with a 1.6mm diameter.
Local Anesthesia:<br />
A small amount of local anesthesia is recommended. Avoiding profound anesthesia of the periodontal<br />
ligament will allow the patient to alert the surgeon if the <strong>OMI</strong> impinges on the root structure.<br />
Placement Into Attached Gingiva (Exposed <strong>Technique</strong>):<br />
▪ Confirm adequate anesthesia<br />
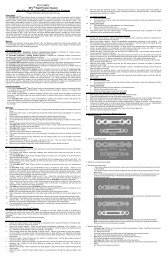
▪ Use a slow-speed drill with a carbide round bur (#2) passing directly through the tissue and 0.5mm<br />
into the underlying cortical bone (“cortical notching”). Adequate irrigation should be used. (fig1)<br />
▪ If adequate space exists between the roots of neighboring teeth, the <strong>OMI</strong> can be inserted perpendicular<br />
to the bone. If there are anatomical barriers to consider (e.g. dental roots), the <strong>OMI</strong> can be placed at<br />
an angle to the long axis of the teeth (approximately 30-60°).(fig2) The cortical notch provides a sufficient<br />
purchase point for an angled path of insertion for the 1.6mm diameter <strong>OMI</strong>. For the 1.2mm diameter<br />
<strong>OMI</strong>, it is recommended that a pilot hole be extended from the cortical notch through the cortical<br />
bone to decrease the chances of <strong>OMI</strong> fracture during insertion (fig3)<br />
▪ Insert the <strong>OMI</strong> under manual pressure with the <strong>OMI</strong>-driver, bringing the bottom of the abutment<br />
into contact with the tissue, avoiding severe blanching. (fig4)<br />
▪ Confirm primary stability avoiding rotation of the <strong>OMI</strong>.<br />
▪ Orthodontic force can be placed on the <strong>OMI</strong> immediately. If during insertion the implant cannot be<br />
completely seated, it is likely that cementum has been encountered. The implant should be redirected at<br />
a new angle or reinserted at a new site if necessary.
Placement Into Unattached Gingiva (Submerged <strong>Technique</strong>):<br />
▪ The protocol is generally the same as with the Exposed <strong>Technique</strong> but the <strong>OMI</strong> should be submerged<br />
under the tissue since the incidence of tissue overgrowth/inflammation is much higher in unattached<br />
gingiva.<br />
▪ Placing a stainless steel ligature around the <strong>OMI</strong>-head resulting in an emerging point of attachment<br />
for orthodontic mechanics is preferred in the Submerged <strong>Technique</strong>. (fig 5)<br />
▪ Make a small stab incision through the soft tissue at the desired point of insertion. This will eliminate<br />
tissue binding around the drill and <strong>OMI</strong>.<br />
▪ Use a slow-speed drill with a carbide round bur (#2) to a depth of 0.5mm into cortical bone with<br />
adequate irrigation (cortical notching).<br />
▪ Insert the <strong>OMI</strong> under manual pressure with the <strong>OMI</strong>-driver, bringing the bottom of the abutment to<br />
the level of the bone. The same issues concerning pilot drilling and the angle of insertion exist as with<br />
the Exposed <strong>Technique</strong>.<br />
▪ Confirm primary stability avoiding rotation of the <strong>OMI</strong>.<br />
▪ Proper suturing of the placement site should be done if necessary, allowing the stainless ligature to<br />
pass freely into the oral cavity. If during insertion the implant cannot be completely seated, it is likely<br />
that cementum has been encountered. The implant should be redirected at a new angle or reinserted at a<br />
new site if necessary.<br />
<strong>OMI</strong> Loading/Removal:<br />
▪ <strong>OMI</strong>’s can be loaded immediately after placement. Up to 300 grams of orthodontic force can be<br />
applied to 1.2mm diameter implants, where as up to 450 grams can be applied to <strong>OMI</strong>’s with a diameter<br />
of 1.6mm. These numbers should serve as a guide only. The exact amount of force that an <strong>OMI</strong> could<br />
withstand depends on many factors that need to be considered.<br />
▪ The orthodontic mechanics are straightforward with the use of nickel-titanium closed-coil springs or<br />
elastic-chain. <strong>OMI</strong>’s can also provide indirect anchorage.<br />
▪ Due to the lack of osseointegration, retrieval of an exposed <strong>OMI</strong> is easily accomplished with the<br />
<strong>OMI</strong>-driver by unscrewing the implant. This is often done without the need for local anesthesia and<br />
healing is uneventful. Retrieval of a submerged <strong>OMI</strong> requires local anesthesia, exposure of the <strong>OMI</strong>, and<br />
unscrewing of the implant with the <strong>OMI</strong>-driver. Suturing may be done if necessary; healing is uneventful.
Cautions/Warnings:<br />
▪ Following placement, avoid producing any rotational or torsional forces on the <strong>OMI</strong>.<br />
▪ Approaching the height/depth of the vestibule with the <strong>OMI</strong> abutment may cause tissue impingement<br />
and ulceration.<br />
▪ Avoid placement of the <strong>OMI</strong> too coronally in the alveolus. Although primary stability may be<br />
achieved, the often-thin interseptal bone may lead to premature <strong>OMI</strong> failure. The roots of the teeth are<br />
closer together as well, increasing the chances for root contact.<br />
▪ If primary stability is not achieved with a 1.2mm diameter <strong>OMI</strong>, remove the <strong>OMI</strong> and reinsert a<br />
1.6mm diameter <strong>OMI</strong> in the same location. If primary stability is not achieved with a 1.6mm diameter<br />
<strong>OMI</strong>, prepare a new placement site and reinsert. Primary stability is absolutely necessary for <strong>OMI</strong> success.<br />
▪ Overheating of the supporting bone can result in osteonecrosis, resulting in <strong>OMI</strong> failure.<br />
▪ Following insertion, post-operative analgesics are usually not necessary, but once the local anesthesia<br />
wears off, a small proportion of patients may complain of dull, aching pain associated with the<br />
neighboring teeth. This happens predominately in the mandible and should subside in a couple of days<br />
or less. For these patients, prescribing analgesics is appropriate and at the doctors discretion.<br />
▪ It is recommended that each patient rinse twice a day with a 0.12% Chlorhexidine Gluconate rinse<br />
for approximately two weeks or until all signs of inflammation are controlled following surgery. Inflammation<br />
of the peri-implant tissues can decrease the success of <strong>OMI</strong>’s, thus diligent oral hygiene<br />
practices are necessary for an optimal outcome. Occasional <strong>OMI</strong> tightening may be necessary. If a<br />
slight clockwise turn results in stability, the <strong>OMI</strong> may remain in place.<br />
Relative Contraindications:<br />
▪ Inadequate bone in quantity or quality.<br />
▪ Active oral infection affecting region of insertion.<br />
▪ Any mental/neurological conditions that would prohibit the patient from tolerating the placement/retrieval<br />
procedure and/or adequately maintaining the necessary oral hygiene of the <strong>OMI</strong>’s.<br />
▪ Any condition of immunodeficiency that would interfere with the normal healing process.<br />
Metabolic conditions affecting bone metabolism.<br />
Bibliography:<br />
▪ Costa A, Raffainl M, Melsen B. Miniscrews as orthodontic anchorage: a preliminary report: Int-J-<br />
Adult-Orthodon-Orthognath-Surg. 1998; 13(3): 201-9; 1998.<br />
▪ Kyung HM, Park HS, Bae SM, Sung JH, Kim IB. Development of orthodontic micro-implants for<br />
intraoral anchorage. J Clin Orthod 2003;37:321-328; quiz 314.<br />
▪ Miyawaki S, Koyama I, Inoue M, Mishima K, Sugahara T, Takano-Yamamoto T. Factors associated<br />
with the stability of titanium screws placed in the posterior region for orthodontic anchorage. Am J Orthod<br />
Dentofacial Orthop 2003;124:373-378.<br />
▪ Park HS, Kwon TG, Sung JH. Nonextraction treatment with microscrew implants. Angle Orthod<br />
2004;74:539-549.<br />
▪ Cheng SJ, Tseng IY, Lee JJ, Kok SH. A prospective study of the risk factors associated with failure<br />
of mini-implants used for orthodontic anchorage. Int J Oral Maxillofac Implants 2004;19:100-106.<br />
▪ Fritz U, Ehmer A, Diedrich P. Clinical suitability of titanium microscrews for orthodontic anchorage-preliminary<br />
experiences. J Orofac Orthop 2004;65:410-418.
P/N 030-1351