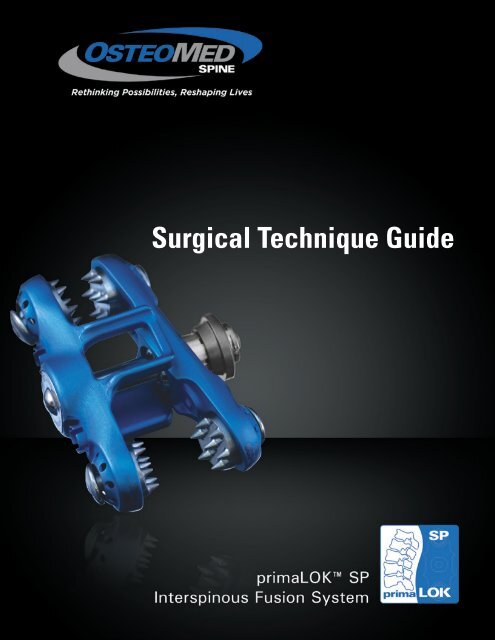
Surgical Technique Guide - OsteoMed
Surgical Technique Guide - OsteoMed
Surgical Technique Guide - OsteoMed

You also want an ePaper? Increase the reach of your titles
YUMPU automatically turns print PDFs into web optimized ePapers that Google loves.
<strong>Surgical</strong> <strong>Technique</strong> <strong>Guide</strong>
Description<br />
The <strong>OsteoMed</strong> Spine PrimaLOK SP Interspinous Fusion System is intended to provide<br />
immobilization and stabilization of spinal segments as an adjunct to fusion of the thoracic,<br />
lumbar and/or sacral spine. PrimaLOK SP is a bilateral locking plate system which attaches<br />
to the posterior non-cervical spine at the spinous processes. It is available in various heights<br />
and widths to accommodate differing anatomic requirements.<br />
<strong>Surgical</strong> procedures appropriate for use with PrimaLOK SP include, but are not limited to:<br />
• Supplemental fixation for Anterior Lumbar Interbody Fusion (ALIF), Transforaminal<br />
Lumbar Interbody Fusion (TLIF), Lateral Lumbar Interbody Fusion (LLIF),<br />
Posterior Lumbar Interbody Fusion (PLIF), Posterior Lateral Fusion (PLF) and<br />
lumbar facet screw procedures.<br />
• Supplemental fixation for failed fusion revision and hybrid constructs<br />
Indications for Use<br />
The PrimaLOK SP Interspinous Fusion System is a posterior, non-pedicle supplemental<br />
fixation device, intended for use in the non-cervical spine (T1-S1). It is intended for plate<br />
fixation/attachment to the spinous process for the purpose of achieving supplemental fusion<br />
in the following conditions: degenerative disc disease (defined as back pain of discogenic<br />
origin with degeneration of the disc confirmed by history and radiographic studies),<br />
spondylolisthesis, trauma (i.e., fracture or dislocation), and/or tumor. The PrimaLOK SP<br />
Interspinous Fusion System is intended for use at one level, with bone graft material, and not<br />
intended for stand-alone use.<br />
For additional information, warnings and contraindications, please refer to the Product Insert.
TABLE OF CONTENTS<br />
Product Labeling<br />
Description<br />
Indications for Use<br />
Inside Cover<br />
Design Rationale<br />
Rethinking Fixation<br />
Design Features and Clinical Benefits<br />
1<br />
2<br />
<strong>Surgical</strong> <strong>Technique</strong><br />
Access and Preparation<br />
Patient Positioning<br />
Distraction<br />
Rasping<br />
Sizing<br />
Sterile Packaging<br />
Bone Graft<br />
3<br />
4<br />
5<br />
5<br />
6<br />
6<br />
Inserting the Implant<br />
General Notes and Cautions<br />
<strong>Technique</strong> 1<br />
<strong>Technique</strong> 2<br />
<strong>Technique</strong> 3<br />
7<br />
8<br />
10<br />
13<br />
Removing the Implant<br />
Removal<br />
16<br />
Product Information<br />
Implant Anatomy<br />
17<br />
Implant Catalog<br />
17<br />
Instruments<br />
Access Instruments<br />
Preparation Instruments<br />
Insertion Instruments<br />
18<br />
18<br />
18<br />
19
DESIGN RATIONALE<br />
RETHINKING FIXATION<br />
Rethinking lumbar fixation in a fresh new way inspired the design of the <strong>OsteoMed</strong> Spine PrimaLOK SP<br />
Interspinous Fusion System. PrimaLOK SP is a next generation posterior lumbar spinous process fixation<br />
device. Patent-pending polyaxial technology provides for optimal placement and enhanced fixation to<br />
accommodate anatomic variations with minimal disruption to anatomy. These unique features, combined<br />
with easy-to-use instrument options for a variety of surgical approaches, result in a streamlined fixation<br />
solution tailored to the needs of surgeons and patients.<br />
Taper locking feature delivers easy-tosecure<br />
locking force<br />
Ample graft window<br />
with anterior floor for<br />
supplemental bone graft<br />
placement<br />
Polyaxial plate and locking grips<br />
conform to unique bony anatomy and<br />
maximize surface contact area for<br />
secure fixation<br />
1<br />
www.osteomed.com
DESIGN FEATURES<br />
CLINICAL BENEFITS<br />
Full Polyaxial Design<br />
• 4 independent grips/feet<br />
• Multi-directional polyaxial plate<br />
• 45 degrees of combined grip/plate<br />
range of motion<br />
Gripping Spikes<br />
• 4 grips that independently orient<br />
to anatomy<br />
• Total of 28 conical spikes (7 per grip)<br />
• 1.6mm spike length<br />
Locking Mechanism<br />
• 6 Morse taper locks<br />
• Provisional and final locking steps<br />
• 300 pounds of compressive force applied<br />
to the implant at final lock<br />
• Accommodates natural variations in anatomy<br />
and challenging anatomy<br />
• Enables ideal anterior placement where bone<br />
quality is best at spinous process/lamina<br />
junction<br />
• Ideal for placement at L5-S1<br />
• Greater load distribution across each spike<br />
provides enhanced fixation while minimizing<br />
disruption to spinous process (SP) and<br />
reducing fracture risk<br />
• Optimal length and number of spikes designed<br />
to minimize force concentrations and avoid SP<br />
fracture, especially where SP thickness varies<br />
• Ability to reposition if necessary before<br />
final locking<br />
• Locking features designed to minimize risk of<br />
implant malfunctions<br />
Graft Window<br />
• Integrated window contains<br />
approximately .5 2 + cc of graft material<br />
• Anterior window floor<br />
• Generous graft window can be easily<br />
packed with bone graft for supplemental<br />
SP fusion<br />
• Window floor adds stability and enhances<br />
graft containment<br />
Implant Sizes and Sterile Packaging<br />
• 7 sizes from 4mm to 18mm<br />
• Central post comes in 2 sizes:<br />
25mm standard, 30mm optional<br />
• Implants supplied in double peel-pack<br />
sterile package that serves as implant<br />
loading caddy and allows for placement<br />
of the inner tray into the sterile field<br />
• Multiple sizes accommodate<br />
variations in patient anatomy<br />
and surgical requirements<br />
• Sterile packaging maintains<br />
implant quality and enhances<br />
O.R. speed and ease-of-use<br />
www.osteomed.com<br />
2
SURGICAL TECHNIQUE<br />
ACCESS AND PREPARATION<br />
Patient Positioning<br />
Position the patient in a prone position on a radiolucent<br />
table. Ensure adequate clearance around the surgical table<br />
for movement of the fluoroscopic C-arm.<br />
Identify the spinous process at the desired level through<br />
manual palpation and intraoperative imaging. Make a<br />
midline incision approximately 3-5 cm in length to expose<br />
the spinous processes at the operative level.<br />
Elevate the paraspinous musculature and adjoining soft<br />
tissue to expose the spinous processes and lamina. Removal<br />
of the supraspinous ligament is recommended to allow for<br />
sizing, distraction, and placement of the implant.<br />
Removing excess soft tissue and osteophytes on the lateral<br />
aspects of the spinous processes may be necessary to allow<br />
for optimal placement and fixation of the implant grips to<br />
the spinous processes.<br />
Caution: If performing a decompression, be careful to<br />
avoid removing excessive bone that may compromise the<br />
integrity of the spinous processes at the operative level.<br />
3<br />
www.osteomed.com
ACCESS AND PREPARATION<br />
Distraction with Frame<br />
Place Caspar-style distractor screws into the spinous processes,<br />
2/3 of the way cephalad and caudal to the operative space.<br />
Screw placement too close to the interspinous space may result<br />
in instrument interference during site preparation and implant<br />
insertion.<br />
Distract the interspinous space using the lumbar Retractor<br />
Frame with the extension arms. Maintain distraction during<br />
implant placement.<br />
Distraction with Laminar Spreader<br />
As an alternative to the Retractor Frame, a Laminar Spreader<br />
is available. With the Laminar Spreader closed, insert the tips<br />
into the anterior portion of the interspinous space where the<br />
PrimaLOK SP will be implanted, near the base of the spinous<br />
processes or upon the lamina. Engage the ratchet arm and<br />
compress the handles of the Laminar Spreader to spread the<br />
tips and distract the interspinous space. Maintain distraction<br />
during implant placement and locking.<br />
Caution: Distraction of the interspinous space is intended to<br />
provide just enough space to slip the PrimaLOK SP implant<br />
into place. Over-distraction may cause damage to the spinous<br />
process or lamina and affect the successful use of the implant.<br />
www.osteomed.com<br />
4
ACCESS AND PREPARATION<br />
Rasping<br />
Prepare the fusion site using the Rasp. Depending on<br />
the amount of distraction needed, apply the Rasp on the<br />
surfaces indicated for the caudal and cephalad spinous<br />
processes.<br />
Caution: Do not use the Rasp where it could easily fracture<br />
the bone.<br />
Sizing<br />
Once the fusion site is prepared, determine the desired<br />
implant size starting with the smallest sizer and increasing<br />
sequentially until initial sizing is determined. Sizers range<br />
from 4mm-18mm.<br />
5<br />
www.osteomed.com
ACCESS AND PREPARATION<br />
Sterile Packaging<br />
Select the indicated implant size from the sterile package.<br />
The sterile pack inner tray is designed to be used as an<br />
implant caddy; a Backup Plate Caddy (800-0302) is also<br />
available.<br />
Bone Graft<br />
Bone graft can be packed into the graft window of the<br />
implant prior to insertion or after placement into the<br />
surgical site. Dependent on the size of implant selected, the<br />
window contains approximately .5cc 2 + cc of graft material.<br />
www.osteomed.com<br />
6
INSERTING THE IMPLANT<br />
The technique for using a PrimaLOK SP implant includes these basic steps:<br />
1. Loading the implant onto the instrument<br />
2. Inserting it into the surgical site at the appropriate level<br />
3. Compressing<br />
4. Provisional locking<br />
5. Final locking<br />
Three minimally-disruptive instrument options are available for tailoring the surgical technique to surgeon<br />
preferences and unique characteristics of the patient’s anatomy.<br />
T1<br />
T2<br />
<strong>Technique</strong> 1<br />
• An all-in-one instrument option for most steps<br />
• One instrument is used for inserting, compressing, and provisional locking, and a separate<br />
instrument is used for final locking<br />
• Select this technique when using 4mm and 6mm implants<br />
<strong>Technique</strong> 2<br />
• A low-profile version of the all-in-one for inserting and compressing<br />
• Separate instruments are used for provisional locking and final locking<br />
• Select this technique when using 4mm and 6mm implants<br />
T3<br />
<strong>Technique</strong> 3<br />
• This is the most decoupled version of each instrument and surgical step<br />
• Two insertion instruments are used – one for each side of the implant<br />
• Separate instruments are used for compressing, provisional locking, and final locking<br />
• Select this technique in cases requiring extreme angulation of the polyaxial plate (10+ degrees)<br />
General Notes and Cautions<br />
• The implant can be placed with the tip of the central post on either side of the spinous process<br />
• Do not place the implant where it could easily fracture the bone<br />
• Do not place the implant where it cannot be locked and unlocked. For example, if the post tip<br />
of the implant is close to a facet, confirm that there is clearance for using the locking instruments<br />
• When placing the implant into the surgical site, confirm placement with fluoroscopy or visual<br />
inspection to ensure that all four polyaxial grips will engage the spinous processes<br />
• If the plates on the implant do not open wide enough to fit over the patient’s spinous processes, the<br />
25mm central post can be replaced with an optional 30mm post<br />
Changing the Central Post<br />
Disengage the implant from the inserter. Slide the lock<br />
ring and the plate off the central post. Push on the tip to<br />
disengage the base of the post from the plate. Replace with<br />
the 30mm post until fully seated and slide the lock ring<br />
assembly and plate onto the new post. Place the implant<br />
back in the caddy and re-engage the inserter.<br />
7<br />
www.osteomed.com
TECHNIQUE 1<br />
T1<br />
INSERTING THE IMPLANT<br />
Prior to loading the implant, make sure the slider tab on the<br />
Inserter is in the CLAMP (1) position. Open the distal jaws of<br />
the Inserter by releasing the ratchet arm. If a wider opening<br />
is needed, depress the tab on the ratchet arm.<br />
Inserter slider tab<br />
Tab on ratchet arm<br />
T1<br />
Loading<br />
Place the Inserter over the implant and gently squeeze until<br />
the spherical tabs engage the mating holes on the lateral<br />
sides of the implant. It will only fit in one direction; rotate<br />
the inserter 180 degrees if it is not engaging.<br />
www.osteomed.com<br />
8
INSERTING THE IMPLANT<br />
T1<br />
Inserting<br />
Place the implant into the operative site, as far anterior and<br />
as close to the lamina as possible. The tip of the central<br />
post can go on either side of the spinous process. Confirm<br />
placement with fluoroscopy or visual inspection, ensuring<br />
that all four polyaxial grips are properly positioned to<br />
engage the spinous processes.<br />
T1<br />
Compressing and Provisional Locking<br />
Gently squeeze the Inserter to partially seat the teeth into<br />
the bone. Confirm that each grip has engaged the spinous<br />
processes and has no polyaxial motion by gently attempting<br />
to move the implant with the inserter or a probe.<br />
Slightly release pressure on the handles, then move the<br />
slider tab on the implant Inserter from the CLAMP (1) to<br />
the LOCK (2) position. Grip and squeeze the Inserter again<br />
until it clicks to provisionally lock the implant plates to the<br />
spinous processes.<br />
To remove the Inserter from the implant, place the slider tab<br />
back into the CLAMP (1) position. Release the ratchet arm<br />
by lifting upward. Carefully spread the distal jaws, lightly<br />
rocking the Inserter side to side, and disengage the spherical<br />
tabs from the implant.<br />
9<br />
www.osteomed.com
INSERTING THE IMPLANT<br />
T1<br />
Final Locking<br />
After confirming desired placement, use the Lock Ring<br />
Compressor to achieve final locking. Place the circular cutout<br />
over the tip of the central post. Grip and squeeze until<br />
an audible click is heard, which indicates that final locking<br />
compressive force has been delivered. Remove final locking<br />
and distraction tools. Ensure that the implant remains<br />
locked.<br />
TECHNIQUE 2<br />
T2<br />
Prior to loading the implant, raise and release the ratchet<br />
arm of the Inserter Compressor.<br />
T2<br />
Loading<br />
Place the pivoting leg of the Inserter Compressor over<br />
the Polyaxial Plate side of the implant and align the rigid<br />
leg with the Post Plate side. Gently squeeze the Inserter<br />
Compressor until the tabs engage with the mating holes on<br />
both plates.<br />
www.osteomed.com<br />
10
INSERTING THE IMPLANT<br />
T2<br />
Inserting<br />
Place the implant into the operative site, as far anterior and<br />
as close to the lamina as possible. Confirm placement with<br />
fluoroscopy or visual inspection.<br />
• Note: In cases of extreme angulation (10 degrees<br />
or more), the pivoting leg of the Inserter<br />
Compressor could potentially block the lock<br />
ring and prevent sufficient provisional locking.<br />
If this occurs, instead use <strong>Technique</strong> 3<br />
instrumentation.<br />
T2<br />
Compressing<br />
Gently squeeze the Inserter Compressor to partially seat the<br />
teeth into the bone. Confirm that each grip has engaged the<br />
spinous processes and has no polyaxial motion by gently<br />
attempting to move the implant with the inserter or a probe.<br />
11<br />
www.osteomed.com
INSERTING THE IMPLANT<br />
T2<br />
Provisional Locking<br />
Drop and engage the ratchet arm of the Inserter Compressor<br />
to maintain compression. Place the Provisional Locker<br />
over the implant. The open, horseshoe tip goes over the<br />
protruding end of the central post and the opposite tip<br />
engages with the mating bump protruding from the rigid<br />
leg. Firmly squeeze the Provisional Locker until it clicks.<br />
T2<br />
Final Locking<br />
After confirming desired placement, use the Lock Ring<br />
Compressor to achieve final locking. Place the circular cutout<br />
over the tip of the central post. Grip and squeeze until<br />
an audible click is heard, which indicates that final locking<br />
compressive force has been delivered. Remove final locking<br />
and distraction tools. Ensure that the implant remains<br />
locked.<br />
www.osteomed.com<br />
12
INSERTING THE IMPLANT<br />
TECHNIQUE 3<br />
T3<br />
Tab<br />
This technique uses a decoupled, two-piece inserter<br />
for each side of the implant.<br />
one<br />
Post Plate Inserter<br />
Polyaxial Plate Inserter<br />
T3<br />
Loading<br />
Open the leg of the Post Plate Inserter by depressing the<br />
larger tab. Place the opened leg down over the graft window<br />
of the implant, then squeeze the leg until it snaps closed.<br />
Place the Polyaxial Plate Inserter over the opposite polyaxial<br />
plate and press down until it snaps onto the collet. Once<br />
secured, lift the implant from the sterile packaging or implant<br />
caddy.<br />
Note: <strong>Technique</strong> 3 instruments will not work with<br />
4mm and 6mm implants. Instead, use <strong>Technique</strong> 1 or 2<br />
instrumentation.<br />
T3<br />
Inserting<br />
Place the implant into the operative site, as far anterior and<br />
as close to the lamina as possible. Confirm placement with<br />
fluoroscopy or visual inspection.<br />
13<br />
www.osteomed.com
INSERTING THE IMPLANT<br />
T3<br />
Compressing<br />
Place the tips of the two Plate Compressors into the<br />
spherical mating pockets on the implant, then loosely<br />
compress. Remove the Polyaxial Plate Inserter before fully<br />
compressing.<br />
Firmly squeeze the Plate Compressors, fully seating the teeth<br />
of the polyaxial grips into the bone. Confirm that each grip<br />
has engaged the spinous processes and has no polyaxial<br />
motion by gently attempting to move the implant with<br />
the inserter or a probe. Remove the Post Plate Inserter by<br />
depressing the larger tab and releasing it from the implant.<br />
T3<br />
Provisional Locking<br />
With the Plate Compressors maintaining compression,<br />
place the Provisional Locker over the implant. The open,<br />
horseshoe tip goes over the protruding end of the central<br />
post and the opposite tip engages with the mating bump<br />
protruding from the head of the central post. Firmly<br />
squeeze the Provisional Locker until it clicks. Remove Plate<br />
Compressors before final locking.<br />
www.osteomed.com<br />
14
INSERTING THE IMPLANT<br />
T3<br />
Final Locking<br />
After confirming desired placement, use the Lock Ring<br />
Compressor to achieve final locking. Place the circular cutout<br />
over the tip of the central post. Grip and squeeze until<br />
an audible click is heard, which indicates that final locking<br />
compressive force has been delivered. Remove final locking<br />
and distraction tools. Ensure that the implant remains<br />
locked.<br />
15<br />
www.osteomed.com
REMOVING THE IMPLANT<br />
Removal<br />
If it becomes necessary to remove the implant, use the<br />
Removal Tool.<br />
Set the Removal Tool to Position 1. Place the forked end<br />
between the lock ring and the lateral side of the plate, with<br />
the paddle end engaging the tip of the central post. Squeeze<br />
the Removal Tool to disengage the lock ring. The implant<br />
plates can then be grasped, disassembled and separated,<br />
and subsequently removed from the spinous processes.<br />
If the spiked teeth are still seated against the spinous<br />
processes, preventing removal, put the Removal Tool into<br />
Position 2 to loosen the polyaxial collet. Again, place the<br />
forked end between the ring and the lateral side of the plate,<br />
but with the paddle end engaging the head, rather than the<br />
tip, of the post. Squeeze the Removal Tool to disengage the<br />
collet. Slightly twist or rock the implant and remove.<br />
Note: Do not reuse an implant that has been previously<br />
locked and unlocked.<br />
www.osteomed.com<br />
16
PRODUCT INFORMATION<br />
IMPLANT ANATOMY<br />
Central Post<br />
Lock Ring & Collet<br />
A-P Width<br />
17mm<br />
Polyaxial Grip<br />
Graft Window<br />
Height<br />
4mm-18mm<br />
Grip<br />
Distance<br />
28-34mm<br />
Instrument<br />
Mating<br />
Holes<br />
Length<br />
39mm-45mm<br />
Post Plate<br />
Polyaxial Plate<br />
Width<br />
5.5mm-13.5mm<br />
IMPLANT CATALOG<br />
Part No. Size (Height) Description Implant Color<br />
800-0104-SP 4mm 4mm Implant, Sterile Light Blue<br />
800-0106-SP 6mm 6mm Implant, Sterile Gold<br />
800-0108-SP 8mm 8mm Implant, Sterile Magenta<br />
800-0110-SP 10mm 10mm Implant, Sterile Blue<br />
800-0112-SP 12mm 12mm Implant, Sterile Green<br />
800-0115-SP 15mm 15mm Implant, Sterile Bronze<br />
800-0118-SP 18mm 18mm Implant, Sterile Gray<br />
800-0130-SP<br />
30mm<br />
30mm Central Locking Post, Sterile<br />
17<br />
www.osteomed.com
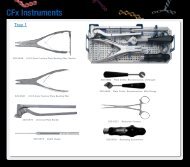
INSTRUMENTS<br />
PRIMALOK SP ACCESS INSTRUMENTS<br />
800-0207 Distractor Screw Driver<br />
800-0206-SP 14mm Distractor Screws,<br />
2 Pack Sterile (Disposable)<br />
800-0221 Retractor Extensions (2)<br />
800-0224 Laminar Spreader<br />
800-0202 Retractor Frame<br />
PRIMALOK SP PREPARATION INSTRUMENTS<br />
800-0402 4mm Rasp<br />
800-0219 Implant Sizer Handle<br />
800-0304 4mm Implant Sizer<br />
800-0306 6mm Implant Sizer<br />
800-0308 8mm Implant Sizer<br />
800-0310 10mm Implant Sizer<br />
800-0312 12mm Implant Sizer<br />
800-0315 15mm Implant Sizer<br />
800-0318 18mm Implant Sizer<br />
www.osteomed.com<br />
18
INSTRUMENTS<br />
PRIMALOK SP INSERTION INSTRUMENTS<br />
T1<br />
Used in <strong>Technique</strong> 1<br />
T2<br />
Used in <strong>Technique</strong> 2<br />
T3<br />
Used in <strong>Technique</strong> 3<br />
800-0200 Implant Inserter<br />
T1<br />
800-0227 Inserter Compressor II<br />
T2<br />
800-0233 Post Plate Inserter Assembly<br />
T3<br />
800-0234 Polyaxial Plate Inserter Assembly<br />
T3<br />
800-0235 Plate Compressor (x2)<br />
T3<br />
800-0228 Offset Provisional Locker<br />
T2<br />
T3<br />
19<br />
www.osteomed.com
INSTRUMENTS<br />
PRIMALOK SP INSTRUMENTS<br />
800-0201 Lock Ring Compressor (Final Locker)<br />
T1<br />
T2<br />
T3<br />
800-0203 Removal Tool<br />
T1<br />
T2<br />
T3<br />
www.osteomed.com<br />
20
SPINE<br />
Rethinking Possibilities, Reshaping Lives<br />
OSTEOMED<br />
3885 Arapaho Rd.<br />
Addison, TX 75001<br />
Customer Service: 800.456.7779<br />
Customer Service Fax: 800.390.2620<br />
Main Number: 972.677.4600<br />
www.osteomed-spine.com<br />
P/N 030-0802 Rev.E