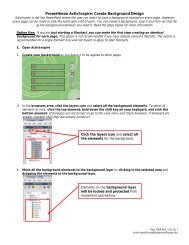
Setting a Username and Department Code for Printing
Setting a Username and Department Code for Printing
Setting a Username and Department Code for Printing

Create successful ePaper yourself
Turn your PDF publications into a flip-book with our unique Google optimized e-Paper software.
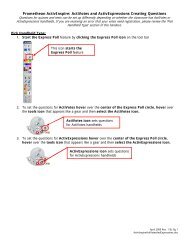
Toshiba Multi‐Function Printers: <strong>Setting</strong> a <strong>Username</strong> <strong>and</strong> <strong>Department</strong> <strong>Code</strong> <strong>for</strong> <strong>Printing</strong><br />
If you set the username area the print jobs you send will always appear from your username. This is especially important when trying to find<br />
your hold print jobs. If you set the department code, you will not have to enter your department code every time you send a print job.<br />
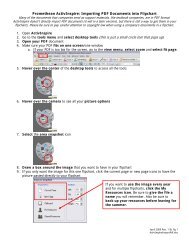
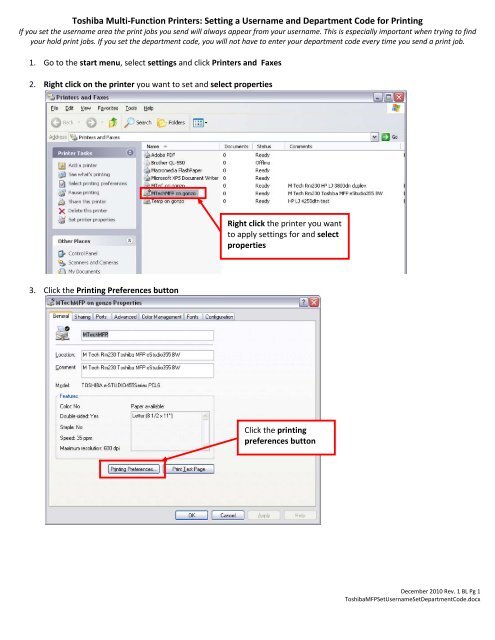
1. Go to the start menu, select settings <strong>and</strong> click Printers <strong>and</strong> Faxes<br />
2. Right click on the printer you want to set <strong>and</strong> select properties<br />
Right click the printer you want<br />
to apply settings <strong>for</strong> <strong>and</strong> select<br />
properties<br />
3. Click the <strong>Printing</strong> Preferences button<br />
Click the printing<br />
preferences button<br />
December 2010 Rev. 1 BL Pg 1<br />
ToshibaMFPSet<strong>Username</strong>Set<strong>Department</strong><strong>Code</strong>.docx
4. Click the Others tab<br />
Click the others tab<br />
5. Enter the username you desire to show up on print jobs <strong>and</strong> enter the department code you want to print from<br />
Enter your username <strong>and</strong><br />
your department code<br />
6. Click the apply button <strong>and</strong> your new settings are complete<br />
December 2010 Rev. 1 BL Pg 2<br />
ToshibaMFPSet<strong>Username</strong>Set<strong>Department</strong><strong>Code</strong>.docx