Synchronous Generators BG 132 and BG 160
Synchronous Generators BG 132 and BG 160
Synchronous Generators BG 132 and BG 160

Create successful ePaper yourself
Turn your PDF publications into a flip-book with our unique Google optimized e-Paper software.
<strong>Synchronous</strong> <strong>Generators</strong> <strong>BG</strong> <strong>132</strong> / <strong>BG</strong> <strong>160</strong><br />
Chapter 8, Removal<br />
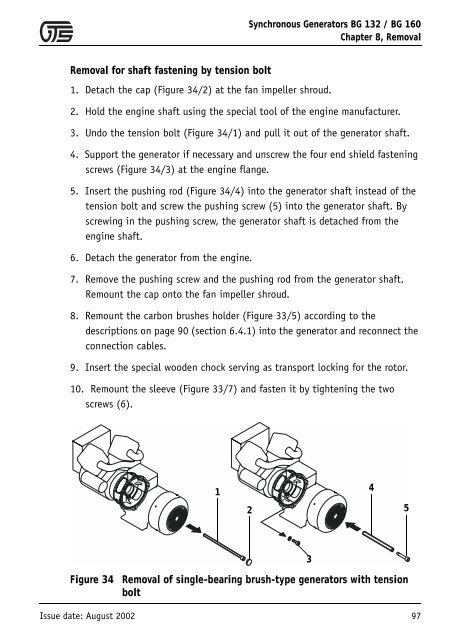
Removal for shaft fastening by tension bolt<br />
1. Detach the cap (Figure 34/2) at the fan impeller shroud.<br />
2. Hold the engine shaft using the special tool of the engine manufacturer.<br />
3. Undo the tension bolt (Figure 34/1) <strong>and</strong> pull it out of the generator shaft.<br />
4. Support the generator if necessary <strong>and</strong> unscrew the four end shield fastening<br />
screws (Figure 34/3) at the engine flange.<br />
5. Insert the pushing rod (Figure 34/4) into the generator shaft instead of the<br />
tension bolt <strong>and</strong> screw the pushing screw (5) into the generator shaft. By<br />
screwing in the pushing screw, the generator shaft is detached from the<br />
engine shaft.<br />
6. Detach the generator from the engine.<br />
7. Remove the pushing screw <strong>and</strong> the pushing rod from the generator shaft.<br />
Remount the cap onto the fan impeller shroud.<br />
8. Remount the carbon brushes holder (Figure 33/5) according to the<br />
descriptions on page 90 (section 6.4.1) into the generator <strong>and</strong> reconnect the<br />
connection cables.<br />
9. Insert the special wooden chock serving as transport locking for the rotor.<br />
10. Remount the sleeve (Figure 33/7) <strong>and</strong> fasten it by tightening the two<br />
screws (6).<br />
1<br />
2<br />
4<br />
5<br />
3<br />
Figure 34<br />
Removal of single-bearing brush-type generators with tension<br />
bolt<br />
Issue date: August 2002 97