Zeiss Axio Observer manual
Zeiss Axio Observer manual Zeiss Axio Observer manual
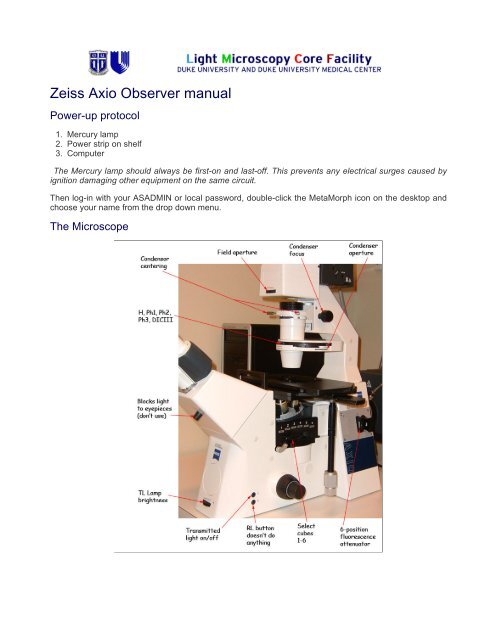
Zeiss Axio Observer manual Power-up protocol 1. Mercury lamp 2. Power strip on shelf 3. Computer The Mercury lamp should always be first-on and last-off. This prevents any electrical surges caused by ignition damaging other equipment on the same circuit. Then log-in with your ASADMIN or local password, double-click the MetaMorph icon on the desktop and choose your name from the drop down menu. The Microscope
- Page 2 and 3: Binocular eye pieces - adjust the i
- Page 4 and 5: Things to set in the Acquire window
<strong>Zeiss</strong> <strong>Axio</strong> <strong>Observer</strong> <strong>manual</strong><br />
Power-up protocol<br />
1. Mercury lamp<br />
2. Power strip on shelf<br />
3. Computer<br />
The Mercury lamp should always be first-on and last-off. This prevents any electrical surges caused by<br />
ignition damaging other equipment on the same circuit.<br />
Then log-in with your ASADMIN or local password, double-click the MetaMorph icon on the desktop and<br />
choose your name from the drop down menu.<br />
The Microscope
Binocular eye pieces - adjust the inter-ocular distance<br />
Wheel on the leftside of the scope controlling the light path - Either to camera (arrow), eyepice<br />
(circle) or 50/50<br />
Stage - control xy position <strong>manual</strong>ly using hanging drive<br />
Focus knobs - outer part is coarse; inner is fine focus<br />
Objectives<br />
Condenser<br />
The condenser is above the stage and is only used for transmitted light imaging -<br />
H - Brightfield<br />
Phase contrast 1<br />
Phase contrast 2<br />
Phase contrast 3<br />
DIC III<br />
The DIC analyzer is in filter cube position 1<br />
Transmitted light imaging<br />
Mag NA Oil? DIC/phase<br />
5x 0.16 NO Phase1<br />
10x 0.30 NO Phase1<br />
20x 0.50 NO Phase2<br />
40x 0.75 NO Phase2<br />
63x 1.40 Yes DIC III<br />
100x 1.40 Yes Phase 3<br />
<br />
<br />
Cube 1 (DIC analyzer) is the best choice for transmitted images (DIC, phase or brighfield)<br />
Press the TL button on the scope to turn on the light, adjust brightness.<br />
Kohler illumination<br />
If you want to accurately observe or capture transmitted light images, you will need to establish Kohler<br />
illumination each time you change objective. This ensures the illumination is even and is essential for<br />
optimal image quality.<br />
<br />
<br />
<br />
<br />
Focus on your specimen using transmitted light<br />
Close down the field aperture until it occupies about 2/3 of the field of view.<br />
Focus the condenser with the knobs underneath the stage that raise/lower entire condenser. Then<br />
center the field of view using the centering pins also located underneath the stage. Finally, open the<br />
field aperture until it is out of view.<br />
Remove eyepiece and close condenser aperture until 2/3 of field is illuminated (or you can adjust<br />
this while looking at your sample until the image has the best contrast)
Fluorescence imaging<br />
The reflector turret contains these filter cubes:<br />
1. For transmitted images<br />
2. DAPI<br />
3. CFP<br />
4. GFP<br />
5. YFP<br />
6. Red<br />
A far-red cube is available.<br />
<br />
<br />
<br />
<br />
<br />
Choose the cube you want<br />
Make sure the TL is off<br />
Choose "Fluorescence" from the MetaMorph illumination menu<br />
Click the toggle shutter icon to the right of the menu to open/close the shutter<br />
The brightness can be adjusted with the 6-position fluorescence attentuator<br />
Image acquisition using MetaMorph<br />
When you have located and focused on your specimen, rotate the wheel to send light to the camera.<br />
Remember that the field of view of the camera is a smaller than the field of view down the eye pieces so<br />
make sure your sample is centered.<br />
Open the acquire dialog box<br />
This can be opened from the task bar Acquire or from the dropdown menu, Acquire> Acquire
Things to set in the Acquire window:<br />
<br />
<br />
<br />
<br />
<br />
<br />
<br />
<br />
<br />
Set the display to "Autoscale" - the triangles on the image histogram show the scale min and max.<br />
The image gamma - the relationship between measured and displayed brightness. 1=linear<br />
Exposure Time - Type in value (or choose AutoExpose) mouse-over image to give pixel intensity<br />
values (between 0 and 4095)<br />
Full chip uses entire CCD camera, sub-arrays produce smaller files and may be faster<br />
Binning - combines CCD pixels to form n x n super pixels - increases sensitivity but reduces<br />
resolution<br />
Press Show Live to see the specimen through the camera - it may be necessary to focus or move<br />
the stage slightly<br />
Clicking the folder icon allows you to set whether each image starts in a new window or overwrites<br />
the previous image (handy for optimizing your image, be careful not to lose your data though)<br />
External shutter linked to camera should be [Current Shutter]<br />
Gain and offset for the camera under the Special tab - Start as 0 and 255 respectively<br />
Press the Acquire button to capture the image<br />
Saving images<br />
Simply click save and name your file. Images will be saved as 12-bit TIFF images with all the original<br />
data. Not all programs will open these images but you are recommended to save the original images.<br />
To save your individual images as 8-bit files (compatible with all programs but some information is lost)<br />
<br />
<br />
<br />
Press Copy to 8-bit button on the task bar<br />
Select the desired image from the "Image:" drop-down menu<br />
Press Copy and Save by going to File >Save as (make sure the file name is different otherwise you<br />
will overwrite the original)<br />
If you have more than one colour, you can make an overlay of the images. Click "overlay images" on the<br />
task bar and follow the dialog box. The result is 24 bit RGB image compatible with all programs.
Finishing and shutting down<br />
<br />
<br />
<br />
Clean any oil objective(s) using lens tissue and cotton tipped applicators<br />
Close MetaMorph<br />
If there is somebody booked after you, logoff the computer<br />
If nobody is scheduled to use the instrument within 1 hour of finishing, please shut it down:<br />
1. Computer<br />
2. Powerstrip<br />
3. Mercury lamp (Remember: First-on, last-off)<br />
<br />
<br />
Fill in log book, noting lamp hours<br />
If you are the last user of the day, please cover the microscope making sure the cover doesn't touch<br />
the hot mercury lamp housing


