Infamous Alias Board Instructions - Tadao Technologies
Infamous Alias Board Instructions - Tadao Technologies
Infamous Alias Board Instructions - Tadao Technologies

Create successful ePaper yourself
Turn your PDF publications into a flip-book with our unique Google optimized e-Paper software.
Startup Sequence:<br />
1. Press Power Button.<br />
2. If battery is fine, skip this step. If low battery, LED rapidly pulses red.<br />
3. LED lights solid blue or blinking blue, depending on whether something<br />
is in the breech, ready to fire.<br />
Eye Operation<br />
The eyes are enabled when the marker is first turned on. The eyes can be toggled<br />
by using Button 1. Press and hold Button 1 for 1 second and the LED will change<br />
colors to indicate the mode change.<br />
<strong>Infamous</strong> <strong>Alias</strong> <strong>Board</strong> <strong>Instructions</strong><br />
Features<br />
• Fully functional in <strong>Alias</strong> and 2K5 Bob Long Frames<br />
• Includes four fire modes: uncapped semi-auto, capped semi-auto, PSP<br />
ramping, and NXL full-automatic<br />
• Continuously monitors the trigger switch through the entire firing cycle<br />
• Super light 25 gram switch<br />
• AMB algorithms help to eliminate mechanical bounce<br />
• Power efficient software lengthens battery life<br />
• Programming mode allows changes to debounce, dwell, loader delay,<br />
AMB, bolt delay, fire mode, and fire mode max rate of fire<br />
• All settings are stored in non-volatile memory so they are not lost when<br />
battery is disconnected<br />
• One-touch startup enables the marker to fire instantly<br />
• Automatic 15-minute idle power down saves batteries<br />
• Delayed and forced eye mode with force shot allows the marker to be<br />
fired when the eyes are enabled but no object is present in the breech<br />
• Low battery indicator software<br />
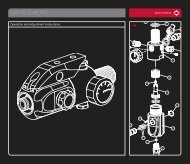
Installation<br />
The <strong>Infamous</strong> <strong>Alias</strong> <strong>Board</strong> is a drop-in upgrade. Installation consists of removing<br />
the old board and putting in the new one:<br />
Note that the eye logic can tell the difference between paint being fired and an<br />
object constantly blocking the eyes. The eyes watch for the bolt to return every<br />
shot. If this does not happen, the LED will flash yellow to indicate an eye<br />
malfunction. Unblocking the eyes will cause it to revert to a blinking blue LED to<br />
show that the eyes are working again and the breech is empty.<br />
To determine if the eyes are working correctly, insert an object into the breech.<br />
Check to see if the LED changes from blinking blue to solid blue and then back to<br />
blinking blue once the object is removed.<br />
The eyes can be disabled at startup by holding down the trigger when the marker is<br />
turned on. This is similar to the “Simulate” mode found in the stock Frenzy<br />
software.<br />
Battery Indicator<br />
The battery indicator software is standard on the <strong>Infamous</strong> <strong>Alias</strong> <strong>Board</strong>. When the<br />
marker is turned on, the LED may briefly flicker red to indicate a low battery, and<br />
it should be changed as soon as possible. Your battery may last for another case of<br />
paint, but it is close to failing. If the battery is fine, the software will go directly<br />
into the firing mode.<br />
Programming<br />
The tournament lock must be disabled in order to change settings on the board.<br />
The tournament lock is toggled by shorting the bottom 2 pins on the programming<br />
connector:<br />
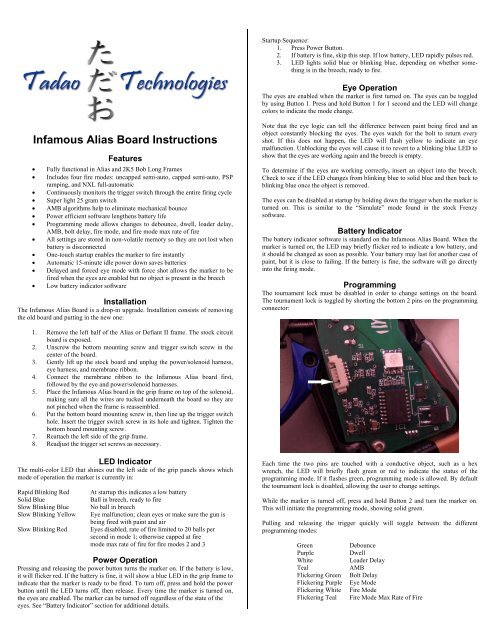
1. Remove the left half of the <strong>Alias</strong> or Defiant II frame. The stock circuit<br />
board is exposed.<br />
2. Unscrew the bottom mounting screw and trigger switch screw in the<br />
center of the board.<br />
3. Gently lift up the stock board and unplug the power/solenoid harness,<br />
eye harness, and membrane ribbon.<br />
4. Connect the membrane ribbon to the <strong>Infamous</strong> <strong>Alias</strong> board first,<br />
followed by the eye and power/solenoid harnesses.<br />
5. Place the <strong>Infamous</strong> <strong>Alias</strong> board in the grip frame on top of the solenoid,<br />
making sure all the wires are tucked underneath the board so they are<br />
not pinched when the frame is reassembled.<br />
6. Put the bottom board mounting screw in, then line up the trigger switch<br />
hole. Insert the trigger switch screw in its hole and tighten. Tighten the<br />
bottom board mounting screw.<br />
7. Reattach the left side of the grip frame.<br />
8. Readjust the trigger set screws as necessary.<br />
LED Indicator<br />
The multi-color LED that shines out the left side of the grip panels shows which<br />
mode of operation the marker is currently in:<br />
Rapid Blinking Red<br />
Solid Blue<br />
Slow Blinking Blue<br />
Slow Blinking Yellow<br />
Slow Blinking Red<br />
At startup this indicates a low battery<br />
Ball in breech, ready to fire<br />
No ball in breech<br />
Eye malfunction; clean eyes or make sure the gun is<br />
being fired with paint and air<br />
Eyes disabled, rate of fire limited to 20 balls per<br />
second in mode 1; otherwise capped at fire<br />
mode max rate of fire for fire modes 2 and 3<br />
Power Operation<br />
Pressing and releasing the power button turns the marker on. If the battery is low,<br />
it will flicker red. If the battery is fine, it will show a blue LED in the grip frame to<br />
indicate that the marker is ready to be fired. To turn off, press and hold the power<br />
button until the LED turns off, then release. Every time the marker is turned on,<br />
the eyes are enabled. The marker can be turned off regardless of the state of the<br />
eyes. See “Battery Indicator” section for additional details.<br />
Each time the two pins are touched with a conductive object, such as a hex<br />
wrench, the LED will briefly flash green or red to indicate the status of the<br />
programming mode. If it flashes green, programming mode is allowed. By default<br />
the tournament lock is disabled, allowing the user to change settings.<br />
While the marker is turned off, press and hold Button 2 and turn the marker on.<br />
This will initiate the programming mode, showing solid green.<br />
Pulling and releasing the trigger quickly will toggle between the different<br />
programming modes:<br />
Green<br />
Purple<br />
White<br />
Teal<br />
Flickering Green<br />
Flickering Purple<br />
Flickering White<br />
Flickering Teal<br />
Debounce<br />
Dwell<br />
Loader Delay<br />
AMB<br />
Bolt Delay<br />
Eye Mode<br />
Fire Mode<br />
Fire Mode Max Rate of Fire
When the LED is lit for the desired setting, press and hold the trigger until the<br />
LED goes out. When you release the trigger, the LED will blink to show the<br />
current setting. For example, if the current setting for debounce is 5, the LED will<br />
blink green 5 times. Once the LED stops blinking, you have 2 seconds to begin<br />
entering the new setting.<br />
To enter the new setting, pull the trigger the desired number of times. For example,<br />
to set the debounce to 2, you must pull the trigger 2 times. Every time you pull the<br />
trigger the LED will light. After all settings have been changed, turn the marker<br />
off, using the power button.<br />
Programming Example<br />
If you want to set the dwell to 10, you should:<br />
1. Make sure the marker is powered off and the tournament lock is<br />
disabled.<br />
2. Push and hold Button 2 and press the power button to turn on the<br />
marker.<br />
3. The LED shows green. This is the debounce mode.<br />
4. Quickly pull and release the trigger 1 time to switch to the dwell mode.<br />
The LED will show purple.<br />
5. Pull and HOLD the trigger until the LED turns off.<br />
6. Release the trigger. The LED will blink out the current setting.<br />
7. When the LED stops blinking, enter the new setting by pulling the<br />
trigger 10 times.<br />
8. Wait until the LED turns back on, indicating programming has been<br />
completed.<br />
9. Turn the marker off.<br />
Program Reset<br />
To reset all settings to factory defaults hold down Button 2 for 10 seconds while in<br />
programming mode. The LED will rapidly cycle through every setting color to<br />
indicate that the process has completed.<br />
Settings<br />
Debounce – The Musashi software features a hybrid debounce scheme that uses<br />
microcontroller cycles to debounce the pull of the trigger and ½ ms time<br />
increments to debounce the release. This results in a very effective debounce<br />
algorithm that does not hinder the user at any setting. At low debounce settings,<br />
however, it may cause the marker to read switch bounce as additional pulls, falsely<br />
generating shots or near full automatic fire. The setting ranges from 1 to 50 and is<br />
defaulted at 10.<br />
Dwell – The amount of time the solenoid is energized each time the marker is<br />
fired. The default is 10 ms. The range is 4 to 20 ms. Too low of a dwell may lead<br />
to inconsistency or drop off. Too high of a dwell can cause bad air efficiency.<br />
Loader Delay – Adds a slight delay after the eye has seen a ball and the bolt is<br />
cycled, causing the gun to fire. If not using force fed loaders, it may be necessary<br />
to increase this setting to prevent chopping. A setting of 1 means no loader delay,<br />
which is the fastest. The default is 2 and may be set from 1 to 50.<br />
AMB – Allows the user to adjust the anti-mechanical bounce feature. Mechanical<br />
bounce occurs with the <strong>Alias</strong> Intimidator due to the kick generated during each<br />
shot and can cause the marker to “run away,” firing even after the trigger has been<br />
released. AMB helps stop markers from going full auto when the trigger is pulled<br />
very slowly. The default is 2 and may be set from 1 to 5 (1 being off). AMB is<br />
only used in fire modes 1 and 2 (semi-automatic unlimited and capped). In PSP or<br />
NXL mode AMB is disabled.<br />
Bolt Delay – This setting determines how long the eyes are ignored after the dwell<br />
time ends. Some delay is necessary to allow the bolt to get far enough forward so<br />
the eye system does not mistake a small gap between a paintball and the bolt face<br />
for a bolt return. The default is 15 ms and may be set from 5 to 25 ms. Higher<br />
settings will reduce the maximum capable rate of fire, while lower settings may<br />
lead to skipped or blank shots because the bolt does not have enough time to block<br />
the eyes on its forward stroke.<br />
Eye Mode – This setting selects the eye mode. The default is 1, which is delayed.<br />
In delayed mode the eyes will watch for a ball up to ½ second after the trigger is<br />
pulled. After ½ second the marker will fire whether or not a ball is in the breech. If<br />
set to 2, the eye mode is forced. In forced mode the marker will not fire unless a<br />
ball is present in the breech or a force shot is utilized. The user can fire a force shot<br />
by holding down the trigger for ½ second.<br />
Fire Mode – Included are four different fire modes (default is 1):<br />
1. Semi-automatic, unlimited rate of fire<br />
2. Semi-automatic, adjustable rate of fire<br />
3. PSP ramping, adjustable rate of fire<br />
4. NXL full-automatic, adjustable rate of fire<br />
Setting 1 is normal semi-automatic with an unlimited rate of fire while the eyes are<br />
enabled. When the eyes are turned off, the max rate of fire is set to 20 balls per<br />
second.<br />
Setting 2 is semi-automatic with a capped rate of fire. It limits the maximum balls<br />
per second that can be fired. The cap is set by the Max ROF setting.<br />
Setting 3 is the PSP ramping fire mode that works as follows:<br />
• The first 3 shots of a string are semi-automatic<br />
• After the 4 th shot the marker will add shots as long as the user continues<br />
to pull the trigger<br />
• If the trigger is released, the marker will stop firing immediately<br />
• If the trigger is not pulled after 1 second of release, the 3-shot semiautomatic<br />
count starts over<br />
In normal operation, continually pulling the trigger faster than 5 to 6 pulls per<br />
second will effectively give the user full automatic at the max rate of fire. If the<br />
user stops shooting then resumes within 1 second, the marker will return to the<br />
max rate of fire. If the user stops shooting for more than 1 second, the next 3 shots<br />
will be semi-automatic. On the 4 th shot it will resume a faster fire rate.<br />
Setting 4 is the NXL full automatic fire mode. It functions similarly to the PSP<br />
ramping mode except after the 3 rd semi-automatic shot the marker will fire in full<br />
automatic if the user pulls and holds the trigger.<br />
Fire Mode Max ROF – The maximum rate of fire setting only applies to the 2 nd ,<br />
3 rd , and 4 th fire modes. The max rate of fire is adjustable from 14 to 20 balls per<br />
second in ¼ balls per second increments. It has an unlimited setting. The default is<br />
4, which is roughly 14.75 balls per second. Oscillator inconsistencies from chip to<br />
chip make it impossible to time perfectly, so the only true way to check rate of fire<br />
is to use a Pact Timer or ballistic chronograph. The red radar chronographs<br />
commonly found at fields are NOT reliable.<br />
Setting BPS Setting BPS Setting BPS<br />
1 14.0 9 16.0 17 18.0<br />
2 14.25 10 16.25 18 18.25<br />
3 14.5 11 16.5 19 18.5<br />
4 14.75 12 16.75 20 18.75<br />
5 15.0 13 17.0 21 19.0<br />
6 15.25 14 17.25 22 19.25<br />
7 15.5 15 17.5 23 19.5<br />
8 15.75 16 17.75 24 19.75<br />
25 20.0<br />
26 Unlimited<br />
w/eyes on<br />
Additional Features<br />
Force Shot (while in forced eye mode only) – In the event the eyes are enabled,<br />
the breech is empty, and the user wants to fire a clearing shot, a force shot can be<br />
initiated by pulling and holding the trigger for ½ second. This is useful with forcefed<br />
loaders that sometimes push a ball slightly into the detents where the eyes are<br />
unable to see it. After force firing, the next ball will load, and operation will<br />
continue as normal.<br />
A tip for setting the debounce and AMB – Although AMB is meant as a safety<br />
feature to stop runaway markers, it also has the unfortunate side effect of hiding<br />
bounce. To test your marker for bounce, shoot it as fast as possible with a single<br />
finger. If you have bounce, you’ll see and hear double shots for individual pulls.<br />
This means you need to turn up your debounce. The slow pull test in use by some<br />
judges is not realistic for finding guns that have the debounce set too low.<br />
Additional Information<br />
www.tadaotechnologies.com