Glove Lock QCP manual here - SI Tech
Glove Lock QCP manual here - SI Tech
Glove Lock QCP manual here - SI Tech

Create successful ePaper yourself
Turn your PDF publications into a flip-book with our unique Google optimized e-Paper software.
www.sitech.se<br />
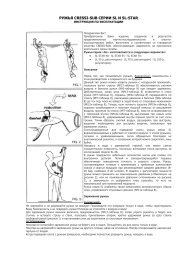
2. Attach glove<br />
3. Donning<br />
Equalization Tube<br />
2.1 Start by finding appropriate Spanner<br />
Ring. When pressing the Spanner Ring and<br />
glove into the <strong>Glove</strong> Ring they shall slide<br />
without use of excessive force.<br />
2.2 Place the Spanner Ring on the inside of<br />
the glove, make sure to find proper position<br />
for optimized length of the glove.<br />
2.3 Fold the glove shaft inwards over the<br />
Spanner Ring (latex gloves can be fitted<br />
and folded the opposite way).<br />
3.1 Put your hand through the seal and fit the<br />
Equalization Tube between seal and wrist.<br />
Make sure the Equalization Tube reaches<br />
all the way through the seal.<br />
Bayonet<br />
3.2 Join the rings together (make sure that<br />
the O-ring and sealing surface [5.3] are<br />
properly cleaned and lubricated).<br />
3.3 When the <strong>Glove</strong> Ring and the Suit<br />
Ring has been joined together just turn the<br />
<strong>Lock</strong> and Release Ring as the image displays.<br />
Turn the <strong>Lock</strong> and Release Ring until it stops.<br />
When this procedure has been made properly<br />
you should only be able to see part of the<br />
edge of the bayonet (as displayed in the<br />
right section of the image box).<br />
2.4 Press the glove with Spanner Ring<br />
2.6 Test the strength of attachment by<br />
evenly into the <strong>Glove</strong> Ring.<br />
pulling <strong>Glove</strong> Ring and <strong>Glove</strong> in the<br />
2.5 Check for creases on the glove as<br />
opposite direction. If the assembly does<br />
creases may cause leakage.<br />
not hold together, please change the<br />
Spanner Ring to a thicker one.<br />
After you have conducted a testdive you may trim the excess material on the glove shaft<br />
for optimized function, comfort and visual appearance.<br />
4. Doffing<br />
4.1 Turn the <strong>Lock</strong> and Release ring in opposite direction compared to the donning procedure.<br />
Turn until the <strong>Glove</strong> Ring and the Assembly Ring are separated. Tip! Keep glove on when<br />
doffing second ring. The glove provide a higher friction against the rubber ring.<br />
These are suggested instructions only<br />
Whatever method chosen, be certain the wrist seal, be it latex or silicone, is properly treated.<br />
Always make a leakage and stress test on your drysuit seals before diving.