Glove Lock QCP manual here - SI Tech
Glove Lock QCP manual here - SI Tech
Glove Lock QCP manual here - SI Tech

You also want an ePaper? Increase the reach of your titles
YUMPU automatically turns print PDFs into web optimized ePapers that Google loves.
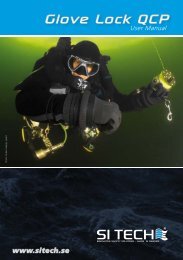
<strong>Glove</strong> <strong>Lock</strong> <strong>QCP</strong><br />
User Manual<br />
Photo: Anders Salesjö, Lysekil<br />
www.sitech.se
www.sitech.se<br />
<strong>Glove</strong> <strong>Lock</strong> <strong>QCP</strong> – User Manual<br />
We want to congratulate you on your purchase of the <strong>Glove</strong> <strong>Lock</strong> <strong>QCP</strong>, a Dry <strong>Glove</strong><br />
system developed and manufactured by <strong>SI</strong> TECH in Sweden. By reading this <strong>manual</strong><br />
you are only some simple steps away from diving it. The <strong>Glove</strong> <strong>Lock</strong> <strong>QCP</strong> is an<br />
easy to mount, easy to use Dry <strong>Glove</strong> System, designed to perform – no matter<br />
the diving environment. This complete package include components that will fit<br />
your needs undepending the choice of Dry <strong>Glove</strong>s.<br />
Important information<br />
• The different Spanner Rings included in the package allows use of<br />
a great variety of seals and gloves. The different Spanner Rings are<br />
color coded which indicates various thickness. You simply choose<br />
the thickness best fitted for your choice of seals and gloves.<br />
• Always dive the <strong>Glove</strong> <strong>Lock</strong> <strong>QCP</strong> system with seals installed.<br />
Suit Ring<br />
<strong>Glove</strong> Ring<br />
Components<br />
Benefits<br />
The system itself consists of eight<br />
components per arm:<br />
• Suit Rings<br />
• <strong>Glove</strong> Rings<br />
• O-rings<br />
• Red, green, blue, yellow and black<br />
Spanner Rings<br />
1. Suit Ring: No alignment needed,<br />
360° swiveling connection.<br />
2. <strong>Lock</strong> and Release Ring: made of rubber for<br />
maximum grip, protects the O-ring<br />
from mud and debris.<br />
3. <strong>Glove</strong> Ring.<br />
4. Concealed O-ring.<br />
• Connects on Quick Cuff*.<br />
• User friendly.<br />
• Self supported.<br />
• Accomodating all hands.<br />
• Fits to most common Dry <strong>Glove</strong>s.<br />
• Sturdy construction.<br />
*Quick Cuff is a Modular Quick Change Solution designed to simplify change of broken or torn<br />
wrist seals on drysuits.<br />
This <strong>manual</strong> does not address the topic of gluing/attaching the Wrist Ring of the<br />
Quick Cuff to your drysuit. Please visit: www.sitech.se for information.<br />
2<br />
3<br />
1<br />
4<br />
Fitting alternatives<br />
• <strong>Glove</strong> <strong>Lock</strong> <strong>QCP</strong> Suit Ring clamped onto fixed seal.<br />
• <strong>Glove</strong> <strong>Lock</strong> <strong>QCP</strong> Suit Ring mounted on top of the Quick Cuff<br />
attachment platform.<br />
Photo: Jonas Andersson, Lysekil
www.sitech.se<br />
GLOVE LOCK <strong>QCP</strong> SUIT RING<br />
1a. Fitting into suit<br />
QUICK CUFF<br />
1b. Fitting onto Quick Cuff<br />
The Quick Cuff system is a Modular Quick Change Solution for rapid change<br />
of broken or torn seals. It was developed and launched years before the<br />
<strong>Glove</strong> <strong>Lock</strong> <strong>QCP</strong>. The <strong>Glove</strong> <strong>Lock</strong> <strong>QCP</strong> however was designed so that the<br />
user of Quick Cuff could benefit from it when choosing the <strong>Glove</strong> <strong>Lock</strong> <strong>QCP</strong>.<br />
For illustrative reasons we are using a yellow Wrist Ring. (This is not an available product!)<br />
1a.1 Find appropriate Spanner Ring and move<br />
it forward through the arm of the suit towards<br />
the latex seal.<br />
1a.2 Position the Spanner Ring so that the<br />
system does not affect your wrist movement<br />
when diving.<br />
IMPORTANT: Make sure that the soft rounded edge of the Spanner Ring heads forward so that the sharp edge<br />
of the opposite side does not damage the seal.<br />
1b.1 Located on the inside of the Suit Ring of<br />
the <strong>Glove</strong> <strong>Lock</strong> <strong>QCP</strong>, t<strong>here</strong> is an edge that will<br />
act as fixation point for the soft Wrist Ring of<br />
the Quick Cuff System.<br />
1b.2 Squeeze the soft Wrist Ring and insert it<br />
into the Suit Ring of the <strong>Glove</strong> <strong>Lock</strong> <strong>QCP</strong>.<br />
Expand the Wrist Ring fully and arrange so<br />
that the edges of the rings come together.<br />
1a.3 Press the Suit Ring evenly onto the seal so that the seal tightens in between<br />
the rings. Check for creases on the seal as creases may cause leakage.<br />
1b.3 The last steps of the mounting process<br />
is same as with a regular Quick Cuff System.<br />
It only differs by the fact that you need to<br />
choose the black Spanner Ring that comes<br />
with the <strong>Glove</strong> <strong>Lock</strong> <strong>QCP</strong> kit instead of the<br />
Spanner Ring delivered with the<br />
Quick Cuff kit.<br />
1a.4 Test the strength of attachment by pulling<br />
the arm of the suit and the Suit Ring in the<br />
opposite direction. If the Suit Ring falls off,<br />
change the Spanner Ring to a thicker one.<br />
Always check for ceases, dirt<br />
or damaged surfaces before mounting<br />
and use of the equipment!<br />
Spanner Ring, black
www.sitech.se<br />
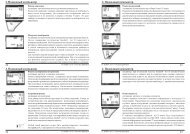
2. Attach glove<br />
3. Donning<br />
Equalization Tube<br />
2.1 Start by finding appropriate Spanner<br />
Ring. When pressing the Spanner Ring and<br />
glove into the <strong>Glove</strong> Ring they shall slide<br />
without use of excessive force.<br />
2.2 Place the Spanner Ring on the inside of<br />
the glove, make sure to find proper position<br />
for optimized length of the glove.<br />
2.3 Fold the glove shaft inwards over the<br />
Spanner Ring (latex gloves can be fitted<br />
and folded the opposite way).<br />
3.1 Put your hand through the seal and fit the<br />
Equalization Tube between seal and wrist.<br />
Make sure the Equalization Tube reaches<br />
all the way through the seal.<br />
Bayonet<br />
3.2 Join the rings together (make sure that<br />
the O-ring and sealing surface [5.3] are<br />
properly cleaned and lubricated).<br />
3.3 When the <strong>Glove</strong> Ring and the Suit<br />
Ring has been joined together just turn the<br />
<strong>Lock</strong> and Release Ring as the image displays.<br />
Turn the <strong>Lock</strong> and Release Ring until it stops.<br />
When this procedure has been made properly<br />
you should only be able to see part of the<br />
edge of the bayonet (as displayed in the<br />
right section of the image box).<br />
2.4 Press the glove with Spanner Ring<br />
2.6 Test the strength of attachment by<br />
evenly into the <strong>Glove</strong> Ring.<br />
pulling <strong>Glove</strong> Ring and <strong>Glove</strong> in the<br />
2.5 Check for creases on the glove as<br />
opposite direction. If the assembly does<br />
creases may cause leakage.<br />
not hold together, please change the<br />
Spanner Ring to a thicker one.<br />
After you have conducted a testdive you may trim the excess material on the glove shaft<br />
for optimized function, comfort and visual appearance.<br />
4. Doffing<br />
4.1 Turn the <strong>Lock</strong> and Release ring in opposite direction compared to the donning procedure.<br />
Turn until the <strong>Glove</strong> Ring and the Assembly Ring are separated. Tip! Keep glove on when<br />
doffing second ring. The glove provide a higher friction against the rubber ring.<br />
These are suggested instructions only<br />
Whatever method chosen, be certain the wrist seal, be it latex or silicone, is properly treated.<br />
Always make a leakage and stress test on your drysuit seals before diving.
Troubleshooting<br />
• If high resistance occurs, disassemble and lubricate with <strong>SI</strong> TECH Lube Stick.<br />
• If the rings are misaligned, disassemble and don again.<br />
• Sand and debris caught up by lubricant on <strong>Glove</strong> Ring and/or Suit Ring may cause<br />
leakage if not removed. Remove O-ring and make sure the O-ring groove and adjoining<br />
surface on Suit Ring is clean before replacing the O-ring.<br />
Maintenance and Storage<br />
• After every dive you should check for damage or debris and clean the system with fresh water.<br />
• Before every dive you may do the same check depending on how you store the system.<br />
• The O-ring seal and its groove is especially important to check for dirt.<br />
• Store the rings apart in a debris free enviroment.<br />
To change or to clean and lubricate the O-ring, follow these simple steps:<br />
Press the <strong>Lock</strong> and Release Ring backwards<br />
with your thumbs until you can access the<br />
O-ring. NOTE: Do not use excessive force as<br />
that might break the rings.<br />
Lubrication<br />
When <strong>Lock</strong> and Release Ring is trapped in its<br />
backward position, you will be able to pinch<br />
the O-ring and pick it out of its groove.<br />
NOTE: Do not use any sharp tools as they<br />
may damage the O-ring.<br />
IMPORTANT:<br />
• Lubricate the O-rings.<br />
• Avoid any lubricant on seals.<br />
• Clean by disassemble and rinsing all<br />
parts thoroughly in fresh water.<br />
• Dry before assembly.<br />
For best performance; lubricate the surface<br />
marked with red. Use <strong>SI</strong> TECH Lube Stick.
www.sitech.se<br />
Our products have<br />
been trusted by divers<br />
for more than 40 years<br />
Spare Parts<br />
Item no. Item<br />
60523 Suit Ring<br />
60539 <strong>Glove</strong> Ring with Rubber Ring and O-ring<br />
60538 Spanner Ring, red: For extremely thin fabrics<br />
60537 Spanner Ring, green: For thin fabrics<br />
60536 Spanner Ring, blue: For medium fabrics<br />
60535 Spanner Ring, yellow: For thick fabrics<br />
80197 O-ring<br />
60540 Lube Stick<br />
60233 Pressure Equalization Tube<br />
60524 Spanner Ring, black: For attachment to Quick Cuff<br />
<strong>SI</strong> TECH is a Swedish company focusing on manufacturing and<br />
marketing of components for protective suits such as; drysuits,<br />
rescue suits and garments designed for diverse hostile<br />
environments. <strong>SI</strong> TECH is rooted in the diving industry which<br />
is still the company’s core market. The company was founded<br />
in 1971 by the diving pioneer Stig Insulán.<br />
Core products<br />
Modular Quick Change Solutions, Drysuit Valves, Drysuit seals,<br />
Dry <strong>Glove</strong> Systems, Gas Inflation Systems and special<br />
compoents for military purposes<br />
Inhouse capabilities<br />
Development and production is made in-house at our facilities in<br />
Brastad, Sweden. Inhouse competencies include: CAD construction,<br />
Injection Molding, CNC Machining, EMD Machining,<br />
Assembly, Sales and Marketing, Logistics and Administration.<br />
Our team of engineers, sales and marketing personell have<br />
close co-operation with the distributors and end-users of our products.<br />
timaladyk.se
<strong>SI</strong> TECH AB | <strong>Glove</strong> <strong>Lock</strong> <strong>QCP</strong> <strong>manual</strong> | Version: 2.0 | February 6, 2013<br />
www.sitech.se