UM EN FLX ASI SYS PRO INST - Onlinecomponents.com
UM EN FLX ASI SYS PRO INST - Onlinecomponents.com
UM EN FLX ASI SYS PRO INST - Onlinecomponents.com

You also want an ePaper? Increase the reach of your titles
YUMPU automatically turns print PDFs into web optimized ePapers that Google loves.
AUTOMATION<br />
User Manual<br />
online<strong>com</strong>ponents.<strong>com</strong><br />
<strong>UM</strong> <strong>EN</strong> <strong>FLX</strong> <strong>ASI</strong> <strong>SYS</strong> <strong>PRO</strong> <strong>INST</strong><br />
Configuring and Installing Devices in the<br />
Fieldline Extension AS-Interface Product Group
online<strong>com</strong>ponents.<strong>com</strong>
AUTOMATION<br />
User Manual<br />
Configuring and Installing Devices in the<br />
Fieldline Extension AS-Interface Product Group<br />
Designation:<br />
Revision:<br />
This user manual is valid for:<br />
<strong>UM</strong> <strong>EN</strong> <strong>FLX</strong> <strong>ASI</strong> <strong>SYS</strong> <strong>PRO</strong> <strong>INST</strong><br />
01<br />
The Fieldline Extension AS-Interface product group<br />
online<strong>com</strong>ponents.<strong>com</strong><br />
09/2009<br />
7513_en_01<br />
PHO<strong>EN</strong>IX CONTACT
<strong>UM</strong> <strong>EN</strong> <strong>FLX</strong> <strong>ASI</strong> <strong>SYS</strong> <strong>PRO</strong><br />
Please observe the following notes<br />
In order to ensure the safe use of the product described, you have to read and understand<br />
this manual. The following notes provide information on how to use this manual.<br />
User group of this manual<br />
The use of products described in this manual is oriented exclusively to qualified electricians<br />
or persons instructed by them, who are familiar with applicable standards and other<br />
regulations regarding electrical engineering and, in particular, the relevant safety concepts.<br />
Phoenix Contact accepts no liability for erroneous handling or damage to products from<br />
Phoenix Contact or third-party products resulting from disregard of information contained in<br />
this manual.<br />
Explanation of symbols used and signal words<br />
This is the safety alert symbol. It is used to alert you to potential personal injury<br />
hazards. Obey all safety messages that follow this symbol to avoid possible<br />
injury or death.<br />
DANGER<br />
This indicates a hazardous situation which, if not avoided, will result in death or serious<br />
injury.<br />
WARNING<br />
This indicates a hazardous situation which, if not avoided, could result in death or serious<br />
injury.<br />
CAUTION<br />
This indicates a hazardous situation which, if not avoided, could result in minor or<br />
moderate injury.<br />
The following types of messages provide information about possible property damage and<br />
general information concerning proper operation and ease-of-use.<br />
NOTE<br />
This symbol and the ac<strong>com</strong>panying text alerts the reader to a situation which may cause<br />
damage or malfunction to the device, either hardware or software, or surrounding<br />
property.<br />
online<strong>com</strong>ponents.<strong>com</strong><br />
This symbol and the ac<strong>com</strong>panying text provides additional information to the reader. It is<br />
also used as a reference to other sources of information (manuals, data sheets, literature)<br />
on the subject matter, product, etc.<br />
PHO<strong>EN</strong>IX CONTACT<br />
7513_en_01
<strong>UM</strong> <strong>EN</strong> <strong>FLX</strong> <strong>ASI</strong> <strong>SYS</strong> <strong>PRO</strong><br />
General terms and conditions of use for technical documentation<br />
Phoenix Contact reserves the right to alter, correct, and/or improve the technical<br />
documentation and the products described in the technical documentation at its own<br />
discretion and without giving prior notice, insofar as this is reasonable for the user. The<br />
same applies to any technical changes that serve the purpose of technical progress.<br />
The receipt of technical documentation (in particular data sheets, installation instructions,<br />
manuals, etc.) does not constitute any further duty on the part of Phoenix Contact to furnish<br />
information on alterations to products and/or technical documentation. Any other<br />
agreement shall only apply if expressly confirmed in writing by Phoenix Contact. Please<br />
note that the supplied documentation is product-specific documentation only and that you<br />
are responsible for checking the suitability and intended use of the products in your specific<br />
application, in particular with regard to observing the applicable standards and regulations.<br />
Although Phoenix Contact makes every effort to ensure that the information content is<br />
accurate, up-to-date, and state-of-the-art, technical inaccuracies and/or printing errors in<br />
the information cannot be ruled out. Phoenix Contact does not offer any guarantees as to<br />
the reliability, accuracy or <strong>com</strong>pleteness of the information. All information made available<br />
in the technical data is supplied without any ac<strong>com</strong>panying guarantee, whether expressly<br />
mentioned, implied or tacitly assumed. This information does not include any guarantees<br />
regarding quality, does not describe any fair marketable quality, and does not make any<br />
claims as to quality guarantees or guarantees regarding the suitability for a special purpose.<br />
Phoenix Contact accepts no liability or responsibility for errors or omissions in the content<br />
of the technical documentation (in particular data sheets, installation instructions, manuals,<br />
etc.).<br />
The aforementioned limitations of liability and exemptions from liability do not apply, in so<br />
far as liability must be assumed, e.g., according to product liability law, in cases of<br />
premeditation, gross negligence, on account of loss of life, physical injury or damage to<br />
health or on account of the violation of important contractual obligations. Claims for<br />
damages for the violation of important contractual obligations are, however, limited to<br />
contract-typical, predictable damages, provided there is no premeditation or gross<br />
negligence, or that liability is assumed on account of loss of life, physical injury or damage<br />
to health. This ruling does not imply a change in the burden of proof to the detriment of the<br />
user.<br />
online<strong>com</strong>ponents.<strong>com</strong><br />
7513_en_01<br />
PHO<strong>EN</strong>IX CONTACT
<strong>UM</strong> <strong>EN</strong> <strong>FLX</strong> <strong>ASI</strong> <strong>SYS</strong> <strong>PRO</strong><br />
Statement of legal authority<br />
This manual, including all illustrations contained herein, is copyright protected. Use of this<br />
manual by any third party is forbidden. Reproduction, translation, and public disclosure, as<br />
well as electronic and photographic archiving or alteration requires the express written<br />
consent of Phoenix Contact. Violators are liable for damages.<br />
Phoenix Contact reserves all rights in the case of patent award or listing of a registered<br />
design. Third-party products are always named without reference to patent rights. The<br />
existence of such rights shall not be excluded.<br />
Internet<br />
Subsidiaries<br />
How to contact us<br />
Up-to-date information on Phoenix Contact products and our Terms and Conditions can be<br />
found on the Internet at:<br />
www.phoenixcontact.<strong>com</strong>.<br />
Make sure you always use the latest documentation.<br />
It can be downloaded at:<br />
www.download.phoenixcontact.<strong>com</strong>.<br />
A conversion table is available on the Internet at:<br />
www.download.phoenixcontact.<strong>com</strong>/general/7000_en_00.pdf.<br />
If there are any problems that cannot be solved using the documentation, please contact<br />
your Phoenix Contact subsidiary.<br />
Subsidiary contact information is available at www.phoenixcontact.<strong>com</strong>.<br />
Published by .<br />
PHO<strong>EN</strong>IX CONTACT GmbH & Co. KG<br />
Flachsmarktstraße 8<br />
32825 Blomberg<br />
Germany<br />
Phone +49 - (0) 52 35 - 3-00<br />
Fax +49 - (0) 52 35 - 3-4 12 00<br />
PHO<strong>EN</strong>IX CONTACT<br />
P.O. Box 4100<br />
Harrisburg, PA 17111-0100<br />
USA<br />
Phone +1-717-944-1300<br />
Should you have any suggestions or re<strong>com</strong>mendations for improvement of the contents and<br />
layout of our manuals, please send your <strong>com</strong>ments to<br />
tecdoc@phoenixcontact.<strong>com</strong>.<br />
online<strong>com</strong>ponents.<strong>com</strong><br />
PHO<strong>EN</strong>IX CONTACT<br />
7513_en_01
Table of Contents<br />
1 Fieldline Extension and the AS-Interface System ...................................................................1-1<br />
1.1 Fieldline Extension AS-Interface Product Group.................................................1-1<br />
1.2 For Your Safety...................................................................................................1-2<br />
1.2.1 Correct Usage .....................................................................................1-2<br />
1.2.2 Regulations .........................................................................................1-2<br />
1.2.3 Safety Notes .......................................................................................1-2<br />
1.3 Documentation for AS-i Devices.........................................................................1-3<br />
1.4 Function Description of the AS-Interface System ...............................................1-3<br />
1.4.1 Easy Handling .....................................................................................1-4<br />
1.4.2 Information Content of Data Telegrams ..............................................1-4<br />
1.4.3 Communication Principle ....................................................................1-4<br />
1.4.4 Time Response ...................................................................................1-4<br />
1.5 AS-Interface standardization ..............................................................................1-5<br />
1.5.1 AS-Interface specification ...................................................................1-5<br />
1.5.2 AS-Interface profile .............................................................................1-6<br />
1.5.3 Profile structure ...................................................................................1-6<br />
1.6 Different data transmission types (Single/Combined Transaction) .....................1-7<br />
1.7 System Components of the AS-Interface System...............................................1-8<br />
1.7.1 Masters/Gateways ..............................................................................1-8<br />
1.7.2 Power Supply Units .............................................................................1-8<br />
1.7.3 Slaves .................................................................................................1-8<br />
1.7.4 Cable ..................................................................................................1-9<br />
1.8 Topology ............................................................................................................1-9<br />
2 AS-Interface Masters/Gateways .............................................................................................2-1<br />
2.1 AS-Interface Master for Inline (<strong>ASI</strong> MA IL UNI) ...................................................2-2<br />
2.1.1 Description ..........................................................................................2-2<br />
2.1.2 Housing Dimensions ...........................................................................2-3<br />
2.1.3 Function ..............................................................................................2-3<br />
2.1.4 Mounting the AS-Interface Master for Inline (<strong>ASI</strong> MA IL UNI) ..............2-4<br />
2.1.5 Connecting the AS-Interface Master for Inline (<strong>ASI</strong> MA IL UNI) ..........2-6<br />
2.1.6 Power Supply and AS-i Connection Method .......................................2-7<br />
2.1.7 Diagnostic and Status Indicators .........................................................2-7<br />
2.1.8 Buttons ...............................................................................................2-8<br />
2.1.9 7-Segment Display .............................................................................2-9<br />
2.1.10 Removing the AS-Interface Master for Inline (<strong>ASI</strong> MA IL UNI) .............2-9<br />
online<strong>com</strong>ponents.<strong>com</strong><br />
2.2 AS-Interface Gateway for <strong>PRO</strong>FIBUS<br />
with standard function <strong>FLX</strong> <strong>ASI</strong> MA PB SF .......................................................2-10<br />
2.2.1 Description ........................................................................................2-10<br />
2.2.2 Housing dimensions .........................................................................2-11<br />
2.2.3 Function ............................................................................................2-11<br />
2.2.4 Mounting/demounting the Master <strong>FLX</strong> <strong>ASI</strong> MA PB SF ......................2-12<br />
2.2.5 Connecting the Master <strong>FLX</strong> <strong>ASI</strong> MA PB SF ......................................2-12<br />
2.2.6 Power Supply and AS-i Connection Method .....................................2-13<br />
7513_en_01 PHO<strong>EN</strong>IX CONTACT i
<strong>UM</strong> <strong>EN</strong> <strong>FLX</strong> <strong>ASI</strong> <strong>SYS</strong> <strong>PRO</strong> <strong>INST</strong><br />
2.2.7 Diagnostic and Status Indicators .......................................................2-14<br />
2.2.8 Buttons .............................................................................................2-14<br />
2.3 AS-Interface Gateway for <strong>PRO</strong>FIBUS<br />
with extended function <strong>FLX</strong> <strong>ASI</strong> MA 2 PB EF....................................................2-15<br />
2.3.1 Description ........................................................................................2-15<br />
2.3.2 Housing dimensions .........................................................................2-16<br />
2.3.3 Function ............................................................................................2-16<br />
2.3.4 Mounting/demounting the Master <strong>FLX</strong> <strong>ASI</strong> MA 2 PB EF ...................2-18<br />
2.3.5 Connecting the Master <strong>FLX</strong> <strong>ASI</strong> MA 2 PB EF ....................................2-19<br />
2.3.6 Power Supply and AS-i Connection Method .....................................2-20<br />
2.3.7 Diagnostic and Status Indicators .......................................................2-21<br />
2.3.8 Buttons .............................................................................................2-21<br />
3 Power Supply Units .................................................................................................................3-1<br />
3.1 Description .........................................................................................................3-1<br />
3.2 Product Versions for the AS-Interface System....................................................3-2<br />
3.3 Function..............................................................................................................3-2<br />
3.4 Housing Dimensions of the Power Supply Units.................................................3-3<br />
3.5 Mounting/Removing Power Supply Units ...........................................................3-4<br />
3.5.1 Mounting on the DIN Rail (Narrow Mounting Position) ........................3-4<br />
3.5.2 Mounting on the DIN Rail (Flat Mounting Position) ..............................3-5<br />
3.6 Connecting the Power Supply Units ...................................................................3-5<br />
4 Slaves .....................................................................................................................................4-1<br />
4.1 Description for Fieldline Extension AS-i M12 Devices ........................................4-1<br />
4.1.1 Housing Versions for Fieldline Extension AS-i M12 Devices ...............4-2<br />
4.1.2 Housing Dimensions of Fieldline Extension AS-i M12 Devices ...........4-3<br />
4.1.3 Basic Structure of Fieldline Extension AS-i M12 Devices ....................4-4<br />
4.1.4 Mounting Fieldline Extension AS-i M12 Devices .................................4-5<br />
4.1.5 Flat-Ribbon Cable ...............................................................................4-7<br />
4.1.6 Penetration Technique ........................................................................4-8<br />
4.1.7 Connecting AS-Interface and the Auxiliary Voltage AUX<br />
to M12 Devices ...................................................................................4-9<br />
4.1.8 Pin Assignment of the Inputs and Outputs ........................................4-10<br />
4.1.9 Labeling Fieldline Extension AS-i M12 Devices ................................4-11<br />
4.1.10 Diagnostic and Status Indicators<br />
of Fieldline Extension AS-i M12 Devices ...........................................4-12<br />
4.1.11 Setting the Address for Fieldline Extension AS-i M12 Devices .........4-13<br />
4.1.12 Replacing the Electronics Module .....................................................4-14<br />
4.2 Description for Fieldline Extension AS-i M8 Devices ........................................4-15<br />
4.2.1 Housing Versions for Fieldline Extension AS-i M8 Devices ...............4-16<br />
4.2.2 Housing Dimensions of Fieldline Extension AS-i M8 Devices ...........4-17<br />
4.2.3 Basic Structure of Fieldline Extension AS-i M8 Devices ....................4-18<br />
4.2.4 Mounting Fieldline Extension AS-i M8 Devices .................................4-19<br />
online<strong>com</strong>ponents.<strong>com</strong><br />
ii PHO<strong>EN</strong>IX CONTACT 7513_en_01
Table of Contents<br />
4.2.5 Connecting AS-Interface and the Auxiliary Voltage AUX<br />
to M8 Devices ...................................................................................4-20<br />
4.2.6 Pin Assignment of the AS-i Connection ............................................4-20<br />
4.2.7 Pin Assignment of the Inputs and Outputs ........................................4-21<br />
4.2.8 Labeling Fieldline Extension AS-i M8 Devices ..................................4-21<br />
4.2.9 Diagnostic and Status Indicators<br />
of Fieldline Extension AS-i M8 Devices .............................................4-22<br />
4.2.10 Setting the Address for Fieldline Extension AS-i M8 Devices ...........4-23<br />
4.3 Description for AS-i Control Cabinet Modules ..................................................4-24<br />
4.3.1 Product Versions for AS-i Control Cabinet Modules ..........................4-24<br />
4.3.2 Description for <strong>ASI</strong> IO ME DI 4 AB ....................................................4-25<br />
4.3.3 Description for <strong>ASI</strong> IO ME DIO 4/3 AB ..............................................4-26<br />
4.3.4 Description for <strong>ASI</strong> IO ME DIO 4/4 AB ..............................................4-27<br />
4.3.5 Housing Dimensions of Control Cabinet Modules .............................4-28<br />
4.3.6 Mounting Control Cabinet Modules ...................................................4-28<br />
4.3.7 Connecting Cables ...........................................................................4-28<br />
4.3.8 Terminal Assignment of Control Cabinet Modules ............................4-29<br />
4.3.9 Diagnostic and Status Indicators of Control Cabinet Modules ..........4-30<br />
4.3.10 Setting the Address for Control Cabinet Modules .............................4-31<br />
4.3.11 Setting the Sensor Power Supply ......................................................4-32<br />
5 Configuration ..........................................................................................................................5-1<br />
5.1 Number of Inputs and Outputs............................................................................5-1<br />
5.2 Position of Inputs and Outputs in the Application................................................5-1<br />
5.3 Required Current in an AS-i System...................................................................5-1<br />
5.4 Selecting the Cable ............................................................................................5-2<br />
5.5 Speed of Data Exchange....................................................................................5-2<br />
5.6 Integrating the AS-i System in the Control System .............................................5-3<br />
5.7 AS-Interface in the Control Cabinet ....................................................................5-3<br />
6 General Information About Installation ....................................................................................6-1<br />
6.1 Interference Suppression Measures...................................................................6-2<br />
6.2 Installation Instructions .......................................................................................6-3<br />
6.3 Mounting Distances............................................................................................6-3<br />
online<strong>com</strong>ponents.<strong>com</strong><br />
7 Startup ....................................................................................................................................7-1<br />
7.1 Mounting and Installation....................................................................................7-1<br />
7.2 Address Assignment ..........................................................................................7-1<br />
7.3 Configuring the Master .......................................................................................7-2<br />
7.4 Operation............................................................................................................7-2<br />
7513_en_01 PHO<strong>EN</strong>IX CONTACT iii
<strong>UM</strong> <strong>EN</strong> <strong>FLX</strong> <strong>ASI</strong> <strong>SYS</strong> <strong>PRO</strong> <strong>INST</strong><br />
online<strong>com</strong>ponents.<strong>com</strong><br />
iv PHO<strong>EN</strong>IX CONTACT 7513_en_01
Fieldline Extension and the AS-Interface System<br />
1 Fieldline Extension and the AS-Interface System<br />
1.1 Fieldline Extension AS-Interface Product Group<br />
Fieldline Extension is an extension of the existing Fieldline product range. AS-Interface<br />
integrates seamlessly into this product range.<br />
Easy handling is a key feature of Fieldline Extension AS-Interface devices. Innovative<br />
technologies such as SPEEDCON fast connection technology or tool-free contacting of<br />
<strong>FLX</strong> AS-i M12 devices to AS-Interface reduce the assembly time by 90%.<br />
The input and output devices in the Fieldline Extension AS-Interface product group are<br />
designed for distributed automation tasks in harsh environmental conditions. The devices<br />
meet IP65/67 protection. The direct connection of sensors and actuators in close proximity<br />
to the process is thus easily implemented.<br />
In addition to <strong>com</strong>ponents with IP65/67 protection, the Fieldline Extension<br />
AS-Interface product group also includes other AS-Interface system <strong>com</strong>ponents. These<br />
include IP20 AS-Interface masters/gateways, AS-Interface power supply units, and<br />
I/O slaves for use in the control cabinet.<br />
AS-Interface masters are available in two versions.<br />
The AS-Interface master for Inline can be used to connect AS-Interface to virtually all<br />
<strong>com</strong>mon networks. This connection is established via the network-dependent Inline<br />
bus coupler and the Inline local bus.<br />
<strong>FLX</strong> <strong>ASI</strong> MA PB SF und <strong>FLX</strong> <strong>ASI</strong> MA 2 PB EF master are a Stand-Alone <strong>PRO</strong>FIBUS version<br />
for connecting AS-Interface to <strong>PRO</strong>FIBUS DP networks.<br />
The <strong>PRO</strong>FIBUS masters support AS-i specification 3.0. Networks with up to 248 inputs and<br />
248 outputs can be implemented together with different I/O devices (slaves) and IP20 or<br />
IP65/67 protection.<br />
They are backwards <strong>com</strong>patible which means they can also be operated with slaves of AS-<br />
Interface specifications 2.0 or 2.1.<br />
online<strong>com</strong>ponents.<strong>com</strong><br />
7513_en_01 PHO<strong>EN</strong>IX CONTACT 1-1
<strong>UM</strong> <strong>EN</strong> <strong>FLX</strong> <strong>ASI</strong> <strong>SYS</strong> <strong>PRO</strong> <strong>INST</strong><br />
1.2 For Your Safety<br />
1.2.1 Correct Usage<br />
AS-i devices are designed for use as specified in this user manual and in the<br />
device-specific data sheets.<br />
Always observe the data specified in the user manual and in the data sheets. If the operating<br />
instructions and safety notes for configuration, installation, and operation provided in the<br />
documentation are followed, the devices should not normally present a risk to people or<br />
property.<br />
1.2.2 Regulations<br />
During device configuration, installation, startup, and maintenance, the valid safety and<br />
accident prevention regulations for the specific application must be observed.<br />
1.2.3 Safety Notes<br />
NOTE:<br />
To ensure IP65/67 protection, cover unused connections with protective caps.<br />
NOTE:<br />
Only operate AS-i devices with a maximum safety extra-low voltage (SELV) of 30 V<br />
according to IEC 60950/<strong>EN</strong> 60950/VDE 0805.<br />
online<strong>com</strong>ponents.<strong>com</strong><br />
1-2 PHO<strong>EN</strong>IX CONTACT 7513_en_01
1.3 Documentation for AS-i Devices<br />
Fieldline Extension and the AS-Interface System<br />
Configuring and Installing Devices in the Fieldline Extension AS-Interface Product<br />
Group<br />
This user manual describes the AS-i devices.<br />
This includes:<br />
– Device properties<br />
– Configuration<br />
– Assembly and connection<br />
– Startup<br />
Further information can be found in the user manuals:<br />
– AS-i-Gateways for <strong>PRO</strong>FIBUS,<br />
<strong>UM</strong> <strong>EN</strong> <strong>FLX</strong> <strong>ASI</strong> MA PB SF/EF<br />
– Configuring and Installing the AS-Interface Gateway for Inline,<br />
<strong>UM</strong> <strong>EN</strong> <strong>ASI</strong> MA IL UNI<br />
– Configuring and installing the INTERBUS Inline product range<br />
IB IL <strong>SYS</strong> <strong>PRO</strong> <strong>UM</strong> E<br />
– Power Supply Units, <strong>SYS</strong> POWER SUPPLY <strong>UM</strong> E, Order No. 2745855<br />
– AS-Interface Addressing Device, <strong>ASI</strong> CC ADR <strong>UM</strong> E, Order No. 9013727<br />
Device-Specific Data Sheet<br />
The data sheet describes the specific properties of a device.<br />
This includes e.g.:<br />
– Description<br />
– Technical data<br />
– Local diagnostic and status indicators<br />
– Pin assignment and connection example<br />
– Programming data/configuration data<br />
1.4 Function Description of the AS-Interface System<br />
online<strong>com</strong>ponents.<strong>com</strong><br />
The AS-Interface system enables the easy connection of sensors and actuators to a control<br />
system (Actuator Sensor Interface = AS-Interface = AS-i). It replaces the considerably more<br />
<strong>com</strong>plex option of parallel cabling in machines and systems. The system simplifies the<br />
installation of devices at sensor/actuator level and replaces the conventional cable harness<br />
with a single cable. The AS-Interface system is therefore also a serial <strong>com</strong>munication<br />
system. As a sensor bus it directly penetrates through to the individual sensors and<br />
actuators.<br />
It is precisely here that AS-Interface has be<strong>com</strong>e established as a global standard solution.<br />
AS-Interface is internationally standardized in standards <strong>EN</strong> 50295 and IEC 62026-2. It is<br />
supported by most well-known manufacturers of control systems and sensors/actuators.<br />
7513_en_01 PHO<strong>EN</strong>IX CONTACT 1-3
<strong>UM</strong> <strong>EN</strong> <strong>FLX</strong> <strong>ASI</strong> <strong>SYS</strong> <strong>PRO</strong> <strong>INST</strong><br />
1.4.1 Easy Handling<br />
In the AS-Interface system, the binary I/O device is addressed via the control system (PLC)<br />
in the same way as when using I/O boards and a cable harness. The direct addressing of<br />
devices and the simple electromechanical structure (penetration technique, tree structure)<br />
also simplify retrofitting and the conversion of an AS-i system.<br />
No special knowledge of the system, e.g., for service and maintenance, is required in order<br />
to ensure a smooth transition from the previous star cabling to serial bus technology. The<br />
unerring self-diagnostics of the AS-i system significantly contribute to the reduction of<br />
system downtimes. For example, when replacing a faulty slave device it is not necessary to<br />
assign a new address or modify the PLC program. The AS-Interface system supports the<br />
replacement of a slave through automatic addressing.<br />
1.4.2 Information Content of Data Telegrams<br />
The AS-Interface system is optimized for networking the most basic devices using just a few<br />
items of bit information per device. The data telegrams are therefore very short and have a<br />
very simple structure. This means that the electronics to be integrated in the devices can be<br />
created cost-effectively. The AS-i telegram contains a maximum of four data bits for<br />
information exchange from the control system to the slave (output data) and from the slave<br />
to the control system (input data). Both the input data and the output data are updated in<br />
each cycle.<br />
For more <strong>com</strong>plex devices, e.g., analog devices, larger amounts of data can also be<br />
transmitted. This data must be split and transmitted in several consecutive cycles in<br />
multiplex mode.<br />
1.4.3 Communication Principle<br />
The AS-Interface system is a single master system. A bus access method is used for<br />
<strong>com</strong>munication, which ensures a defined and fast response time. Communication is always<br />
initiated by the master, the slaves only respond to master requests. The master<br />
<strong>com</strong>municates cyclically with all devices, which are addressed using an address that is<br />
programmed once. A master cycle consists of the requests for all connected devices. This<br />
<strong>com</strong>munication method is known as cyclic polling.<br />
1.4.4 Time Response<br />
online<strong>com</strong>ponents.<strong>com</strong><br />
The cycle time of the AS-Interface system is deterministic and proportional to the number of<br />
devices. A time of 150 microseconds is required per device. At full system configuration with<br />
62 devices, the cycle time is 10 milliseconds. At the end of this time, all information that was<br />
transferred from the control system to the Fieldline Extension AS-Interface system (the<br />
master) has arrived at the slaves. Within this time all input data has also been read.<br />
1-4 PHO<strong>EN</strong>IX CONTACT 7513_en_01
1.5 AS-Interface standardization<br />
Fieldline Extension and the AS-Interface System<br />
1.5.1 AS-Interface specification<br />
The AS Interface specification defines the <strong>com</strong>plete AS-Interface system and guarantees<br />
standardization of all system <strong>com</strong>ponents. Three AS-Interface specifications have been<br />
published since AS-Interface has been introduced in the mid-90s.<br />
Standard slaves<br />
Slaves with extended<br />
addressing<br />
Table 1-1<br />
Specification 2.0 describes standard slaves. Addresses from 1 to 31 can be assigned to<br />
standard slaves. This limits an AS-Interface network to 31 AS-Interface slaves.<br />
Specifications 2.1 and 3.0 describe slaves with extended addressing. Addresses from 1A<br />
to 31A and 1B to 31B may be assigned to AS-Interface slaves according to these<br />
specifications. Thus, the possible number of AS-Interface-slaves in a network is doubled<br />
<strong>com</strong>pared with specification 2.0.<br />
The currently valid specification is the "Complete Specification" version 3.0, revision 2.0<br />
dated July 09, 2008 (as of August 14, 2009).<br />
AS Interface specification overview<br />
2.0 2.1 3.0<br />
31 slaves, maximum 62 slaves, maximum 62 slaves, maximum<br />
31 single slaves or 31 A slaves<br />
(can be mixed)<br />
31 A slaves and 31 B slaves<br />
(single slaves will also be supported.)<br />
31 A slaves and 31 B slaves<br />
(single slaves will also be supported.)<br />
4 inputs and 4 outputs 4 inputs and 3 outputs 4 inputs and 4 outputs<br />
Master profile M0, or later Master profile M3, or later Master profile M4, or later<br />
No "Combined Transaction" "Combined Transaction" "Combined Transaction"<br />
Support of "Combined Transaction" Type 1 Support of "Combined Transaction"<br />
Type 1 to Type 5<br />
online<strong>com</strong>ponents.<strong>com</strong><br />
7513_en_01 PHO<strong>EN</strong>IX CONTACT 1-5
<strong>UM</strong> <strong>EN</strong> <strong>FLX</strong> <strong>ASI</strong> <strong>SYS</strong> <strong>PRO</strong> <strong>INST</strong><br />
1.5.2 AS-Interface profile<br />
Fixed defined profiles for AS-Interface guarantee manufacturer-independent <strong>com</strong>patibility.<br />
The profiles summarize the meaning of the 4 data bits, the precise configuration, and the<br />
precise functions of an AS-i slave.<br />
1.5.3 Profile structure<br />
Slave profile<br />
Example<br />
Master profile<br />
Standard masters<br />
A slave profile <strong>com</strong>prises IO code, ID code and ID2 code.<br />
IO code and ID code describe the basic functions of a slave. These fixed codes allow a<br />
manufacturer-independent exchange of slave devices and guarantee <strong>com</strong>patibility among<br />
each other. ID2 code is also fixed and describes further identification characteristics of the<br />
slave devices.<br />
ID1 code is not considered when a profile is created as the code can be freely changed by<br />
the user.<br />
Profile S-7.A.7 (4 inputs, 4 outputs)<br />
IO code = 7<br />
ID code = A<br />
ID2 code = 7<br />
AS-Interface permits 16 different I/O configurations for the 4 data bits.<br />
These 16 <strong>com</strong>binations are distinguished by the IO code. IO code 7, in this<br />
example, is defined with 4 bidirectional data bits.<br />
The ID code describes the distinguishing features of the various slaves<br />
and is defined by the manufacturer. It cannot be changed. In this example,<br />
ID code A defines this slave as a slave with extended addressing.<br />
The ID2 code describes further distinguishing features of the various<br />
slaves and is also defined by the manufacturer. It cannot be changed. In<br />
this example, ID2 code 7 defines this slave as 4IN/4OUT slave with<br />
extended addressing.<br />
AS-Interface masters are also categorized in various profiles and are standardized just like<br />
AS-Interface slaves.<br />
Standard masters support up to 31 standard slaves or up to 31 slaves with extended<br />
addressing. When using slaves with extended addressing, please note that - in this caseaddresses<br />
1A to 31A will be supported only.<br />
Standard masters also support only "Single Transaction" see Section 1.6 on page 1-7.<br />
The profiles for standard masters are defined with M0 to M2.<br />
online<strong>com</strong>ponents.<strong>com</strong><br />
Extended masters<br />
Extended masters support extended addressing. That means up to 62 slaves with extended<br />
addressing. Extended masters are backwards <strong>com</strong>patible. They support "Single<br />
Transaction" as well as "Combined Transaction" see Section 1.6 on page 1-7. The profiles<br />
for extended masters are defined with M3 to M4.<br />
1-6 PHO<strong>EN</strong>IX CONTACT 7513_en_01
1.6 Different data transmission types<br />
(Single/Combined Transaction)<br />
Fieldline Extension and the AS-Interface System<br />
Single Transaction<br />
AS-Interface Single Transaction permit a maximum information exchange of 4 bits.<br />
Combined Transaction<br />
Table 1-2<br />
AS-Interface Combined Transaction (CTT1..5) permit an information exchange of more<br />
than 4 bits. Further data exchange rules are needed to implement additional functions<br />
requiring a higher data width with AS-Interface such as analog transmission or I/O versions<br />
with inputs and outputs > 4. These rules are defined in Combined Transaction.<br />
The data transmission package remains unchanged to ensure backwards <strong>com</strong>patibility to<br />
older profiles. Profiles with Combined Transaction use the multiplex procedure to transmit<br />
more than 4 data bits. That means that more than one cycle is used to transfer the data.<br />
As data is transmitted in several cycles, this method could possibly cause higher transmission<br />
rates than a network without Combined Transaction.<br />
List of "Combined Transaction" (selection)<br />
Combined Transaction type Example of a Master profile required Function<br />
slave profile<br />
Type 1 S-7.3 M3 Analog transmission<br />
Type 1 S-7.4 M3 Extended analog transmission<br />
Type 3 S-7.A.7 M4 4IN/4OUT in extended addressing mode<br />
Type 3 S-7.A.A M4 8IN/8OUT in extended addressing mode<br />
Type 4 S-7.A.8 M4 16IN in extended addressing mode<br />
Type 5 S-6.0 M4 Fast analog transmission 16 bits<br />
online<strong>com</strong>ponents.<strong>com</strong><br />
7513_en_01 PHO<strong>EN</strong>IX CONTACT 1-7
<strong>UM</strong> <strong>EN</strong> <strong>FLX</strong> <strong>ASI</strong> <strong>SYS</strong> <strong>PRO</strong> <strong>INST</strong><br />
1.7 System Components of the AS-Interface System<br />
An AS-i system consists of at least the <strong>com</strong>ponents described below.<br />
1.7.1 Masters/Gateways<br />
Slave profile<br />
An AS-i master (gateway) is used to integrate an AS-i system into a higher-level fieldbus.<br />
These are "intelligent" units in the AS-i system, which are responsible for serial<br />
<strong>com</strong>munication and self-diagnostics in the system. For the control system or in the higherlevel<br />
network, the AS-i system is represented in the corresponding process data, which can<br />
be accessed in the normal way.<br />
1.7.2 Power Supply Units<br />
AS-Interface networks are supplied by special power supply units. These power supply<br />
units provide as DC voltage of 29.5 V to 31.6 V at the output side. This is necessary in order<br />
to safely operate all the sensors and actuators with the 24 V nominal voltage in the AS-i<br />
system. In addition, with an integrated data decoupling network the power supply unit<br />
ensures that data can superimpose the supply voltage. AS-i power supply units meet the<br />
requirements of "functional extra-low voltages with safe isolation (PELV)". Outputs are<br />
usually supplied separately via a black power cable. These standard power supply units<br />
must also meet the requirements of PELV. This ensures that in the event of a device fault<br />
the AS-i system cannot output any hazardous voltages.<br />
1.7.3 Slaves<br />
Through the concentration of special AS-i functions in the <strong>com</strong>pact protocol chip a wide<br />
range of termination devices can be adapted for use in the AS-i system. These termination<br />
devices are the devices on the bus, i.e., the slaves. I/O devices are AS-i slaves, which<br />
integrate several devices of conventional (parallel) type in AS-i systems.<br />
Each slave is identified by a slave profile. The slave profile is used for clear, functional<br />
identification by the AS-i master. The specifications for this are defined in the AS-Interface<br />
specification and <strong>com</strong>prise an ID code, two extended ID codes (ID1 code and ID2 code),<br />
and a configuration code for inputs/outputs (IO code). This data indicates the function of the<br />
slave.<br />
The slave profile looks like this: S-7.A.0. It <strong>com</strong>prises the IO code, ID code, and ID2 code, it<br />
cannot be modified and is permanently programmed by the manufacturer.<br />
online<strong>com</strong>ponents.<strong>com</strong><br />
All information in the slave profile (ID, ID1, ID2, and IO code) is required in order to easily<br />
replace slaves within an existing system. The master uses this data to check whether the<br />
actual configuration matches the desired configuration.<br />
1-8 PHO<strong>EN</strong>IX CONTACT 7513_en_01
!<br />
"<br />
<br />
* )<br />
4 +<br />
<br />
! !<br />
" "<br />
<br />
4 , 7 7 5<br />
,<br />
7 <br />
<br />
!<br />
"<br />
<br />
!<br />
"<br />
<br />
<br />
!<br />
"<br />
<br />
!<br />
"<br />
<br />
<br />
!<br />
"<br />
<br />
!<br />
"<br />
+ . /<br />
) 5 1<br />
<br />
,<br />
6 4<br />
<br />
!<br />
"<br />
, -<br />
5 - 6<br />
<br />
!<br />
"<br />
) 5 1<br />
2 4 <br />
<br />
2 4 /<br />
<br />
!<br />
"<br />
1` 1` 1` ! 1` "<br />
1 1 1 ! 1 "<br />
1 1 1 ! 1 "<br />
! "<br />
1<br />
. ) 7 6<br />
1 6<br />
2 9 4<br />
) 7 :<br />
) , , 4<br />
!<br />
7 6<br />
) 5 11 - , 1 " ! ) *<br />
H@ % " $ $ &<br />
<br />
! !<br />
) 5 E ) 5 E` ) 7 : ) 7 : `<br />
Fieldline Extension and the AS-Interface System<br />
1.7.4 Cable<br />
The entire conventional and <strong>com</strong>plex parallel cabling system, which is prone to errors, is no<br />
longer required and is replaced by a single AS-i cable. Power and data are transmitted via<br />
a single cable. The profiled flat-ribbon cable, which is typical for AS-i, is used for data<br />
transmission for Fieldline Extension AS-i M12 devices. The new innovative locking<br />
mechanism for AS-i M12 devices enables tool-free connection to the AS-i flat-ribbon cable.<br />
1 6 - 4 * 7 5<br />
1 1* * <br />
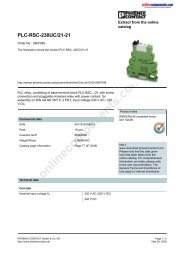
1.8 Topology<br />
The topology of an AS-i network can be freely selected. The cable routing can be adapted<br />
to the local requirements. The network can be created with a linear, star or tree structure.<br />
Branch lines are permitted. The system can be installed like a normal electrical installation<br />
for power distribution. The devices can be connected to the cable at any point in the system,<br />
without having to consider the order, positions or distances. Cable termination resistors are<br />
not required on the AS-i cable.<br />
The only restriction that must be observed is that the total length of the cable must not<br />
exceed 100 m. The value includes all cable lengths, i.e., even branch lines.<br />
An AS-i network consists of the following <strong>com</strong>ponents, see also "System Components of<br />
the AS-Interface System" on page 1-8.<br />
– An AS-i master/gateway<br />
– An AS-i power supply unit<br />
– Another power supply unit (as an option) for supplying the outputs with external<br />
auxiliary voltage<br />
– A maximum of 62 AS-i slaves (SPEC. 2.1/3.0) or 31 AS-i slaves (SPEC. 2.0)<br />
– AS-i cable (flat-ribbon cable)<br />
) 5 1 ) 1 7 1<br />
) 5 1 ) 1 7 1<br />
H@ % ! $ $ &<br />
online<strong>com</strong>ponents.<strong>com</strong><br />
) 5 E<br />
) 5 13 7 1 6 " " - . , ) 5 13 7 1 6 " 8 , + # ) ) 5 11 - , 1 " ! ) *<br />
3 7 1 6 2 9 - 4<br />
. : ) 5 1! , 1 " " ) . : ) 5 1, 1" &<br />
3 7 1 6 2 9 - 4<br />
+ JH ? = > E A JA L A <br />
. EA @ A L A <br />
. : ) 5 1, " <br />
% # ! ) !<br />
Figure 1-1<br />
Typical structure of an AS-i network<br />
7513_en_01 PHO<strong>EN</strong>IX CONTACT 1-9
<strong>UM</strong> <strong>EN</strong> <strong>FLX</strong> <strong>ASI</strong> <strong>SYS</strong> <strong>PRO</strong> <strong>INST</strong><br />
online<strong>com</strong>ponents.<strong>com</strong><br />
1-10 PHO<strong>EN</strong>IX CONTACT 7513_en_01
AS-Interface Masters/Gateways<br />
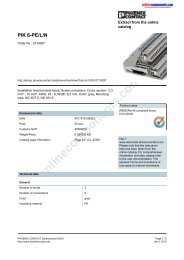
2 AS-Interface Masters/Gateways<br />
An AS-i master (gateway) is used to integrate an AS-i system into a higher-level fieldbus,<br />
such as INTERBUS or <strong>PRO</strong>FIBUS. For AS-Interface, the gateway represents the <strong>com</strong>plete<br />
master and for the higher-level fieldbus it represents a slave device.<br />
+ JH I O I JA <br />
. EA @ > K I<br />
. EA @ > K I I = L A<br />
. EA @ > K I I = L A<br />
) 5 E = I JA H<br />
) 5 E<br />
) 5 EI = L A I<br />
% # ! ) "<br />
Figure 2-1 AS-i master as the gateway between the fieldbus and AS-Interface<br />
online<strong>com</strong>ponents.<strong>com</strong><br />
7513_en_01 PHO<strong>EN</strong>IX CONTACT 2-1
<strong>UM</strong> <strong>EN</strong> <strong>FLX</strong> <strong>ASI</strong> <strong>SYS</strong> <strong>PRO</strong> <strong>INST</strong><br />
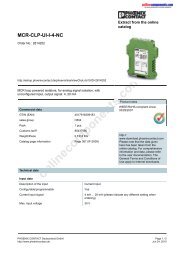
2.1 AS-Interface Master for Inline (<strong>ASI</strong> MA IL UNI)<br />
2.1.1 Description<br />
Components<br />
The AS-i master (gateway) establishes the connection between a higher-level network and<br />
the AS-Interface system. From the point of view of the application program, the AS-i master<br />
is a slave, for the AS-Interface system it represents the master. The AS-i master enables -<br />
independently of the application program and without additional tools - <strong>com</strong>plete startup<br />
and diagnostics of the AS-i system. It maps the I/O information transparently to the other<br />
system. It also enables the exchange of parameter and diagnostic data in both directions.<br />
The AS-i master enables the operation of 62 slaves with extended addressing. The AS-i<br />
master can be ordered using Order No. 2736628.<br />
The AS-i master consists of the following <strong>com</strong>ponents:<br />
1 Configuration connector<br />
2 Diagnostic and status indicators<br />
3 AS-i connection<br />
4 7-segment display<br />
5 Configuration and diagnostics buttons<br />
Figure 2-2<br />
<strong>ASI</strong> MA IL UNI AS-i master<br />
online<strong>com</strong>ponents.<strong>com</strong><br />
Features – Diagnostic and status indicators<br />
– Three-digit 7-segment display<br />
– AS-i connection via Inline connector<br />
– Local bus connection via Inline potential distributor<br />
– Up to 62 AS-i slaves with a maximum of 248 inputs and 186 outputs<br />
– Up to 100 m of cable in one AS-i system<br />
– 1 word PCP<br />
– AS-i specification 2.1<br />
– Master profil M3<br />
– IP20 protection<br />
<br />
!<br />
#<br />
"<br />
% " ) <br />
2-2 PHO<strong>EN</strong>IX CONTACT 7513_en_01
AS-Interface Masters/Gateways<br />
2.1.2 Housing Dimensions<br />
,<br />
+ . /<br />
6 4<br />
, -<br />
) 5 1<br />
2 4 <br />
2 4 /<br />
) 5 1<br />
5 - 6<br />
<br />
<br />
Integration<br />
Slave device<br />
AS-i master<br />
$ <br />
Figure 2-3<br />
<br />
!<br />
"<br />
2.1.3 Function<br />
<br />
!<br />
"<br />
) 5 1 ) 1 7 1<br />
H@ % ! $ $ &<br />
% ! % # <br />
Housing dimensions of the <strong>ASI</strong> MA IL UNI AS-i master in mm<br />
The AS-i master is used to integrate the AS-Interface system into an Inline station and<br />
connects AS-i to a higher-level network. The primary task of the AS-i master for Inline is to<br />
transmit bits from the higher-level network to the AS-i slaves (actuators) and bits from<br />
AS-i (sensors) to the higher-level network.<br />
On one side, the AS-i master for Inline is controlled by the higher-level master, i.e., it is a<br />
slave device in the network.<br />
On the other side, it is the AS-i master, i.e., it monitors the connected AS-i system and<br />
controls all processes on it.<br />
The processes on both sides are executed independently of one another:<br />
• The information from the process data channel of the Inline Modular local bus is<br />
buffered in the AS-i master for Inline until it can be transmitted to the corresponding ASi<br />
slave.<br />
• The latest available information from all AS-i slaves is forwarded in one local bus cycle<br />
to the Inline master via the process data channel.<br />
online<strong>com</strong>ponents.<strong>com</strong><br />
<br />
!<br />
"<br />
<br />
!<br />
"<br />
% # ! ) #<br />
Startup<br />
The AS-i master enables <strong>com</strong>plete startup and diagnostics of the AS-i system. Startup,<br />
troubleshooting, and configuration on AS-Interface can be carried out directly on the device<br />
using the two buttons, a display, and LEDs.<br />
7513_en_01 PHO<strong>EN</strong>IX CONTACT 2-3
<strong>UM</strong> <strong>EN</strong> <strong>FLX</strong> <strong>ASI</strong> <strong>SYS</strong> <strong>PRO</strong> <strong>INST</strong><br />
Parameterization and<br />
diagnostics<br />
The AS-Interface gateway for Inline has 1 word of PCP data. Complex functions for<br />
parameterization and diagnostics of the AS-Interface system can be used with this<br />
parameter channel (PCP). These include:<br />
– Activating/deactivating automatic addressing<br />
– Changing between configuration and operating modes<br />
– Assigning the addresses of connected slaves<br />
– Reading the addresses of connected slaves<br />
A detailed description of available functions can be found in the "Configuring and<br />
installing the AS-Interface gateway for Inline" (<strong>UM</strong> <strong>EN</strong> <strong>ASI</strong> MA IL UNI) user manual.<br />
2.1.4 Mounting the AS-Interface Master for Inline (<strong>ASI</strong> MA IL UNI)<br />
In order to ensure reliable operation, an AS-i master must be integrated into an Inline station<br />
as follows:<br />
1 End clamp (e.g., CLIPFIX 35, Order No. 3022218)<br />
2 Bus coupler<br />
3 AS-i master for Inline<br />
4 Terminals appropriate to the application (optional)<br />
5 End plate<br />
1<br />
online<strong>com</strong>ponents.<strong>com</strong><br />
Figure 2-4<br />
1<br />
2<br />
3<br />
4<br />
BA<br />
RC<br />
1 2<br />
11<br />
22<br />
33<br />
44<br />
2 4<br />
3 4 5<br />
RD UL US<br />
LD<br />
1 2<br />
11<br />
22<br />
33<br />
44<br />
1 2<br />
11<br />
22<br />
33<br />
44<br />
<strong>UM</strong><br />
1 2<br />
1<br />
2<br />
3<br />
4<br />
1<br />
2<br />
3<br />
4<br />
D<br />
CFG<br />
<strong>ASI</strong><br />
TR<br />
1 2<br />
1<br />
2<br />
3<br />
4<br />
<strong>ASI</strong> MA IL UNI<br />
Ord.-No.: 27 36 62 8<br />
Structure of an Inline station with an AS-i master<br />
MODE<br />
SET<br />
1<br />
2<br />
3<br />
4<br />
AS-I<br />
PRJ<br />
PRG<br />
1 2<br />
1<br />
2<br />
3<br />
4<br />
1<br />
7027002<br />
2-4 PHO<strong>EN</strong>IX CONTACT 7513_en_01
AS-Interface Masters/Gateways<br />
Snapping the Inline AS-i<br />
master onto the DIN rail<br />
• Before snapping on the AS-i master, remove the inserted connectors and the adjacent<br />
connector from the neighboring terminal on the left.<br />
• Snap the AS-i master onto the DIN rail (A).<br />
• Ensure that the featherkeys and keyways on the adjacent terminals are securely<br />
interlocked (B).<br />
1A<br />
1B<br />
Figure 2-5<br />
Snapping the AS-i master onto the DIN rail<br />
Inserting the connectors • Insert the connectors in the specified order (1, 2).<br />
Figure 2-6<br />
1<br />
2<br />
63410003<br />
56821002<br />
Inserting the connectors<br />
online<strong>com</strong>ponents.<strong>com</strong><br />
7513_en_01 PHO<strong>EN</strong>IX CONTACT 2-5
<strong>UM</strong> <strong>EN</strong> <strong>FLX</strong> <strong>ASI</strong> <strong>SYS</strong> <strong>PRO</strong> <strong>INST</strong><br />
Terminal point<br />
assignment<br />
2.1.5 Connecting the AS-Interface Master for Inline<br />
(<strong>ASI</strong> MA IL UNI)<br />
Determining the process<br />
data length (connector 1)<br />
<br />
<br />
!<br />
"<br />
Figure 2-7<br />
* O JA<br />
<br />
<br />
!<br />
Figure 2-8<br />
<br />
!<br />
"<br />
<br />
!<br />
"<br />
<br />
<br />
<br />
!<br />
"<br />
<br />
!<br />
"<br />
<br />
<br />
!<br />
"<br />
<br />
!<br />
"<br />
<br />
<br />
<br />
<br />
!<br />
"<br />
Terminal point assignment<br />
<br />
!<br />
"<br />
<br />
Determining the process data length<br />
To determine the process data length, insert wire jumpers in the configuration connector<br />
(connector 1) as shown in Figure 2-8 "Determining the process data length".<br />
J1 between 1.1 and 2.1<br />
J2 between 1.2 and 2.2<br />
J3 between 1.3 and 2.3<br />
online<strong>com</strong>ponents.<strong>com</strong><br />
<br />
!<br />
"<br />
<br />
<br />
!<br />
"<br />
% " ) #<br />
$ " & $ ! <br />
<br />
!<br />
"<br />
<br />
!<br />
"<br />
<br />
<br />
!<br />
"<br />
<br />
!<br />
"<br />
<br />
<br />
!<br />
"<br />
<br />
!<br />
"<br />
<br />
<br />
!<br />
"<br />
<br />
!<br />
"<br />
<br />
<br />
!<br />
"<br />
<br />
!<br />
"<br />
<br />
<br />
!<br />
"<br />
<br />
!<br />
"<br />
<br />
$ ! " ) <br />
<br />
!<br />
"<br />
The process data length may be between 2 bytes and 30 bytes. Please note the different<br />
levels according to Figure 2-8.<br />
AS-i connection<br />
(connector 2)<br />
Terminal Point Assignment<br />
1.1, 1.2, 1.3, 1.4 AS-i +<br />
2.1, 2.2, 2.3, 2.4 AS-i –<br />
2-6 PHO<strong>EN</strong>IX CONTACT 7513_en_01
2.1.6 Power Supply and AS-i Connection Method<br />
AS-Interface Masters/Gateways<br />
The AS-i master does not require a separate power supply. The <strong>com</strong>munications power of<br />
the AS-i master is supplied in full from the Inline Modular local bus. All the power for the ASi<br />
electronics is obtained directly from the AS-i network (current consumption around 200 mA<br />
from AS-i). An additional 24 V power supply is not required for the AS-i master. The AS-i<br />
master is simply integrated in the Inline Modular local bus and connected to the AS-i cable.<br />
The master starts working when the AS-i power supply unit is switched on.<br />
Like all other AS-i <strong>com</strong>ponents, the AS-i power supply unit is connected at any point in the<br />
AS-i network via the AS-i cable, see also "Power Supply Units" on page 3-1.<br />
2.1.7 Diagnostic and Status Indicators<br />
Figure 2-9<br />
,<br />
+ . /<br />
) 5 1<br />
6 4<br />
% " ) !<br />
<strong>ASI</strong> MA IL UNI with appropriate connectors<br />
online<strong>com</strong>ponents.<strong>com</strong><br />
, -<br />
Designation Color Meaning<br />
D Green LED Diagnostics<br />
ON<br />
Bus active<br />
Flashing<br />
0.5 Hz Supply present, bus not active<br />
2 Hz Bus active, I/O error<br />
4 Hz Cable interrupt before the master<br />
OFF No <strong>com</strong>munications power, bus not active<br />
5 - 6<br />
) 5 E<br />
2 4 /<br />
2 4 <br />
7513_en_01 PHO<strong>EN</strong>IX CONTACT 2-7
<strong>UM</strong> <strong>EN</strong> <strong>FLX</strong> <strong>ASI</strong> <strong>SYS</strong> <strong>PRO</strong> <strong>INST</strong><br />
Local bus module error<br />
Designation Color Meaning<br />
TR Green LED PCP <strong>com</strong>munication<br />
ON<br />
PCP channel not active<br />
OFF PCP channel active<br />
CFG Red LED AS-i configuration error or I/O error<br />
The 7-segment display indicates the lowest AS-i address<br />
at which a configuration or I/O error was detected. Once<br />
the error at this AS-i address has been removed, the next<br />
AS-i address at which an error was detected is displayed,<br />
if applicable.<br />
ON<br />
At least one slave address has a configuration error<br />
Flashing At least one AS-i slave has an I/O error<br />
OFF No error<br />
AS-i Green LED AS-i operating voltage<br />
ON<br />
AS-i operating voltage present<br />
OFF AS-i operating voltage not present<br />
PRG Green LED Automatic address programming<br />
ON<br />
Automatic address programming is possible.<br />
A slave is missing in the AS-i configuration and automatic<br />
addressing is activated in the gateway (default setting).<br />
When an appropriate new slave is connected the unused<br />
address is automatically assigned to it.<br />
OFF Automatic address programming is not possible. All<br />
slaves are present in the AS-i configuration or this<br />
function is deactivated in the gateway.<br />
PRJ Yellow LED Configuration mode<br />
ON<br />
Configuration mode is active<br />
OFF Configuration mode is not active<br />
The local bus module error can be configured so that the module error is triggered on an ASi<br />
power-fail (voltage interrupt) or AS-i configuration errors.<br />
2.1.8 Buttons<br />
online<strong>com</strong>ponents.<strong>com</strong><br />
Button<br />
MODE<br />
SET<br />
Meaning<br />
Activates and deactivates configuration mode, saves configuration data<br />
Modifies configuration data<br />
2-8 PHO<strong>EN</strong>IX CONTACT 7513_en_01
AS-Interface Masters/Gateways<br />
2.1.9 7-Segment Display<br />
The 7-segment display contains different information depending on the operating state:<br />
– During normal operation it displays a chasing light.<br />
– In the event of a configuration or I/O error, it displays the lowest AS-i address at which<br />
an error was detected.<br />
– In configuration mode it displays slave addresses or error messages.<br />
2.1.10 Removing the AS-Interface Master for Inline<br />
(<strong>ASI</strong> MA IL UNI)<br />
Removing the connector • If a labeling field is present, remove it.<br />
• Remove the connector by pressing the back shaft latching (1) and levering off the<br />
connector (2).<br />
Removing the Inline AS-i<br />
master from the DIN rail<br />
Figure 2-10<br />
Removing the connector<br />
• Before removing the base, remove all the connectors from the AS-i master and the<br />
connectors of the neighboring terminals (left and right).<br />
• Release the base by pressing on the front and back snap-on mechanisms (1) and pull<br />
it out perpendicular to the DIN rail (2).<br />
online<strong>com</strong>ponents.<strong>com</strong><br />
2<br />
1<br />
1<br />
2<br />
63410004<br />
1<br />
Figure 2-11<br />
56812005<br />
Removing the Inline AS-i master from the DIN rail<br />
For additional information please refer to the data sheet and the following documentation:<br />
User manual: Configuring and Installing the AS-Interface Gateway for Inline,<br />
<strong>UM</strong> <strong>EN</strong> <strong>ASI</strong> MA IL UNI User manual: Configuring and Installing the INTERBUS Inline<br />
Product Range, IB IL <strong>SYS</strong> <strong>PRO</strong> <strong>UM</strong> E<br />
7513_en_01 PHO<strong>EN</strong>IX CONTACT 2-9
<strong>PRO</strong>FIBUS<br />
<strong>UM</strong> <strong>EN</strong> <strong>FLX</strong> <strong>ASI</strong> <strong>SYS</strong> <strong>PRO</strong> <strong>INST</strong><br />
2.2 AS-Interface Gateway for <strong>PRO</strong>FIBUS with standard<br />
function <strong>FLX</strong> <strong>ASI</strong> MA PB SF<br />
2.2.1 Description<br />
Components<br />
The AS-i master (gateway) establishes the connection between <strong>PRO</strong>FIBUS DP and the AS-<br />
Interface system. From the point of view of the application program, the AS-i master is a<br />
slave, for the AS-Interface system it represents the master. The AS-i master can be ordered<br />
using Order No. 2773597.<br />
The AS-i master consists of the following <strong>com</strong>ponents:<br />
1 Diagnostic and status indicators<br />
2 7-segment display<br />
3 Two buttons for hand operations<br />
4 Ground<br />
5 AS-i power supply<br />
6 AS-i circle<br />
7 9-pos. D-SUB female connector for <strong>PRO</strong>FIBUS connection<br />
7<br />
4<br />
Figure 2-12<br />
AS-i master <strong>FLX</strong> <strong>ASI</strong> MA PB SF<br />
online<strong>com</strong>ponents.<strong>com</strong><br />
Features – Diagnostic and status indicators<br />
– Three-digit 7-segment display<br />
– AS-i connection via spring-cage terminal block<br />
– Up to 62 AS-i slaves with a maximum of 248 inputs and 248 outputs<br />
– Up to 100 m of cable in one AS-i system<br />
– AS-i specification 3.0<br />
– Master profil M4<br />
– IP20 protection<br />
power<br />
periphery fault<br />
6 6<br />
<strong>PRO</strong>FIBUS<br />
missing slave<br />
type conflict<br />
unknown slave<br />
U AS-i<br />
config error<br />
AS-i active<br />
Mode Set<br />
prg enable<br />
<strong>FLX</strong> <strong>ASI</strong> MA PB SF<br />
Order-No.: 2773 507<br />
<strong>ASI</strong><br />
+<strong>ASI</strong>- +<strong>ASI</strong>- +PWR-<br />
prj mode<br />
4<br />
5<br />
1<br />
2<br />
3<br />
7793a000<br />
2-10 PHO<strong>EN</strong>IX CONTACT 7513_en_01
AS-Interface Masters/Gateways<br />
2.2.2 Housing dimensions<br />
45<br />
44,33<br />
Connecting to<br />
<strong>PRO</strong>FIBUS DP<br />
<strong>PRO</strong>FIBUS DP slave<br />
AS-i master<br />
Startup<br />
120<br />
Figure 2-13<br />
2.2.3 Function<br />
7513A041<br />
Housing dimensions of the <strong>FLX</strong> <strong>ASI</strong> MA PB SF master in mm<br />
The AS-i master (gateway) establishes the connection between <strong>PRO</strong>FIBUS DP and the AS-<br />
Interface system. The primary task of the AS-i master is to transmit bits from the <strong>PRO</strong>FIBUS<br />
DP to the AS-i slaves (actuators) and bits from AS-i (sensors) to the <strong>PRO</strong>FIBUS DP.<br />
On one side, the AS-i master is controlled by the <strong>PRO</strong>FIBUS master, i.e., it represents a<br />
<strong>PRO</strong>FIBUS DPslave.<br />
On the other side, it is the AS-i master, i.e., it monitors the connected AS-i system<br />
andcontrols all processes on it. All AS-i functions can be called via <strong>PRO</strong>FIBUS DP,<br />
see "AS-i Fault Detector" on page 2-17.<br />
A device database file (GSD) is supplied with the devices, which enables the easy startupof<br />
the AS-i master for <strong>PRO</strong>FIBUS DP. A device database file (GSD) is supplied with the<br />
devices, which enables the easy startup of the AS-i master for <strong>PRO</strong>FIBUS DP. It is<br />
necessary to link a corresponding parameterization/programming software to a device<br />
description file (GSD) to start up AS-i masters. It can be downloaded free of charge at<br />
www.phoenixcontact.net/download.<br />
By default, the device is set to <strong>PRO</strong>FIBUS address 3. The <strong>PRO</strong>FIBUS address can be<br />
modified with two buttons, the three-digit display and the LEDs directly at the device. A<br />
detailed description can be found in the "AS-i-Gateways for <strong>PRO</strong>FIBUS" user manual,<br />
<strong>UM</strong> <strong>EN</strong> <strong>FLX</strong> <strong>ASI</strong> MA PB SF/EF.<br />
online<strong>com</strong>ponents.<strong>com</strong><br />
Configuration<br />
If no PC is available, startup, troubleshooting, and configuration on the AS-i system canalso<br />
be carried out directly on the device using the two buttons, the three-digit display, and the<br />
LEDs. This also includes the addressing of the connected slaves in your AS-i network.<br />
7513_en_01 PHO<strong>EN</strong>IX CONTACT 2-11
<strong>UM</strong> <strong>EN</strong> <strong>FLX</strong> <strong>ASI</strong> <strong>SYS</strong> <strong>PRO</strong> <strong>INST</strong><br />
Mounting/demounting the<br />
device on a DIN rail<br />
2.2.4 Mounting/demounting the Master <strong>FLX</strong> <strong>ASI</strong> MA PB SF<br />
power<br />
<strong>PRO</strong>FIBUS<br />
config error<br />
U AS-i<br />
AS-i active<br />
prg enable<br />
prj mode<br />
Mode<br />
Set<br />
Figure 2-14<br />
Mounting/demounting the device on a DIN rail<br />
• Assembly: Use a screwdriver to reach into the latch and pull the latch downwards (A).<br />
Snap the device directly onto a DIN rail (B).<br />
• Removal: Use a screwdriver to reach into the latch and pull the latch downwards (C).<br />
Pull the device out perpendicular to the DIN rail. Pull the device upwards away from the<br />
DIN rail (D).<br />
2.2.5 Connecting the Master <strong>FLX</strong> <strong>ASI</strong> MA PB SF<br />
online<strong>com</strong>ponents.<strong>com</strong><br />
Figure 2-15<br />
7793a001a<br />
2<br />
<strong>ASI</strong><br />
+<strong>ASI</strong>- +<strong>ASI</strong>- +PWR-<br />
B<br />
A<br />
7793a001c<br />
2<br />
1<br />
1 3<br />
7793a003<br />
Connecting Ground, AS-i circuit and AS-i power supply<br />
D<br />
C<br />
7793a001b<br />
• Connect the functional earth ground cable (2) to ground the module.<br />
• Connect the AS-i cables (1) to the corresponding terminals.<br />
• Connect the AS-i power supply (3).<br />
.<br />
CAUTION:<br />
Observe the required polarity.<br />
• Connect the <strong>PRO</strong>FIBUS to the 9-pin D-SUB female connector (see "Connection to<br />
<strong>PRO</strong>FIBUS DP" on page 2-13).<br />
2-12 PHO<strong>EN</strong>IX CONTACT 7513_en_01
AS-Interface Masters/Gateways<br />
Connection to<br />
<strong>PRO</strong>FIBUS DP<br />
'<br />
&<br />
%<br />
$<br />
#<br />
"<br />
!<br />
<br />
Figure 2-16<br />
% # ! ) &<br />
Connection to <strong>PRO</strong>FIBUS DP<br />
Pin Assignment<br />
3 RxD/TxD-P, cable B<br />
5 GND, reference potential up to +5 V<br />
6 +5V<br />
8 RxD/TxD-N, cable A<br />
2.2.6 Power Supply and AS-i Connection Method<br />
AS-i masters do not require a separate power supply. They are supplied in full from theASi<br />
cable (current consumption around 200 mA from AS-i). An additional 24 V powersupply is<br />
not required for the AS-i master. The AS-i master is simply connected to the AS-i cable. The<br />
master starts working when the power supply unit is switched on.<br />
Use a power supply unit that also supplies the AS-i master with voltage and, like all other<br />
AS-i <strong>com</strong>ponents, can be connected to the AS-i cable at any point, see also "Power Supply<br />
Units" on page 3-1.<br />
online<strong>com</strong>ponents.<strong>com</strong><br />
7513_en_01 PHO<strong>EN</strong>IX CONTACT 2-13
<strong>UM</strong> <strong>EN</strong> <strong>FLX</strong> <strong>ASI</strong> <strong>SYS</strong> <strong>PRO</strong> <strong>INST</strong><br />
2.2.7 Diagnostic and Status Indicators<br />
power<br />
<strong>PRO</strong>FIBUS<br />
config error<br />
U AS-i<br />
AS-i active<br />
prg enable<br />
prj mode<br />
Figure 2-17<br />
2.2.8 Buttons<br />
Diagnostic and Status Indicators<br />
Designation Colour Meaning<br />
power green Electronics module operating voltage<br />
<strong>PRO</strong>FIBUS green/red Module/network status<br />
config error red AS-i configuration error<br />
U AS-i green AS-i operating voltage<br />
AS-i active green AS-i transmission<br />
green flashing<br />
B slave indicator<br />
prg enable green Programming mode active<br />
prj mode yellow Configuration mode active<br />
Button<br />
Meaning<br />
Mode Activates and deactivates configuration mode, saves configuration data<br />
Set<br />
Modifies configuration data<br />
7793A005<br />
online<strong>com</strong>ponents.<strong>com</strong><br />
Further technical information can be found in the data sheet and in the user manual:<br />
AS-i-Gateways for <strong>PRO</strong>FIBUS, <strong>UM</strong> <strong>EN</strong> <strong>FLX</strong> <strong>ASI</strong> MA PB SF/EF<br />
2-14 PHO<strong>EN</strong>IX CONTACT 7513_en_01
<strong>PRO</strong>FIBUS<br />
AS-Interface Masters/Gateways<br />
2.3 AS-Interface Gateway for <strong>PRO</strong>FIBUS with<br />
extended function <strong>FLX</strong> <strong>ASI</strong> MA 2 PB EF<br />
2.3.1 Description<br />
Components<br />
The AS-i master (gateway) establishes the connection between <strong>PRO</strong>FIBUS DP and the AS-<br />
Interface system. From the point of view of the application program, the AS-i master<br />
represents a slave, for the AS-Interface system it represents the master.<br />
The AS-i gateway with extended functions can be used to connect two AS-i circuits.The<br />
AS-i master can be ordered using Order No. 2773607.<br />
The AS-i master consists of the following <strong>com</strong>ponents:<br />
1 RS 232 connection<br />
2 Diagnostic and status indicators<br />
3 Three-digit LCD for displaying the respective operating state of the device and the<br />
configuration menu<br />
4 Four buttons for hand operations<br />
5 Ground<br />
6 AS-i power supply, circuit 2<br />
7 AS-i circle 2<br />
8 AS-i power supply, circuit 1<br />
9 AS-i circle 1<br />
10 3<br />
online<strong>com</strong>ponents.<strong>com</strong><br />
Figure 2-18<br />
5<br />
RS 232<br />
power<br />
<strong>PRO</strong>FIBUS<br />
Mode<br />
Set<br />
U AS-i<br />
config error<br />
<strong>FLX</strong> <strong>ASI</strong> MA 2PBEF<br />
Order-No.: 27 73 607<br />
ESC OK<br />
PWR<br />
+<strong>ASI</strong>1- +<strong>ASI</strong>2- +<strong>ASI</strong>2-<br />
+<strong>ASI</strong>1-<br />
AS-i active<br />
PWR<br />
6<br />
5<br />
7<br />
8<br />
9 7810a000<br />
AS-i master <strong>FLX</strong> <strong>ASI</strong> MA 2 PB EF<br />
prg enable<br />
prj mode<br />
1<br />
2<br />
4<br />
7513_en_01 PHO<strong>EN</strong>IX CONTACT 2-15
<strong>UM</strong> <strong>EN</strong> <strong>FLX</strong> <strong>ASI</strong> <strong>SYS</strong> <strong>PRO</strong> <strong>INST</strong><br />
Features – Double master<br />
– Diagnostic and status indicators<br />
– Three-digit LCD<br />
– AS-i connection via spring-cage terminal block<br />
– Up to 62 AS-i slaves with a maximum of 248 inputs and 248 outputs<br />
– Up to 100 m of cable in one AS-i system<br />
– Integrated AS-i Fault Detector<br />
– AS-i specification 3.0<br />
– Master profil M4<br />
– IP20 protection<br />
Connecting to<br />
<strong>PRO</strong>FIBUS DP<br />
2.3.2 Housing dimensions<br />
120<br />
Figure 2-19<br />
75<br />
2.3.3 Function<br />
Housing dimensions of the <strong>FLX</strong> <strong>ASI</strong> MA 2 PB EF master in mm<br />
online<strong>com</strong>ponents.<strong>com</strong><br />
The AS-i master (gateway) establishes the connection between <strong>PRO</strong>FIBUS DP and the AS-<br />
Interface system. The primary task of the AS-i master is to transmit bits from the <strong>PRO</strong>FIBUS<br />
DP to the AS-i slaves (actuators) and bits from AS-i (sensors) to the <strong>PRO</strong>FIBUS DP.<br />
83<br />
7513A040<br />
<strong>PRO</strong>FIBUS DP slave<br />
AS-i master<br />
On one side, the AS-i master is controlled by the <strong>PRO</strong>FIBUS master, i.e., it represents a<br />
<strong>PRO</strong>FIBUS DPslave.<br />
On the other side, it is the AS-i master, i.e., it monitors the connected AS-i system<br />
andcontrols all processes on it. All AS-i functions can be called via <strong>PRO</strong>FIBUS DP.<br />
2-16 PHO<strong>EN</strong>IX CONTACT 7513_en_01
AS-Interface Masters/Gateways<br />
AS-i Fault Detector<br />
Functions of the AS-i Fault Detector:<br />
Duplicate address‘ recognition<br />
If two slaves have the same address in an AS-i circuit, a duplicate address exists. Because<br />
of this error the master can not send a request to each slave separately. At that time both<br />
repsonses overlap themselves on the line, it is impossible for the master to recognize the<br />
slave response safely. It exists an unstable network behaviour.<br />
The function "duplicate address‘ recognition" allows to recognize a duplicate address and<br />
to indicate this via the superior fieldbus. By voltage reset at the AS-i circuit 1 the <strong>com</strong>plete<br />
gateway with enhanced function range will be shut down. The respective bits ground fault,<br />
over-voltage, noise, double address will only be set if AS-i masters are used that support<br />
these functions. A duplicate address causes a configuration error and will be shown in the<br />
display of the master.<br />
Duplicate addresses can be recognized only in the AS-i segment directly at the master. If<br />
both slaves participate in a duplicate address located behind a repeater, the duplicate<br />
address‘ recognition is impossible.<br />
Earth Fault Detector<br />
An Earth Fault exists when the voltage U GND (Nominal value of U GND =0,5 U AS-i )<br />
is outside of the following range:<br />
10% U AS-i < U GND < 90% U AS-i<br />
This error limits the fail-safe characteristic of the AS-i transmission substantially. Ground<br />
faults are indicated on the masters display.<br />
For recognition of earth faults the master must be grounded with the function earth.<br />
Noise Detector<br />
The noise detector detects alternating voltages on AS-i, which are not produced by AS-i<br />
master or AS-i slaves. These interference voltages can cause telegram disturbances. A<br />
frequent cause are insufficiently shielded frequency inverters or awkwardly shifted cables.<br />
Noises are indicated in the master´s display as well as via the upstream fieldbus.<br />
Overvoltage Detector<br />
Overvoltages are present, if the AS-i line, whose conductors lie normally electrically<br />
symmetrically to the plant earth, are strongly electrically raised. A cause can be e.g. poweron<br />
procedures of large consumers. However sometimes overvoltages don‘t generally<br />
disturb AS-i <strong>com</strong>munication, but can release incorrect signals of sensors. Overvoltages are<br />
indicated in the master´s display as well as via the upstream fieldbus.<br />
online<strong>com</strong>ponents.<strong>com</strong><br />
Startup<br />
A device database file (GSD) is supplied with the devices, which enables the easy startupof<br />
the AS-i master for <strong>PRO</strong>FIBUS DP. A device database file (GSD) is supplied with the<br />
devices, which enables the easy startup of the AS-i master for <strong>PRO</strong>FIBUS DP. It is<br />
necessary to link a corresponding parameterization/programming software to a device<br />
description file (GSD) to start up AS-i masters. It can be downloaded free of charge at<br />
www.phoenixcontact.net/download.<br />
By default, the device is set to <strong>PRO</strong>FIBUS address 3. The <strong>PRO</strong>FIBUS address can be<br />
modified with two buttons, the three-digit display and the LEDs directly at the device.<br />
7513_en_01 PHO<strong>EN</strong>IX CONTACT 2-17
<strong>UM</strong> <strong>EN</strong> <strong>FLX</strong> <strong>ASI</strong> <strong>SYS</strong> <strong>PRO</strong> <strong>INST</strong><br />
Configuration<br />
You may also start up, troubleshoot, and configure the AS-i systems with the help of the<br />
buttons or the multi-line LCD directly on the device. All functions required can be<br />
conveniently carried out in the advanced display mode.<br />
A detailed description of the menu structure is supplied with the device. For more detailed<br />
information, please refer to the user manual: <strong>UM</strong> <strong>EN</strong> <strong>FLX</strong> <strong>ASI</strong> MA PB SF/EF<br />
2.3.4 Mounting/demounting the Master <strong>FLX</strong> <strong>ASI</strong> MA 2 PB EF<br />
Mounting/demounting the<br />
device on a DIN rail<br />
Figure 2-20<br />
7810a001<br />
Mounting/demounting the device on a DIN rail<br />
• Assembly: Use a screwdriver to reach into the latch and pull the latch downwards (A).<br />
Snap the device directly onto a DIN rail (B).<br />
• Removal: Use a screwdriver to reach into the latch and pull the latch downwards (C).<br />
Pull the device out perpendicular to the DIN rail. Pull the device upwards away from the<br />
DIN rail (D).<br />
online<strong>com</strong>ponents.<strong>com</strong><br />
B<br />
A<br />
7793a001c<br />
D<br />
C<br />
7793a001b<br />
2-18 PHO<strong>EN</strong>IX CONTACT 7513_en_01
2.3.5 Connecting the Master <strong>FLX</strong> <strong>ASI</strong> MA 2 PB EF<br />
AS-Interface Masters/Gateways<br />
ESC<br />
Set<br />
OK<br />
5<br />
4<br />
Figure 2-21<br />
Connecting Ground, AS-i circuit and AS-i power supply<br />
• Connect the functional earth ground cable (1) to ground the module.<br />
• Connect the AS-i cables (3, 5) to the corresponding terminals.<br />
• Connect the AS-i power supply (2, 4).<br />
.<br />
1<br />
+<strong>ASI</strong>1-<br />
CAUTION:<br />
Observe the required polarity.<br />
PWR<br />
PWR<br />
+<strong>ASI</strong>1- +<strong>ASI</strong>2- +<strong>ASI</strong>2-<br />
• Connect the <strong>PRO</strong>FIBUS to the 9-pin D-SUB female connector (see "Connection to<br />
<strong>PRO</strong>FIBUS DP" on page 2-20).<br />
online<strong>com</strong>ponents.<strong>com</strong><br />
1<br />
2<br />
3<br />
7810a002<br />
7513_en_01 PHO<strong>EN</strong>IX CONTACT 2-19
<strong>UM</strong> <strong>EN</strong> <strong>FLX</strong> <strong>ASI</strong> <strong>SYS</strong> <strong>PRO</strong> <strong>INST</strong><br />
Connection to<br />
<strong>PRO</strong>FIBUS DP<br />
'<br />
&<br />
%<br />
$<br />
#<br />
"<br />
!<br />
<br />
% # ! ) &<br />
Figure 2-22<br />
Connection to <strong>PRO</strong>FIBUS DP<br />
Pin Assignment<br />
3 RxD/TxD-P, cable B<br />
5 GND, reference potential up to +5 V<br />
6 +5V<br />
8 RxD/TxD-N, cable A<br />
2.3.6 Power Supply and AS-i Connection Method<br />
AS-i masters do not require a separate power supply. They are supplied in full from the<br />
AS-i cable (current consumption around 200 mA from AS-i). An additional 24 V powersupply<br />
is not required for the AS-i master. The AS-i master is simply connected to theAS-i cable.<br />
The master starts working when the power supply unit is switched on.<br />
Use a power supply unit that also supplies the AS-i master with voltage and, like all other<br />
AS-i <strong>com</strong>ponents, can be connected to the AS-i cable at any point, see also "Power Supply<br />
Units" on page 3-1.<br />
online<strong>com</strong>ponents.<strong>com</strong><br />
2-20 PHO<strong>EN</strong>IX CONTACT 7513_en_01
2.3.7 Diagnostic and Status Indicators<br />
AS-Interface Masters/Gateways<br />
power<br />
<strong>PRO</strong>FIBUS<br />
config error<br />
U AS-i<br />
AS-i active<br />
prg enable<br />
prj mode<br />
Figure 2-23<br />
2.3.8 Buttons<br />
Diagnostic and Status Indicators<br />
Designation Colour Meaning<br />
power green Electronics module operating voltage<br />
<strong>PRO</strong>FIBUS green/red Module/network status<br />
config error red AS-i configuration error<br />
U AS-i green AS-i operating voltage<br />
AS-i active green AS-i transmission<br />
green flashing<br />
B slave indicator<br />
prg enable green Programming mode active<br />
prj mode yellow Configuration mode active<br />
Button<br />
Mode<br />
Set<br />
ESC<br />
OK<br />
7793A005<br />
Meaning<br />
Activates and deactivates configuration mode, saves configuration data<br />
Modifies configuration data<br />
Change mode,<br />
Change to next lower menu,<br />
Change editing<br />
Change mode,<br />
Change to next higher menu,<br />
Confirm selection<br />
online<strong>com</strong>ponents.<strong>com</strong><br />
Further technical information can be found in the data sheet and in the user manual:<br />
AS-i-Gateways for <strong>PRO</strong>FIBUS, <strong>UM</strong> <strong>EN</strong> <strong>FLX</strong> <strong>ASI</strong> MA PB SF/EF.<br />
7513_en_01 PHO<strong>EN</strong>IX CONTACT 2-21
<strong>UM</strong> <strong>EN</strong> <strong>FLX</strong> <strong>ASI</strong> <strong>SYS</strong> <strong>PRO</strong> <strong>INST</strong><br />
online<strong>com</strong>ponents.<strong>com</strong><br />
2-22 PHO<strong>EN</strong>IX CONTACT 7513_en_01
Power Supply Units<br />
3 Power Supply Units<br />
3.1 Description<br />
Device view, connections,<br />
and operating elements<br />
Power supply units greatly influence the availability and operational reliability of electrical<br />
systems. Therefore, the power supply unit should be chosen as carefully as all the other<br />
system <strong>com</strong>ponents. Universal power supply units must meet all the necessary<br />
requirements. This increases the reliability of electrical systems.<br />
<strong>ASI</strong> QUINT power supply units supply the AS-i system with the power required. In order to<br />
minimize the number of terminal points, a single two-wire cable is used to transmit<br />
information and supply power. AS-i power supply units use an integrated filter to ensure that<br />
the modulated data flow is not affected.<br />
online<strong>com</strong>ponents.<strong>com</strong><br />
Figure 3-1<br />
Device view, connections, and operating elements of the<br />
<strong>ASI</strong> QUINT 100-240/2.4 A EFD power supply unit<br />
1 AC input: 85 - 264 V AC input voltage,<br />
45 Hz - 65 Hz frequency<br />
DC input: 90 - 250 V DC input voltage<br />
5 Red EFD indicator<br />
2 DC output: 30 V DC output voltage 6 Reset button<br />
3 Floating EFD output 7 EFD internal/external switch<br />
4 Green DC OK indicator 8 UTA 107 universal DIN rail adapter<br />
7513_en_01 PHO<strong>EN</strong>IX CONTACT 3-1
<strong>UM</strong> <strong>EN</strong> <strong>FLX</strong> <strong>ASI</strong> <strong>SYS</strong> <strong>PRO</strong> <strong>INST</strong><br />
3.2 Product Versions for the AS-Interface System<br />
The following power supply units are available from Phoenix Contact for the AS-i system:<br />
Description Order Designation Order No.<br />
Primary-switched power supply unit <strong>ASI</strong> QUINT 100-240/2.4 A EFD 2736686<br />
Primary-switched power supply unit <strong>ASI</strong> QUINT 100-240/4.8 A EFD 2736699<br />
One cable –<br />
two functions<br />
Safety through automatic<br />
ground fault detection<br />
Universal use<br />
Integrated harmonic filter<br />
Wide range of<br />
applications<br />
3.3 Function<br />
Thanks to its simplified installation technology, AS-Interface offers further potential savings.<br />
In order to minimize the number of terminal points, a single two-wire cable is used to<br />
transmit information and supply power.<br />
AS-i power supply units use an integrated filter to ensure that the modulated data flow is not<br />
affected. In addition, the short-circuit-proof and idling-proof voltage output provides a power<br />
reserve of around 60%. This means that even loads with high inrush currents can start<br />
safely.<br />
If there are two ground faults in an AS-i system, this can result in undesired machine startup<br />
or it no longer being possible to stop the machine. In order to prevent this, the<br />
AS-i power supply units from Phoenix Contact indicate the first ground fault. The message<br />
is indicated on the device via LEDs and via an output. In the configuration set upon delivery,<br />
the alarm output signal can be used to selectively stop the system via the control program.<br />
As an alternative, it is possible to configure the AS-i power supply unit so that the AS-i<br />
voltage switches off automatically when a ground fault is detected. Dangerous states for<br />
operating personnel and for machines/systems are thus prevented in advance.<br />
The wide-range input, which can be used to operate the AS-i power supply units from<br />
Phoenix Contact on all popular single-phase AC and DC networks, supports universal use.<br />
<strong>EN</strong> 61000-3-2 came into force on January 1, 2001. As of this date, all primary-switched<br />
power supply units, which are connected directly to the public low-voltage network, must be<br />
fitted with a harmonic filter in order to suppress the supply of high-frequency reverse<br />
currents into the power supply <strong>com</strong>pany's network. All AS-i power supply units from<br />
Phoenix Contact are fitted with an active PFC filter (Power Factor Correction). In addition to<br />
the filter function, this circuit ensures mains buffering of more than 40 ms across the entire<br />
input voltage range.<br />
online<strong>com</strong>ponents.<strong>com</strong><br />
The <strong>ASI</strong> QUINT 100-240/2.4 EFD and <strong>ASI</strong> QUINT 100-240/4.8 EFD power supply units<br />
meet the requirements of <strong>EN</strong> 55022 Class B with regard to noise immunity and noise<br />
emission. The devices are therefore suitable for universal use – both under extreme<br />
industrial conditions and in sensitive office and residential areas.<br />
For additional information, please refer to the data sheets for the power supply units or the<br />
<strong>SYS</strong> POWER SUPPLY <strong>UM</strong> E user manual (Order No. 2745855).<br />
3-2 PHO<strong>EN</strong>IX CONTACT 7513_en_01
Power Supply Units<br />
3.4 Housing Dimensions of the Power Supply Units<br />
125<br />
Figure 3-2<br />
145<br />
Housing dimensions of the <strong>ASI</strong> QUINT 100-240/2.4 A EFD<br />
power supply unit in mm<br />
online<strong>com</strong>ponents.<strong>com</strong><br />
145<br />
55<br />
125<br />
7513A019<br />
70<br />
7513A020<br />
Figure 3-3<br />
Housing dimensions of the <strong>ASI</strong> QUINT 100-240/4.8 A EFD<br />
power supply unit in mm<br />
7513_en_01 PHO<strong>EN</strong>IX CONTACT 3-3
<strong>UM</strong> <strong>EN</strong> <strong>FLX</strong> <strong>ASI</strong> <strong>SYS</strong> <strong>PRO</strong> <strong>INST</strong><br />
3.5 Mounting/Removing Power Supply Units<br />
CAUTION:<br />
Never carry out work when voltage is present.<br />
CAUTION: Explosion hazard<br />
Never carry out work when voltage is present.<br />
CAUTION:<br />
In order to ensure sufficient convection, a minimum spacing of 5 cm must be maintained<br />
between other modules above and below the device.<br />
Side spacing between other modules is not required in order to ensure correct device<br />
function.<br />
The housing temperature can reach high values depending on the ambient temperature<br />
and device load.<br />
3.5.1 Mounting on the DIN Rail (Narrow Mounting Position)<br />
Figure 3-4<br />
DIN rail mounting/removal<br />
The power supply unit can be snapped onto all 35 mm DIN rails according to <strong>EN</strong> 60715. It<br />
should be mounted horizontally (with the input terminals facing downwards).<br />
online<strong>com</strong>ponents.<strong>com</strong><br />
3-4 PHO<strong>EN</strong>IX CONTACT 7513_en_01
Power Supply Units<br />
3.5.2 Mounting on the DIN Rail (Flat Mounting Position)<br />
Figure 3-5<br />
Flat mounting position with UTA 107 universal DIN rail adapter<br />
The device is supplied as standard for a narrow mounting position. A flat mounting position<br />
is achieved by mounting the device at a 90° angle to the DIN rail.<br />
To do this, mount the UTA 107 DIN rail adapter as shown in Figure 3-5 (Torx T10 mounting<br />
screws, tightening torque of 0.8 - 0.9 Nm (7 - 8 lb in)). No additional mounting material is<br />
required.<br />
3.6 Connecting the Power Supply Units<br />
The device is equipped with plug-in spring-cage terminals. This enables fast device<br />
connection and visible isolation of the electrical connection, if required.<br />
CAUTION:<br />
Connectors may only be operated when the power is switched off.<br />
The following cable cross-sections can be connected:<br />
Solid [mm 2 ] Stranded [mm 2 ] AWG Stripping Length L [mm]<br />
0.2 - 2.5 0.2 - 2.5 24 - 12 10<br />
online<strong>com</strong>ponents.<strong>com</strong><br />
In order to <strong>com</strong>ply with UL approval, use copper cables that are designed for operating<br />
temperatures > 75°C. For reliable and safe-to-touch connections, strip the cable ends<br />
according to Figure 3-6.<br />
Figure 3-6<br />
Stripping length<br />
NOTE:<br />
Each AS-Interface system may only be supplied by one AS-Interface power supply unit.<br />
7513_en_01 PHO<strong>EN</strong>IX CONTACT 3-5
<strong>UM</strong> <strong>EN</strong> <strong>FLX</strong> <strong>ASI</strong> <strong>SYS</strong> <strong>PRO</strong> <strong>INST</strong><br />
online<strong>com</strong>ponents.<strong>com</strong><br />
3-6 PHO<strong>EN</strong>IX CONTACT 7513_en_01
Slaves<br />
4 Slaves<br />
Up to 62 slaves can be connected to the AS-Interface system (master/slave structure). Up<br />
to three actuators and/or four sensors can be connected to each slave. The master<br />
permanently monitors the slaves by scanning them cyclically. For maximum expansion, the<br />
cycle time is less than 10 ms; the maximum cycle time may increase when certain profiles<br />
are used. The cycle time adjusts automatically to the number of connected slaves<br />
(6 slaves around 1 ms, 31 slaves around 5 ms).<br />
Versions<br />
4.1 Description for Fieldline Extension<br />
AS-i M12 Devices<br />
The Fieldline Extension AS-Interface product group includes digital slave devices with the<br />
following functions:<br />
- DI Digital input devices acquire digital control signals from the process level. These signals are<br />
transferred to the higher-level automation equipment via the bus. The signal status is<br />
indicated on the device using LEDs. Sensors are connected via M12 screw connectors. The<br />
sensors are supplied from the sensor voltage U LS (26.5 V to 31.6 V from AS-Interface).<br />
- DO Digital output devices transfer the digital control signals from the automation equipment to<br />
the process level at the actuators. For the specified load currents for the outputs of the<br />
various devices, please refer to the data sheet. The signal status is indicated on the device<br />
using LEDs. Actuators are connected via M12 screw connectors. The outputs are<br />
short-circuit-proof. The actuators are supplied from the auxiliary voltage U AUX<br />
(20 V DC PELV to 30 V DC PELV).<br />
- DIO Digital I/O devices have digital inputs and digital outputs with the same properties as the<br />
input and output devices.<br />
Connections<br />
Degree of protection<br />
The bus and supply are connected to the AS-i flat-ribbon cable using the penetration<br />
technique. The I/O devices are connected via M12 connectors using SPEEDCON fast<br />
connection technology.<br />
The devices have IP65/67 protection.<br />
online<strong>com</strong>ponents.<strong>com</strong><br />
7513_en_01 PHO<strong>EN</strong>IX CONTACT 4-1
<strong>UM</strong> <strong>EN</strong> <strong>FLX</strong> <strong>ASI</strong> <strong>SYS</strong> <strong>PRO</strong> <strong>INST</strong><br />
4.1.1 Housing Versions for Fieldline Extension AS-i M12 Devices<br />
Two housing versions are available for Fieldline Extension AS-i M12 devices.<br />
I1<br />
I2<br />
I1<br />
I2<br />
7472c001<br />
Figure 4-1 Housing versions for Fieldline Extension AS-i M12 devices<br />
A<br />
B<br />
PWR<br />
FAULT<br />
<strong>FLX</strong> <strong>ASI</strong> DI 4 M12<br />
Order-No.: 27 73 42 9<br />
I3 I4<br />
ADDR<br />
Digital devices (DI/DO/DIO)<br />
Digital devices (DIO)<br />
online<strong>com</strong>ponents.<strong>com</strong><br />
PWR<br />
FAULT<br />
AUX<br />
I3<br />
O1<br />
O3<br />
I4<br />
O2<br />
<strong>FLX</strong> <strong>ASI</strong> DIO 4/3 M12-2A<br />
Order-No.: 27 73 44 5<br />
ADDR<br />
4-2 PHO<strong>EN</strong>IX CONTACT 7513_en_01
Slaves<br />
4.1.2 Housing Dimensions of Fieldline Extension<br />
AS-i M12 Devices<br />
155<br />
108<br />
34,5<br />
29<br />
46<br />
58<br />
35<br />
46<br />
34,5<br />
29<br />
Figure 4-2<br />
118<br />
150<br />
Figure 4-3<br />
190<br />
118<br />
Housing dimensions of Fieldline Extension AS-i M12 devices (DI/DO/DIO)<br />
in mm<br />
Housing dimensions of Fieldline Extension AS-i M12 devices (DIO) in mm<br />
online<strong>com</strong>ponents.<strong>com</strong><br />
58<br />
108<br />
7465c002<br />
7509b003<br />
7513_en_01 PHO<strong>EN</strong>IX CONTACT 4-3
<strong>UM</strong> <strong>EN</strong> <strong>FLX</strong> <strong>ASI</strong> <strong>SYS</strong> <strong>PRO</strong> <strong>INST</strong><br />
4.1.3 Basic Structure of Fieldline Extension AS-i M12 Devices<br />
Figure 4-4 shows the basic structure of the devices. Depending on the device function, the<br />
device may not have all of the elements shown. These elements are marked with an<br />
asterisk.<br />
9<br />
1<br />
Figure 4-4<br />
1 Top and bottom mounting holes<br />
2 Connections for inputs<br />
3 Connections for outputs<br />
4 Connection to AS-i (bus and power supply)<br />
5 Connection to auxiliary voltage AUX*<br />
8<br />
7<br />
6<br />
4 4<br />
5*<br />
7513B007<br />
Basic structure of Fieldline Extension AS-i M12 devices<br />
online<strong>com</strong>ponents.<strong>com</strong><br />
1<br />
2<br />
3<br />
5*<br />
6 Status indicators for AS-i power supply<br />
7 Status indicators for the outputs<br />
8 Status indicators for the inputs<br />
9 Slot for self-adhesive labeling field<br />
4-4 PHO<strong>EN</strong>IX CONTACT 7513_en_01
Slaves<br />
4.1.4 Mounting Fieldline Extension AS-i M12 Devices<br />
Fieldline Extension AS-i devices can be mounted directly on the machine. They can be<br />
screwed onto flat surfaces or snapped onto a DIN rail.<br />
The mounting surface must be flat to avoid strain in the housing when tightening the<br />
screws.<br />
Mounting with<br />
screws<br />
The devices can be mounted directly on the mounting surface using two or more mounting<br />
holes (1) in Figure 4-5. The diameter of the mounting holes is 4 mm, the cylindrical sinking<br />
is 8 mm. For the drill hole spacing, please refer to the dimensional drawings on page 4-3.<br />
Figure 4-5<br />
Front mounting of Fieldline Extension AS-i M12 device<br />
online<strong>com</strong>ponents.<strong>com</strong><br />
2<br />
1 1<br />
7513c010<br />
Tighten the mounting screws on the support plate with a maximum of 0.8 Nm.<br />
Use the protection against unlocking (<strong>FLX</strong> <strong>ASI</strong> M12 FS, Order No. 2773539) to prevent<br />
the device from getting unlocked unintentionally. Screw the protection against unlocking<br />
to one of the mounting holes (1) in Figure 4-5.<br />
2<br />
7513_en_01 PHO<strong>EN</strong>IX CONTACT 4-5
<strong>UM</strong> <strong>EN</strong> <strong>FLX</strong> <strong>ASI</strong> <strong>SYS</strong> <strong>PRO</strong> <strong>INST</strong><br />
DIN rail mounting<br />
Mounting<br />
• Place the device with the bottom metal edge (1) on the DIN rail.<br />
• Push the device forwards (A) until it snaps onto the DIN rail.<br />
A<br />
Figure 4-6<br />
Snapping the device onto the DIN rail<br />
Removing<br />
• Push the device forwards (B).<br />
• At the same time, push the device down (C), until it detaches from the DIN rail.<br />
Figure 4-7<br />
7513A036<br />
Removing the device from the DIN rail<br />
online<strong>com</strong>ponents.<strong>com</strong><br />
1<br />
B<br />
C<br />
7513A037<br />
4-6 PHO<strong>EN</strong>IX CONTACT 7513_en_01
Slaves<br />
4.1.5 Flat-Ribbon Cable<br />
A key electromechanical feature of AS-Interface is the flat-ribbon cable. This cable design<br />
is used because the AS-i cable should be contacted where possible without cutting off or<br />
stripping the sheath. In order to avoid the risk of polarity reversal of the wires, the flat-ribbon<br />
cable has a keyway at one end. Unless forced mechanically, the cable cannot be inserted<br />
incorrectly in the cable routing aids, which prevents unintentional polarity reversal. The<br />
trapezoidal cross-section of the cable makes it easier to seal the cable in the devices, thus<br />
providing IP67 protection.<br />
In addition to the mechanical keying, both wires in the flat-ribbon cable are color-coded: the<br />
positive cable has brown sheathing and the negative cable has light blue sheathing. The<br />
external sheath is usually yellow, and when the same cable type is used for the external<br />
auxiliary voltage of output devices with 24 V DC a black sheath is used.<br />
Figure 4-8<br />
2.5<br />
3.6<br />
7<br />
10<br />
AS-i flat-ribbon cable<br />
The cable sheath can consist of various different types of insulation material. For normal<br />
rubber cable, the sheath ensures that it automatically closes any contact points that have<br />
opened again. This effect is known as self-healing. This means that multiple contact and<br />
release is possible at the same point without adversely affecting the seal and the cable<br />
insulation.<br />
Other cable materials are also available, which have a high level of resistance to chemicals<br />
and can permanently withstand UV light. However, the selected material does affect the<br />
mechanical properties of the outer cable sheath.<br />
online<strong>com</strong>ponents.<strong>com</strong><br />
0.5<br />
2<br />
4<br />
7513A012<br />
7513_en_01 PHO<strong>EN</strong>IX CONTACT 4-7
<strong>UM</strong> <strong>EN</strong> <strong>FLX</strong> <strong>ASI</strong> <strong>SYS</strong> <strong>PRO</strong> <strong>INST</strong><br />
4.1.6 Penetration Technique<br />
For the AS-i flat-ribbon cable, the penetration technique is used as the connection method.<br />
The penetration technique enables contact to be established quickly, easily, and reliably<br />
between the cable and the device without having to strip or cut the cable in any way. No<br />
special tools are required.<br />
The electrical connection of cables in the flat-ribbon cable to the device is established via<br />
contact pins, which penetrate through the cable sheath to the copper conductors. This<br />
method is therefore only suitable because the position of the conductors in the cable is fixed<br />
and there is no braided shield to prevent penetration.<br />
Figure 4-9<br />
Cable connection using the penetration technique<br />
The cable support has negative contouring, which prevents incorrect insertion of the cable<br />
resulting in polarity reversal. When the device locking latch is closed, the contact pins<br />
automatically penetrate through the cable sheath and the conductor insulation into the litz<br />
wire structure. Following assembly, additional pressure is not required in order to ensure<br />
permanent contacting.<br />
The penetration technique used with AS-i means that the system can be installed extremely<br />
easily and quickly.<br />
online<strong>com</strong>ponents.<strong>com</strong><br />
4-8 PHO<strong>EN</strong>IX CONTACT 7513_en_01
Slaves<br />
4.1.7 Connecting AS-Interface and the Auxiliary Voltage AUX to<br />
M12 Devices<br />
A<br />
The connection to AS-Interface and the auxiliary voltage AUX is established by inserting the<br />
AS-i flat-ribbon cables in the corresponding cable routing aids in the mounting base of the<br />
device and then contacting the electronics module. Contact is established as soon as the<br />
locking latch snaps in.<br />
Proceed as follows:<br />
• Open the device by releasing the locking latch (A) and then pushing the electronics<br />
module until it engages with a click (B).<br />
• Insert the yellow flat-ribbon cable for the bus in the cable routing aid (AS-i) (C1).<br />
• If necessary, insert the black flat-ribbon cable for the auxiliary voltage AUX in the cable<br />
routing aid (C2).<br />
• Close the device by pushing the electronics module back to its original position until it<br />
engages with a click (D). Then close the locking latch (E). The device is connected to<br />
the AS-i cable(s) using the penetration technique by snapping in the locking latch.<br />
B<br />
Figure 4-10<br />
D<br />
Inserting the AS-i flat-ribbon cable<br />
online<strong>com</strong>ponents.<strong>com</strong><br />
C1<br />
C2<br />
E<br />
7472B004<br />
7513_en_01 PHO<strong>EN</strong>IX CONTACT 4-9
<strong>UM</strong> <strong>EN</strong> <strong>FLX</strong> <strong>ASI</strong> <strong>SYS</strong> <strong>PRO</strong> <strong>INST</strong><br />
To reverse the orientation of the cables, proceed as follows:<br />
• Remove the cable routing aid from the device using a screwdriver (A) and turn it over<br />
(B).<br />
• Insert the cabling routing aid in the device again (C). Insert the corresponding<br />
flat-ribbon cable in the cable routing aid (D).<br />
• Close the device by pushing the electronics module back to its original position until it<br />
engages with a click (E). Then close the locking latch.<br />
AS-i<br />
AUX<br />
A<br />
B<br />
Figure 4-11<br />
Reversing the cable orientation<br />
4.1.8 Pin Assignment of the Inputs and Outputs<br />
Figure 4-12<br />
AS-i<br />
AUX<br />
AS-i<br />
AUX<br />
$ $ # ) $<br />
Pin assignment of the inputs and outputs<br />
online<strong>com</strong>ponents.<strong>com</strong><br />
C<br />
Pin<br />
Female Input Connectors<br />
IN1 IN2 IN3 IN4<br />
1 IN+1 IN+2 IN+3 IN+4<br />
2 IN2 Not used IN4 Not used<br />
3 IN-1 IN-2 IN-3 IN-4<br />
4 IN1 IN2 IN3 IN4<br />
5 Not used<br />
Pin<br />
Female Output Connectors<br />
OUT1 OUT2 OUT3 OUT4<br />
1 Not used Not used Not used Not used<br />
2 OUT2 Not used OUT4 Not used<br />
3 OUT-1 OUT-2 OUT-3 OUT-4<br />
4 OUT1 OUT2 OUT3 OUT4<br />
5 Not used<br />
AS-i<br />
AUX<br />
E<br />
D<br />
7862B004<br />
The M12 connectors are designed for a tightening torque of 0.4 Nm.<br />
4-10 PHO<strong>EN</strong>IX CONTACT 7513_en_01
Slaves<br />
4.1.9 Labeling Fieldline Extension AS-i M12 Devices<br />
All Fieldline Extension AS-i M12 devices can be labeled individually.<br />
The following options are available:<br />
– Labeling each row of slots<br />
– Using a continuous labeling strip for all slots<br />
Description Designation Order No.<br />
Material for labeling individual slots<br />
BMKL 15 x 9 WH 803663<br />
(1 in Figure 4-13)<br />
Material for continuous labeling of all slots for devices BMKL 64 x 16 WH 8021807<br />
with four slots (2 in Figure 4-13)<br />
Material for continuous labeling of all slots for devices<br />
with eight slots (3 in Figure 4-13)<br />
BMKL 11,5<br />
(108X16) WH<br />
821797<br />
Figure 4-13<br />
1 2 3<br />
Labeling options<br />
All of the above labeling options are self-adhesive and supplied on DIN A4 sheets.<br />
online<strong>com</strong>ponents.<strong>com</strong><br />
For professional labeling, Phoenix Contact offers the CMS-MARK-WIN software<br />
(see Phoenix Contact CLIPLINE catalog).<br />
7513B029<br />
7513_en_01 PHO<strong>EN</strong>IX CONTACT 4-11
<strong>UM</strong> <strong>EN</strong> <strong>FLX</strong> <strong>ASI</strong> <strong>SYS</strong> <strong>PRO</strong> <strong>INST</strong><br />
4.1.10 Diagnostic and Status Indicators of Fieldline Extension<br />
AS-i M12 Devices<br />
Diagnostic indicators<br />
Status indicators<br />
Diagnostic indicators (green/yellow/red) indicate whether an error is present. In the event of<br />
an error, they indicate the error type and location. A Fieldline Extension AS-i M12 device is<br />
operating correctly if all of the green diagnostic indicators are on.<br />
Status indicators (yellow) indicate the signal status of the corresponding input/output. If the<br />
yellow status indicators are on, this indicates the signal status "1" of the I/O signal.<br />
Fieldline Extension AS-i M12 devices have two areas for diagnostic and status indicators.<br />
These areas are illustrated in Figure 4-14.<br />
Figure 4-14<br />
Main diagnostic and status indicators<br />
1 Inputs and outputs (device-specific)<br />
2 AS-i bus-specific indicators<br />
1<br />
2<br />
7513B008<br />
For additional information about the diagnostic and status indicators, please refer to the<br />
data sheet for the relevant device.<br />
online<strong>com</strong>ponents.<strong>com</strong><br />
4-12 PHO<strong>EN</strong>IX CONTACT 7513_en_01
Slaves<br />
4.1.11 Setting the Address for Fieldline Extension<br />
AS-i M12 Devices<br />
Before starting up a system with an AS-Interface system for the first time, all connected<br />
devices must be assigned an operating address. By default upon delivery, all devices have<br />
the address "zero". During address assignment, only one device may be addressed with<br />
"zero".<br />
Address programming via<br />
the master<br />
Address programming<br />
using an addressing<br />
device<br />
Addressing can be performed by the master via the AS-Interface cable. All devices must be<br />
connected individually and addressed directly.<br />
For additional information about address programming, please refer to "Address<br />
Assignment" on page 7-1.<br />
There is also the option of using an addressing device for manual addressing.<br />
To manually set the address of the device, proceed as follows:<br />
• Remove the protective cap (1) from the female addressing connector.<br />
• Connect the addressing device (Order No. 2741338) to the female addressing<br />
connector using the addressing cable (Order No. 2741341).<br />
• At the touch of a button, the address of the connected slave can be read and displayed<br />
on the LCD.<br />
• The address that is returned can be modified using the two arrow buttons in order to<br />
enter the new desired address.<br />
• Press the programming button to save the device address.<br />
• Disconnect the addressing device from the device.<br />
• Push the protective cap back onto the female addressing connector.<br />
1<br />
online<strong>com</strong>ponents.<strong>com</strong><br />
7472B006<br />
Figure 4-15<br />
Female addressing connector<br />
For additional information about addressing, please refer to the user manual:<br />
AS-Interface Addressing Device, <strong>ASI</strong> CC ADR <strong>UM</strong> E, Order No. 9013727<br />
7513_en_01 PHO<strong>EN</strong>IX CONTACT 4-13
<strong>UM</strong> <strong>EN</strong> <strong>FLX</strong> <strong>ASI</strong> <strong>SYS</strong> <strong>PRO</strong> <strong>INST</strong><br />
4.1.12 Replacing the Electronics Module<br />
If in the event of servicing it is necessary to replace the electronics module, proceed as<br />
follows:<br />
• Release the locking latch (A).<br />
• Remove the electronics module from the mounting base (B).<br />
• Make sure the arrows on the side of the electronics module and mounting base line up<br />
when snapping the electronics module onto the mounting base with the locking latch<br />
open (C).<br />
A<br />
B<br />
B<br />
C<br />
7513A033<br />
7513A034<br />
7513A035<br />
online<strong>com</strong>ponents.<strong>com</strong><br />
7513A032<br />
Figure 4-16<br />
Replacing the electronics module<br />
4-14 PHO<strong>EN</strong>IX CONTACT 7513_en_01
Slaves<br />
4.2 Description for Fieldline Extension<br />
AS-i M8 Devices<br />
Versions<br />
The Fieldline Extension AS-Interface product group includes digital slave devices with the<br />
following functions:<br />
- DI Digital input devices acquire digital control signals from the process level. These signals are<br />
transferred to the higher-level automation equipment via the bus. The signal status is<br />
indicated on the device using LEDs. Sensors are connected via M8 screw connectors. The<br />
sensors are supplied from the sensor voltage U LS (26.5 V to 31.6 V from AS-Interface).<br />
- DIO Digital I/O devices have digital inputs and digital outputs. They acquire digital control signals<br />
from the process level. These signals are transferred to the higher-level automation<br />
equipment via the bus. Sensors are connected via M8 screw connectors. The sensors are<br />
supplied from the sensor voltage U LS (26.5 V to 31.6 V from AS-Interface).<br />
Digital I/O devices transfer the digital control signals from the automation equipment to the<br />
process level at the actuators. For the specified load currents for the outputs of the various<br />
devices, please refer to the data sheet. Actuators are connected via M8 screw connectors.<br />
The outputs are short-circuit-proof. The actuators are supplied from the auxiliary voltage<br />
U AUX . The signal status is indicated on the device using LEDs.<br />
Connection<br />
Degree of protection<br />
The bus and supply (20 V DC PELV to 30 V DC PELV) are connected via an M12 screw<br />
connector using SPEEDCON fast connection technology. The I/O devices are connected<br />
via M8 connectors.<br />
The devices have IP65/67 protection.<br />
online<strong>com</strong>ponents.<strong>com</strong><br />
7513_en_01 PHO<strong>EN</strong>IX CONTACT 4-15
<strong>UM</strong> <strong>EN</strong> <strong>FLX</strong> <strong>ASI</strong> <strong>SYS</strong> <strong>PRO</strong> <strong>INST</strong><br />
4.2.1 Housing Versions for Fieldline Extension AS-i M8 Devices<br />
Independent of the bus system, two housing versions are available for Fieldline Extension<br />
AS-i M8 devices.<br />
A<br />
B<br />
Figure 4-17<br />
A<br />
B<br />
7513A001<br />
Housing versions for Fieldline Extension AS-i M8 devices<br />
Digital input device,<br />
connection to AS-i (bus and power supply via M12 connectors)<br />
Digital I/O device,<br />
connection to AS-i (bus and power supply via M12 connectors)<br />
online<strong>com</strong>ponents.<strong>com</strong><br />
4-16 PHO<strong>EN</strong>IX CONTACT 7513_en_01
Slaves<br />
4.2.2 Housing Dimensions of Fieldline Extension<br />
AS-i M8 Devices<br />
95<br />
105<br />
85<br />
Figure 4-18<br />
Figure 4-19<br />
29,8 26,5<br />
Housing dimensions of Fieldline Extension AS-i M8 devices in mm<br />
(digital input devices)<br />
133<br />
7513A002<br />
Housing dimensions of Fieldline Extension AS-i M8 devices in mm<br />
(digital I/O devices)<br />
online<strong>com</strong>ponents.<strong>com</strong><br />
143<br />
123<br />
40 7513A003<br />
7513_en_01 PHO<strong>EN</strong>IX CONTACT 4-17
<strong>UM</strong> <strong>EN</strong> <strong>FLX</strong> <strong>ASI</strong> <strong>SYS</strong> <strong>PRO</strong> <strong>INST</strong><br />
4.2.3 Basic Structure of Fieldline Extension AS-i M8 Devices<br />
Figure 4-20 shows the basic structure of Fieldline Extension AS-i M8 devices.<br />
1<br />
1 Top and bottom fixing clip<br />
2 Connections for inputs<br />
3 Connections for outputs<br />
4 Slot for labeling field<br />
Figure 4-20<br />
8<br />
7<br />
6<br />
7513A004<br />
Basic structure of Fieldline Extension AS-i M8 devices<br />
online<strong>com</strong>ponents.<strong>com</strong><br />
1<br />
5<br />
4<br />
2<br />
3<br />
5 Status indicators for AS-i power supply<br />
6 Connection for AS-i (bus and power supply)<br />
7 Status indicators for the outputs<br />
8 Status indicators for the inputs<br />
4-18 PHO<strong>EN</strong>IX CONTACT 7513_en_01
Slaves<br />
4.2.4 Mounting Fieldline Extension AS-i M8 Devices<br />
Fieldline Extension AS-i devices can be mounted directly on the machine. They can be<br />
screwed onto flat surfaces.<br />
The mounting surface must be flat to avoid strain in the housing when tightening the<br />
screws.<br />
Direct mounting The devices can be mounted directly on the mounting surface using two mounting holes (1)<br />
in Figure 4-21. The diameter of the mounting holes is 4 mm, the cylindrical sinking is 8 mm.<br />
For the drill hole spacing, please refer to the dimensional drawings in Figure 4-19 on<br />
page 4-17.<br />
Mounting on a<br />
mounting profile<br />
When mounting on a mounting profile, the mounting materials required are two screws with<br />
a diameter of 4 mm (M4) and a maximum head diameter of 7 mm and two retaining<br />
washers. The screws should have a minimum length of 30 mm.<br />
online<strong>com</strong>ponents.<strong>com</strong><br />
Figure 4-21<br />
1<br />
1<br />
DIO 4/4<br />
7513A009<br />
Front mounting of a Fieldline Extension AS-i M8 device<br />
Tighten the mounting screws with a maximum of 0.8 Nm.<br />
7513_en_01 PHO<strong>EN</strong>IX CONTACT 4-19
<strong>UM</strong> <strong>EN</strong> <strong>FLX</strong> <strong>ASI</strong> <strong>SYS</strong> <strong>PRO</strong> <strong>INST</strong><br />
4.2.5 Connecting AS-Interface and the Auxiliary Voltage AUX to<br />
M8 Devices<br />
For Fieldline Extension AS-i M8 devices, the AS-i bus and the power supply are connected<br />
via an M12 female connector. Fieldline Extension AS-i output devices also require the<br />
auxiliary voltage AUX, which is likewise connected via this M12 female connector.<br />
Connection<br />
All supply voltages are connected via an M12 connector.<br />
4.2.6 Pin Assignment of the AS-i Connection<br />
Figure 4-22<br />
Pin assignment of the AS-i connection<br />
Pin AS-i and AUX<br />
1 AS-i +<br />
2 AUX-<br />
3 AS-i -<br />
4 AUX+<br />
online<strong>com</strong>ponents.<strong>com</strong><br />
4-20 PHO<strong>EN</strong>IX CONTACT 7513_en_01
Slaves<br />
4.2.7 Pin Assignment of the Inputs and Outputs<br />
<br />
"<br />
Figure 4-23<br />
!<br />
$ ! % # ) "<br />
Pin assignment of the inputs and outputs<br />
Pin Female Input Connector Female Output Connector<br />
1 30 V U S supply voltage for sensors Not used<br />
3 0 V 0 V<br />
4 Input Output<br />
4.2.8 Labeling Fieldline Extension AS-i M8 Devices<br />
The devices can be labeled next to the bus connection (4 in Figure 4-20) and at every<br />
I/O connection.<br />
Depending on the device type, five or ten blank marking labels are supplied as standard with<br />
the devices.<br />
When labeling, proceed as follows:<br />
• Complete a labeling field and snap it into the relevant slot.<br />
• If you want to replace a labeling field, it can be removed using a small screwdriver.<br />
For professional labeling, Phoenix Contact offers the CMS-MARK-WIN software<br />
(see Phoenix Contact CLIPLINE catalog).<br />
online<strong>com</strong>ponents.<strong>com</strong><br />
7513_en_01 PHO<strong>EN</strong>IX CONTACT 4-21
<strong>UM</strong> <strong>EN</strong> <strong>FLX</strong> <strong>ASI</strong> <strong>SYS</strong> <strong>PRO</strong> <strong>INST</strong><br />
4.2.9 Diagnostic and Status Indicators<br />
of Fieldline Extension AS-i M8 Devices<br />
Diagnostic indicators<br />
Diagnostic indicators (green/red) indicate whether or not an error is present. In the event of<br />
an error, they indicate the error type and location. A Fieldline Extension AS-i M8 device is<br />
operating correctly if all of the green indicators are on.<br />
Status indicators<br />
Status indicators (yellow) indicate the signal status of the corresponding input/output. If the<br />
yellow status indicators are on, this indicates the signal status "1" of the I/O signal.<br />
Fieldline Extension AS-i M8 devices have two areas for diagnostic and status indicators.<br />
These areas are illustrated in Figure 4-24.<br />
Figure 4-24<br />
Diagnostic and status indicators of Fieldline Extension AS-i M8 devices<br />
1 Inputs and outputs (device-specific)<br />
2 AS-i bus-specific indicators (not for DI)<br />
7513A005<br />
online<strong>com</strong>ponents.<strong>com</strong><br />
I<br />
1<br />
I<br />
2<br />
I<br />
3<br />
I<br />
4<br />
O<br />
1<br />
O<br />
2<br />
O<br />
3<br />
O<br />
4<br />
For additional information about the diagnostic and status indicators, please refer to the<br />
data sheet for the relevant device.<br />
2<br />
1<br />
4-22 PHO<strong>EN</strong>IX CONTACT 7513_en_01
Slaves<br />
4.2.10 Setting the Address for Fieldline Extension<br />
AS-i M8 Devices<br />
Before starting up a system with an AS-Interface system for the first time, all connected<br />
devices must be assigned an operating address. By default upon delivery, all devices have<br />
the address "zero". During address assignment, only one device may be addressed with<br />
"zero".<br />
Address programming via<br />
the master<br />
Address programming<br />
using an addressing<br />
device<br />
Addressing can be performed by the master via the AS-Interface cable. All devices must be<br />
connected individually and addressed directly.<br />
For additional information about address programming, please refer to "Address<br />
Assignment" on page 7-1.<br />
There is also the option of using an addressing device for manual addressing.<br />
To manually set the address of the device, proceed as follows:<br />
• Remove the AS-i round cable from the AS-i connection (1) on the device.<br />
• Connect the addressing device (Order No. 2741338) to the AS-i connection (1) using a<br />
4-pos. unshielded cable with M12 connector.<br />
• At the touch of a button, the address of the connected slave can be read and displayed<br />
on the LCD.<br />
• The address that is returned can be modified using the two arrow buttons in order to<br />
enter the new desired address.<br />
• Press the programming button to save the device address.<br />
• Disconnect the addressing device from the device.<br />
• Connect the AS-i round cable to the AS-i connection on the device.<br />
1<br />
online<strong>com</strong>ponents.<strong>com</strong><br />
Figure 4-25<br />
O<br />
3<br />
O<br />
4<br />
7513A030<br />
Addressing and AS-i connection<br />
For additional information about addressing, please refer to the user manual:<br />
AS-Interface Addressing Device, <strong>ASI</strong> CC ADR <strong>UM</strong> E, Order No. 9013727<br />
7513_en_01 PHO<strong>EN</strong>IX CONTACT 4-23
<strong>UM</strong> <strong>EN</strong> <strong>FLX</strong> <strong>ASI</strong> <strong>SYS</strong> <strong>PRO</strong> <strong>INST</strong><br />
4.3 Description for AS-i Control Cabinet Modules<br />
Versions<br />
An AS-Interface system contains digital AS-i control cabinet modules with the following<br />
functions:<br />
- DI Digital input modules acquire digital control signals from the process level. These signals<br />
are transferred to the higher-level automation equipment via the bus. The signal status is<br />
indicated on the module using LEDs. The sensors are connected via plug-in COMBICON<br />
connections. The sensors are either supplied from the sensor voltage U LS (26.5 V to 31.6 V<br />
from AS-Interface) or from an external power supply unit.<br />
- DIO Digital I/O modules have digital inputs and digital outputs. They acquire digital control<br />
signals from the process level. These signals are transferred to the higher-level automation<br />
equipment via the bus. The sensors are connected via plug-in COMBICON connections.<br />
The sensors are supplied from the sensor voltage U S .<br />
Digital I/O modules transfer the digital control signals from the automation equipment to the<br />
process level at the actuators. For the specified load currents for the outputs of the various<br />
modules, please refer to the data sheet. The actuators are connected via plug-in<br />
COMBICON connections. The outputs are protected against short circuits and overloads.<br />
The actuators are supplied from the auxiliary voltage AUX. The signal status is indicated on<br />
the device using LEDs.<br />
Connection<br />
Degree of protection<br />
The bus, I/O devices, and supply are connected via plug-in COMBICON connections.<br />
The modules have IP20 protection.<br />
4.3.1 Product Versions for AS-i Control Cabinet Modules<br />
The following control cabinet modules are available from Phoenix Contact for the AS-i<br />
system:<br />
Description Order Designation Order No.<br />
AS-Interface input module with four digital inputs <strong>ASI</strong> IO ME DI 4 AB 2741671<br />
(AB slave)<br />
AS-Interface I/O module with four digital inputs <strong>ASI</strong> IO ME DIO 4/3 AB 2741668<br />
and three digital outputs (AB slave)<br />
AS-Interface I/O module with four digital inputs<br />
and four digital outputs (AB slave)<br />
<strong>ASI</strong> IO ME DIO 4/4 AB 2773542<br />
online<strong>com</strong>ponents.<strong>com</strong><br />
4-24 PHO<strong>EN</strong>IX CONTACT 7513_en_01
Slaves<br />
4.3.2 Description for <strong>ASI</strong> IO ME DI 4 AB<br />
The <strong>ASI</strong> IO ME DI 4 AB is an AS-Interface input module with four digital inputs (AB slave). It<br />
is used to input digital signals in the control cabinet.<br />
Components<br />
The module consists of the following <strong>com</strong>ponents:<br />
1 Plug-in COMBICON connections<br />
2 Diagnostic and status indicators<br />
3 Female addressing connector<br />
Figure 4-26<br />
Module view<br />
Features – Four digital signal inputs<br />
– Diagnostic and status indicators<br />
– Female addressing connector<br />
– AB slave with extended addressing options for up to 62 AS-i slaves<br />
– Plug-in COMBICON connections<br />
– Communication monitoring<br />
– Inputs for 2 and 3-wire sensors<br />
– Inputs supplied from either the AS-i supply or the external auxiliary voltage<br />
– IP20 protection<br />
online<strong>com</strong>ponents.<strong>com</strong><br />
<br />
<br />
!<br />
$ $ # ) <br />
7513_en_01 PHO<strong>EN</strong>IX CONTACT 4-25
<strong>UM</strong> <strong>EN</strong> <strong>FLX</strong> <strong>ASI</strong> <strong>SYS</strong> <strong>PRO</strong> <strong>INST</strong><br />
4.3.3 Description for <strong>ASI</strong> IO ME DIO 4/3 AB<br />
The <strong>ASI</strong> IO ME DIO 4/3 AB is an AS-Interface I/O module with four digital inputs and three<br />
digital outputs (AB slave). It is used to input and output digital signals in the control cabinet.<br />
Components<br />
The module consists of the following <strong>com</strong>ponents:<br />
1 Plug-in COMBICON connections<br />
2 Diagnostic and status indicators<br />
3 Female addressing connector<br />
Figure 4-27<br />
Module view<br />
Features – Four digital signal inputs<br />
– Three digital signal outputs<br />
– Diagnostic and status indicators<br />
– Indicator for the external auxiliary voltage<br />
– Female addressing connector<br />
– AB slave with extended addressing options for up to 62 AS-i slaves<br />
– Plug-in COMBICON connections<br />
– Communication monitoring<br />
– Inputs for 2 and 3-wire sensors<br />
– Inputs supplied from either the AS-i supply or the external auxiliary voltage<br />
– Outputs supplied from the external auxiliary voltage<br />
– IP20 protection<br />
online<strong>com</strong>ponents.<strong>com</strong><br />
<br />
<br />
!<br />
$ $ " ) <br />
4-26 PHO<strong>EN</strong>IX CONTACT 7513_en_01
Slaves<br />
4.3.4 Description for <strong>ASI</strong> IO ME DIO 4/4 AB<br />
The <strong>ASI</strong> IO ME DIO 4/4 AB is an AS-Interface I/O module with four digital inputs and four<br />
digital outputs (AB slave). It is used to input and output digital signals in the control cabinet.<br />
Components<br />
The module consists of the following <strong>com</strong>ponents:<br />
1 Plug-in COMBICON connections<br />
2 Diagnostic and status indicators<br />
3 Female addressing connector<br />
Figure 4-28<br />
Module view<br />
Features – Four digital signal inputs<br />
– Four digital signal outputs<br />
– Diagnostic and status indicators<br />
– Indicator for the external auxiliary voltage<br />
– Female addressing connector<br />
– AB slave (specification 3.0)<br />
with extended addressing options for up to 62 AS-i slaves<br />
– Plug-in COMBICON connections<br />
– Communication monitoring<br />
– Inputs for 2 and 3-wire sensors<br />
– Inputs supplied from either the AS-i supply or the external auxiliary voltage<br />
– Outputs supplied from the external auxiliary voltage<br />
– IP20 protection<br />
online<strong>com</strong>ponents.<strong>com</strong><br />
<br />
<br />
!<br />
% # & " ) !<br />
7513_en_01 PHO<strong>EN</strong>IX CONTACT 4-27
<strong>UM</strong> <strong>EN</strong> <strong>FLX</strong> <strong>ASI</strong> <strong>SYS</strong> <strong>PRO</strong> <strong>INST</strong><br />
4.3.5 Housing Dimensions of Control Cabinet Modules<br />
<br />
Figure 4-29<br />
Housing dimensions of modules in mm<br />
4.3.6 Mounting Control Cabinet Modules<br />
Snap the module directly onto a DIN rail (1).<br />
Figure 4-30<br />
<br />
Snapping on modules<br />
4.3.7 Connecting Cables<br />
If required, loosen the mounting screws. Insert the cables in the corresponding connections<br />
(1 to 4) and tighten the mounting screws.<br />
online<strong>com</strong>ponents.<strong>com</strong><br />
"<br />
!<br />
# # <br />
% # ! ) &<br />
% # ! ) <br />
<br />
% # ! ) ! <br />
Figure 4-31<br />
Connecting cables<br />
4-28 PHO<strong>EN</strong>IX CONTACT 7513_en_01
Slaves<br />
4.3.8 Terminal Assignment of Control Cabinet Modules<br />
) 5 11 - , 1" ) * ) 5 11 - , 1 " ! ) * ) 5 11 - , 1 " " ) *<br />
1 1"<br />
1 1 "<br />
1 1 "<br />
1 1"<br />
1 1 "<br />
1 1 "<br />
1 1"<br />
1 1 "<br />
1 1 "<br />
) 5 E ) 5 E<br />
) 5 E ) 5 E<br />
) 7 : ) 7 : <br />
Figure 4-32<br />
! !<br />
<br />
% # ! ) $<br />
Terminal assignment of the modules<br />
) 5 E ) 5 E<br />
) 7 : ) 7 : <br />
online<strong>com</strong>ponents.<strong>com</strong><br />
<br />
! ! " "<br />
% # ! ) $<br />
<strong>ASI</strong> IO ME DI 4 AB <strong>ASI</strong> IO ME DIO 4/3 AB <strong>ASI</strong> IO ME DIO 4/4 AB<br />
Terminal Point Assignment Terminal Point Assignment Terminal Point Assignment<br />
1.1, 1.2, 1.3, 1.4 I–1 ... I–4 I–1 ... I–4 L–1 ... I–4 I–1 ... I–4 L–1 ... L–4<br />
2.1, 2.2, 2.3, 2.4 IN1 ... IN4 IN1 ... IN4 IN1 ... IN4 IN1 ... IN4 IN1 ... IN4<br />
3.1, 3.2, 3.3, 3.4 I+1 ... I+4 I+1 ... I+4 L+1 ... L+4 I+1 ... I+4 L+1 ... L+4<br />
AS-i +, AS-i – AS-i +, AS-i – O1, O–1, O2, O–2 O1, O–1, O2, O–2 O1, O–1, O2, O–2 O1, O–1, O2, O–2<br />
O3, O–3 O3, O–3 O3, O–3, O4, O–4 O3, O–3, O4, O–4<br />
AS-i+, AS-i– AS-i+, AS-i– AS-i+, AS-i– AS-i+, AS-i–<br />
AUX+, AUX– AUX+, AUX– AUX+, AUX– AUX+, AUX–<br />
7513_en_01 PHO<strong>EN</strong>IX CONTACT 4-29
<strong>UM</strong> <strong>EN</strong> <strong>FLX</strong> <strong>ASI</strong> <strong>SYS</strong> <strong>PRO</strong> <strong>INST</strong><br />
4.3.9 Diagnostic and Status Indicators of Control Cabinet<br />
Modules<br />
) 5 11 - , 1" ) * ) 5 11 - , 1 " ! ) *<br />
) 5 11 - , 1 " " ) *<br />
! "<br />
1<br />
. ) 7 6<br />
1 6<br />
2 9 4<br />
) , , 4<br />
! "<br />
1<br />
. ) 7 6<br />
1 6<br />
2 9 4<br />
) , , 4<br />
Figure 4-33<br />
<strong>ASI</strong> IO ME DI 4 AB<br />
! "<br />
1<br />
. ) 7 6<br />
1 6<br />
2 9 4<br />
) 7 :<br />
) , , 4<br />
!<br />
7 6<br />
1<br />
. ) 7 6<br />
! "<br />
2 9 4<br />
) , , 4<br />
!<br />
7 6<br />
Diagnostic and status indicators<br />
online<strong>com</strong>ponents.<strong>com</strong><br />
1 6<br />
) 7 :<br />
! "<br />
1<br />
. ) 7 6<br />
1 6<br />
2 9 4<br />
) 7 :<br />
) , , 4<br />
! "<br />
7 6<br />
1<br />
. ) 7 6<br />
2 9 4<br />
) , , 4<br />
! "<br />
! "<br />
7 6<br />
Designation Color Meaning<br />
IN<br />
Yellow LED Status of the inputs<br />
PWR Green LED AS-i operating voltage<br />
FAULT Red LED Error display<br />
ON Communication error or address is 0<br />
Flashing Overload of sensor power supply and/or outputs<br />
OFF No error<br />
INT Green LED Internal input supply<br />
<strong>ASI</strong> IO ME DIO 4/3 AB and <strong>ASI</strong> IO ME DIO 4/4<br />
Designation Color Meaning<br />
IN<br />
Yellow LED Status of the inputs<br />
PWR Green LED AS-i operating voltage<br />
FAULT Red LED Error display<br />
ON Communication error or address is 0<br />
Flashing Overload of sensor power supply and/or outputs<br />
OFF No error<br />
AUX Green LED External auxiliary voltage<br />
INT Green LED Internal input supply<br />
OUT<br />
Yellow LED Status of the outputs<br />
1 6<br />
) 7 :<br />
% # ! ) %<br />
4-30 PHO<strong>EN</strong>IX CONTACT 7513_en_01
Slaves<br />
4.3.10 Setting the Address for Control Cabinet Modules<br />
To set the module address manually instead of via the master, proceed as follows:<br />
• Connect the addressing device (Order No. 2741338) to the female addressing<br />
connector (1) using the addressing cable (Order No. 2741341).<br />
• Set the module address.<br />
• Disconnect the addressing device from the module.<br />
Figure 4-34<br />
) 5 11 - , 1" ) *<br />
! "<br />
1<br />
. ) 7 6<br />
1 6<br />
2 9 4<br />
) , , 4<br />
% # ! ) !<br />
Connecting the addressing device using the example of an<br />
<strong>ASI</strong> IO ME DI 4 AB<br />
online<strong>com</strong>ponents.<strong>com</strong><br />
<br />
7513_en_01 PHO<strong>EN</strong>IX CONTACT 4-31
<strong>UM</strong> <strong>EN</strong> <strong>FLX</strong> <strong>ASI</strong> <strong>SYS</strong> <strong>PRO</strong> <strong>INST</strong><br />
4.3.11 Setting the Sensor Power Supply<br />
You can specify whether the sensor is to be supplied from the AS-i circuit or from an external<br />
power supply.<br />
For the <strong>ASI</strong> IO ME DI 4 AB and <strong>ASI</strong> IO ME DIO 4/3 modules, proceed as follows:<br />
• To release the upper part, press on both tabs (1) one after the other using a screwdriver.<br />
• Pull the upper part towards you until you can feel some resistance.<br />
Opening the module<br />
<strong>ASI</strong> IO ME DI 4 AB<br />
<strong>ASI</strong> IO ME DIO 4/3 AB<br />
Setting the switch<br />
<strong>ASI</strong> IO ME DI 4 AB<br />
<strong>ASI</strong> IO ME DIO 4/3 AB<br />
Figure 4-35<br />
<br />
% # ! ) #<br />
Opening the module<br />
• If you are using an external sensor power supply (U EXT = 12 V DC to 30 V DC) set the<br />
switch to the "EXT" position.<br />
• If you want to supply the sensor from the AS-i circuit set the switch to the "INT"<br />
position. The green "INT" LED lights up.<br />
CAUTION: Use a PELV power supply<br />
The auxiliary voltage for the output supply must be taken from an isolated power supply<br />
(PELV according to IEC 60364-4-41).<br />
online<strong>com</strong>ponents.<strong>com</strong><br />
1 6<br />
- : 6<br />
% # ! ) "<br />
Figure 4-36<br />
Setting the switch<br />
4-32 PHO<strong>EN</strong>IX CONTACT 7513_en_01
Slaves<br />
Setting the switch<br />
<strong>ASI</strong> IO ME DIO 4/4 AB<br />
1 6<br />
- : 6<br />
Figure 4-37<br />
Setting the switch<br />
% # & " ) %<br />
• If you are using an external sensor power supply (U EXT = 12 V DC to 30 V DC) set the<br />
switch to the "EXT" position.<br />
The green "INT" LED does not light up.<br />
• If you want to supply the sensor from the AS-i circuit set the switch to the "INT"<br />
position. The green "INT" LED lights up.<br />
CAUTION: Use a PELV power supply<br />
The auxiliary voltages for the input/output supply must be taken from an isolated power<br />
supply (PELV according to IEC 60364-4-41).<br />
For additional information about the control cabinet modules, please refer to the<br />
corresponding data sheets.<br />
online<strong>com</strong>ponents.<strong>com</strong><br />
7513_en_01 PHO<strong>EN</strong>IX CONTACT 4-33
<strong>UM</strong> <strong>EN</strong> <strong>FLX</strong> <strong>ASI</strong> <strong>SYS</strong> <strong>PRO</strong> <strong>INST</strong><br />
online<strong>com</strong>ponents.<strong>com</strong><br />
4-34 PHO<strong>EN</strong>IX CONTACT 7513_en_01
Configuration<br />
5 Configuration<br />
Before selecting the devices of an AS-i system it is useful to clarify the requirements of your<br />
application with the aid of a checklist. This enables quick and optimum planning of your own<br />
system.<br />
5.1 Number of Inputs and Outputs<br />
The number of inputs and outputs required determines whether the application can be<br />
covered with a single AS-i system. An AS-i system can operate a maximum of 62 slaves with<br />
4 digital inputs and 4 digital outputs each (specification 3.0). This equals a maximum of<br />
248 inputs and 248 outputs per system.<br />
Considerably fewer inputs and outputs are often required in an AS-i system. In this case,<br />
masters and slaves can be used according to AS-i specification 2.0<br />
(e.g., <strong>FLX</strong> <strong>ASI</strong> DO 4 M12). These single slaves do not support the extended addressing<br />
options according to AS-i specification 2.1. Single slaves can also be used in mixed<br />
operation with specification 2.1 slaves (e.g., <strong>FLX</strong> <strong>ASI</strong> DI 4 M12).<br />
5.2 Position of Inputs and Outputs in the Application<br />
The advantage of an AS-i system is that the termination devices can be connected directly<br />
at the installation location. When using devices, small groups of terminal points are created,<br />
e.g., 4 digital inputs. Check how the termination devices to be connected can be assigned<br />
to specific AS-i devices. The most cost-effective solution is to use devices with<br />
4 digital inputs and 4 digital outputs. This configuration can be implemented, e.g., with the<br />
<strong>FLX</strong> <strong>ASI</strong> DIO 4/4 M8-1A according to specification 2.0. or even with the<br />
<strong>FLX</strong> <strong>ASI</strong> 3.0 DIO 4/4 M12-2A according to specification 3.0. This means that the same<br />
number of inputs and outputs are required and that they are located at the same points in<br />
the application. Otherwise use devices with different I/O <strong>com</strong>binations. Please note the limit<br />
is 62 slaves (specification 2.1/3.0).<br />
5.3 Required Current in an AS-i System<br />
online<strong>com</strong>ponents.<strong>com</strong><br />
Each AS-i system is supplied by a power supply unit. Therefore correct sizing is crucial from<br />
as early as the system planning phase. To do this, all current loads in the AS-i system must<br />
be identified and their current requirement quantified.<br />
Each AS-i master and AS-i slave obtains a specific amount of current from AS-i. These<br />
values are listed in the relevant data sheet, typically a master requires, e.g., 100 mA to<br />
200 mA and a slave requires 30 mA to 60 mA. In addition, the sensors and actuators that<br />
are supplied directly via AS-i must be taken into consideration.<br />
7513_en_01 PHO<strong>EN</strong>IX CONTACT 5-1
<strong>UM</strong> <strong>EN</strong> <strong>FLX</strong> <strong>ASI</strong> <strong>SYS</strong> <strong>PRO</strong> <strong>INST</strong><br />
Please note that the sensors connected to the AS-i devices are supplied via the power<br />
supply unit. The connected actuators are operated separately via the black AS-i cable.<br />
Example Calculation:<br />
AS-i system with 25 slaves and 100 sensors.<br />
The actuators are supplied via a 24 V auxiliary voltage.<br />
AS-i master 200 mA 200 mA<br />
AS-i slaves 25 x 40 mA 1000 mA<br />
Sensors 100 x 10 mA 1000 mA<br />
Total<br />
2200 mA<br />
In this example, a total of 2.1 A is required in the AS-i system. Here it is sufficient to use an<br />
AS-i power supply unit with a maximum output current of 2.4 A,<br />
e.g., <strong>ASI</strong> QUINT 100-240/2.4 A EFD.<br />
5.4 Selecting the Cable<br />
A typical, profiled flat-ribbon cable made from rubber is used consistently throughout the<br />
AS-i system. This offers the advantage of a quick and easy connection method. In the event<br />
that the cable must meet special requirements in terms of resistance to oil or<br />
UV light, versions are also available that are made from resistant materials such as PUR.<br />
For additional information, please refer to "Flat-Ribbon Cable" on page 4-7.<br />
5.5 Speed of Data Exchange<br />
At maximum configuration, the AS-i system has a very fast cycle time of 10 ms. If even faster<br />
response times are required, reducing the number of slaves results in a proportional<br />
decrease in the cycle time. A system with just six slaves can thus be updated in 1 ms.<br />
If only part of the data needs to be updated faster, there is the option of configuring some of<br />
the slaves without extended addressing. This reduces the number of possible slaves in the<br />
AS-i system. The devices operated as single slaves are updated twice as fast,<br />
i.e., in a maximum of 5 ms. Both methods can also be <strong>com</strong>bined.<br />
When using AS Interface slaves according to specification 3.0 (e.g, Profile 7.A.7), please<br />
note that the cycle time is above the previously mentioned 10 ms for these "<strong>com</strong>bined<br />
transactions". The exact cycle time depends on the selected slave type/profile.<br />
online<strong>com</strong>ponents.<strong>com</strong><br />
5-2 PHO<strong>EN</strong>IX CONTACT 7513_en_01
Configuration<br />
5.6 Integrating the AS-i System in the Control System<br />
The type of control system used determines which AS-i master is selected. A fieldbus<br />
system is often already available for the same system. The corresponding gateways can<br />
then be used as AS-i masters.<br />
Integration in a<br />
<strong>PRO</strong>FIBUS DP network<br />
For integration in a <strong>PRO</strong>FIBUS DP network, use the AS-i masters <strong>FLX</strong> <strong>ASI</strong> MA PB SF or<br />
<strong>FLX</strong> <strong>ASI</strong> MA 2 PB EF.<br />
Integration in another<br />
network<br />
To connect AS-Interface to virtually all other networks, the <strong>ASI</strong> MA IL UNI AS-i gateway for<br />
Inline can be used in <strong>com</strong>bination with a corresponding Inline bus coupler.<br />
Together with a modular ILC1xx or ILC3xx <strong>com</strong>pact controller from Phoenix Contact, the<br />
<strong>ASI</strong> MA IL UNI AS-i gateway for Inline. be<strong>com</strong>es a <strong>com</strong>pact control unit including master<br />
with Ethernet interface. A station <strong>com</strong>bined this way is parameterized and programmed with<br />
the PC WORX software.<br />
5.7 AS-Interface in the Control Cabinet<br />
One of the key advantages of the AS-i system is that termination devices are connected<br />
directly to the machine. Ultimately the system is designed with a very high level of protection<br />
in the form of IP67. This saves a lot of space in the control cabinet, which usually contains<br />
just the AS-i master and the AS-i power supply unit. If, however, I/O functions are required<br />
directly via AS-Interface in the control cabinet, AS-i ME Line devices,<br />
e.g., <strong>ASI</strong> IO ME DIO 4/3 AB, can be used.<br />
online<strong>com</strong>ponents.<strong>com</strong><br />
7513_en_01 PHO<strong>EN</strong>IX CONTACT 5-3
<strong>UM</strong> <strong>EN</strong> <strong>FLX</strong> <strong>ASI</strong> <strong>SYS</strong> <strong>PRO</strong> <strong>INST</strong><br />
online<strong>com</strong>ponents.<strong>com</strong><br />
5-4 PHO<strong>EN</strong>IX CONTACT 7513_en_01
6 General Information About Installation<br />
General Information About Installation<br />
When preparing for cable installation, the local conditions and the corresponding mounting<br />
regulations are of major importance. Cables can be installed, for example, in cable ducts or<br />
on cable jumpers.<br />
A minimum distance between the cabling and possible sources of interference<br />
(e.g., machines, welding equipment, power cables) is defined in the relevant regulations<br />
and standards. During system planning and installation, these regulations and standards<br />
must be taken into account and observed.<br />
Protect the cables from sources of electrical/magnetic interference and mechanical strain.<br />
Observe the following guidelines to keep mechanical danger and interference as low as<br />
possible:<br />
Mechanical strain – Select the correct cable type for each application (e.g., indoor or outdoor installation,<br />
drag chains).<br />
– Observe the minimum bending radius.<br />
– Cables must not enter the shear area of moving machine parts.<br />
– Do not install bus cables at right angles to driving paths and machine movements.<br />
– Use cable ducts or cable jumpers.<br />
Observe the specifications for the cable used.<br />
online<strong>com</strong>ponents.<strong>com</strong><br />
7513_en_01 PHO<strong>EN</strong>IX CONTACT 6-1
<strong>UM</strong> <strong>EN</strong> <strong>FLX</strong> <strong>ASI</strong> <strong>SYS</strong> <strong>PRO</strong> <strong>INST</strong><br />
Interference – Signal and power supply cables should not be installed in parallel. If necessary, metal<br />
isolating segments should be placed between the power supply and signal cables.<br />
– During installation, all connector interlocks must be firmly tightened to ensure the best<br />
possible contact.<br />
Cable routing in control<br />
cabinets<br />
– Install AS-i cables in separate cable ducts.<br />
– Install AS-i cables with a minimum distance of 10 cm to power cables.<br />
Cable routing in buildings – Where possible, use metal cable hangers.<br />
– Install AS-i cables as far away as possible from sources of interference, for example,<br />
motors and welding equipment.<br />
6.1 Interference Suppression Measures<br />
Phoenix Contact re<strong>com</strong>mends connecting relay coils or motor coils with an RC element to<br />
protect the devices against interference. Depending on the application, the delay time of the<br />
relay can be increased by approximately 1 ms.<br />
Figure 6-1<br />
5001B301<br />
Relay coil with RC element<br />
For the sizing of the RC element the following values are re<strong>com</strong>mended:<br />
R = 100 Ω to 200 Ω; C=220nFto470nF.<br />
online<strong>com</strong>ponents.<strong>com</strong><br />
6-2 PHO<strong>EN</strong>IX CONTACT 7513_en_01
6.2 Installation Instructions<br />
General Information About Installation<br />
Electrostatic discharge<br />
The device contains <strong>com</strong>ponents that can be damaged or destroyed by electrostatic<br />
discharge. When handling the device, observe the necessary safety precautions against<br />
electrostatic discharge (ESD) according to <strong>EN</strong> 61340-5-1 and <strong>EN</strong> 61340-5-2.<br />
NOTE:<br />
The device may only be installed and removed by qualified personnel while observing the<br />
ESD regulations.<br />
NOTE: Ensure IP65/67 protection<br />
To ensure IP65/67 protection, cover unused connections with protective caps.<br />
NOTE: Avoid damage to the electronics<br />
Only supply the sensors of <strong>FLX</strong> <strong>ASI</strong> M8 and <strong>FLX</strong> <strong>ASI</strong> M12 devices with the voltage U LS<br />
provided at the terminal points.<br />
NOTE: Avoid polarity reversal<br />
Avoid polarity reversal of the supply voltages U LS and U AUX .<br />
6.3 Mounting Distances<br />
No specific distances must be observed between devices or between a device and a<br />
cabinet door or cover. Mounting distances are determined solely by the connectors used<br />
and the bending radii of the cables.<br />
online<strong>com</strong>ponents.<strong>com</strong><br />
7513_en_01 PHO<strong>EN</strong>IX CONTACT 6-3
<strong>UM</strong> <strong>EN</strong> <strong>FLX</strong> <strong>ASI</strong> <strong>SYS</strong> <strong>PRO</strong> <strong>INST</strong><br />
online<strong>com</strong>ponents.<strong>com</strong><br />
6-4 PHO<strong>EN</strong>IX CONTACT 7513_en_01
Startup<br />
7 Startup<br />
7.1 Mounting and Installation<br />
Address assignment via<br />
the AS-Interface master<br />
Address assignment via a<br />
manual addressing device<br />
Fieldline Extension AS-i devices can be mounted directly on the machine. They can be<br />
screwed onto a flat surface, see page 4-5. Fieldline Extension AS-i M12 devices can also<br />
be snapped onto a DIN rail, see page 4-6.<br />
When using Fieldline Extension AS-i M12 devices with separate mounting bases the<br />
devices do not all have to be installed in the same area or at the same time. The first step is<br />
to mount the mounting bases on the machine. The AS-i flat-ribbon cable can then be<br />
installed. In a separate step, the electronics module is snapped on shortly before or during<br />
initial startup of the AS-i system, see also page 4-14.<br />
7.2 Address Assignment<br />
Before starting up a system with the AS-Interface system for the first time, all connected<br />
slaves must be assigned an operating address. By default upon delivery, the address for all<br />
slaves is set to zero.<br />
Address programming can be carried out directly via an AS-Interface master during device<br />
startup. AS-Interface masters offer the option of carrying out address assignment for<br />
connected AS-i slaves directly on the device using indicators and operating buttons. As only<br />
one slave can be addressed with the address "zero", only one slave may be active with this<br />
address in the system.<br />
For additional information, please refer to the user manuals:<br />
Configuring and Installing the AS-Interface Gateway for Inline,<br />
<strong>UM</strong> <strong>EN</strong> <strong>ASI</strong> MA IL UNI, Order No. 2699671<br />
AS-i Gateways for <strong>PRO</strong>FIBUS, <strong>UM</strong> <strong>EN</strong> <strong>FLX</strong> <strong>ASI</strong> MA PB SF/EF<br />
Another option is to use a special addressing device that has been specified for<br />
AS-Interface, which enables manual address assignment.<br />
At the touch of a button, the address of the connected slave can be read and displayed on<br />
the LCD. The address that is returned can be modified using the two arrow buttons in order<br />
to enter the new desired slave address. The address is saved on the slave via the<br />
programming button. Slaves with different connection methods can be connected directly<br />
to this simple manual programming device via a universal connection head without the need<br />
for adapters.<br />
online<strong>com</strong>ponents.<strong>com</strong><br />
For additional information about addressing, please refer to the user manual:<br />
AS-Interface Addressing Device, <strong>ASI</strong> CC ADR <strong>UM</strong> E, Order No. 9013727<br />
7513_en_01 PHO<strong>EN</strong>IX CONTACT 7-1
<strong>UM</strong> <strong>EN</strong> <strong>FLX</strong> <strong>ASI</strong> <strong>SYS</strong> <strong>PRO</strong> <strong>INST</strong><br />
7.3 Configuring the Master<br />
To operate and monitor the AS-i system, the AS-i master constantly <strong>com</strong>pares the actual<br />
status of all slaves with the desired status. Therefore the AS-i master must be informed once<br />
of the desired status of the system during AS-i system startup; this is referred to as the<br />
master configuration process.<br />
In the simplest case, the network at the time of startup can be configured as the desired<br />
configuration.<br />
For additional information, please refer to the user manuals:<br />
Configuring and Installing the AS-Interface Gateway for Inline,<br />
<strong>UM</strong> <strong>EN</strong> <strong>ASI</strong> MA IL UNI, Order No. 2699668<br />
AS-i Gateways for <strong>PRO</strong>FIBUS, <strong>UM</strong> <strong>EN</strong> <strong>FLX</strong> <strong>ASI</strong> MA PB SF/EF<br />
7.4 Operation<br />
The AS-i master carries out system diagnostics continuously during operation. Errors in the<br />
system configuration are displayed immediately together with the corresponding slave<br />
address.<br />
To this end, AS-i masters have LED indicators and displays. This means that it is<br />
immediately clear whether an error has occurred and where the error is located in the<br />
system.<br />
In the event that a slave device fails, only the affected device has to be replaced. This<br />
means that the system can continue operating. The replacement device is automatically<br />
started up using the correct <strong>com</strong>munication address, without having to restart the system.<br />
online<strong>com</strong>ponents.<strong>com</strong><br />
PHO<strong>EN</strong>IX CONTACT 09/2009<br />
7-2 PHO<strong>EN</strong>IX CONTACT 7513_en_01