Create successful ePaper yourself
Turn your PDF publications into a flip-book with our unique Google optimized e-Paper software.
<strong>ODYS</strong> <strong>MP3</strong> <strong>Player</strong> <strong>S19</strong><br />
<strong>Select</strong> <strong>Language</strong><br />
1. Switch on: The <strong>S19</strong> starts in music mode<br />
2. Press M to open the menu.<br />
3. <strong>Select</strong> the second menu item<br />
(Setting) and press M to confirm.<br />
EN<br />
3. <strong>Select</strong> the seventh menu item<br />
(<strong>Language</strong>) and press M to<br />
confirm.<br />
4. <strong>Select</strong> your language. The<br />
language names are shown in<br />
their respective language. Press M<br />
to confirm.<br />
1
EN<br />
2<br />
<strong>ODYS</strong> <strong>MP3</strong> <strong>Player</strong> <strong>S19</strong><br />
Table of contents<br />
<strong>Select</strong> <strong>Language</strong>...........................................................................1<br />
1 Contents of package........................................................3<br />
2 Introduction ...................................................................4<br />
3 Getting started................................................................5<br />
3.1 Controls ............................................................................5<br />
3.2 Inserting the battery............................................................6<br />
3.3 Battery status .....................................................................7<br />
3.4 Installing the driver ............................................................7<br />
3.5 Transferring files <strong>MP3</strong> player - PC......................................8<br />
3.6 DRM Protected Files..........................................................9<br />
3.7 Disable the <strong>MP3</strong> <strong>Player</strong> from the PC .................................10<br />
4 About Audible..............................................................11<br />
5 Operation.....................................................................12<br />
5.1 Switching the <strong>MP3</strong> player on and off.................................12<br />
5.2 LCD Display and Icons ....................................................13<br />
5.3 Music Mode (Play Music).................................................13<br />
5.4 Change Mode in Main Menu.............................................15<br />
5.5 Navigation.......................................................................16<br />
5.6 Voice playback mode (Play Voice)....................................17<br />
5.7 Voice recording mode (Record) ........................................18<br />
5.8 System settings (Setting) ..................................................19<br />
5.9 Memory Info (About).......................................................22<br />
5.10 Delete .............................................................................22<br />
6 Troubleshooting ...........................................................23<br />
7 Specifications...............................................................24<br />
8 Safety instructions ........................................................25<br />
9 Warranty conditions......................................................26
<strong>ODYS</strong> <strong>MP3</strong> <strong>Player</strong> <strong>S19</strong><br />
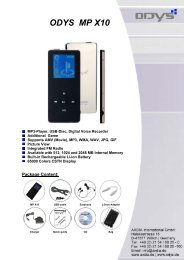
1 Contents of package<br />
Please ensure that the following items are included in the box. If the<br />
package is not complete, please contact your dealer:<br />
EN<br />
<strong>ODYS</strong> <strong>MP3</strong> player <strong>S19</strong> Headphones USB Extension<br />
AAA battery Neck strap User manual<br />
Warranty card<br />
3
EN<br />
2 Introduction<br />
<strong>ODYS</strong> <strong>MP3</strong> <strong>Player</strong> <strong>S19</strong><br />
Thank you for choosing our product. Please read this manual carefully<br />
before use to make best use of all functions of the product and to<br />
guarantee that it has a long service life. Please store the manual in a<br />
safe place for later reference.<br />
This product is a portable digital audio player which allows you to play<br />
your <strong>MP3</strong> and WMA tracks (multi-codec player) and make voice<br />
recordings or save files of any kind. The backlit LCD displays information<br />
on the current digital music file via the ID3 tag.<br />
Caution<br />
Please read the general safety instructions in chapter 7<br />
before using the <strong>MP3</strong> player. Pay particular attention to the<br />
instructions on safely concluding the digital transfer<br />
between the <strong>MP3</strong> player and computer in chap. 3.7.<br />
Support<br />
URL: http://www.odys.de<br />
See our website for the latest information on this <strong>MP3</strong> player, on other<br />
products by our company and on our company itself. Any firmware<br />
updates for this <strong>MP3</strong> player are also made available on our website. If<br />
you have questions or problems, please read the FAQs on our website<br />
or contact our customer support service support@odys.de.<br />
4
<strong>ODYS</strong> <strong>MP3</strong> <strong>Player</strong> <strong>S19</strong><br />
3 Getting started<br />
3.1 Controls<br />
Familiarise yourself with the controls of your <strong>MP3</strong> player before use.<br />
PREV ◄ / MODE / NEXT ►<br />
(Press and tilt button)<br />
A-B<br />
HOLD<br />
EN<br />
Headphone<br />
connection<br />
PLAY<br />
USB-connector<br />
LCD<br />
Mikrophone<br />
Loop for<br />
carrying<br />
strap<br />
VOL − VOL +<br />
Cover of the battery<br />
compartment<br />
Button Functions<br />
PLAY : Play, Pause, Stop, Exit Menu, On/Off<br />
REC/A-B: A/B Repeat, Voice Recording, Skip Chapter (Audible)<br />
MODE: Change to menu, select options<br />
VOL +: Increase volume<br />
VOL −: Decrease volume<br />
NEXT ►: Fast Forward, mark next option<br />
PREV ◄: Rewind, mark previous option<br />
HOLD: Key lock<br />
5
Description of key operation<br />
<strong>ODYS</strong> <strong>MP3</strong> <strong>Player</strong> <strong>S19</strong><br />
The keys can be operated in four different ways: with a short, long, or<br />
normal press, or they can be held down. In this handbook, a "short<br />
press" is to be assumed unless stated otherwise.<br />
EN<br />
Short press: This will take effect shortly after you press the key.<br />
Long press: This will take effect when you press the key and hold it for 1<br />
to 2 seconds.<br />
Normal press: This will only take effect when you release the key.<br />
Press and Hold: This will take effect and repeat at certain intervals while the<br />
key is held down, such as for fast forward or rewind.<br />
Lock function (Hold)<br />
You can block all buttons of your <strong>MP3</strong> player to prevent accidental<br />
operation. To do so, simply move the key lock switch in the direction of<br />
the USB connector (HOLD). During operation, "Hold" is shown in the<br />
LCD display. Unlock the keys by moving the switch back.<br />
3.2 Inserting the battery<br />
Use one AAA (micro) battery.<br />
Open the cover of the battery compartment.<br />
Insert the battery into the battery compartment and ensure that the<br />
polarity is correct.<br />
Close the battery compartment cover.<br />
6
3.3 Battery status<br />
<strong>ODYS</strong> <strong>MP3</strong> <strong>Player</strong> <strong>S19</strong><br />
The service life of the battery is approximately 8 hours. The service life<br />
of the battery may vary depending on the various operating conditions of<br />
the <strong>MP3</strong> player and installed firmware.<br />
The charge state of the battery is indicated by various symbols to enable<br />
you to estimate how long the player will operate:<br />
EN<br />
full 66% 33% empty<br />
Please replace the battery if an empty battery symbol is displayed. Use<br />
rechargeable batteries with at least 800 mAh or alkaline batteries.<br />
3.4 Installing the driver<br />
When using Windows 98SE, you must first install the<br />
correspondding driver before connecting the <strong>MP3</strong> player to<br />
your computer. You can find this driver on our website at<br />
http://www.odys.de. This is not required when using<br />
Windows ME, 2000, XP and Vista.<br />
Connect the <strong>MP3</strong> player to your PC.<br />
The driver installation starts. When using Windows ME, 2000, XP and<br />
Vista, the PC recognizes a new hardware device (mass storage<br />
device) and automatically installs the corresponding driver.<br />
If an error occurs during installation, remove the Device, restart the<br />
operating system and reconnect it to the PC.<br />
7
EN<br />
<strong>ODYS</strong> <strong>MP3</strong> <strong>Player</strong> <strong>S19</strong><br />
3.5 Transferring files <strong>MP3</strong> player - PC<br />
Connect the <strong>MP3</strong> player to your PC.<br />
Open the Windows Explorer or double-click My Computer.<br />
<strong>Select</strong> folders or files to be transferred and drag them to the removable<br />
data storage symbol of the <strong>MP3</strong> player (download to root directory). It<br />
is possible to create different folders for the classification of your file<br />
types in the player memory beforehand and then to save the relevant<br />
files to them.<br />
Once the transmission is complete, click the <strong>MP3</strong> player symbol and<br />
check whether the files were completely copied.<br />
Following the same procedure, you can also copy files from the <strong>MP3</strong><br />
player to the PC (upload).<br />
Formatting the Flash Memory<br />
Using the PC operating system:<br />
Open Windows Explorer and right click on the player’s removable data<br />
storage symbol. Then click on the Format option in the context menu.<br />
You can also use your <strong>MP3</strong> player to transport all types of<br />
files.<br />
Never disconnect your <strong>MP3</strong> player during a data transfer or<br />
formatting.<br />
PLease note that the device's main directory can only control a<br />
maximun of 150 entries (Folders and Files). If you wish to save<br />
more titels then you will have to create sub-folders. In these subfolders<br />
you can save as many files as you deem necessary.<br />
8
<strong>ODYS</strong> <strong>MP3</strong> <strong>Player</strong> <strong>S19</strong><br />
The device creates automatically a folder using the file<br />
format "DIR". Voice recordings which were created by the<br />
device using the file format WAV can be found in this folder.<br />
Please do not use this folder to save <strong>MP3</strong> or WMA files.<br />
EN<br />
Please note that only WAV files using IMADPCM coding can<br />
be used when in the voice playback mode. Please use the<br />
Music Playback mode to playback MP2 and WMA files.<br />
3.6 DRM Protected Files<br />
What is a DRM file?<br />
DRM stands for “Digital Rights Management”. WMA files that are legally<br />
downloaded from the internet are generally protected by DRM. These<br />
files contain a license that directs how the file may be used. All licenses<br />
are controlled by the Windows Media® <strong>Player</strong> (version 9.0 and higher).<br />
In order to play DRM protected files, the Windows Media® <strong>Player</strong> must<br />
be used.<br />
Which Windows Media® <strong>Player</strong> Version is installed on my<br />
computer?<br />
Open the Windows Media® <strong>Player</strong> installed on your computer, click the<br />
question mark located on the menu bar and select “INFO”. The<br />
Windows Media® <strong>Player</strong> version will appear in the next window.<br />
Windows Media® <strong>Player</strong> is free and can be downloaded from the<br />
internet. We recommend using Windows Media® <strong>Player</strong> Version 10.0.<br />
Using DRM Protected Files<br />
Open the Windows Media® <strong>Player</strong> and click on the synchronization<br />
button. Browse through your computer and select a DRM protected file.<br />
9
<strong>ODYS</strong> <strong>MP3</strong> <strong>Player</strong> <strong>S19</strong><br />
EN<br />
Use your mouse to move the file, per drag and drop, to the left area of<br />
the Windows Media® <strong>Player</strong> window, the file should appear. If the <strong>MP3</strong><br />
<strong>Player</strong> is already connected to the PC, you may select the track you<br />
would like to play. If not, connect the <strong>MP3</strong> <strong>Player</strong> at this time and press<br />
the F5 key. Click “START SYNCHRONIZATION” to start transferring the<br />
files.<br />
Insure that the player is in the DRM-MTP mode. When in the DRM-MTP<br />
mode and connected to a computer, the display will show MTP twice.<br />
Should MSC (Removable Disk Mode) be shown in the<br />
display, transfering DRM secured files to the player is not possible.<br />
Note: To view the license information, right click the selected file and<br />
click on “PROPERTIES”.<br />
Copying an Audio CD<br />
<strong>Select</strong> “COPY” from the Windows Media® <strong>Player</strong> menu. All tracks must<br />
me copied to the PC when using the Windows Media® <strong>Player</strong>. The<br />
tracks should appear in the lower portion of the selected directory and<br />
can be copied to the <strong>MP3</strong> <strong>Player</strong>.<br />
Please visit our Web Site for more information.<br />
3.7 Disable the <strong>MP3</strong> <strong>Player</strong> from the PC<br />
Disable the digital <strong>MP3</strong> player from the operating system correctly using<br />
the “Remove Hardware Safely” option .<br />
Click the task bar on the right-hand side below the symbol and select<br />
the “Remove USB Mass Storage Device – Drive (X:)” in the following<br />
dialog window.<br />
Then the message now appears that the hardware can be removed.<br />
10<br />
When using Windows 98SE, does not appear in the task<br />
bar. Once the data has been completely transferred, simply<br />
remove the device.
4 About Audible<br />
<strong>ODYS</strong> <strong>MP3</strong> <strong>Player</strong> <strong>S19</strong><br />
The www.audible.de range is generally available for a fee.<br />
The general terms and conditions of Audible GmbH apply.<br />
1. Create Audible Accounts<br />
• To use the Audible function you first have to create a user profile<br />
(account) on the website www.audible.de.<br />
EN<br />
2. Install Audible Manager<br />
• Download and install the “Audible Manager” after successful<br />
registration on the Audible website. You need the Audible Manager to<br />
manage and transfer your Audible files to your <strong>MP3</strong> player.<br />
3. Buy E-Books<br />
• <strong>Select</strong> and buy e-books from the Audible range. Download these files<br />
to your computer using the Audible Manager.<br />
4. Activate the <strong>MP3</strong> player<br />
• Activate your <strong>MP3</strong> player for using Audible files with the Audible<br />
Manager. You need your Audible.de username and password. Please<br />
keep both ready for device registration.<br />
11
<strong>ODYS</strong> <strong>MP3</strong> <strong>Player</strong> <strong>S19</strong><br />
EN<br />
5 Operation<br />
5.1 Switching the <strong>MP3</strong> player on and off<br />
Switching the <strong>MP3</strong> player on<br />
Ensure that the hold setting is deactivated. If necessary, push the hold<br />
switch into the off position.<br />
Hold the PLAY key down for approx. three seconds<br />
until the Display illuminates and a greeting is<br />
displayed. When the <strong>MP3</strong> player is switched on<br />
for the first time, the player is in music mode. The LCD shows the<br />
current track and the number of tracks available. See chapter 4.6<br />
Settings for information on the duration of the blue backlighting. If the<br />
<strong>MP3</strong> player is not switched on, check the polarity of the battery and<br />
ensure that it is charged.<br />
Switching the <strong>MP3</strong> player off<br />
Press and hold the PLAY key for approximately<br />
three seconds until the player has shut down and<br />
the LCD display goes blank. This is true<br />
irrespective of the current operating state of the player.<br />
12
<strong>ODYS</strong> <strong>MP3</strong> <strong>Player</strong> <strong>S19</strong><br />
5.2 LCD Display and Icons<br />
LCD Display Overview<br />
The LCD display shows a variety of information about the current song,<br />
playback time and system settings. The icons are explained as follows.<br />
A/B repeat (mp3) / Chapter mode (Audible)<br />
Repeat mode<br />
EQ preset<br />
Play mode<br />
File format<br />
A-B Rock<br />
Battery status<br />
Volume<br />
Playback time<br />
/ Length of song<br />
EN<br />
File name/<br />
ID3 Tag<br />
Song number/<br />
Total number of songs<br />
5.3 Music Mode (Play Music)<br />
Playback, forwards/back, pause, stop<br />
Insert the headphones in the headphone connection and<br />
turn the player on.<br />
Press the PLAY button to play the track showed. The track information<br />
(ID3 tag) is scrolled on the Display.<br />
Tilt and hold the ► or ◄ keys during play to skip forwards or back within<br />
the track.<br />
If you briefly press the ► or ◄ keys playback skips to the next or<br />
previous track respectively.<br />
Press the PLAY button briefly to pause playback. To resume play, press<br />
the PLAY key again (resume function).<br />
During play, press the PLAY button for approx. 1 second to stop play<br />
(STOP) and to go back to the start of the track.<br />
13
Setting the volume<br />
<strong>ODYS</strong> <strong>MP3</strong> <strong>Player</strong> <strong>S19</strong><br />
Press or hold the respective volume control button (+, -) to raise or lower<br />
the volume. The volume has 33 settings (0…32).<br />
EN<br />
A/B repeat<br />
This function allows you to repeat a specific section of a music file by<br />
setting the starting and finishing point of the section during playback.<br />
Briefly press the A-B key during playback to mark the beginning of the<br />
section (A).<br />
Briefly press the A-B key again during playback to mark the end of the<br />
desired section (B).<br />
The selected section will now be repeated indefinitely until you press the<br />
A-B key again.<br />
Please note that this function is invalid when playing Audible<br />
files.<br />
Skip Chapter (Audible Files Only)<br />
With activated function you can skip to the next chapter within an<br />
Audible e-book file, if the file is devided into chapters.<br />
To activate the function briefly press REC during Audible file playback;<br />
is displayed on the top of the screen.<br />
Press ◄► to select the desired chapter.<br />
Press REC again to deactivate the skip function.<br />
The current position within the Audible file is saved when<br />
turning the player off.<br />
Please note that in stop mode the REC button starts the<br />
voice recording.<br />
14
<strong>ODYS</strong> <strong>MP3</strong> <strong>Player</strong> <strong>S19</strong><br />
5.4 Change Mode in Main Menu<br />
General procedure:<br />
In ON mode press and hold MODE for 1<br />
sec to access the main menu. In the<br />
main menu you have access to the<br />
different modes and player setting:<br />
Navigation, Music, Voice, Setting, Record, Delete, About and Exit.<br />
Press ◄► to select the desired option and press MODE to confirm.<br />
In the submenus press ◄► to select the desired option and press<br />
MODE to confirm.<br />
To return to the main menu from the sub-menus or switch to music<br />
mode, press the PLAY key once or several times or use the ◄► keys<br />
to select the Exit option and confirm by pressing the MODE key. If no<br />
button is pressed, the player returns to the normal playback display<br />
after approx. 20 seconds.<br />
EN<br />
15
5.5 Navigation<br />
<strong>ODYS</strong> <strong>MP3</strong> <strong>Player</strong> <strong>S19</strong><br />
EN<br />
You can create various folders on your <strong>MP3</strong> player to<br />
manage your music files or other files. Connect your player<br />
to the PC, create the desired folder in the player memory<br />
and copy files into the folder.<br />
Access folders on your player as follows:<br />
Press and hold MODE for 1 sec. Press<br />
◄► to select navigation mode and<br />
press MODE to confirm.<br />
Navigation<br />
Press ◄► to navigate the folders and<br />
ROOT<br />
selct the desired file.<br />
Press MODE to open a folder.<br />
Current song<br />
Press REC to exit a folder.<br />
Press Play to confirm, select the desired music file and start playback.<br />
PLease note that the device's main directory can only control a<br />
maximun of 150 entries (Folders and Files). If you wish to save<br />
more titels then you will have to create sub-folders. In these subfolders<br />
you can save as many files as you deem necessary.<br />
16
<strong>ODYS</strong> <strong>MP3</strong> <strong>Player</strong> <strong>S19</strong><br />
5.6 Voice playback mode (Play Voice)<br />
Your <strong>MP3</strong> player can also be used as a digital dictaphone.<br />
This allows you to record important ideas or thoughts<br />
when away from home, so you don’t forget them. <strong>Select</strong><br />
this function in the main menu as<br />
follows.<br />
EN<br />
<strong>Select</strong> Play Voice mode in the main<br />
menu, as described in section 4.3.<br />
Mit Hilfe der Tasten ◄► können Sie die gewünschte Datei aussuchen.<br />
Press PLAY to play back the selected file.<br />
If you would like to return to music mode, press the MODE button for<br />
approx. 1 sec. and use ◄► to select Play Music mode.<br />
Please note that only WAV files using IMADPCM coding can<br />
be used when in the voice playback mode. Please use the<br />
Music Playback mode to playback MP2 and WMA files.<br />
17
EN<br />
<strong>ODYS</strong> <strong>MP3</strong> <strong>Player</strong> <strong>S19</strong><br />
5.7 Voice recording mode (Record)<br />
<strong>Select</strong> Music or Voice mode in the main menu, as<br />
described in section 4.3.<br />
During play, press the PLAY button for approx. 1 second<br />
to stop play (STOP) and to go back to the start of the track.<br />
Voice recording starts as soon as you press the A-B key. Speak into the<br />
microphone of the player.<br />
Press the PLAY key to interrupt voice recording. Press the PLAY key<br />
again to resume voice recording.<br />
Press the MODE key briefly once again to stop and save voice<br />
recording. You can now listen to the recorded file in voice playback<br />
mode.<br />
Check the battery status to ensure that the player has sufficient<br />
power to complete recording. Finish recording by pressing the<br />
MODE key and save the recording. The sound is recorded as a<br />
WAV file (32 … 88 kbps, settings see Chapt. 4.6).<br />
The device creates automatically a folder using the file<br />
format "DIR". Voice recordings which were created by the<br />
device using the file format WAV can be found in this folder.<br />
Please do not use this folder to save <strong>MP3</strong> or WMA files.<br />
18
<strong>ODYS</strong> <strong>MP3</strong> <strong>Player</strong> <strong>S19</strong><br />
5.8 System settings (Setting)<br />
The mode setting allows you to change important system<br />
settings for your <strong>MP3</strong> player. It contains a total of 8 options:<br />
Equalizer, Play Mode, Contrast, Backlight, Power Set, Record Set,<br />
<strong>Language</strong> und Exit.<br />
EN<br />
Recurring operating steps:<br />
<strong>Select</strong> Setting mode in the main menu, as described in chapter 4.3.<br />
Use the ◄► keys to select the relevant sub-menu and confirm using the<br />
MODE key.<br />
Use ◄► to select the specific value and press the MODE button again<br />
to confirm the selection. Press the PLAY key twice to exit the menus.<br />
Equalizer settings<br />
Use ◄► to select the desired sound<br />
(Normal, Pop, Rock, Classic, Jazz<br />
and Bass).<br />
Confirm using the MODE button again.<br />
19
<strong>ODYS</strong> <strong>MP3</strong> <strong>Player</strong> <strong>S19</strong><br />
EN<br />
Repeat mode (Play Mode)<br />
Use ◄► to select the desired repeat<br />
mode (Normal, Repeat One, Repeat<br />
All und Shuffle).<br />
Confirm using the MODE button again.<br />
Normal: Playback of all files once in<br />
original sequence.<br />
Repeat All:<br />
Repeat all files in original sequence.<br />
Repeat One:<br />
Repeat the current file.<br />
Random:<br />
Playback of all files once in random sequence.<br />
Random All:<br />
Repeat all files in random sequence.<br />
Preview:<br />
Play the first 10 seconds of all files.<br />
LCD Contrast<br />
Allows you to set the required display<br />
contrast (6 levels).<br />
Automatic shutdown of the display (Backlight)<br />
This allows you to set whether the<br />
display is to remain on after a button is<br />
pressed and how long it stays on:<br />
Always Off, 5 s, 10 s and Always On.<br />
The Always On setting sets the display<br />
to remain on.<br />
20
<strong>ODYS</strong> <strong>MP3</strong> <strong>Player</strong> <strong>S19</strong><br />
Colour of the backlighting (Backlight)<br />
<strong>Select</strong> one of seven different colours for the backlighting.<br />
If “auto” was selected the backlight colour changes by every key stroke.<br />
Automatic shutdown of the player (Powerset)<br />
The automatic shutdown switches off the<br />
unit to save energy if during the term of<br />
the given limit (unit: minutes) no key is<br />
pressed. The Disable setting sets the<br />
display to remain on.<br />
EN<br />
Record Set<br />
Set the desired quality and the recording<br />
format. The source is preset to “MIC“.<br />
Press ◄► to select the desired option.<br />
Press MODE to change the value.<br />
[Source]<br />
[Encode]<br />
[Sample]<br />
This value is preset to “MIC“.<br />
<strong>Select</strong> between WAV formats:<br />
ADPCM; MSADPCM, IMADPCM<br />
<strong>Select</strong> between quality settings:<br />
8000Hz, 11025Hz, 16000Hz, 22050Hz, 32000Hz,<br />
44100Hz, 48000Hz<br />
The higher the value, the higher the quality – and the<br />
higher the memory requirements.<br />
<strong>Language</strong><br />
Use this option to select the required<br />
language: English, French, Chinese (T),<br />
Chinese (S), German, Spanish, Italian,<br />
Portuguese, Hebrew, Russion, Greek,<br />
Arabian.<br />
21
Reset<br />
Reset values to factory settings.<br />
<strong>ODYS</strong> <strong>MP3</strong> <strong>Player</strong> <strong>S19</strong><br />
EN<br />
5.9 Memory Info (About)<br />
Shows the current amount of free<br />
memory space and the total memory<br />
space on your <strong>MP3</strong> player.<br />
5.10 Delete<br />
You can delete files directly on your <strong>MP3</strong> player in delete<br />
mode.<br />
Press and hold MODE 1 sec. Press ◄► to select delete<br />
mode and press MODE to confirm.<br />
Press ◄► to select the voice recording to be deleted.<br />
Press Vol+ / Vol- to select “Yes“ to delete the file and press MODE to<br />
confirm.<br />
In this mode you can only delete voice recording files.<br />
Files and folders, and <strong>MP3</strong> files can only be deleted with the<br />
file manager of your PC while the player is connected via<br />
USB cable.<br />
22
6 Troubleshooting<br />
<strong>ODYS</strong> <strong>MP3</strong> <strong>Player</strong> <strong>S19</strong><br />
Symptoms<br />
The device does not<br />
work.<br />
No sound comes out of<br />
the headphones.<br />
Unknown characters<br />
shown on the display.<br />
Music cannot be<br />
downloaded as usual.<br />
No USB connection is<br />
established to the PC.<br />
Cause and solution<br />
Check whether the batteries are charged<br />
properly.<br />
Make sure that the player is turned on.<br />
Make sure that the volume is set above zero<br />
and that the headphones are connected<br />
correctly.<br />
Make sure that the headphones are not dirty.<br />
Faulty <strong>MP3</strong> files will cause the player to output<br />
various sounds, even if no music can be played.<br />
Make sure that the files are complete.<br />
Make sure that you have chosen the correct<br />
language.<br />
Check whether the driver was installed properly<br />
(Windows 98).<br />
Check whether the USB cable is damaged and<br />
make sure that the device is connected to the<br />
USB port properly. Make sure that you have<br />
sufficient disk space available<br />
Check cable/plug connection to the PC,<br />
Windows system configuration and USB driver.<br />
Restart PC, remove and reconnect the USB<br />
cable, reinstall driver (Windows 98).<br />
If the malfunction continues, contact customer<br />
services.<br />
EN<br />
23
7 Specifications<br />
<strong>ODYS</strong> <strong>MP3</strong> <strong>Player</strong> <strong>S19</strong><br />
EN<br />
Internal memory<br />
2048MB, 4096MB<br />
(Integrated flash memory)<br />
Formats<br />
<strong>MP3</strong>, WMA, WAV<br />
Bit rate<br />
<strong>MP3</strong>: 56 … 256 kbps<br />
Battery 1 AAA Batterie (No. 7)<br />
Battery life<br />
ca. 8 h<br />
Display<br />
LCD (26 mm x 8 mm)<br />
USB type USB 2.0<br />
S/N ratio<br />
> 90 dB<br />
Headphone output > 2 x 9 mW<br />
Output frequency<br />
File system<br />
20 Hz … 20 kHz<br />
FAT, FAT32<br />
Subject to technical changes.<br />
24
<strong>ODYS</strong> <strong>MP3</strong> <strong>Player</strong> <strong>S19</strong><br />
8 Safety instructions<br />
Although this product is safe, please observe the following information<br />
and warnings.<br />
Never expose the device to rain, moisture or humidity.<br />
Malfunctions and damage can occur as a result.<br />
Never press two buttons simultaneously and handle the LCD<br />
display carefully.<br />
Do not expose the device to direct sunlight or a dusty<br />
environment.<br />
Do not shake the device or subject it to hard knocks. The<br />
device may be damaged if it falls. Do not place any heavy<br />
objects on top of the device.<br />
Do not carry the <strong>MP3</strong> player with other metal objects (coins or<br />
keys) in your pocket.<br />
Clean the device only using a soft, dry cloth.<br />
When cleaning the device, do not use any volatile substances,<br />
such as solvents, to avoid damaging the surface.<br />
Do not open the casing of the device under any circumstances,<br />
and do not attempt to repair or modify the device.<br />
If the <strong>MP3</strong> player is not to be used for a longer period of time,<br />
remove the battery. Used batteries should be disposed of<br />
properly to protect the environment.<br />
Prevent hearing damage and keep the volume in an<br />
acceptable range. For safety reasons, do not wear<br />
headphones while actively participating in traffic.<br />
EN<br />
Disposal<br />
Do not dispose of a defective <strong>MP3</strong> player in normal<br />
household waste disposal containers. Take the defective<br />
device to your retailer or to an appropriate waste collection<br />
site. This will ensure that the device is disposed of in an<br />
environmentally-friendly way.<br />
25
<strong>ODYS</strong> <strong>MP3</strong> <strong>Player</strong> <strong>S19</strong><br />
9 Warranty conditions<br />
The following conditions comprise the requirements and scope of our warranty conditions and<br />
do not affect our legal and contractual warranty obligations.<br />
EN<br />
We offer a warranty on our products in accordance with the following<br />
conditions:<br />
1. We will remedy free of charge any product damage or defect that is proven to be based on a<br />
manufacturing fault, provided the end user reports this immediately upon noticing it and<br />
within a period of 24 months following the date of purchase.<br />
The warranty does not cover batteries and other parts, which are considered consumables,<br />
parts that break easily such as glass or plastic or defects based on normal wear and tear.<br />
There is no warranty obligation in the event of marginal differences compared to the target<br />
appearance and workmanship provided these have a negligible effect on the product's<br />
fitness for use, in the event of damage caused by chemical or electrochemical effects, by<br />
water or generally from abnormal conditions.<br />
2. The warranty will be performed in such a way that we shall decide whether to repair the<br />
defective parts or to replace them with working parts free of charge. AXDIA reserves the<br />
right to exchange the product for a replacement product of equal value if the product that is<br />
sent in cannot be repaired within a reasonable time or at reasonable cost. The product can<br />
also be exchanged for a different model of the same value. Requests cannot be made for<br />
repairs to be carried out on site. Parts that have been replaced or exchanged become our<br />
property.<br />
3. The warranty claim does not apply if repairs or other work is carried out by unauthorized<br />
persons or if our products are equipped with additional parts or accessories that are not<br />
approved for our products.<br />
4. Warranties that have been activated do not cause the warranty period to be extended, nor<br />
do they trigger a new warranty period. The warranty period for any replacement parts<br />
installed ends with the warranty period for the entire product.<br />
5. Any other or further claims are excluded, especially those for replacement due to damage<br />
caused outside of the product, provided there is no obligatory legal liability. We therefore<br />
accept no liability for accidental, indirect or other consequential damage of any kind, which<br />
leads to usage restrictions, data loss, loss of earnings or interruption to business.<br />
Asserting a warranty claim<br />
1. To make use of the warranty service, you must contact the AXDIA Service Center by e-mail,<br />
fax or phone (see below for contact details). You can also use the service form on our<br />
website or on the back of the warranty conditions.<br />
2. AXDIA Service Center will try to diagnose and solve your problem. If it is determined that a<br />
warranty claim exists, you will be given an RMA number (Return Material Authorization) and<br />
you will be asked to send the product to AXDIA.<br />
IMPORTANT: AXDIA will only accept parcels that have an RMA number.<br />
Please observe the following when sending the product:<br />
26
<strong>ODYS</strong> <strong>MP3</strong> <strong>Player</strong> <strong>S19</strong><br />
1. Send the product suitably packaged with carriage and insurance paid. Do not enclose any<br />
accessories with the products (no cables, CD's, memory cards, manuals, etc.), unless the<br />
AXDIA Service Centre specifies otherwise.<br />
2. Mark the RMA number on the outside of the package in such a way that it is visible and<br />
clearly legible.<br />
3. You must enclose a copy of the sales slip as proof of purchase.<br />
4. Once AXDIA has received the product, it will meet its warranty obligations in accordance<br />
with the warranty conditions and will return the product to the sender with carriage and<br />
insurance paid.<br />
EN<br />
Service outside of warranty<br />
AXDIA can refuse any service claim made that is not covered by the warranty. If AXDIA<br />
agrees to provide a service outside the warranty, the customer will be invoiced for all repair<br />
and transport costs.<br />
AXDIA will not accept any packages that have not first been approved by AXDIA by means of<br />
an RMA (Return Material Authorization).<br />
[International charges to Germany depend on the selected service provider]<br />
27