Autodesk AutoCAD 2012 Student Laptop installation - Northeast ...
Autodesk AutoCAD 2012 Student Laptop installation - Northeast ...
Autodesk AutoCAD 2012 Student Laptop installation - Northeast ...
Create successful ePaper yourself
Turn your PDF publications into a flip-book with our unique Google optimized e-Paper software.
<strong>Autodesk</strong> <strong>Student</strong> Installation<br />
Instructions for <strong>AutoCAD</strong> <strong>2012</strong><br />
Disable Fire wall and Virus Protection on your PC<br />
Registration Process<br />
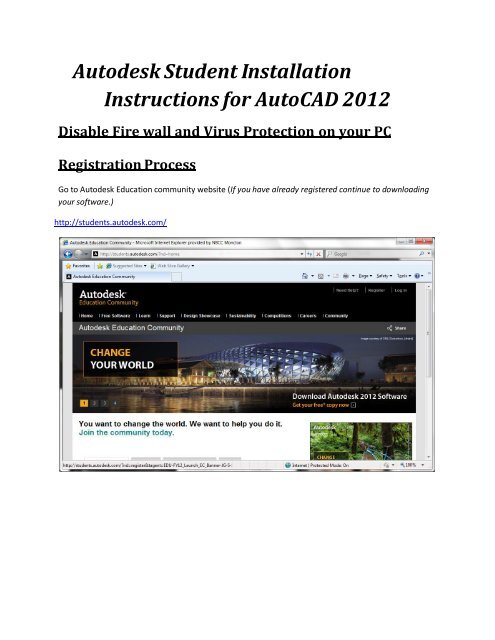
Go to <strong>Autodesk</strong> Education community website (If you have already registered continue to downloading<br />
your software.)<br />
http://students.autodesk.com/
In the top right hand corner click on Register<br />
https://students.autodesk.com/?nd=register
Example:<br />
Country<br />
Email<br />
Confirm<br />
I am a<br />
<br />
<br />
USA<br />
Yourname@mymail.nwtc.edu<br />
Yourname@mymail.nwtc.edu<br />
<strong>Student</strong><br />
Click Continue to step 2.
The next step is to enter your personal info. After doing so be sure to check the Terms and conditions<br />
box and enter the school information as shown in the example below.<br />
Example<br />
State/Region Wisconsin<br />
City Green Bay<br />
School <strong>Northeast</strong> Wisconsin Technical College<br />
Now click Continue to step 3.
Once you reach this screen login to your email that you previously provided and click the link to<br />
complete the registration process.<br />
You will now be able to access the <strong>Autodesk</strong> Education Software.
Downloading your software<br />
Return to the <strong>Autodesk</strong> Education website<br />
https://students.autodesk.com/?nd=home<br />
Click on Log in at the top right hand corner.
Sign in using the newly created username and password.
If you get a blank screen like this when you attempt to sign in click on compatibility view which is<br />
highlighted in the image below.
You should see this welcome screen<br />
Click on the free* download link.
Select <strong>AutoCAD</strong> if it has not already been selected.<br />
Select Version <strong>2012</strong><br />
Select Language English<br />
Select your OS version<br />
Note: If you don’t know your OS version here is how to find it.<br />
1. Click the windows button at the bottom left of your screen. {If you have XP this<br />
button is labelled Start.}<br />
2. Right Click the Computer button in the right pane and click Properties. {In XP right click on My<br />
Computer.}<br />
3. Under system in the pane on the right you will see system type. This will tell you if you have a<br />
32 bit (x86) or 64 bit (x64) system. In this case we can see we have a 64 bit system.<br />
Click Next<br />
On the next page you will be issued a product key and serial number. Write down this information<br />
as you will need it to install <strong>AutoCAD</strong>.
Now click the Download button.<br />
You will receive this popup window<br />
Click download the installer.
A popup will appear<br />
Click Run<br />
Another popup will appear<br />
Click Run
The installer license agreement will appear.<br />
Click I Agree and click Next.
The installer will complete.<br />
Click Close.
You should now download the program using the downloader<br />
Check off the automatically open when complete check box
You should see this screen next<br />
Click Yes<br />
This Window will appear.<br />
Click the Install button<br />
You may receive a User Access Control prompt. Click Yes
Installing <strong>AutoCAD</strong> <strong>2012</strong><br />
You will now see the <strong>AutoCAD</strong> <strong>2012</strong> <strong>installation</strong> screen.<br />
Click on Install
Read the license and services agreement<br />
Click on I Accept then click Next
Enter the serial number and product key you were provided earlier.<br />
Once you have entered your serial number and set your license type to Stand-Alone click Next.
You will see the install options screen.<br />
Choose the following setup options listed below
Check off design review
Under <strong>AutoCAD</strong> <strong>2012</strong> click on Click to Open and Configure<br />
Click Custom<br />
Click once in the box beside Feature a green check mark will appear.<br />
Click Include Service Pack(s) from <strong>Autodesk</strong>.com and click Download<br />
Click Close and return to product list
Under <strong>Autodesk</strong> Inventor Fusion <strong>2012</strong> click on Click to Open and Configure<br />
Click Include Service Pack(s) from <strong>Autodesk</strong>.com<br />
Click Download
Now click Install
You will see this progress bar<br />
Be patient this install will take time to finish.
Upon completion you should see this screen.<br />
Click Finish and you are done installing. Now run the <strong>AutoCAD</strong> <strong>2012</strong> program
You will get an activation screen<br />
Click Activate
Check the box and click Continue
Login using the <strong>Autodesk</strong> user ID and password you created earlier
Fill out the information on this page<br />
Click Next when finished.
If changes are suggested accept them<br />
Click Accept
Select your account<br />
Click Next
If successful you should see this screen.<br />
Click Finish


